TE
AM
FL
Y
Microsoft
Office XP
Microsoft
Office XP
®
Check the Web for Updates
To check for updates or corrections relevant to this book and/or CD-ROM, visit our updates page on the Web at http://www.prima-tech.com/updates.
Send Us Your Comments
To comment on this book or any other PRIMATECHtitle, visit our reader response
page on the Web at http://www.prima-tech.com/comments.
How to Order
For information on quantity discounts, contact the publisher: Prima Publishing, P.O. Box 1260BK, Rocklin, CA 95677-1260; (916) 787-7000. On your letterhead, include information concerning the intended use of the books and the number of books you want to purchase. For individual orders, turn to the back of this book for more information.
Diane Koers
A D I V I S I O N O F P R I M A P U B L I S H I N G
Microsoft
Office XP
Microsoft
Office XP
®
©2001 by Prima Publishing. All rights reserved. No part of this book may be reproduced or transmitted in any form or by any means, electronic or mechanical, including photocopying, recording, or by any information storage or retrieval system without written permission from Prima Publishing, except for the inclusion of brief quotations in a review.
A Division of Prima Publishing
Prima Publishing and colophon and fast & easy are registered trademarks of Prima Communications, Inc. PRIMA TECH is a trademark of Prima Communications, Inc., Roseville, California 95661.
Publisher:Stacy L. Hiquet
Managing Editor:Sandy Doell
Acquisitions Editor:Debbie Abshier
Project Editor:Kezia Endsley
Technical Reviewer:Jacqueline Harris
Copy Editor: Kezia Endsley
Interior Layout:Marian Hartsough
Cover Design:Prima Design Team
Indexer:Johnna Dinse
Proofreader:Mitzi Foster
Microsoft, Windows, Office XP, Word, Excel, Access, PowerPoint, and Internet Explorer are either registered trademarks or trademarks of Microsoft Corporation in the United States and/or other countries. Netscape is a registered trademark of Netscape Communications Corporation in the U.S. and other countries.
Important:Prima Publishing cannot provide software support. Please contact the appropriate software manufacturer’s technical support line or Web site for assistance.
Prima Publishing and the author have attempted throughout this book to distinguish proprietary trademarks from descriptive terms by following the capitalization style used by the manufacturer.
Information contained in this book has been obtained by Prima Publishing from sources believed to be reliable. However, because of the possibility of human or mechanical error by our sources, Prima Publishing, or others, the Publisher does not guarantee the accuracy, adequacy, or completeness of any information and is not responsible for any errors or omissions or the results obtained from use of such information. Readers should be particularly aware of the fact that the Internet is an ever-changing entity. Some facts may have changed since this book went to press.
ISBN: 0-7615-3388-5
Library of Congress Catalog Card Number: 2001086686 Printed in the United States of America
00 01 02 03 04 DD 10 9 8 7 6 5 4 3 2 1
To Tresee and Spencer
I
am deeply grateful to the many people at Prima Publishing who worked on this book. Thank you for all the time you gave and for your assistance.While I can’t name everyone involved, I’d like to especially thank Debbie Abshier for the opportunity to write this book and her confidence in me; to Jacqueline Harris for her assistance in making this book technically correct, and to Kezia Endsley for all her patience and guidance in pulling the project together. It takes a lot of both to work with me! Also, a special note of thanks to Stacey Hiquet, Sandy Doell, Marian Hartsough, Johnna Dinse, Mitzi Foster, and the Prima Design Team for all their help behind the scenes.
Lastly, a big hug and kiss to my husband, Vern, for his never-ending patience during those very late nights spent writing this book.
Acknowledgments
Acknowledgments
DIANEKOERSowns and operates All Business Service, a software training and
consulting business formed in 1988 that services the central Indiana area. Her area of expertise has long been in the word processing, spreadsheet, and graphics area of computing as well as providing training and support for Peachtree Accounting Software. Diane’s authoring experience includes 14 other Prima Publishing Fast & Easy books including Windows Millennium Fast & Easy, WordPerfect 9 Fast & Easy, Paint Shop Pro 7 Fast & Easy, Office 2000 Fast & Easy, Word XP Fast & Easy,and has co-authored Prima’s Essential Windows 98. She has also developed and written software training manuals for her clients’ use.
Active in her church and civic activities, Diane enjoys spending her free time traveling and playing with her grandson and her three Yorkshire Terriers.
Introduction . . . xx
PART I
GETTING STARTED . . . 1
Chapter 1 Welcome to Office XP . . . 3
Chapter 2 Choosing Commands. . . 11
Chapter 3 Finding Common Ways to Work . . . 25
Chapter 4 Getting Help with Office . . . 39
PART II
USING WORD . . . 49
Chapter 5 Learning Word Basics . . . 51
Chapter 6 Formatting a Word Document . . . 65
Chapter 7 Improving Your Writing . . . 83
Chapter 8 Working with Longer Documents . . . 101
PART III
USING EXCEL . . . 113
Chapter 9 Creating a Simple Spreadsheet . . . 115
Chapter 10 Editing a Spreadsheet . . . 125
Chapter 11 Working with Functions and Formulas . . . 136
Chapter 12 Formatting Worksheets . . . 153
Chapter 13 Completing Your Spreadsheet . . . 169
Chapter 14 Creating Charts . . . 178
Contents at a Glance
Contents at a Glance
PART IV
USING POWERPOINT. . . 193
Chapter 15 Creating and Viewing Presentations . . . 195
Chapter 16 Editing a Presentation . . . 209
Chapter 17 Working with Presentation Special Effects . . . 222
PART V
USING OUTLOOK . . . 239
Chapter 18 Getting Started with Outlook . . . 241
Chapter 19 Working with the Address Book . . . 251
Chapter 20 Using E-mail . . . 260
Chapter 21 Using the Calendar . . . 284
Chapter 22 Using Outlook to Keep Organized . . . 307
PART VI
USING ACCESS . . . 317
Chapter 23 Creating an Access Database . . . 319
Chapter 24 Modifying an Access Database . . . 338
PART VII
DISCOVERING OFFICE PRODUCTIVITY TOOLS. . 357
Chapter 25 Saving Office Documents as Web Documents . . . 359
Chapter 26 Streamlining Office Activities . . . 375
Chapter 27 Speaking with Office . . . 389
PART VIII
APPENDIXES . . . 413
Appendix A Using Keyboard Shortcuts . . . 414
Appendix B Installing Microsoft Office XP . . . 422
Glossary. . . 435
Index . . . 445
ix
Introduction . . . xx
PART I
GETTING STARTED . . . 1
Chapter 1
Welcome to Office XP . . . 3
Discovering Office Applications . . . 4
Starting a Program. . . 6
Identifying Common Screen Elements . . . 7
Exiting a Program . . . 10
Chapter 2
Choosing Commands . . . 11
Discovering Personalized Menus. . . 12
Choosing Commands with the Keyboard . . . 14
Using Shortcut Menus . . . 15
Working with Dialog Boxes . . . 16
Working with Toolbars. . . 17
Separating Toolbars . . . 18
Using the Standard Toolbar . . . 19
Displaying Other Toolbars . . . 20
Moving Toolbars . . . 21
Closing Toolbars . . . 22
Understanding SmartTags . . . 23
Chapter 3
Finding Common Ways to Work . . . 25
Working with the Task Pane . . . 26
Changing Tasks Panes. . . 26
Contents
Contents
00 OfficeXP_F&E FM.qxd 2/24/03 8:17 AM Page x
TE
AM
FL
Y
Closing the Task Pane. . . 26
Redisplaying the Task Pane . . . 27
Adding Random Text. . . 28
Previewing a Document. . . 29
Printing a Document . . . 30
Printing from the Toolbar . . . 30
Printing from the Menu. . . 31
Saving Your Document . . . 32
Saving a File the First Time . . . 32
Resaving a Document . . . 33
Closing a Document. . . 34
Opening an Existing File . . . 36
Displaying the Open Dialog Box . . . 36
Opening a Recently Used Document . . . 37
Starting a New Document . . . 38
Chapter 4
Getting Help with Office . . . 39
Using the Office Assistant . . . 40
Asking the Assistant for Help . . . 40
Choosing a Different Assistant . . . 42
Hiding the Assistant . . . 43
Turning Off the Assistant . . . 44
Using What’s This?. . . 45
Searching the Web for Help . . . 47
Part I Review Questions. . . 48
PART II
USING WORD . . . 49
Chapter 5
Learning Word Basics . . . 51
Typing Text . . . 52
Inserting, Selecting, and Deleting Text . . . 53
Inserting Text . . . 53
Selecting Text . . . 54
Deleting Text. . . 56
Using Undo and Redo . . . 57
Inserting Special Characters or Symbols . . . 58
Moving Around the Screen . . . 60
Using Click and Type. . . 60
xi
Using the Scroll Bars . . . 61
Using the Keyboard to Move Around. . . 62
Using the Go To Command . . . 63
Chapter 6
Formatting a Word Document . . . 65
Enhancing Text . . . 66
Changing the Font . . . 66
Changing the Font Size. . . 66
Applying Bold, Italic, or Underline . . . 67
Copying Formatting to Another Selection . . . 68
Changing Text Case . . . 69
Working with Bulleted or Numbered Lists . . . 70
Arranging Text on a Page . . . 72
Aligning Text . . . 72
Changing Line Spacing . . . 73
Indenting Text . . . 74
Working with Tabs . . . 74
Setting Tabs . . . 74
Moving Tabs . . . 77
Deleting Tabs . . . 77
Moving or Copying Text . . . 78
Moving Text . . . 78
Copying Text. . . 79
Using Drag-and-Drop . . . 81
Chapter 7
Improving Your Writing . . . 83
Working with AutoCorrect and AutoFormat . . . 84
Adding AutoCorrect Entries . . . 84
Deleting AutoCorrect Entries . . . 85
Exploring AutoFormat as You Type . . . 86
Using Find and Replace . . . 88
Using Find . . . 88
Finding All Occurrences . . . 90
Using Replace . . . 91
Correcting Spelling and Grammatical Errors . . . 94
Checking Spelling as You Go . . . 94
Running a Spelling and Grammar Check . . . 95
Finding that Elusive Word with the Thesaurus . . . 98
xii
CONTENTSChapter 8
Working with Longer Documents . . . 101
Setting Page Options. . . 102
Changing Margins and Orientation . . . 102
Selecting a Paper Size . . . 103
Managing Page Breaks . . . 104
Inserting a Page Break . . . 104
Deleting a Page Break . . . 107
Working with Headers and Footers . . . 107
Creating a Header or Footer . . . 108
Adding the Date, Time, or Page Numbering . . . 109
Displaying Non-Printing Characters . . . 111
Part II Review Questions . . . 112
PART III
USING EXCEL . . . 113
Chapter 9
Creating a Simple Spreadsheet . . . 115
Exploring the Spreadsheet Screen . . . 116
Moving Around the Spreadsheet Screen . . . 117
Entering Data . . . 119
Entering Labels . . . 119
Entering Values . . . 121
Editing Data . . . 122
Replacing the Contents of a Cell . . . 122
Editing the Contents of a Cell . . . 123
Chapter 10
Editing a Spreadsheet . . . 125
Learning Selection Techniques . . . 126
Inserting Rows and Columns . . . 127
Inserting Columns . . . 127
Inserting Rows. . . 128
Deleting Rows and Columns . . . 129
Moving Data Around . . . 130
Copying and Pasting Cells . . . 130
Using Drag-and-Drop to Move Cells . . . 132
Clearing Cell Contents. . . 133
Using the Fill Feature. . . 133
xiii
Chapter 11
Working with Functions and Formulas . . . 136
Creating Formulas . . . 137
Creating a Simple Formula . . . 137
Creating a Compound Formula . . . 139
Editing Entries . . . 140
Editing from the Cell. . . 140
Editing from the Contents Line . . . 141
Copying Formulas . . . 142
Copying Using the Fill Feature . . . 142
Copying with Copy and Paste . . . 144
Creating an Absolute Reference in a Formula . . . 145
Using Functions . . . 147
Using the SUM Function . . . 147
Using the AutoSum Button . . . 150
Using the AVERAGE Function . . . 151
Chapter 12
Formatting Worksheets . . . 153
Formatting Numbers . . . 154
Formatting Numbers with the Toolbar. . . 154
Changing the Decimal Point Places . . . 156
Adjusting Column Widths . . . 156
Setting Cell Alignment. . . 158
Adjusting Cell Alignment . . . 158
Centering Headings . . . 161
Formatting with Fonts . . . 162
Selecting a Font Typeface. . . 162
Selecting a Font Size. . . 162
Selecting a Font Style . . . 163
Adding Cell Borders . . . 164
Changing the Spreadsheet Display . . . 165
Freezing Spreadsheet Titles . . . 165
Using Zoom . . . 166
Viewing Formulas . . . 167
Chapter 13
Completing Your Spreadsheet . . . 169
Preparing to Print . . . 170
Setting Up Margins . . . 170
Setting Page Orientation and Size . . . 171
Setting Other Printing Options. . . 172
xiv
CONTENTSPrinting a Spreadsheet . . . 172
Using Print Preview . . . 172
Printing Your Work . . . 174
E-mailing a Spreadsheet . . . 176
Chapter 14
Creating Charts . . . 178
Creating a Chart . . . 179
Modifying a Chart . . . 183
Resizing a Chart . . . 183
Moving a Chart . . . 184
Changing a Chart Style . . . 185
Changing the Series Appearance . . . 187
Modifying Chart Text . . . 189
Deleting a Chart. . . 190
Deleting a Chart on a Data Sheet. . . 190
Deleting a Chart on Its Own Sheet. . . 191
Part III Review Questions. . . 192
PART IV
USING POWERPOINT. . . 193
Chapter 15
Creating and Viewing Presentations . . . 195
Creating a Presentation . . . 196
Adding Text to a Slide . . . 199
Adding Slides . . . 200
Adding Bullet Point Text . . . 201
Switching Views . . . 203
Using Normal Tri-Pane View . . . 203
Viewing the Outline . . . 206
Viewing a Slide Show . . . 207
Chapter 16
Editing a Presentation . . . 209
Deleting and Rearranging Slides . . . 210
Deleting Slides . . . 210
Rearranging Slides . . . 210
Editing Text . . . 211
Changing Presentation Designs . . . 217
Changing Slide Layouts . . . 218
Printing a Presentation . . . 220
xv
Chapter 17
Working with Presentation Special Effects . . . 222
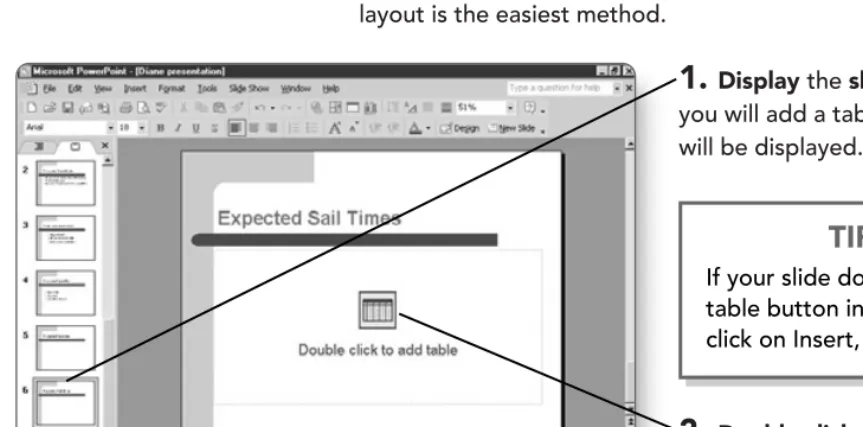
Adding Tables . . . 223
Inserting Charts . . . 225
Creating a Chart in PowerPoint . . . 225
Inserting an Excel Chart . . . 228
Moving a Chart . . . 231
Working with Clip Art . . . 232
Adding Transitions . . . 233
Part IV Review Questions. . . 237
PART V
USING OUTLOOK . . . 239
Chapter 18
Getting Started with Outlook . . . 241
Understanding the Outlook Window . . . 242
Viewing Outlook Today . . . 244
Displaying Outlook Folders . . . 245
Adding a Folder in Outlook . . . 246
Changing the Order of Outlook Bar Shortcuts . . . 248
Deleting a Shortcut . . . 249
Chapter 19
Working with the Address Book . . . 251
Adding an Address Book Entry . . . 252
Printing a Contact List . . . 257
Deleting a Contact. . . 259
Chapter 20
Using E-Mail. . . 260
Configuring Outlook for Internet E-mail . . . 261
Creating an E-mail Message . . . 266
Sending Your Message . . . 269
Checking for Messages . . . 272
Reading Your Messages . . . 273
Responding to a Message . . . 274
Replying to a Message . . . 274
Forwarding a Message . . . 275
Managing Files and Messages. . . 276
Managing Messages . . . 276
Managing Attached Files . . . 287
Deleting a Message . . . 280
xvi
CONTENTSFinding Messages . . . 281
E-mailing Files from Windows . . . 282
Chapter 21
Using the Calendar . . . 284
Viewing the Calendar. . . 285
Changing the Calendar’s View . . . 285
Using the Date Navigator . . . 287
Looking at the Calendar in Table View. . . 289
Setting Your Schedule . . . 290
Making an Appointment . . . 290
Scheduling a Meeting . . . 294
Responding to a Meeting Call . . . 299
Creating Recurring Entries . . . 300
Editing an Appointment . . . 303
Moving Appointments to a Different Time . . . 303
Moving to a Different Date. . . 304
Deleting an Appointment . . . 305
Printing the Calendar. . . 305
Chapter 22
Using Outlook to Keep Organized . . . 307
Working with Tasks . . . 308
Creating a One-Time Task . . . 308
Creating Recurring Tasks . . . 310
Printing a Task List . . . 312
Changing the Task List View . . . 313
Deleting a Task . . . 314
Making Notes. . . 314
Part V Review Questions . . . 316
PART VI
USING ACCESS . . . 317
Chapter 23
Creating an Access Database . . . 319
Understanding Database Terms . . . 320
Using the Database Wizard . . . 321
Looking at the Switchboard. . . 326
Working with Records . . . 326
Adding Records. . . 327
Viewing Records . . . 329
xvii
Editing Records . . . 331
Deleting Records. . . 332
Finding Records . . . 333
Printing Database Reports. . . 335
Chapter 24
Modifying an Access Database . . . 338
Modifying Table Structure . . . 339
Adding Fields to a Table . . . 339
Deleting Table Fields . . . 344
Modifying a Form. . . 345
Adding a Field to a Form . . . 345
Moving a Form Field . . . 348
Deleting a Field from a Form . . . 349
Creating Mailing Labels . . . 350
Part VI Review Questions. . . 356
PART VII
DISCOVERING OFFICE
PRODUCTIVITY TOOLS. . . 357
Chapter 25
Saving Office Documents as Web Documents . . . 359
Saving an Existing Document as a Web Document . . . 360
Viewing the Document in Internet Explorer . . . 363
Editing a Word Web Document . . . 369
Adding Scrolling Text . . . 369
Using a Web Theme . . . 372
Publishing Web Documents. . . 374
Chapter 26
Streamlining Office Activities . . . 375
Working with the Office Shortcut Bar . . . 376
Understanding and Using the Office Shortcut Bar. . . 376
Moving the Office Shortcut Bar . . . 378
Resizing the Office Shortcut Bar. . . 379
Hiding the Office Shortcut Bar . . . 380
Closing the Office Shortcut Bar . . . 382
Customizing the Office Shortcut Bar. . . 383
Renaming a Toolbar Button . . . 385
Moving a Toolbar Button . . . 387
Using the Office Shortcut Bar . . . 388
xviii
CONTENTSChapter 27
Speaking with Office . . . 389
Installing Speech . . . 390
Setting Up Your Microphone . . . 391
Training Speech Recognition . . . 393
Understanding the Language Bar . . . 397
Moving the Language Bar. . . 397
Hiding the Language Bar . . . 398
Speaking Into Office . . . 399
Making Corrections. . . 403
Creating Special Words . . . 404
Dictating Menu Commands . . . 406
Working with the Keyboard Commands . . . 408
Discovering Text to Speech. . . 408
Part VII Review Questions . . . 411
PART VIII
APPENDIXES . . . 413
Appendix A
Using Keyboard Shortcuts. . . 414
Learning the Basic Shortcuts . . . 415
Common Office Shortcuts . . . 415
Using Word Shortcut Keys. . . 416
Using Excel Shortcuts . . . 417
Using PowerPoint Shortcuts . . . 418
Using Outlook Shortcuts . . . 419
Using Access Shortcuts . . . 420
Using Speech Shortcuts . . . 421
Appendix B
Installing Microsoft Office XP . . . 422
Understanding System Requirements . . . 423
Installing Office XP. . . 424
Installing with Default Settings . . . 425
Installing Office Components . . . 426
Working in Maintenance Mode . . . 429
Repairing or Reinstalling Office . . . 430
Adding or Removing Components . . . 432
Uninstalling Microsoft Office . . . 433
Glossary . . . 435
Index . . . 445
xix
W
elcome to the world of Microsoft Office.This new Fast & Easyguide from Prima Publishing will help you master the many and varied features of one of Microsoft’s most popular products—Microsoft Office XP. Microsoft Office is a powerful and popular suite of programs that will support many aspects of your everyday work style. For example, information is provided to help you write a letter, create a spreadsheet, produce a professional-looking
presentation, and manage your schedule and electronic mail.
Each of the individual programs interact with the other programs in the suite. For example, you might need to prepare a business report in Word that contains graphs and charts based on data you enter in an Excel spreadsheet. Perhaps later, after you have delivered your report (possibly using Outlook’s e-mail), you might need to prepare and schedule a PowerPoint presentation. In addition, you’ll learn how to use Office products to interact with the Internet.
Through this book you learn howto create Office documents, however whatyou create is totally up to you! Your imagination is the only limit to what you can do with them after that. This book cannot begin to teach you everything you can do with Microsoft Office, nor will it give you all the different ways to accomplish a task. What I havetried to do is give you the fastest and easiest way to get started with this fun and exciting suite of programs.
I’ve divided the book into seven parts and two appendixes. In Part I, I show you how to use basic Office commands; things that are common among most Office applications. Although it’s not the most exciting part of the book, it’s certainly the
Introduction
Introduction
00 OfficeXP_F&E FM.qxd 2/24/03 8:17 AM Page xx
TE
AM
FL
Y
most practical. Look out then! Things start to be lots of fun! In Parts II, III, IV, V, and VI, you learn the basics of five of the most popular Office applications: Word, Excel, PowerPoint, Outlook, and Access.
While some versions of Microsoft Office XP will also include other products such as Microsoft FrontPage, we didn’t include them in this Microsoft Office XP Fast & Easy
guide, however Prima Publishing has a number of books available dedicated exclusively to those special products. Some titles you might want to investigate includeMicrosoft FrontPage XP Fast & Easy(ISBN #0761533907) or Create FrontPage XP Web Pages In A Weekend(ISBN #0761534474).
The final part, Part VII, teaches you how to use Office’s state of the art technological features to create Web documents, save time with the Office Shortcut Bar, and the newest and most exciting feature—Speech. Speech lets you talk to your computer, allowing your voice to do the work instead of your fingers!
I’ve even included two helpful appendixes to show you how to install Microsoft Office and how to save your valuable time with keyboard shortcuts!
Who Should Read This Book?
Whether you are computer challenged or have used Microsoft products before, you will be able to quickly tap into the user-friendly integrated design and feature-rich environment of Microsoft Office XP.
Prima Publishing Fast & Easyguides use a step-by-step approach with illustrations of what you will see on your screen, linked with instructions for the next mouse movements or keyboard operations to complete your task. Computer terms and phrases are clearly explained in non-technical language, and expert tips and shortcuts help you produce professional-quality documents.
This book can be used as a learning tool or as a task reference. The easy-to-follow, highly visual nature of this book makes it the perfect learning tool. No prerequisites are required from you, the reader, except that you know how to turn your
computer on and how to use your mouse.
In addition, anyone using a software application always needs an occasional reminder about the steps required to perform a particular task. By using the
Microsoft Office XP Fast & Easy guide, any level of user can look up steps for a task quickly without having to plow through pages of descriptions.
xxi
Added Advice to Make You a Pro
You’ll notice that this book uses steps and keeps explanations to a minimum to help you learn faster. Included in the book are a few elements that provide some
additional comments to help you master the program, without encumbering your progress through the steps:
•
Tips offer shortcuts when performing an action, or a hint about a feature that might make your work in Word quicker and easier.•
Notes give you a bit of background or additional information about a feature, or advice about how to use the feature in your day-to-day activities.Read and enjoy this Fast & Easybook. It certainly is the fastest and easiest way to learn Microsoft Office XP.
— Diane Koers
xxii
INTRODUCTIONGetting
Started
Getting
Started
P A R T I
Chapter 1
Welcome to Office XP . . .
3
Chapter 2
Choosing Commands. . .
11
Chapter 3
Finding Common Ways to Work . . .
25
Chapter 4
01 OfficeXP_F&E CH01.qxd 2/24/03 8:20 AM Page 2
Welcome to
Office XP
I
f you’re relatively new to using a computer, not understanding
the basic elements you see on-screen can be frustrating. What’s
a dialog box? Where is that pop-up menu coming from? The
good thing about Microsoft Office products is that the
elements are the same in each program.
Throughout Part I, you will learn the common ways you can
approach tasks, regardless of the Office program you are using
or the document in which you are working.
The basic premise of each
Fast & Easy
guide is that people
learn best by doing. In this chapter, you’ll learn how to:
Understand the different Office programs
Start and exit an Office XP program
Identify common screen elements
1
1
Discovering Office
Applications
Microsoft Office includes multiple applications; each designed to accomplish a particular task. Although each application
operates independently of the others, all are designed to tightly integrate so information you enter in one application can be shared among the others. The Office applications covered in this book include:
•
Word— The Microsoft Office word-processing application. You’ll learn about Word in Part II of this book.•
Excel— The Microsoft Office spreadsheet application. You’ll learn about Excel in Part III of this book.4
CHAPTER 1: WELCOME TO OFFICE XP•
PowerPoint— The Microsoft Office graphics andpresentations application. You’ll learn about PowerPoint in Part IV of this book.
•
Outlook—The Microsoft Office e-mail and personal information management application. You’ll learn about Outlook in Part V of this book.5
•
Access— The Microsoft Office database application. You’ll learn about Access in Part VI of this book.Starting a Program
Starting a program (also called an application) is simple to do — and it’s the first, necessary step toward getting anything done. Because computers can be set up differently, you might not see the icons on your Desktop or the menu choices on the Programs menu that you see in this example.
1.
Clickon the Start buttonon the Windows Taskbar. The Start menu will appear.2.
ClickonPrograms. The Programs menu will appear.3.
Clickon the Office program name (in this instance,Microsoft Word) that you want to start. The Welcome screen for the program will appear briefly before the main program window opens.
6
CHAPTER 1: WELCOME TO OFFICE XPIf this is the first time you have accessed a Microsoft Office appli-cation, the Activation Wizard will appear. You can only access Microsoft Office a total of 50 times without using the Activation
Wizard. After the 50 uses, you will not be able to access Office until you register your product with the Activation Wizard.
4.
Clickon the Activate Later button. The Office application you selected will appear.Identifying Common
Screen Elements
All Office programs contain common screen elements. You’ll learn more about the following elements as you work in
individual programs in this book:
•
Title bar— A bar displayed at the top of a document that displays the name of the current Office program and document.7
IDENTIFYING COMMON SCREEN ELEMENTS
TIP
•
Menu bar— A group of all available features in the selected Office program.•
Toolbars— A selection of commonly used features. A single click on a toolbar item activates the feature. Most Office applications include multiple toolbars.•
Window control buttons— Three buttons, Minimize, Maximize/Restore, and Close, used to control the size of a document window.•
Mouse pointer— The mouse pointer, which will change shape as it moves to different locations on the screen.8
CHAPTER 1: WELCOME TO OFFICE XP01 OfficeXP_F&E CH01.qxd 2/24/03 8:20 AM Page 8
TE
AM
FL
Y
•
Working area (also called the Document screen)— The white area of the screen where the text will appear.•
Insertion point— The blink-ing vertical line in the docu-ment screen that indicates where text will appear when you begin typing.The insertion point appears in different locations in the various Office programs. On your screen, it flashes. The insertion point represents the location at which text will appear when you start typing. As you type, the insertion point moves to the right.
•
Scroll bars— Horizontal and vertical bars on the bottom and right sides of the screen that allow you to see more of a document.•
Task Pane— Small windows that assist you in working with Word. Task panes store collections of important features and present them in ways that are much easier to find and use. There are several different task panes.•
Status bar— A bar at the bottom of the screen indicating document information such as the current page or the location of the insertion point.9
Exiting a Program
When you no longer want to work in a program, you should follow the proper procedures for exiting the program to ensure that you don’t damage files.
1a.
Clickon the Close button. The program will close.OR
1b.
Clickon the File menu. The File menu will appear.2.
ClickonExit. The program will close.10
CHAPTER 1: WELCOME TO OFFICE XPNOTE
If you did any work in a document, a dialog box will appear asking whether you want to save your work. In Chapter 3,
“Finding Common Ways to Work,” you’ll learn how to save documents.
Choosing
Commands
Y
ou use commands to communicate with programs —
commands
are your way of telling a program what you want it
to do. Most often, you issue commands by choosing them from
menus, but you also can issue commands using toolbars,
shortcut menus, and keyboard shortcuts. In this chapter, you’ll
learn how to:
Use the menu and keyboard to choose commands
Make selections in dialog boxes
Work with shortcut menus and toolbars
Use the standard toolbar to fix mistakes
Understand SmartTags
2
2
Choosing
Discovering
Personalized Menus
All Windows programs use menus to select commands and options from, but Office has a functionality called
personalized menus. When the menu is first accessed, only the most common features are displayed. If you pause the mouse pointer over the main menu selection, or move it down to the double arrows at the bottom of a menu, the menu will expand to include all available features for that menu.
In this chapter, you’ll use the Microsoft Word application. Start Word by clicking on the Start button in Windows and choosing Programs, Microsoft Word.
1.
ClickonFormat. The Format menu will appear with eight options.12
CHAPTER 2: CHOOSING COMMANDSTIP
If you find you don’t like using personalized menus, see “Separating Toolbars” later in this chapter for a tip on turning off the personalized menu feature.
2.
Pausethemouse pointer over the Format menu. The Format menu will expand to include more items.When you see a right-pointing arrowhead in a menu (such as in the Background command), it means another menu is available.
3.
Movethemouse pointerdown a menu to select any item with an arrow. The item will be highlighted and a submenu will appear.
4.
Movethemouse pointerto the right of your selection in step 3. The first item in the submenu will be highlighted.5.
Clickon a selectionin the submenu. The featureassociated with that menu item will be activated.
13
DISCOVERING PERSONALIZED MENUS
TIP
Choosing Commands
with the Keyboard
If you’re not comfortable with using the mouse, you can also open menus and choose commands using the keyboard.
1.
PresstheAlt keyon your keyboard. The menu bar will become active and a box will appear around the word “File” on the menu bar.2.
Presstheunderlined letterof a menu name. The menu will appear.
3.
Presstheunderlined letterof a command name. The command will execute. Press the Esc key twice to cancel out of the menu.
14
CHAPTER 2: CHOOSING COMMANDSNOTE
Some options in a menu can appear dimmed, mean-ing that they are not avail-able at this time. You probably need a document open or text selected before you can use items that are dimmed. For example, the Cut
command is dimmed here because nothing is selected to be cut.
Using Shortcut Menus
Shortcut menus contain a limited number of commands. The commands you see on a shortcut menu depend on what you’re doing at the time you open the shortcut
menu. You always click the right mouse button (called a right-click) to open a shortcut menu.
1.
Movethemouse pointerinto the document area. The pointer will appear as an I-beam.
2.
Presstheright mouse button(right-click). The mouse pointer will change to an arrow and the shortcut menu for regular text will appear in the working area of the document.3.
Clickon a menu selection. The menu action will take place.15
USING SHORTCUT MENUS
TIP
Working with Dialog Boxes
Many selections in the menu are followed by three periods, calledellipses. Selections followed by ellipses indicate that, if you select one of these items, a dialog box will appear with the next group of options. Word’s Page Setup menu selection
will display an example of such a dialog box.
1.
ClickonFile. The File menu will appear.2.
ClickonPage Setup. The Page Setup dialog box will open. Options have been grouped together by tabs in the dialog box. In this example, you can select from these groups: Margins, Paper, or Layout. You click on a tab to bring it to the front.Depending on the dialog box, several types of selections will appear.
3.
Clickon the Margins tab. The Margins tab will display on top.•
Spin Boxes.Adjust numbers by clicking on the up and down arrows.•
Drop-Down Lists.You can select from drop-down lists by clicking on the down arrow and then clicking on a desired choice.16
CHAPTER 2: CHOOSING COMMANDS•
Option Buttons (not shown). Select one of the available options by clicking on the small circle (or the words next to it). The selected option will display a small back dot in the circle.4.
Clickon the Layout tab. The Layout tab will come to the top of the stack.•
Check Boxes. Turn features on or off by clicking on a box to insert or delete a check mark. Multiple check box options can be selected at once.•
Command Buttons.Usually indicated by an OK or Cancel button. Selecting OK tells Word to accept the choices you have made and close the dialog box. Selecting Cancel tells Word to ignore any changes you have made and close the dialog box.5.
Click on OK. The dialog box will close.Working with Toolbars
As a wonderful time-saver, the Office applications include toolbars that include buttons to launch commonly used features. Any toolbar button function can be accessed through a menu, but may take a number of steps to get the feature. Using the toolbar button reduces the number of steps to 1.
17
Separating Toolbars
Most Office applications include two main toolbars, Standard and Formatting. By default, these two toolbars are displayed on the same line and unless you have an extremely large
monitor screen, you can’t see all the tools. I recommend you separate them into two toolbars.
1.
OpenanOffice application, for example Word.2.
ClickonTools. The Tools menu will appear.3.
ClickonCustomize. The Customize dialog box will open.4.
Clickon the Options tab. The Options tab will appear in front.5.
ClickonShow Standard and Formatting toolbars on two rows. A check mark will appear in the box.18
CHAPTER 2: CHOOSING COMMANDS02 OfficeXP_F&E CH02.qxd 2/24/03 8:22 AM Page 18
TE
AM
FL
Y
6.
ClickonClose. TheCustomize dialog box will close and both toolbars will appear under the menu bar.
Using the Standard Toolbar
There are several buttons on the Standard toolbar that are common to most Office applications. The following list describes these common buttons and their functions:
1New.Delivers a new blank document
2Open.Opens a previously created document
3Save.Saves a document
4E-Mail.E-mails a document. (Provided you have e-mail capability on your computer)
5Print.Prints a document
6Print Preview.Shows a document in full page
19
WORKING WITH TOOLBARS
TIP
If you don’t like the delayed personalized menus, click on Always show full menus.
TIP
Pause the mouse pointer over a button to get a description of the tool.
1 Cut.Removes selected information to the Windows Clipboard
2 Copy.Duplicates selected information to the Windows Clipboard
3 Paste.Copies information on the Windows Clipboard to the current document
4 Undo.Reverses the last action taken
5 Redo.Reverses the most recent Undo step
Displaying Other Toolbars
There are a number of other toolbars with buttons
appropriate to various tasks. You can display as many toolbars as you want, but each additional toolbar you display takes room away from your display for seeing your document.
1.
ClickonView. The View menu will appear.2.
ClickonToolbars. The Toolbars submenu will appear.3.
Clickon a toolbar. The toolbar will appear.Some toolbars will appear at the top of your screen, some at the bottom of your screen, or some right in the middle of your screen. You’ll learn how to move toolbars in the next section.
20
CHAPTER 2: CHOOSING COMMANDS123 4 5
Moving Toolbars
Other toolbars will appear as you use certain features in Office applications. As toolbars appear on the screen, they might appear in an unsuitable location and you’ll want to move them.
1.
Press and hold themouse pointerover the title bar of the toolbar. The mouse pointer turns into a four headed arrow.2.
Press and drag thetitle barto a new location. The toolbar will move along with the mouse.
3.
Releasethemouse button. The toolbar will remain in the new location.21
WORKING WITH TOOLBARS
TIP
Closing Toolbars
If a toolbar is displayed and you no longer need it, you can easily close it.
1a.
Clickon the toolbar close box. The toolbar will close.OR
1b.
ClickonView. The View menu will appear.2.
ClickonToolbars. The Toolbars submenu will appear. Currently displayed toolbars have a check mark next to them.3.
Clickon the toolbaryou want to close. The toolbar will close.22
CHAPTER 2: CHOOSING COMMANDSUnderstanding SmartTags
SmartTags are new to Office XP. SmartTagsare small icons that appear throughout your document as you perform various tasks or enter certain types of text. SmartTags perform actions in Office applications that would normally require you to open other programs.
SmartTag functions range from quickly adding a name or address from your document to an Outlook contact folder to offering options when pasting data from the Clipboard.
The appearance of SmartTags will vary depending on the function, but all of them appear as small icons near the area in question.
You might see text with purple dotted lines under it; Office recognizes that text as SmartTag text. As you move your mouse over the text, an indicator in the form of an icon will appear. Other times, the SmartTag will automatically appear depending on the function you used last.
23
Clicking on the SmartTag icon will make a menu appear from which you can make additional choices. In this example, if you click on Add to Contacts, a contact card from Microsoft Outlook will appear with the name and possibly the address already entered. You’ll learn about Outlook contacts in Chapter 19, “Working with the Address Book.”
24
CHAPTER 2: CHOOSING COMMANDSFinding Common
Ways to Word
M
icrosoft Office applications let you perform tasks in the
same way, regardless of the program in which you are working.
In this chapter, you’ll learn how to:
Use the Task pane
Preview a document before printing
Print, save, and close a document
Open an existing document
Start a new document
3
3
Working with the Task Pane
New to Office XP is the Task pane. Most Office applications include the Task pane, with the exception of Outlook. Actually each application includes several different Task panes, each of which appears as you attempt various tasks. One feature of the Task pane assists you in creating new documents, whereas another function enables you to format your document more quickly.
Changing Task Panes
By default, Office displays the New Document Task pane. The New Document Task pane lists common features associated with creating a new document. As you select various functions of the application, the Task pane will change automatically.
See “Starting a Program” in Chapter 1 to refresh yourself on starting the Word application used in this chapter.
1.
Clickon the Task pane drop-down arrow. A list of other Task panes will appear.2.
Clickon a Task pane name. The selected Task pane will appear.Closing the
Task Pane
You can close the Task pane during the current session of your current application, which will then redisplay the next time you start the program.
26
CHAPTER 3: FINDING COMMON WAYS TO WORK1.
Clickon the Close button. The Task pane will close.If you choose a feature (such as mail merge in Word) that uses the Task pane, the Task pane will reappear.
Redisplaying the Task Pane
As previously mentioned, if you choose an Office feature that used the Task pane, it automatically reappears. You can,
however, redisplay the Task pane whenever you want it.
1.
ClickonView. The View menu will appear.2.
ClickonTask Pane. The Task pane will reopen.27
WORKING WITH THE TASK PANE
TIP
Click on Show at Startup to remove the check mark, and then click on the Close button. The Task pane will close. The next time you launch the current appli-cation, the Task pane will not automatically appear.
NOTE
Adding Random Text
What you see (and the rest of the tasks covered in this chapter) is more meaningful when you have some text on-screen, so you’ll start by letting Word add some random text.
1.
Type =Rand()in the Word working area. The insertion point will move to the right as you type.2.
PresstheEnter key. The text you typed will be replaced with several copies of the sentence “The quick brown fox jumps over the lazy dog.”28
CHAPTER 3: FINDING COMMON WAYS TO WORKNOTE
The text you typed was actually a formula that Word recognizes as meaning “Enter some sample text.”
03 OfficeXP_F&E CH03.qxd 2/24/03 8:27 AM Page 28
TE
AM
FL
Y
Previewing a Document
Print Preview is available in Word and Excel and is most helpful when you’re trying to make sure information is aligned as you want it.
1.
Clickon the Print Preview button. Word and Excel will switch to Print Preview mode, in which you can see the layout and appearance of yourdocument as it will appear when printed.
2.
Movethemouse pointerover the document on-screen. The pointer will change to a magnifying glass.
3.
Clickon the document. It will enlarge (zoom in) so you can actually read the text.29
PREVIEWING A DOCUMENT
NOTE
4.
Clickon the documentagain. The document will return to regular size.
5.
ClickonClose. The document will return to its previous view.Printing a
Document
When your document is complete, you’ll probably want to print it. You can send it to your printer for a hard copy of the document.
Printing from the Toolbar
Each Office program contains a Print button on the standard toolbar that makes printing easy. In addition, you can print
from Print Preview in both Word and Excel.
1.
Clickon the Print button. One copy of the entire docu-ment will be printed, without showing the Print dialog box.30
CHAPTER 3: FINDING COMMON WAYS TO WORKNOTE
Clicking on the Print button in Outlook will dis-play the Print dialog box.
Printing from the Menu
When electing to print from the menu, a dialog box will appear in which you can determine exactly what portion of
the document to print, which printer to use, how many copies to print, and other printing options.
1.
ClickonFile. The File menu will appear.2.
ClickonPrint. The Print dialog box will open.3.
Makeany desired changesin the Print dialog box. The dialog box will change to match your selections.
4.
ClickonOK. The document will be printed.31
Saving Your Document
Anyone who uses a computer has probably lost data at one time or another. If you haven’t been saving to disk regularly, it only takes a few seconds to lose hours of work. Office includes built-in features to help protect you against this eventuality. However, you still need to save on your own.
The process of saving is necessary in Word, Excel, and PowerPoint. Office saves Outlook and Access files automatically.
Saving a File the First Time
When you first create a file, it has no name. If you want to use that document later, it must have a name so the application can find it. The Office program asks for a name the first time you save the document, and then puts the name in the title bar at the top of the screen.
1.
ClickonFile. The File menu will appear.2.
ClickonSave As.The Save As dialog box will open.32
CHAPTER 3: FINDING COMMON WAYS TO WORK3.
Typeanamefor your file in the File Name text box. The file name will be displayed.File names can be up to 256 characters in length and can include spaces, dashes, and some other special characters, but cannot include the asterisk (*), slash (/), backslash (\) or question mark (?) characters.
4.
ClickonSave. Your file will be saved and the name you specified will appear in the title bar.Resaving a Document
As you continue to work on your document, resave it every 10 minutes or so to help ensure that you do not lose any changes.
33
SAVING YOUR DOCUMENT
NOTE
1.
Clickon the Save button. The file will be resaved with any changes. No dialog box will appear because the file is resaved with the same name and in the same folder as previously specified.Closing a Document
When you are finished working on a file, you should close it.
Closingis the equivalent of putting it away for later use. When you close a file, you are only putting the document away— not the program. The applica-tion, Word for example, is still active and ready to work for you.
1a.
ClickonFile. The File menu will appear.2a.
ClickonClose. The file will be put away.OR
34
CHAPTER 3: FINDING COMMON WAYS TO WORKTIP
If you want to save the file with a different name or in a different folder, click on File, and then choose Save As. The Save As dialog box will prompt you for the new name or folder. You will have the original file as well as the new one.
1b.
Clickon the document’s Close button. The file will be closed. By choosing this method, you combine steps 1 and 2.35
CLOSING A DOCUMENT
NOTE
Opening an Existing File
Opening a file is putting a copy of that file into the computer’s memory and onto your screen so that you can work on it. If you make any changes, be sure to save the file again. Office provides several ways to open an existing file.
Displaying the
Open Dialog Box
Office applications include an Open dialog box that lists all previously saved files located in a particular folder.
1.
ClickonFile. The File menu will appear.2.
ClickonOpen. The Open dialog box will appear.3.
Clickon the file nameyou want to open. The file name will be highlighted.36
CHAPTER 3: FINDING COMMON WAYS TO WORKTIP
Optionally, click on the toolbar Open button to display the Open dialog box.
4.
ClickonOpen. The file will be placed on your screen, ready for you to edit.Opening a Recently
Used Document
The Task pane lists several of the files you’ve recently used with the current Office application. You can quickly open a file using the Task pane.
1.
From the Task pane, clickon thefile nameyou want to open. The file will appear on your screen.37
OPENING AN EXISTING FILE
NOTE
If your file is located in a different folder than the one displayed in the Look In list box, click on the drop-down arrow to navi-gate to the proper folder.
TIP
If the file you want isn’t listed, click on More Documents to display the Open dialog box, from which you can select additional files.
Starting a New Document
When a Word, Excel, PowerPoint, or FrontPage session first begins, a new empty blank document appears ready for you
to use. However, during the course of using one of these applications you might need to begin another new file.
1.
Clickon the New button. A new screen will appear. If you are using Access, a blank screen doesn’t automatically appear. Instead, the Task screen appears to assist you inselecting options. You’ll learn more about Access in Part VI “Using Access”.
38
CHAPTER 3: FINDING COMMON WAYS TO WORKTIP
Recently used files are also listed under the File menu.
03 OfficeXP_F&E CH03.qxd 2/24/03 8:27 AM Page 38
TE
AM
FL
Y
Getting Help
with Office
A
lthough you’ll find many answers to your questions in this
book, sometimes you need additional information. Microsoft
supplies you with several types of assistance. In this chapter,
you’ll learn how to:
Work with the Office Assistant
Use the Help menu
Get help on the Web
4
4
Using the Office Assistant
When you opened an Office application for the first time, what you probably noticed first was that cute little paper clip trying to get your attention. That’s Clippitthe Office
Assistant, Office’s Help feature. You can use Clippit to assist you with common tasks or help you understand a topic.
Asking the
Assistant for Help
What sets Office Assistant apart from other help features is that you can use simple, everyday language to ask for assistance.
1.
Click anywhere on the Office Assistant. A balloon will appear asking, “What would you like to do?” with an insertion point flashing in the white text box.2.
Typeaquestionor just a word or two about what you need assistance with. An example might be: “How do I set a tab?” The text will appear in the white text box.3.
ClickonSearch. A new window will appear with more choices related to your topic.40
CHAPTER 4: GETTING HELP WITH OFFICETIP
Pressing F1 also brings up the Assistant query window.
4.
Clickon a topic. The help information window will appear on your screen.5.
Clickon the help Close boxwhen you are finished reading the help topic. The help window will close and the original window will return to full size.
41
Choosing a Different Assistant
Is Clippit, the helpful little piece of metal, getting a little dull or just not your style? There is a way to select a different icon for Office Assistant.
1.
Right-clickon the Assistant. A shortcut menu will appear.2.
ClickonChoose Assistant. The Office Assistant dialog box will appear with the Gallery tab displayed.42
CHAPTER 4: GETTING HELP WITH OFFICENOTE
Sometimes the Assistant will try to guess what you are doing and offer assis-tance. Click on an option when this happens.
3.
ClickonBackorNextto view other Assistants. A picture and description of the available assistants will appear.4.
ClickonOKwhen you see the one you want. The Office Assistant dialog box will close and you’ll have a new helper!Hiding the Assistant
The Office Assistant is cute, but sometimes it’s just in your way. You can hide the assistant and recall it whenever you need it.
1.
Right-clickon the Assistant. A shortcut menu will appear.2.
ClickonHide. The Office Assistant will disappear.43
USING THE OFFICE ASSISTANT
NOTE
3.
Clickon the Help button. The Assistant will reappear.Turning Off the Assistant
If you find that you don’t use the Assistant and don’t want to see it, you can turn it off.
1.
Click anywhereon the Office Assistant. The “What would you like to do?” balloon will appear.2.
ClickonOptions. The Office Assistant dialog box will open.44
CHAPTER 4: GETTING HELP WITH OFFICENOTE
If the Assistant is in the way when you are typing text in your document, it will automatically move as your insertion point gets close to it. You can also move it manually by click-ing on it and draggclick-ing it to a new location.
3.
ClickonUse the Office Assistant. The check mark will be removed from the box.4.
ClickonOK. The Office Assistant will be turned off until you manually choose to use it again.Using What’s This?
There are so many items on an Office application screen, it’s hard to remember what each item is or does. You can use the
What’s This? feature to identify the various buttons and components:
1.
ClickonHelp. The Help menu will appear.2.
ClickonWhat’s This?The mouse pointer will change to a black pointer with a question mark.45
USING WHAT’S THIS?
TIP
Click on Help and choose Use Office Assistant to return the Assistant to an active status.
TIP
3.
Clickthemouse pointerover any button or item on the screen. A detailed information screen will appear and explain the item’s function.
4.
Click anywhereon the document window. The What’s This?box will close.46
CHAPTER 4: GETTING HELP WITH OFFICESearching the Web for Help
If you have access to the Internet, Microsoft includes some wonderful assistance from its Web site.
1.
Clickon the Help command. The Help menu will appear.2.
ClickonOffice on the Web. If you are not already connected to the Internet, you will be prompted to connect. Your Web browser will launch and a Microsoft Office Web page will display.3.
Followtheinstructionson the screen to access various help topics.When you have completed accessing the Web help, you’ll want to close the Internet Explorer window.
4.
Clickon the Close button. The Internet Explorer window will close.You might be prompted to disconnect from your Internet Service Provider (ISP).
47
SEARCHING THE WEB FOR HELP
NOTE
48
PART I REVIEW QUESTIONSPart I Review Questions
1.
How do you start an Office XP program?
See “Starting a Program”
in Chapter 1
2.
Why should you follow proper procedures when exiting an Office
XP program?
See “Exiting a Program” in Chapter 1
3.
What are personalized menus?
See “Discovering Personalized
Menus” in Chapter 2
4.
How do you display a shortcut menu?
See “Using Shortcut Menus”
in Chapter 2
5.
What must you do to access a drop-down list in a dialog box?
See “Working with Dialog Boxes” in Chapter 2
6.
Name three toolbar buttons that are common to the Office
applications.
See “Using the Standard Toolbar” in Chapter 2
7.
What must you specify when saving a document?
See “Saving
a File the First Time” in Chapter 3
8.
What happens when you try to close a document with changes that
have not been saved?
See “Closing a Document” in Chapter 3
9.
What is the Office Assistant?
See “Using the Office Assistant”
in Chapter 4
10.
What happens to the mouse pointer when you click on “What’s
This?” from the Help menu?
See “Using What’s This?” in Chapter 4
04 OfficeXP_F&E CH04.qxd 2/24/03 8:28 AM Page 48
TE
AM
FL
Y
Using Word
Using Word
P A R T I I
Chapter 5
Learning Word Basics . . .
51
Chapter 6
Formatting a Word Document. . .
65
Chapter 7
Improving Your Writing . . .
83
Chapter 8
05 OfficeXP_F&E CH05.qxd 2/24/03 8:29 AM Page 50
Learning
Word Basics
W
hen you first start any Office program, including Word, you
need to learn how to enter and manipulate information. If you
don’t have Word open on your screen, follow the steps in
Chapter 1, “Welcome to Office XP,” to open Word. In this
chapter, you’ll learn how to:
Type, delete, and select text
Insert special characters
Use Undo and Redo
Move around in a document
Use Click and Type
5
5
Learning
Typing Text
Notice that there is a flashing vertical bar on your screen when you’re in Word. This is called the insertion point. It marks the location where text will appear when you type. If you type a few lines of text, you’ll notice that you don’t need to press the Enter key at the end of each line. The program automatically moves down or wraps to the next line for you. This feature is called word wrap. You only press the Enter key to start a new paragraph.
1.
Typesometext. The text will display on the screen.2.
Press Enter. The insertion point will move down to the next line.3.
Press Enteragain. The insertion point will move down another line, creating a blank line between your paragraphs.4.
Typeaparagraphof text. Don’t press Enter, just keep typing until you have several lines of text. The word wrap feature will take care of moving the insertion point down to the next line when necessary.52
CHAPTER 5: LEARNING WORD BASICS5.
Continue typingtext until your document is complete. The text you type will display on the screen.Inserting, Selecting, and
Deleting Text
Editing text with Word is a breeze. Need extra words? Just type them in. Need to delete words? Just highlight them and press the Delete key.
Inserting Text
Word begins in insertmode. This means that when you want to add new text to a document, simply place the insertion point where you want the new text to be and start typing.
53
INSERTING, SELECTING, AND DELETING TEXT
TIP
1.
Clickthemouse pointerdirectly in front of the word within the body of the
document where you want new text to appear. The blinking insertion point will appear.
2.
Typeanynew wordorphrase, adding a space before or after as necessary. The new text is inserted into the document. Word will push the existing text to the right and keep moving it over or down to make room for the new text.
Selecting Text
To move, copy, delete, or change the formatting of text, select the text you want to edit. When text is selected, it will appear as light type on a dark background on your screen, the reverse of non-selected text. In previous versions of
Microsoft Word, you could only select a sequential block of text at a time, not bits of text in different places. New to Word XP is the capability to select non-sequential blocks of text. The following list shows different selection techniques:
•
To select one word, double-click on the word.•
To select a sentence, hold down the Ctrl key and click anywhere on the sentence.54
CHAPTER 5: LEARNING WORD BASICS•
To select an entire paragraph, click three times (triple-click) anywhere in the paragraph.•
To select a single line of text, move the mouse pointer to the left margin next to the line. The mouse pointer will change to an arrow. Click once.•
To select a block of text, click at the beginning of the text, hold the mouse button down, and drag across the balance of the text to be selected.•
To select non-sequential blocks of text, hold down the Ctrl key and use the previous selection techniques for each additional text block you want to include.55
INSERTING, SELECTING, AND DELETING TEXT
TIP
To select the entire document, press Ctrl+A or choose Edit, Select All.
TIP
Deleting Text
You can delete unwanted text one character, one word, and one paragraph at a time; or any combination of these. Two common keys used to delete text are the Backspace and the Delete keys. Pressing the Backspace key will delete one character at a time to the left of the insertion point, whereas pressing the Delete key will delete one character at a time to the right of the insertion point.
1.
Selectthetextto be deleted. The text will be highlighted.2.
PresstheDelete key. The text will be deleted.56
CHAPTER 5: LEARNING WORD BASICSTIP
An easy way to remember which direction the Backspace key will delete is to look at the arrow printed on the Backspace key (most keyboards). The arrow points to the left, indicating this is the direction the characters are deleted.