I
NTRODUCTION TOP
YTHONGregor von Laszewski
I
NTRODUCTION TOP
YTHON 1 PREFACE1.1 Disclaimer ☁
1.1.1 Acknowledgment 1.1.2 Extensions
2 INTRODUCTION
2.1 Introduction to Python ☁
2.1.1 References 3 INSTALATION
3.1 Python 3.7.4 Installation ☁
3.1.1 Hardware
3.1.2 Prerequisits Ubuntu 19.04 3.1.3 Prerequisits macOS
3.1.3.1 Installation from Apple App Store 3.1.3.2 Installation from python.org
3.1.3.3 Installation from Hoembrew 3.1.4 Prerequisits Ubuntu 18.04
3.1.5 Prerequisite Windows 10 3.1.5.1 Linux Subsystem Install 3.1.6 Prerequisit venv
3.1.7 Install Python 3.7 via Anaconda
3.1.7.1 Download conda installer
3.1.7.2 Install conda
3.1.7.3 Install Python 3.7.4 via conda
3.2 Multi-Version Python Installation ☁
3.2.1 Disabling wrong python installs
3.2.2 Managing 2.7 and 3.7 Python Versions without Pyenv 3.2.3 Managing Multiple Python Versions with Pyenv
3.2.3.1 Installation pyenv via Homebrew 3.2.3.2 Install pyenv on Ubuntu 18.04 3.2.3.3 Using pyenv
3.2.3.3.1 Using pyenv to Install Different Python Versions 3.2.3.3.2 Switching Environments
3.2.3.4 Updating Python Version List
3.2.4 Anaconda and Miniconda and Conda 3.2.4.1 Miniconda
3.2.4.2 Anaconda 3.2.5 Exercises 4 FIRST STEPS
4.1 Interactive Python ☁
4.1.1 REPL (Read Eval Print Loop) 4.1.2 Interpreter
4.1.3 Python 3 Features in Python 2
4.2 Editors ☁
4.2.1 Pycharm
4.2.2 Python in 45 minutes
4.3 Google Colab ☁
4.3.1 Introduction to Google Colab 4.3.2 Programming in Google Colab
4.3.3 Benchamrking in Google Colab with Cloudmesh 5 LANGUAGE
5.1 Language ☁
5.1.1 Statements and Strings 5.1.2 Comments
5.1.3 Variables 5.1.4 Data Types
5.1.4.1 Booleans 5.1.4.2 Numbers
5.1.5 Module Management 5.1.5.1 Import Statement
5.1.5.2 The from … import Statement 5.1.6 Date Time in Python
5.1.7 Control Statements 5.1.7.1 Comparison 5.1.7.2 Iteration 5.1.8 Datatypes
5.1.8.1 Lists 5.1.8.2 Sets
5.1.8.3 Removal and Testing for Membership in Sets 5.1.8.4 Dictionaries
5.1.8.6 Counting with Dictionaries 5.1.9 Functions
5.1.10 Classes 5.1.11 Modules
5.1.12 Lambda Expressions 5.1.12.1 map
5.1.12.2 dictionary 5.1.13 Iterators
5.1.14 Generators
5.1.14.1 Generators with function 5.1.14.2 Generators using for loop
5.1.14.3 Generators with List Comprehension 5.1.14.4 Why to use Generators?
6 CLOUDMESH
6.1 Introduction ☁
6.2 Installation ☁
6.2.1 Prerequisite 6.2.2 Basic Install
6.3 Output ☁
6.3.1 Console 6.3.2 Banner 6.3.3 Heading 6.3.4 VERBOSE
6.3.5 Using print and pprint
6.4 Dictionaries ☁
6.4.1 Dotdict 6.4.2 FlatDict 6.4.3 Printing Dicts
6.5 Shell ☁
6.6 StopWatch ☁
6.7 Cloudmesh Command Shell ☁
6.7.1 CMD5
6.7.1.1 Resources
6.7.1.2 Installation from source 6.7.1.3 Execution
6.8 Exercises ☁
6.8.1 Cloudmesh Common 6.8.2 Cloudmesh Shell 7 LIBRARIES
7.1 Python Modules ☁
7.1.1 Updating Pip
7.1.2 Using pip to Install Packages 7.1.3 GUI
7.1.3.1 GUIZero 7.1.3.2 Kivy
7.1.4 Formatting and Checking Python Code 7.1.5 Using autopep8
7.1.6 Writing Python 3 Compatible Code 7.1.7 Using Python on FutureSystems 7.1.8 Ecosystem
7.1.8.1 pypi
7.1.8.2 Alternative Installations 7.1.9 Resources
7.1.9.1 Jupyter Notebook Tutorials 7.1.10 Exercises
7.2 Data Management ☁
7.2.1 Formats 7.2.1.1 Pickle 7.2.1.2 Text Files 7.2.1.3 CSV Files
7.2.1.4 Excel spread sheets 7.2.1.5 YAML
7.2.1.6 JSON 7.2.1.7 XML 7.2.1.8 RDF 7.2.1.9 PDF 7.2.1.10 HTML
7.2.4.1 Exercises
7.3 Plotting with matplotlib ☁
7.4 DocOpts ☁
7.5 OpenCV ☁
7.5.1 Overview 7.5.2 Installation
7.5.3 A Simple Example 7.5.3.1 Loading an image 7.5.3.2 Displaying the image 7.5.3.3 Scaling and Rotation 7.5.3.4 Gray-scaling
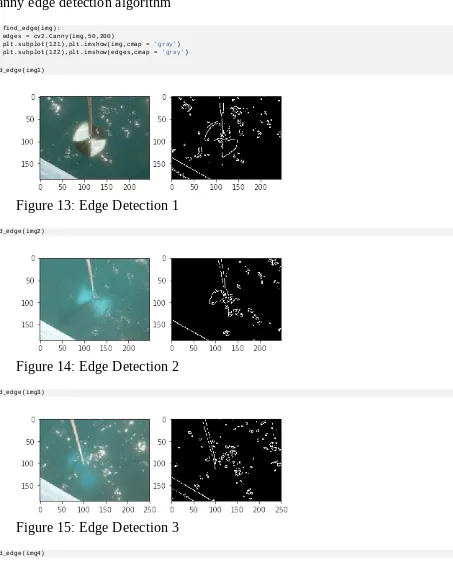
7.5.3.5 Image Thresholding 7.5.3.6 Edge Detection 7.5.4 Additional Features
7.6 Secchi Disk ☁
7.6.1 Setup for OSX
7.6.2 Step 1: Record the video
7.6.3 Step 2: Analyse the images from the Video 7.6.3.1 Image Thresholding
7.6.3.2 Edge Detection 7.6.3.3 Black and white 8 DATA
8.1 Data Formats ☁
8.1.1 YAML 8.1.2 JSON 8.1.3 XML 9 MONGO
9.1 MongoDB in Python ☁
9.1.1 Cloudmesh MongoDB Usage Quickstart 9.1.2 MongoDB
9.1.2.1 Installation
9.1.2.1.1 Installation procedure 9.1.2.2 Collections and Documents
9.1.2.3.1 Mongo Queries examples 9.1.2.4 MongoDB Basic Functions
9.1.2.4.1 Import/Export functions examples 9.1.2.5 Security Features
9.1.2.5.1 Collection based access control example 9.1.2.6 MongoDB Cloud Service
9.1.3 PyMongo 9.1.3.1 Installation 9.1.3.2 Dependencies
9.1.3.3 Running PyMongo with Mongo Deamon 9.1.3.4 Connecting to a database using MongoClient 9.1.3.5 Accessing Databases
9.1.3.6 Creating a Database
9.1.3.7 Inserting and Retrieving Documents (Querying) 9.1.3.8 Limiting Results
9.1.3.9 Updating Collection 9.1.3.10 Counting Documents 9.1.3.11 Indexing
9.1.3.12 Sorting 9.1.3.13 Aggregation
9.1.3.14 Deleting Documents from a Collection 9.1.3.15 Copying a Database
9.1.3.16 PyMongo Strengths 9.1.4 MongoEngine
9.1.4.1 Installation
9.1.4.2 Connecting to a database using MongoEngine 9.1.4.3 Querying using MongoEngine
9.1.5 Flask-PyMongo 9.1.5.1 Installation 9.1.5.2 Configuration
9.1.5.3 Connection to multiple databases/servers 9.1.5.4 Flask-PyMongo Methods
9.1.5.5 Additional Libraries 9.1.5.6 Classes and Wrappers
9.2 Mongoengine ☁
9.2.1 Introduction
9.2.3 Basics 10 OTHER
10.1 Word Count with Parallel Python ☁
10.1.1 Generating a Document Collection 10.1.2 Serial Implementation
10.1.3 Serial Implementation Using map and reduce 10.1.4 Parallel Implementation
10.1.5 Benchmarking 10.1.6 Excersises 10.1.7 References
10.2 NumPy ☁
10.2.1 Installing NumPy 10.2.2 NumPy Basics
10.2.3 Data Types: The Basic Building Blocks 10.2.4 Arrays: Stringing Things Together 10.2.5 Matrices: An Array of Arrays 10.2.6 Slicing Arrays and Matrices 10.2.7 Useful Functions
10.2.8 Linear Algebra 10.2.9 NumPy Resources
10.3 Scipy ☁
10.3.1 Introduction 10.3.2 References
10.4 Scikit-learn ☁
10.4.1 Introduction to Scikit-learn 10.4.2 Installation
10.4.3 Supervised Learning 10.4.4 Unsupervised Learning
10.4.5 Building a end to end pipeline for Supervised machine learning using Scikit-learn
10.4.6 Steps for developing a machine learning model 10.4.7 Exploratory Data Analysis
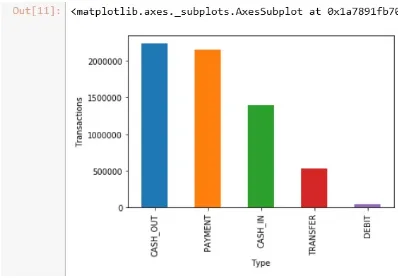
10.4.7.1 Bar plot
10.4.7.2 Correlation between attributes
10.4.7.3 Histogram Analysis of dataset attributes 10.4.7.4 Box plot Analysis
10.4.8 Data Cleansing - Removing Outliers 10.4.9 Pipeline Creation
10.4.9.1 Defining DataFrameSelector to separate Numerical and Categorical attributes
10.4.9.2 Feature Creation / Additional Feature Engineering 10.4.10 Creating Training and Testing datasets
10.4.11 Creating pipeline for numerical and categorical attributes 10.4.12 Selecting the algorithm to be applied
10.4.12.1 Linear Regression 10.4.12.2 Logistic Regression 10.4.12.3 Decision trees 10.4.12.4 K Means
10.4.12.5 Support Vector Machines 10.4.12.6 Naive Bayes
10.4.12.7 Random Forest 10.4.12.8 Neural networks
10.4.12.9 Deep Learning using Keras 10.4.12.10 XGBoost
10.4.13 Scikit Cheat Sheet 10.4.14 Parameter Optimization
10.4.14.1 Hyperparameter optimization/tuning algorithms
10.4.15 Experiments with Keras (deep learning), XGBoost, and SVM (SVC) compared to Logistic Regression(Baseline)
10.4.15.1 Creating a parameter grid
10.4.15.2 Implementing Grid search with models and also creating metrics from each of the model.
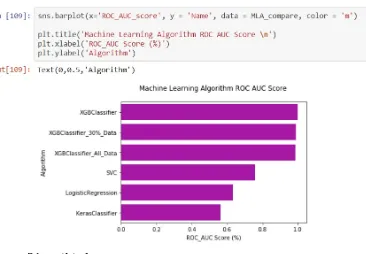
10.4.15.3 Results table from the Model evaluation with metrics. 10.4.15.4 ROC AUC Score
10.4.16 K-means in scikit learn. 10.4.16.1 Import
10.4.17 K-means Algorithm 10.4.17.1 Import
10.4.17.2 Create samples 10.4.17.3 Create samples 10.4.17.4 Visualize 10.4.17.5 Visualize
10.5.1 Setup 10.5.2 Dataset
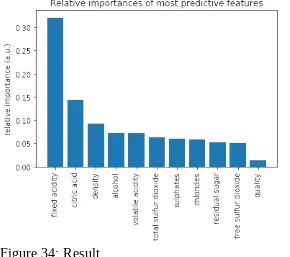
10.5.3 Detecting Features 10.5.3.1 Data Preparation 10.5.4 Random Forest 10.5.5 Acknowledgement
10.6 Parallel Computing in Python ☁
10.6.1 Multi-threading in Python 10.6.1.1 Thread vs Threading
10.6.1.2 Locks
10.6.2 Multi-processing in Python 10.6.2.1 Process
10.6.2.2 Pool
10.6.2.2.1 Synchronous Pool.map()
10.6.2.2.2 Asynchronous Pool.map_async()
10.6.2.3 Locks
10.6.2.4 Process Communication 10.6.2.4.1 Value
10.7 Dask ☁
10.7.1 How Dask Works 10.7.2 Dask Bag
10.7.3 Concurrency Features 10.7.4 Dask Array
10.7.5 Dask DataFrame
10.7.6 Dask DataFrame Storage 10.7.7 Links
11 APPLICATIONS
11.1 Fingerprint Matching ☁
11.1.1 Overview 11.1.2 Objectives 11.1.3 Prerequisites 11.1.4 Implementation 11.1.5 Utility functions 11.1.6 Dataset
11.1.7 Data Model 11.1.7.1 Utilities
11.1.7.1.2 Path 11.1.7.1.3 Image 11.1.7.2 Mindtct 11.1.7.3 Bozorth3
11.1.7.3.1 Running Bozorth3 11.1.7.3.1.1 One-to-one 11.1.7.3.1.2 One-to-many 11.1.8 Plotting
11.1.9 Putting it all Together
11.2 NIST Pedestrian and Face Detection ☁
11.2.0.1 Introduction
11.2.0.1.1 INRIA Person Dataset 11.2.0.1.2 HOG with SVM model 11.2.0.1.3 Ansible Automation Tool 11.2.0.2 Deployment by Ansible
11.2.0.3 Cloudmesh for Provisioning 11.2.0.4 Roles Explained for Installation
11.2.0.4.1 Server groups for Masters/Slaves by Ansible inventory 11.2.0.5 Instructions for Deployment
11.2.0.5.1 Cloning Pedestrian Detection Repository from Github 11.2.0.5.2 Ansible Playbook
11.2.0.6 OpenCV in Python 11.2.0.6.1 Import cv2 11.2.0.6.2 Image Detection
11.2.0.7 Human and Face Detection in OpenCV 11.2.0.7.1 INRIA Person Dataset
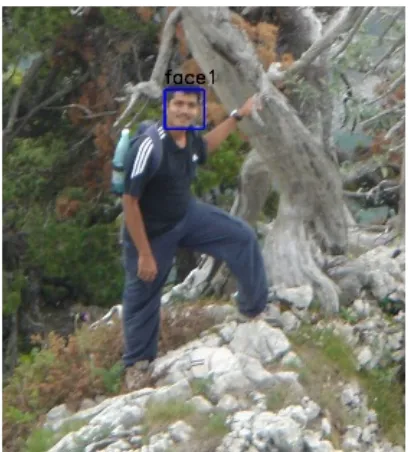
11.2.0.7.2 Face Detection using Haar Cascades 11.2.0.7.3 Face Detection Python Code Snippet 11.2.0.8 Pedestrian Detection using HOG Descriptor
11.2.0.8.1 Python Code Snippet 11.2.0.9 Processing by Apache Spark
11.2.0.9.1 Parallelize in Spark Context 11.2.0.9.2 Map Function (apply_batch) 11.2.0.9.3 Collect Function
1 PREFACE
Sat Nov 23 05:25:16 EST 2019 ☁
1.1 D
ISCLAIMER☁
This book has been generated with Cyberaide Bookmanager.
Bookmanager is a tool to create a publication from a number of sources on the internet. It is especially useful to create customized books, lecture notes, or handouts. Content is best integrated in markdown format as it is very fast to produce the output.
Bookmanager has been developed based on our experience over the last 3 years with a more sophisticated approach. Bookmanager takes the lessons from this approach and distributes a tool that can easily be used by others.
The following shields provide some information about it. Feel free to click on them.
pypi
pypi v0.2.28v0.2.28 LicenseLicense Apache 2.0Apache 2.0 pythonpython 3.73.7 formatformat wheelwheel statusstatus stablestable buildbuild unknownunknown
1.1.1 Acknowledgment
If you use bookmanager to produce a document you must include the following acknowledgement.
“This document was produced with Cyberaide Bookmanager
developed by Gregor von Laszewski available at
https://pypi.python.org/pypi/cyberaide-bookmanager. It is in the responsibility of the user to make sure an author acknowledgement section is included in your document. Copyright verification of content included in a book is responsibility of the book editor.”
The bibtex entry is
1.1.2 Extensions
We are happy to discuss with you bugs, issues and ideas for enhancements. Please use the convenient github issues at
https://github.com/cyberaide/bookmanager/issues
Please do not file with us issues that relate to an editors book. They will provide you with their own mechanism on how to correct their content.
title = {{Cyberaide Book Manager}}, howpublished = {pypi},
month = apr, year = 2019,
url={https://pypi.org/project/cyberaide-bookmanager/}
2 INTRODUCTION
2.1 I
NTRODUCTION TOP
YTHON☁
Learning Objectives
Learn quickly Python under the assumption you know a programming language
Work with modules
Understand docopts and cmd
Contuct some python examples to refresh your python knpwledge Learn about the map function in Python
Learn how to start subprocesses and rederect their output
Learn more advanced constructs such as multiprocessing and Queues Understand why we do not use anaconda
Get familiar with pyenv
Portions of this lesson have been adapted from the official Python Tutorial
copyright Python Software Foundation.
Python is an interpreted, dynamic, high-level programming language suitable for a wide range of applications.
The philosophy of python is summarized in The Zen of Python as follows: Explicit is better than implicit
Simple is better than complex Complex is better than complicated Readability counts
The main features of Python are:
Use of indentation whitespace to indicate blocks Object orient paradigm
Dynamic typing Interpreted runtime
Garbage collected memory management a large standard library
a large repository of third-party libraries
Python is used by many companies and is applied for web development, scientific computing, embedded applications, artificial intelligence, software development, and information security, to name a few.
The material collected here introduces the reader to the basic concepts and features of the Python language and system. After you have worked through the material you will be able to:
use Python
use the interactive Python interface understand the basic syntax of Python write and run Python programs
have an overview of the standard library
install Python libraries using pyenv for multipython interpreter development.
noteworthy features, and will give you a good idea of the language’s flavor and style. After reading it, you will be able to read and write Python modules and programs, and you will be ready to learn more about the various Python library modules.
In order to conduct this lesson you need A computer with Python 2.7.16 or 3.7.4 Familiarity with command line usage
A text editor such as PyCharm, emacs, vi or others. You should identity which works best for you and set it up.
2.1.1 References
Some important additional information can be found on the following Web pages.
Python Pip
Virtualenv NumPy SciPy Matplotlib Pandas pyenv PyCharm
Python module of the week is a Web site that provides a number of short examples on how to use some elementary python modules. Not all modules are equally useful and you should decide if there are better alternatives. However for beginners this site provides a number of good examples
Python 2: https://pymotw.com/2/
3 INSTALATION
3.1 P
YTHON3.7.4 I
NSTALLATION☁
Learning Objectives
Learn how to install python.
Find additional information about Python. Make sure your Computer supports Python.
In this setion we explain how to install python 3.7.4 on a computer. Likely much of the code will work with earlier versions, but we do the development in Python on the newest version of python available at https://www.python.org/downloads
.
3.1.1 Hardware
Python does not require any special hardware. We have installed Python not only on PC’s and Laptops, but also on Raspberry PI’s and Lego Mindstorms. However, there are some things to consider. If you use many programs on your desktop and run them all at the same time you will find that in up-to-date operating systems you will find your self quickly out of memmory. This is especially true if you use editors such as PyCharm which we highly recommend. Furthermore, as you likely have lots of disk access, make sure to use a fast HDD or better an SSD.
A typical modern developer PC or Laptop has 16GB RAM and an SSD. You can certainly do python on a $35 Rapbperry PI, but you probably will not be able to run PyCharm. There are many alternative editors with less Memory footprint avialable.
Python 3.7 is installed in ubuntu 19.04. Therefore, it already fulfills the prerequisits. However we recommend that you update to the newest version of python and pip. However we recommend that you update the the newest version of python. Please visit: https://www.python.org/downloads
3.1.3 Prerequisits macOS
3.1.3.1 Installation from Apple App Store
You want a number of useful tool on your macOS. They are not installed by default, but are available via Xcode. First you need to install xcode from
https://apps.apple.com/us/app/xcode/id497799835
Next you need to install macOS xcode command line tools:
3.1.3.2 Installation from python.org
The easiest instalation of Python for cloudmesh is to use the instaltion from
https://www.python.org/downloads. Please, visit the page and follow the
instructions. After this install you have python3 avalable from the commandline
3.1.3.3 Installation from Hoembrew
An alternative instalation is provided from Homebrew. To use this install method, you need to install Homebrew first. Start the process by installing the python 3 using homebrew. Install homebrew using the instruction in their web page:
Then you should be able to install Python 3.7.4 using:
3.1.4 Prerequisits Ubuntu 18.04
We recommend you update your ubuntu version to 19.04 and follow the
$ xcode-select --install
$ /usr/bin/ruby -e "$(curl -fsSL https://raw.githubusercontent.com/Homebrew/install/master/install)"
instructions for that version instead, as it is significantly easier. If you however are not able to do so, the following instructions may be helpful.
We first need to make sure that the correct version of the Python3 is installed. The default version of Python on Ubuntu 18.04 is 3.6. You can get the version with:
If the version is not 3.7.4 or newer, you can update it as follows:
You can then check the installed version using python3.7 --version which should be 3.7.4.
Now we will create a new virtual environment:
The edit the ~/.bashrc file and add the following line at the end:
now activate the virtual environment using:
now you can install the pip for the virtual environment without conflicting with the native pip:
3.1.5 Prerequisite Windows 10
Python 3.7 can be installed on Windows 10 using:
https://www.python.org/downloads
For 3.7.4 can go to the download page and download one of the different files for Windows.
$ python3 --version
$ sudo apt-get update
$ sudo apt install software-properties-common $ sudo add-apt-repository ppa:deadsnakes/ppa
$ sudo apt-get install python3.7 python3-dev python3.7-dev
$ python3.7 -m venv --without-pip ~/ENV3
alias ENV3="source ~/ENV3/bin/activate"
ENV3
$ source ~/.bashrc
$ curl "https://bootstrap.pypa.io/get-pip.py" -o "get-pip.py"
Let us assume you choe the Web based installer, than you click on the file in the edge browser (make sure the account you use has administrative priviledges). Follow the instructions that the installer gives. Important is that you select at one point “[x] Add to Path”. There will be an empty checkmark about this that you will click on.
Once it is installed. chose a terminal and execute
However, if you have installed conda for some reason you need to read up on how to install 3.7.4 python in conda or identify how to run conda and python.org at the same time. We see often others giving the wrong installation instructions. An alternative is to use python from within the Linux Subsystem. But that has some limitations and you will need to explore how to exxess the file system in the subssytem to have a smooth integration between your Windows host so you can for example use PyCharm.
3.1.5.1 Linux Subsystem Install
To activate the Linux Subsystem, please follow the instructions at
https://docs.microsoft.com/en-us/windows/wsl/install-win10
A suitable distribution would be
https://www.microsoft.com/en-us/p/ubuntu-1804-lts/9n9tngvndl3q? activetab=pivot:overviewtab
However as it uses an older version of python you will ahve to update it.
3.1.6 Prerequisit venv
This step is highly recommend if you have not yet already installed a venv for
python to make sure you are not interfering with your system python. Not using a venv could have catastrophic consequences and a destruction of your operating system tools if they realy on Python. The use of venv is simple. For our purposes we assume that you use the directory:
Follow these steps first:
First cd to your home directory. Then execute
You can add at the end of your .bashrc (ubuntu) or .bash_profile (macOS) file the line
so the environment is always loaded. Now you are ready to install cloudmesh. Check if you have the right version of python installed with
To make sure you have an up to date version of pip issue the command
3.1.7 Install Python 3.7 via Anaconda
3.1.7.1 Download conda installer
Miniconda is recommended here. Download an installer for Windows, macOS, and Linux from this page: https://docs.conda.io/en/latest/miniconda.html
3.1.7.2 Install conda
Follow instructions to install conda for your operating systems:
Windows. https://conda.io/projects/conda/en/latest/user-guide/install/windows.html
macOS. https://conda.io/projects/conda/en/latest/user-guide/install/macos.html
Linux. https://conda.io/projects/conda/en/latest/user-guide/install/linux.html
~/ENV3
$ python3 -m venv ~/ENV3 $ source ~/ENV3/bin/activate
$ source ~/ENV3/bin/activate
$ python --version
3.1.7.3 Install Python 3.7.4 via conda
It is very important to make sure you have a newer version of pip installed. After you installed and created the ENV3 you need to activate it. This can be done with
If you like to activate it when you start a new terminal, please add this line to your .bashrc or .bash_profile
If you use zsh please add it to .zprofile instead.
3.2 M
ULTI-V
ERSIONP
YTHONI
NSTALLATION☁
Learning Objectives
Understand why we need to worry about python 3.7 and 2.7 Use pyenv to support both versions
Understand the limitations of anaconda/conda for developers
We are living in an interesting junction point in the development of Python. In January 2019, it is encouraged that Python developers swoth from python version 2.7 to python version 3.7.
However there may be the requirement when you still need to develop code not only in python 3.7 but also in python 2.7. To facilitate this multi-python version development, the best tool we know about capable of doing so is pyenv. We will explain you in this section how to install both versions with the help of pyenv. Python is easy to install and very good instructions for most platforms can be found on the python.org Web page. We see two different versions:
$ cd ~
$ conda create -n ENV3 python=3.7.4 $ conda activate ENV3
$ conda install -c anaconda pip $ conda deactivate ENV3
Python 2.7.16 Python 3.7.4
To manage python modules, it is useful to have pip package installation tool on your system.
We assume that you have a computer with python installed. The version of python however may not be the newest version. Please check with
which version of python you run. If it is not the newest version, we use pyenv to install a newer version so you do not effect the default version of python from your system.
3.2.1 Disabling wrong python installs
While working with students we have seen at times that they take other classes either at universities or online that teach them how to program in python. Unfortunately, they seem to often ignore to teach you how to properly install Python. I just recently had a students that had installed python 7 different times on his macOS machine, while another student had 3 different installations, all of which conflicted with each other as they were not set up properly and the students did not even realize that they were using Python incorrectly on their computer due to setup issues and conflicting libraries.
We recommend that you inspect if you have a files such as ~/.bashrc or ~/.bashrc_profile
in your home directory and identify if it activates various versions of python on your computer. If so you could try to deactivate them while out-commenting the various versions with the # character at the beginning of the line, start a new terminal and see if the terminal shell still works. Than you can follow our instructions here while using an install on pyenv.
3.2.2 Managing 2.7 and 3.7 Python Versions without Pyenv
If you need to have more than one python version installed and do not want or can use pyenv, we recommend you download and install python 2.7.16 and 3.7.4 from python.org (https://www.python.org/downloads/)
YOu can than use either python2 or python3 to invoke the python interpreter.
3.2.3 Managing Multiple Python Versions with Pyenv
Python has several versions that are used by the community. This includes Python 2 and Python 3, but all different management of the python libraries. As each OS may have their own version of python installed. It is recommended that you not modify that version. Instead you may want to create a localized python installation that you as a user can modify. To do that we recommend pyenv. Pyenv allows users to switch between multiple versions of Python
(https://github.com/yyuu/pyenv). To summarize:
users to change the global Python version on a per-user basis; users to enable support for per-project Python versions;
easy version changes without complex environment variable management; to search installed commands across different python versions;
integrate with tox (https://tox.readthedocs.io/).
To install pyenv on your system you can use the command
Now you can install different python versions on your system such as python 2.7 and 3.7 with a few commands:
To automatically access them from your shell we integrate them into bash by editing the bash configuration files. Make sure that on Linux you add to the
~/.bashrc file and on macOS to the file ~/.bash_profile or .zprofile. $ curl https://pyenv.run |bash
$ pyenv install 3.7.4 $ pyenv install 2.7.16 $ pyenv virtualenv 3.7.4 ENV3 $ pyenv virtualenv 2.7.16 ENV2
export PYENV_ROOT="$HOME/.pyenv"
export PATH="$PYENV_ROOT/bin:$PATH"
export PYENV_VIRTUALENV_DISABLE_PROMPT=1 eval "$(pyenv init -)"
eval "$(pyenv virtualenv-init -)" __pyenv_version_ps1() {
local ret=$?;
output=$(pyenv version-name)
if [[ !-z $output ]]; then
echo -n "($output)"
fi
We recommend that you do this towards the end of your file. Than look up our convenience methods to set an ALIAS and install Python 3.7.4 via pyenv
Next we recommend to update pip
3.2.3.1 Installation pyenv via Homebrew
On macOS you can install pyenv also via Homebrew. Before installing anything on your computer make sure you have enough space. Use in the terminal the command:
which gives your an overview of your file system. If you do not have enough space, please make sure you free up unused files from your drive.
In many occasions it is beneficial to use readline as it provides nice editing features for the terminal and xz for completion. First, make sure you have xcode installed:
On Mojave you will get an error that zlib is not installed. THis is due to that the header files are not properly installed. To do this you can say
Next install homebrew, pyenv, pyenv-virtualenv and pyenv-virtualwrapper. Additionally install readline and some compression tools:
PS1="\$(__pyenv_version_ps1) ${PS1}"
alias ENV2="pyenv activate ENV2"
alias ENV3="pyenv activate ENV3"
ENV3
$ ENV2
$ pip install pip -U $ ENV3
$ pip install pip -U
$ df -h
$ xcode-select --install
$ sudo installer -pkg /Library/Developer/CommandLineTools/Packages/macOS_SDK_headers_for_macOS_10.14.pkg -target /
$ /usr/bin/ruby -e "$(curl -fsSL https://raw.githubusercontent.com/Homebrew/install/master/install)"
$ brew update
To install pyenv with homebrew execute in the terminal:
3.2.3.2 Install pyenv on Ubuntu 18.04
The following steps will install pyenv in a new ubuntu 18.04 distribution.
Start up a terminal and execute in the terminal the following commands. We recommend that you do it one command at a time so you can observe if the command succeeds:
You can also install pyenv using curl command in following way:
Then install its dependencies:
Now that you have installed pyenv it is not yet activated in your current terminal. The easiest thing to do is to start a new terminal and typ in:
If you see a response pyenv is installed and you can proceed with the next steps. Please remember whenever you modify .bashrc or .bash_profile or .zprofile you need to
start a new terminal.
3.2.3.3 Using pyenv
3.2.3.3.1 Using pyenv to Install Different Python Versions
brew install pyenv pyenv-virtualenv pyenv-virtualenvwrapper
$ sudo apt-get update
$ sudo apt-get install git python-pip make build-essential libssl-dev $ sudo apt-get install zlib1g-dev libbz2-dev libreadline-dev libsqlite3-dev $ sudo pip install virtualenvwrapper
$ git clone https://github.com/yyuu/pyenv.git ~/.pyenv
$ git clone https://github.com/pyenv/pyenv-virtualenv.git ~/.pyenv/plugins/pyenv-virtualenv
$ git clone https://github.com/yyuu/pyenv-virtualenvwrapper.git ~/.pyenv/plugins/pyenv-virtualenvwrapper $ echo 'export PYENV_ROOT="$HOME/.pyenv"' >> ~/.bashrc
$ echo 'export PATH="$PYENV_ROOT/bin:$PATH"' >> ~/.bashrc
$ curl -L https://raw.githubusercontent.com/yyuu/pyenv-installer/master/bin/pyenv-installer |bash
$ sudo apt-get update && sudo apt-get upgrade
$ sudo apt-get install -y make build-essential libssl-dev
$ sudo apt-get install -y zlib1g-dev libbz2-dev libreadline-dev libsqlite3-dev $ sudo apt-get install -y wget curl llvm libncurses5-dev git
Pyenv provides a large list of different python versions. To see the entire list please use the command:
However, for us we only need to worry about python 2.7.16 and python 3.7.4. You can now install different versions of python into your local environment with the following commands:
You can set the global python default version with:
Type the following to determine which version you activated:
Type the following to determine which versions you have available:
Associate a specific environment name with a certain python version, use the following commands:
In the example, ENV2 would represent python 2.7.16 while ENV3 would represent python 3.7.4. Often it is easier to type the alias rather than the explicit version.
3.2.3.3.2 Switching Environments
After setting up the different environments, switching between them is now easy. Simply use the following commands:
To make it even easier, you can add the following lines to your .bash_profile or or $ pyenv install -l
$ pyenv update $ pyenv install 2.7.16 $ pyenv install 3.7.4
$ pyenv global 3.7.4
$ pyenv version
$ pyenv versions
$ pyenv virtualenv 2.7.16 ENV2 $ pyenv virtualenv 3.7.4 ENV3
(2.7.16) $ pyenv activate ENV2
(ENV2) $ pyenv activate ENV3
(ENV3) $ pyenv activate ENV2
(ENV2) $ pyenv deactivate ENV2
.zprofile file:
If you start a new terminal, you can switch between the different versions of python simply by typing:
3.2.3.4 Updating Python Version List
Pyenv maintains locally a list of available python versions. To see the list use the command
You will see the updated list.
3.2.3.4.1 Updating to a new version of Python with pyenv
Naturally python itself evolves and new versions will become available via pyenv. To facilitate such a new version you need to first install it into pyenv. Let us assume you had an old version of python installed onto the ENV3 environment. Than you need to execute the following steps:
With the pi install command, we make sure we have the newest version of pip. In case you get an error, you may have to update xcode as follows and try again:
After you installed it you can activate it by typing ENV3. Naturally this requires that
you added it to your bash environment as discussed in Section 1.1.1.8.
3.2.4 Anaconda and Miniconda and Conda
alias ENV2="pyenv activate ENV2"
alias ENV3="pyenv activate ENV3"
$ ENV2 $ ENV3
$ pyenv update $ pyenv install -l
$ pyenv deactivate $ pyenv uninstall ENV3 $ pyenv install 3.7.4 $ pyenv virtualenv 3.7.4 ENV3 $ ENV3
$ pip install pip -U
While in others on the internet or in your classes may have taught you to use anaconda, We will avoid it as it has several disadvantages for edevelopers. The reason for this is that it installs many packages that you are likely not to use. In fact installing anaconda on your VM will waste space and time and you should look into other installs.
We do not recommend that you use anaconda or miniconda as it may interfere with your default python interpreters and setup.
Please note that beginners to python should always use anaconda or miniconda only after they have installed pyenv and use it. For this class neither anaconda nor miniconda is required. In fact we do not recommend it. We keep this section as we know that other classes at IU may use anaconda. We are not aware if these classes teach you the right way to install it, with pyenv.
3.2.4.1 Miniconda
This section about miniconda is experimental and has not been tested. We are looking for contributors that help completing it. If you use anaconda or miniconda we recommend to manage it via pyenv.
To install mini conda you can use the following commands:
To activate use:
To deactivate use:
3.2.4.2 Anaconda
This section about anaconda is experimental and has not been
$ mkdir ana $ cd ana
$ pyenv install miniconda3-latest $ pyenv local miniconda3-latest $ pyenv activate miniconda3-latest $ conda create -n ana anaconda
$ source activate ana
tested. We are looking for contributors that help completing it.
You can add anaconda to your pyenv with the following commands:
To switch more easily we recommend that you use the following in your
.bash_profile or .zprofile file:
Once you have done this you can easily switch to anaconda with the command:
Terminology in anaconda could lead to confusion. Thus we like to point out that the version number of anaconda is unrelated to the python version. Furthermore, anaconda uses the term root not for the root user, but for the originating directory in which the anaconda program is installed.
In case you like to build your own conda packages at a later time we recommend that you install the conda-build package:
When executing:
you will see after the install completed the anaconda versions installed:
Let us now create virtualenv for anaconda:
To activate it you can now use:
pyenv install anaconda3-4.3.1
alias ANA="pyenv activate anaconda3-4.3.1"
$ ANA
$ conda install conda-build
$ pyenv versions
pyenv versions system 2.7.16
2.7.16/envs/ENV2 3.7.4
3.7.4/envs/ENV3 ENV2
ENV3
* anaconda3-4.3.1 (set by PYENV_VERSION environment variable)
$ pyenv virtualenv anaconda3-4.3.1 ANA
However, anaconda may modify your .bashrc or .bash_profile or or .zprofile files and
may result in incompatibilities with other python versions. For this reason we recommend not to use it. If you find ways to get it to work reliably with other versions, please let us know and we update this tutorial.
3.2.5 Exercises
E.Python.Install.1:
Install Python 3.7.4
E.Python.Install.1:
Write installation instructions for an operating system of your choice and add to this documentation.
E.Python.Install.2:
Replicate the steps to install pyenv, so you can type in ENV2 and ENV3 in your terminals to switch between python 2 and 3.
E.Python.Install.3:
4 FIRST STEPS
4.1 I
NTERACTIVEP
YTHON☁
Python can be used interactively. You can enter the interactive mode by entering the interactive loop by executing the command:
You will see something like the following:
The >>> is the prompt used by the interpreter. This is similar to bash where
commonly $ is used.
Sometimes it is convenient to show the prompt when illustrating an example. This is to provide some context for what we are doing. If you are following along you will not need to type in the prompt.
This interactive python process does the following:
read your input commands
evaluate your command
print the result of evaluation
loop back to the beginning.
This is why you may see the interactive loop referred to as a REPL: R
ead-Evaluate-Print-Loop.
4.1.1 REPL (Read Eval Print Loop)
There are many different types beyond what we have seen so far, such as
dictionariess, lists, sets. One handy way of using the interactive python is to get the type of a value using type():
$ python
$ python
Python 3.7.1 (default, Nov 24 2018, 14:27:15) [Clang 10.0.0 (clang-1000.11.45.5)] on darwin
Type "help", "copyright", "credits" or"license" for more information.
You can also ask for help about something using help():
Using help() opens up a help message within a pager. To navigate you can use the spacebar to go down a page w to go up a page, the arrow keys to go up/down line-by-line, or q to exit.
4.1.2 Interpreter
Although the interactive mode provides a convenient tool to test things out you will see quickly that for our class we want to use the python interpreter from the commandline. Let us assume the program is called prg.py. Once you have written
it in that file you simply can call it with
It is important to name the program with meaningful names.
4.1.3 Python 3 Features in Python 2
In this course we want to be able to seamlessly switch between python 2 and python 3. Thus it is convenient from the start to use python 3 syntax when it is supported also in python 2. One of the most used functions is the print statement that has in python 3 parentheses. To enable it in python 2 you just need to import this function:
The first of these imports allows us to use the print function to output text to the screen, instead of the print statement, which Python 2 uses. This is simply a
design decision that better reflects Python’s underlying philosophy.
Other functions such as the division also behave differently. Thus we use
>>> type(42)
<type 'int'> >>> type('hello')
<type 'str'> >>> type(3.14)
<type 'float'>
>>> help(int)
>>> help(list)
>>> help(str)
$ python prg.py
from __future__ import print_function, division
This import makes sure that the division operator behaves in a way a newcomer to the language might find more intuitive. In Python 2, division / is floor division
when the arguments are integers, meaning that the following
In Python 3, division / is a floating point division, thus
4.2 E
DITORS☁
This section is meant to give an overview of the python editing tools needed for doing for this course. There are many other alternatives, however, we do recommend to use PyCharm.
4.2.1 Pycharm
PyCharm is an Integrated Development Environment (IDE) used for programming in Python. It provides code analysis, a graphical debugger, an integrated unit tester, integration with git.
Python 8:56 Pycharm
4.2.2 Python in 45 minutes
An additional community video about the Python programming language that we found on the internet. Naturally there are many alternatives to this video, but the video is probably a good start. It also uses PyCharm which we recommend.
Python 43:16 PyCharm
How much you want to understand of python is actually a bit up to you. While its good to know classes and inheritance, you may be able for this class to get away without using it. However, we do recommend that you learn it.
PyCharm Installation: Method 1: PyCharm Installation on ubuntu using umake
(5 / 2 == 2) isTrue
Once umake command is run, use the next command to install Pycharm community edition:
If you want to remove PyCharm installed using umake command, use this:
Method 2: PyCharm installation on ubuntu using PPA
PyCharm also has a Professional (paid) version which can be installed using following command:
Once installed, go to your VM dashboard and search for PyCharm.
4.3 G
OOGLEC
OLAB☁
In this section we are going to introduce you, how to use Google Colab to run deep learning models.
4.3.1 Introduction to Google Colab
This video contains the introduction to Google Colab. In this section we will be learning how to start a Google Colab project.
4.3.2 Programming in Google Colab
In this video we will learn how to create a simple, Colab Notebook.
sudo add-apt-repository ppa:ubuntu-desktop/ubuntu-make
sudo apt-get update
sudo apt-get install ubuntu-make
umake ide pycharm
umake -r ide pycharm
sudo add-apt-repository ppa:mystic-mirage/pycharm
sudo apt-get update
sudo apt-get install pycharm-community
Required Installations
4.3.3 Benchamrking in Google Colab with Cloudmesh
In this video we learn how to do a basic benchmark with Cloudmesh tools. Cloudmesh StopWatch will be used in this tutorial.
Required Installations
pip install numpy
pip install numpy
5 LANGUAGE
5.1 L
ANGUAGE☁
5.1.1 Statements and Strings
Let us explore the syntax of Python while starting with a print statement
This will print on the terminal
The print function was given a string to process. A string is a sequence of characters. A character can be a alphabetic (A through Z, lower and upper case), numeric (any of the digits), white space (spaces, tabs, newlines, etc), syntactic directives (comma, colon, quotation, exclamation, etc), and so forth. A string is just a sequence of the character and typically indicated by surrounding the characters in double quotes.
Standard output is discussed in the Section Linux.
So, what happened when you pressed Enter? The interactive Python program read the line print ("Hello world from Python!"), split it into the print statement and the "Hello world from Python!" string, and then executed the line, showing you the output.
5.1.2 Comments
Comments in python are followed by a #:
5.1.3 Variables
You can store data into a variable to access it later. For instance:
print("Hello world from Python!")
Hello world from Python!
# This is a comment
hello = 'Hello world from Python!'
This will print again
5.1.4 Data Types
5.1.4.1 Booleans
A boolean is a value that can have the values True or False. You can combine
booleans with boolean operators such as and and or
5.1.4.2 Numbers
The interactive interpreter can also be used as a calculator. For instance, say we wanted to compute a multiple of 21:
We saw here the print statement again. We passed in the result of the operation 21 * 2. An integer (or int) in Python is a numeric value without a fractional component (those are called floating point numbers, or float for short).
The mathematical operators compute the related mathematical operation to the provided numbers. Some operators are:
Operator Function
* multiplication
/ division
+ addition
- subtraction
** exponent
Exponentiation xy is written as x**y is x to the yth power.
Hello world from Python!
print(True and True) # True
print(True and False) # False
print(False and False) # False
print(True or True) # True
print(True or False) # True
print(False orFalse) # False
You can combine floats and ints:
Note that operator precedence is important. Using parenthesis to indicate affect the order of operations gives a difference results, as expected:
5.1.5 Module Management
A module allows you to logically organize your Python code. Grouping related code into a module makes the code easier to understand and use. A module is a Python object with arbitrarily named attributes that you can bind and reference. A module is a file consisting of Python code. A module can define functions, classes and variables. A module can also include runnable code.
5.1.5.1 Import Statement
When the interpreter encounters an import statement, it imports the module if the module is present in the search path. A search path is a list of directories that the interpreter searches before importing a module. The from…import Statement Python’s from statement lets you import specific attributes from a module into the current namespace. It is preferred to use for each import its own line such as:
When the interpreter encounters an import statement, it imports the module if the module is present in the search path. A search path is a list of directories that the interpreter searches before importing a module.
5.1.5.2 The from … import Statement
Python’s from statement lets you import specific attributes from a module into the current namespace. The from … import has the following syntax:
print(3.14 * 42 / 11 + 4 - 2) # 13.9890909091
print(2**3) # 8
print(3.14 * (42 / 11) + 4 - 2) # 11.42
print(1 + 2 * 3 - 4 / 5.0) # 6.2
print( (1 + 2) * (3 - 4) / 5.0 ) # -0.6
import numpy import matplotlib
5.1.6 Date Time in Python
The datetime module supplies classes for manipulating dates and times in both simple and complex ways. While date and time arithmetic is supported, the focus of the implementation is on efficient attribute extraction for output formatting and manipulation. For related functionality, see also the time and calendar modules.
The import Statement You can use any Python source file as a module by executing an import statement in some other Python source file.
This module offers a generic date/time string parser which is able to parse most known formats to represent a date and/or time.
pandas is an open source Python library for data analysis that needs to be imported.
Create a string variable with the class start time
Convert the string to datetime format
Creating a list of strings as dates
Convert Class_dates strings into datetime format and save the list into variable a
Use parse() to attempt to auto-convert common string formats. Parser must be a
from datetime import datetime
from dateutil.parser import parse
import pandas as pd
fall_start = '08-21-2018'
datetime.strptime(fall_start, '%m-%d-%Y') \#
datetime.datetime(2017, 8, 21, 0, 0)
class_dates = [ '8/25/2017', '9/1/2017', '9/8/2017', '9/15/2017', '9/22/2017', '9/29/2017']
string or character stream, not list.
Use parse() on every element of the Class_dates string.
Use parse, but designate that the day is first.
Create a dataframe.A DataFrame is a tabular data structure comprised of rows and columns, akin to a spreadsheet, database table. DataFrame as a group of Series objects that share an index (the column names).
Convert df[`date`] from string to datetime
5.1.7 Control Statements
5.1.7.1 Comparison
parse(fall_start) # datetime.datetime(2017, 8, 21, 0, 0)
[parse(x) for x in class_dates]
# [datetime.datetime(2017, 8, 25, 0, 0), # datetime.datetime(2017, 9, 1, 0, 0), # datetime.datetime(2017, 9, 8, 0, 0), # datetime.datetime(2017, 9, 15, 0, 0), # datetime.datetime(2017, 9, 22, 0, 0), # datetime.datetime(2017, 9, 29, 0, 0)]
parse (fall_start, dayfirst=True)
# datetime.datetime(2017, 8, 21, 0, 0)
import pandas as pd data = {
'dates': [
'8/25/2017 18:47:05.069722', '9/1/2017 18:47:05.119994', '9/8/2017 18:47:05.178768', '9/15/2017 18:47:05.230071', '9/22/2017 18:47:05.230071', '9/29/2017 18:47:05.280592'], 'complete': [1, 0, 1, 1, 0, 1]} df = pd.DataFrame(
data,
columns = ['dates','complete']) print(df)
# dates complete # 0 8/25/2017 18:47:05.069722 1 # 1 9/1/2017 18:47:05.119994 0 # 2 9/8/2017 18:47:05.178768 1 # 3 9/15/2017 18:47:05.230071 1 # 4 9/22/2017 18:47:05.230071 0 # 5 9/29/2017 18:47:05.280592 1
import pandas as pd pd.to_datetime(df['dates'])
Computer programs do not only execute instructions. Occasionally, a choice needs to be made. Such as a choice is based on a condition. Python has several conditional operators:
Operator Function
> greater than < smaller than
== equals
!= is not
Conditions are always combined with variables. A program can make a choice using the if keyword. For example:
In this example, You guessed correctly! will only be printed if the variable x equals to four. Python can also execute multiple conditions using the elif and else keywords.
5.1.7.2 Iteration
To repeat code, the for keyword can be used. For example, to display the numbers from 1 to 10, we could write something like this:
The second argument to range, 11, is not inclusive, meaning that the loop will only get to 10 before it finishes. Python itself starts counting from 0, so this code will also work:
x = int(input("Guess x:"))
if x == 4:
print('Correct!')
x = int(input("Guess x:"))
if x == 4:
print('Correct!')
elif abs(4 - x) == 1:
print('Wrong, but close!')
else:
print('Wrong, way off!')
for i in range(1, 11): print('Hello!')
In fact, the range function defaults to starting value of 0, so it is equivalent to:
We can also nest loops inside each other:
In this case we have two nested loops. The code will iterate over the entire coordinate range (0,0) to (9,9)
5.1.8 Datatypes
5.1.8.1 Lists
see: https://www.tutorialspoint.com/python/python_lists.htm
Lists in Python are ordered sequences of elements, where each element can be accessed using a 0-based index.
To define a list, you simply list its elements between square brackets ‘[ ]’:
You can also use a negative index if you want to start counting elements from the end of the list. Thus, the last element has index -1, the second before last element has index -2 and so on:
Python also allows you to take whole slices of the list by specifying a beginning and end of the slice separated by a colon
for i in range(10): print(i + 1)
for i in range(0,10): for j in range(0,10): print(i,' ',j)
names = [ 'Albert', 'Jane', 'Liz', 'John', 'Abby']
# access the first element of the list
names[0]
# 'Albert'
# access the third element of the list
names[2]
# 'Liz'
# access the last element of the list
names[-1]
# 'Abby'
# access the second last element of the list
names[-2]
As you can see from the example, the starting index in the slice is inclusive and the ending one, exclusive.
Python provides a variety of methods for manipulating the members of a list. You can add elements with append’:
As you can see, the elements in a list need not be unique. Merge two lists with ‘extend’:
Find the index of the first occurrence of an element with ‘index’:
Remove elements by value with ‘remove’:
Remove elements by index with ‘pop’:
Notice that pop returns the element being removed, while remove does not. If you are familiar with stacks from other programming languages, you can use insert and ‘pop’:
# the middle elements, excluding first and last
names[1:-1]
# ['Jane', 'Liz', 'John']
names.append('Liz') names
# ['Albert', 'Jane', 'Liz', # 'John', 'Abby', 'Liz']
names.extend(['Lindsay', 'Connor']) names
# ['Albert', 'Jane', 'Liz', 'John', # 'Abby', 'Liz', 'Lindsay', 'Connor']
names.index('Liz') \# 2
names.remove('Abby') names
# ['Albert', 'Jane', 'Liz', 'John', # 'Liz', 'Lindsay', 'Connor']
names.pop(1)
# 'Jane'
names
# ['Albert', 'Liz', 'John', # 'Liz', 'Lindsay', 'Connor']
names.insert(0, 'Lincoln') names
# ['Lincoln', 'Albert', 'Liz', # 'John', 'Liz', 'Lindsay', 'Connor']
The Python documentation contains a full list of list operations.
To go back to the range function you used earlier, it simply creates a list of numbers:
5.1.8.2 Sets
Python lists can contain duplicates as you saw previously:
When we do not want this to be the case, we can use a set:
Keep in mind that the set is an unordered collection of objects, thus we can not access them by index:
However, we can convert a set to a list easily:
Notice that in this case, the order of elements in the new list matches the order in which the elements were displayed when we create the set. We had
set(['Lincoln', 'John', 'Albert', 'Liz', 'Lindsay'])
and now we have
['Lincoln', 'John', 'Albert', 'Liz', 'Lindsay'])
# 'Connor'
names
# ['Lincoln', 'Albert', 'Liz', # 'John', 'Liz', 'Lindsay']
range(10)
# [0, 1, 2, 3, 4, 5, 6, 7, 8, 9]
range(2, 10, 2)
# [2, 4, 6, 8]
names = ['Albert', 'Jane', 'Liz', 'John', 'Abby', 'Liz']
unique_names = set(names) unique_names
# set(['Lincoln', 'John', 'Albert', 'Liz', 'Lindsay'])
unique_names[0]
# Traceback (most recent call last): # File "<stdin>", line 1, in <module>
# TypeError: 'set' object does not support indexing
unique_names = list(unique_names)
unique_names [`Lincoln', `John', `Albert', `Liz', `Lindsay'] unique_names[0]
You should not assume this is the case in general. That is, do not make any assumptions about the order of elements in a set when it is converted to any type of sequential data structure.
You can change a set’s contents using the add, remove and update methods which correspond to the append, remove and extend methods in a list. In addition to these, set objects support the operations you may be familiar with from mathematical sets: union, intersection, difference, as well as operations to check containment. You can read about this in the Python documentation for sets.
5.1.8.3 Removal and Testing for Membership in Sets
One important advantage of a set over a list is that access to elements is fast. If
you are familiar with different data structures from a Computer Science class, the Python list is implemented by an array, while the set is implemented by a hash table.
We will demonstrate this with an example. Let us say we have a list and a set of the same number of elements (approximately 100 thousand):
We will use the timeit Python module to time 100 operations that test for the existence of a member in either the list or set:
The exact duration of the operations on your system will be different, but the take away will be the same: searching for an element in a set is orders of magnitude faster than in a list. This is important to keep in mind when you work with large amounts of data.
5.1.8.4 Dictionaries
import sys, random, timeit
nums_set = set([random.randint(0, sys.maxint) for _ in range(10**5)]) nums_list = list(nums_set)
len(nums_set)
# 100000
timeit.timeit('random.randint(0, sys.maxint) in nums',
setup='import random; nums=%s' % str(nums_set), number=100)
# 0.0004038810729980469
timeit.timeit('random.randint(0, sys.maxint) in nums',
setup='import random; nums=%s' % str(nums_list), number=100)
One of the very important data structures in python is a dictionary also referred to as dict.
A dictionary represents a key value store:
A convenient for to print by named attributes is
This form of printing with the format statement and a reference to data increases readability of the print statements.
You can delete elements with the following commands:
You can iterate over a dict:
5.1.8.5 Dictionary Keys and Values
You can retrieve both the keys and values of a dictionary using the keys() and values() methods of the dictionary, respectively:
person = {
'Name': 'Albert', 'Age': 100,
'Class': 'Scientist'
}
print("person['Name']: ", person['Name'])
# person['Name']: Albert
print("person['Age']: ", person['Age'])
# person['Age']: 100
print("{Name} {Age}'.format(**data))
del person['Name'] # remove entry with key 'Name' # person
# {'Age': 100, 'Class': 'Scientist'}
person.clear() # remove all entries in dict # person
# {}
del person # delete entire dictionary # person
# Traceback (most recent call last): # File "<stdin>", line 1, in <module> # NameError: name 'person' is not defined
person = {
'Name': 'Albert', 'Age': 100,
'Class': 'Scientist'
}
for item in person: print(item, person[item])
# Age 100 # Name Albert # Class Scientist
person.keys() # ['Age', 'Name', 'Class']
Both methods return lists. Notice, however, that the order in which the elements appear in the returned lists (Age, Name, Class) is different from the order in which we listed the elements when we declared the dictionary initially (Name, Age, Class). It is important to keep this in mind:
You cannot make any assumptions about the order in which the elements of a dictionary will be returned by the keys() and values() methods.
However, you can assume that if you call keys() and values() in sequence, the order
of elements will at least correspond in both methods. In the example Age corresponds to 100, Name to Albert, and Class to Scientist, and you will observe
the same correspondence in general as long as keys() and values() are called one
right after the other.
5.1.8.6 Counting with Dictionaries
One application of dictionaries that frequently comes up is counting the elements in a sequence. For example, say we have a sequence of coin flips:
The actual list die_rolls will likely be different when you execute this on your computer since the outcomes of the die rolls are random.
To compute the probabilities of heads and tails, we could count how many heads and tails we have in the list:
In addition to how we use the dictionary counts to count the elements of
import random die_rolls = [
random.choice(['heads', 'tails']) for _ in range(10) ]
# die_rolls
# ['heads', 'tails', 'heads', # 'tails', 'heads', 'heads',
'tails', 'heads', 'heads', 'heads']
counts = {'heads': 0, 'tails': 0}
for outcome in coin_flips: assert outcome in counts counts[outcome] += 1
print('Probability of heads: %.2f' % (counts['heads'] / len(coin_flips)))
# Probability of heads: 0.70
print('Probability of tails: %.2f' % (counts['tails'] / sum(counts.values())))
coin_flips, notice a couple things about this example:
1. We used the assert outcome in counts statement. The assert statement in Python allows you to easily insert debugging statements in your code to help you discover errors more quickly. assert statements are executed whenever the internal Python __debug__ variable is set to True, which is always
the case unless you start Python with the -O option which allows you to run
optimized Python.
2. When we computed the probability of tails, we used the built-in sum function, which allowed us to quickly find the total number of coin flips. sum is one of many built-in function you can read about here.
5.1.9 Functions
You can reuse code by putting it inside a function that you can call in other parts of your programs. Functions are also a good way of grouping code that logically belongs together in one coherent whole. A function has a unique name in the program. Once you call a function, it will execute its body which consists of one or more lines of code:
The def keyword tells Python we are defining a function. As part of the definition, we have the function name, check_triangle, and the parameters of the function – variables that will be populated when the function is called.
We call the function with arguments 4, 5 and 6, which are passed in order into the parameters a, b and c. A function can be called several times with varying parameters. There is no limit to the number of function calls.
It is also possible to store the output of a function in a variable, so it can be reused.
def check_triangle(a, b, c):
return \
a < b + c and a > abs(b - c) and \
b < a + c and b > abs(a - c) and \
c < a + b and c > abs(a - b) print(check_triangle(4, 5, 6))
def check_triangle(a, b, c): return\
a < b + c and a > abs(b - c) and \
b < a + c and b > abs(a - c) and \
5.1.10 Classes
A class is an encapsulation of data and the processes that work on them. The data is represented in member variables, and the processes are defined in the methods of the class (methods are functions inside the class). For example, let’s see how to define a Triangle class:
Python has full object-oriented programming (OOP) capabilities, however we can not cover all of them in this section, so if you need more information please refer to the Python docs on classes and OOP.
5.1.11 Modules
Now write this simple program and save it:
As a check, make sure the file contains the expected contents on the command line:
result = check_triangle(4, 5, 6) print(result)
class Triangle(object):
def __init__(self, length, width,
height, angle1, angle2, angle3): if not self._sides_ok(length, width, height): print('The sides of the triangle are invalid.') elif not self._angles_ok(angle1, angle2, angle3): print('The angles of the triangle are invalid.') self._length = length
self._width = width self._height = height self._angle1 = angle1 self._angle2 = angle2 self._angle3 = angle3
def _sides_ok(self, a, b, c): return \
a < b + c and a > abs(b - c) and \
b < a + c and b > abs(a - c) and \
c < a + b and c > abs(a - b)
def _angles_ok(self, a, b, c): return a + b + c == 180
triangle = Triangle(4, 5, 6, 35, 65, 80)
print("Hello world!")
To execute your program pass the file as a parameter to the python command:
Files in which Python code is stored are called modules. You can execute a Python module form the command line like you just did, or you can import it in other Python code using the import statement.
Let us write a more involved Python program that will receive as input the lengths of the three sides of a triangle, and will output whether they define a valid triangle. A triangle is valid if the length of each side is less than the sum of the lengths of the other two sides and greater than the difference of the lengths of the other two sides.:
Assuming we save the program in a file called check_triangle.py, we can run it like so:
Let us break this down a bit.
1. We are importing the print_function and division modules from python 3 like we did earlier in this section. It’s a good idea to always include these in your programs.
2. We’ve defined a boolean expression that tells us if the sides that were input define a valid triangle. The result of the expression is stored in the
$ python hello.py Hello world!
"""Usage: check_triangle.py [-h] LENGTH WIDTH HEIGHT
Check if a triangle is valid.
Arguments:
LENGTH The length of the triangle. WIDTH The width of the traingle. HEIGHT The height of the triangle.
Options: -h --help """
from docopt import docopt
if __name__ == '__main__': arguments = docopt(__doc__) a, b, c = int(arguments['LENGTH']), int(arguments['WIDTH']), int(arguments['HEIGHT']) valid_triangle = \
a < b + c and a > abs(b - c) and \ b < a + c and b > abs(a - c) and \ c < a + b and c > abs(a - b)
print('Triangle with sides %d, %d and %d is valid: %r' % ( a, b, c, valid_triangle
))
$ python check_triangle.py 4 5 6