Adobe Enterprise Technical Enablement
Using Business Rules to Control
Process Flow
In this topic, you will learn how to implement business rules to control the flow of a
process.
Objectives
After completing this unit, you should be able to • Assign a condition to a route
• Control process flow using a Decision Point • Set route evaluation order
Concepts
In this topic, you will learn about the following concepts • Selecting routes based on business rules
Selecting routes based on business rules
• Points in the process exist where multiple routes exit an operation
• The Decision Point service works with route conditions to implement business rules that then dictate how the process proceeds
• Examples
■ Based on the amount of an expense report, different individuals must approve it ■ Based on the amount of a mortgage, different levels of approval are required ■ Based on a new employee’s position, different subprocesses are initiated
Using rules on routes
• Rules can be used to determine whether a route is a valid and the appropriate steps can be executed when the process runs
• Each route can have one or more rules, or conditions, associated with it
• If a route does not have an associated rule, the route is always considered to be valid (true)
Setting rules on routes
• Select the route to set a rule(s) on it
• Rules must evaluate to true or false and consist of three parts, in the following form ■ expression1 operator expression2
■ Where
– Expressions consist of literal values or values from the process schema or form data, or are derived from data values by using functions
– The operator defines the required relationship between the two expressions – The expressions must be of the same data type
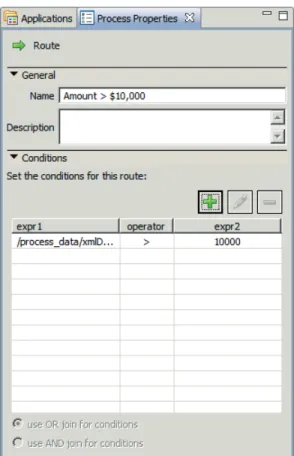
• Rules are built using the Conditions category from the route Properties view
Figure 1: Creating a rule
• Once a rule is created, it will appear in the Conditions category
• When a route has a rule associated with it, the route appears as a dotted line in the process diagram
Figure 3: A conditional route
Using the Decision Point service
• The Decision Point service provides the execute operation, which represents a point in the process where a decision is made that affects how the process progresses
• Located in Foundation > Decision Point- 1.0
Figure 4: Decision Point execute operation in the process diagram palette
• The Decision Point operation acts as a node in the process that serves as the origin of many routes, but has no executable function itself
• Works with routes to determine which route is executed
Understanding the execute operation
• Several situations require the use of the execute operation
■ Several routes need to be evaluated to determine the first operation to execute in a process
■ Several different routes in a process converge at a point where a set of rules are evaluated
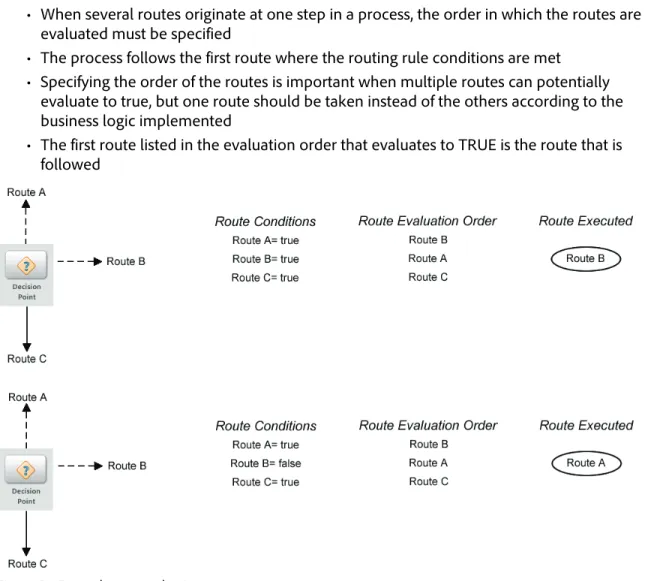
Checking route evaluation order
• When several routes originate at one step in a process, the order in which the routes are evaluated must be specified
• The process follows the first route where the routing rule conditions are met
• Specifying the order of the routes is important when multiple routes can potentially evaluate to true, but one route should be taken instead of the others according to the business logic implemented
• The first route listed in the evaluation order that evaluates to TRUE is the route that is followed
Figure 5: Example route selection
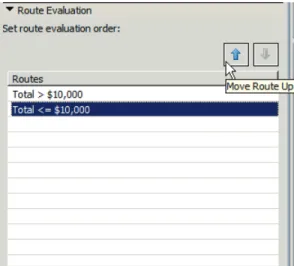
Setting route evaluation order
• The route evaluation order is set in the Decision Point service’s Process Properties view, Route Evaluation category
• Select route and move up or down using the arrow buttons provided to change the route evaluation order
Task 1: Branching on the expense amount
In this task, you will perform the following • Add a Decision Point to the process • Add a condition to a route
• Set the route evaluation order • Test the process
Setup
1. Import Conditional_Routing.lca.
Steps
Add a Decision Point to the process
1. Login to the Workbench.
2. Open the Conditional_Routing application.
3. Expand the Processes folder, right-click the Expense_Report process and select Check Out. 4. Double-click the Expense_Report process to open it.
5. Click on the Decision Point icon in the process diagram palette, drag it to the Check Amount
abstract activity and drop it.
6. When prompted to replace Check Amount with execute click Yes.
Note: If the name of the operation is changed, set the operation name back to Check Amount.
Add a condition to a route
8. From the Process Properties view, locate the Add Route Condition button and click it. The Route Properties dialog will appear.
9. Drill down through the xmlData node and double-click the numGrandTotal node located at
/process_data/xmlData/xdp/datasets/data/Expense/numGrandTotal to fill in the first Expression for the condition.
10. Select the > operator.
11. Enter 10000 for the second expression. 12. Click OK.
13. Check to be sure that the selected route is now a dashed line.
Set the route evaluation order
15. In the Process Properties view, Route Evaluation category, be sure the
Amount > $10,000 is the first route listed.
Note: If the routes are not in the correct order, select one of the routes and use the up and down arrows to position the routes correctly.
16. Click the Expense Report Second Review operation to select it. 17. In the Process Properties view, Route Evaluation category, be sure
Approved is the first route listed.
Note: YOU MUST make sure the Approved route is evaluated before the Rejected route or else the process may be in an endless loop when testing.
18. Save the process and deploy the application.
Test the process
19. Using Notepad, open the sampleData.xml file located at
C:\AdobeTraining\Doc_Services\Core\Conditional_Routing. 20. Select all of the text (Ctrl-a) and copy it to the clipboard (Ctrl-c).
21. Right-click an empty area of the process diagram and select Invoke Process....
22. When prompted to enter a value for the xmlData input parameter, click the ellipsis button and paste the contents of the clipboard (Ctrl-v) into the dialog.
23. Observe that the value of the <numGrandTotal> node is less than 10,000. 24. Click OK.
25. Select the Enable and playback recording checkbox and click OK.
26. When the Invocation completed successfully message appears, click OK.
27. Confirm the Playback perspective opens with the recording just completed displayed. 28. Click the step forward button and confirm that after the Check Amount operation the process
goes to the Set Review Date operation.
29. Close the Playback perspective by clicking the Exit button.
30. Right-click an empty area of the process diagram and select Invoke Process.... 31. Click the ellipsis button to view the XML data.
32. Navigate to the <numGrandTotal> node and change it so the value is greater than 10,000. Click OK.
33. Select the Playback recording checkbox and click OK to invoke the process.
34. Step through the process recording and confirm that after the Check Amount operation the process goes to the Expense Report Second Review operation.
Summary
• The Decision Point service works with route conditions to implement business rules that dictate how a process proceeds
• Rules are used to determine a valid and appropriate path
■ Each route can have one or more rules associated with it and rules determine if a path is valid or not at a particular time in the process
■ If a route does not have a rule associated with it, the route is always considered valid ■ Route evaluation order determines which route to take if multiple routes are valid • Rules are expressions that must be evaluated to a boolean value
Adobe, Acrobat, Adobe AIR, AIR, Distiller, Flash, Flash Builder, Flash Catalyst, Flex, Adobe Digital Enterprise Platform, MXML, PostScript, Reader, SiteCatalyst, SearchCenter, Discover, Recommendations, Insight, Test&Target, ReportBuilder, Survey,
Review
1. When two routes exit an operation, what determines which route is followed?
2. When two routes exit an operation and both routes evaluate to false, what will happen to the process?