Oracle
®
Linux 6
Administrator's Guide
E41138-36 September 2020
Oracle Legal Notices
Copyright © 2013, 2020, Oracle and/or its affiliates.
This software and related documentation are provided under a license agreement containing restrictions on use and disclosure and are protected by intellectual property laws. Except as expressly permitted in your license agreement or allowed by law, you may not use, copy, reproduce, translate, broadcast, modify, license, transmit, distribute, exhibit, perform, publish, or display any part, in any form, or by any means. Reverse engineering, disassembly, or decompilation of this software, unless required by law for interoperability, is prohibited.
The information contained herein is subject to change without notice and is not warranted to be error-free. If you find any errors, please report them to us in writing.
If this is software or related documentation that is delivered to the U.S. Government or anyone licensing it on behalf of the U.S. Government, then the following notice is applicable:
U.S. GOVERNMENT END USERS: Oracle programs (including any operating system, integrated software, any programs embedded, installed or activated on delivered hardware, and modifications of such programs) and Oracle computer documentation or other Oracle data delivered to or accessed by U.S. Government end users are "commercial computer software" or "commercial computer software documentation" pursuant to the applicable Federal Acquisition Regulation and agency-specific supplemental regulations. As such, the use, reproduction, duplication, release, display, disclosure, modification, preparation of derivative works, and/or adaptation of i) Oracle programs (including any operating system, integrated software, any programs embedded, installed or activated on delivered hardware, and modifications of such programs), ii) Oracle computer documentation and/or iii) other Oracle data, is subject to the rights and limitations specified in the license contained in the applicable contract. The terms governing the U.S. Government's use of Oracle cloud services are defined by the applicable contract for such services. No other rights are granted to the U.S. Government.
This software or hardware is developed for general use in a variety of information management applications. It is not developed or intended for use in any inherently dangerous applications, including applications that may create a risk of personal injury. If you use this software or hardware in dangerous applications, then you shall be responsible to take all appropriate fail-safe, backup, redundancy, and other measures to ensure its safe use. Oracle Corporation and its affiliates disclaim any liability for any damages caused by use of this software or hardware in dangerous applications.
Oracle and Java are registered trademarks of Oracle and/or its affiliates. Other names may be trademarks of their respective owners.
Intel and Intel Inside are trademarks or registered trademarks of Intel Corporation. All SPARC trademarks are used under license and are trademarks or registered trademarks of SPARC International, Inc. AMD, Epyc, and the AMD logo are trademarks or registered trademarks of Advanced Micro Devices. UNIX is a registered trademark of The Open Group.
This software or hardware and documentation may provide access to or information about content, products, and services from third parties. Oracle Corporation and its affiliates are not responsible for and expressly disclaim all warranties of any kind with respect to third-party content, products, and services unless otherwise set forth in an applicable agreement between you and Oracle. Oracle Corporation and its affiliates will not be responsible for any loss, costs, or damages incurred due to your access to or use of third-party content, products, or services, except as set forth in an applicable agreement between you and Oracle.
Abstract
This guide provides an introduction to administering various features of Oracle Linux systems. Document generated on: 2020-09-02 (revision: 10658)
Table of Contents
Preface ... xiii I System Configuration ... 1 1 Yum ... 7 1.1 About Yum ... 7 1.2 About ULN ... 7 1.3 Yum Configuration ... 71.3.1 Configuring Use of a Proxy Server ... 8
1.3.2 Yum Repository Configuration ... 9
1.3.3 Downloading the Oracle Linux Yum Server Repository Files ... 10
1.3.4 Using Yum Utilities to Manage Configuration ... 11
1.4 Using Yum from the Command Line ... 11
1.5 Yum Groups ... 13
1.6 Installing and Using the Yum Security Plugin ... 13
1.7 Switching CentOS or Scientific Linux Systems to Use the Oracle Linux Yum Server ... 15
1.8 Creating and Using a Local ULN Mirror ... 16
1.9 Creating a Local Yum Repository Using an ISO Image ... 16
1.10 Setting up a Local Yum Server Using an ISO Image ... 17
1.11 For More Information About Yum ... 18
2 Ksplice ... 19
2.1 Overview of Oracle Ksplice ... 19
2.1.1 Supported Kernels ... 19
2.1.2 About Ksplice Updates ... 20
2.1.3 Patching and Updating Your System ... 20
2.2 About the Ksplice Client Software ... 20
2.2.1 About the Ksplice Enhanced Client ... 20
2.2.2 About the Ksplice Uptrack Client ... 21
2.3 Choosing a Ksplice Client ... 22
2.4 Preparing to Use Oracle Ksplice ... 22
3 Boot Configuration ... 23
3.1 About the Boot Process ... 23
3.2 About the GRUB Boot Loader ... 24
3.2.1 About the GRUB Configuration File ... 25
3.2.2 Configuring a GRUB Password ... 28
3.2.3 Using GRUB ... 29
3.3 About Run Levels ... 29
3.3.1 Displaying the Run Level ... 30
3.3.2 Changing the Run Level ... 30
3.3.3 Shutting down the System ... 30
3.3.4 About Service Scripts ... 31
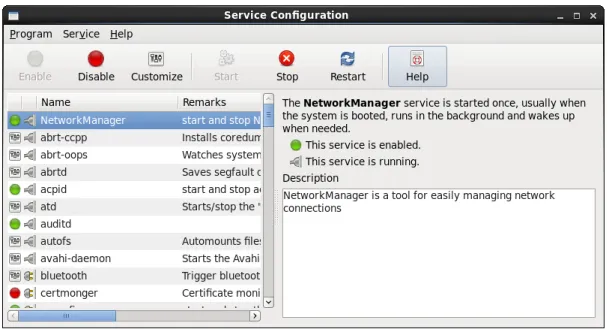
3.3.5 About the Service Configuration GUI ... 31
3.3.6 Starting and Stopping Services ... 32
3.3.7 Configuring Services to Start at Different Run Levels ... 33
4 System Configuration Settings ... 35
4.1 About /etc/sysconfig Files ... 35
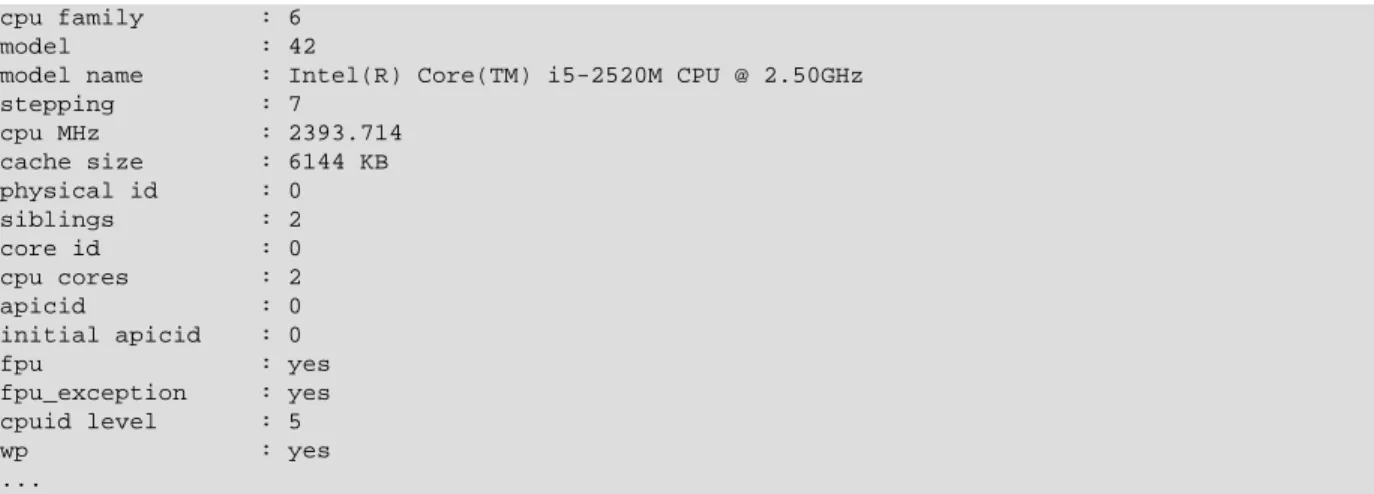
4.2 About the /proc Virtual File System ... 36
4.2.1 Virtual Files and Directories Under /proc ... 37
4.2.2 Changing Kernel Parameters ... 40
4.2.3 Parameters that Control System Performance ... 41
4.2.4 Parameters that Control Kernel Panics ... 42
4.3 About the /sys Virtual File System ... 43
Oracle® Linux 6
4.4 System Date and Time Settings ... 44
5 Kernel Modules ... 47
5.1 About Kernel Modules ... 47
5.2 Listing Information about Loaded Modules ... 47
5.3 Loading and Unloading Modules ... 48
5.4 About Module Parameters ... 49
5.5 Specifying Modules to be Loaded at Boot Time ... 50
6 Device Management ... 51
6.1 About Device Files ... 51
6.2 About the Udev Device Manager ... 53
6.3 About Udev Rules ... 53
6.4 Querying Udev and Sysfs ... 56
6.5 Modifying Udev Rules ... 59
7 Task Management ... 61
7.1 About Automating Tasks ... 61
7.2 Configuring cron Jobs ... 61
7.2.1 Controlling Access to Running cron Jobs ... 62
7.3 Configuring anacron Jobs ... 63
7.4 Running One-time Tasks ... 64
7.4.1 Changing the Behavior of Batch Jobs ... 64
8 System Monitoring and Tuning ... 67
8.1 About sosreport ... 67
8.1.1 Configuring and Using sosreport ... 67
8.2 About System Performance Tuning ... 68
8.2.1 About Performance Problems ... 68
8.2.2 Monitoring Usage of System Resources ... 69
8.2.3 Using the Graphical System Monitor ... 72
8.2.4 About OSWatcher Black Box ... 72
9 System Dump Analysis ... 75
9.1 About Kdump ... 75
9.1.1 Configuring and Using Kdump ... 75
9.1.2 Files Used by Kdump ... 77
9.1.3 Using Kdump with OCFS2 ... 77
9.1.4 Using Kdump with a System Hang ... 78
9.2 Using the crash Debugger ... 78
9.2.1 Installing the crash Packages ... 78
9.2.2 Running crash ... 79
9.2.3 Kernel Data Structure Analysis Commands ... 80
9.2.4 System State Commands ... 82
9.2.5 Helper Commands ... 85
9.2.6 Session Control Commands ... 86
9.2.7 Guidelines for Examining a Dump File ... 86
10 Control Groups ... 87 10.1 About cgroups ... 87 10.2 Subsystems ... 88 10.2.1 blkio Parameters ... 88 10.2.2 cpu Parameters ... 90 10.2.3 cpuacct Parameters ... 90 10.2.4 cpuset Parameters ... 91 10.2.5 devices Parameters ... 92 10.2.6 freezer Parameter ... 93 10.2.7 memory Parameters ... 93 10.2.8 net_cls Parameter ... 96
Oracle® Linux 6
10.4 Enabling PAM to Work with cgroup Rules ... 96
10.5 Restarting the cgconfig Service ... 97
10.6 About the cgroups Configuration File ... 97
10.7 About the cgroup Rules Configuration File ... 99
10.8 Displaying and Setting Subsystem Parameters ... 99
10.9 Use Cases for cgroups... 100
10.9.1 Pinning Processes to CPU Cores ... 100
10.9.2 Controlling CPU and Memory Usage ... 100
10.9.3 Restricting Access to Devices ... 101
10.9.4 Throttling I/O Bandwidth ... 101
II Networking and Network Services ... 103
11 Network Configuration ... 107
11.1 About Network Interfaces ... 107
11.2 About Network Configuration Files ... 109
11.2.1 About the /etc/hosts File ... 109
11.2.2 About the /etc/nsswitch.conf File ... 109
11.2.3 About the /etc/resolv.conf File ... 109
11.2.4 About the /etc/sysconfig/network File ... 110
11.3 Command-line Network Configuration Interfaces ... 110
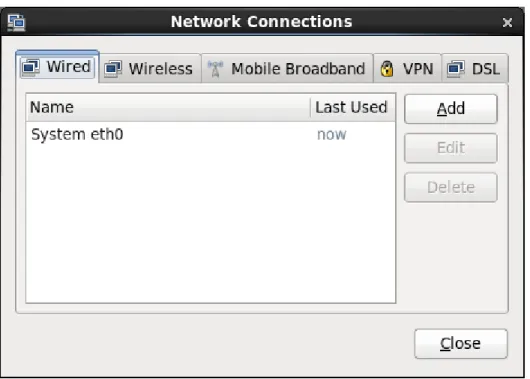
11.4 Configuring Network Interfaces Using Graphical Interfaces ... 112
11.5 Configuring Network Interface Bonding ... 113
11.5.1 Using ifenslave to Create Bonded Interfaces ... 114
11.6 Configuring VLANs with Untagged Data Frames ... 115
11.6.1 Using vconfig to Create VLAN Devices ... 116
11.7 Configuring Network Routing ... 116
12 Network Address Configuration ... 119
12.1 About the Dynamic Host Configuration Protocol ... 119
12.2 Configuring a DHCP Server ... 119
12.3 Configuring a DHCP Client ... 120
12.4 About Network Address Translation ... 121
13 Name Service Configuration ... 123
13.1 About DNS and BIND ... 123
13.2 About Types of Name Servers ... 124
13.3 About DNS Configuration Files ... 124
13.3.1 About the /etc/named.conf File ... 124
13.3.2 About Resource Records in Zone Files ... 127
13.3.3 About Resource Records for Reverse-name Resolution ... 129
13.4 Configuring a Name Server ... 129
13.5 Administering the Name Service ... 130
13.6 Performing DNS Lookups ... 131
14 Network Time Configuration ... 133
14.1 About the NTP Daemon ... 133
14.1.1 Configuring the ntpd Service ... 133
14.2 About PTP ... 134
14.2.1 Configuring the PTP Service ... 135
14.2.2 Using PTP as a Time Source for NTP ... 138
15 Web Service Configuration ... 139
15.1 About the Apache HTTP Server ... 139
15.2 Installing the Apache HTTP Server ... 139
15.3 Configuring the Apache HTTP Server ... 139
15.4 Testing the Apache HTTP Server ... 142
15.5 Configuring Apache Containers ... 142
15.5.1 About Nested Containers ... 143
Oracle® Linux 6
16 Email Service Configuration ... 147
16.1 About Email Programs ... 147
16.2 About Email Protocols ... 147
16.2.1 About SMTP ... 147
16.2.2 About POP and IMAP ... 148
16.3 About the Postfix SMTP Server ... 148
16.4 About the Sendmail SMTP Server ... 149
16.4.1 About Sendmail Configuration Files ... 149
16.5 Forwarding Email ... 150
16.6 Configuring a Sendmail Client ... 150
17 Load Balancing and High Availability Configuration ... 153
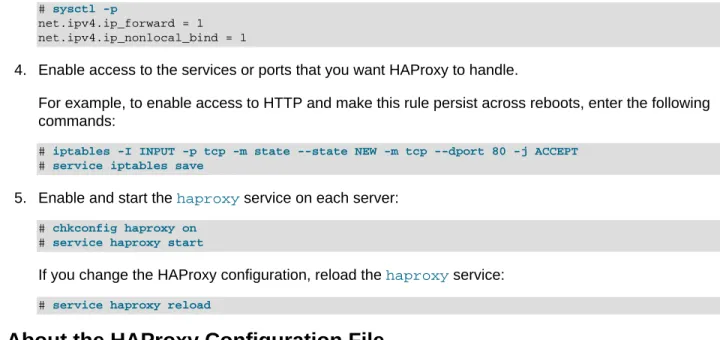
17.1 About HAProxy ... 153
17.2 Installing and Configuring HAProxy ... 153
17.2.1 About the HAProxy Configuration File ... 154
17.3 Configuring Simple Load Balancing Using HAProxy ... 154
17.3.1 Configuring HAProxy for Session Persistence ... 156
17.4 About Keepalived ... 157
17.5 Installing and Configuring Keepalived ... 157
17.5.1 About the Keepalived Configuration File ... 158
17.6 Configuring Simple Virtual IP Address Failover Using Keepalived ... 159
17.7 Configuring Load Balancing Using Keepalived in NAT Mode ... 161
17.7.1 Configuring Firewall Rules for Keepalived NAT-Mode Load Balancing ... 164
17.7.2 Configuring Back-End Server Routing for Keepalived NAT-Mode Load Balancing ... 165
17.8 Configuring Load Balancing Using Keepalived in DR Mode ... 165
17.8.1 Configuring Firewall Rules for Keepalived DR-Mode Load Balancing ... 168
17.8.2 Configuring the Back-End Servers for Keepalived DR-Mode Load Balancing .... 168
17.9 Configuring Keepalived for Session Persistence and Firewall Marks ... 169
17.10 Making HAProxy Highly Available Using Keepalived ... 169
17.11 About Keepalived Notification and Tracking Scripts ... 172
17.12 Making HAProxy Highly Available Using Oracle Clusterware ... 174
III Storage and File Systems ... 177
18 Storage Management ... 183
18.1 About Disk Partitions ... 183
18.1.1 Managing Partition Tables Using fdisk ... 184
18.1.2 Managing Partition Tables Using parted ... 186
18.1.3 Mapping Partition Tables to Devices ... 188
18.2 About Swap Space ... 188
18.2.1 Viewing Swap Space Usage ... 189
18.2.2 Creating and Using a Swap File ... 189
18.2.3 Creating and Using a Swap Partition ... 189
18.2.4 Removing a Swap File or Swap Partition ... 190
18.3 About Logical Volume Manager ... 190
18.3.1 Initializing and Managing Physical Volumes ... 190
18.3.2 Creating and Managing Volume Groups ... 191
18.3.3 Creating and Managing Logical Volumes ... 192
18.4 About Software RAID ... 193
18.4.1 Creating Software RAID Devices ... 194
18.5 Creating Encrypted Block Devices ... 195
18.6 SSD Configuration Recommendations for btrfs, ext4, and swap ... 196
18.7 About iSCSI Storage ... 196
18.7.1 Configuring an iSCSI Target ... 197
18.7.2 Configuring an iSCSI Initiator ... 198
Oracle® Linux 6
18.8 About Device Multipathing ... 201
18.8.1 Configuring Multipathing ... 202
19 File System Administration ... 207
19.1 Making File Systems ... 207
19.2 Mounting File Systems ... 208
19.2.1 About Mount Options ... 209
19.3 About the File System Mount Table ... 210
19.4 Configuring the Automounter ... 211
19.5 Mounting a File Containing a File System Image ... 212
19.6 Creating a File System on a File ... 213
19.7 Checking and Repairing a File System ... 213
19.7.1 Changing the Frequency of File System Checking ... 214
19.8 About Access Control Lists ... 215
19.8.1 Configuring ACL Support ... 215
19.8.2 Setting and Displaying ACLs ... 215
19.9 About Disk Quotas ... 217
19.9.1 Enabling Disk Quotas on File Systems ... 217
19.9.2 Assigning Disk Quotas to Users and Groups ... 217
19.9.3 Setting the Grace Period ... 218
19.9.4 Displaying Disk Quotas ... 218
19.9.5 Enabling and Disabling Disk Quotas ... 218
19.9.6 Reporting on Disk Quota Usage ... 219
19.9.7 Maintaining the Accuracy of Disk Quota Reporting ... 219
20 Local File System Administration ... 221
20.1 About Local File Systems ... 222
20.2 About the Btrfs File System ... 223
20.3 Creating a Btrfs File System ... 224
20.4 Modifying a Btrfs File System ... 225
20.5 Compressing and Defragmenting a Btrfs File System ... 226
20.6 Resizing a Btrfs File System ... 226
20.7 Creating Subvolumes and Snapshots ... 227
20.7.1 Cloning Virtual Machine Images and Linux Containers ... 228
20.8 Using the Send/Receive Feature ... 228
20.8.1 Using Send/Receive to Implement Incremental Backups ... 229
20.9 Using Quota Groups ... 230
20.10 Replacing Devices on a Live File System ... 230
20.11 Creating Snapshots of Files ... 230
20.12 Converting an Ext2, Ext3, or Ext4 File System to a Btrfs File System ... 231
20.12.1 Converting a Non-root File System ... 231
20.12.2 Converting the root File System ... 231
20.12.3 Mounting the Image of the Original File System ... 233
20.12.4 Deleting the Snapshot of the Original File System ... 233
20.12.5 Recovering an Original Non-root File System ... 234
20.13 Installing a Btrfs root File System ... 234
20.13.1 Setting up a New NFS Server ... 234
20.13.2 Configuring an Existing NFS Server ... 235
20.13.3 Setting up a New HTTP Server ... 236
20.13.4 Configuring an Existing HTTP Server ... 237
20.13.5 Setting up a Network Installation Server ... 237
20.13.6 Installing from a Network Installation Server ... 239
20.13.7 About the Installation root File System ... 239
20.13.8 Creating Snapshots of the root File System ... 241
20.13.9 Mounting Alternate Snapshots as the root File System ... 241
Oracle® Linux 6
20.14 Converting a Non-root Ext2 File System to Ext3 ... 242
20.15 Converting a root Ext2 File System to Ext3 ... 242
20.16 Creating a Local OCFS2 File System ... 243
20.17 About the XFS File System ... 244
20.17.1 About External XFS Journals ... 245
20.17.2 About XFS Write Barriers ... 246
20.17.3 About Lazy Counters ... 246
20.18 Installing the XFS Packages ... 246
20.19 Creating an XFS File System ... 246
20.20 Modifying an XFS File System ... 247
20.21 Growing an XFS File System ... 247
20.22 Freezing and Unfreezing an XFS File System ... 248
20.23 Setting Quotas on an XFS File System ... 248
20.23.1 Setting Project Quotas ... 249
20.24 Backing up and Restoring XFS File Systems ... 250
20.25 Defragmenting an XFS File System ... 251
20.26 Checking and Repairing an XFS File System ... 252
21 Shared File System Administration ... 253
21.1 About Shared File Systems ... 253
21.2 About NFS ... 253
21.2.1 Configuring an NFS Server ... 255
21.2.2 Mounting an NFS File System ... 258
21.3 About Samba ... 258
21.3.1 Configuring a Samba Server ... 258
21.3.2 About Samba Configuration for Windows Workgroups and Domains ... 260
21.3.3 Accessing Samba Shares from a Windows Client ... 263
21.3.4 Accessing Samba Shares from an Oracle Linux Client ... 263
22 Oracle Cluster File System Version 2 ... 265
22.1 About OCFS2 ... 265
22.2 Installing and Configuring OCFS2 ... 266
22.2.1 Preparing a Cluster for OCFS2 ... 267
22.2.2 Configuring the Firewall ... 268
22.2.3 Configuring the Cluster Software ... 268
22.2.4 Creating the Configuration File for the Cluster Stack ... 268
22.2.5 Configuring the Cluster Stack ... 271
22.2.6 Configuring the Kernel for Cluster Operation ... 272
22.2.7 Starting and Stopping the Cluster Stack ... 273
22.2.8 Creating OCFS2 volumes ... 273
22.2.9 Mounting OCFS2 Volumes ... 275
22.2.10 Querying and Changing Volume Parameters ... 275
22.3 Troubleshooting OCFS2 ... 276
22.3.1 Recommended Tools for Debugging ... 276
22.3.2 Mounting the debugfs File System ... 276
22.3.3 Configuring OCFS2 Tracing ... 276
22.3.4 Debugging File System Locks ... 277
22.3.5 Configuring the Behavior of Fenced Nodes ... 279
22.4 Use Cases for OCFS2 ... 279
22.4.1 Load Balancing ... 279
22.4.2 Oracle Real Application Cluster (RAC) ... 279
22.4.3 Oracle Databases ... 280
22.5 For More Information About OCFS2 ... 280
IV Authentication and Security ... 281
23 Authentication Configuration ... 285
Oracle® Linux 6
23.2 About Local Oracle Linux Authentication ... 286
23.2.1 Configuring Local Access ... 287
23.2.2 Configuring Fingerprint Reader Authentication ... 289
23.2.3 Configuring Smart Card Authentication ... 289
23.3 About IPA ... 290
23.3.1 Configuring IPA ... 290
23.4 About LDAP Authentication ... 290
23.4.1 About LDAP Data Interchange Format ... 291
23.4.2 Configuring an LDAP Server ... 291
23.4.3 Replacing the Default Certificates ... 294
23.4.4 Creating and Distributing Self-signed CA Certificates ... 295
23.4.5 Initializing an Organization in LDAP ... 298
23.4.6 Adding an Automount Map to LDAP ... 299
23.4.7 Adding a Group to LDAP ... 300
23.4.8 Adding a User to LDAP ... 300
23.4.9 Adding Users to a Group in LDAP ... 303
23.4.10 Enabling LDAP Authentication ... 303
23.5 About NIS Authentication ... 308
23.5.1 About NIS Maps ... 308
23.5.2 Configuring a NIS Server ... 309
23.5.3 Adding User Accounts to NIS ... 312
23.5.4 Enabling NIS Authentication ... 314
23.6 About Kerberos Authentication ... 316
23.6.1 Configuring a Kerberos Server ... 318
23.6.2 Configuring a Kerberos Client ... 321
23.6.3 Enabling Kerberos Authentication ... 322
23.7 About Pluggable Authentication Modules ... 325
23.7.1 Configuring Pluggable Authentication Modules ... 325
23.8 About the System Security Services Daemon ... 326
23.8.1 Configuring an SSSD Server ... 327
23.9 About Winbind Authentication ... 329
23.9.1 Enabling Winbind Authentication ... 329
24 Local Account Configuration ... 331
24.1 About User and Group Configuration ... 331
24.2 Changing Default Settings for User Accounts ... 332
24.3 Creating User Accounts ... 332
24.3.1 About umask and the setgid and Restricted Deletion Bits ... 333
24.4 Locking an Account ... 333
24.5 Modifying or Deleting User Accounts ... 333
24.6 Creating Groups ... 334
24.7 Modifying or Deleting Groups ... 334
24.8 Configuring Password Ageing ... 334
24.9 Granting sudo Access to Users ... 335
25 System Security Administration ... 337
25.1 About System Security ... 337
25.2 Configuring and Using SELinux ... 338
25.2.1 About SELinux Administration ... 339
25.2.2 About SELinux Modes ... 341
25.2.3 Setting SELinux Modes ... 341
25.2.4 About SELinux Policies ... 341
25.2.5 About SELinux Context ... 343
25.2.6 About SELinux Users ... 346
25.2.7 Troubleshooting Access-Denial Messages ... 347
Oracle® Linux 6
25.3.1 Controlling the Firewall Service ... 349
25.3.2 Listing Firewall Rules ... 350
25.3.3 Inserting and Replacing Rules in a Chain ... 350
25.3.4 Deleting Rules in a Chain ... 351
25.3.5 Saving Rules ... 352
25.4 About TCP Wrappers ... 352
25.5 About chroot Jails ... 353
25.5.1 Running DNS and FTP Services in a Chroot Jail ... 353
25.5.2 Creating a Chroot Jail ... 354
25.5.3 Using a Chroot Jail ... 354
25.6 About Auditing ... 354
25.7 About System Logging ... 356
25.7.1 Configuring Logwatch ... 359
25.8 About Process Accounting ... 359
25.9 Security Guidelines ... 360
25.9.1 Minimizing the Software Footprint ... 360
25.9.2 Configuring System Logging ... 361
25.9.3 Disabling Core Dumps ... 362
25.9.4 Minimizing Active Services ... 362
25.9.5 Locking Down Network Services ... 365
25.9.6 Configuring a Packet-filtering Firewall ... 366
25.9.7 Configuring TCP Wrappers ... 366
25.9.8 Configuring Kernel Parameters ... 366
25.9.9 Restricting Access to SSH Connections ... 367
25.9.10 Configuring File System Mounts, File Permissions, and File Ownerships ... 367
25.9.11 Checking User Accounts and Privileges ... 369
26 OpenSSH Configuration ... 373
26.1 About OpenSSH ... 373
26.2 OpenSSH Configuration Files ... 373
26.2.1 OpenSSH User Configuration Files ... 374
26.3 Configuring an OpenSSH Server ... 375
26.4 Installing the OpenSSH Client Packages ... 375
26.5 Using the OpenSSH Utilities ... 375
26.5.1 Using ssh to Connect to Another System ... 376
26.5.2 Using scp and sftp to Copy Files Between Systems ... 377
26.5.3 Using ssh-keygen to Generate Pairs of Authentication Keys ... 378
26.5.4 Enabling Remote System Access Without Requiring a Password ... 378
V Virtualization ... 381
27 Linux Containers ... 385
27.1 About Linux Containers ... 385
27.1.1 Supported Oracle Linux Container Versions ... 387
27.2 Configuring Operating System Containers ... 387
27.2.1 Installing and Configuring the Software ... 387
27.2.2 Setting up the File System for the Containers ... 388
27.2.3 Creating and Starting a Container ... 388
27.2.4 About the lxc-oracle Template Script ... 390
27.2.5 About Veth and Macvlan ... 392
27.2.6 Modifying a Container to Use Macvlan ... 393
27.3 Logging in to Containers ... 394
27.4 Creating Additional Containers ... 394
27.5 Monitoring and Shutting Down Containers ... 395
27.6 Starting a Command Inside a Running Container ... 397
27.7 Controlling Container Resources ... 397
Oracle® Linux 6
27.9 Configuring Kernel Parameter Settings for Oracle Linux Containers ... 398
27.10 Deleting Containers ... 399
27.11 Running Application Containers ... 399
Preface
Oracle® Linux 6: Administrator's Guide provides introductory information about administering various features of Oracle Linux systems, including system configuration, networking, network services, storage devices, file systems, authentication, and security.
Audience
This document is intended for administrators who need to configure and administer Oracle Linux. It is assumed that readers are familiar with web technologies and have a general understanding of using the Linux operating system, including knowledge of how to use a text editor such as emacs or vim, essential commands such as cd, chmod, chown, ls, mkdir, mv, ps, pwd, and rm, and using the man command to view manual pages.
Document Organization
The document is organized as follows:
• Part I, “System Configuration” describes how to configure software and kernel updates, booting, kernel and module settings, and devices, how to schedule tasks, and how to monitor and tune your system. • Part II, “Networking and Network Services” describes how to configure network interfaces, network
addresses, name service, network time services, basic web and email services, load balancing, and high availability.
• Part III, “Storage and File Systems” describes how to configure storage devices and how to create and manage local, shared, and cluster file systems.
• Part IV, “Authentication and Security” describes how to configure user account databases and authentication, how to add group and user accounts, how to administer essential aspects of system security, and how to configure and use the OpenSSH tools.
Related Documents
The documentation for this product is available at:
Oracle® Linux Documentation
Conventions
The following text conventions are used in this document:
Convention Meaning
boldface Boldface type indicates graphical user interface elements associated with an action, or terms defined in text or the glossary.
italic Italic type indicates book titles, emphasis, or placeholder variables for which you supply particular values.
monospace Monospace type indicates commands within a paragraph, URLs, code in examples, text that appears on the screen, or text that you enter.
Documentation Accessibility
For information about Oracle's commitment to accessibility, visit the Oracle Accessibility Program website at
Access to Oracle Support
https://www.oracle.com/corporate/accessibility/.
Access to Oracle Support
Oracle customers that have purchased support have access to electronic support through My Oracle Support. For information, visit
Part I System Configuration
This section contains the following chapters:
• Chapter 1, Yum describes how you can use the yum utility to install and upgrade software packages.
• Chapter 2, Ksplice describes how to configure Ksplice Uptrack to update the kernel on a running system.
• Chapter 3, Boot Configuration describes the Oracle Linux boot process, how to use the GRUB boot loader, how to change the run level of a system, and how to configure the services that are available at each run level.
• Chapter 4, System Configuration Settings describes the files and virtual file systems that you can use to change configuration settings for your system.
• Chapter 5, Kernel Modules describes how to load, unload, and modify the behavior of kernel modules.
• Chapter 6, Device Management describes how the system uses device files and how the udev device manager dynamically creates or removes device node files.
• Chapter 7, Task Management describes how to configure the system to run tasks automatically within a specific period of time, at a specified time and date, or when the system is lightly loaded.
• Chapter 8, System Monitoring and Tuning describes how to collect diagnostic information about a system for Oracle Support, and how to monitor and tune the performance of a system.
• Chapter 9, System Dump Analysis describes how to configure a system to create a memory image in the event of a system crash, and how to use the crash debugger to analyse the memory image in a crash dump or for a live system.
Table of Contents
1 Yum ... 7
1.1 About Yum ... 7
1.2 About ULN ... 7
1.3 Yum Configuration ... 7
1.3.1 Configuring Use of a Proxy Server ... 8
1.3.2 Yum Repository Configuration ... 9
1.3.3 Downloading the Oracle Linux Yum Server Repository Files ... 10
1.3.4 Using Yum Utilities to Manage Configuration ... 11
1.4 Using Yum from the Command Line ... 11
1.5 Yum Groups ... 13
1.6 Installing and Using the Yum Security Plugin ... 13
1.7 Switching CentOS or Scientific Linux Systems to Use the Oracle Linux Yum Server ... 15
1.8 Creating and Using a Local ULN Mirror ... 16
1.9 Creating a Local Yum Repository Using an ISO Image ... 16
1.10 Setting up a Local Yum Server Using an ISO Image ... 17
1.11 For More Information About Yum ... 18
2 Ksplice ... 19
2.1 Overview of Oracle Ksplice ... 19
2.1.1 Supported Kernels ... 19
2.1.2 About Ksplice Updates ... 20
2.1.3 Patching and Updating Your System ... 20
2.2 About the Ksplice Client Software ... 20
2.2.1 About the Ksplice Enhanced Client ... 20
2.2.2 About the Ksplice Uptrack Client ... 21
2.3 Choosing a Ksplice Client ... 22
2.4 Preparing to Use Oracle Ksplice ... 22
3 Boot Configuration ... 23
3.1 About the Boot Process ... 23
3.2 About the GRUB Boot Loader ... 24
3.2.1 About the GRUB Configuration File ... 25
3.2.2 Configuring a GRUB Password ... 28
3.2.3 Using GRUB ... 29
3.3 About Run Levels ... 29
3.3.1 Displaying the Run Level ... 30
3.3.2 Changing the Run Level ... 30
3.3.3 Shutting down the System ... 30
3.3.4 About Service Scripts ... 31
3.3.5 About the Service Configuration GUI ... 31
3.3.6 Starting and Stopping Services ... 32
3.3.7 Configuring Services to Start at Different Run Levels ... 33
4 System Configuration Settings ... 35
4.1 About /etc/sysconfig Files ... 35
4.2 About the /proc Virtual File System ... 36
4.2.1 Virtual Files and Directories Under /proc ... 37
4.2.2 Changing Kernel Parameters ... 40
4.2.3 Parameters that Control System Performance ... 41
4.2.4 Parameters that Control Kernel Panics ... 42
4.3 About the /sys Virtual File System ... 43
4.3.1 Virtual Directories Under /sys ... 43
4.4 System Date and Time Settings ... 44
5.1 About Kernel Modules ... 47
5.2 Listing Information about Loaded Modules ... 47
5.3 Loading and Unloading Modules ... 48
5.4 About Module Parameters ... 49
5.5 Specifying Modules to be Loaded at Boot Time ... 50
6 Device Management ... 51
6.1 About Device Files ... 51
6.2 About the Udev Device Manager ... 53
6.3 About Udev Rules ... 53
6.4 Querying Udev and Sysfs ... 56
6.5 Modifying Udev Rules ... 59
7 Task Management ... 61
7.1 About Automating Tasks ... 61
7.2 Configuring cron Jobs ... 61
7.2.1 Controlling Access to Running cron Jobs ... 62
7.3 Configuring anacron Jobs ... 63
7.4 Running One-time Tasks ... 64
7.4.1 Changing the Behavior of Batch Jobs ... 64
8 System Monitoring and Tuning ... 67
8.1 About sosreport ... 67
8.1.1 Configuring and Using sosreport ... 67
8.2 About System Performance Tuning ... 68
8.2.1 About Performance Problems ... 68
8.2.2 Monitoring Usage of System Resources ... 69
8.2.3 Using the Graphical System Monitor ... 72
8.2.4 About OSWatcher Black Box ... 72
9 System Dump Analysis ... 75
9.1 About Kdump ... 75
9.1.1 Configuring and Using Kdump ... 75
9.1.2 Files Used by Kdump ... 77
9.1.3 Using Kdump with OCFS2 ... 77
9.1.4 Using Kdump with a System Hang ... 78
9.2 Using the crash Debugger ... 78
9.2.1 Installing the crash Packages ... 78
9.2.2 Running crash ... 79
9.2.3 Kernel Data Structure Analysis Commands ... 80
9.2.4 System State Commands ... 82
9.2.5 Helper Commands ... 85
9.2.6 Session Control Commands ... 86
9.2.7 Guidelines for Examining a Dump File ... 86
10 Control Groups ... 87 10.1 About cgroups ... 87 10.2 Subsystems ... 88 10.2.1 blkio Parameters ... 88 10.2.2 cpu Parameters ... 90 10.2.3 cpuacct Parameters ... 90 10.2.4 cpuset Parameters ... 91 10.2.5 devices Parameters ... 92 10.2.6 freezer Parameter ... 93 10.2.7 memory Parameters ... 93 10.2.8 net_cls Parameter ... 96
10.3 Enabling the cgconfig Service ... 96
10.4 Enabling PAM to Work with cgroup Rules ... 96
10.6 About the cgroups Configuration File ... 97
10.7 About the cgroup Rules Configuration File ... 99
10.8 Displaying and Setting Subsystem Parameters ... 99
10.9 Use Cases for cgroups... 100
10.9.1 Pinning Processes to CPU Cores ... 100
10.9.2 Controlling CPU and Memory Usage ... 100
10.9.3 Restricting Access to Devices ... 101
Chapter 1 Yum
Table of Contents
1.1 About Yum ... 7
1.2 About ULN ... 7
1.3 Yum Configuration ... 7
1.3.1 Configuring Use of a Proxy Server ... 8
1.3.2 Yum Repository Configuration ... 9
1.3.3 Downloading the Oracle Linux Yum Server Repository Files ... 10
1.3.4 Using Yum Utilities to Manage Configuration ... 11
1.4 Using Yum from the Command Line ... 11
1.5 Yum Groups ... 13
1.6 Installing and Using the Yum Security Plugin ... 13
1.7 Switching CentOS or Scientific Linux Systems to Use the Oracle Linux Yum Server ... 15
1.8 Creating and Using a Local ULN Mirror ... 16
1.9 Creating a Local Yum Repository Using an ISO Image ... 16
1.10 Setting up a Local Yum Server Using an ISO Image ... 17
1.11 For More Information About Yum ... 18 This chapter describes how you can use the yum utility to install and upgrade software packages.
1.1 About Yum
Oracle Linux provides the yum utility which you can use to install or upgrade RPM packages. The main benefit of using yum is that it also installs or upgrades any package dependencies. yum downloads the packages from repositories such as those that are available on the Oracle Linux yum server, but you can also set up your own repositories on systems that do not have Internet access.
The Oracle Linux yum server is a convenient way to install Oracle Linux and Oracle VM packages, including bug fixes, security fixes and enhancements, rather than installing them from installation media. You can access the server at https://yum.oracle.com/.
You can also subscribe to the Oracle Linux and Oracle VM errata mailing lists to be notified when new packages are released. You can access the mailing lists at https://oss.oracle.com/mailman/listinfo/el-errata
and https://oss.oracle.com/mailman/listinfo/oraclevm-errata.
1.2 About ULN
The repositories available on the Oracle Linux yum server are aligned with the channels that are available on the Unbreakable Linux Network (ULN), with the exception of ULN channels that are limited to Oracle Linux Premier Support customers. These include channels for products such as Ksplice and DTrace. ULN is tightly integrated with yum. If you have registered your system with ULN, you can use yum
commands with ULN channels to maintain the software on your system, as described in Oracle® Linux: Unbreakable Linux Network User's Guide for Oracle Linux 6 and Oracle Linux 7.
1.3 Yum Configuration
The main configuration file for yum is /etc/yum.conf. The global definitions for yum are located under the [main] section heading of the yum configuration file. The following table lists the important directives.
Configuring Use of a Proxy Server
Directive Description
cachedir Directory used to store downloaded packages.
debuglevel Logging level, from 0 (none) to 10 (all).
exactarch If set to 1, only update packages for the correct architecture.
exclude A space separated list of packages to exclude from installs or updates, for example: exclude=VirtualBox-4.? kernel*.
gpgcheck If set to 1, verify the authenticity of the packages by checking the GPG
signatures. You might need to set gpgcheck to 0 if a package is unsigned, but you should be wary that the package could have been maliciously altered.
gpgkey Pathname of the GPG public key file.
installonly_limit Maximum number of versions that can be installed of any one package.
keepcache If set to 0, remove packages after installation.
logfile Pathname of the yum log file.
obsoletes If set to 1, replace obsolete packages during upgrades.
plugins If set to 1, enable plugins that extend the functionality of yum.
proxy URL of a proxy server including the port number. See Section 1.3.1, “Configuring Use of a Proxy Server”.
proxy_password Password for authentication with a proxy server.
proxy_username User name for authentication with a proxy server.
reposdir Directories where yum should look for repository files with a .repo extension. The default directory is /etc/yum.repos.d.
See the yum.conf(5) manual page for more information.
The following listing shows an example [main] section from the yum configuration file.
[main] cachedir=/var/cache/yum keepcache=0 debuglevel=2 logfile=/var/log/yum.log exactarch=1 obsoletes=1 gpgkey=file://media/RPM-GPG-KEY gpgcheck=1 pligins=1 installonly_limit=3
It is possible to define repositories below the [main] section in /etc/yum.conf or in separate repository configuration files. By default, yum expects any repository configuration files to be located in the /etc/ yum.repos.d directory unless you use the reposdir directive to define alternate directories.
1.3.1 Configuring Use of a Proxy Server
If your organization uses a proxy server as an intermediary for Internet access, specify the proxy setting in /etc/yum.conf as shown in the following example.
proxy=http://proxysvr.example.com:3128
If the proxy server requires authentication, additionally specify the proxy_username, and
Yum Repository Configuration
proxy=http://proxysvr.example.com:3128 proxy_username=yumacc
proxy_password=clydenw
If you use the yum plugin (yum-rhn-plugin) to access the ULN, specify the enableProxy and
httpProxy settings in /etc/sysconfig/rhn/up2date as shown in this example.
enableProxy=1
httpProxy=http://proxysvr.example.com:3128
If the proxy server requires authentication, additionally specify the enableProxyAuth, proxyUser, and
proxyPassword settings. enableProxy=1 httpProxy=http://proxysvr.example.com:3128 enableProxyAuth=1 proxyUser=yumacc proxyPassword=clydenw Caution
All yum users require read access to /etc/yum.conf or /etc/sysconfig/rhn/ up2date. If these files must be world-readable, do not use a proxy password that is the same as any user's login password, and especially not root's password.
1.3.2 Yum Repository Configuration
The yum configuration file or yum repository configuration files can contain one or more sections that define repositories.
The following table lists the basic directives for a repository.
Directive Description
baseurl Location of the repository channel (expressed as a file://, ftp://,
http://, or https:// address). This directive must be specified.
enabled If set to 1, permit yum to use the channel.
name Descriptive name for the repository channel. This directive must be specified.
Any other directive that appears in this section overrides the corresponding global definition in [main]
section of the yum configuration file. See the yum.conf(5) manual page for more information.
The following listing shows an example repository section from a configuration file.
[ol6_u2_base]
name=Oracle Linux 6 U2 - $basearch - base
baseurl=https://yum.oracle.com/repo/OracleLinux/OL6/2/base/$basearch gpgkey=file:///etc/pki/rpm-gpg/RPM-GPG-KEY
gpgcheck=1 enabled=1
In this example, the values of gpgkey and gpgcheck override any global setting. yum substitutes the name of the current system's architecture for the variable $basearch.
yum automatically searches the /etc/yum.repos.d directory for files with the suffix .repo and appends these to the configuration when it is processing. Use this directory to define repository files for repositories that you want to make available.
Downloading the Oracle Linux Yum Server Repository Files
1.3.3 Downloading the Oracle Linux Yum Server Repository Files
The Oracle Linux yum server provides a direct mapping of all of the Unbreakable Linux Network (ULN) channels that are available to the public without any specific support agreement. The repository labels used for each repository on the Oracle Linux yum server map directly onto the channel names on ULN. See Oracle® Linux: Unbreakable Linux Network User's Guide for Oracle Linux 6 and Oracle Linux 7 for more information about the channel names and common suffixes used for channels and repositories. Prior to January 2019, Oracle shipped a single yum repository configuration file for each Oracle Linux release. This configuration file is copied into /etc/yum.repos.d/public-yum-ol6.repo at installation, but can also be downloaded from the Oracle Linux yum server directly to obtain updates. The original configuration file is deprecated in favor of modular repository files that are managed and updated automatically via yum in the form of RPM packages that are more targeted in scope. For example, core repository configuration files required for Oracle Linux 6 are available in the
oraclelinux-release-el6 package. This package includes all of the repository configuration required to install base packages for the release, including packages from the ol6_latest, ol6_addons repositories and all of the supported repositories for UEK.
The modular yum repository configuration files released as packages that can be maintained via yum can help to simplify repository management and also ensure that your yum repository definitions are kept up to date automatically, whenever you update your system.
A list of all available RPM files to manage all of the possible yum repository configurations for your release can be obtained by running:
# yum list *release-el6*
To install the yum repository configuration for a particular set of software that you wish to use, use yum to install the corresponding package. For example, to install the yum repository configuration for the Oracle Linux Software Collection Library, run:
# yum install oracle-softwarecollection-release-el6
If your system is still configured to use the original single yum repository configuration file at /etc/ yum.repos.d/public-yum-ol6.repo, you should update your system to transition to the current approach to handling yum repository configuration. To do this, ensure that your system is up to date and then run the /usr/bin/ol_yum_configure.sh script:
# yum update
# /usr/bin/ol_yum_configure.sh
The /usr/bin/ol_yum_configure.sh script checks the /etc/yum.repos.d/public-yum-ol6.repo file to determine which repositories are already enabled and installs the appropriate
corresponding packages before renaming the original configuration file to /etc/yum.repos.d/public-yum-ol6.repo.sav to disable it in favor of the more recent modular repository configuration files.
If, for some reason, you manage to remove all configuration to access the Oracle Linux yum server repositories, you should create a temporary yum repository configuration file at /etc/yum.repos.d/ ol6-temp.repo with the following as the minimum required content:
[ol6_latest]
name=Oracle Linux $releasever Latest ($basearch)
baseurl=https://yum.oracle.com/repo/OracleLinux/OL6/latest/$basearch/ gpgkey=file:///etc/pki/rpm-gpg/RPM-GPG-KEY-oracle
Using Yum Utilities to Manage Configuration
enabled=1
Then reinstall the oraclelinux-release-el6 package to restore the default yum configuration:
# yum reinstall oraclelinux-release-el6
# rm /etc/yum.repos.d/ol6-temp.repo
For more information on manually setting up Oracle Linux yum server repository configuration files, see
https://yum.oracle.com/getting-started.html.
You can enable or disable repositories in each repository configuration file by setting the value of the
enabled directive to 1 or 0 for each repository listed in the file, as required. The preferred method of enabling or disabling repositories under Oracle Linux 6 is to use the yum-config-manager command provided in the yum-utils package.
1.3.4 Using Yum Utilities to Manage Configuration
The yum-utils package includes several utilities that can help you to manage configuration and apply updates safely to your existing configuration. Most significant of these is yum-config-manager.
To install the yum-utils package:
# yum install -y yum-utils
You can use yum-config-manager to add repositories either at a specified URL, or within a specified repository file. For example, to add the legacy repository configuration file for Oracle Linux 6 from the Oracle Linux yum server:
# yum-config-manager --add-repo https://yum.oracle.com/public-yum-ol6.repo
Note
The legacy repository configuration file is unmaintained and deprecated. The information in this file may not be current and newer repositories may not be listed. You can use the same command to automatically generate a repository configuration file for a valid yum repository, by pointing to the URL where the repository is hosted. For example, to create a new configuration file in /etc/repos.d for the Unbreakable Enterprise Kernel Release 4 repository. run:
# yum-config-manager --add-repo https://yum.oracle.com/repo/OracleLinux/OL6/UEKR4/x86_64
To enable a repository using yum-config-manager, use the --enable option. For example, to enable the ol6_addons repository, run:
# yum-config-manager --enable ol6_addons
You can use the --disable option in a similar way to disable a repository.
The yum-config-manager tool can also be used to set other configuration options using the --setopt
and --save options. See the yum-config-manager(1) manual page for more information.
For a list of the tools included in the yum-utils package and a description of what these tools can do, see the yum-utils(1) manual page for more information.
1.4 Using Yum from the Command Line
Using Yum from the Command Line
Command Description
yum repolist Lists all enabled repositories.
yum list Lists all packages that are available in all enabled repositories and all packages that are installed on your system.
yum list installed Lists all packages that are installed on your system.
yum list available Lists all packages that are available to be installed in all enabled repositories.
yum searchstring Searches the package descriptions for the specified string.
yum providesfeature Finds the name of the package to which the specified file or feature belongs. For example:
yum provides /etc/sysconfig/atd
yum infopackage Displays detailed information about a package. For example:
yum info bind
yum installpackage Installs the specified package, including packages on which it depends. For example:
yum install ocfs2-tools
yum check-update Checks whether updates exist for packages that are already installed on your system.
yum updatepackage Updates the specified package, including packages on which it depends. For example:
yum upgrade nfs-utils
yum update Updates all packages, including packages on which they depend.
yum removepackage Removes the specified package. For example:
yum erase nfs-utils
yum erasepackage Removes the specified package. This command has the same effect as the yum remove command.
yum update Updates all packages, including packages on which they depend.
yum clean all Removes all cached package downloads and cached headers that contain information about remote packages. Running this command can help to clear problems that can result from unfinished transactions or out-of-date headers.
yum help Displays help about yum usage.
yum helpcommand Displays help about the specified yum command. For example:
yum help upgrade
yum shell Runs the yum interactive shell.
See the yum(8) manual page for more information.
To list the files in a package, use the repoquery utility, which is included in the yum-utils package. For example, the following command lists the files that the btrfs-progs package provides.
# repoquery -l btrfs-progs
Yum Groups /sbin/btrfs-convert /sbin/btrfs-debug-tree . . . Note
yum makes no distinction between installing and upgrading a kernel package.
yum always installs a new kernel regardless of whether you specify update or
install.
1.5 Yum Groups
A set of packages can themselves be organized as a yum group. Examples include the groups for Eclipse, fonts, and system administration tools. The following table shows the yum commands that you can use to manage these groups.
Command Description
yum grouplist Lists installed groups and groups that are available for installation.
yum groupinfogroupname Displays detailed information about a group.
yum groupinstallgroupname Installs all the packages in a group.
yum groupupdategroupname Updates all the packages in a group.
yum groupremovegroupname Removes all the packages in a group.
1.6 Installing and Using the Yum Security Plugin
The yum-plugin-security package allows you to use yum to obtain a list of all of the errata that are available for your system, including security updates. You can also use Oracle Enterprise Manager 12c Cloud Control or management tools such as Katello, Pulp, Red Hat Satellite, Spacewalk, and SUSE Manager to extract and display information about errata.
To install the yum-plugin-security package, enter the following command:
# yum install yum-plugin-security
To list the errata that are available for your system, enter:
# yum updateinfo list
Loaded plugins: refresh-packagekit, rhnplugin, security
ELBA-2012-1518 bugfix NetworkManager-1:0.8.1-34.el6_3.x86_64 ELBA-2012-1518 bugfix NetworkManager-glib-1:0.8.1-34.el6_3.x86_64 ELBA-2012-1518 bugfix NetworkManager-gnome-1:0.8.1-34.el6_3.x86_64 ELBA-2012-1457 bugfix ORBit2-2.14.17-3.2.el6_3.x86_64
ELBA-2012-1457 bugfix ORBit2-devel-2.14.17-3.2.el6_3.x86_64 ELSA-2013-0215 Important/Sec. abrt-2.0.8-6.0.1.el6_3.2.x86_64
ELSA-2013-0215 Important/Sec. abrt-addon-ccpp-2.0.8-6.0.1.el6_3.2.x86_64 ELSA-2013-0215 Important/Sec. abrt-addon-kerneloops-2.0.8-6.0.1.el6_3.2.x86_64 ELSA-2013-0215 Important/Sec. abrt-addon-python-2.0.8-6.0.1.el6_3.2.x86_64 ELSA-2013-0215 Important/Sec. abrt-cli-2.0.8-6.0.1.el6_3.2.x86_64
ELSA-2013-0215 Important/Sec. abrt-desktop-2.0.8-6.0.1.el6_3.2.x86_64 ...
The output from the command sorts the available errata in order of their IDs, and it also specifies whether each erratum is a security patch (severity/Sec.), a bug fix (bugfix), or a feature enhancement (enhancement). Security patches are listed by their severity: Important, Moderate, or Low.
Installing and Using the Yum Security Plugin
You can use the --sec-severity option to filter the security errata by severity, for example:
# yum updateinfo list --sec-severity=Moderate
Loaded plugins: refresh-packagekit, rhnplugin, security ELSA-2013-0269 Moderate/Sec. axis-1.2.1-7.3.el6_3.noarch ELSA-2013-0668 Moderate/Sec. boost-1.41.0-15.el6_4.x86_64
ELSA-2013-0668 Moderate/Sec. boost-date-time-1.41.0-15.el6_4.x86_64 ELSA-2013-0668 Moderate/Sec. boost-devel-1.41.0-15.el6_4.x86_64 ELSA-2013-0668 Moderate/Sec. boost-filesystem-1.41.0-15.el6_4.x86_64 ELSA-2013-0668 Moderate/Sec. boost-graph-1.41.0-15.el6_4.x86_64 ELSA-2013-0668 Moderate/Sec. boost-iostreams-1.41.0-15.el6_4.x86_64 ELSA-2013-0668 Moderate/Sec. boost-program-options-1.41.0-15.el6_4.x86_64 ELSA-2013-0668 Moderate/Sec. boost-python-1.41.0-15.el6_4.x86_64
...
To list the security errata by their Common Vulnerabilities and Exposures (CVE) IDs instead of their errata IDs, specify the keyword cves as an argument:
# yum updateinfo list cves
Loaded plugins: refresh-packagekit, rhnplugin, security CVE-2012-5659 Important/Sec. abrt-2.0.8-6.0.1.el6_3.2.x86_64 CVE-2012-5660 Important/Sec. abrt-2.0.8-6.0.1.el6_3.2.x86_64
CVE-2012-5659 Important/Sec. abrt-addon-ccpp-2.0.8-6.0.1.el6_3.2.x86_64 CVE-2012-5660 Important/Sec. abrt-addon-ccpp-2.0.8-6.0.1.el6_3.2.x86_64 CVE-2012-5659 Important/Sec. abrt-addon-kerneloops-2.0.8-6.0.1.el6_3.2.x86_64 CVE-2012-5660 Important/Sec. abrt-addon-kerneloops-2.0.8-6.0.1.el6_3.2.x86_64 CVE-2012-5659 Important/Sec. abrt-addon-python-2.0.8-6.0.1.el6_3.2.x86_64 CVE-2012-5660 Important/Sec. abrt-addon-python-2.0.8-6.0.1.el6_3.2.x86_64 ...
Similarly, the keywords bugfix, enhancement, and security filter the list for all bug fixes, enhancements, and security errata.
You can use the --cve option to display the errata that correspond to a specified CVE, for example:
# yum updateinfo list --cve CVE-2012-2677
Loaded plugins: refresh-packagekit, rhnplugin, security ELSA-2013-0668 Moderate/Sec. boost-1.41.0-15.el6_4.x86_64
ELSA-2013-0668 Moderate/Sec. boost-date-time-1.41.0-15.el6_4.x86_64 ELSA-2013-0668 Moderate/Sec. boost-devel-1.41.0-15.el6_4.x86_64 ELSA-2013-0668 Moderate/Sec. boost-filesystem-1.41.0-15.el6_4.x86_64 ELSA-2013-0668 Moderate/Sec. boost-graph-1.41.0-15.el6_4.x86_64 ELSA-2013-0668 Moderate/Sec. boost-iostreams-1.41.0-15.el6_4.x86_64 ELSA-2013-0668 Moderate/Sec. boost-program-options-1.41.0-15.el6_4.x86_64 ELSA-2013-0668 Moderate/Sec. boost-python-1.41.0-15.el6_4.x86_64
ELSA-2013-0668 Moderate/Sec. boost-regex-1.41.0-15.el6_4.x86_64
ELSA-2013-0668 Moderate/Sec. boost-serialization-1.41.0-15.el6_4.x86_64 ELSA-2013-0668 Moderate/Sec. boost-signals-1.41.0-15.el6_4.x86_64 ELSA-2013-0668 Moderate/Sec. boost-system-1.41.0-15.el6_4.x86_64 ELSA-2013-0668 Moderate/Sec. boost-test-1.41.0-15.el6_4.x86_64 ELSA-2013-0668 Moderate/Sec. boost-thread-1.41.0-15.el6_4.x86_64 ELSA-2013-0668 Moderate/Sec. boost-wave-1.41.0-15.el6_4.x86_64 updateinfo list done
To display more information, specify info instead of list, for example:
# yum updateinfo info --cve CVE-2012-2677
Loaded plugins: refresh-packagekit, rhnplugin, security
=============================================================================== boost security update
=============================================================================== Update ID : ELSA-2013-0668
Release : Oracle Linux 6 Type : security Status : final
Switching CentOS or Scientific Linux Systems to Use the Oracle Linux Yum Server
Issued : 2013-03-21 CVEs : CVE-2012-2677 Description : [1.41.0-15]
: - Add in explicit dependences between some boost : subpackages
:
: [1.41.0-14]
: - Build with -fno-strict-aliasing :
: [1.41.0-13]
: - In Boost.Pool, be careful not to overflow : allocated chunk size (boost-1.41.0-pool.patch) :
: [1.41.0-12]
: - Add an upstream patch that fixes computation of : CRC in zlib streams.
: - Resolves: #707624 Severity : Moderate
updateinfo info done
To update all packages for which security-related errata are available to the latest versions of the packages, even if those packages include bug fixes or new features but not security errata, enter:
# yum --security update
To update all packages to the latest versions that contain security errata, ignoring any newer packages that do not contain security errata, enter:
# yum --security update-minimal
To update all kernel packages to the latest versions that contain security errata, enter:
# yum --security update-minimal kernel*
You can also update only those packages that correspond to a CVE or erratum, for example:
# yum update --cve CVE-2012-3954
# yum update --advisory ELSA-2012-1141
Note
Some updates might require you to reboot the system. By default, the boot manager will automatically enable the most recent kernel version.
For more information, see the yum-security(8) manual page.
1.7 Switching CentOS or Scientific Linux Systems to Use the Oracle
Linux Yum Server
You can use the centos2ol.sh script to convert CentOS 5 and 6 or Scientific Linux 5 and 6 systems to Oracle Linux. The script configures yum to use the Oracle Linux yum server and installs a few additional packages that are required. There is no need to reboot the system.
To perform the switch to Oracle Linux, run the following commands as root:
# curl -O https://linux.oracle.com/switch/centos2ol.sh
# sh centos2ol.sh
Creating and Using a Local ULN Mirror
1.8 Creating and Using a Local ULN Mirror
For information on how to create and use a yum server that acts as a local mirror of the ULN channels, see
Oracle® Linux: Unbreakable Linux Network User's Guide for Oracle Linux 6 and Oracle Linux 7.
1.9 Creating a Local Yum Repository Using an ISO Image
Note
The system must have sufficient storage space to host a full Oracle Linux Media Pack DVD image (approximately 3.5 GB for Oracle Linux Release 6 Update 3). To create a local yum repository (for example, if a system does not have Internet access):
1. On a system with Internet access, download a full Oracle Linux DVD image from the Oracle Software Delivery Cloud at https://edelivery.oracle.com/linux onto removable storage (such as a USB memory stick). For example, V33411-01.iso contains the Oracle Linux Release 6 Update 3 Media Pack for x86 (64 bit).
Note
You can verify that the ISO was copied correctly by comparing its checksum with the digest value that is listed on edelivery.oracle.com, for example:
# sha1sum V33411-01.iso
7daae91cc0437f6a98a4359ad9706d678a9f19de V33411-01.iso
2. Transfer the removable storage to the system on which you want to create a local yum repository, and copy the DVD image to a directory in a local file system.
# cp /media/USB_stick/V33411-01.iso /ISOs
3. Create a suitable mount point, for example /var/OSimage/OL6.3_x86_64, and mount the DVD image on it.
# mkdir -p /var/OSimage/OL6.3_x86_64
# mount -o loop,ro /ISOs/V33411-01.iso /var/OSimage/OL6.3_x86_64
Note
Include the read-only mount option (ro) to avoid changing the contents of the ISO by mistake.
4. Create an entry in /etc/fstab so that the system always mounts the DVD image after a reboot.
/ISOs/V33411-01.iso /var/OSimage/OL6.3_x86_64 iso9660 loop,ro 0 0
5. Disable all existing yum repositories.
In the /etc/yum.repos.d directory, edit any existing repository files and disable all entries by setting
enabled=0. If you have the yum-utils package installed, as described in Section 1.3.4, “Using Yum Utilities to Manage Configuration”, you can disable all repositories by running:
# yum-config-manager --disable \*
6. Create the following entries in a new repository file (for example, /etc/yum.repos.d/OL63.repo).
[OL63]
Setting up a Local Yum Server Using an ISO Image
baseurl=file:///var/OSimage/OL6.3_x86_64 gpgkey=file:///etc/pki/rpm-gpg/RPM-GPG-KEY gpgcheck=1
enabled=1
7. Clean up the yum cache.
# yum clean all
8. Test that you can use yum to access the repository.
# yum repolist
Loaded plugins: refresh-packagekit, security ...
repo id repo name status OL63 Oracle Linux 6.3 x86_64 25,459 repolist: 25,459
1.10 Setting up a Local Yum Server Using an ISO Image
To set up a local yum server (for example, if you have a network of systems that do not have Internet access):
1. Choose one of the systems to be the yum server, and create a local yum repository on it as described in Section 1.9, “Creating a Local Yum Repository Using an ISO Image”.
2. Install the Apache HTTP server from the local yum repository.
# yum install httpd
3. If SELinux is enabled in enforcing mode on your system:
a. Use the semanage command to define the default file type of the repository root directory hierarchy as httpd_sys_content_t:
# /usr/sbin/semanage fcontext -a -t httpd_sys_content_t "/var/OSimage(/.*)?"
b. Use the restorecon command to apply the file type to the entire repository.
# /sbin/restorecon -R -v /var/OSimage
Note
The semanage and restorecon commands are provided by the
policycoreutils-python and policycoreutils packages. 4. Create a symbolic link in /var/www/html that points to the repository:
# ln -s /var/OSimage /var/www/html/OSimage
5. Edit the HTTP server configuration file, /etc/httpd/conf/httpd.conf, as follows:
a. Specify the resolvable domain name of the server in the argument to ServerName.
ServerName server_addr:80
If the server does not have a resolvable domain name, enter its IP address instead.
b. Verify that the setting of the Options directive in the <Directory "/var/www/html"> section specifies Indexes and FollowSymLinks to allow you to browse the directory hierarchy, for example:
For More Information About Yum
Options Indexes FollowSymLinks
c. Save your changes to the file.
6. Start the Apache HTTP server, and configure it to start after a reboot.
# service httpd start
# chkconfig httpd on
7. If you have enabled a firewall on your system, configure it to allow incoming HTTP connection requests on TCP port 80.
For example, the following command configures iptables to allow incoming HTTP connection requests and saves the change to the firewall configuration:
# iptables -I INPUT -p tcp -m state --state NEW -m tcp --dport 80 -j ACCEPT
# service iptables save
8. Disable all existing yum repositories on the server and each client system.
In the /etc/yum.repos.d directory, edit any existing repository files and disable all entries by setting
enabled=0. If you have the yum-utils package installed, as described in Section 1.3.4, “Using Yum Utilities to Manage Configuration”, you can disable all repositories by running:
# yum-config-manager --disable \*
9. Edit the repository file on the server (for example, /etc/yum.repos.d/OL63.repo):
[OL63]
name=Oracle Linux 6.3 x86_64
baseurl=http://server_addr/OSimage/OL6.3_x86_64 gpgkey=file:///etc/pki/rpm-gpg/RPM-GPG-KEY gpgcheck=1
enabled=1
Replace server_addr with the IP address or resolvable host name of the local yum server. 10. On each client, copy the repository file from the server to the /etc/yum.repos.d directory.
11. On the server and each client, test that you can use yum to access the repository.
# yum repolist
Loaded plugins: refresh-packagekit, security ...
repo id repo name status OL63 Oracle Linux 6.3 x86_64 25,459 repolist: 25,459
1.11 For More Information About Yum
For more information about yum, see http://yum.baseurl.org/.Frequently asked questions about the Oracle Linux yum server are answered at https://yum.oracle.com/ faq.html.
For more information about how to download the latest packages from the Unbreakable Linux Network and make the packages available through a local yum server, see https://www.oracle.com/technetwork/articles/ servers-storage-admin/yum-repo-setup-1659167.html.
Chapter 2 Ksplice
Table of Contents
2.1 Overview of Oracle Ksplice ... 19 2.1.1 Supported Kernels ... 19 2.1.2 About Ksplice Updates ... 20 2.1.3 Patching and Updating Your System ... 20 2.2 About the Ksplice Client Software ... 20 2.2.1 About the Ksplice Enhanced Client ... 20 2.2.2 About the Ksplice Uptrack Client ... 21 2.3 Choosing a Ksplice Client ... 22 2.4 Preparing to Use Oracle Ksplice ... 22 This chapter provides a high-level overview of Oracle Ksplice. For detailed information and instructions, see Oracle® Linux: Ksplice User's Guide.
2.1 Overview of Oracle Ksplice
Linux systems receive regular security updates to core operating system components that necessitate patching and rebooting. Traditionally, applying such updates would require you to obtain and install the updated RPMs, schedule downtime, and reboot the server to the new package version, with any critical updates. However, as system setups become more complex, with many interdependencies, access to services and applications must remain as undisrupted as possible, as scheduling such reboots becomes more difficult and costly.
Oracle Ksplice provides a way for you to keep your systems secure and highly available by enabling you to update them with the latest kernel and key user-space security and bug fix updates, and Xen hypervisor updates on Oracle VM Server 3.4.5 and later.
Note
When using Ksplice to patch the Xen hypervisor on Oracle VM Server 3.4.5 and later, the minimum version that is required is xen-4.4.4-196.el6.x86_64.rpm.
Oracle Ksplice updates the running operating system without requiring a reboot. Your systems remains up to date with OS vulnerability patches and downtime is minimized. A Ksplice update takes effect immediately upon application. Note that a Ksplice update is not the same as an on-disk change that requires a subsequent reboot to take effect. However, note that on-disk updates are still required when using Ksplice to ensure that package binaries are updated to the most recent version and can be used in the event that the system or processes are restarted. On-disk updates are handled by subscribing to the Unbreakable Linux Network (ULN) or by using a local ULN mirror.
Oracle creates each Ksplice update from a package update that originates either from Oracle or the open source community.
To learn more about Ksplice, go to http://www.ksplice.com/.
2.1.1 Supported Kernels
You can use Ksplice to bring the following Oracle Linux kernels up to date with the latest important security and bug fix patches:
About Ksplice Updates
• All Oracle Unbreakable Enterprise Kernel versions for Oracle Linux 5 and Oracle Linux 6 starting with 2.6.32-100.28.9 (released March 16, 2011).
• All Oracle Linux 6 kernels starting with the official release.
• All Oracle Linux 5 Red Hat Compatible Kernels starting with Oracle Linux 5.4 (2.6.18-164.el5, released September 9, 2009).
• All Oracle Linux 5 Red Hat Compatible Kernels with bug fixes added by Oracle starting with Oracle Linux 5.6 (2.6.18-238.0.0.0.1.el5, released January 22, 2011).
To confirm whether a particular kernel is supported, install the Ksplice Uptrack client or Ksplice Enhanced Client on a system that is running the kernel.
Note
If your system is currently running Red Hat Enterprise Linux and you have recently migrated to Oracle Linux Premier Support, you can use Ksplice to update the existing Red Hat Enterprise Linux kernel. You do not need to switch to the Red Hat Compatible Kernel to use Ksplice kernel patches. These patches are available on ULN as uptrack-updates-kernel_version packages in the Ksplice for Oracle Linux channels.
For questions about supported kernels, send e-mail to [email protected].
2.1.2 About Ksplice Updates
When a critical bug or security vulnerability is discovered in the Linux kernel, Oracle produces a new kernel release and prepares a rebootless update corresponding to that release. The rebootless update is securely distributed using the Oracle Ksplice Uptrack server and the Unbreakable Linux Network (ULN) and is applied to your systems by the Ksplice Uptrack client or Ksplice Enhanced client with zero downtime. Your infrastructure is again up to date and secure.
For more detailed information, see Oracle® Linux: Ksplice User's Guide.
2.1.3 Patching and Updating Your System
Ksplice patches enable you to keep a system up to date while it is running. You should also use the
yum command to install the regular kernel RPM packages for released errata that are available from the Unbreakable Linux Network (ULN) or the Oracle Linux yum server. Your system will then be ready for the next maintenance window or reboot. When you restart the system, you can boot it from a newer kernel version. Ksplice Uptrack uses the new kernel as a baseline for applying patches as they become available. For more detailed information, see Oracle® Linux: Ksplice User's Guide.
2.2 About the Ksplice Client Software
This section describes the different Ksplice client software types that are available in Oracle Linux. A description of each Ksplice client type, as well as information about when you might use each client, is provided.
2.2.1 About the Ksplice Enhanced Client
The Ksplice Enhanced client is available for Oracle Linux 6, but not Oracle Linux 5. The enhanced version of the Ksplice online client supports kernel and user-space updates and can also be used to patch the Xen hypervisor on Oracle VM Server Release 3.4.5 and later.