FORTUNE:WORO
MRecords Processing
User's Guide
I:
FORTUNE
3~!~~~~a~
Copyright © 1987 by Fortune Systems Corporation. All rights reserved. Printed in
the United States of America.
No part of this document may be copied, photocopied, reproduced, translated, or reduced to any electronic medium or machine-readable form without prior consent in writing from Fortune Systems Corporation. For full details of the terms and conditions for using Fortune software, please refer to the Fortune Systems Corporation Customer Software License Agreement.
The information in this document is subject to change without notice and should not be construed as a commitment by Fortune Systems Corporation. Fortune Systems Corporation assumes no responsibility for any errors that may appear in this document. This document describes features available with Fortune:Word
release 3.0.
This document contains samples of names, addresses, and products to illustrate the features and capabilities of Records Processing. Any similarity to the names,
addresses, or products of actual individuals or companies is purely coincidental.
Fortune is a registered trademark and Fortune:Word., and FOR:PRO are trademarks of Fortune Systems Corporation.
Reg. U.S. Pat. & Tm. Off.
Consult an authorized Fortune Representative for copies of manuals and technical information.
Contents
1
2
Introduction
How Records Processing Works Four Types of Documents
The List Document The Format Document The Control Glossary The Output Document
Accessing Records Processing Printing Functions
Make Output Document Only Make Output Document and Print Print Only
A Records Processing Tutorial Typing the Documents Merging the Documents
Creating the List Document
The Parts of a List Document Fields Field Labels Field Contents Size Limitations Records Summary
Designing the List Document Typing the List Document
Exercise
Using Glossary Entries to Create the List Document Creating a Records Processing Glossary by Example
Creating an Inventory List
3
Creating the Format Document 3-1The Parts of the Format Document 3-1
Field Labels 3-1
Standard Text 3-2
Date and Time Field Labels 3-3
Repeat Statements 3-3
Include Statements 3-4
Creating and Using the Format Document 3-4
How to Create the Format Document 3-5
Creating a Form Letter and Using Records Processing 3-6
Building the Format Document 3-8
The Repeat Feature 3-10
Repeating Different Field Labels Vertically 3-10 Repeating the Same Field Labels Horizontally 3-11 Producting an Inventory Report Using Repeat 3-13
The Document Include Feature 3-14
Using Include Statements for Document Assembly 3-15
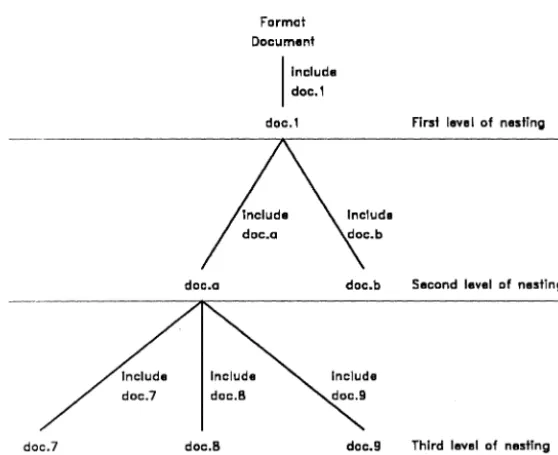
Using Nested Include Statements 3-16
Procedures for Using an Include Statement 3-17
Producing a Memo Using Include 3-18
4 Creating Format Documents for Address Labels,
Envelopes, and File Cards 4-1
Mailing Labels 4-1
Determining the Label Size to Purchase 4-2
Determining Vertical Layout 4-2
Determining Horizontal Layout 4-4
Printing Labels 4-6
Hints on Printing Labels 4-6
Summary 4-7
Envelopes 4-7
Continuous-Form Envelopes 4-8
Single Envelopes 4-10
File Cards 4-10
5
Creating Control-Glossary EntriesWhat is a Control Glossary? 5-1
How a Control Glossary Differs from a Regular Glossary 5-1
Control-Glossary Syntax 5-2
Control-Glossary Functions 5-4
The Sort Function 5-6
Ascending and Descending Order 5-9
Sorting on More than One Field at a Time 5-9
Sort Syntax 5-9
Using Sort to Change the Order of a List Document 5-12
The Selection Functions 5-12
An Example of Using the Selection Functions 5-13
Relational Operators 5-13
Selecting Records by Suppressing a Blank Field 5-15
The Syntax of Selection Functions 5-16
The Thru Function 5-17
Summary 5-19
Using the Control-Glossary Entry 5-19
6
Advanced Control-Glossary Functions 6-1Arithmetic Operators 6-2
Addition 6-2
Subtraction 6-3
Multiplication 6-3
Division 6-4
Remainder 6-5
String-Manipulation Functions 6-5
Index 6-7
Occur (Occurrence) 6-9
Num (Numeric 6-10
Len (Length) 6-11
Max (Maximum) 6-12
Min (Minimum) 6-13
Seg (Segment) 6-14
Substr (Substring) 6-15
Cat (Concatenate) 6-17
Combining String-Manipulation Functions 6-17
A Sample Interactive Control Glossary 6-18
7 Error Messages and Troubleshooting 7-1
Information Messages in Records Processing 7-1
Error Messages in Records Processing 7-2
Errors in the Selection and Sort Phases 7-2
Errors in the Merge Phase 7-2
Errors in Control Glossaries 7-7
Errors in Verification 7-8
Errors in Syntax 7-10
Using Arguments Within Functions 7-10
Appendix A String-Manipulation Functions A-I
Appendix B ASCII Collating Sequence B-1
Appendix C Creating a List Document USing Glossary Entries C-l
About This Guide
This guide is a learning and reference tool for Fortune:Word Records Processing. Records Processing is an integral part of Fortune: Word that allows you to quickly and economically produce customized form letters, labels, or lists. This guide teaches you how to use Records Processing as a mail-merge program to automate mass mailings. It also teaches you how to use Records Processing as a simple data base management system.
Anyone who knows how to use Fortune:Word can learn to use Records Processing. For detailed reference information and a procedural summary of any Fortune:Word feature, refer to the Fortune:Word Reference Guide. Each feature is listed
alphabetically-in Chapter 3 of the Guide. Cross-references to other features are provided.
This guide describes glossary features that can be used with Records Processing control-glossary entries. It does not contain complete descriptions of all the glossary functions. Use the Fortune:Word Glossary UseYs Guide as a complement to the Fortune:Word Records Processing Useys Guide.
You do not need to be familiar with Fortune:Word glossary functions to use Chapters 1 through 4 of this guide. Chapters 5 through 7 contain instructions on how to use control-glossary entries to increase the power of Records Processing. You can learn how to write control-glossary entries from the information in this guide. A familiarity with glossary functions is useful, but is not essential to understand the information in this guide.
HOW THIS BOOK IS ORGANIZED
This book has seven chapters. Appendices and an index are also provided. Following is a brief description of each part.
Chapter 1: Introduction: This chapter explains the concepts of Records Processing and briefly introduces the four types of documents you can create. It explains how to use the Records Processing menu. At the end of the chapter a short Records Processing tutorial shows you now to produce a short form letter.
Chapter 2: Creating the List Document: Records Processing list documents act as the data base that contain the variable information you manipulate with other parts of the Records Processing feature. This chapter contains an in-depth
discussion of how to create and use list documents, and also contains training exercises.
Chapter 3: Creating the Format Document: The format document contains the unchanging data and text that merge with the variable data and text from records in the list document. This chapter contains an in-depth discussion of the parts of a format document, and also contains training exercises. Information is presented on using repeat and include statements in format documents.
Chapter 4: Creating Format Documents for Address Labels, Envelopes, and File Cards: As you develop expertise in Records Processing, you will create more types of format documents. This chapter tells you how to set up format documents for three special types of mail-merge activities: address labels, envelopes, and file cards.
Chapter 5: Creating Control-Glossary Entries: Control-glossary entries can be used to sort records or to sort and select specific records based on criteria that you specify. This chal,)ter describes control-glossary syntax and basic functions, and provides complete examples of entries for each function.
Chapter 6: Advanced Control-Glossary Functions: This chapter describes how to use arithmetic operators and string-manipulation functions in control-glossary entries. Specific examples of entries using these functions are provided.
Chapter 7: Error Messages and Troubleshooting: This chapter contains an alphabetical list of Records Processing error messages and troubleshooting suggestions.
Appendices
• Appendix A String-Manipulation Functions: This appendix provides an alphabetical listing of the string-manipulation functions and syntax for quick reference.
• Appendix B ASCII Collating Sequence: This appendix shows the case-insensitive ASCII collating sequence that is used by Records Processing.
• Appendix C Creating a List Document Using Glossary Entries: This appendix gives some examples of glossaries you can use to create list
documents.
CONVENTIONS USED IN THIS BOOK
The following conventions are used throughout this document:
RETURN INSERT
SEARCH INDENT GO TO PAGE
• The four directional arrow keys (up, down, left, and right) that move the cursor are identified as follows:
UP DOWN LEFT RIGHT
• To perform certain word processing functions, you have to hold down one key while you press a second key. This combination of keystrokes is shown in the following way:
Press SHIFT/COPY Press SHIFT/MERGE
In the examples above, you hold down SHIFT while you press COpy or MERGE.
• Words or phrases you type are in boldface type, as shown in the following example:
Press MERGE, type first name, then press SHIFT/MERGE
• Variable words or phrases that you replace with your own selection are in italic type, as shown in the following example:
Type: field label
• Screen prompts and messages are in italic type as shown in the following example:
Press EXECUTE to continue
• Fortune:Word document names are in bold type as shown in the following example:
Create a new document named add.form
Text and Program Display
In the control-glossary entries in this guide, keywords are in italics, functions are boldfaced, and variables are boldfaced italics. This convention is only used for emphasis in examples. It is not necessary for you to observe these conventions in your glossary entries.
RELATED FORTUNE DOCUMENTS
Following is a list of other Fortune publications that will be of interest to you.
• How to Use Fortune:Word) Self-Paced Learning • Fortune: Word Reference Guide
Chapter 1
Introduction
Records Processing is a major feature of Fortune:Word. To access Records Processing you select Document Processing Tools from the' Fortune:Word Main menu, then select Records Processing. Records Processing can be used in many different ways. As an important example, you can use Records Processing as a mail-merge program to automate mass mailings. In this application, a list of addresses is merged into a document to quickly and economically produce customized form letters, labels, or lists. You only need to type the address list and a master form letter one time. Records Processing merges the individual addresses into the form letter for you automatically. You can then use the same address list to print labels or envelopes, and to generate reports.
Once you find out how easy it is to use Records Processing as a mail-merge feature, you may want to learn some of its more sophisticated
capabilities. You can use Records Processing as a simple data base management system to maintain parts lists, handle client lists, or update employee records. You can merge selected information into reports produced with Fortune:Word, sorting and selecting specific items from a list document that contains your data base.
This chapter contains information on the following topics:
• How Records Processing works
• The four types of Records Processing documents • The Records Processing menu
• A Records Processing tutorial
HOW RECORDS PROCESSING WORKS
When you use Records Processing for mail merge, you create two
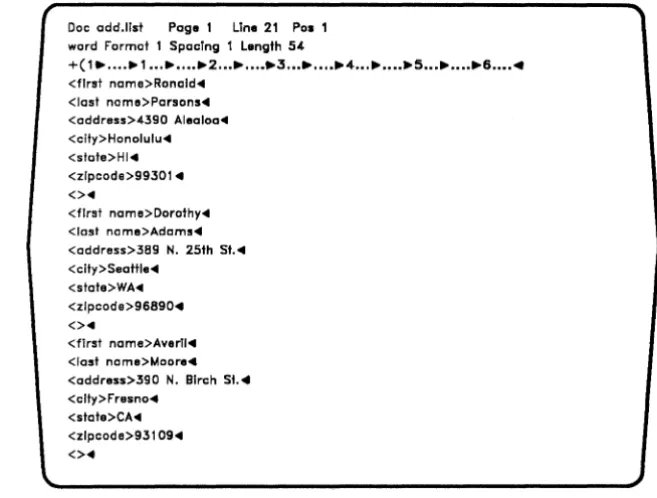
Fortune:Word documents. One document-the list document-contains the list of addresses. The other document-the format document-contains the letter, with markers to indicate where the variable information from the list document is to be inserted. Figure 1-1 shows a sample list document, and Figure 1-2 shows a sample format document. You will learn more about list and format documents in later chapters of this guide.
Introduction
Doc odd.list Page 1 Line 21 Pas 1 word Format Spacing 1 Length 54
+( 1 •..•• ~ 1 ••••••••• 2 ••.•.•••• 3 •••••••• ~4 ••.••••• ~5 ••• ~ ••••• 6 •••••
<first nome>Ronald ... <Iasl nom.>Porsons'" <oddress>4390 Aleoloo ... <city>Honolulu'" <state>HI4 <zlpcode>99301 ... <> ...
<first nome>Dorathy'"
<last name>Adams411
<address>389 N. 25th St. .. <city>Seattle'"
<state>WA'" <zlpcode>96890 .. <> ...
<first name>Avorll .. <lost nom.>Moore" <oddress>390 N. Birch St." <clty>Fresno"
<state>CA'" <zlpcode>931 09 ... <> ...
Figure 1-1. A Sample List Document
Doc odd. form Page 1 Line 1 Pos 39 word Format 1 Spacing 1 Length 54
1 (1 ) .•••• 1 .•••••••• 2 ••••••.•. 3 ... 4 ••••••••• 5 ••••••••• 6 •••••
...
<first name> <last name> ... <address> ...
<city>. <state> <zipcode>" Dear <first nome>:"
...
• <datel > ...
Thank you for your membership in the Central Valley Art Association.. As a member. you will receive our newsletter
keeping you informed of meetings, workshopsi exhibits, and special events."
...
~Slncerely."
.Sandra Simons ... • Public Relations.,.
1 (1 ) .••.• 1 ..••••••• 2 •••.••••. 3 ... 4 ••••••••• 5 ••••••••• 6 ••.••
(Document End)
[image:13.507.76.405.45.294.2] [image:13.507.73.411.87.570.2]Introduction
Mter you have created these two documents, you select Records Processing from the Document Processing Tools menu. You then enter the names of the two documents on the Records Processing menu. Records Processing combines the list and format documents to create an output document. You can do
further editing on this document or print it as it is. Figure 1-3 shows a sample output document.
You do not have to know how Records Processing merges documents to use this feature successfully. However, reading the explanation of the
process that follows may help you remember what information should go into a list document and what should go into a format document. Suppose you have a list document containing a list of addresses, and a format document containing a one-page form letter. In combining these two documents, Records Processing automatically follows these steps:
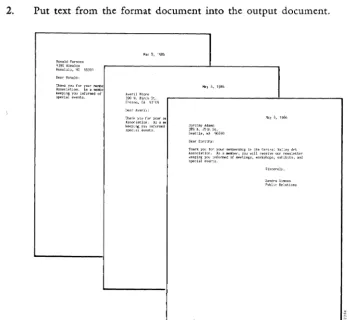
1. Begin at the top of the format document.
2. Put text from the format document into the output document.
Thank you for your merrtle
Association. As a "",mbe keeplngyoulnformedof special events.
May 8, 1986
May 8, 1986
Dear Dorothy:
Figure 1-3. A Sample Output Document
3/87
1-3MayS, 1986
In the Central ",illrecelve workshops,
Sincerely,
Sandra 3Hoc>ns Public Relations
[image:14.513.67.418.243.563.2]Introduction
3. When a merge marker is found indicating that variable information is to be inserted, go to the list document.
4. Find the variable information from the first address in the list document, and insert it into the output document.
5. Go back to the format document, and repeat steps 2 through 4 until the end of the format document is reached.
6. Repeat steps 1 through 5 until the end of the list document-the last address-is reached.
When this process has been completed, each page of the output document will contain a letter with a different address. Note that in this example the address also includes the name. There will be one page in the output document for each address in the list document, plus one blank page at the end of the document. You can edit, print, and archive the output document as you would any other Fortune: Word document.
There is another kind of document, called a control glossary, that you can use with Records Processing. A control glossary is a Fortune:Word glossary document containing entries. Fortune:Word glossaries can be used to store text and keystrokes that can be recalled for use later. A
control-glossary entry uses functions accessible only from the Records Processing menu. You can use a control-glossary entry to sort and/or select specific items from a list document.
FOUR TYPES OF DOCUMENTS
The four types of documents used in Records Processing have already been briefly introduced. To summarize, when you use Records Processing, you first create up to three kinds of Fortune:'V\Tord documents and then use the Records Processing menu to merge the information in them into a final document. These are the three types of documents you can create to use with Records Processing:
• The list document • The format document • The control glossary
Mter you make your selections from the Records Processing menu, these documents are merged to create a new document called the output
Introduction
Sometimes, you will need to use all four kinds of documents to achieve the results you want. At other times, you will use only two or three of the four types. The four kinds of documents are described below briefly. Later chapters contain detailed information on how to create and use each type of document.
The List Document
The list document is a Fortune:Word document containing information grouped into fields and records. For example, if the list document
contains a list of addresses, each separate part of one address is a
field, and each complete address is a record. You will learn more about fields and records in Chapter 2. Although an address list is a common kind of list document, such a document can contain a list of information on almost any subject, such as merchandise orders or machine parts. You can merge the information from a list into form letters, or you can use it for record keeping. In addition, you can select information from a list document to use in building tables or other forms.
Suppose, for example, that an administrative assistant in a North American company's international accounts department creates a list containing the names and addresses of the company's clients in Europe. This list document could be used in the following ways:
• Whenever a sales representative goes to Europe, the assistant could use Records Processing to create a list of European clients to help the representative.
• The assistant could combine the same list with a form letter to create mass mailings to all international clients.
• Using client names and sales information, the assistant could use the list to prepare a table showing how much the clients in each country ordered from the company.
The Format Document
The format document is a Fortune:Word document containing the basic structure, format line(s), standard text, header and footer and work page of the final document. The format document includes any text that remains the same from record to record, plus field labels indicating where the system is to insert information from the list document. Records and fields are described in Chapter 2.
Introduction
A typical format document (see Figure 1-2), of a letter to be used in a mass mailing has the standard body of a letter, including a salutation, text, a closing, and possibly, a date. However, the format document contains special identifying field labels in place of the address, the name in the salutation, and any other information that varies from one record to another in the list document. The field labels indicate where the variable information from the list document is to go in the letter.
The Control Glossary
The control glossary is a glossary document containing an entry or entries consisting of glossary functions specific to Records Processing. You can only use these control-glossary entries from the Records Processing menu. The control glossary does not need to be attached for you to use one of the entries from the Records Processing menu. You use a control glossary if you want to select particular records from a list document or do
sorting from the Records Processing menu.
You can create a new control glossary by using the Create New Glossary selection on the Glossary Functions menu, or you can add control-glossary entries to an existing glossary document. If you are not familiar with creating, editing, and verifying glossaries, refer to the Fortune: Word Glossary Users Guide for more information.
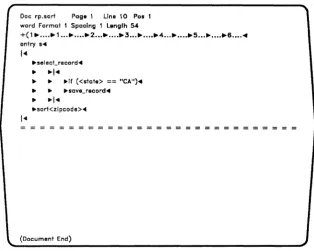
A control-glossary entry might contain instructions for sorting a list of records alphabetically by last name, or instructions for selecting the records of people who live in a particular city or state from an address list. Figure 1-4 shows a sample control-glossary entry. This entry would select all records for the state of California from a list document and sort them by zip code into an output document.
There are two ways YOll can 11·se a control-glossary entry frem the P,-ecords
Processing menu to produce an output document:
• Use a control-glossary entry with list and format documents. The control-glossary function is performed first, and the results are
then merged with the format document to produce the output document.
• Use a control-glossary entry with a list document. When no format document is used, the field labels are preserved in the output
document. In this way, you can select specific records from a master list document to generate smaller, specialized list documents.
r
Doc rp.sort Paga 1 Lina 10 Pos 1 word Format 1 Spacing 1 Length 54
+(1 •....• 1 ... 2 ... 3 .•••.•••• 4 ... 5 .•••••.•• 6 .... .. entry ....
j ...
• selecCrecord ...
•
• j ...• •
.if «stete> == "CA").• •
..sava_record ...•
·1'"
•• ort<zlpcode>'"
(Document End)
Figure 1-4. A Sample Control-Glossary Entry
NOTE: The only time you can use a format document without a list document or control glossary is when you are using a format document for Document Assembly that contains include statements, but does not contain any field labels. See Chapter 3, "Creating the Format Document," for information on how to use include statements.
The Output Document
Introduction
The output document is a Fortune:Word document that contains the final text that results when Records Processing automatically combines
documents. You assign a name to this document, and Records Processing creates it automatically as a part of its function. Output documents can range in length from a large document containing all the letters in a mass mailing to a small sublist containing only the records selected for a particular purpose from a larger list.
[image:18.507.96.410.60.311.2]Introduction
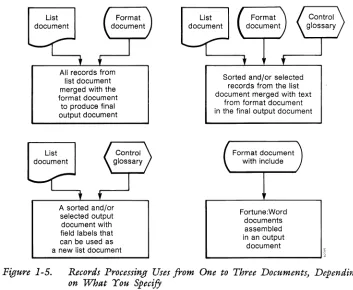
List document
All records from list document merged with the format document
to produce final output document
List document
A sorted and/or selected output document with field labels that can be used as a new list document
List document
Sorted and/or selected records from the list document merged with text
from format document in the final output document
Format document with include
Fortune:Word documents assembled in an output
document
Figure 1-5. Records Processing Uses from One to Three Documents) Depending on What You SpecifJ
When Records Processing is used with a mailing list, for example, the system merges the names, addresses, and other variable information from the list document into the standard letter contained in the format
document. The resulting output document contains a letter for each person on the mailing list, with the appropriate name and address merged into the body of the letter. You can view the output document on your screen to make sure each letter is correct before you send it to the printer.
Alternatively, you can have the letters printed without producing an output document.
The format lines are carried over from the Format document at the end of Records Processing. If you press CANCEL while an output document is being created, the records that have been processed appear in the output
document, but the format may not match the format in the source document.
ACCESSING RECORDS PROCESSING
[image:19.504.72.425.59.349.2]RECORDS PROCESSING
Please enler Ihe following document names L1s1 dacumenl
Format documenl _ _ _ _ _ _ _ _ _ _ _ _ Conlrol glossary
onlry
Please select one of Ihe following processing options Make output document only
[image:20.508.89.408.57.304.2]Make output document and prlnl Print only
Figure 1-6. The Records Processing Menu
To use Records Processing, follow these steps:
Introduction
1. Create your list and format documents from the Fortune:Word Main menu. If you plan to use a control-glossary entry, create a control glossary from the Glossary Functions menu or add a control-glossary entry to an existing glossary.
2. Select Document Processing Tools from the Fortune: Word Main menu.
3. Select Records Processing from the Document Processing Tools menu.
4. Enter the name of the list document you want to use, and press RETURN.
5. Enter the name of the format document you want to use, and press RETURN.
6. If you are using a control glossary, enter the name of the glossary document and press RETURN. Otherwise, press RETURN to move to the next field.
Introduction
7. If you have entered a control-glossary name, type the entry label. Otherwise, press RETURN to move to the next selection.
8. Select one of the processing options and press. EXECUTE. If you have selected an option that creates an output document, enter the name of the output document, and press RETURN or EXECUTE.
If you use Records Processing frequently, you may find it convenient to use the shortcut code rpr to access the Records Processing menu (press COMMAND and type rpr from any menu).
PRINTING FUNCTIONS
When you combine list, format, and control documents from the Records Processing menu, you can make one of three selections:
• Make output document only • Make output document and print • Print only
Make Output Document Only
The first processing selection is Make output document only. When you choose this option, the Records Processing documents are combined in an output document on the system disk. This document is assigned the name you enter on the Records Processing menu. If you enter the name of an existing document, you can choose either to overwrite that document or to enter a new name for the output document.
Once the output document has been created, you can edit, print, and a.rchive- it as you ,,,auld any other Fortune:\A.!ord document.
If you create large output documents, you may want to archive them for later use. You might also use the Delete Document selection on the Filing menu to remove them. If you delete an output document but save its accompanying list, format, or control glossary documents, you can always use Records Processing again to recreate the output document.
Introduction
up into several parts so that an individual document contains no more than 999 pages before you can print, use Spelling Tools, or hyphenate and paginate it. To do this, use the Create New Document selection from the Fortune:Word Main menu to create a new document, and SHIFT/MOVE the extra pages into that document.
Make Output Document and Print
The second processing selection is Make Output Document and Print.
This option creates an output document on the system disk and
automatically sends a copy of that document to the printer. When printing is completed, the copy is deleted. The settings on the Print Document menu for the format document are used as the default print settings. If no format document is used, the format line from the list document is used. Make sure that your printer is turned on and has enough paper. Once the document is sent to the printer from Records Processing, you can use the Printer Control menu to control printing functions.
Print Only
Suppose you frequently perform the same Records Processing functions and are confident that your output document is correctly formatted. In that case, you do not need to edit the output document before printing it. Thus, you may just want to print the output results without creating a copy of the document on the system disk. To do this, you can use the
Print Only selection on the Records Processing menu.
Even though you only want to print the output document, a file must be created for the output. Records Processing creates a temporary file beginning with the characters dot and double-u (.W) to contain the information to be printed. When the printing is finished, the temporary file is automatically removed. Before you select this option, make sure that your printer is turned on and has enough paper.
If the printer stops for any reason during the printing, you can control the printing of the temporary file in the same way you would any other document in the print queue.
Of course, once the printing process has been completed, you cannot reprint selected parts of the document. This is because the temporary file has been removed from the system disk. If you think you may want to reprint portions of a Records Processing output document, you should choose one of the two other processing options when creating it.
Introduction
A RECORDS PROCESSING TUTORIAL
Now that you have an idea of how Records Processing works, here is a brief exercise you can use to combine a list and format document into an output document.
In this exercise, you will type the list document shown in Figure 1-2 and the format document shown in ,Figure 1-3. For your convenience, the text of these documents is repeated here. Be sure to use the MERGE key to type the symbol "<" and the SHIFT/MERGE key to type the symbol ">." You can compare the text of the documents on your screen with the figures.
Typing the Documents
1. Create a new document named add.list using the Create New Document selection from the Fortune:Word Main menu.
2. Type the three addresses exactly as shown below. Remember to use MERGE and SHIFT/MERGE. Compare your document with Figure 1-2 to be sure you have entered the text correctly.
<first name> Ronald <last name> Parsons <address>4390 Alealoa < city> Honolulu < state> HI <zipcode> 99301 <>
<first name> Dorothy <last name>Adams <address>389 N. 25th St. < citv> Seattle
<state>WA <zipcode>96890 <>
<first name>Averil <last name> Moore
<address>390 N. Birch St. < city> Fresno
<state>CA <zipcode>93109 <>
3. When the list is complete, leave the document, saving the changes.
Introduction
5. Type the form letter exactly as shown below. Remember to use
MERGE and SHIFT/MERGE. Compare your document with Figure 1-3 to be sure you have entered the text correctly.
<first name> <last name> <address>
<city>, <state> <zipcode>
Dear <first name>:
< date1 >
Thank you for your membership in the Central Valley Art Association. As a member, you will receive our newsletter keeping you informed of meetings, workshops, exhibits, and special events.
Sincerely,
Sandra Simons Public Relations
6. Be sure to enter a page break at the end of the document, as shown in Figure 1-3.
7. When the form letter is complete, leave the document, saving the changes.
Merging the Documents
You have created two separate documents that can be merged together with
Records Processing. To do this, follow the steps below:
1. Select Document Processing Tools from the Fortune:Word Main menu.
2. Select Records Processing from the Document Processing Tools menu.
3. Type add.1ist on the List document line and press RETURN.
4. Type add. form on the Format document line and press EXECUTE.
3/87
Since you are not using a control glossary, you can leave the Control glossary and entry lines blank.
Introduction
5. Type add. out on the Please enter output document name line and
press RETURN or EXECUTE.
6. Return to the Fortune:Word Main menu.
7. Using the Edit Old Document selection, look at the document add.out. If you have done everything correctly, the output document will
contains three letters, each with a different address, and each on a separate page. The last page in the document will be blank. If you want to, you can print this document.
Chapter 2
Creating the List Document
The list document is the most important of the three types of Records Processing documents. The entries you make in the list document are used as a data base for all subsequent Records Processing functions. You can use Records Processing without a format document or control glossary, but, in almost every instance, you must have a list document.
NOTE: The only time you do not need to use a list document in Records Processing is when you have a format document with include statements and no field labels. See Chapter 3, "Creating the Format Document," for information on how to use include statements.
In this chapter you will learn how to create a list document. You can use the exercises in this chapter to learn how to set up the kinds of lists you might typically create in your work. The list documents you create in this chapter are used with the exercises in Chapters 3 and 4.
This chapter contains information on the following topics:
• The parts of the list document • Designing the list document • Typing the list document
• Using glossary entries to create the list document • Creating an inventory list
THE PARTS OF A LIST DOCUMENT
The list document contains the variable text-the information that changes for each item merged into the format document. You use Fortune:Word to create and edit the list document. List documents are divided into
fields. Each complete group of fields forms a record.
CreRtinjf the List Document
Fields
The individual items in a list document are called fields. Each field has two parts:
• The field label • The field contents
Field Labels
The field IRbel is the name you assign to each field in a record. It identifies the contents of the field and remains the same from record to record. You use the same field label in the format document to indicate where the variable information is to be placed. You also use the field label to define fields you want to sort and select in a control-glossary entry.
You choose the field labels and decide what information should be included in the field contents. The labels you assign will depend on the type of information in your list document and on the way you want to combine it with the format document. It is a good idea to ,choose field labels that briefly describe the field contents.
Once you decide on a label for a particular field, it is a good practice to use it consistently in all your list documents. Suppose you decide to use the field label <zipcode>. If you use <zip> to label the
zip-code field in another list document, you will not be able to use the original format document with that list document unless you edit it to change the field label.
Each field label begins with a MERGE and ends with a SHIFT/MERGE. Be sure you use the Merge key (F6) to create the field labels in any F ... eccrds Processing document. Records Processing will not function correctly if you use the angle brackets at the lower-right corner of the keyboard in place of MERGE and SHIFT/MERGE. Refer to the section entitled "Designing the List Document" later in this chapter for suggestions on how to choose labels for your list document.
NOTE: Field labels should never be broken by Returns or page breaks.
You do not need to have the same number of field labels in each record. However, it is a good idea to make the number of field labels match, even if many field contents are blank for a particular field label. What
Creating the List Document
field label is found, or press CANCEL to end the process. If you have many records that are missing that field label, it will take more time to run Records Processing, and you may not get all the records you want in the output document.
Field Contents
The field contents consist of the text you type following a field label.
This information, which varies from record to record in the list document constitutes your data base.
When you type the field contents, you should enter only the text,
punctuation, and spaces. An entry does not have to be one line. You can also enter Returns, Tabs, and other screen symbols needed within a
variable entry. Any text or punctuation surrounding the field contents that does not change for each record should be included in the format document rather than in the field contents in the list document. For
example, the comma and space that appear between the name of the city and the name or abbreviation of the state in an address should be entered into the format document. These characters should not be included in the list document as part of the <city> or <state> field contents.
The essential parts of a field and the keys you press to create a field are shown in Figure 2-1.
REMEMBER: Always press MERGE (F6) to begin a field label and SHIFT/MERGE to end a field label.
Merge Symbol (press the Merge key) Field Label
Merge Symbol (hold down Shift key and press the Merge key)
I FIeld Contents
AIDJO
I
,I I
<name>Mr. Averil Moore
Figure 2-1. The Parts of a Field
Creating the List Document
When you run Records Processing, you can use the field contents in two ways:
• When you use a list document and a format document, the field labels in the format document determine where the field contents will appear in the output document. In this case, the field labels are never
included in the output document. See Chapter 3, "Creating the Format Document," for information on how to create and use format documents.
• When you use a list document and a control glossary without using a format document, the field labels remain with the field contents. In this way, you can sort and select individual records from a master list document to create separate specialty lists. The master list
remains unchanged. See Chapter 5, "Creating the Control Document," for information on how to create and use control-glossary entries.
Size Limitations
A field can contain a maximum of 2048 characters, including field labels and merge symbols. Text formatting symbols such as TAB and RETURN are counted as more than one character. See Appendix B in the Fortune: Word Reference Guide for more information.
If you use control-glossary entries for sorting and selecting, there are additional restrictions on the sizes of fields and records:
• Each record must contain no more than 2048 characters, including field labels, Merge symbols, and Returns.
• If you use sort, the total length of the contents of all fields to be sorted in a record cannot be greater than 1024 characters, excluding field labels
See Chapter 5, "Creating Control-Glossary Entries," for information on how to write control-glossary entries to sort and select records.
Records
A group of fields that belong together is called a record. Each record
contains specific information about, for example, a person, company, or product. This information is saved in the list document. It can be
Creating the List Document
Records can be any length unless you plan to use a control-glossary entry to select or sort the list document. If you use a control-glossary entry, no record in the list document can contain more than 2048 characters. A list document can have an unlimited number of records (as long as there is enough free space on the system disk).
Each record must end with an end-of-record indicator on a separate line, followed by a RETURN. To create an end-of-record indicator, type MERGE, SHIFT/MERGE, and RETURN
«
> ).If you create a list composed only of employee names, each name is considered an individual record. However, a list typically contains records with more information about the list members. For example, the address list of a magazine publisher might contain additional information about the subscribers, such as their business titles and the names of magazines to which they subscribe.
Here are three examples of different types of records that you might have in separate list documents:
<first name> Rose <last name>Smith < title> Technical Writer <>
<name>!' M. Smith < title> Representative
< address> House of Representatives < city> Washington
<state>DC <zipcode> 10001 <>
<garment> Wool suit <style>Three piece <fabric>Gray pinstripe < suppliers> Clothing, Inc. <price>$375.00
<>
Which record structure you choose depends on what requirements you have for the list. You might use the first record in a list of employees, the second in a product list, and the third in an address list.
3/87
NOTE: Never put a page break in the middle of a record. When you put page breaks in your list document, always start the top of a new page with the first line of a new record.
Creating the List Document
Summary
The important information about creating a list document is summarized below:
• Each item in a list document is called a field. A field can contain a maximum of 2048 characters, including field labels and merge symbols.
• Fields have two parts: field labels and field contents.
• Fields labels always precede field contents.
• Each field label must begin with a MERGE and end with a SHIFT/MERGE.
• Never put a RETURN or page break in the middle of a field label.
• A collection of related fields is a record.
• There is no limitation on the size of records unless you use a control-glossary entry.
• If you use a control-glossary entry, each record can contain only 2048 characters.
• If you use sort in a control-glossary, the total length of the contents of all fields to be sorted in a record cannot be greater than 1024 characters, excluding field labels.
• Each record must end with an end-of-record indicator «
»
on a separate line, followed by a RETURN.• Never put a page break in the middle of a record. If you put page breaks in your list document, always start the top of a page with the first line of a new record.
• The records in a list document do not need to have the same number of fields. However, this is not recommended since unpredictable results can occur.
• Field labels must be consistent from record to record in a list document. For example, if you use <zipcode>, you should not use
Creating the List Document
DESIGNING THE LIST DOCUMENT
Before you begin typing your list document, you should carefully consider how you want to use the information. If you want to sort and select records that contain specific types of information, the list document is easier to manipulate when such information is in a separate field. You will have more options if you have a separate field for <state> and
<zipcode> rather than combining them in one field named <state &
zipcode>.
You should also think carefully about the field labels you use. In addition to being used in the list document, field labels are used in the format document and in the control-glossary entry. Since the labels appear without their accompanying information in these other two places, you should assign field names to the labels that are easy to recognize. This will make it easier for you to design the format document and to write the control-glossary entry.
It is a good idea to keep your field labels as short as possible, however, since field labels count in the total number of allowable characters per field and record.
You do not need to include all the fields from a list-document record in the format document. For example, if you are creating a membership mailing list, you might add such information about each member as
enrollment date and dues paid. Currently, however, you might only want to use the names and addresses from the list. You can enter all the
information you might ever use into a list document when you first create it. You can also add more fields and information to a list document at any time thereafter.
If you want to use information such as a company name more than one time in a form letter, you only need to type it once for each record in the
list document. Each time you want to use the information in the format document, you simply repeat the field label. For example, you could use the field label <company> in the address line, and then refer to the company by name in the body of the letter by repeating the field label
< company> at the appropriate place.
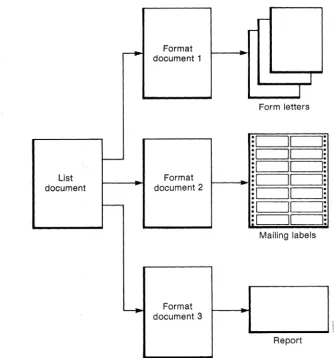
You can use the same list document with a variety of format documents to create different output documents, as shown in Figure 2-2. Each of the format documents might use a different set of field labels from the list document. Be sure you think through the different ways you might want to use the list document, and create it with the maximum flexibility
possible.
Crell-ting the List Document
---.
Format document 1I
1
Form letters
:1
r--
:1
:1
List Format
: I
document document 2
: I
r--
: I
II
: 1
II
Mailing labels
~ Format
document 3
Report
Figure 2-2. You can use the same list document with different format documents
I:
I:
I:
I:
I:
I:
I:
Once you have decided on a naming system for your field labels, you should use it consistently for all the records in that list document. Suppose you decide to label a field <name> in an address list. If you use <Name> to label some of the name fields, Records Processing will be unable to process those records.
[image:33.514.77.412.52.410.2]Creating the List Document
Suppose you want to put the following address in a list document:
Ms. Ruby Katz
85 Swanson Road, Apt. 5 Boxborough, MA 01719
You could assign the following field labels:
<name> Ms. Ruby Katz
<address>85 Swanson Road, Apt. 5 <city> Boxborough
<state>MA < zipcode > 01719 <>
With these field labels, you can easily write a control-glossary entry to sort or select addresses from the list document according to city, state, or zip code. However, if you later decide that you want to sort the list alphabetically by last name, it would be difficult for you to do so without revising the list document.
If you designed the list-document field labels in the following way, you would have a much more flexible data base:
<honorific> Ms. <first name> Ruby <last name> Katz
<street>85 Swanson Road <apt>Apt. 5
<city> Boxborough <state>MA <zipcode> 01719 <>
The field labels in these examples are spelled out completely for clarity. You can abbreviate field labels in your list and format documents to save space.
REMEMBER: Use field labels that are easy to recognize and remember. This can be especially important if you have a group of people using the same Records Processing documents.
An additional advantage of this selection of field labels is that, in a format document consisting of a letter, you can use the <honorific>,
<first name>, and <last name> field labels for the address, and the <honorific> and <last name> field labels for the salutation, by typing Dear <honorific> <last name>: in the format document.
Creating the List Document
REMEMBER: You only need to enter the contents of a field once, even if you intend to use the field more than one time in the format document.
Follow these steps in designing a list document:
1. Mter you have decided on the type of record needed for the list, make a sample of the fOrIpat document. Refer to Chapter 3, "Creating the Format Document," for information on how to set up a format document.
2. Define any parts of the format document that will vary from record to record. These will be your fields.
3. Make a list of all the possible fields needed in a record. Write down the field labels, NOT the contents of the fields. The field labels should clearly identify the information contained in the fields.
TYPING THE LIST DOCUMENT
Now that you have designed the list document, you are ready to type it. Follow these steps:
1. Create a new document, using the Create New Document selection on the Fortune:Word Main menu.
SUGGESTION: Use the word "list" or an abbreviation of it in the name of your list document. Give the format document a similar name, using the word "format" or an abbreviation of it. If you use this convention, it ,viII help you remember VvThat each document is and which list and format documents go together.
NOTE: The format line in the list document does not affect the output document, so you do not need to change it.
2. Press MERGE.
3. Type a field label.
4. Press SHIFT/MERGE.
Creating the List Document
6. Repeat steps 2 through 6 until you reach the last field label.
7. Type the end-of-record indicator by pressing MERGE, SHIFT/MERGE, and RETURN. For the list and format documents to merge properly, each record must end with an end-of-record indicator, including the last record in the list document. The last end-of-record indicator in the list document must be followed by a RETURN.
8. Use the Copy key to copy the field labels, including the
end-of-record indicator, a~d put them at the end of the document.
9. You can keep on copying the field labels until you have the correct number of records before you enter any of the field ·contents. Alternatively, you can copy the field labels and then fill in the field contents one record at a time.
For information about some shortcuts in creating list documents, refer to Appendix C, "Creating a List Document Using Glossary Entries."
You can also use the Forms Processing feature to create list documents. Refer to the Fortune: Word Reference Guide for information about Forms Processing.
10. Enter the field contents for each field label until you have completed all the records in the list document. Include only the punctuation and spacing that is to be part of the field contents. Do not leave any spaces between the end of the field label and the
beginning of the field contents unless you make allowance for them in the format document.
11. When you have entered all the records, leave the document and save the changes as you normally would.
12. You can paginate your list document to make it easier to handle.
3/87
However, be sure you do NOT put a page break in the middle of a record. If you insert page breaks within a record, an extra page break followed by a RETURN will be inserted into your output document. Page breaks BETWEEN records do not affect the pagination of the output document.
When you use the Hyphenation and Pagination feature, you can set the text length so that page breaks are automatically entered at the
correct place. For example, if the records in the list document are each 10 lines long, you can set the text length to 50. The paginated list document will then have 5 records per page. .
Creating the List Document
You can place the label and contents for each field on a separate line in the list, or you can string them together on one or more lines, as shown in the example below. If you do combine fields on one line, it may be more difficult to edit the list document.
<name>Robert Simmons<address>2390 Wisconsin Ave. <city> Washington <state> DC<zipcode> 20301
<>
Even though each record in a list document does not have to contain the same number of fields, if a field is missing and you use a
control-glossary entry to sort or select the list, you may miss some records. When a field for a particular record has no information, just type the field label and leave the field contents blank, as shown in this example:
<name> Mr. Ronald Parsons <title> Vice President
<company> Windward Leasing <address1>4390 Alealoa <address2>
<city> Honolulu <state>HI <zipcode>99301 <>
In this list document, <address2> is a separate field for an apartment number, even though not all the people on the list live in apartments. If you want, you can later use a control glossary to find all the fields with missing information. See Chapter 5 for information on how to use a control-glossary entry to select records with blank fields.
Exercise
3/87
<honorific> Mr. <first name>Ronald <last name> Parsons <title> Vice President
<company> Windward Leasing < address >4390 Alealoa <city> Honolulu < state> HI <zipcode> 99301
<memb since>March, 1980 <memb end> March, 1986 <dues>$150.00
<paid>$250.00 <>
<honorific> Mrs. <first name> Dorothy <last name>Adams < title> President
< company> Northwest Canners <address>389 N. 25th St. < city> Vancouver
<state>BC
<zipcode> V6K 2Y9
<1l1.emb since>September, 1978 <memb end>September, 1986 <dues>$200.00
<paid> <>
<honorific> Mr. <first name>Averil <last name>Moore <title> President
< company> Westmore Growers <address>390 N. Birch St. <city> Fresno
<state>CA <zipcode> 93109
<memb since> November, 1983 <memb end>November, 1985 <dues> $250.00
<paid>$150.00 <>
2-13
Creating the List· Document
CreRting the List Document
<honorific> Mr. <first name> Arnold <last name> Yates <title> Manager
<company> Westfield Chamber of Commerce < address >Rt. 9, Box 678
< city> Westfield <state>CA <zipcode>91293
<memb since> June, 1979 <memb end> June, 1986 <dues>$200.00
<paid> $250.00 <>
<honorific> Ms. <first name> Leona <last name> Rogers <title> Vice President
<company>Central Valley Expeditions <address>P.O. Box 45
< city> Corvallis <state>OR <zipcode>98101
<memb since>August, 1981 <memb end>August, 1986 <dues>$300.00
<paid> $250.00 <>
<honorific> Mr. <first name> Richard <last name> Harmon < title> District Director
< company> California Mining Association <address> 1930 Watt Ave.
< city> Sacramento <state>CA <zipcode>93190
<memb since>February, 1980 <memb end>February, 1986 <dues>$250.00
3/87
<honorific> Ms. <first name> Margaret <last name>Overstreet <title> President
< company> Overstreet Productions <address>5389 S. 57th St.
<city> Mississauga < state> Ontario <zipcode> L4W 1E4 <memb since> July, 1981 <memb end> July, 1986 <dues>$250.00
<paid>$250.00 <>
<honorific> Mr. <first name> David <last name> Rossman < title> Regional Manager
<company> Brimstone Microcircuits <address>2618 Archway Ave. < city> Sunnyvale
<state>CA <zipcode> 92167
<memb since> May, 1981 <memb end> May, 1986 <dues>$150.00
<paid>$150.00 <>
<honorific> Ms. <first name> Joan <last name> Peters <title> Vice President
< company> Rightway Publications <address> 128 Maple St.
<city> Hibbing <state>MN <zipcode> 55746
< memb since> April, 1983 <memb end>April, 1987 <dues>$200.00
<paid>$200.00 <>
2-15
Creating the List Document
Creating the List Document
<honorific> Mr. <first name> Ray <last name> Banyon <title> Vice President < company> Banyon Sales <address>909 Washington Ave. < city> Phoenix
<state>AZ <zipcode> 87190
<memb since>August, 1981 <memb end>August, 1986 <dues>$250.00
<paid>$250.00 <>
<name> <title> <company> <address> <city> <state> < zipcode > <memb since> <memb end> <dues> <paid> <>
USING GLOSSARY ENTRIES TO CREATE THE LIST DOCUMENT
A helpful shortcut for creating field labels in a list document is to create a glossary entry containing the labels. Then, as you create the list document, rec.all the entry. If you are not familiar vv"ith using glossaries, refer to the Fortune:Word Glossary Users Guide.
This section describes how to create a glossary by example that you can then use to help you type the entries into your list document. Refer to Appendix C, "Creating a List Document Using Glossary Entries," for additional suggestions on how to use glossary entries to create a list document.
When you create a glossary to use with Records Processing, it is a good idea to use the initials rp in the glossary name to help you identify it as a Records Processing glossary.
Crefl,ting the List Document
In the next section of this chapter, entitled "Creating an Inventory List," you will create a list document called parts.list. One glossary entry that you can use to create this list is presented in the paragraphs that follow.
Creating a Records Processing Glossary by Example
You can use the Glossary by Example feature to create a glossary entry to use when you create your list document. Follow these steps to create a glossary entry you can use to create the list document in the next example:
1. Select Glossfl,ry Functions from the Fortune: Word Main menu.
2. Select Crefl,te New Glossfl,ry from the Glossary Functions menu.
3. Use parts.g.rp as the glossary name.
4. Without typing anything from the editing screen, press .CANCEL and EXECQTE. The glossary will verify, and the messages An empty glossfl,ry is fl,ttfl,ched and Press execute to continue are displayed.
5. Press EXECUTE.
6. Select Crefl,te New Document from the Fortune:Word Main menu.
7. Use parts.list as the document name.
8. When the editing screen appears, press MODE and then GL. The words Glossfl,ry entry flash at the bottom of the screen while you are creating the glossary by example.
9. Type the labels listed below into the document. Be sure you use the Merge and Shift/Merge keys. If you make typing mistakes, use the Backspace key to correct them. Be sure you terminate the list with an end-of-record indicator
«
»
and a RETURN.<part no> <type> <in stock> <on order> <last order> < back order> <unit cost> <>
10. When you have finished typing the field labels and the end-of-record indicator, position the cursor on the RETURN following <part no>.
Crelltina the List Document
11. Press MODE and then GL. The words Glossary entry are no longer displayed at the bottom of the screen. The prompt at the top of the screen is Whllt entry?
12. Type a and press RETURN.
The glossary entry in parts.g.rp should contain the information shown below. Since the Glossary by Example feature does not put each field label on a separate line, the format of the entry will vary. If you want, you can edit the glossary entry to make it look exactly like the example.
entry a
{
merge "part no" MERGE return merge "type" MERGE return merge "in stock" MERGE return merge "on order" MERGE return merge "last order" MERGE return merge "back order" MERGE return merge "unit cost" MERGE return merge MERGE return
up(8) right(9) }
NOTE: There may be keywords such as "backspace" and additional characters in your glossary entry if you made any corrections while typing the entry.
If you want to type the entry directly into a glossary instead of using Glossary by Example, it should look exactly like the example above. For more information on how to create a glossary entry, refer to the
Fortune:Word Glossary User's Guide. .
To use the glossary entry you have created, the glossary parts.g.rp must be attached. For information on how to attach a glossary, refer to the
Fortune:Word Reference Guide. To use the glossary entry, follow these steps:
1. Press GL and type a. The field labels are automatically entered into the document, and the cursor moves to the end of the first field label.
2. Type the field contents for each label.