Mokum is the only full-time Oracle virtualization integrator with the expertise to help you
virtualize your Oracle workloads without having to overprovision hardware, and Oracle
licenses.
Call 1 (415) 252-9164
Email:
[email protected]
Web:
http://mokumsolutions.com
Copyright © 2015 Mokum Solutions, Inc. All rights reserved.
Distribution of the Mokum Oracle Private Cloud Reference Design or derivative
of the work in any form is prohibited unless prior permission is obtained from
the Copyright holder.
About Mokum Solutions, Inc.
Founded in March 2011, Mokum Solutions, Inc. specializes in virtualizing Oracle
workloads in private and hybrid clouds. Mokum corporate headquarters are
located in San Francisco, CA http://mokumsolutions.com or call 1 415 252 9164.
About the Author
The author of the Mokum Oracle Private Cloud Reference Design is none other
than the owner of Mokum Solutions, Inc., Roddy Rodstein. Roddy is one of the
most respected Oracle Cloud Computing experts, having designed and managed
many of the world’s largest and most complex Oracle private clouds. Before
establishing Mokum in March 2011, Roddy spent three years at Oracle on the
Oracle VM and Oracle Linux team designing and supporting Oracle's largest and
most complex customer environments. Before Oracle, Roddy spent six years at
Citrix, designing and supporting Citrix's largest and most complex customer
environments, Including Oracle's.
Document Created: 09/10/11 Last Update: 02/13/15
This chapter of the Oracle Cloud Cookbook describes how to plan for and install Oracle VM Server. This chapter applies to all Oracle VM 3 releases.
Table of Contents
Oracle VM Server Installation Introduction Oracle VM Server Pre-Deployment Checklist Download the Oracle VM Media Pack Oracle VM Server Installation Release 3.3.x
Oracle VM Server Installation Release 3.1 up to 3.2 Oracle VM Post Installation Checklist
1.Oracle VM Name Resolution
2.Oracle VM /etc/hosts File Requirements
3.Disable Extra C-states
4.Patch the Oracle VM Server(s)
5.Install the Oracle VM Server Support Tools
6.Install Oracle OS Watcher
7.Install the Mokum Oracle VM Diagnostic Utilities
8.Install OVMProf
9.Install NMON
10. Oracle VM NUMA Best Practices Uninstall / Remove Oracle VM
Call 415-252-9164 Mokum Oracle Cloud Cookbook http://mokumsolutions.com/
Oracle VM Server Installation Introduction
Oracle VM Server for x86 can be installed on Intel or AMD x86_64 hardware using a bootable CD-ROM or over the network using a pre-boot execution environment (PXE). Both Oracle VM Server installation methods, CD-ROM and PXE boot, require the Oracle VM Server Media Pack. The Oracle VM Server Media Pack is available at the Oracle Linux and Oracle VM Cloud Portal. Access to the Oracle Linux and Oracle VM Cloud Portal requires an Oracle SSO user account and password. The Oracle VM Server Media Pack is downloaded as zip and/or ISO files. The Oracle VM Server ISO image can be burned to a bootable CD and used for a CD-ROM installation as well as staged on a boot server for a PXE boot
installation. Oracle VM is distributed as Open Source software, therefore the source code is also available along with the ISO image at the Oracle Linux and Oracle VM Cloud Portal. The Oracle VM Server source code is not needed to install Oracle VM server.
Oracle VM Server can be installed from a CD-ROM, or over the network (PXE) with the installation media hosted via NFS, FTP, or HTTP. The difference between installing Oracle VM Server from a CD-ROM, or over the network is how the server boots and the location of the installation media. Contemporary servers can boot from a bootable CD in a local CD-ROM drive, from a remote CD-CD-ROM drive using a Lights out Management (LOM) solution as well as over the network using a pre-boot execution environment (PXE). Once the server boots, the installation program can install Oracle VM Server from the CD-ROM, or over the network via NFS, FTP or HTTP.
Tip: Occasionally CD-ROM installations using Lights out Management (LOM) solutions terminate with file copy errors. If you encounter file copy errors with a Lights out Management (LOM) installation, the workaround is to stage the Oracle VM Server media files on the server’s hard disk, or on a NFS share, FTP server or a HTTP server on the same network as the target server. Once the Oracle VM Server media files have been staged on the server’s hard disk, a NFS share, FTP server or a HTTP server, boot the server with the bootable CD and when presented with the Install Method screen, enter the path to the installation media.
Oracle recommends a dual core CPU or multiple CPUs with at least 1GB or 2GB of RAM. Oracle’s minimum CPU and RAM recommendation for Oracle VM Server is a starting point for a proof of concept (POC) running only a couple virtual
per Oracle VM Server.
The exact number of network interfaces for an Oracle VM Server entirely depends on your organization’s business
requirements, server hardware, and network and storage infrastructure capabilities. For example, an Oracle VM Server with four 10G NICs, configured with two 802.1Q bonds could support the most demanding network and storage requirements, with only four NICs. By contrast, an Oracle VM Server using access ports/port-based VLANs or 802.1Q tag-based VLANS on a 1G copper network, could easily use over 10 NIC/ports to meet your minimum network requirements.
The Oracle VM 3.0 installation program allows the server' IP address to be assigned using DHCP or as a static IP address. It is recommended to use a static IP address for Oracle VM Servers to ensure that each server always receives the same IP address. Using DHCP assigned IP addresses can result in unexpected IP address changes due to DHCP lease expiry setting causing unexpected results.
The default behavior of the Oracle VM Server 3.1 and 3.2 installation program is to allocate only 3GB of storage for the entire installation, regardless of the amount of available disk space. With Oracle VM Server 3.1 and 3.2 I recommend re-allocating the free space to the root “/” partition for log files and diagnostics. Server Oracle VM Server 3.1 and 3.2 only requires 3 GB of storage, you might consider procuring disk-less hardware with a flash storage module or boot from SAN to reduce operating costs.
Tip: When installing Oracle VM Server 3.1 and 3.2 on a small flash storage module, i.e. 4GB, it is necessary to select the "Create a minimal partition layout for installation to a USB drive" partition layout option.
The default behavior of the Oracle VM Server 3.3.x installation program is to create partitions with the maximum amount of disk space for dom0, then use the rest for an OCSF2 local repository for virtual machines, templates, or SWAP disks. The only way to change the default partitioning layout is to install Oracle VM Server using a kickstart file.
The following table shows the Oracle VM Server installation roadmap:
Step 1 Step 2 Step 3 Step 4
Oracle VM Server Pre-Deployment Checklist
Download the Oracle VM Media Pack
Oracle VM Server Installation
Oracle VM Post Installation Checklist
Oracle VM Server Pre-Deployment Checklist
Step 1 Step 2 Step 3 Step 4
Oracle VM Server Pre-Deployment Checklist
Download the Oracle VM Media Pack
Oracle VM Server Installation
Oracle VM Post Installation Checklist
This checklist should be completed before Oracle VM Server is installed.
Task Verify
Oracle Application Certification
Verify which version of Oracle VM is certified for the Oracle applications you plan to deploy on Oracle VM.
Note: Visit My Oracle Support and click the Certifications link to search for the Oracle products you
Call 415-252-9164 Mokum Oracle Cloud Cookbook http://mokumsolutions.com/
plan to deploy on Oracle VM. Hardware
Certification
Verify that the server hardware is jointly supported by the hardware vendor and Oracle for the version of Oracle VM you plan to use.
Note: The following link is the Oracle' hardware certification page. http://linux.oracle.com/pls/apex/f?p=117:1:5773793518142288::NO:RP:: Storage
Certification
Verify that the storage solution is jointly supported by the storage vendor and Oracle for the version of Oracle VM you plan to use.
Note: The following link is the Oracle' hardware certification page. http://linux.oracle.com/pls/apex/f?p=117:1:5773793518142288::NO:RP:: Download the The Oracle VM Server installation media.
Verify that the Oracle VM Server installation media has been downloaded, and made available to the Oracle VM engineer.
Select Passwords Verify that the passwords for the root user account and the Oracle VM Agent have been selected and documented.
Switch
Configurations
Verify that the VLANS have been provisioned and configured. 1) ILO Network
2) Server Management 3) Cluster Heartbeat 4) Live Migration
5) Virtual Machine VLANs IP Addresses,
Subnet Masks & Gateways
Verify that each Oracle VM Server's IP Addresses, Subnet Masks & Gateways have been selected, documented and provisioned for each of the following Oracle VM Management Networks: 1) ILO Network
2) Server Management
3) Cluster Heartbeat (Only for clustered server pools) 4) Live Migration
5) Storage (only for iSCSI and/or NFS storage)
DNS Settings 1) Verify that the Oracle VM Server host names are in DNS and are accessible with both forward and reverse lookups.
Note: The Oracle VM Server's “Server Management” network IP addresses should be configured in DNS.
2) Verify that two DNS server IP addresses are available for the Oracle VM Server installation.
Note: The storage does not need to be made available (zoned and masked) to Oracle VM Manager. The storage only needs to be made available to the Oracle VM servers.
dom0 Memory Sizing
Post-installation the dom0 memory allocation will need to be increased if the Oracle VM Server hosts a large number of virtual machines, or connects to a large number of LUNs. Insufficient dom0 memory will result in out-of-memory (oom) kills, server instability, and unbootable servers. The number of paths affect the number of accessible fiber channel LUNs:
dom0 can access 1024 fiber channel LUNs with 2 paths per LUN dom0 can access 512 fiber channel LUNs with 4 paths per LUN dom0 can access 256 fiber channel LUNs with 8 paths per LUN dom0 can access 128 fiber channel LUNs with 16 paths per LUN
To accommodate a large number of iSCSI or fiber channel LUNs, the dom0 memory allocation must be increased. The formula for calculating dom0 memory is:
The dom0 memory allocation is set in the /boot/grub/grub.conf file in the "dom0_mem=XXXM" section.
If adding 512 iSCSI or fiber channel LUNs, the formula is ((3.5M * 512) + XXXM)=XXXXM Update grub.conf with "dom0_mem=XXXXM".
After updating the grub.conf file, the Oracle VM Server will need to be rebooted for the change to take effect.
Note: A single LUN consumes approximately 3.5MB of dom0 memory. Rack and Cable
the Server Hardware
Verify that the server hardware has been racked, cabled (power, network and storage) and tested.
BIOS Settings
1) Verify that the BIOS and FIRMWARE are at the latest release. 2) Verify that C-States has been disabled in the BIOS.
3) Verify that Hyperthreading is enabled in the BIOS.
4) Verify that the I/O MMU Virtualization settings are disabled; with Intel servers the feature is called VT-d; with AMD servers the feature is called AMD-Vi or IOMMU.
5) Disable NUMA if supporting virtual machines with more allocated vCPUs (cores or threads) than available from a single pCPU. For example, Xen NUMA aware scheduling will place a virtual machine with 32 vCPUs on a single NUMA node, even if the node does not have 32 cores or threads.
5) Verify that the server boots without any human intervention.
Download the Oracle VM Media Pack
Step 1 Step 2 Step 3 Step 4
Oracle VM Server Pre-Deployment Checklist
Download the Oracle VM Media Pack
Oracle VM Server Installation
Oracle VM Post Installation Checklist
The Oracle VM Media Pack is available at the Oracle Software Delivery Cloud - Oracle Linux and Oracle VM portal.
Call 415-252-9164 Mokum Oracle Cloud Cookbook http://mokumsolutions.com/
Access to the Oracle Software Delivery Cloud requires an Oracle.com user account and password. If you do not already have an Oracle.com user account, visit the Oracle Software Delivery Cloud, portal click the Sign In / Register link or button to create an Oracle.com account.
Figure 1 shows the Oracle Software Delivery Cloud - Oracle Linux and Oracle VM portal.
From the Sign In page, enter your Oracle.com user name and password, then click the Sign In button. Figure 2 shows the Oracle Software Delivery Cloud - Oracle Linux and Oracle VM portal Sign In page.
Once authenticated, accept the registration/export regulations to access to the Oracle VM and Oracle Linux Media. Figure 3 shows the registration/export regulations form.
After completing the registration/export regulation form, you will be redirected to the Media Pack Search page. From the
Media Pack Search page, select Oracle VM from the Select a Product Pack dropdown menu. Next, select x86 64-bit
from the Platform dropdown menu, then click the Go button to be taken to the Oracle VM Media Pack download page.
Tip: If you do not see Oracle VM from the Select a Product Pack dropdown menu, you are not in the Oracle Linux and Oracle VM section of the Oracle Software Delivery Cloud. Click the Cloud Portal link in the page header, then click the
Oracle Linux/VM drop down menu to be redirected to the Oracle Linux and Oracle VM section of the Oracle Software Delivery Cloud portal.
Figure 4 shows the Media Pack Search page.
Call 415-252-9164 Mokum Oracle Cloud Cookbook http://mokumsolutions.com/
From the Media Pack Search page, click the desired Oracle VM Manager release radio button, then the Continue button, or simply click the Oracle VM 3.x hyperlink to go directly to the download page.
Figure 5 shows the Media Pack Search page.
From the Oracle VM Server 3.x Media Pack for x86 (64 bit) download page, click the desired Oracle VM Server 3.x for x86 64 (64 bit)Download button to download the Oracle VM media pack.
Tip: Oracle VM is distributed as Open Source software, therefore the source code is also available along with the ISO image. The Source Code is not used for the Oracle VM Server installation.
Figure 6 shows the Oracle VM Media Pack page.
The Oracle VM media is packaged as a zip file. The zip file name corresponds to the Part Number listed on the download page. The zip file contains the Oracle VM server ISO file. Once the zip file is downloaded, use your favorite zip utility to unzip the ISO file. Next, burn the ISO file to CD to be able to install Oracle VM with a CD-ROM drive, or copy the ISO file to a loaction where your Lights out Management (LOM) sofware can access the ISO file.
Oracle VM Server Installation Release 3.3.x
Step 1 Step 2 Step 3 Step 4
Oracle VM Server Pre-Deployment Checklist
Download the Oracle VM Media Pack
Oracle VM Server Installation
Oracle VM Post Installation Checklist
1. Insert the Oracle VM Server media into the CD-ROM drive.
Call 415-252-9164 Mokum Oracle Cloud Cookbook http://mokumsolutions.com/
2. Boot the server with the Oracle VM Server media in the CD-ROM drive. 3. The Oracle VM Server Welcome screen is displayed, as shown in Figure 7.
Oracle VM Server Installation Start screen
From Oracle VM Server Installation Start screen press the Enter key to start the install program. If the Enter key is not pressed for one minute, the install program will automatically start.
Figure 7 shows the Oracle VM Server Installation Start screen.
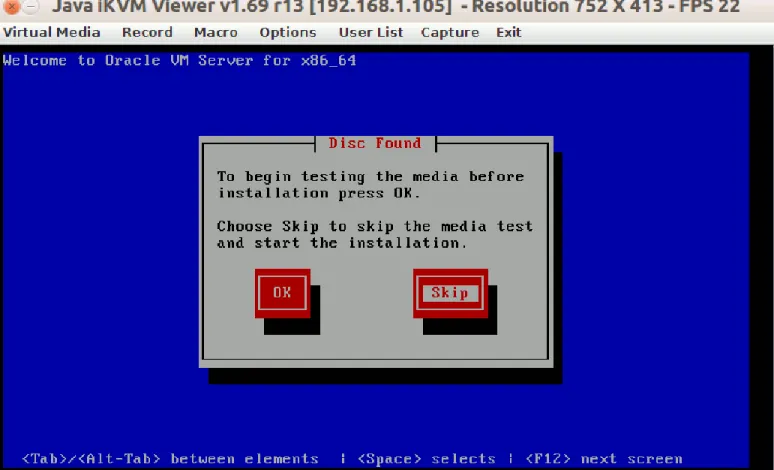
The Disk Found screen
On the Disk Found screen, you can test the media for errors. To test the media, use the Tab key to select the OK button and press Enter. Once the media test is completed, any errors will be reported. To skip the media test and continue with the install, use the Tab key to select the Skip button and press Enter to continue.
Figure 8 shows the Disk Found screen.
Oracle VM Server Welcome screen
From Oracle VM Server Welcome screen press the OK key to start the install program. If the Enter key is not pressed for one minute, the install program will automatically start.
Figure 9 shows the Oracle VM Server Welcome screen.
Call 415-252-9164 Mokum Oracle Cloud Cookbook http://mokumsolutions.com/
The Language Selection screen
On the Language Selection screen, use the Tab key to select the list of keyboard models. Then use
the UP and DOWN keys (↑ or ↓) to select the desired keyboard model. The keyboard that is selected becomes the default keyboard for dom0. Next, use the Tab key to select OK, and press Enter to continue.
Figure 10 shows the Language Selection screen.
The Keyboard Selection screen
On the Keyboard Selection screen, use the Tab key to select the list of keyboard models. Then use
the UP and DOWN keys (↑ or ↓) to select the desired keyboard model. The keyboard that is selected becomes the default keyboard for dom0. Next, use the Tab key to select OK, and press Enter to continue.
Figure 11 shows the Keyboard Selection screen.
Call 415-252-9164 Mokum Oracle Cloud Cookbook http://mokumsolutions.com/
OVS EULA screen
On the OVS EULA screen, use the UP and DOWN keys (↑ or ↓) to read the License Agreement. Next, use the Tab key to select the ACCEPT button to continue.
Figure 12 shows the OVS EULA screen.
Warning screen
Depending upon the condition of the installation disk, i.e. a new disk, or an existing disk with an operating system, you may see one or more Warning messages. Figure 13 shows a disk reinitializing Warning. The example Oracle VM Server's SSD disk had been wiped, so the appropriate selection was the Re-initialize all tab. As shown in Figure 13, reinitializing will cause data loss. Only Re-initialize is you are 100% sure that the disk or LUN can be wiped for the installation.
Note: If your installing a new server that has been zones and masked to existing SAN storage, DO NOT RE-INITIALIZE ANY SAN PARTITIONS! Re-initializeing the wrong SAN partitions could delete an existing server pool and/or virtual machine repositories.
Figure 13 shows the Warning screen.
Call 415-252-9164 Mokum Oracle Cloud Cookbook http://mokumsolutions.com/
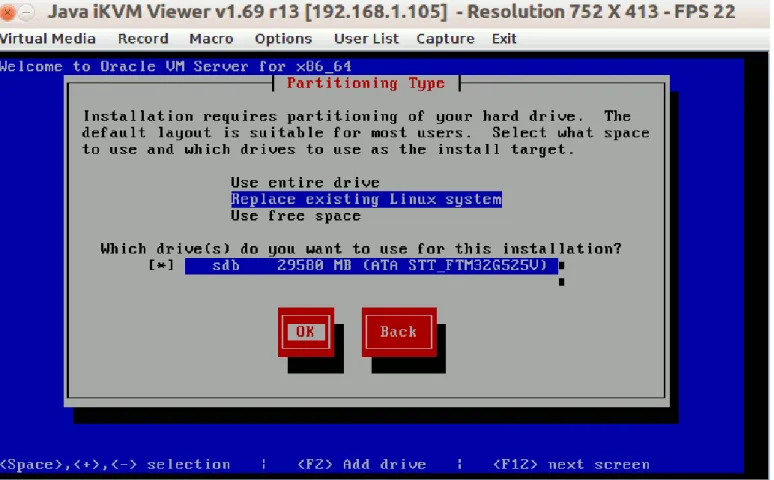
Partitioning Type screen
The Partitioning Type screen offers the following three options: Use the entire drive
Replace the existing Linux system (if any) Use the free space
Select which drive(s) you want to use for the installation. Replace the existing Linux system (if any) is the defaut option and is suitable for most systems.
Tip: The default behavior of the Oracle VM Server installation program is to create partitions with the maximum amount of disk space for dom0, then use the rest for an OCSF2 local repository for virtual machines, templates, or SWAP disks. The only way to change the default partitioning layout is to install Oracle VM Server using a kickstart file.
Use the Tab key to select your Partitioning option. In this example we selected the Replace existing Linux system option. Use the Tab key to select the OK button to continue.
Figure 14 shows the Partitioning Type screen.
Writing storage configuration to disk screen
On the Writing storage configuration to disk screen you must confirm that you wish to write the partitioning information to disk to proceed, or Go back to make changes. Selecting Writing storage configuration to disk will erase any data on the disk.
Use the Tab key to select the Writing storage configuration to disk button to continue.
Figure 15 shows the Writing storage configuration to disk screen.
Call 415-252-9164 Mokum Oracle Cloud Cookbook http://mokumsolutions.com/
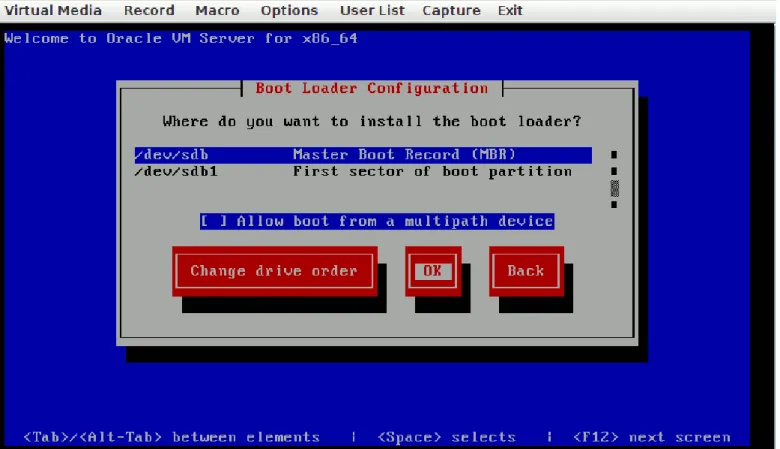
The Boot Loader Configuration screen
On the Boot Loader Configuration screen, use the Tab key to select the Master Boot Record (MBR) or the First sector of boot partition as the location to install the boot loader. Unless your booting from SAN, or the data displayed on the Boot Loader Configuration screen looks suspect, accepted the defaults, and use the Tab key to select the OK button and
press Enter to continue.
Figure 16 shows the Boot Loader Configuration screen.
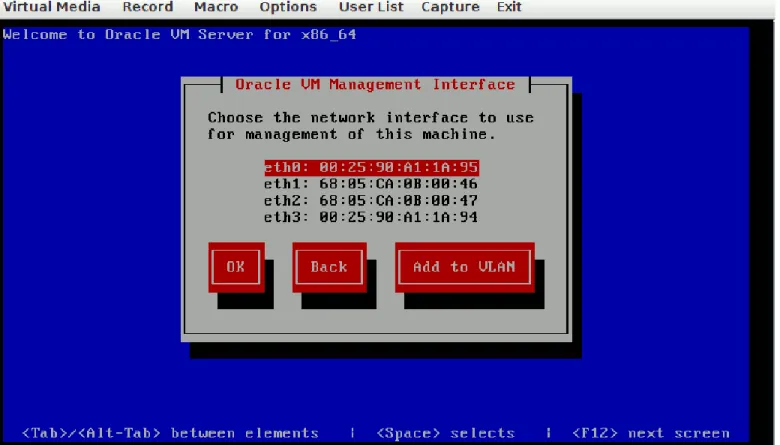
Oracle VM Server Management Interface screen
On the Oracle VM Server Management Interface screen, use the Tab key to select the network interface (Access Port) that will be dedicated for the server management network channel. If you select OK, the expectation is that the selected server management interface is not a tagged VLAN, i.e. the port on the network switch is configured as an access port. For 802.1Q (Tagged VLANs), select the Add to VLAN tab to enter the VLAN ID show in Figure 18.
Note: The installer program selects eth0 as the default server management interface. The server management interface can be changed post installation by hand in the /etc/sysconfig/network-scripts/ifcfg-* files.
Figure 17 shows the Oracle VM Server Management Interface screen.
Call 415-252-9164 Mokum Oracle Cloud Cookbook http://mokumsolutions.com/
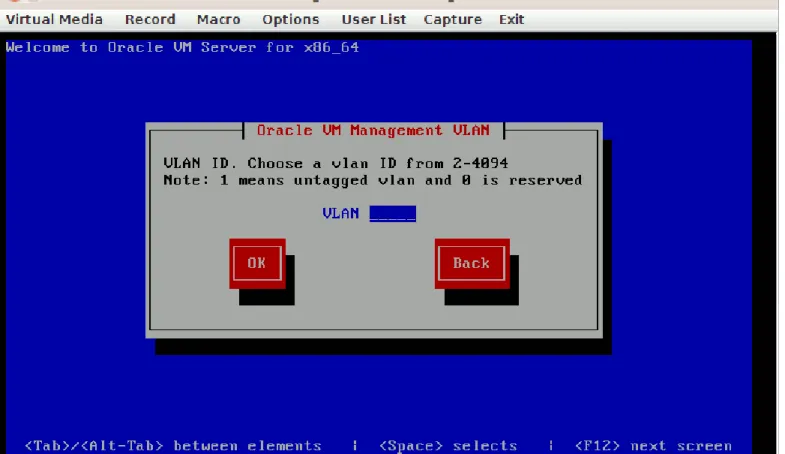
Oracle VM Server Management VLAN screen
On the Oracle VM Server Management VLAN screen, use the Tab key and enter the server management network channel VLAN ID in the VLAN text box. Once the Oracle VM Server Management VLAN is entered, use the Tab key to select the OK button to continue.
Figure 18 shows the Oracle VM Server Management VLAN screen.
The IPv4 Configuration for eth0 screen
The IPv4 Configuration for eth0 screen offers the following three options: Dynamic IP configuration (DHCP)
Manual address configuration IP Address / Prefix (netmask)
If your Oracle VM server will use DHCP to assign its IP address, select the Dynamic IP configuration (DHCP) option. To select the Dynamic IP configuration (DHCP) entry, use the Tab key to highlight the Dynamic IP configuration
(DHCP) entry, then use the Space bar to select the Dynamic IP configuration (DHCP) entry. Use the Tab key to select the OK button to continue.
If your Oracle VM server will use a static IP address, select the Manual address configuration entry. To select the Manual address configuration entry use the Tab key to highlight the Manual address configuration entry, then use the Space bar to select the Manual address configuration entry. Next, use the Tab key to enter the IP Address and Prefix (netmask). Use the Tab key to select the OK button to continue.
Figure 19 shows the IPv4 Configuration for eth0 screen.
Call 415-252-9164 Mokum Oracle Cloud Cookbook http://mokumsolutions.com/
The Miscellaneous Network Settings screen
On the Miscellaneous Network Settings screen, use the Tab key to select the Gateway, Primary DNS and
optional Secondary DNS to enter the networking settings for your environment. Use the Tab key to select the OK button and press Enter to continue.
Figure 20 shows the Miscellaneous Network Settings screen.
Hostname Configuration screen
On the Hostname Configuration screen, select one of the following two options: automatically via DHCP
manually
If the machine uses DHCP to assign its hostname, then select the automatically via DHCP option. Next, use the Tab key to select the OK button to continue.
To assign a hostname for your Oracle VM server, select the manually option and enter the host' short name in the text box. Then, use the Tab key to select the OK button to continue.
Tip: The hostname entered into the Hostname Configuration screen will be displayed in Oracle VM Manager for the host and its objects.
Figure 21 shows the Hostname Configuration screen.
Call 415-252-9164 Mokum Oracle Cloud Cookbook http://mokumsolutions.com/
Time Zone Selection screen
On the Time Zone Selection screen select the System clock uses UTC option to use Coordinated Universal Time (UTC), then use the Tab key and the UP or DOWN key (↑ or ↓) to select the time zone closest to your Oracle VM server’s physical location. Next, use the Tab key to select the OK button and press Enter to continue.
Figure 22 shows the Time Zone Selection screen.
Oracle VM Agent password screen
On the Oracle VM Agent password screen, enter the password for the Oracle VM agent in the Password field. The Agent password should "not" contain special character, i.e. ;:#,!, etc. In the Password (confirm) field, re-enter the password. Use the Tab key to select the OK button and press Enter to continue. If the two passwords do not match, the installation program will ask you to re-enter the passwords.
The Oracle VM agent password is used by Oracle VM Manager and the Oracle VM Management Pack to dispatch
commands and to retrieve pool-status data. The Oracle VM agent password can be changed after the installation from dom0 by typing “ovs-agent-passwd oracle” for the oracle account.
Figure 23 shows the Oracle VM Agent password screen.
Call 415-252-9164 Mokum Oracle Cloud Cookbook http://mokumsolutions.com/
Root Password screen
On the Root Password screen, enter a password with at least six characters for the root user in the Password field. In the Password (confirm) field, re-enter the password. Use the Tab key to select the OK button and press Enter to continue. If the two passwords do not match, the installation program will ask you to re-enter the passwords.
Figure 24 shows the Root Password screen.
Installation Starting screen
On the Installation Starting screen you can monitor the progress of the installation. Figure 25 shows the Installation to begin screen.
Call 415-252-9164 Mokum Oracle Cloud Cookbook http://mokumsolutions.com/
Post Instalation screen
On the Post Instalation screen you can monitor the progress of the Post Installation configurations. Figure 26 shows the Complete screen.
Complete screen
When the Complete screen appears, remove the Oracle VM Server media and press Enter to reboot the Oracle VM server. Figure 27 shows the Complete screen.
Call 415-252-9164 Mokum Oracle Cloud Cookbook http://mokumsolutions.com/
Oracle VM Server login prompt screen
On the Oracle VM Server login prompt screen, enter ALT-F2 to access the login screen. From the login prompt, enter the root username and the password selected during the installation to access the server console.
Figure 28 shows the Oracle VM Server login prompt screen.
After installing Oracle VM, review and complete all of the necessary tasks on the post-installation checklist before the server is added to a pool. Once the post-installation checklist is completed, the Oracle VM Server can be added to a server pool and patched using Oracle VM Manager or Oracle Enterprise Manager.
Oracle VM Server Installation Release 3.1 up to 3.2
Step 1 Step 2 Step 3 Step 4
Oracle VM Server Pre-Deployment Checklist
Download the Oracle VM Media Pack
Oracle VM Server Installation
Oracle VM Post Installation Checklist
1. Insert the Oracle VM Server media into the CD-ROM drive.
2. Boot the server with the Oracle VM Server media in the CD-ROM drive. 3. The Oracle VM Server Welcome screen is displayed, as shown in Figure 7.
Oracle VM Server Welcome screen
From Oracle VM Server Welcome screen press the Enter key to start the install program. If the Enter key is not pressed for one minute, the install program will automatically start.
Figure 29 shows the Oracle VM Server Welcome screen.
Call 415-252-9164 Mokum Oracle Cloud Cookbook http://mokumsolutions.com/
The CD Found screen
On the CD Found screen, you can test the media for errors. To test the media, use the Tab key to select the OK button and press Enter. Once the media test is completed, any errors will be reported. To skip the media test and continue with the install, use the Tab key to select the Skip button and press Enter to continue.
Figure 30 shows the CD Found screen.
The Keyboard Selection screen
On the Keyboard Selection screen, use the Tab key to select the list of keyboard models. Then use the UP and DOWN
keys (↑ or ↓) to select the desired keyboard model. The keyboard that is selected becomes the default keyboard for dom0. Next, use the Tab key to select OK, and press Enter to continue.
Figure 31 shows the Keyboard Selection screen.
OVS EULA screen
Call 415-252-9164 Mokum Oracle Cloud Cookbook http://mokumsolutions.com/
On the OVS EULA screen, use the UP and DOWN keys (↑ or ↓) to read the License Agreement. Next, use the Tab key to select the ACCEPT button to continue.
Figure 32 shows the OVS EULA screen.
Partitioning Type screen
The Partitioning Type screen offers the following five partitioning options: Remove all partitions and create a new default partition layout
Remove all Linux partitions and create a new default partition layout Use the free space on selected drives to create a new default partition layout Create a minimal partition layout for installation to a USB drive
Create a custom partition layout
Tip: The default behavior of the Oracle VM Server installation program is to allocate only 3GB of storage for the entire installation, regardless of the amount of available disk space. I recommend re-allocating the free space to the root “/” partition for log files and diagnostics. When installing Oracle VM Server on a small flash storage module, i.e. 4GB, select the "Create a minimal partition layout for installation to a USB drive" partition layout option.
Use the Tab key to select the Remove all partitions and create a new default partition layout option. Ensure that the appropriate drive is selected in the Which drive(s) do you want to use for this installation section. Use the Tab key to select the OK button to continue.
Warning screen
On the Warning screen, use the Tab key to select the Yes button, then press Enter to continue.
Note: If your installing a new server that has been zones and masked to existing SAN storage, DO NOT REMOVE ANY OF THE SAN PARTITIONS! Removing the SAN partitions could delete the existing server pool with its virtual machines. Figure 34 shows the Warning screen.
Call 415-252-9164 Mokum Oracle Cloud Cookbook http://mokumsolutions.com/
Review Partition Layout screen
On the Review Partition Layout screen, use the Tab key to select the YES to review and/or modify the Partition Layout,
oruse the Tab key to select the NO to accept the defaults and continue to the Boot Loader Configuration screen. The default behavior of the Oracle VM Server installation program is to allocate only 3GB of storage for the entire Oracle VM Server installation, regardless of the amount of available disk space. I recommend re-allocating the free space to the root “/” partition for log files and diagnostics.
The following examples show how to re-allocating the free space to the root “/” partition for log files and diagnostics. Figure 35 shows the Review Partition Layout screen.
Partitioning screen
On the Partitioning screen, use the Tab key to select the root “/”partition, then use the Tab key to select the Edit button. Press Enter to continue.
Figure 36 shows the Partition screen.
Add Partition screen
On the Add Partition screen, use the Tab key to select the Fill all available space option. Next, press the Space bar to select the Fill all available space option. Use the Tab key to select the OK button to proceed.
Figure 37 shows the Add Partition screen.
Partitioning screen
On the Partitioning screen, use the Tab key to select OK to continue.
Call 415-252-9164 Mokum Oracle Cloud Cookbook http://mokumsolutions.com/
Figure 38 shows the Partitioning screen
The Boot Loader Configuration screen
On the Boot Loader Configuration screen, use the Tab key to select the Master Boot Record (MBR) or the First sector of boot partition as the location to install the boot loader. For this example, we have selected the Master Boot Record (MBR) option. Next, use the Tab key to select the OK button and press Enter to continue.
Figure 39 shows the Boot Loader Configuration screen.
Oracle VM Server Management Interface screen (ACCESS PORTS - NOT 802.1q)
On the Oracle VM Server Management Interface screen, use the Tab key to select the network interface that will be dedicated for the server management network channel. If your using 802.1Q (VLANs), select the Add to VLAN tab to enter the VLAN ID of the server management network channel. Once the network interface is selected, use the Tab key to select the OK button and press Enter to continue.
If you select OK, skip to the The IPv4 Configuration for eth0 screen.
Note: The installer program selects eth0 as the default server management interface. The server management interface settings are controlled in the /etc/ovs-config file. The server management interface can be changed post installation using Oracle VM Manager.
Figure 40 shows the Oracle VM Server Management Interface screen.
Oracle VM Server Management Interface screen - Add to VLAN (802.1q)
On the Oracle VM Server Management Interface screen, use the Tab key to select the network interface that will be dedicated for the server management network channel. For 802.1Q (VLANs), select the Add to VLAN tab to enter the VLAN ID of the server management network channel. Once the network interface is selected, use the Tab key to select the
OK button and press Enter to continue.
Note: The installer program selects eth0 as the default server management interface. The server management interface settings are controlled in the /etc/ovs-config file. The server management interface can be changed post installation using Oracle VM Manager.
Figure 41 shows the Oracle VM Server Management Interface screen.
Call 415-252-9164 Mokum Oracle Cloud Cookbook http://mokumsolutions.com/
From the Oracle VM Management VLAN screen enter the VLAN ID of the server management network channel.
Tip: VLAN ID 1 can not be used with Oracle VM Manager. Figure 42 shows the Oracle VM Management VLAN screen.
Dynamic IP configuration (DHCP) Manual address configuration IP Address and Prefix (netmask)
If your Oracle VM server will use DHCP to assign its IP address, select the Dynamic IP configuration (DHCP) option. To select the Dynamic IP configuration (DHCP) entry, use the Tab key to highlight the Dynamic IP configuration
(DHCP) entry, then use the Space bar to select the Dynamic IP configuration (DHCP) entry. Use the Tab key to select the OK button to continue.
If your Oracle VM server will use a static IP address, select the Manual address configuration entry. To select the Manual address configuration entry use the Tab key to highlight the Manual address configuration entry, then use the Space bar to select the Manual address configuration entry. Next, use the Tab key to enter the IP Address and Prefix (netmask). Use the Tab key to select the OK button to continue.
Figure 43 shows the IPv4 Configuration for eth0 screen.
The Miscellaneous Network Settings screen
On the Miscellaneous Network Settings screen, use the Tab key to select the Gateway, Primary DNS and
optional Secondary DNS to enter the networking settings for your environment. Use the Tab key to select the OK button and press Enter to continue.
Figure 44 shows the Hostname Configuration screen.
Call 415-252-9164 Mokum Oracle Cloud Cookbook http://mokumsolutions.com/
Hostname Configuration screen
On the Hostname Configuration screen, select one of the following two options: automatically via DHCP
manually
If the machine uses DHCP to assign its hostname, then select the automatically via DHCP option. Next, use the Tab key to select the OK button to continue.
To assign a hostname for your Oracle VM server, select the manually option and enter the host' short name in the text box. Then, use the Tab key to select the OK button to continue.
Tip: The hostname entered into the Hostname Configuration screen will be displayed in Oracle VM Manager for the host and its objects.
Figure 45 shows the Hostname Configuration screen.
Time Zone Selection screen
On the Time Zone Selection screen select the System clock uses UTC option to use Coordinated Universal Time (UTC), then use the Tab key and the UP or DOWN key (↑ or ↓) to select the time zone closest to your Oracle VM server’s physical location. Next, use the Tab key to select the OK button and press Enter to continue.
Figure 46 shows the Time Zone Selection screen.
Oracle VM Agent password screen
Call 415-252-9164 Mokum Oracle Cloud Cookbook http://mokumsolutions.com/
On the Oracle VM Agent password screen, enter the password for the Oracle VM agent in the Password field. The Agent password should "not" contain special character, i.e. ;:#,!, etc. In the Password (confirm) field, re-enter the password. Use the Tab key to select the OK button and press Enter to continue. If the two passwords do not match, the installation program will ask you to re-enter the passwords.
The Oracle VM agent password is used by Oracle VM Manager and the Oracle VM Management Pack to dispatch
commands and to retrieve pool-status data. The Oracle VM agent password can be changed after the installation from dom0 by typing “ovs-agent-passwd oracle” for the oracle account.
Figure 47 shows the Oracle VM Agent password screen.
Root Password screen
On the Root Password screen, enter a password with at least six characters for the root user in the Password field. In the Password (confirm) field, re-enter the password. Use the Tab key to select the OK button and press Enter to continue. If the two passwords do not match, the installation program will ask you to re-enter the passwords.
Figure 48 shows the Root Password screen.
Installation to begin screen
On the Installation to begin screen, select OK and press Enter to continue. Figure 49 shows the Installation to begin screen.
Complete screen
When the Complete screen appears, remove the Oracle VM Server media from the CD-ROM drive and press Enter to reboot the Oracle VM server.
Call 415-252-9164 Mokum Oracle Cloud Cookbook http://mokumsolutions.com/
Figure 50 shows the Complete screen.
Oracle VM Server login prompt screen
On the Oracle VM Server login prompt screen, enter ALT-F2 to access the login screen. From the login prompt, enter the root username and the password to access the dom0 console.
Figure 51 shows the Oracle VM Server login prompt screen.
After installing Oracle VM, review and complete all of the necessary tasks on the post-installation checklist before the server is added to a pool. Once the post-installation checklist is completed, the Oracle VM Server can be added to a server pool and patched using Oracle VM Manager or Oracle Enterprise Manager.
Oracle VM Post Installation Checklist
Step 1 Step 2 Step 3 Step 4
Oracle VM Server Pre-Deployment Checklist
Download the Oracle VM Media Pack
Oracle VM Server Installation
Oracle VM Post Installation Checklist
After installing Oracle VM, review and complete all of the necessary tasks on the post-installation checklist before the Oracle VM Server is added to a pool. These tasks involve validating the Oracle VM Server's networking prerequisites and disabling CPU operating states (C-states) in the BIOS.
1. Oracle VM Name Resolution
Applicable to all Oracle VM 3.x Releases.The Oracle VM Server(s) must have consistent name resolution using DNS with both forward and reverse lookups. First, open the “/etc/resolv.conf” file by typing “vi /etc/resolv.conf” and confirm that the domain name or names, and two DNS servers are listed. The next example shows one domain name and two DNS servers listed in a resolv.conf file. # vi /etc/resolv.conf
search <DOMAIN NAME>
nameserver <MY DNS SERVER1 IP ADDRESS> nameserver <MY DNS SERVER2 IP ADDRESS>
From each Oracle VM server ping each DNS server listed in the resolv.conf file to ensure network connectivity.
Next, validate the forward lookups for each Oracle VM Server and the Oracle VM Manager host using the “getent hosts” command. For example, to validate server2's forward lookup from server1 type “getent hosts server2” as shown in the next example.
# getent hosts server2
server2 has address 192.168.4.6
Note: Using only hosts files without DNS is not advised and may produce unpredictable results.
2. Oracle VM /etc/hosts File Requirements
Applicable to all Oracle VM 3.x Releases.The Oracle VM Server’s host name in the /etc/hosts file must be associated with the server's public IP address. If an Oracle VM Server host name is associated with 127.0.0.1, the cluster.conf file will be malformed and the cluster will not be operational.
The next example shows the proper syntax for an Oracle VM Server’s hosts file entry. 127.0.0.1 localhost.localdomain localhost
Call 415-252-9164 Mokum Oracle Cloud Cookbook http://mokumsolutions.com/
192.168.4.8 servername.com servername
The next example shows the improper syntax from an Oracle VM Server's hosts file entry. 127.0.0.1 servername.com servername localhost.localdomain localhost
192.168.4.8 servername.com servername
3. Disable Extra C-states
Applicable to all Oracle VM 3.x Releases.
To reduce the risk of unexpected server reboots, extra C-states should be disabled in the BIOS of each Oracle VM Server. If the BIOS has a settings named "Active Power Controller mode", disable this option as well.
The Intel Nehalem CPU introduced a CPU power-saving feature called deep CPU operating states (C-states). C-states allows an idle processor to turn off unused components to save power. Some of the components that C-states turns off include the processor clock and interrupts. Under certain conditions, when C-states turns off unused CPU components, the Oracle VM OCFS2 heartbeat mechanism triggers an unexpected server reboot.
C-states server reboots log the following log entries in /var/log/messages. May 4 16:45:40 <HOST NAME> syslogd 1.4.1: restart.
May 4 16:45:40 <HOST NAME> kernel: klogd 1.4.1, log source = /proc/kmsg started.
On alive servers in the pool, the following OCFS2 o2net connection error appear in /var/log/messages.
server2 kernel: o2net: Connection to node "<HOST NAME>" (num 0) at xx.xx.xxx.xxx:7777 has been idle for 60.5 secs, shutting it down.
To confirm if extra C-states are enabled, as root type: # xenpm get-cpuidle-states | grep total | uniq
total C-states : 2
If the "total C-states" is greater than 2, then extra C-states is enabled in the server's BIOS. The above example shows that extra C-states are disabled on the hosts, i.e. "total C-states : 2". If extra C-States are enabled, the command output would show: "total C-states: 4"
How to Disable Extra C-states on HP Servers:
1. Reboot2. Enter the BIOS Setup Utility by pressing F9 on POST
3. Navigate to Power Management Option" => Advanced Power Management Options => Minimum Processor Idle Power State
4. Choose "No C-States"
4. Choose "Disabled"
5. To exit the BIOS Setup Utility and save the new settings, press Esc.
4. Patch the Oracle VM Server(s)
Applicable to all Oracle VM 3.x Releases.Even after a fresh installation of the lastest Oracle VM Server release, a best practice is to patch the Oracle VM Server before setting up the server pool, and doing any testing to avoid previously fixed bugs.
When upgrading Oracle VM, Oracle VM Manager must be upgraded first, followed by the Oracle VM Servers managed by Oracle VM Manager. Oracle VM Servers are updated and patched using a local yum repository or the Oracle public yum server. A local yum repository can be configured on any Internet accessible Oracle Linux or Red Hat Enterprise Linux web server that has been registered with the Unbreakable Linux Network. A valid customer service identifier (CSI) for Oracle Linux and/or Oracle VM is required to configure a yum server at the Unbreakable Linux Network. Access to the Oracle public yum server is opened to the public without registration.
Oracle's public yum server allows us to keep Oracle Linux, Red Hat Enterprise Linux, and Oracle VM systems up to date to the "latest" update version, using the "_latest" RPM repository. A "latest" patch job executed on a Oracle VM 3.1.1 host would update the host from 3.1.1 to 3.2.2 with the latest software patches, updates and fixes. To keep an Oracle VM host at its respected update level, a local yum server and a valid CSI and the Unbreakable Linux Network is required. With the Unbreakable Linux Network, it is possible to register and subscribe a yum server to the desired base and patch
RPM channels. When Oracle VM hosts are patched using the ovm*_base and ovm*_patch RPM channels, the Oracle VM hosts are patched with the latest software patches, updates and fixes from their respected update channel. For example, an Oracle VM 3.1.1 host patched using the ovm3_3.1.1_x86_64_base and ovm3_3.1.1_x86_64_patch RPM channels are patched with the latest software patches, updates and fixes from the 3.1.1 RPM channels. If an Oracle VM 3.1.1 host is patched using the ULN or public yum server ovm3_x86_64_latest RPM channel, the host will be upgraded from 3.1.1 to 3.2.2 with the latest software patches, updates and fixes.
I actually have an entire chapter of the Oracle Cloud Cookbook, Oracle VM Patch Updates, that describes how to apply patch updates to Oracle VM Manager and Oracle VM Server, as well as an entire chapter, Oracle Linux Yum Server Setup, that describes how to set-up a Oracle Linux yum server.
If you do not have the time to setup a local yum server, Oracle VM Servers can be patched using the Oracle public yum server's latest RPM channel. To patch an Oracle VM Server using the Oracle public yum server, create a repo file on the Oracle VM Server in the /etc/yum.repos.d/ directory, i.e. /etc/yum.repos.d/public-yum-ovm3.repo with the following contents:
Oracle VM Release 3.1 up to 3.2.x:
[ovm3_latest]
name=Oracle VM Server 3 Latest ($basearch)
baseurl=http://public-yum.oracle.com/repo/OracleVM/OVM3/latest/x86_64/ gpgkey=http://public-yum.oracle.com/RPM-GPG-KEY-oracle-el5 gpgcheck=1 enabled=1 Oracle VM Release 3.3.x: [ovm3x_latest]
name=Oracle VM Server 3x Latest ($basearch)
Call 415-252-9164 Mokum Oracle Cloud Cookbook http://mokumsolutions.com/
baseurl=http://public-yum.oracle.com/repo/OracleVM/OVM3/3x_latest/x86_64/ gpgkey=http://public-yum.oracle.com/RPM-GPG-KEY-oracle-el5
gpgcheck=1 enabled=1
Next, type "yum clean all", then "yum update -y" to update the server with the latest software patches, updates and fixes from the Oracle VM latest RPM channel.
5. Install the Oracle VM Server Support Tools
Applicable up to Oracle VM 3.2.8 Releases, NOT applicable for Oracle VM 3.3.x Release and above.
The default behavior of the Oracle VM Server installation program is to allocate only 3GB of storage for the entire Oracle VM server installation, regardless of the amount of available disk space. Oracle VM Server 3.x was designed to be installed on small (3GB) flash storage modules. To accommodate such a small installation footprint, Oracle VM server does not include man pages, or standard Linux troubleshooting tools. Starting with Oracle VM 3.2.1, Oracle created a handy meta-package named “ovs-support-tools” to install sudo, bind-utils, iperf, rsync, sysstat, traceroute, and vixie-cron including all dependency packages. The ovs-support-tools meta-package can be installed using the Oracle VM 3 latest RPM channel. To install ovs-support-tools from the Oracle public yum server, create a repo file on the Oracle VM Server in the
/etc/yum.repos.d/ directory, i.e. /etc/yum.repos.d/public-yum-ovm3.repo with the following contents. [ovm3_latest]
name=Oracle VM Server 3 Latest ($basearch)
baseurl=http://public-yum.oracle.com/repo/OracleVM/OVM3/latest/x86_64/ gpgkey=http://public-yum.oracle.com/RPM-GPG-KEY-oracle-el5
gpgcheck=1 enabled=1
Warning: Patch jobs using the latest RPM channel will update hosts to their respected latest version update with the latest software patches, updates and fixes. A patch job executed on a Oracle VM 3.1.1 host using the latest RPM channel would update the host from 3.1.1 to 3.2.x with the latest software patches, updates and fixes. If the intent is to only install the ovs-support-tools, after the ovs-support-tools installation disable or delete the /etc/yum.repos.d/public-yum-ovm3.repo file. Next, as root, type "yum install ovs-support-tools -y" to install the sudo, bind-utils, iperf, rsync, sysstat, traceroute, and vixie-cron.
# yum install ovs-support-tools -y Setting up Install Process
Resolving Dependencies --> Running transaction check
---> Package ovs-support-tools.x86_64 0:3.2.1-1 set to be updated
---> Package bind-utils.x86_64 30:9.3.6-20.P1.el5_8.4 set to be updated
--> Processing Dependency: bind-libs = 30:9.3.6-20.P1.el5_8.4 for package: bind-utils --> Processing Dependency: liblwres.so.9()(64bit) for package: bind-utils
--> Processing Dependency: libbind9.so.0()(64bit) for package: bind-utils --> Processing Dependency: libisccfg.so.1()(64bit) for package: bind-utils --> Processing Dependency: libisc.so.15()(64bit) for package: bind-utils --> Processing Dependency: libisccc.so.0()(64bit) for package: bind-utils --> Processing Dependency: libdns.so.26()(64bit) for package: bind-utils ---> Package iperf.x86_64 0:2.0.5-1.el5 set to be updated
---> Package rsync.x86_64 0:3.0.6-4.el5_7.1 set to be updated ---> Package sudo.x86_64 0:1.7.2p1-14.el5_8 set to be updated ---> Package sysstat.x86_64 0:7.0.2-11.el5 set to be updated ---> Package traceroute.x86_64 3:2.0.1-6.el5 set to be updated --> Running transaction check
---> Package bind-libs.x86_64 30:9.3.6-20.P1.el5_8.4 set to be updated --> Finished Dependency Resolution
Dependencies Resolved
============================================================================================ Package Arch Version Repository Size
============================================================================================ Installing:
ovs-support-tools x86_64 3.2.1-1 ovm3_latest 1.6 k Installing for dependencies:
bind-libs x86_64 30:9.3.6-20.P1.el5_8.4 ovm3_latest 897 k bind-utils x86_64 30:9.3.6-20.P1.el5_8.4 ovm3_latest 180 k iperf x86_64 2.0.5-1.el5 ovm3_latest 54 k rsync x86_64 3.0.6-4.el5_7.1 ovm3_latest 347 k sudo x86_64 1.7.2p1-14.el5_8 ovm3_latest 358 k sysstat x86_64 7.0.2-11.el5 ovm3_latest 187 k traceroute x86_64 3:2.0.1-6.el5 ovm3_latest 41 k Transaction Summary ============================================================================================ Install 8 Package(s) Upgrade 0 Package(s) Total size: 2.0 M Downloading Packages:
warning: rpmts_HdrFromFdno: Header V3 DSA signature: NOKEY, key ID 1e5e0159 ovm3_latest/gpgkey | 2.7 kB 00:00 ...
Importing GPG key 0x1E5E0159 "Oracle OSS group (Open Source Software group) <[email protected]>" from http://public-yum.oracle.com/RPM-GPG-KEY-oracle-el5
Running rpm_check_debug Running Transaction Test Finished Transaction Test Transaction Test Succeeded
Call 415-252-9164 Mokum Oracle Cloud Cookbook http://mokumsolutions.com/
Running Transaction Installing : sudo 1/8 Installing : traceroute 2/8 Installing : sysstat 3/8 Installing : bind-libs 4/8 Installing : bind-utils 5/8 Installing : rsync 6/8 Installing : iperf 7/8 Installing : ovs-support-tools 8/8 Installed: ovs-support-tools.x86_64 0:3.2.1-1 Dependency Installed:
bind-libs.x86_64 30:9.3.6-20.P1.el5_8.4 bind-utils.x86_64 30:9.3.6-20.P1.el5_8.4 iperf.x86_64 0:2.0.5-1.el5 rsync.x86_64 0:3.0.6-4.el5_7.1
sudo.x86_64 0:1.7.2p1-14.el5_8 sysstat.x86_64 0:7.0.2-11.el5 traceroute.x86_64 3:2.0.1-6.el5
Complete!
Next, delete or disable the /etc/yum.repos.d/public-yum-ovm3.repo file.
Disable the .repo file by changing enabled=1 to enabled=0. The next example shows a disabled ovm3_latest .repo file. [ovm3_latest]
name=Oracle VM Server 3 Latest ($basearch)
baseurl=http://public-yum.oracle.com/repo/OracleVM/OVM3/latest/x86_64/ gpgkey=http://public-yum.oracle.com/RPM-GPG-KEY-oracle-el5
gpgcheck=1
enabled=0
6. Install Oracle OS Watcher
Applicable to all Oracle VM 3.x Releases.OS Watcher Black Box (oswbb) is a utility that uses native Linux commands and shell scripts to collect and archive metrics for diagnostics and performance troubleshooting. OS Watcher Black Box operates as a set of background processes that collect and archive data on a regular basis, using ps, top, mpstat, iostat, netstat, traceroute and vmstat. OS Watcher Black Box is comprised of three components:
1. oswbb: a shell script that collects and archives data
Box Every System Boot [ID 580513.1]
Tip: OS Watcher Black Box is one of Oracle support's primary tool for working Linux Service Requests (SRs). To expedite your Oracle VM and Linux SRs, always include the OS Watcher Black Box archive files from each Oracle VM Server and Linux VM.
OS Watcher Black Box Installation and Setup
Once you have downloaded the OS Watcher Black box tar file, and the oswbb-service, copy the files to each Oracle VM Server. Next, untar the file in the directory where you would like to run OS Watcher Black Box, i.e. /opt, and then install the RPM.
The next example shows how to install OS Watcher Black Box. Substitute path_to_the_oswbb_directory with the directory name you would like to place and run OS Watcher Black Box. As root type:
# tar xvf oswbbxxx.tar -C path_to_the_oswbb_directory, i.e. tar xvf oswbbxxx.tar -C /opt Next, chown the oswbb directoty to root, chown root:root -R /opt/oswbb.
Next, install the RPM by typing rpm -ivh oswbb-service-X.X.X-X.noarch.rpm. The oswbb-service RPM package adds an init script with the osw service to run the OS Watcher Black Box at system boot, and to stop it down gracefully at system shutdown. OS Watcher Black Box can be started and stoped using the standard Linux init scripts:
# /sbin/chkconfig oswbb on
The oswbb-service RPM package automatically configures the osw service to start at runlevel 3, 5 and 5. The next example shows the default runlevels for the oswatcher service.
# chkconfig --list |grep oswbb
oswatcher 0:off 1:off 2:on 3:on 4:on 5:on 6:off OS Watcher Black Box can be started by typing:
# /sbin/service oswbb start
OS Watcher Black Box can be stoped by typing: # /sbin/service oswbb stop
Note: As of this writing, May 12th, 2014, the oswbb-service-1.1.7-1.noarch.rpm' init script fails with: //usr///libexec/oswbb-service/oswbb-helper: line 45: unexpected EOF while looking for matching `"'
Edit line 45 in the /usr/libexec/oswbb-service/oswbb-helper file as follows: Change:
"${OSW_ARCHIVE}/heartbeat 2>&1 & to
"${OSW_ARCHIVE}"/heartbeat 2>&1 &
With the above fix, oswbb will successfully start using the oswbb-service-1.1.7-1.noarch.rpm init script.
The last step is to edit the OS Watcher Black Box configuration file with your enviromentail settings. The OS Watcher Black Box configuration file is located at /etc/oswbb.conf.
The next example shows the default OS Watcher Black Box settings. The file must be edited for your environmental requirements.
# cat /etc/oswbb.conf
# Set OSW_ARCHIVE where the logs should be stored # OSW_ARCHIVE='archive'
Call 415-252-9164 Mokum Oracle Cloud Cookbook http://mokumsolutions.com/
# Set OSW_COMPRESSION to the desired compression scheme # OSW_COMPRESSION='gzip'
# Set OSW_HOME to the directory where your OSWatcher tools are installed # OSW_HOME='/opt/oswbb'
# Set OSW_INTERVAL to the number of seconds between collections # OSW_INTERVAL='30'
# Set OSW_RETENTION to the number of hours logs are to be retained # OSW_RETENTION='48'
# Set OSW_USER to the owner of the OSW_HOME directory # OSW_USER='root'
The OSW_HOME directive controls the {OSWHOME} directory. {OSWHOME} is where the oswatcher logs are kept. For example, the default OSW_HOME=/opt/oswbb creates the /opt/oswbb directory for the log files. The OSW_INTERVAL directive controls the interval in seconds between statistics collections. The default OSW_INTERVAL='30' should be modified to meet your specific business requirments. The OSW_RETENTION='48' directive controls the retention policy in hours of the log files in the {OSWHOME}/archive directory.
The next example shows a modified /etc/oswbb.conf file. # Set OSW_ARCHIVE where the logs should be stored OSW_ARCHIVE='archive'
# Set OSW_COMPRESSION to the desired compression scheme OSW_COMPRESSION='gzip'
# Set OSW_HOME to the directory where your OSWatcher tools are installed OSW_HOME='/opt/oswbb'
# Set OSW_INTERVAL to the number of seconds between collections OSW_INTERVAL='30'
# Set OSW_RETENTION to the number of hours logs are to be retained OSW_RETENTION='72'
# Set OSW_USER to the owner of the OSW_HOME directory OSW_USER='root'
The OSW log files are saved in the following directories: {OSWHOME}/archive/ oswifconfig oswiostat oswmeminfo oswmpstat oswnetstat oswprvtnet oswps
chmod 755 -R mokum_oracle_vm_server_diagnostic_utilities7-21-2014, and run the scripts from the mokum_oracle_vm_server_diagnostic_utilities-7-21-2014 directory.
For exmaple, first unzip the file as show in the example below: # unzip mokum_oracle_vm_server_diagnostic_utilities-7-21-2014.zip # chmod 755 -R mokum_oracle_vm_server_diagnostic_utilities7-21-2014
This will create a subdirectory mokum_oracle_vm_server_diagnostic_utilities-7-21-2014 which contains 8 scripts. # cd mokum_oracle_vm_server_diagnostic_utilities7-21-2014 # ll blank_vnc_console_fix.sh clean_cluster.sh cluster_health.sh fcsan_details.sh list_vms.sh local_bench.sh ocfs2_bench.sh uuid_to_vm.sh READ_ME
To run any of the scripts, as root, type ./script_name, i.e. ./list_vms.sh would print a list to stdout of all of the virtual machines, templates and assemblies within a server pool.
Note: If a previous version of Mokum Oracle VM server Diagnostic Utilities already is installed, it is highly recommended to remove this rm -rf mokum_oracle_vm_server_diagnostic_utilities-DATE prior to installing the new version.
blank_vnc_console_fix.sh:
When opening a Virtual Machine console using Oracle VM Manager, if the VNC console opens with “Status: Connected to Server” and no VNC console, run blank_vnc_console_fix to remove the broken ovm-consoled pid and start the ovm-consoled service.
clean_cluster.sh:
To be able to reuse an Oracle VM Server in a new or existing server pool, run clean_cluster to wipe the Oracle VM Server's berkeley DB and cluster data before discovering in Oracle VM Manager.
cluster_health.sh:
To troubleshoot berkeley DB and cluster issues run cluster_health to generate a status report named hostname-date-cluster_health.out.
fcscan_details.sh:
To troubleshoot Fibre Channel HBA issues run fcscan_details to generate a status report on multipath and HBA details named hostname-date-san-details.out.
list_vms.sh:
list_vms will print a list to stdout of all of the virtual machines, templates and assemblies within a server pool.
uuid_to_vm.sh:
uuid_to_vm generates xm list output with uuid to simple name mappings to stdout.
local_bench.sh:
local_bench will run a simple dd test in the /tmp directory on local disk and output to hostname-date-local_bench.out.
ocfs2_bench:
ocfs2_bench will run a simple dd test for Oracle VM repositories (LUNS) and outputs to local_bench.out. Note: It is necessary to edit/change the path to dd test each desired repository.
8. Install OVMProf
Applicable to all Oracle VM 3.x Releases.
Oracle VM Profiler (OVMProf) is a system-wide profiler for Oracle VM Server Release 3 and above used to collect, display and compare system and cluster configurations. OVMProf is non-intrusive, it simply gathers information using native linux commands. OVMProf can output to one large text file and/or a menu driven web page. With OVMProf, you can easily validate server and cluster configurations, best practices, and operational correctness for new and existing Oracle VM deployments.
OVMProf gathers the following information:
Dom0 Summary Storage & Disk Summary
Call 415-252-9164 Mokum Oracle Cloud Cookbook http://mokumsolutions.com/
Networking Summary OCFS2 Summary
Oracle VM Agent Summary Virtual Machine (domU) Configuration Summary
Sysctl Summary RPM Packages & Patch Summary
Kernel Mods & ulimits Summary Socket Ports
Chkconfig Summary Hardware Summary
Cron Job Summary dmesg & /var/log/messages errors
OVMProf Installation, Set-up and Usage:
1- Download OVMProf (ovmprof-v1.0.tar).
2- Copy and extract ovmprof-v1.0.tar onto each Oracle VM Server in the /usr/local/sbin directory. 3- Make the ovmprof.sh script executable by typing: chmod 755 ovmprof.sh.
To view an Oracle VM Server's system and cluster configurations, copy and extract the OVMProf tar file, i.e. /tmp/ovmprof/ovmprof_your-server-name.tar on a workstation and open the index.html file with a Web browser.
Create a menu driven web page to display and compare system and cluster configurations:
1- For a menu driven web page, copy each Oracle VM Server's OVMProf/tmp/ovmprof/ovmprof_your-server-name.tar file to directory on a web server, i.e. /var/www/html/ovmprof/
2- Extract the tar file(s) into the directory, i.e. /var/www/html/ovmprof/. The next example shows a directory on an apache web server with three OVMProf tar files as well as the extracted tar file directories, and an index.html file.
. ├── index.html ├── ovmprof_ovs-archer.tar ├── ovmprof_ovs-janeway.tar ├── ovmprof_ovs-kirk.tar ├──ovs-archer ├──ovs-janeway └──ovs-kirk
3- Create an index.html text file in the /var/www/html/ovmprof directory with the following content:
Note: Change the bold sections below with the names of the extracted tar files from step 2 above (see the above directory tree example, i.e. ovs-archer, ovs-janeway and ovs-kirk are the extracted files).
<title>System Information for Oracle VM Servers</title> Mokum Oracle VM Server Profiler (OVMProf)<br> <a href=ovs-archer>ovs-archer></a><br>
<a href=ovs-janeway>ovs-janeway></a><br> <a href=ovs-kirk>ovs-kirk></a><br>
-w : Create web pages and master info file ONLY. Default (no options) is the same as -d.
9. Install NMON
Applicable to all Oracle VM 3.x Releases.
nmon (short for Nigel's Monitor) is a free system monitor tool for the AIX and Linux operating systems, like Oracle VM. nmon concentrates on performance information for the performance tuner and in a concise layout to aim understanding. This includes: CPU, memory, disks, adapters, networks, NFS, Kernel statistics, File-systems, Workload Manger (AIX), Workload Partitions (AIX) and Top Processes.
Even if your using the Infrastructure Cloud, and OS Watcher for your Oracle VM environments, nmon is still very complimentary, and provides detailed performance information for Oracle VM servers.
nmon can output the data in two ways:
On screen via an ssh session to an Oracle VM server. Using single characters on the keyboard enable/disable various sorts of data. nmon displays the CPU, memory, network, disks, file systems, NFS, top processes, and system resources.
nmon can be setup to save the data to a comma separated file for analysis and longer term data capture. Download and nmon usages:
1. Download nmon for Oracle VM.
2. Copy nmon onto each Oracle VM Server in the /usr/local/sbin directory. 3. Make the nmon scipt executable by typing: chmod 755 nmon
4. As root, type nmon to run the application nmon keyboard shortcuts:
q - To stop and exit nmon.
h - To see quick help (hint) screen and press h again to remove the hints. Use the following command to turn on or off stats:
c - See cpu stats. m - See memory stats. d - See disk stats. k - See kernel stats. n - See network stats. N - See NFS stats. j - See file system stats. t - See top process.
V - See virtual memory stats. . - See only busy disks/procs.
v - Verbose mode (display as Ok/warning/danger on screen).
10. Oracle VM NUMA Best Practices
Applicable to all Oracle VM 3.x Releases.
Contemporary CPU’s from Intel and AMD have NUMA architectures. NUMA stands for Non-Uniform Memory Access. With NUMA each physical CPU (pCPU) will be assigned its own local memory. An assigned processor-memory pair is called a NUMA node. Local memory access from CPUs on the same socket will have significantly lower latency than remote memory access from CPUs on a different socket.
Call 415-252-9164 Mokum Oracle Cloud Cookbook http://mokumsolutions.com/