© 2018 IJSRSET | Volume 4 | Issue 9 | Print ISSN: 2395-1990 | Online ISSN : 2394-4099 Themed Section : Engineering and Technology
Pendrive to Pendrive Selective Data Transfer
Akshay Ravindra Bhasarkar1, Mrs. R. N. Mandavgane2
1Student M.tech (VLSI), Department of Electronics & Telecommunication Engineering, BDCOE, Sevagram,
Maharashtra, India
2Associate Professor, Department of Electronics & Telecommunication Engineering, BDCOE, Sevagram,
Maharashtra, India
ABSTRACT
In this modern era data is omnipresent, be it for business, medicine, entertainment or even education. This has resulted in the data sharing being one of the important task in our day to day life. For data sharing, most often used devices are pendrives. A desktop computer or a laptop is involved in the data sharing process, generally. This projects intends to bypass the need of a computer or a laptop for the sake of data transfer between pendrives by building a small, portable device using Raspberry Pi and a display
Keywords : Pendrive, Raspberry Pi , Display.
I.
INTRODUCTIONComputers and laptops has become an inseparable part of our busy life. For all the information we need for various purposes is in the form of data. Thus the need for data sharing is at its pinnacle. Generally, we transfer data between two pen drives by using laptops or desktops. For this user has to find a computer first then wait for it to boot up, then plug in his device, and then transfer the data. Different types of USB flash devices are used now-a-days. It is not necessary that all of these devices are supported by the computer and the operating system and their device drivers are available and installed. The USB disks are slave device which means that they cannot initiate data transfers on their own. These slave devices need a master controller (PC or Laptop) which commands them to do appropriate operations on the data. The master controller cannot be eliminated and the only thing which can be done is to reduce the size of
master controller and make it portable, quick and user-friendly for access.
Carrying a computer or a laptop just for the sake of data transfer is not affordable in these days and age when people want all devices to be handy. Moreover, transferring data via a computer involves a lot of power to be wasted, since the computer has to be entirely functional before it can transfer data. Also, the threat of viruses and malware has made the life of computer users more complicated.
II.
PROPOSED METHODOLOGYdetecting a virus, it will not allow the transfer of the file unless the virus is deleted. The block diagram of proposed system is shown in fig 1. It consists of Raspberry pi module in the centre of system. The system mainly consists of Raspberry Pi, USB ports, touch screen and power supply. On software front, Python is Pi‟s recommended language for programming, but Linux is its recommended operating system.
Fig 1: Block diagram of Proposed Design [6]
The touch screen will be used to select the file and display the Path. The inputs from the touch panel will be used to execute the operation to be performed. The processor will send a corresponding signal for each touch to the touch screen so that it will update the screen and send the corresponding commands. This system will allow the user to select any files or folders to be copied from the source drive to the user selected destination drive. In addition, the system will first check for sufficient amount of memory space for the operation, if not then system will generate the message to free some space of the destination drive so that data transfer takes place. It will also scans for the presence of any virus. On detecting a virus, it will not allow the transfer of the file unless the virus is deleted. This is an added advantage of the proposed system.
TOOLS / PLATFORM TO BE USED Raspberry Pi and Python
The Raspberry Pi is a low cost, credit-card sized computer that plugs into a computer monitor or TV, and uses a standard keyboard and mouse. It‟s capable of doing everything you‟d expect a desktop computer to do, from browsing the internet and playing
high-definition video, to making spreadsheets, word-processing, and playing games. The Raspberry Pi board contains a processor and graphics chip, program memory (RAM) and various interfaces and connectors
for external devices. Some of these devices are essential, others are optional. Raspberry Pi operates in
the same way as a standard PC, requiring a keyboard for command entry, a display unit and a power supply.
It also requires „mass-storage‟, but a hard disk drive of the type found in a typical PC is not really in keeping with the miniature size of Raspberry Pi. Instead we will use an SD Flash memory card normally used in digital cameras, configured in such a way to „look like‟
a hard drive to Raspberry Pi‟s processor. It will „boot‟ (load the Operating System into RAM) from this card in the same way as a PC „boots up‟ into Windows from its hard disk. As the Raspberry Pi has no internal mass storage or built-in operating system it requires an SD card preloaded with a version of the Linux Operating
System.
Fig 2: Raspberry Pi Module [9]
quad-core ARMv8 CPU, 1GB RAM, built-in wireless/Bluetooth support and much more. This amount of computing power is more than sufficient to run your applications and to program them using a variety of programming tools/environments. In this article, let‟s get started with programming on the Raspberry Pi using one of the most popular languages in the world, Python.
Python, on the other hand, is one of the most popular languages in the world and has been around for more than two decades. It is heavily used in academic environments and is a widely supported platform in modern applications, especially utilities, and desktop and Web applications. Python is highly recommended as a language that is easy for newcomers to program. With its easy-to-read syntax, the introduction is gentle and the overall experience much better for a newbie.
The latest version of the Raspbian OS comes bundled with both Python 3.3 and Python 2.x tools. Python 3.x is the latest version of the Python language and is recommended by the Raspberry Pi Foundation too. [10]
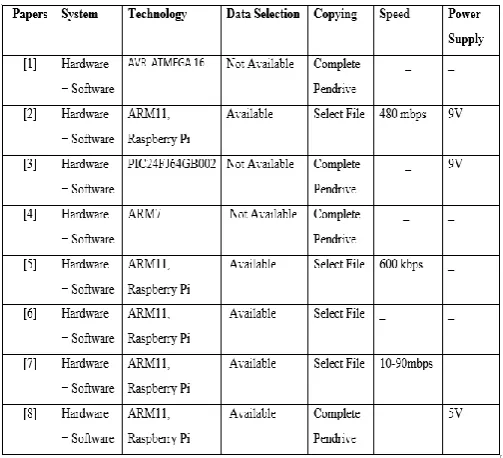
COMPARISION TABLE
Table 1: Comparison table of previous reported work
IMPLEMENTATION DETAILS
As the Raspberry Pi has no internal mass storage or built-in operating system it requires an SD card preloaded with a version of the Linux Operating System such as Raspbian OS. So, we will flash the Raspbian OS on the SD Flash Memory card. This memory card then will be installed in the slot provided on the Raspberry Pi Board. This memory card flashed with Raspbian OS will act as the hard drive for the system. It will „boot‟ (load the Operating System into RAM) from this card in the same way as a PC „boots up‟ into Windows from its hard disk. For our assistance, we connect monitor to the board by connecting the HDMI cable. A USB keyboard is also connected to the Pi board to enter the commands to the Pi. Furthermore, a Display module is also connected. This complete setup is powered by USB2.0 charger or can be battery operated through power bank.
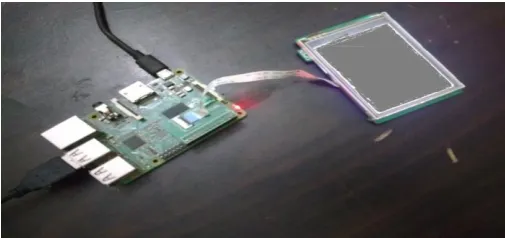
Fig 3: 320x240 3.2" TFT Touch screen Display Monitor for Raspberry Pi
hardware is compatible HY28B. Initially, it is not illuminated at this instance.
Fig 4: Pi board connected to the display and Keyboard Now the Terminal software is used to feed the instruction to the Pi. There are total 23 Instructions
which are used to interface the display with the Pi.
Steps to follow [11]
For Raspberry Pi
Ensure Raspberry Pi Boots with command line https://www.raspberrypi.org/forums/viewtopic.php?f= 45&t=105797
01. sudo raspi-config
Enable Expand File System
Enable Advanced Option Device Tree
02. sudo apt-mark hold raspberrypi-bootloader
03. sudo apt-get update
04. sudo apt-get upgrade
05. sudo rpi-update
06. sudo apt-get install libts-bin evtest xinput python-dev python-pip -y
07. sudo pip install evdev
08. sudo shutdown -h now
09. sudo nano /boot/cmdline.txt
fbcon=map:10 fbcon=map:10 fbcon=rotate:1
10. sudo nano /boot/config.txt
· dtoverlay=hy28b, rotate=90
#hdmi_force_hotplug=1
dtoverlay=hy28b,rotate=90,speed=12000000,fps=30,sw ap_xy=1
11.sudo nano
/usr/share/X11/xorg.conf.d/99fbturbo.conf
· put a # at the start of line:
· Option "fbdev" "/dev/fb0"
12. sudo dpkg-reconfigure console-setup
· Go through the following menu choices:
·Encoding to use on the console: <UTF-8>
·Character set to support: <Guess optimal character set>
·Font for the console: Terminus (default is VGA)
·Font size: 6x12 (framebuffer only)
13. sudo reboot
For TFT screen
· sudo FRAMEBUFFER=/dev/fb1 startx -- -dpi 60
Fig 5: The display connected to Pi board asking Login details
Now, login and password are required to enter the user interface of the OS. After successful login, we are greeted with the UI.
For HDMI
Sample configuration files could be seen as
https://www.dropbox.com/sh/kmlgn3exzno85re/AAD 4idNTwJelXdQkMy9XgaLMa?dl=0
Touch Screen Calibration
14.sudo TSLIB_FBDEVICE=/dev/fb1TSLIB_TS
DEVICE=/dev/input/event0 ts_calibrate
Touch Screen Orientation
15. cd /tmp
16.wget http://tronnes.org/downloads/xinput-calibra
tor_0.7.5-1_armhf.deb
17. sudo dpkg -i -B xinput-calibrator_0.7.5-1_armhf.deb
18. rm xinput-calibrator_0.7.5-1_armhf.deb
19. sudo mkdir /etc/X11/xorg.conf.d/
20. sudo nano /etc/X11/xorg.conf.d/99-ads7846-cal.conf
Section "InputClass"
Identifier "calibration"
MatchProduct "ADS7846 Touchscreen"
Option "SwapAxes" "1"
EndSection
21.sudo wget -O /etc/X11/Xsession.d/xinput_
calibrator_pointercal
https://raw.github.com/tias/xinput_calibrator/master/s cripts/xinput_calibrator_pointercal.sh
22. echo "sudo /bin/sh/etc/X11/Xsession.d/xinput_
calibrator_pointercal"| sudo tee -a /etc/xdg/lxsession
/LXDE-pi/autostart
Restart the Raspberry Pi using
23. sudo FRAMEBUFFER=/dev/fb1 startx -- -dpi 60
Calibrate the touch Screen once X windows.
The above commands are executed for performing the other various important operations. These important
operations include the touch screen calibration, touch screen orientation, pointer calibration, and others. When all these instructions are executed in order, we get the output as follows:
Fig 6: UI of the Raspbian OS after configuration
From fig.6 we can see the contents of the UI. The taskbar consist of Menu, Internet, File Manager Sound etc. There are two other icons outside the taskbar, Wastebasket and Task Manager.
Now as the first important part has been successfully done. Next part is to connect the pendrives to the Raspberry Pi and perform the data transfer. For this, any four of the existing ports on the Pi board can be used.
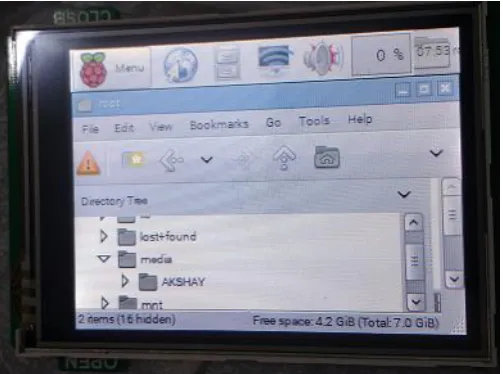
When three pendrives are connected to the Pi board for data transfer operation, it appears something like fig.7. File Manager is accessed for checking if the pendrives are connected properly or not. In the File Manager, first we have to access the root directory. The dialogue box of File manager with Directory tree for accessing the location of the desired folder is shown the fig. 8. Then find the folder named Media in it. The folder of the respective pendrives is located in this Media folder.
Fig 8: Accessing directory tree for finding desired folder location
Now the file to be transferred is located in the folder of the source pendrive. This file is selected first and copied. For copying operation, Edit menu on the toolbar is accessed. Under this Edit menu, Copy option is selected. Then the destination pendrives folder is accessed. There it is copied by using Paste
option in the Edit menu.
File Size Time
12000.jpg 101KB Less than 1sec
Content.docx 1.25MB 1 sec
Lec 03 OPAMP Characteristics_HD.mp 4
50.4MB 7 sec
Basics of Control systems- Control Systems, Important
132MB 16 sec
GATE
questions_HIGH.mp4
Table 2: Data transfer details for different file sizes
Speed of data transfer is a function of the file size as well as the amount of free space available on the destination pendrive. If the available space on the drive is low, it would take more time for data transfer than it would take in general. Therefore, the results from the transfer speed test show that increasing the files sizes requires more time.
The Terminal can be used to obtain the IP address of the Pi using command as: Sudo ifconfig. This will generate the IP address which can be used to monitor status and perform operations over WiFi. For this, both the Pi and the device (mobile) need to be connected to the same network (Hotspot).
RaspManager is an android application which can come handy while performing such operations.
III.
DISCUSSION AND RESULTSThe proposed system had two important parts. First to interface the display with the Raspberry Pi board and second to connect the pendrives to the board for the transfer of data. Here, we have successfully connected and interfaced the display module with the board. Along with this, pointer calibration, touch screen calibration, touch screen orientation is also done in order to have the desired UI. Following this, we were able to successfully transfer the data from source pendrive to the destination pendrive and vice versa. In future, there is scope for improvement in the WiFi implementation.
IV.
CONCLUSIONviruses, malwares. No extra input device is required as we are using a touch screen module for the display. So it will be sophisticated to use for the data transfer.
V.
REFERENCES[1] Lalit, Anurag Sharma, Arun Agarwal,Vijay Sharma, Amit Srivastava,Varun Maheshwari, “Data Transfer with the Help of USB Host Controller without PC ”, IEEE 2015 International Conference on Communication, Control and Intelligent Systems (CCIS)
[2] Tushar Sawant, Bhagya Parekh, Naineel Shah , “Computer Independent USB to USB Data Transfer Bridge” , IEEE 2013 Sixth International Conference on Emerging Trends in Engineering and Technology
[3] K.B.Tripathy, Ankita Sharma, Prince Goyal, Avnish Sharma, Mr. V. Upmanu , “A concept of data transfer via bluetooth in pen drive”, Journal of Global Research in Computer Science ; Volume 4, No. 4, April 2013
[4] Mr.V.S.Gawali and Mr.A.M.Agarkar, “Pen Drive to Pen Drive and Mobile Data Transfer Using ARM”,2nd International Conference on Emerging Trends in Engineering (SICETE) [5] Mr. Ranganath N. P. and Mrs. Shilpashree P. S.,
“Data Transfer using Pendrives”, International Journal of Computer Applications (0975 – 8887) National Conference on “Recent Trends in Information Technology” (NCRTIT-2016)
[6] Mr. Pushpak Dhangar, Mrs. Sonam Kanade, Mrs. Aishwarya Kute, Mrs. Kavita Labhade, “Implementation Paper On Data Transmission And Reception Using Raspberry Pi”, International Journal of Scientific Research Engineering & Technology (IJSRET), ISSN 2278 – 0882, Volume 5, Issue 6, June 2016
[7] Mrs. Sarita S. Umadi, Dr. Shobha.R. Savanur, “Transferring the Data between One USB to another USB without Using a Computers or Laptops”, International Journal of Innovative
Research in Computer and Communication Engineering (An ISO 3297: 2007 Certified Organization) Vol. 4, Issue 5, May 2016
[8] Mrs. K. Meenakumari, Mr. J.Suneel Chakravarthi, “Pendrive to Pendrive Data Transfer without PC”, International Journal of Engineering Science and Computing, January 2017
[9] http://www.devicegadget.com/resources/raspber ry-pi-starters-guide.html
[10]
https://en.wikipedia.org/wiki/Python_(program ming_language)
![Fig 1: Block diagram of Proposed Design [6]](https://thumb-us.123doks.com/thumbv2/123dok_us/1232727.1628203/2.595.314.542.503.685/fig-block-diagram-proposed-design.webp)