AN417
Secure Embedded Web Application Kit 2.0
Introduction
The Secure Embedded Web Application Kit allows you to develop a secure embedded Web interface for your embedded systems. The Application Kit is based on the RCM4300 RabbitCore module, which features built-in Ethernet, a swappable flash memory device, and an optional A/D converter.
Features
• RCM4300 RabbitCore® module with 512 MB miniSD™ Card and SD Card adapter • Prototyping Board.
• Secure Embedded Web Application Kit CD including Complete Dynamic C®, FAT File System, RabbitWeb, Rabbit Embedded Security Pack, and sample programs and reference information related to the Application Kit
Example Applications
• Gathering, storing, reading, and manipulating data on miniSD™ Card
• Encrypting and reading encrypted data on miniSD™ Card
• Accessing data on miniSD™ Card in a secure way
• Controlling and monitoring outputs and inputs securely via a Web browser in real time
What Else You Will Need
Besides what is supplied with the Application Kit, you will need a PC with an available USB port to program the RCM4300 RabbitCore module in the Application Kit. Your PC also needs an RJ-45 jack to allow an Ethernet interface with the RCM4300.
Hardware Setup
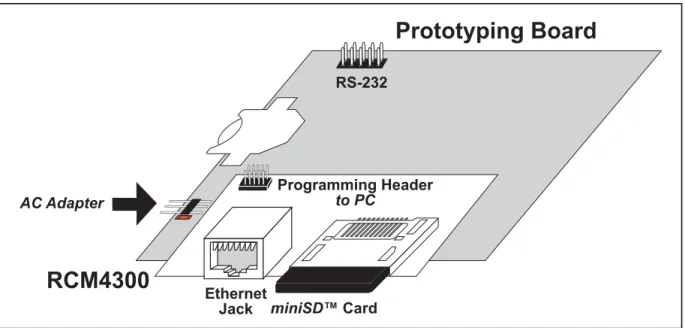
The Secure Embedded Web Application Kit 2.0 Getting Started instructions included with the Application Kit show how to set up and program the RCM4300. Figure 1 summarizes the setup process.
Figure 1. Application Kit Setup
The following steps from the Secure Embedded Web Application Kit 2.0 Getting Started instructions list the steps to place the RCM4300 RabbitCore module on the Prototyping Board once Dynamic C, the Dynamic C software modules, and the software from the supplemental CD have been installed on your computer.
Step 1 — Prepare the Prototyping Board
To facilitate handling the Prototyping Board, snap in four plastic standoffs to the four holes at the corners from the bottom side of the Prototyping Board.
Step 2 — Insert the miniSD™ Card
Insert the
miniSD™ Card
.into the
miniSD
Card holder on the RCM4300. The card is designed to
fit easily only one way — do
not
bend the card or force it into the slot. While you insert the card,
take care to avoid touching the electrical contacts on the bottom of the card to prevent electrostatic
discharge damage to the card and to keep any moisture or other contaminants off the contacts.
You will sense a soft click once the card is inserted completely.
Step 3 — Attach RCM4300 Module to Prototyping Board
Turn the RCM4300 module so that the mounting holes line up with the corresponding holes on the Proto-typing Board. Insert the metal standoffs, secure them from the bottom of the ProtoProto-typing Board using three screws and washers, then insert the module’s header J4 on the bottom side into header socket RCM1 on the Prototyping Board. (You may use plastic standoffs instead of the metal standoffs and screws.)
PWR Ethernet Jack Programming Header to PC
RCM4300
Prototyping Board
AC Adapter miniSD Card RS-232Step 4 — Connect Programming Cable
Connect the 10-pin connector of the programming cable labeled PROG to header J1 on the RCM4300. Be sure to orient the marked (usually red) edge of the cable towards pin 1 of the connector. (Do not use the
DIAG connector, which is used for a normal serial connection.)
Connect the other end of the programming cable to an available USB port on your computer.
Your computer should recognize the new USB hardware, and the LEDs in the shrink-wrapped area of the USB programming cable will flash — if you get an error message, you will have to install USB drivers. Drivers for Windows XP are available in the Dynamic C Drivers\Rabbit USB Programming Cable\WinXP_2K folder — double-click DPInst.exe to install the USB drivers. Drivers for other operating systems are available online at www.ftdichip.com/Drivers/VCP.htm.
Step 5 — Connect Power
Once all the other connections have been made, you can connect power to the Prototyping Board. First, prepare the AC adapter for the country where it will be used by selecting the plug. The Secure Embedded Web Application Kit 2.0 presently includes Canada/Japan/U.S., Australia/N.Z., U.K., and European style plugs. Snap in the top of the plug assembly into the slot at the top of the AC adapter, then press down on the spring-loaded clip below the plug assembly to allow the plug assembly to click into place. Release the clip to secure the plug assembly in the AC adapter.
Connect the AC adapter to 3-pin header J1 on the Prototyping Board as shown in Figure 1. The connector may be attached either way as long as it is not offset to one side—the center pin of J1 is always connected to the positive terminal, and either edge pin is ground.
Plug in the AC adapter. The PWR LED on the Prototyping Board next to the power connector at J1 should light up. The RCM4300 and the Prototyping Board are now ready to be used.
NOTE: A RESET button is provided on the Prototyping Board next to the battery holder to allow a hardware reset without disconnecting power.
Computer Setup
Follow these instructions to set up your computer. Check with your administrator if you are
unable to change the settings as described here since you may need administrator privileges. The
instructions are specifically for Windows XP, but the interface is similar for other versions of
Windows.
TIP: If you are using a computer that is already on a network, disconnect the computer from that network to run these sample programs. Write down the existing settings before changing them to facilitate restoring them when you are finished with the sample programs and reconnect your computer to the network.
1. Go to the control panel (Start > Settings > Control Panel), and then double-click the Network Connections icon.
2. Select the Local Area Connection and click the “Properties” button on the “General” tab. Click “Internet Protocol (TCP/IP)” and click the “Properties” button on the “General” tab.
In earlier versions of Windows, you would select the network interface card used for the Ethernet inter-face you intend to use (e.g., TCP/IP Xircom Credit Card Network Adapter) and click on the “Properties” button. Now “Configure” your interface card for an “Auto-Negotiation” connection on the “Advanced” tab. Now select the IP Address tab, and check Specify an IP Address, or select TCP/IP and click on “Properties” to assign an IP address to your computer (this will disable “obtain an IP address automatically”)
NOTE: Your network interface card will likely have a different name.
3. Assign the following IP address settings to your computer (this will disable “obtain an IP address auto-matically”):
IP Address : 10.10.6.101 Netmask : 255.255.255.0 Default gateway : 10.10.6.1
4. Click <OK> or <Close> to exit the various dialog boxes.
Use the Cat. 5 Ethernet crossover cable to connect the RCM4300 to your computer’s RJ-45 Ethernet jack.
RCM4300
User’s PC
Ethernet crossover cable IP 10.10.6.101 Netmask 255.255.255.0Direct Connection PC to RCM4300 Module
Sample Programs
The following sample programs are available for the Secure Embedded Web Application Kit 2.0, and can be found in the Dynamic C SAMPLES\SecureWeb folder.
Follow these steps to run these and other sample programs.,
1. Your RCM4300 with the miniSD™ Card installed must be plugged in to the Prototyping Board as described in the Secure Embedded Web Application Kit 2.0 Getting Started instructions.
2. Dynamic C and the software from the Dynamic C software modules and supplemental CD in the Secure Embedded Web Application Kit 2.0 must be installed and running on your computer.
3. The programming cable must connect the programming header on the RCM4300 to your computer. 4. Power must be applied to the RCM4300 via the Prototyping Board.
To run a sample program, open it with the File menu, then run it by selecting Run in the Run menu (or press F9).
Getting Ready to Work with the Sample Programs
Browser Setup
Except for the two sample programs used to configure network settings, the sample programs use the TCPCONFIG 1 macro. As long as you have not changed this macro, enter the following server address in your Web browser to bring up the Web page served by the sample program.
http://10.10.6.100
The two sample programs that illustrate how to configure network settings via a Web interface, SSL_ FAT_NETCNFIG.C and SSL_FAT_NETCNFIG.C, use the TCPCONFIG 0 macro, which means that the network settings are specified in the sample program. Use the following server address in your Web browser to bring up the Web page served by these two sample program.
http://192.168.1.197
Otherwise use the TCP/IP settings you entered according to the Dynamic C LIB\Rabbit4000\TCP_ CONFIG.LIB library.
SSL Certificate
Before you can compile and run the sample programs, you must first create a certificate named mycert. dcc in the Dynamic C SAMPLES\SecureWeb\cert directory. Use the Rabbit SSL certificate utility, which is included in the SSL installation, to create the certificate. Complete details of how to do this are provided in Section 4.1 of the Secure Sockets Layer (SSL) Protocol guide in the Dynamic C documentation. This certificate is called by the #ximport line in the sample programs.
#ximport 'cert\mycert.dcc' SSL_CERTIFICATE
Login Information
Username: rabbit Password: test
Format the miniSD Card
Format the miniSD Card using the FAT16 file system. The FAT_CREATE.C sample program in the SAMPLES\Filesystem\FAT directory provides an example of how to format the miniSD Card.
Sample Program Descriptions
• INFO_PROTECT.C—This sample program demonstrates the basic capabilities of the Secure Embedded Web Application Kit 2.0.
Once you have compiled and run this sample program, point your Web browser to the IP address you set in the preparatory steps. The sample program serves a Web page with a login button that redirects you to an SSL-secured Web page to enter a username and password. Once you are logged in, you may enter data, which will be encrypted and stored on the miniSD Card in the cdata.txt file.
Once the new record is stored, the entire cdata.txt file is decrypted and displayed in the Dynamic C
STDIO window.
You may break this sample program down into two programs as you develop your own application. 1. Gather and store data securely using the Data_Set_cb() and Write_Data() function calls. 2. Retrieve, examine, and manipulate data using the Read_Data() function call.
• SD_LOCK.C—This sample program and its associated sample program SD_UNLOCK.C dem-onstrate how to lock and unlock data on a miniSD Card with a shared key.
Once you have compiled and run this sample pro-gram, point your Web browser to the IP address you set in the preparatory steps. The sample pro-gram serves a Web page with a login button that redirects you to an SSL-secured Web page to enter a username and password. Once you are logged in, you will enter a passphrase that will then be used to encrypt the SD_lock.txt data file and the MD5 checksum in the SD_lock.log file on the miniSD Card.
Once the files are created, run the SD_UNLOCK.C sample program to validate the data.
• SD_UNLOCK.C—This sample program and its associated sample program SD_LOCK.C demon-strate how to lock and unlock data on a miniSD Card with a shared key.
Run the SD_LOCK.C sample program to create the data and checksum log files before you com-pile and run this sample program. Once you have the files, run the SD_UNLOCK.C sample program, and point your Web browser to the IP address you set in the preparatory steps. The sample program serves a Web page with a login button that redi-rects you to an SSL-secured Web page to enter a username and password. Once you are logged in, you will enter a passphrase that will then be used to access the data stored on the miniSD Card.
A Hypothetical Security Issue
Two users (Alice and Bob) would like to exchange data, but are concerned about security over the Internet. Alice contracts a courier to hand-deliver a miniSD Card with encrypted data to Bob. 1. Alice and Bob agree on a passphrase that willbe used to generate an AES symmetric key to lock and unlock the data.
2. The Rabbit generates an MD5 checksum on the data before they are encrypted.
3. The checksum is stored in a file (SD_lock. log) that is encrypted using the passphrase. 4. The data are stored in a file (SD_lock.txt)
that is encrypted using the passphrase. 5. The encrypted files are stored on the miniSD
Card that Alice sends it to Bob via the courier. 6. When Bob receives the miniSD Card, both files
are decrypted with the passphrase.
7. The MD5 checksum is used to verify the integ-rity of the file, and Bob is able to view it. If a villain intercepts the miniSD Card, there would be nothing he could do with the card other than what was intended. He doesn’t know the passphrase or the AES key generated from the passphrase, so he cannot read the data on the
miniSD Card. Furthermore, he can’t change the data because the MD5 checksum that is encrypted within the data would no longer match.
Alice and Bob can invalidate old cards by chang-ing the AES key/passphrase that is used to encrypt the data.
• SSL_SD_EXPLORE.C—This sample program demonstrates how to access the the miniSD Card via HTTP and HTTPS (SSL) servers. It also illustrates how to protect folders and files so that only authenticated users can access them via the Web interface. Users can view folders and files, upload and download files, and delete files via a Web interface..
By default, the sample program creates an ADMIN_FOLDER called “admin” that is only accessible by the ADMIN_USER authenticated by the ADMIN_PWORD. The default username and password for these sample programs will allow access to the ADMIN_FOLDER.
ADMIN_FOLDER "admin" ADMIN_USER "rabbit" ADMIN_PWORD "test"
If the ADMIN_FOLDER, ADMIN_USER, or ADMIN_PWORD macros are changed, they must also be changed in the sd_explore.htm file in the Pages folder.
• SSL_FAT_NETCNFIG.C—This sample program provides an easy method to configure the network settings of a device using the ifconfig() function call and a Web page driven by RabbitWeb and protected by SSL. New settings are entered via the Web interface and are stored on the on the miniSD Card in a file called net.cfg. The net.cfg file is parsed on startup to get the network settings. If there is no net.cfg file, one is created and a default IP address is stored there.
When the network settings change, the sample program will test the new IP address by pinging it. If the ping receives a response, that means that another device on the network has the same IP address. The program will abort changing the network settings. Otherwise the previous network settings will be stored in a flat text file named net.log on the miniSD Card.
The file names can be changed by using the CONFIG_FILE and LOG_FILE macros in the FAT con-figuration portion of the code.
Remember to access the Web interface via http://192.168.1.197 in your Web browser.
NOTE: Be cautious when using a Web-based program to set the IP address of the device. If the IP address is set incorrectly, you may no longer be able to access the Web page. This program does not test for incorrectly typed IP addresses.
• SSL_FATSHELL.C—This sample program demonstrates the use of the FAT file system using UNIX or DOS style commands. This sample program can be used to format either an empty device or unfor-matted FAT partitions. The sample program can also be used to reformat existing partitions once it is running, which is essentially a fast way to delete all files. When an empty device is being formatted, the shell sample program creates one large FAT partition and then formats that partition. You will be prompted for permission to proceed before formatting an empty device. Use the shell’s format com-mand to format partitions that are either formatted or unformatted.
The shell commands are reproduced below.
• SSL_NETCNFIG.C—This sample program provides an easy method to configure the network settings of a device using the ifconfig() function call and a Web page driven by RabbitWeb and protected by SSL. New settings are entered via the Web interface and the sample program will test the new IP address by pinging it. If the ping receives a response, that means that another device on the network has the same IP address. The program will abort changing the network settings.
Remember to access the Web interface via http://192.168.1.197 in your Web browser.
NOTE: Be cautious when using a Web-based program to set the IP address of the device. If the IP address is set incorrectly, you may no longer be able to access the Web page. This program does not test for incorrectly typed IP addresses.
FAT_Shell commands
p:...Set partition where p is partition id ls...List current directory
cd [dirname]...Change directory [root]< pwd...Print current directory touch filename [alc]....Create file [1 cluster alloc] mtouch n filename [alc].Create n files [1 cluster each] wr filename [bytes]...Write to file [1k]
mwr n filename [bytes]..Write to n files [1k each] ap filename [bytes]...Append to file [1k]
map n filename [bytes]..Append to n files [1k each] mkdir dirname...Create directory
mmkdir n dirname...Create n directories
rd filename [bytes]...Read from file [first 1k max]< split filename newfile..Split excess allocation to newfile trunc filename [bytes]..Truncate file [length] (Free Prealloc.) del filename...Delete the file
rmdir dirname...Remove the directory (must be empty) tail filename [bytes]...Read last bytes from file [last 1k max] pdump...Print partition info
fat [startx [endx]]...Print FAT table [2 [64]] stat filename...Print file/directory info
format [p]...Erase partition or device a,b,...,0,... help...Print this help message
exit...Unmount the SD Card and exit program h or ? = help>
• SSL_RSI.C—This sample program demonstrates how to control and monitor I/O via a Web browser in real time. The sample program uses a CGI function call to communicate with a client application within the ssl_rsi.htm Web page. The client application uses JavaScripts, iframes, and forms to communicate with the Rabbit server (server_cgi() function call). This technique is called remote scripting with iframes, and it allows Web servers to send data to clients without having client requests. It allows for event-driven Web applications, which are hosted in the Web browser. Up to five users can access the Rabbit server and view I/O in real time. This is limit is set by the HTTP_ MAXSERVERS-1 macro, which is set to 6. (At least one socket must remain open for users to have the ability to post output changes to the server.)
This program also uses SSL and HTTP basic authentication. Any user can monitor the status of I/O in real time, but only the ADMIN_USER, who is authenticated using HTTP Basic over an SSL connec-tion, is able to make changes to the I/O.
Once you compile and run this sample program, you may access the Web interface through your Web browser to toggle the Prototyping Board “LEDs” on/off with the “switches.”
Parallel Port B bit 2 = Prototyping Board LED DS2 Parallel Port B bit 3 = Prototyping Board LED DS3 Parallel Port B bit 4 = Prototyping Board switch S2 Parallel Port B bit 5 = Prototyping Board switch S3
• SSL_RSI_RWEB.C—This sample program demonstrates how to control and monitor I/O via a Web browser in real time. The sample program uses a CGI function call to communicate with a client application within the ssl_rsi.htm Web page. The client application uses JavaScripts, iframes, and forms to communicate with the Rabbit server (server_cgi() function call). This technique is called remote scripting with iframes, and it allows Web servers to send data to clients without having client requests. It allows for event-driven Web applications, which are hosted in the Web browser. Up to five users can access the Rabbit server and view I/O in real time. This is limit is set by the HTTP_ MAXSERVERS-1 macro, which is set to 6. (At least one socket must remain open for users to have the ability to post output changes to the server.)
This program also uses SSL and HTTP basic authentication. Any user can monitor the status of I/O in real time, but only the ADMIN_USER, who is authenticated using HTTP Basic over an SSL connec-tion, is able to make changes to the I/O.
Once you compile and run this sample program, you may access the Web interface through your Web browser to toggle the Prototyping Board “LEDs” on/off with the “switches.”
Parallel Port B bit 2 = Prototyping Board LED DS2 Parallel Port B bit 3 = Prototyping Board LED DS3 Parallel Port B bit 4 = Prototyping Board switch S2 Parallel Port B bit 5 = Prototyping Board switch S3
• SSL_RTC_RWEB.C—This sample program demonstrates how to view the Rabbit’s real-time clock via a Web browser. The ADMIN_USER, who is authenticated using basic authentication over an SSL connection, is able to make changes to the date/time.
The date and time are stored in UTC/GMT, which is converted to the time zone the computer is set to using the JavaScript Date object in the Web browser.
Appendix — Software Reference
Sample Program
Let’s examine some of the code in the SSL_FATSHELL.C sample program.
First, the program settings used at startup are defined. These macros are used by the parameters in the function calls, and you may change the macro definitions to suit your needs.
TCP/IP Configuration
The TCPCONFIG 1 macro specifies a basic Ethernet configuration with no PPP, no DHCP, and no runt-ime setup. The macro will set the IP configuration as follows.
IP Address : 10.10.6.100 Netmask : 255.255.255.0 Nameserver: 10.10.6.1 Default gateway : 10.10.6.1
If you would like to change the default values, for example, to use an IP address of 10.1.1.2 for the RCM4300 module, and 10.1.1.1 for your PC, you can edit the values in the section that directly follows the “General Configuration” comment in the TCP_CONFIG.LIB library. You will find this library in the Dynamic C LIB\TCPIP directory.
You can create a CUSTOM_CONFIG.LIB library and use a TCPCONFIG value greater than 100. Instruc-tions for doing this are at the beginning of the TCP_CONFIG.LIB library in the LIB\TCPIP directory. There are some other “standard” configurations for TCPCONFIG that let you select different features such as DHCP. Their values are documented at the top of the TCP_CONFIG.LIB library in the LIB\TCPIP directory. More information is available in the Dynamic C TCP/IP User’s Manual.
Web Interface Configuration
These commands are used to configure the Web interface. The HTTP_MAXBUFFER macro is used for each Web server to hold received and transferred information. In particular, it holds each header line received from the Web client. Digest authentication generally results in a large WWW-Authenticate header that can be larger than the default HTTP_MAXBUFFER value of 256.
These macros set the size of the network buffer to 40 bytes, the maximum number of HTTP servers on port 80 (4), the maximum number of open sockets (4), the number of TCP socket buffers (4), and the maximum name length of each dynamic or static resource (32 bytes).
These macros set up the number of HTTPS sockets.
The Dynamic C TCP/IP User’s Manual (Volume 2) provides additional information about these macros and their use.
Authentication
These macros contain the username and password information used for logon authentication.
Debugging Macro Settings
These debugging macros allow the flow to be documented without stopping the sample program’s execu-tion. Uncomment the commented out macros to enable the debug options.
#define HTTP_MAXBUFFER (ETH_MTU-40)/2 #define HTTP_MAXSERVERS 4
// must have more than 1 server for this sample #define SSPEC_MAX_OPEN HTTP_MAXSERVERS
#define SSPEC_MAXNAME 32
#define MAX_TCP_SOCKET_BUFFERS HTTP_MAXSERVERS #define TCP_BUF_SIZE (ETH_MTU-40)*4
#define MAX_CMD_SIZE 64 // maximum size of a command #define MAX_PWD_SIZE 64 // maximum size of directory path
#define MAX_LINE_SIZE MAX_PWD_SIZE+28 // maximum size of a single rsp #define STDIO_ENABLE_LONG_STRINGS
// allows for longer printf statements than the default 128 bytes #define MAX_SIZE_RSP_PAGE 4096 // maximum size of fatRSP.htm page
#define HTTP_SSL_SOCKETS 2 // number of HTTP_SERVERS to use as HTTPS #define SSL_MAX_CONNECTIONS HTTP_SSL_SOCKETS
#define USE_HTTP_BASIC_AUTHENTICATION 1 #define ADMIN_USER "rabbit"
#define ADMIN_PWORD "test" #define ADMIN_REALM "Secure"
//#define LOCAL_VERBOSE // uncomment to enable local printf statements #ifdef LOCAL_VERBOSE
#define BLACK "\x1b[30m" // foreground colors for printf #define RED "\x1b[31m" // foreground colors for printf #define GREEN "\x1b[32m" // foreground colors for printf #define BLUE "\x1b[34m" // foreground colors for printf #endif
Rabbit — A Digi International Brand
www.rabbit.comWeb Pages
The Web pages and security certificate used by the Web browser for this sample program are imported from the Samples\SecureWeb\pages folder into xmem with the ximport commands as shown below.
The remaining code in this section specifies the types of files that will be served.
The maximum name length of each dynamic or static resource (SSPEC_MAXNAME) is affected by the size of the javascript file.
// Import the rsi.htm page with contains the client JavaScript application #ximport "pages/ssl_fatshell.htm" client_htm
#ximport "pages/imgs/gifs/rabbit.gif" rabbit_gif #ximport "pages/imgs/gifs/uload.gif" uload_gif #ximport "pages/imgs/icons/locked.ico" locked_ico #ximport "pages/imgs/icons/unlock.ico" unlock_ico
// Import the certificate (use default of SSL_CERTIFICATE,
// used automatically by the HTTP library, no API calls necessary) #ximport "cert\mycert.dcc" SSL_CERTIFICATE
SSPEC_MIMETABLE_START
SSPEC_MIME(".exe","application/exe"), SSPEC_MIME(".htm", "text/html"),
SSPEC_MIME(".js","application/x-javascript"), // need to change SSPEC_MAXNAME
SSPEC_MIME(".gif","image/gif"), SSPEC_MIME(".jpg","image/jpg"), SSPEC_MIME(".ico","image/x-icon"), SSPEC_MIME(".cgi",""), SSPEC_MIME("/", "text/html") SSPEC_MIMETABLE_END