3Com
®
eXchange Call Center
Administration Guide
Version 4.33
http://www.3com.com
3Com Corporation, 350 Campus Drive, Marlborough, MA 01752-3064
Copyright © 2004, 3Com Corporation. All rights reserved. No part of this documentation may be reproduced in any form or by any means or used to make any derivative work (such as translation, transformation, or adaptation) without written permission from 3Com Corporation.
3Com Corporation reserves the right to revise this documentation and to make changes in content from time to time without obligation on the part of 3Com Corporation to provide notification of such revision or change.
3Com Corporation provides this documentation without warranty, term, or condition of any kind, either implied or expressed, including, but not limited to, the implied warranties, terms, or conditions of merchantability, satisfactory quality, and fitness for a particular purpose. 3Com may make improvements or changes in the product(s) and/or the program(s) described in this documentation at any time.
If there is any software on removable media described in this documentation, it is furnished under a license agreement included with the product as a separate document, in the hardcopy documentation, or on the removable media in a directory file named LICENSE.TXT or !LICENSE.TXT. If you are unable to locate a copy, please contact 3Com and a copy will be provided to you.
UNITED STATES GOVERNMENT LEGEND
If you are a United States government agency, then this documentation and the software described herein are provided to you subject to the following:
All technical data and computer software are commercial in nature and developed solely at private expense. Software is delivered as “Commercial Computer Software” as defined in DFARS 252.227-7014 (June 1995) or as a “commercial item” as defined in FAR 2.101(a) and as such is provided with only such rights as are provided in 3Com’s standard commercial license for the Software. Technical data is provided with limited rights only as provided in DFAR 252.227-7015 (Nov 1995) or FAR 52.227-14 (June 1987), whichever is applicable. You agree not to remove or deface any portion of any legend provided on any licensed program or documentation contained in, or delivered to you in conjunction with, this guide.
Unless otherwise indicated, 3Com registered trademarks are registered in the United States and may or may not be registered in other countries.
3Com, the 3Com logo, NBX, and SuperStack are registered trademarks of 3Com Corporation. NBX NetSet and pcXset are trademarks of 3Com Corporation.
Adobe is a trademark and Adobe Acrobat is a registered trademark of Adobe Systems Incorporated. Microsoft, Windows, Windows 2000, and Windows NT are registered trademarks of Microsoft Corporation.
C
ONTENTS
A
BOUTT
HISG
UIDE5
Conventions 5
Related Documentation 5
Documentation Comments 6
Registration, Warranty, and Support Information 6
Disclaimer 6
C
HAPTER1:
O
VERVIEW OF THE3C
OM EX
CHANGEC
ALLC
ENTER7
Engine Module 7
Admin Module 7
Visor Module 7
Agent Module 7
C
HAPTER2:
EX
CHANGEC
ALLC
ENTERA
DMINISTRATIONO
VERVIEW9
Starting 3Com eXchange Administration 10
The Administration Application Main Window 11
Menus on the Administration Application Menu Bar 11
C
HAPTER3:
C
ONFIGURING THEE
NTITIES15
Defining a New Agent 15
Configuring Agents Details 16
Configuring Agents Groups 17
Configuring the Agents COS 19
Configuring Groups 25
Configuring Groups Details 26
Configuring the Groups Agents 27
Configuring Group's Thresholds 29
Configuring Trunks 32
Configuring Trunks Details 35
Configuring Trunk Groups Trunks 36
Entering a New Trunk Group 38
Configuring Super Groups 39
Configuring Supervisors 43
Configuring Supervisors Details 45
Configuring Services 46
Defining a New Service 47
Configuring Services Announcers 49
Configuring Services Destination 51
Configuring Services Overflow 52
Configuring Services Interflow 54
Configuring Services No Agents 55
Configuring the IRN 57
Configuring IRN Details 59
Configuring the IRN Destination 59
Configuring the DNIS 61
Configuring the System 63
Configuring System Working Times 64
Configuring the MIS Parameters 66
Configuring System Miscellaneous Parameters 68
Configuring System IVR Ports 69
Configuring System Incomplete Destinations 71
Configuring System Wrap-Ups 73
Configuring System Management Parameters 74
The Call Control Scripts Administration 76
The CCS Administration Dialog Box 77
The CCS Administration Menu Bar 79
The CCS Admin Options 79
Viewing and Modifying Scripts 80
Configuring Script Actions 82
Configuring the Announce Place in Queue Action 83
Configuring the Hang-Up Action 83
Configuring the Menu Action 83
Configuring the Play File Action 85
Configuring the Transfer Action 85
A
BOUT
T
HIS
G
UIDE
This book describes how to use the 3Com eXchange Center Administration Application and the 3Com eXchange Engine Call Control Scripts (CCS). It describes how to configure system entities and how to define the various methods of call routing. It is intended for the Call Center administrators and programmers.
For information on the eXchange Call Center Administration applications, see the Help topics. For a description of many of the eXchange Center concepts and terms used in this document, see Appendix A: Glossary.
Conventions
Table 1 lists conventions that are used throughout this guide.
Table 1 Notice Icons
Icon Notice Type Description
Information note Information that describes important features or instructions
Caution Information that alerts you to potential loss of data or potential damage to an application, device, system, or network
Warning Information that alerts you to potential personal injury or death
Related Documentation
The following documents are available for the 3Com eXchange Call Center system:
3Com eXchange Call Center Release Notes
3Com eXchange Call Center Hardware and Software Guidelines
3Com eXchange Call Center Setup Worksheets Guide
3Com eXchange Call Center Quick Installation Guide
3Com eXchange Call Center Installation and Getting Started Guide
3Com eXchange Call Center Administration Guide (this guide)
3Com eXchange Call Center Visor User Guide
Documentation Comments
Your suggestions are important to us because we want to make our documentation more useful to you.
Please send e-mail comments about this guide or any of the eXchange Call Center documentation and Help systems to:
Please include the following information with your comments:
Document title
Document part number (usually found on the front page)
Page number
Your name and organization (optional)
Example:
3Com eXchange Call Center Administration Guide Part Number 900-0146-01 Rev AA
Page 25
Registration, Warranty, and Support Information
For details on how to register your product and get support from 3Com, see the Appendix “Obtaining Support for Your 3Com Products” in the 3Com eXchange Call Center Installation Guide.
Disclaimer
The illustrations and other views, telephone displays, and screen captures appearing in this manual are examples used to explain how the application’s features and controls are used. What appears in the illustrations may differ from what appears on your actual equipment and may not represent something that is possible in actual operation. The functions that you can use and the information that you can display may differ depending on the telephony state and external equipment connected in your network and eXchange system. Therefore, use the illustrations only as guidelines.
C
HAPTER
1:
O
VERVIEW OF THE
3C
OM
E
X
CHANGE
C
ALL
C
ENTER
3Com eXchange Call Center is a comprehensive routing and management system designed to control and monitor the activities of the Call Center. The Call Center operates by means of several modules: Engine, Admin, Visor, and Agent. They enable Call Center managers to design a routing plan, accurately assess Call Center activity trends, and provide the most efficient personnel allocation plan to meet the Call Center's requirements.
This chapter gives an overview of the product and these modules.
The figures in this guide may not represent exactly what you see on your screen in all details. Use them only as guidelines. See the Help topics for details.
Engine Module
The Engine module, together with the Interactive Voice Response package (IVR), provides the Call Center administrator with a number of sophisticated mechanisms for routing incoming calls to agents according to the service required by the DNIS (number dialed).
Admin Module
The Administration module, also called the Admin module, is described more fully in the rest of this guide. It enables authorized supervisors to define the parameters of different system entities (for example, Agents, Agent Groups, and Trunk Groups) and to modify their profiles. The Admin module has several administration levels with different access rights.
Visor Module
The Visor module is a Management Information System that monitors Call Center activities, provides real-time information, generate reports that summarize the system's performance over a given time period, and provides statistical analysis of the Call Center system behavior within a specified period. See the 3Com eXchange Call Center Visor User Guide for details.
Agent Module
C
HAPTER
2:
E
X
CHANGE
C
ALL
C
ENTER
A
DMINISTRATION
O
VERVIEW
The figures in this guide may not represent exactly what you see on your monitor in all details. Use them only as guidelines. See the Help topics for feature details.
The 3Com eXchange Admin module enables authorized supervisors to define the parameters of different system entities (for example, Agents, Agent Groups, and Trunk Groups) and easily modify their profiles and behavior in the system. Several administration levels have different access rights.
The following parameters reflect the structure of the Call Center that is handled by the Administration:
Hardware (for example, the type of PBX installed, Number and types of trunks, and number and types of IVR channels)
Personnel (for example, the list of Agents and the list of Supervisors and their authorizations)
Functional (for example, the Services offered by the Call Center and its various Groups and Super Groups)
Operational (for example, working days, holidays, and calls behavior).
The various types of parameters that are called ENTITIES are handled in the following groups, which are discussed in this guide:
Agents
Groups
Trunks
Super Groups
Supervisors
Services
IRN (Intelligent Routing Numbers)
DNIS
Starting 3Com eXchange Administration
To start the 3Com eXchange Administration application, choose one of these ways:
On your desktop, double-click 3Com eXchange Center folder > Administration OR
Click Start > Programs > 3Com eXchange Center > Administration
If the computer is not already logged on to another 3Com eXchange application, and the user is authorized, the system displays the Login dialog box.
• Every system must have at least one Supervisor with Administrator authorization defined.
• New installations have a single supervisor defined by default. The default login name is "EA". The default password is "E1996". Use this login name and password when you log in for the first time.
Enter the Login Name, Password; choose the language and Server in the appropriate fields:
The Administration Application Main Window
After you successfully log in, the system displays the Administration Main Window.
The Administration window contains a menu bar, options, and toolbar that display icons that you click to open configuration windows. The toolbar icons mirror the options within the Entities menu. The remainder of the window contains a work area in which you configure and display the Entities’ windows.
Menus on the Administration Application Menu Bar
Table 2 lists the menus on the Administration menu bar.
Table 2 Administration Application Menu Bar
Menu Name Operations
Entities Options to define or modify the attributes of specific 3Com eXchange Call Center entities.
Tools Options for terminating all the 3Com eXchange Visor open applications, and to activate the scripting administration application.
Sort Options for sorting.
Window Arranges the Administration windows and allows you to switch between open windows.
Help Opens context-sensitive Help topics on 3Com eXchange Call Center windows and operations.
Figure 1 The 3Com eXchange Call Center Administration Application Toolbar
The Entities Menu
Table 3 describes the Entities menu and its icons.
Table 3 Entities Menu
Entity Icon Description
Agents Opens a Configuration window for configuring agents.
Groups Opens a Configuration window for configuring groups.
Super Groups
Opens a Configuration window for configuring super groups.
Supervisors Opens a Configuration window for configuring supervisors.
Services Opens a Configuration window for configuring services.
IRN Opens a Configuration window for configuring the IRN.
DNIS Opens an Entity Configuration Window for configuring the DNIS.
System Opens a Configuration window for configuring the system parameters.
CCS Admin Opens the Call Control Scripts Administration application.
Exit Closes the Administration application.
The Tools Menu
Table 4 describes the Tools menu.
Table 4 Tools Menu
Option Description
CCS Admin Opens the CCS Administration application. Call Control Scripts can define the requirements of incoming calls by extracting information. They also provide voice messages to callers waiting in queue.
The Sort Menu
Table 5 describes the Sort menu:
Table 5 Sort Menu
Option Description
By Name Sorts the currently selected list by name.
The Window Menu
The Window menu provides options that enable the open windows on the window to be arranged in an orderly way. It also lists all the currently open windows. To switch from one window to another, click the one that you want.
Table 6 Window Menu
Option Description
Tile The windows are displayed in a vertical tile format, one next to the other.
Cascade The windows are cascaded one on top of the other.
The Active window has a checkmark next to it in the list at the bottom of the menu.
The Help Menu
The Help menu provides Help topics as well as information about the 3Com eXchange Call Center Administration system.
Table 7 Help Menu
Option Description
Index Opens the Index of the Help topics for all of the 3Com eXchange Call Center applications. Enter a key word to search for a topic.
Contents Opens the Table of Contents for Help for only the current application.
The Quick Search Option
The Quick Search option is not a menu option. Rather, it is located under any list of entities. You can use it to locate specific entries in the list according to name or number: The Quick Search is helpful when you need to locate specific entries in long lists. See Figure 2.
Click the Quick Search button at the bottom of the list and select the field in which you want to search. Enter the information; the cursor moves to the first entry in the list that fits the prefix entered. Characters that do not fit any of the entries are not echoed to the window.
C
HAPTER
3:
C
ONFIGURING THE
E
NTITIES
This chapter covers how to configure the eXchange Call Center Administration entities.
The figures in this guide may not represent exactly what you see on your monitor in all details. Use them only as guidelines. See the Help topics for feature details.
Defining a New Agent
This section describes how to define new agents that you want to add to the list of agents in the Agents Groups administration window.
To Add a New Agent to the Agents List:
1 In the Administration application window, click the Agents tab below the list at the left of the window.
-Or-
Click Entities > Agents.
2 In the Agents Configuration window, click the New button. The New Agent dialog box appears.
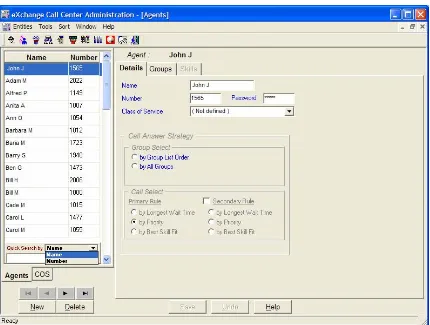
Configuring Agents Details
Use the Details page of the Agents Configuration window to configure the details of agents in the system.
To Open the Details Page:
1 Click the Agents tab below the list. -Or-
Select the Agents option from the Entities menu.
2 Click the Details tab at the top of the Agents Configuration window.
The Details page of the Agents Configuration window displays the details for the currently selected agent in the Agents list.
Table 8 describes the fields and buttons.
Table 8 Details Page of the Agents Configuration Window
Field, Button, or Area Description
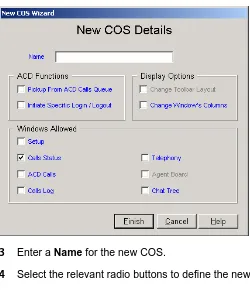
Name The name of the selected agent.
Number The identification number of the selected agent.
Password The 3Com eXchange Agent uses this password together with the agent number to log on to the 3Com eXchange system.
Class Of Service (CoS) The Class of Service to which the agent belongs. CoS determines the permissible operations for this agent. For example, the CoS may prevent the agent from being able to pick up calls from the queue.
Call Answer Strategy Use this area to define the method by which an incoming call is routed to the agent when the agent becomes available.
The strategy has two stages: 1) Determine the set of calls to be considered for routing and then 2) Select, from the set, a single call to route to the agent.
Group select Click the appropriate radio button in this area to define the criteria for selecting the set of calls:
By scanning groups in the order in which they appear in the agent's group list.
By all groups without any priority
Call select Click the appropriate radio button in this area to define the criteria for selecting a single call to route to the agent:
Answer the call that has been waiting the longest time
Answer the call that has the highest priority
Answer the call whose requirements are best suited to the agent (that is, the best skill fit)
To save the Changes That You Made to the Configuration:
Click Save below the Details page.
To undo the Previous Change That You Made to the Configuration:
Click Undo.
To open the Help Topic for the Agents Configuration Dialog Box:
Click Help.
Configuring Agents Groups
Use the Groups page of the Agents Configuration dialog box to edit the Primary Groups assignment for agents in the system.
To Open the Groups Page:
1 Click the Agents tab below the Agents list.
2 Click the Groups tab at the top of the Agents Configuration window.
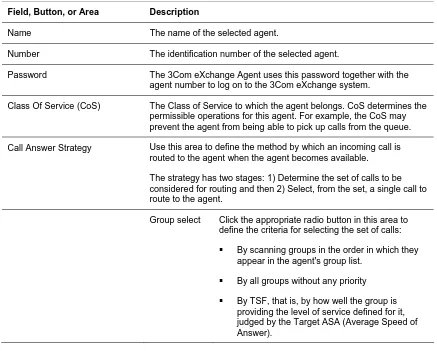
Figure 3 Agent Groups Window Dialog Box
The Groups tab of the Agents Configuration window displays the current groups configured for the selected agent in the Agents list. The Agents Groups list contains the primary groups to which the selected agent belongs. The selected agent becomes member of these groups after performing Primary login. Table 9 describes the areas.
Table 9 Agents Group List
Agent's Groups This area displays the Order and Name of all the currently assigned groups for the agent. The assignment configuration can be edited as required.
For agents who are assigned a Call Answer Strategy of "by group list order," the list order defines from which group the agent will pick the next call. The first group has priority over the second group when routing agent calls. For this reason, the
Sort/Order option cannot be used for this list. (For a full description, see “Call Answer Strategy” in “Configuring Agents Details.”)
Available Groups This area displays the Name of all the available (unassigned) groups in the system.
To Assign a Group to the Selected Agent:
1 Select the required group in the Available Groups list.
2 Drag and drop it into the Agent's Groups list, or click Add.
To Assign More Than One Group to the Selected Agent:
1 Use Ctrl+Click to select the required groups from the Available Groups list.
To Un-assign a Group from the Selected Agent:
1 Click the group that you want to remove from the Agent's Groups list.
2 Drag and drop it into the Available Groups list, or click Remove.
To un-assign more than one group from the selected agent:
1 Click the groups to be removed from the Agent's Groups list using the <Ctrl>+<Left mouse button click>.
2 Drag and drop it into the Available Groups list, or click the Remove button. To remove all groups, click Remove all.
To Change the Order of the Groups:
Click the group to be moved and drag and drop it into the required position in the list.
To save the changes made to the configuration:
Click Save below the Groups page.
To undo the previous change that you made to the configuration:
Click Undo.
To open the help topic for the agent's configuration:
Click Help.
Configuring the Agents COS
The figures in this guide may not represent exactly what you see on your monitor in all details. Use them only as guidelines. See the Help topics for feature details.
Agent Class of Service (CoS) enables the system administrators to control the set of capabilities that are available to the agents. For example, one of the features available to agents is the means to change their toolbar. If, in some environments, there is a reason not to enable the agents to change the toolbar, the administrator can create an Agent COS that disables this feature and then assign the relevant agents to this COS.
To Add a New Agent COS to the Agents COS List:
1 In the Agents Configuration window, click the COS tab located below the list.
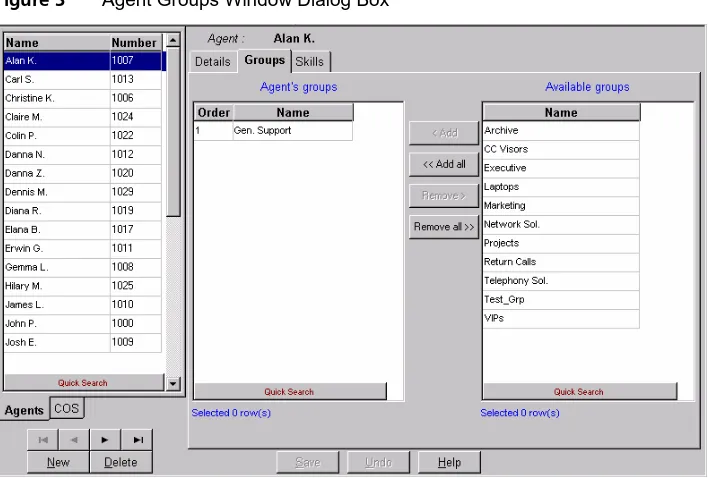
2 Click New. The New COS Details dialog box appears.
Figure 4 New COS Details Dialog Box
3 Enter a Name for the new COS.
4 Select the relevant radio buttons to define the new agents COS.
5 Click Finish.
The newly defined agents COS now appears in the Agents COS list.
To Configure the Agents COS Details
Use the Details page of the Agent COS Configuration dialog box to set or reset the available features to the selected COS.
To open the page:
1 Click the COS tab below the list.
The Agents COS Details dialog box appears.
Figure 5 The Agent COS Details Dialog Box
Table 10 describes the Details page of the Agents COS configuration dialog box.
Table 10 Details of Agents COS
Name The Name of the Selected Agents Class of Service
ACD Functions The set of ACD functions that may be enabled or disabled by the COS.
Initiate Specific Login/Logout This checkbox, if checked, enables the agents who belong to the selected COS to use the specific login and logout buttons to log into or out of a single group. The specific group may or may not be part of the agent's primary groups list. This checkbox, if checked, also enables the agent to use the Login Manager.
Display Options This set of options gives or denies the agent the ability to design the agent workspace (toolbar, windows, and so on)
Change Toolbar Layout This checkbox, if checked, enables the agent to add or remove buttons to or from the agent toolbar
Windows Allowed
This set of options gives or denies the agent the permission to use each of the windows the agent may work with
Setup If checked, enables the agent to use the setup window
Call Status If checked, enables the agent to use the call status window. This window displays each active call at the agent extension. (Active means a call on hold, a ringing call, a call the agent is talking on, a call that the agent is initiating, and so on.)
Calls Log If checked, enables the agent to use the calls log window. This window displays all calls that were handled by the agent during this shift (since last primary login), and the agent may add log information on each call.
Telephony If checked, enables the agent to use the telephony option.
Agent Board If checked, enables the agent to use the agent board.
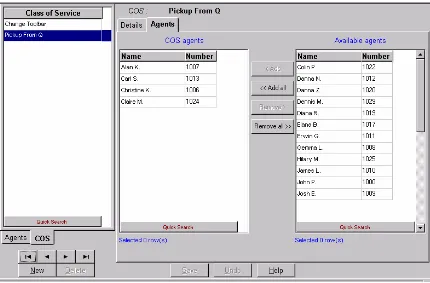
To Configure the Agents COS Agents
Use the Agents page of the Agents COS Configuration dialog box to assign or un-assign agents to or from the selected COS.
To open this page:
1 Click the COS tab below the list.
Figure 6 The Agents COS Agents Dialog Box
The Agents page of the Agents COS Configuration dialog box displays the agents currently assigned to the selected Agent COS in the COS list. It contains the following areas.
Table 11 COS Agents
COS Agents This area displays the Name and Number of all agents currently assigned to the Agents COS.
Available Agents This area displays the Name and Number of all agents that are not assigned to any COS.
To Assign an Agent to the Selected Agents COS:
1 Click the required agent from the Available Agents list.
2 Drag and drop it into the COS Agents list, or click Add.
To Assign More Than One Agent to the Selected Agents COS:
1 Select the required agents from the Available Agents list (using the <Ctrl><Left mouse button click>).
To Assign All Available Agents to the Selected Agents COS:
Click the Add all button.
To Un-assign an Agent from the Selected Agents COS:
1 Click the agent to be removed from the COS Agents list
2 Drag and drop it into the Available Agents list, or click Remove.
To Un-assign More Than One Agent from the Selected Agents COS:
1 Click the agents to be removed from the COS Agents list (using the <Ctrl>+<Left mouse button click>).
2 Drag and drop it into the Available Agents list, or click Remove.
To Un-assign All Agents from the Selected Agents COS:
Click Remove all.
To Change the Order of the Groups:
Click the group to be moved and drag and drop it into the required position in the list.
To save the changes that you made to the configuration:
Click Save below the Groups page.
To undo the previous change that you made to the configuration:
Click Undo.
To open the help topic for the agent's configuration:
Configuring Groups
The figures in this guide may not represent exactly what you see on your monitor in all details. Use them only as guidelines. See the Help topics for feature details.
The icon in the Help topic text denotes that this particular function is NOT available in the eXchange Call Center.
Use the Groups Configuration dialog box to view and edit the information for each group in the system. In addition, new groups may be added and existing groups deleted from the system.
To Open the Groups Configuration Dialog Box:
Click the Groups button in the Toolbar of the main application window.
OR
Select the Groups option from the Entities menu.
Table 12 describes the Groups Configuration dialog box.
Table 12 Groups Configuration
Name Description
Groups List This scrollable list displays the Name and Number of all the groups in the system. Use the four navigational buttons below the list to move up and down the list, and jump to the beginning or end of the list.
Click on any group in the list to see the list of options for sorting the list by Name or Number.
New Click this button to activate a wizard that enables you to add a new group to the list. To add a new group to the Groups list:
1 Click the New button below the groups list. The New Group Wizard appears.
2 Enter Name and Number for the new group, and click the Finish button.
The newly defined group then appears in the Groups list.
Note: The Group Number is a virtual DN used by the 3Com eXchange system to identify the group. This DN must be unique throughout the PBX numbering plan.
Delete Click this button to delete a group from the group list. To delete a group from the groups list, select the group to be removed from the list and click Delete.
Note: Deleting a group also deletes all of its statistics.
Tabs Area This area, at the right of the groups list, contains tabs that enable the configuration of the selected group's Details, Agents and Thresholds
Save Click Save to save any changes that you made to the selected group's configuration.
Undo Click Undo to undo the previous change that you made to the selected group's configuration.
Help Click Help to open the context-sensitive Help topic for the selected group's configuration.
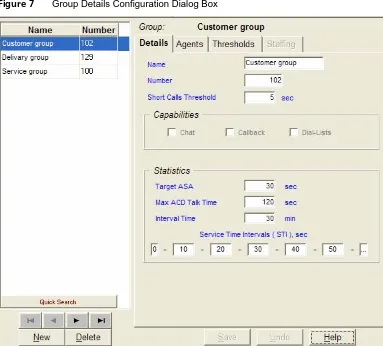
Configuring Groups Details
Use the Details page of the Groups Configuration window to configure the details of groups in the system.
To open the Details page, click the Details tab at the top of the Groups Configuration dialog box. Table 13 describes the elements of this tab.
Table 13 Group Details
Name A unique name for the group
Number A unique number for the group. Note: The Group Number is a virtual DN used by the 3Com eXchange system to identify the group. This DN must be unique throughout the PBX numbering plan.
Short Calls Threshold
Configuring the Groups Agents
Use the Agents page of the Groups Configuration window to edit the Agents configuration for groups in the system
To open the Agents Page:
Click the Agents tab at the top of the Groups Configuration window.
Figure 8 The Group Agents Configuration Dialog Box
The Agents page of the Groups Configuration window displays the current agents configuration for the selected group in the Groups list. Table 15 describes the two lists.
Table 14 Group List
Group's Agents A scrollable list of agents that belong to the group.
Because the order in the list may affect the calls routing (see Agent Search Criteria in Configuring Services Details, be careful how you order the list.
Available Agents A scrollable list displaying all of the agents in the systems that are not assigned to this group.
To Assign an Agent to the Selected Group:
1 Click the required group from the Available Agents list.
To Assign More Than One Agent to the Selected Group:
1 Click to select the required agents from the Available Agents list.
2 Drag and drop it into the Group's Agents list, or click Add.
To Assign All Agents to the Selected Group:
Click Add all.
To Un-assign an Agent from the Selected Group:
1 Click the agent that you want to remove from the Group's Agents list.
2 Drag and drop it into the Available Agents list, or click Remove.
To Un-assign More Than One Agent from the Selected Group:
1 Click to select the agents that you want to remove from the Group's Agents list.
2 Drag and drop it into the Available Agents list, or click Remove.
To Un-assign All Agents from the Selected Group:
Click Remove all.
To Change the Order of the Agents in the Group's Agents List:
Click the agent that you want to move, and drag and drop it into the required position in the list.
To Sort the Available Groups Lists:
Right-click the list area and select the required sort (by name or number) from the pop-up menu
OR
Select the required sort option from the Sort menu in the menu bar.
To save the changes that you made to the configuration:
Click Save below the Agents page.
To undo the previous change that you made to the configuration:
Click Undo.
To open the help topic for the Agent's configuration:
Configuring Group's Thresholds
You assign threshold values to fields that are shown in the Real Time reports. Each of the fields that has a threshold value attached to it may appear in those reports in one of three background colors, depending on the field's current numerical value and its thresholds:
Normal color — The default background color is White. It indicates that the value shown is in the normal zone, that is, no alarm range.
Yellow color — The default background color is Yellow. It indicates that the value is in a warning level zone, that is, slightly too high or too low.
Red value color — The default background color is Red. It indicates that the value is unacceptably high or low.
To Open the Threshold Page:
Click the Threshold tab at the top of the Group Configuration window.
The Threshold page of the Groups Configuration dialog box displays the fields described in Table 16. They can be edited, as required.
Table 15 Threshold
Name The name of the event for which the threshold is specified.
Yellow Indicates that the threshold has been exceeded.
Red Indicates that the threshold has been exceeded to an unacceptable level.
UP When the "UP" box is unmarked, this is "the higher the better" situation - the "normal range starts with infinity and "yellow "> "red" - See example 1 later in this chapter. When the "UP" box is marked, this is "the lower the better" situation - the "normal" range starts with 0 and "yellow" < "red." See example 2.
The Table 17 lists the fields that may have threshold values assigned to them.
Table 16 Threshold Values
Number Of Waiting Calls
Number of calls currently in the queue.
Number Calls Above Target ASA
Number of calls currently in the queue waiting above T.ASA seconds.
Avg. Call Wait Time (sec.)
Average wait time in queue of currently queued calls, in seconds
Number Of Logged In Agents
Number of agents currently logged in to the group.
Number Of Release Agents
Number of agents currently logged in to the group and in Release state.
Number Of Idle Agents
Number of agents currently logged in to the group and in Idle state.
Num. Of Agents On Non-ACD Call
Number of agents currently logged in to the group and busy with Non-ACD calls.
The TSF For Time-Interval (%)
The Target Service Factor, for the specified time interval.
Number Of Abandoned Calls
The number of abandoned calls, that is, calls during which the caller hangs up before being served.
Avg. Wait Time Of Abnd. Calls
The average time that an abandoned call waited in the queue.
Num. Of Calls Ovfl. From Group
The number of overflowed calls in the group.
Avg. Wait Time Of Ovfl. Calls
The average time an overflowed call waited in the queue.
Avg. Wait Time In Queue (sec.)
The average time that a delayed call waited in the queue.
Avg. ACD Talk Time (sec)
The average time that an agent talks on an ACD call.
Avg. Answer Time (sec.)
The average time that an agent is in Busy Out State (that is, the agent did not answer a routed call within a prescribed time).
Idle State (sec) The time that the agent is in the Idle state.
ACD Ring State (sec)
The time that an ACD call is ringing at an agent's extension.
ACD Talk State (sec)
The time during which no calls are being handled and the agent is free to receive calls.
Wrap Up State (sec) The time that the agent is in the Wrap Up state.
NACD Inc State (sec)
The time that the agent is busy with an incoming non-ACD call.
NACD Out State (sec)
The time that the agent is busy with an outgoing non-ACD call.
Release State (sec) The time that the agent is in the Release state.
NACD Out + Rls State (sec)
The time that the agent is busy with an outgoing non-ACD call while the station is in Release state.
NACD Inc + Rls State (sec)
The time that the agent is busy with an incoming non-ACD call while the station is in Release state.
Busy + Release State (sec)
The time that an incoming call is ringing on the agent's telephone.
Busy State (sec) The time that the agent is in the Busy state. ACD calls are not routed to an agent in this state.
Busy ACD Other Grp State (sec)
The time that the agent is busy with an ACD call from another group.
O-ACD Rsrvd State (sec)
The time that the agent is reserved during preparations for an Outbound ACD call.
O-ACD Talk State (sec)
The time that the agent is busy talking on an Outbound ACD call.
To save the changes that you made to the configuration:
Click Save below the Threshold page.
To undo the previous change that you made to the configuration:
Click Undo.
Table 17 Examples of the Group's Threshold Setting
Example 1:
Number of logged in agents
Management requires that a minimum of 5 agents will be logged into a group at all times, for best service level. When this numbers falls, the supervisor should be warned, and then alerted when there are no agents logged in.
The field "Number of Logged In Agents" should be set to 5 as the Yellow value and 0 as the Red value.
Example 2:
Average wait time in queue
Management decides to provide that a level of service in which no call will wait longer than 15 seconds in the group's queue. When the average wait time exceeds this level, the supervisor should be warned, and then alerted when the value exceeds 30 seconds.
The field "Avg. Call Wait Time (sec.)” should be set to 15 as the "Yellow" value and 30 as the "Red" value.
Configuring Trunks
The figures in this guide may not represent exactly what you see on your monitor in all details. Use them only as guidelines. See the Help topics for feature details.
Use the Trunks Configuration dialog box to configure the trunk groups and trunks parameters in the system, as well as adding and deleting trunks and trunk groups to and from the
system.
To Open the Trunks Configuration Dialog Box:
Click the Trunks button in the Toolbar of the main application dialog box OR
Figure 10 The Trunk Groups Details Configuration Dialog Box
The Trunks Configuration dialog box contains these features:
Trunk Groups/ Trunks tab — To switch between lists, click the Trunk Groups or Trunks tab below the Trunks list.
Trunk Groups Trunks list — When you select the Trunk Groups tab, this scrollable list displays the Name and identification Number of the trunk groups in the system. When you select the Trunks tab, the list displays the Name, identification Number, and Trunk Group of all the trunks in the system.
Below the list, use the four navigational buttons to move up and down the list and to jump to the beginning or end of the list.
Right-click on any trunk or trunk group in the list to access options for sorting the list by Name or Number.
New — Click the New button to activate a wizard that helps you add a new trunk or trunk group to the Trunks/Trunk Groups list.
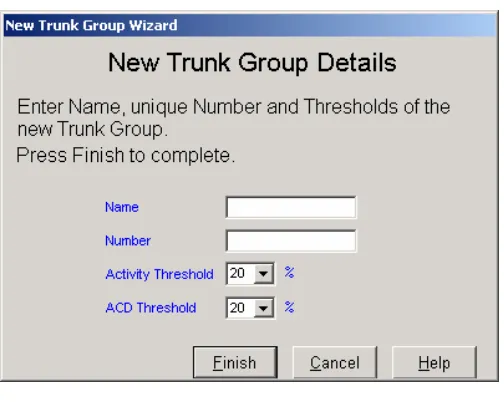
To Add a New Trunk Group to the List:
2 Click the New button below the list. The New Trunk Group Wizard opens.
3 Enter a Name, Number, Activity Threshold, and ACD Threshold for the new trunk group.
4 Click Finish. The newly defined trunk group appears in the Trunk Groups list.
To Add a New Trunks to the List:
1 Click the Trunks tab and then click the New button below the list. The New Trunks Wizard opens.
Figure 11 New Trunk Wizard
2 Click the Single Trunk or Range of Trunks radio button; depending on how many trunks you want to add.
3 Enter the Trunk Number or Trunk Range as appropriate.
4 Optionally, enter the prefix to be added in order to create the trunk name.
5 If required, select a trunk group from the Trunk Group list. The new trunks are automatically assigned to this group.
6 Click the Finish button. The newly defined trunk appears in the Trunks list.
To Update an Existing Trunk or Trunk Group:
1 Select the item that you want to change in the list. You may choose it by using the Quick Search.
2 In the Details tab, change the relevant fields.
To Delete a Trunk group from the Trunk Groups List:
1 Click the Trunk Groups tab below the list.
When you delete a trunk group, the system deletes all of that group’s statistics.
To Delete One or More Trunks from the Trunks List:
1 Click the Trunks tab below the list and then click Delete. The Delete Trunk(s) Wizard opens.
Figure 12 Delete Trunk(s) Wizard
2 Select the trunk, range of trunks, or all trunks that you want to remove and click Delete.
Table 18 Trunk Group(s) Definitions
Tabs Area If a trunk group is currently selected, this area, at the right of the trunk groups' list, contains two tabs that enable the configuration of the Details and Trunks for the selected trunk group.
Save Click Save to saves any changes that you made to the selected trunk or trunk group's configuration.
Undo Click Undo to undo the previous change that you made to the selected trunk or trunk group's configuration.
Help Click Help to open the context-sensitive Help topic for the selected trunk or trunk group's configuration screen
Configuring Trunks Details
Use the Details page of the Trunks Configuration dialog box to configure the Details of trunks or Trunk groups in the system.
To Configure a Trunk's Details:
1 Verify that the Trunks list is clicked on.
3 Click the Details tab at the top of the Trunks Configuration dialog box. The Details page opens, displaying the Name, Number, and Trunk Group of the selected trunk.
4 Edit the Name and Number, as required.
5 To change the Trunk Group, use the Trunk Group Trunks configuration dialog box to re-assign the trunk.
Assigning a trunk group to a trunk is done from the Trunk Groups dialog box.
6 To save the configuration changes, click Save below the Details page.
To Configure a Trunk Group's Details:
1 Click the Trunk Groups tab below the Trunks list.
2 Select the trunk group that you want to configure from the list.
3 Click the Details tab at the top of the Trunks Configuration dialog box.
The Details page opens, displaying the information in the table. Edit any of these details.
Name The name of the selected trunk group.
Number The identification number of the selected trunk group.
Activity threshold
The percentage of time that you want a trunk in the trunk group to be active. If a trunk's activity falls below this predefined threshold, compared to the Avg. activity per trunk in the trunk group, the system adds a record to the Trunk Exception Log report.
ACD threshold If a trunk's ACD activity falls below this predefined threshold, compared to the
Average ACD activity per trunk in the trunk group, the system adds a record to the Trunk Exception Log report.
To save the Configuration Changes:
Click Save below the Details page.
To undo the Previous Change That You Made to the Trunk's Configuration:
Click Undo.
To open the Help topic for the Trunk's Configuration:
Click Help.
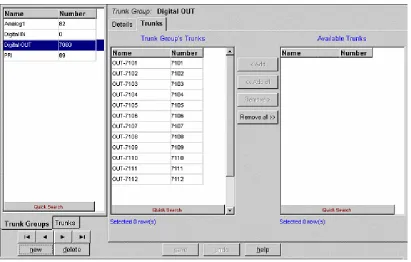
Configuring Trunk Groups Trunks
To Open the Trunks Page:
1 Click the Trunk Groups tab below the Trunks list.
2 Click the Trunks tab at the top of the Trunks Configuration dialog box.
Figure 13 The Trunk Group's Trunks Configuration Dialog Box
The Trunks page displays the current configuration for the selected trunk group. It contains the following lists:
Trunk Group's Trunks
This area displays the Name and Number of all the currently assigned trunks for the selected trunk group. The assignment configuration can be edited, if required.
Available Trunks This scrollable list displays the Name and Number of all the available trunks in the system.
You can assign trunks to the selected trunk group in a number of ways:
Choose from the Available Trunks list the required trunk or trunks using the Shift or the Ctrl button on your keyboard. Drag and drop your selection into the Trunk Group's Trunks list.
OR
Choose from the Available Trunks list the required trunk or trunks using the Shift or the Ctrl button on your keyboard. Then:
OR
Click the Add all button to move all of the trunks listed in the Available Trunks list to the Trunk Groups Trunks list.
To Un-assign (Remove) a Trunk from the Selected Trunk Group:
Select the required trunk or trunks using the Shift or the Ctrl button on your keyboard, and then, from the Trunk Group's Trunks list, drag and drop your selection into the Available Trunks list.
OR
Select the required trunk or trunks using either the Shift or the Ctrl button on your keyboard, and then, from the Trunk Group's Trunks list, click Remove in the application.
OR
Click the Remove all button to remove all of the trunks listed in the Trunk Group's Trunks list.
To Sort the Trunk Group's Trunks or Available Trunks Lists:
Right-click the list area and select the required sort (by name or number) from the pop-up menu
OR
Select the required sort option from the Sort menu in the menu bar.
To save the Changes That You Made to the Configuration:
Click Save below the Trunks page.
To undo the Previous Change That You Made to the Configuration:
Click Undo.
To open the Help topic for the Trunk's Configuration:
Click Help.
Entering a New Trunk Group
Use the Trunk Groups tab of the Trunks Configuration dialog box to configure the trunk groups in the system, as well as adding or deleting trunk groups' to and from the system.
To Open the Trunk Groups Configuration Dialog Box:
1 Click the Trunks button in the Toolbar of the main application dialog box.
Select the Trunks option from the Entities menu.
2 Click the Trunk Groups tab under the list on the left side
3 Click New. The New Trunk Group Wizard opens
Figure 14 New Trunk Group Details Dialog Box
4 Enter Name, Number, Activity Threshold, and ACD Threshold as required.
5 Click Finish.
Configuring Super Groups
The figures in this guide may not represent exactly what you see on your monitor in all details. Use them only as guidelines. See the Help topics for feature details.
A Super Group is a statistical entity that gives the supervisor the ability to view a number of ACD groups as a single statistical entity. It provides a way to split the organization into departments and to analyze the performance of each department.
Use the Super Groups Configuration dialog box to configure the details and groups for each super group. You can also use this box to add new super groups and delete existing super groups from the system.
3Com recommend that you do not delete any existing super groups that are already active, that is, super groups that have accumulated statistical information. Such data will remain in the Data Base with no standard way for you to retrieve it.
To Open the Super Groups Configuration Dialog Box:
Click the Super Groups button in the Toolbar of the main application dialog box.
Select the Super Groups option from the Entities menu.
Figure 15 The Super Groups Details Configuration Dialog Box
The Super Groups Configuration dialog box contains these items:
Super Groups list
This scrollable list displays the Name of all existing super groups in the system. Below the list, use the four navigational buttons to move up and down the list and to jump to the beginning or end of the list.
New To add a new Super Group to the list, click New. The New Super Group Wizard opens.
Enter a unique name for the new super group and click Finish.
Delete To delete a super group from the Super Groups list:
1 Select the super group that you want to remove from the list.
2 Click Delete.
Tabs Area This area at the right of the groups list contains two tabs that enable the configuration of the Details and Groups for the currently selected super group.
Save Click Save to save any changes that you have made to the selected super group's configuration.
Undo Click Undo to undo the previous change that you made to the selected super group's configuration.
Help Click Help to open the context-sensitive Help topic for the selected super group's configuration.
Configuring Super Groups Details
Use the Details page of the Super Groups Configuration dialog box to configure the names of the super groups in the system.
To Open the Details Page:
1 Click the Details tab at the top of the Super Groups Configuration dialog box.
2 The Details page of the Super Groups Configuration dialog box displays the name of the currently selected super group in the Super Groups list, which you can edit if required.
To save Any Changes That You Made to the Configuration:
Click Save below the Details page.
To undo the Previous Unsaved Change That You Made to the Configuration:
Click Undo.
To open the Help Topic for the Super Group's Configuration:
Click Help.
Configuring Super Groups
Use the Groups page of the Super Groups Configuration dialog box to edit the Groups configuration for super groups in the system.
To Open the Groups Page:
Figure 16 The Super Group Groups Configuration Dialog Box
The Groups page of the Super Groups Configuration dialog box displays the current groups assignment for the selected super group in the Super Groups list. It contains the following two lists:
Super Group's Groups
This area displays the Name and identification Number of all the groups currently assigned to the selected super group. The assignment configuration can be edited, if required.
Available Groups A scrollable list displaying the Name and Number of all the groups available for assignment in the system.
There are several ways to assign a group to the selected super group:
Select the required group, using the Shift or the Ctrl button on your keyboard, from the Available Groups list and drag and drop your selection into the Super Group's Groups list.
OR
Select the required group, using the Shift or the Ctrl button on your keyboard, from the Available Groups list and click the Add button in the application to add your selection to the Super Group's Groups list.
OR
To Un-assign a Group from the Selected Super Group:
Select the required group, using the Shift or the Ctrl button, from the Super Group's Groups list and drag and drop your selection into the Available Groups list.
OR
Select the required group, using the Shift or the Ctrl button, from the Super Group's Groups list and click the Remove button in the application.
OR
Click the Remove all button to remove all the groups listed in the Super Group's Groups list.
To Sort the Super Group's Groups or Available Groups Lists:
Right-click the list area and select the required sort (by name or number) from the pop-up menu
OR
Select the required sort option from the Sort menu in the menu bar.
Use Quick Search to locate specific entries in the list without resorting it.
To save the Changes That You Made to the Configuration:
Click Save below the Groups page.
To undo the Previous Change That You Made to the Configuration:
Click Undo.
To open the Help Topic for the Super Group's Configuration:
Click Help.
Configuring Supervisors
The figures in this guide may not represent exactly what you see on your monitor in all details. Use them only as guidelines. See the Help topics for feature details.
To Open the Supervisors Configuration Dialog Box:
Click the Supervisors button in the Toolbar of the main application dialog box. OR
Select the Supervisors option from the Entities menu.
Figure 17 The Supervisors Super Group Configuration Dialog Box
The Supervisors Configuration dialog box contains these items:
Supervisors list
This scrollable list displays the Name of all the supervisors in the system. Below the list, use the four navigational buttons to move up and down the list and to jump to the beginning or end of the list.
New To add a new supervisor to the Supervisor's list:
1 Click the New button below the Supervisors list. The New Supervisor Wizard opens. See the field descriptions in Configuring Supervisors Details.
2 Enter a Name, Extension number, and assign privileges for the new supervisor and click Finish. The newly defined supervisor appears in the Supervisors list.
Delete To delete a supervisor from the Supervisors list, select the supervisor that you want to remove from the list and click Delete.
Tabs Area This area, at the right of the groups list, contains three tabs that enable you to configure the Details and Groups for the currently selected supervisor.
Save Click Save to save changes that you made to the selected supervisor's configuration.
Undo Click Undo to undo the previous change to the selected supervisor's configuration.
Configuring Supervisors Details
The Details page of the Supervisors Configuration dialog box enables you to configure the Details of the supervisors in the system.
To Open the Details Page:
Click the Details tab at the top of the Supervisors Configuration dialog box.
The Details page of the Supervisors Configuration dialog box displays the current details of the selected supervisor in the Supervisors List, which you can edit as required.
The following fields are displayed on the dialog box and in the New Supervisor Wizard:
Name The name of the selected supervisor.
Password The password that the supervisor must type when logging in to the system.
Agent ID The agent ID for the supervisor. This Agent ID is used when the supervisor activates the 3Com eXchange Agent application, thus bypassing the 3Com eXchange Agent log-on procedure.
Supervisor Permissions
This area displays a list of privileges that may be assigned or un-assigned to a supervisor.
Click one of the following radio buttons to assign a supervisor's access level:
Supervisor Administrator This supervisor may access and modify all the system entities.
Entity Administrator This supervisor may access and modify all the system entities except for supervisor's details.
Entity Monitoring The supervisor has limited access to real time report and historical reports for assigned groups.
Selecting Entity Monitoring options enables the tabs for Groups, Super Groups. When the Tabs are enabled, you must drag and drop the available group over to Supervised group. When the group is dragged to the list box, a dialog box opens with options for access to reports or real time monitoring.
To save the Changes That You Made to the Configuration:
Click Save below the Details page.
To undo the Previous Unsaved Change That You Made to the Configuration:
Click Undo.
To open the Help Topic for the Supervisor's Configuration:
Configuring Services
The figures in this guide may not represent exactly what you see on your monitor in all details. Use them only as guidelines. See the Help topics for feature details.
Every incoming call is assigned to a specific service, such as sales of specific products, specific banking services, specific travel agency services, and so on. The service defines how the call will be processed.
Use the Services Configuration dialog box to configure the services to which calls can be assigned. In addition, use this box to add and delete new services from the system.
To Open the Services Configuration Dialog Box:
Click the Services button in the Toolbar of the main application window. OR
Select the Services option from the Entities menu.
Figure 18 Services Configuration Dialog Box
The Services Configuration dialog box contains these items:
New Clicking the New button activates a wizard that enables a new service to be added add a new service to the list.
Delete Clicking this button enables a service to be deleted from the list.
To delete a service from the Services list:
Select the service to be removed from the list and click the Delete button.
Tabs Area This area, at the right of the Services list, contains a number of tabs that enable the configuration of the following parameters for the currently selected service:
Details
Announcers
Destination
Overflow
Interflow
No. Agents
Save Click Save to save any changes made to the selected service's configuration.
Undo Click Undo to undo the previous change made to the selected service's configuration.
Help Click Help to open the context-sensitive Help topic for the selected service's configuration.
Defining a New Service
Use the Services Configuration dialog box to define new services to be added to the list.
To add a new service to the Services list:
1 In the Services Configuration dialog box, click New below the Services list. The New Service Wizard is displayed.
2 Enter a Name, Agent Search Criteria, Music Source and Destination Group for the new service, as requested by the wizard. For further explanation of Agent Search Criteria and Music Source, see Configuring Services Details, next.
3 Click Finish. The newly defined service appears in the Services list.
To save the changes that you made to the configuration:
Click Save at the bottom of the dialog box.
Configuring Services Details
Use the Details page of the Services Configuration dialog box to configure the Details of the services in the system.
To open the Details page:
Click the Details tab at the top of the Services Configuration dialog box.
The Details page of the Services Configuration dialog box displays the current details of the selected service in the Services list, which can be edited, as required.
The following fields, areas, and radio buttons are displayed:
Name The name of the selected service.
Agent Search Criteria
If only one agent is available at that time, he or she gets the call.
Longest Idle Agent The call will be assigned to the agent who is idle the longest.
Terminal The call will be assigned to the first available agent in the list of agents for the group - i.e. an agent that appears higher in the list is preferable to agents lower in the list. Thus agents can be listed according to the order of their ability. The order is defined in Configuring Groups Agents.
Circular The system searches the group's agent list, starting from the last agent to receive a call, for the next available agent. This method attempts to distribute calls equally between agents in the group.
Music Source The system connects a call waiting in queue to a music source. Select the port at which music is provided for calls from the drop-down list. The options are Device or CCS. If no music is specified, then the system default will be used.
To save the changes made to the configuration:
To undo the previous change made to the configuration:
Click Undo.
To open the Help topic for the service's configuration:
Click Help.
Configuring Services Announcers
Use the Announcers page of the Services Configuration dialog box to configure parameters for announcers that are used for the service. Announcers are voice messages or recordings that are played to the caller at certain times.
To open the Announcers page:
Click the Announcers tab at the top of the Services Configuration dialog box.
Figure 20 The Service Announcers Configuration
The Announcers page of the Services Configuration dialog box displays the current
Mandatory Click this check box and all callers entering the service will hear a mandatory announcement, regardless of the availability of agents.
The announcer must be defined before clicking on the check box.
An announcer is defined by two fields:
A destination Call Control (CC) Script for the mandatory announcement
The length of time (in seconds) that the caller will hear music before the next announcer.
First Click this check box and an announcement will be heard once, when a caller first enters the wait queue for the service.
The announcer must be defined before clicking on the check box.
An announcer is defined by two fields:
A destination Call Control (CC) Script for the mandatory announcement
The length of time (in seconds) that the caller will hear music before the next announcer.
Secondary Cycle
Once you have defined the secondary announcers, click one of the following radio buttons:
Cycle All To play all secondary announcements in the order they appear over and over.
Cycle Last To play the last secondary announcement over and over.
No Cycle To play the secondary announcements only once.
Secondary Announcers
Use this area to define the following details, for up to twenty secondary
announcements, that are played according to "Secondary Cycle" settings, while the caller is waiting in the queue:
No. The sequential number of the announcement.
The announcer must be defined before you click on the check box. Unchecked announcements are not played.
Source The CC used for the announcement (CC script).
Time The length of time (in seconds) that the caller will hear music before the next Secondary announcer.
Add Click this button to add a row at the end of the Secondary Announcers list, in which you can add the details of an additional Secondary Announcement.
Insert Click this button to insert a new row in the Secondary Announcers list, according to the position of the hand pointer in the list. In this row, enter the details of an additional Secondary Announcement.
Delete Click this button to delete the last (or a selected) announcement from the Secondary Announcers list.
To save the changes made to the configuration:
To undo the previous unsaved change made to the configuration:
Click Undo.
To open the Help topic for the service's configuration:
Click Help.
Configuring Services Destination
Use the Destination page of the Services Configuration dialog box to configure the services routing destinations in the system. Multiple destinations can be defined for different times of the day (shifts).
To open the Destination page:
Click the Destination tab at the top of the Services Configuration dialog box.
Figure 21 Services Destination
The Destination page of the Services Configuration dialog box displays the current
destination configuration of the selected service in the Services list, which can be edited, as required. The following fields are displayed:
Name The name of the selected service.
Service Routing Destinations
Show default destination
Click this button to display the default destination for the selected service. The default destination is used if no destination is valid for the current day and time.
In Default Destination mode (for example: if show default destination is clicked on), the Available Groups list appears, displaying a list of available groups that may serve as a service destination
To assign another group to the default destination Groups:
Drag the required group from the Available Groups list and drop it into the Groups list.
To save the changes made to the Services Destination configuration:
Click Save below the Destination page.
To undo the previous unsaved change made to the configuration:
Click Undo.
To open the Help topic for the service's configuration:
Click Help.
Configuring Services Overflow
Use the Overflow page of the Services Configuration dialog box to configure the overflow parameters for the service. Calls that overflow after a certain amount of time will actually expand the number of groups for which they are waiting. Groups are the only additional destinations to which a call can overflow. (Multiple destinations can be defined for different times during the day, that is, shifts.) An option allows multiple overflow intervals for the same shift. Example: The default overflow may have two intervals, the first is of 10 seconds and the second is of 30 seconds. For each interval, a different set of groups serves as overflow interval.
To open the Overflow page:
Figure 22 Services Overflow Dialog Box
The Overflow page of the Services Configuration dialog box displays the following areas, fields and buttons, which can be edited, as required.
Name The name of the selected service.
Service Overflow Destinations
This area contains the following radio button:
Show Default Destination Click the Show Default Destination button to display the default overflow destination for the service. The default overflow destination is used if no overflow destination per shift is valid for the current day and time.
In Default Destination mode (e.g.: if Show default destination is clicked on), the Available Groups list appears, displaying a list of available overflow groups that may serve as a service overflow destination, and the currently assigned overflow Groups for the service.
Overflow Use this area to define the interval – for example: the amount of time (in seconds) after which a call will overflow (be put in the queue for other groups).
To assign another group to the overflow interval of the service's default destination:
1 In the Overflow Timeout area, choose the overflow interval.
To un-assign a group from the overflow interval of the service's default destination:
1 In the Overflow Timeout area, choose the overflow interval.
2 Drag the required group from the Groups list and drop it into the Available Groups list.
To save the changes made to the Services overflow configuration:
Click Save below the Overflow page.
To undo the previous unsaved change made to the configuration:
Click Undo.
To open the Help topic for the ser