Vol.9 (2019) No. 4
ISSN: 2088-5334
Design of a User Interface for Radiography Training Simulator
Joon-koo Choi
Department of Radiological Science, Graduate School of Health Science, Far East University, 76-32, Daehak-gil, Gamgok-myeon, Eumsung-gun, Chungcheongbuk-do, 27601, Korea
E-mail: [email protected]
Abstract
—
The radiography training simulator currently in development minimizes errors through mock training on radiology and improves the accuracy of the tests to minimize radiation exposure of the patients and improve the quality of diagnosis services. The objective of this study is to suggest a configuration method for a user interface in developing a radiography training simulator. To configure the operating program of a radiography training simulator in the same manner as an actual radiography equipment, features allow viewing of the worklist and entry of patient information in accordance with the manual. Body part and projection are selected, after which detector, distance, angle and grid are chosen to proceed with the imaging. The image is then printed. The printed image can be transmitted to the PACS server. In addition, a scenario editing feature and help window on the test method are configured so that the user can configured an image database himself. The developed user interface for radiography training simulator simulates an actual X-ray test, improving the effects of mock training and repetitive learning. Since not all variables that may occur during the image printing cannot be configured, the location data of the model device and camera were used to lead to correct testing methods and positions, thus minimizing errors. In follow-up studies, technological development using object recognition and 3D data will be applied to realize various situations that are close to real-life situations.Keywords: radiography; training simulator; operator console; X-ray; user interface.
I. INTRODUCTION
In order to take a radiography image using imaging equipment and conduct tests, the fostering of experts equipped with specialist knowledge and experience is of utmost importance. The education of medical radiology that fosters such expert personnel must combine both theoretical education where theoretical knowledge is learned and practice where clinical skills are learned [1]. However, exposure to radiation during the practice of radiology imaging and manipulation of diagnosis devices have constrained the applying sufficient practice training [2]. As an alternative to circumvent the issue of students’ radiation exposure, human body phantoms or simulators that recreate a scenario on a screen using software were used [3]. However, using a human body phantom imposes a limit to the position of the patient when in an actual radiology test various positions of the patient are required [4]. As such, the benefits of practice can be limited. In clinical practice and training, a variety of patient position need to be applied to reflect more real life-like situations as various positions are used in radiology tests [5].
Meanwhile, training using simulators allow for mock training and repetitive training and thus have been applied in various fields in addition to the medical field [6]. Simulation
training in various forms have been developed in radiology education, too [7] – [10]. However, training through a simulator on a screen based on software does not allow the student to directly manipulate the equipment but use an alternative input device such as a mouse or keyboard. The results, too, are shown only on a screen, undermining the sense of similarities to the actual clinical setting [11]. It has been pointed out continuously that as a result, training using simulators have very low benefit in acquiring experience or skills. The radiography training simulator currently in development minimizes errors through mock training on radiology and improves the accuracy of the tests to minimize radiation exposure of the patients and improve the quality of diagnosis services [12]. As such, the purpose of this study is to develop a simulator fit for mock training, by applying a digital method, and in particular, to suggest a configuration method for the user interface of the simulator.
II. MATERIALS AND METHODS
The simulator should implement the same procedures and situations as the real environment. Therefore, in the educational radiography training simulator, an interface is configured for various setting according to the examination body part setting and examination method in the patient information input so as to implement an interface
environment similar to digital radiography. In addition, the same procedure was applied from the setting of exposure condition to the image output step reflecting that exposure condition. A user can execute a command through a computer monitor or a touch screen using a dedicated program. In the radiography training simulator, the suggested user interface is configured to allow for a test procedure and image acquisition in the same manner as an X-ray test without exposure to X-rays. The user interface model is as follows.
A. Configuration of the User Interface
The user interface was designed to consist of the step to input imaging conditions, the step to select imaging data and the step to display mock images.
1. The step in which data entry tools are used to enter the imaging conditions, including anatomy, projection, angle, voltage and current.
A. Anatomy: SKULL, CHEST, ABDOMEN,
SPINE, EXTRIMITY…etc B. Projection: AP, PA, Lateral…etc
C. Angle: 50, 100. 150, 200 , 250, 300 …etc D. Voltage and current: kVp, mA, sec
2. The step in which imaging materials are selected. One of the radiology imaging materials is selected from the above data base, in accordance with the anatomy, angle and position.
A. Main category anatomy: EXTRIMITY B. Middle category anatomy: HAND C. Small category anatomy: 1st thumb D. Position: AP
E. Angle: 00
3. The step in which the mock image is displayed on the display tool. The image taken is then adjusted using an imaging processing tool in accordance with the voltage and current.
A. kVp: Contrast and brightness B. mAs: Brightness
C. Window width: Contrast D. Window level: Brightness
B. User Interface Features
The user interface features of the simulator were designed as follows.
1. Generator On/Off - Sound effects processing 2. Setting of imaging condition values – mAs, sec
introversion entry feature
3. APR(Anatomical Programmed Radiography) editing and saving feature
A. Body Part: SKULL, CHEST, ABDOMEN,
SPINE, EXTRIMITY
B. Body Type: Baby, Thin, Normal, Fat C. Body Position: AP, PA, Lateral
4. When APR Body Part is selected, condition values for each body type is displayed
5. System status display (icon) feature - Generator On/Off; Whether imaging condition values are exceeded
6. Tube focusing method: Large Focus, Small Focus, imaging preparation and imaging currently in
progress
7. Editing and saving of scenario data 8. Saving of images for each scenario
A. DICOM images (12bits, Inverted) B. TIF images (16bits, No Inverted) C. Raw images (16bits, No Inverted)
9. Imaging printing – Loading of designated imaging for each scenario
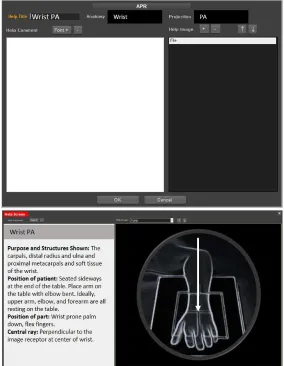
10. Editing and saving of help for testing method A. Help Title: Examination parts
B. Anatomy: Wrist C. Projection: PA
D. Help Comment: Insert of Text E. Help Image: Insert of image
F. Help Screen: Output of text and image
III.RESULTS AND DISCUSSION
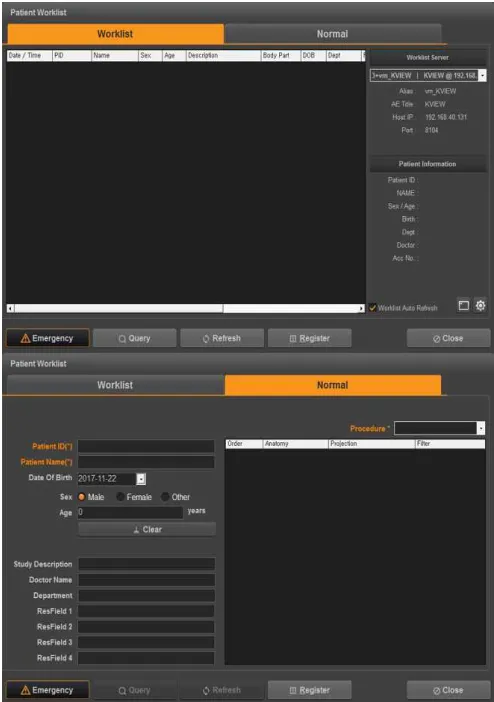
To enter patient information in the operating program, OCS transmission data and search data can be searched and viewed from the Worklist search window. Entry can be made manually. In the radiography training simulator, the simulated patient information can be inputted in advance and then retrieved from the worklist search window. Also, it was configured to input patient information manually or proceed with examination by emergency and to input patient information after examination.
Fig. 1 Window in which patient information is selected from the work list or entered manually.
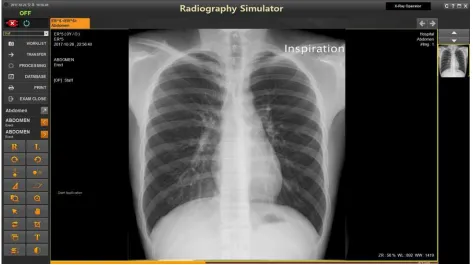
On the operator console, anatomy, projection, exposure setting, director selection, distance and whether a grid is used are set. The exposure body part area was configured to be able to select in detail through the large, middle, and small classification, and the irradiation direction and the
angle of exposure are selected based on the examination method. In addition, exposure condition setting was configured in such a way that it can be adjusted in the same way as that of the actual equipment.
Fig. 2 Window to enter examination parts and exposure conditions
After anatomy, projection, exposure setting, selected director, distance and whether grid is used are set, the patient’s position is set, and the X-ray Tube, table director and stand director are placed at their appropriate place, the sensor data received from the equipment’s firmware are displayed on the screen.
The position value of each component is displayed in the program so that the result value can be known, and the allowable range is set so that the error can be detected in advance. The margin of error for the location data value can be set as shown in Figure 3 and Figure 4 below.
Fig. 3 Window for position measurement output and tolerance setting
Fig. 4 UART Register: Firmware and Software communication
After clicking on the exposure button, the printed image can be saved after being adjusted, and can also be transmitted to the PACS server (see Figure 5). The exposure condition setting of the examination body part and the irradiation direction was configured in such a way that they
can be modified and added according to the user's environment. The user editing feature allows for an addition or editing of scenarios. As such, an expansion of the image data base, as well as continued upgrade is possible (see Figure 6).
Fig. 5 Window on which X-ray pictures are output
Fig. 6. Window for edit scenario (examination procedures)
The help feature allows the user to check the test method before conducting the test to increase the accuracy of the test. The help feature, too, has an editing feature that allows addition or editing. Help Example function is useful for learners as well as for actual radiographers. When examining
low-frequency examination methods, this function is useful since it can reduce the necessity of retaking if the examination is made after checking the examination method in advance (see Figure 7)
Fig. 7 Window to view or edit help screen
The newly developed user interface for radiography training simulator simulates an actual X-ray test, improving the effects of mock training and repetitive learning. Since not all variables that may occur during the image printing cannot be configured, the location data of the model device and camera were used to lead to correct testing methods and positions, thus minimizing errors.
IV.CONCLUSION
The radiography imaging simulator control method in the training simulator offers the same benefit as training with an actual radiography equipment without being exposed to radiation. In particular, since no radiation is used, students that play the role of a patient, as well as the equipment operator and students can undergo training without concern over radiation exposure and related risks.
Positions, angles and directions of imaging can be saved in the image data base to be displayed when students who take part in the training enter matching imaging conditions, anatomy, position or angle. This can offer the same benefit to students as viewing an image that had actually been taken by the student himself, leading to improved training effects. In addition, since an adjusted image is produced and displayed in accordance with the voltage and current entered by the students, the simulator offers students an opportunity to learn whether the voltage or current entered was optimal or erroneous.
Furthermore, the behavior ability of the students can be evaluated by using the examination condition and the exposure condition setting values inputted from the User Interface and the position information value collected from the model detector. The camera and voice recording device installed in the simulation room can perform the patient response evaluation and the image evaluation based on the images outputted on the User Interface.
Therefore, the educational radiography training simulator not only maximizes the effectiveness of learning through simulation training and iterative training, but also evaluates the level and skill of learning by objectively evaluating the ability of the student. In addition, if applied to the practical ability evaluation of the license test, it will be possible to induce the education that strengthens the
practicality through the behaviour-based evaluation. As a follow-up study, technological development using object recognition and 3D data to recreate various scenarios will be conducted.
REFERENCES
[1] Shah, N, Baig L, Shah N, Hussain R, Aly SM, Simulation based medical education; teaching normal delivery on intermediate fidelity simulator to medical students. J Pak Med Assoc, 2017. 67(10): pp. 1476-1481.
[2] Bott, O.J, Dresing K, Wagner M, Raab BW, Teistler M, Informatics in radiology: use of a C-arm fluoroscopy simulator to support training in intraoperative radiography. Radiographics, 2011. 31(3): pp. E65-75.
[3] Riener R, Frey M, Proll T, Regenfelder F, Burgkart R. Phantom-based multimodal interactions for medical education and training: the Munich Knee Joint Simulator. IEEE transactions on information technology in biomedicine: a publication of the IEEE Engineering in Medicine and Biology Society. 2004 Jun; 8(2): pp. 208-216.
[4] Serban A, Crisan-Vida M, Mada L, Stoicu-Tivadar L. User Interface Design in Medical Distributed Web Applications. Studies in health technology and informatics. 2016; 223: pp.223-229. [5] Szanto D, Szucs G. [Enhanced accuracy of the X-ray diagnosis of
acute abdomen with patient in the supine (pregnancy standard) position]. Orvosi hetilap. 1995 Oct 22; 136(43): pp.2329-2332 [6] Chung CA, Alfred M. Design, development, and evaluation of an
interactive simulator for engineering ethics education (SEEE). Science and engineering ethics. 2009 Jun; 15(2): pp.189-199. [7] Fargen KM, Siddiqui AH, Veznedaroglu E, Turner RD, Ringer AJ,
Mocco J. Simulator based angiography education in neurosurgery: results of a pilot educational program. Journal of neurointerventional surgery. 2012 Nov; 4(6): pp.438-441. [8] Hravnak M, Beach M, Tuite P. Simulator technology as a tool for
education in cardiac care. The Journal of cardiovascular nursing. 2007 Jan-Feb; 22(1): pp.16-24.
[9] Uramoto H, Chikaishi Y, Nagata Y, Shimokawa H, Tanaka F. [Student education with using training simulator for endoscopic surgery]. Kyobu geka The Japanese journal of thoracic surgery. 2014 Nov; 67(12): pp.1047-1050.
[10] Lak M, Kim KH, Kwon MJ, Kwon SM, Ra JB, Park H. Fast surface and volume rendering based on shear-warp factorization for a surgical simulator. Computer aided surgery: official journal of the International Society for Computer Aided Surgery. 2002; 7(5): pp.268-278.
[11] Kengyelics SM, Treadgold LA, Davies AG. X-ray system simulation software tools for radiology and radiography education. Computers in biology and medicine. 2017 Dec 13;93: pp.175-183. [12] Choi, J.K., K.B. Kim, and G.J. Kim, Image Selection Algorithm
Proposal for Digital Radiography Training Simulator. Wireless Personal Communications, 2016, 89(3): pp. 833-845.