Access 2007
by
Adrian Beck
Mark Maynard
Richard Rodger
Software Made Simple
PO Box 7068, Rothley, Leicester, UK, LE7 7PT
Telephone: 0845 2803121
Fax:
0845 2803121
Internet:
www.s-m-s.co.uk
The exact appearance of certain screenshots vary depending upon the version of Windows you are using. Windows Vista is used throughout, although for the purpose and scope
of this guide the differences between versions of Windows are largely cosmetic.
Microsoft PowerPoint, Microsoft Word, Microsoft Excel, Microsoft Access, Microsoft Outlook, Microsoft Vista and Windows are registered trademarks of Microsoft Corporation, US Patent No. 4,974,159.
© Software Made Simple
CONTENTS
1.0 INTRODUCTION
1.1 Database
Design
5
1.2
Stages in Creating a Database
6
2.0 STARTING ACCESS
2.1 Starting
Up
Access
10
2.2 Help
Using
Access
11
2.3
Opening an Existing Database
11
2.4
Creating a New Database
14
2.5
Creating a Database Using a Template
15
2.6
Creating a Database from Scratch
15
2.7 Creating
Tables
16
2.8
Creating a Table Using the Table Wizard
16
2.9
Creating a Table from Scratch
17
2.10 Defi ning Fields
17
2.11 Data
Types
19
2.12
Setting the Properties of a Field
19
2.13
Adding, Deleting and Modifying Fields
22
2.14
Setting the Primary Key in a Table
22
2.15 Table
Relationships
23
3.0 ENTERING DATA INTO A TABLE
3.1
Using Cut, Copy and Paste
26
3.2
Selecting in the Datasheet
26
3.3
Adding, Deleting and Modifying a Record
27
3.4 The
Undo
Command
27
4.0 MANIPULATING THE DATABASE
4.1 Sorting
and
Filtering
28
4.2
Performing a Quick Sort
28
4.3
More Complex Sorting and Filtering
29
CONTENTS
5.0 USING FORMS
5.1
Creating a Form Automatically
40
5.2 Refi ning a Form
42
5.3
Making Data Entry Even Easier
45
6.0 REPORTING
6.1
Creating a Report Automatically
49
6.2 Refi ning the Report
51
7.0 SAVING 8.0 PRINTING
1.1
SECTION 1
INTRODUCTION
A database is a collection of information (data) which is systematically organised. There are many examples of databases in everyday life, for example, an attendance register, a shop stock list, a telephone book. Using a database management system (database program) like Access, databases such as these can be manipulated and searched. For example, Access would allow you to sort a database of publications into alphabetical order based on the author’s name, and to search for the author of a particular publication. Access can sort or fi nd information much faster than you could by hand so looking through huge lists of information becomes a practical proposition. Data can also be manipulated using Access, eg. you could fi nd out the total number of publications there are in the database, or how many by a particular author, or published after say, 1980.
Databases are structured into tables, records and fi elds. A table consists of a set of records (rows). Each record contains a number of distinct fi elds (columns). An example of a record would be information about a particular publication, say the book ‘Harry Potter and the Deathly Hallows’. Examples of fi elds are the author, the publisher, and the ISBN (International Standard Book Number). As with database programs generally, before you start to use Access you should consider carefully what information you wish to record, the form in which you wish to record it, and what data you may want to retrieve from the database.
Database Design
Database design is a big topic – entire books have been written on the subject. Traditionally it has been viewed as a diffi cult task requiring highly specialised skills and consuming a great deal of time and effort. Whilst this may be true for large shared databases which have to take into account a wide range of considerations and users, small or single-user databases are not necessarily always diffi cult to design and implement. Outlined below are a number of principles that you should keep in mind when you are designing a database. There are two types of database: Flat File Databases and Relational Databases. Both types can be created using Access. Flat fi le databases are a simple type of database which consist of a single table of data, for example, a telephone book. While simpler in design, fl at fi le databases can be ineffi cient if used to store inappropriate types of data as this can lead to a lot of repetition in the database. In such cases more than one table is required and this is termed a relational database. Consider the example of a library loan database where a person may borrow several books. If this was to be implemented as a fl at fi le database there would need to be a record containing details about each book including a fi eld for the name of the borrower. If the person were borrowing six books her name would be repeated six times in the database alongside the records of the six books borrowed. In addition the database would need to store the person’s library card number and the loan date. Of course each of these would also have to be stored six times – not very effi cient. While with a small-scale database this may not seem important, the larger the database grows the more cumbersome it becomes to search and manipulate.
In a relational database details about the book would be kept in a separate table from those of the borrower; in this way the tables can be linked (related) together by a single common fi eld. This linking fi eld is the only repetition required between the tables and this is much more effi cient. The key to relational databases is the process of deciding which tables you should have in the database, how these tables are related, and what fi elds those tables should contain. A frequent problem in the design of databases is that too few tables are
6
1.2
used which can lead to them becoming overloaded or diffi cult to search, update and expand. You need to consider carefully the sorts of questions you will want to ask the database and the types of output you will require. Very often you may have to review the design.
Stages in Creating a Database
1
Decide upon the design of your database. Section 1.1.2
Create the required tables based upon your design and defi ne the fi elds within each table. Section 2.3.3
8
5
Search the database using a Query. Section 4.0.6
If you wish to print any data from the database as anything other than a simple listing use a Report. Section 6.0.Sample Database
Throughout this guide the examples are based on a database designed to operate a local library loan system. The purpose of the database is to enable the library to store and retrieve information about which publications are on loan and to whom. The following information needs to be recorded about the publications available: which publications are on loan, to whom, and details about people registered to use the library. Each has been logically allocated to one of four tables with the linked element underlined:
Publication: ISBN, Title, Author, Publisher, Loan Period, Times Borrowed, Type of Publication, On Loan.
Loan: ISBN, Library Card Number, Loan Date.
Borrower: Library Card Number, Name, Loan Limit, Adult.
Details: Library Card Number, Address, Telephone Number.
While this may appear intimidating, examples in this guide will refer only to the Publication table unless illustrating how to relate tables together and how these can then be manipulated. The database was divided in this way because it has broken the information which is needed into four distinct entities. The tables are linked either by the ISBN number or the Library Card Number (underlined above). Structuring the database in such a way makes it more effi cient to use and reduces problems of duplication and inconsistencies. The diagram below illustrates the relationship between the four tables which constitute the database. You should note that the sample database is intended purely as an illustration and that some licence has been taken.
10
SECTION 2
STARTING ACCESS
Unlike most programs where it is possible to get started with little background knowledge, the same is not true of a relational database program. Getting the initial design of the database right is essential. If you have not done so already, it is suggested that you read Section 1.0 of this guide and if you are still in any doubt then read a book about database design.
Starting Up Access
Windows Vista
Click on the Start button, choose All Programs and from the Microsoft Offi ce sub-menu choose Microsoft Offi ce Access 2007.
Windows XP
Starting Access 2007 from Windows XP is slightly different
From the Start menu, choose All Programs and from the Microsoft Offi ce sub-menu choose Microsoft Offi ce Access 2007.
Access starts up with a startup screen:
Using a database which has already been set up (see Section 2.3). Setting up a new database (see Section 2.4).
Help Using Access
If you have problems with Access click on the button on the top right corner of the window. To fi nd help on a particular topic, just enter the topic and click on Search. Usually a selection of possible answers is returned, and for further details just click on the most appropriate answer. The Forward and Back buttons at the top of the Access Help window allow you to move between answers. To hide Access Help click on the help window Close Box.
Opening an Existing Database
You may have experience of inputting data or working with an Access database created by someone else. If you wish to adapt an existing database or modify one that you have already created. In either case if Access has just started up you will be presented with a dialogue box similar to the one shown on the following page.
•
•
2.2
12
To the right of the startup screen is the Task pane, and if the database you wish to open has been in use recently then it may be listed here. If so a single click on the name of the database will open it. If the database you wish to open is not listed then click on More and fi nd the database using the Open dialogue box or click on the Offi ce button and on Open.
Windows Vista
you wish to open a database from a folder within the Documents folder, explore the folder structure by double-clicking on folders to the right of the dialogue box. Having found and selected the database you wish to open, click on the Open button to open your database.
If you wish to open a database from a different disc or folder and it is listed amongst your favourite links to the left of the dialogue box, simply make your choice, fi nd the database and click on the Open button.
If the database you wish to open isn’t within the Documents folder and isn’t listed amongst your favourite links, click on the up-arrow to the right of the Folders button, navigate to the folder or disc containing the database, select the database and click on the Open button to open it.
Windows XP
A dialogue box appears like the one below.
A dialogue box appears, and this lists all the fi les or databases in the default My Documents folder that can be opened. If the fi le you wish to open is listed select it and click on the Open button, or double-click on its fi le name. To open a fi le in a different folder or disc, click on the arrow alongside the Look in box and make your choice from those listed. If the fi le was saved into a particular folder double-click on the folder from those listed in the dialogue box. Open the fi le as above.
Existing databases can also be opened by fi nding their icon in Windows and double-clicking.
•
14
Once a database is open the Database window is displayed and from this you can choose which type of database object you wish to use. If you wish to view data in a datasheet, from the Home tab, click on the View button and choose Datasheet View. Tables are listed on tabs across the top of the datasheet and viewing a table is just a matter of clicking on one of these tabs. .If you wish to view data as a form click on tab of the form from the top of the datasheet.
Opening in Compatibility Mode
Sometimes, you may need to open a database created in another program, most commonly, an earlier version of Access. Files such as this can be opened as above but the name of the fi le format eg. ‘Access 2002-2003 fi le format’ shown in the title bar.
Creating a New Database
To create a new database you must decide whether to begin from scratch with a blank database or to use a ready made template. Access provides several ready-made database templates (see Section 2.5), if your information is consistent with one of these templates then they are certainly the easiest way to create your database.
Note: The distinction between a Datasheet and a Form is made later in the guide.
Note: The format of fi les opened in compatibility mode is unchanged when they are saved.
Important: It is important to realise that while you will want to save your database as you develop its design, when entering data, unlike most programs, Access saves as data is entered. See Section 7 for more about Saving.
Creating a Database Using a Template
Access provides a number of templates for databases designed for common purposes and these are shown categorised on the Access startup screen.
To utilise these templates, click on an appropriate category. If one of the templates is suitable choose it, provide a fi lename and save location and click on the Create button. A typical database of the type you require will then be created. The database can be edited as any other Access database, just use the techniques outlined in the following sections.
Creating a Database from Scratch
To create a new database, click on the Blank Database button from the Access startup screen and from the Task Pane title your database and click on to choose where it should be saved.
By default Access uses Database1 as the database fi lename, but this can be edited and deleted as with any text. Access saves with the extension .accdb.
2.5
16
Creating Tables
Having created the database the next step is to create the necessary tables and Access automatically creates a blank table for you to get started.
You can use this as the basis for your fi rst table if you are creating a table from scratch or you can create a table using one of the ready-made table templates. Certainly if one of the templates suits your purpose this is certainly the easiest way to create tables. However, more likely than not, your data will not conform to one of these ready made tables and so you will need to create your own table from scratch.
Creating a Table Using Table Templates
To determine whether the table you wish to create corresponds with one of the pre-defi ned table templates, click on the Create tab and then on the Table Templates button to display the range of templates available. If a template fi ts your needs choose it from the pop-up menu and it will be created for you with all the appropriate fi elds. The table will be listed on the left of the Access window. Tables created in this way can be modifi ed as with any Access table.
2.7
Creating a Table from Scratch
To create a table, click on the Create tab and then on the Table button. The newly created table will be listed on the left of the Access window as table1 and opened in Datasheet View. Having created the table you should now save it, click on the Offi ce button and choose
Save. Enter a suitable table name into the dialogue box displayed and click on OK.
As tables are created a tab bearing the table name is displayed at the top of the window and so changing tables is simply a matter of clicking on a tab. However, if a table is closed it can be reopened by double-clicking on the table name from the left of the window.
With the table created the fi elds of the database now need to be defi ned (see Section 2.10).
Saving in Access is different from other programs. For information about saving see Section 7.0.
Defi ning Fields
Database tables use a number of categories or fi elds in which data is stored. Library catalogues – cards with author’s name, title of publication, publisher, date of publication – are a case in point of a physical database now replaced by an electronic one. Each element – name, title, publisher etc. is a fi eld, and these must be defi ned before data can be entered.
To defi ne fi elds a table needs to be viewed in Design View and you can switch to Design View from the Home tab, by clicking on the View button and choosing Design View
from the pop-up menu.
From the design view window the fi elds common to every record of the database are defi ned.
To defi ne a fi eld, type the name you have chosen for the fi eld into the column beneath Field Name. Long fi eld names can be accommodated by increasing the width of the column. To do, this move the pointer to the line which divides the titles of the Field Name and Data Type columns. The pointer will change shape. Now click and drag right to widen the column as required.
Press the Tab ( ) key to move to the Data Type
column and choose a data type by clicking on the down-arrow and making your choice from the pop-up menu. Defi nitions of the fi eld data types are provided in Section 2.11. Press the Tab ( ) key to move on to the Description column where you may if you wish include a full description of the fi eld.
2.9
18
Move to the next fi eld by pressing the Tab ( ) key or by using the mouse. Repeat this procedure for as many fi elds as you wish to defi ne for the table.
Enter Data Type here Enter Field Name here
Hint: For a shortcut to entering text fi eld data type press the Enter ( ) key after typing the fi eld name. This enters the Text data type automatically.
Note: It is advisable to defi ne all fi elds at this stage though new fi elds can be added at any time. Similarly, the data types and options described below can generally be re-defi ned at any stage. For advice on good practice in database design see Section 1.0.
Data Types
To cope with various forms of data, fi elds are defi ned with different characteristics or data types. There are ten data types; each has particular advantages and disadvantages, and associated options. The most commonly used types are listed below.
Text Used for anything that you can type – letters, numbers or other keyboard symbols. However, without further defi nition numbers typed into a text fi eld cannot be used in calculations. Limited to 255 characters. Examples of text fi elds in the sample database are Title and Author.
Memo Also used for anything that you can type, such as sentences or paragraphs.
Number Primarily used for entering numerical data. Number fi elds can be specifi ed to include commas to denote thousands, a specifi c number of decimal places etc. An example of a number fi eld in the sample database is the Times Borrowed fi eld which records the number of times a publication has been borrowed.
Date/Time The Loan Date is an example of a date/time fi eld in the sample database.
Currency Monetary values.
AutoNumber A numeric value which is automatically increased for each new record.
Yes/No Boolean values. An example of a yes/no fi eld in the sample database is Adult, which indicates whether a borrower is an adult or not.
Setting the Properties of a Field
By setting the Field Property you can ensure that Access automatically records values entered into these fi elds in your preferred format. For example, dates in the 3rd June 2000 format instead of 03/06/2000 or £1,000 instead of 1000.
To alter the property of a fi eld
Ensure that the table is in Design View.
Select the fi eld for which you wish to set the property by clicking on the Field Selector to the left of the fi eld. The current properties of the fi eld are displayed in the lower pane of the window.
•
•
2.11
20
Click in the box of the property you wish to change and enter a value. Typical values for most data types are listed below. Some properties display a predefi ne list of values. To use these click, on the down-arrow which appears and make your choice from the property types displayed in the pop-up menu.
Format Properties
The most commonly used text property is to enter > to display entered text as upper case, enter < to display entered text as lower case.
•
Properties for this fi eld are entered here Field selectorNote: Any properties defi ned for data in a table are automatically also applied to Queries, Forms and Reports. However, properties which relate to each of these database objects can also be set independently.
menu. Alternatively for numbers/currency enter a typical property with zeros representing the numbers, eg. 0,000.00 would display 1234.5 as 1,234.50.
Entering a Default Value
Automated data entry is valuable: it avoids typing errors and ensures accuracy. Where a particular fi eld contains a common value in every record it is very useful to have Access add that value automatically to any new record. In this way the value need only be changed on the odd occasion that it differs from the default, so speeding up data entry. Click on the Default Value property and enter the value you wish to use as a default. For example using the sample database, the Loan period fi eld could be set to a default value of 7 representing the usual one week loan.
Enforcing or Limiting Data Entry
It can be tempting when entering data into a database to omit information which is not easily to hand. The resulting incomplete data can lead to inaccuracies when querying the database. To avoid any omissions in data the Required property can be used by setting this property to Yes.
If you wish to limit the data which may be entered into a fi eld the Validation Rule property can be used. For example you may wish to limit what is entered into the Type of Publication fi eld to Book or Article. To do this enter each of the permitted values separated by or, ie. Book or Article. Now if any other than the permitted values are entered an error will be displayed. If you wish to defi ne the text of the error, enter this text in the Validation Text
property. Test out the validation by changing to datasheet view and entering some sample values.
If you wish to ensure that a number with a specifi c number of digits is entered use the
Input Mask property and enter a zero for each digit. For example, 0000000000 for the 10 digit ISBN number. Text and data fi elds can also use input masks for these a wizard is at hand for assistance click on the button alongside the Input Mask property to start the Wizard.
Note: Null may also be entered into the Validation Rule property if you wish to permit the fi eld to be left blank. Also note, the Validation Rule is not case sensitive.
22
Adding, Deleting and Modifying Fields
To modify the design of a table ensure that it is being viewed in design view. To modify a fi eld within the table, select the fi eld and then modify the fi eld name, data type and description as required. To re-order a fi eld, click on the Field Selector to the left of the fi eld name and drag the fi eld to its new position in the fi eld order.
To adjust the width of a column so as, for example, to view a long fi eld name, move the pointer to the line which divides the titles of the columns you wish to resize. The pointer will change shape. Click and drag right or left to resize the column as required.
To insert a new fi eld, from the Design tab, select the fi eld above which you wish to create a new fi eld and click on the Insert Rows button . To delete a fi eld select it and click on the button.
Setting the Primary Key in a Table
Once you have defi ned all the fi elds of a table you should set its Primary Key. The Primary Key is allocated to a fi eld which identifi es uniquely each record in the table (it is often an identifi cation number or product code). The Primary Key will determine the order of records in a table and its main advantage is that it will speed up the querying (searching) of your database.
To Set a Primary Key:
To defi ne a Primary Key select the fi eld you wish to use and click on the button from the Design tab. A key symbol will appear alongside the fi eld name.
To change the Primary Key to another fi eld repeat the procedure above.
To use our sample database:
In our sample database the Primary Keys for each table were set as the ISBN number for each publication or the Library Card Number. Both of these are unique to each record in the database.
If required you may specify more than one fi eld as the primary key. To do this simply select these fi elds by holding down the Ctrl key while selecting.
2.13
2.14
Primary Key
Important: Be careful when deleting fi elds and re-defi ning a fi elds data type for a table already containing data. If the data cannot be fi tted to the new data type it may be permanently modifi ed eg. re-defi ning a text fi eld as a number fi eld would delete all alphabetic characters entered into the fi eld. Changes such as those above are permanent and there is no way to recover data.
Table Relationships
If you have created a number of tables which are linked you will probably want to establish a relationship between the tables. Building a relationship allows information in different tables to be combined meaningfully.
Access can set up two types of relationship between tables: One and One-to-Many. A third type of relationship called a Many-to-Many relationship exists but can only be accommodated through changes in the design of the database. Many-to-Many relationships are beyond the scope of this guide.
In order to build a relationship between two tables it is necessary for the tables to have a fi eld in common. The fi elds need not necessarily have the same name but they must contain the same data. The common fi eld is usually, but not necessarily, the primary key. The most commonly found relationships are One-to-Many. In a One-to-Many relationship a record in one table can be matched to many records in a second table. However, a record in the second table can only be related to one record in the fi rst. Using our example, one library user may have many publications on loan in the Loan table.
In a One-to-One relationship a record in one table can be matched to no more than one record in a second table, and vice versa. Using our example one record in the Borrower table is associated with one record in the Details table.
Creating a Relationship Between Tables
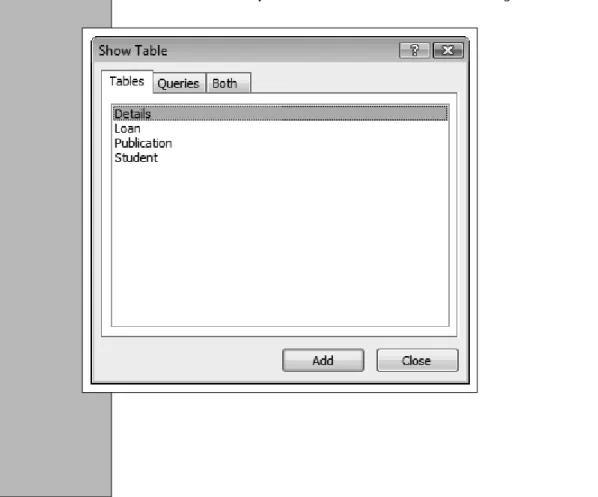
From the Database Tools tab click on the Relationships button to display the Relationships window and the Show Table dialogue box.
•
24
From the dialogue box choose each table you wish to establish a relationship between and click on the Add button. Click on the Close button to fi nish. Any tables added will appear in the relationships window. Having added all the necessary tables click on the
Close button.
•
To create a relationship drag the fi eld you wish to relate from one table to the matching fi eld on the other.
From the dialogue box displayed click on the Enforce Referential Integrity box if you are joining two primary keys. In addition Access displays the relationship type between the two tables. Click on Create to establish the relationship.
In the Relationships window lines (joins) are shown between the tables indicating their relationship. A 1 at the beginning and end of a join indicates a One-to-One relationship. A 1 at the one end of a join and a ∞ at the other indicates a One-to-Many relationship. The relationships window appears as a tab across the top of the window and so it can be chosen at any time.
•
•
•
•
One-to-One Relationship One-to-Many RelationshipSECTION 3
ENTERING DATA INTO A TABLE
Once fi elds have been defi ned the table is just an empty shell awaiting data entry.
Data is generally entered into a table while in datasheet view so ensure that Datasheet is highlighted in the View buttons pop-up menu.
A Datasheet is displayed consisting of a grid showing the previously defi ned fi eld names above each column. Information (data) relating to the fi elds of records is then entered one row at a time.
Data can be entered at the insertion point. To move between fi elds either click on the fi eld where you wish to enter data, or press the Tab ( ) key to move to the next fi eld. Use the same method to move on to a new record that is always displayed beneath the previous record. Record To First Record To Previous Record Record Number To Last Record Fields To Next Record
Note: Unless you specify otherwise it is not necessary to enter data into every fi eld of a record.
26
If there are more fi elds per record than can be displayed in the window the scroll-bars along the side and/or bottom of the window become active. Use these scroll-bars as you would with any other program. Similarly use the scroll-bars to view records not currently displayed in the window.
Data entered into a table is automatically saved each time the insertion point is moved on to the next record.
Creating a Form provides a more accessible way of entering data into a database than using a datasheet. See Section 5.0 for more about Forms.
Using Cut, Copy and Paste
Cut, Copy and Paste can be used to move or copy data around the datasheet or between tables:
Select the data you wish to move.
If you wish to move the data, from the Home tab, click on the Cut button . The data will disappear.
Alternatively, if you wish to copy the data click on the Copy button. Move the insertion point to where the data is to be placed and click on the Paste
button. The data will appear at the insertion point.
Selecting in the Datasheet
Select a single record (row) by clicking on the Record Selector to the left of the record. Select multiple records by clicking on the record selector of the fi rst record of the selection and dragging down to the last record you wish to select.
Select all records by clicking on the Selector in the upper left corner of the datasheet. To select a fi eld (column) contained within all records, click on the particular fi eld name at the top of the datasheet.
•
•
•
•
3.1
3.2
Selector Record SelectorAdding, Deleting and Modifying a Record
Data entered into a fi eld can be edited in the same way as you would with a wordprocessor. Use the mouse to move the insertion point within the fi eld, and then type, delete or amend data as required.
To delete an entry in a fi eld altogether click on the left edge of the fi eld and press the
Delete (Del) or Backspace ( ) key.
To delete a complete record, select it and press the Delete (Del) key.
Undo/Redo and Repeat
One useful facility that you will soon grow to love is Undo. This is available by clicking on the button on the Quick Access toolbar.
Clicking on the down-arrow to the right of the Undo button lists the last changes which you made to your database and these can be undone by choosing the item on the list. Conversely, using the Redo button on the Quick Access toolbar reverses any changes you have made using the Undo button.
The Redo button changes function and appearance to a Repeat button if nothing has been undone and in this case clicking on it repeats your last change.
3.3
28
SECTION 4
MANIPULATING THE DATABASE
The intrinsic power of databases is based on the searching, sorting and cross-matching of records, often from more than one table, and performing calculations based on data stored in a number of individual records. For example, a mail order company may seek to obtain a list of individuals who subscribe to particular magazines and, before targeting potential customers, wish to list those customers who fi t into a particular income bracket or professional group.
Sorting and Filtering
Each record is stored in a table in the order in which it was entered. However, this may not be the order in which you wish to browse the records. By sorting a table you can temporarily rearrange the records according to certain criteria. Alternatively, you may wish to temporarily browse only those records which conform to certain criteria. To achieve this you can fi lter the table.
Sorting and fi ltering differ from querying in that they are temporary and based only upon a single table, whereas a query can be saved and can be based upon several tables.
Performing a Quick Sort
To sort a single table based on one or more fi elds or to sort a form based on a single fi eld the technique below is used. For more complex sorting see Section 4.3.
To sort a table based on a single fi eld:
Ensure that you are viewing the table in Datasheet or Form View by choosing the appropriate view from the View button.
Select the fi eld you wish to sort by clicking on the name of the fi eld at the top of the Datasheet window or by selecting the fi eld in the form.
To apply an ascending sort, click on the button from the Home tab; for a descending sort click on the button.
A sort may be performed on several adjacent fi elds while in datasheet view by selecting the required fi elds. The left-most fi eld is sorted fi rst. While using a form it is only possible to sort on one fi eld at a time.
•
•
•
4.1
4.2
More Complex Sorting and Filtering
Occasionally it may be necessary to perform a more complex sort on your table, perhaps sorting some fi elds in ascending order others in descending order. Also you may wish to fi lter your data in order to browse only a sub-set of the total data available. In these cases you should use the method outlined below:
From the Home tab, click on the Advanced Filter button and choose
Advanced Filter/Sort from the pop-up menu. This will present the Filter window.
From the upper part of the window double-click on each of the fi eld names you wish to use in your criteria for the sort/fi lter. These will in turn appear in the lower half of the window.
A sort order can be applied to each fi eld by clicking in the Sort cell below the fi eld name, clicking on the down-arrow which appears, and choosing a sort order from the resulting pop-up menu.
Filtering criteria can be applied to each fi eld by entering this in the Criteria cell below the fi eld name. For example, to fi nd all the publications by the author Braithwaite, enter Braithwaite in to the criteria cell.
For more information on specifying criteria see Section 4.4. To sort or fi lter choose Apply Filter/Sort from the
Advanced Filter button pop-up menu.
To return to the order in which each record was entered, choose Clear Grid from the Advanced Filter button pop-up menu.
•
•
•
•
•
4.3
Sort Order Table Chosen to Filter/ Sort Field Chosen as Basis of Sort Sort Cell Criteria Cell30
Using Queries to Find Data
One of the most powerful features of a relational database program is its query facility. A query is used to search through the database to locate a particular record or records which conform to specifi ed criteria. These are collected into a special kind of table called a Dynaset. This section of the guide describes how to create the Select Query as this is the most commonly used type of query. Access is capable of other types of query but these are beyond the scope of this guide.
The Select Query
Here we use the Simple Query Wizard to create a Dynaset consisting of fi elds from any table or tables of the database. This is displayed either as a detailed query – showing every fi eld of every record in the Dynaset, or as a summary query – where the contents of fi elds may be totalled in a sum, averaged, or the minimum and maximum values of a fi eld displayed. Here we use a query on our database to show the books on loan to each borrower.
The query can be further refi ned by modifying it in design view. This permits you to limit the records displayed in the Dynaset depending on certain criteria and to determine how those records are displayed. For example, you could display details of those books borrowed by a particular person, or how many books the student had borrowed for more than one week. You could also choose to display records in a particular sort order.
Creating a Select Query
Here we use a wizard to assist us in creating our query
To create a Select Query, from the Home tab click on the Query Wizard button . From the resulting Simple Query Wizard dialogue box, click on Simple Query Wizard and then on Next.
•
•
query from the Tables/Queries pop-up menu. Next, click on each of the fi elds from the table that you wish to use in the query and on the button. If you wish to use all fi elds from the table in your query click on the button. To use fi elds from another table in your query simply choose the table from the Tables/Queries pop-up menu and repeat the procedure above. Click on the Next button when you have added all the required fi elds.
The following dialogue box requires you to choose whether you wish to display a detailed or summary query. If you click on Summary, a Summary Options button is available and clicking on this displays the dialogue box below.
32
The dialogue box allows you to choose the types of summary you require for each of the chosen fi elds. For example using our sample database you might wish to have a query fi nd the average number of times books are borrowed.
Clicking on the Next button displays the last dialogue box of the Simple Query Wizard.
Enter a name for your query and choose whether you wish to Open the query to view information or Modify the query design. If you wish to refi ne the query in the manner described above then click on the latter button. If you choose to view the information but later decide to you wish to refi ne the query simply click on Design View from the View
button pop-up menu.
Lastly, click on the Finish button and the result of the query will be opened as a tab on the datasheet window or in query design view depending upon the options chosen. The Pane on the left of the window has a pop-up menu from which you can choose whether to view tables, queries, forms or reports.
•
•
Refi ning the Query
Refi ning a query permits you to sort the contents of fi elds and add criteria to your select query. For example, using our sample database you might wish to view the titles of all books borrowed more than 100 times or perhaps view the types of publication borrowed by a particular person.
To refi ne a query follow the procedure below: Open the query in design view.
Tables used in the query are displayed in the top half of the window. Where more than one table is used they will be joined together with lines which refl ect the relationship which was established when the tables were created, see Section 2.15. However, if desired, the relationship between tables can be changed in the Select Query window. Fields and any criteria for the query are added to the Query By Example (QBE) grid which occupies the lower half of the Select Query window. Field names are prefi xed by the name of the table to which the fi eld belongs.
A sort order can be applied to each fi eld by clicking fi rst in the Sort cell below the fi eld name, then by clicking on the down-arrow which appears, and fi nally by choosing a sort order from the resulting pop-up menu. The leftmost fi eld on the QBE grid is sorted fi rst. To alter the sort order, select the column containing the fi eld you wish to move by clicking on its Column Selector and dragging the column to its new position in the order. If you wish a fi eld to be included in the query but not displayed in the Dynaset (eg. to be used as part of a calculation, see Specifying Criteria in a Query below) click in the Show box under the fi eld you do not wish to display.
Using the View button to change to Datasheet view causes all data from the fi elds specifi ed on the QBE grid to be displayed in a Dynaset.
If you wish to return to the Select Query window, perhaps to refi ne your query further, change back to Design view.
You may wish to save your query so that it can be used again, perhaps when more data has been added to the database or when data has been modifi ed. For information about saving refer to Section 7.0.
•
•
•
•
•
•
•
•
4.4
Column Selector Field Cell Sort Cell Criteria Cell Show Box QBE Grid34
Specifying Criteria in a Query
Query criteria can be applied to each fi eld by entering this in the Criteria cell beneath the fi eld name.
If your criteria are simple then they can be entered directly into the criteria cell. Examples of such criteria are shown in the boxed section below.
Access provides a convenient method of specifying more complex criteria by using the Expression Builder. To use the Expression Builder button click in the criteria cell beneath the column representing the fi eld and click on the button from the Design tab. This will display the Expression Builder dialogue box.
The expression or criteria is built in the upper half of the Expression Builder dialogue box from components specifi ed in the lower half of the dialogue box. The pane to the left lists categories of items which may be used in the expression such as tables and within tables fi elds, forms, reports and other queries. These are all items which are saved to the database fi le and are here presented as a folder structure. Double-clicking on a folder reveals the items contained within it, and these are shown in the central pane of the dialogue box.
•
•
•
•
Examples of Simple Criteria
Text Criteria
Entering text would fi nd an exact match for the text, eg. entering Buck under the Author fi eld would fi nd the Author Buck but not Buckland. Unless otherwise specifi ed text searches are not case sensitive, eg. buck and Buck are both found.
Simple Mathematics
Access enables you to make specifi c query’s of an arithmetic kind. How often, more than, less than and the number of occurrences between, a range of numbers can be specifi ed easily.
If you wished to fi nd publications which are available on loan for longer than the standard 7 days the criteria >7 can be entered under the Loan Period fi eld.
If you wished to fi nd publications which had been borrowed less than ten times the criteria <10 can be entered under the Times Borrowed fi eld.
If you wished to fi nd publications which had never been borrowed the criteria 0 can be entered under the Times Borrowed fi eld.
Note: On leaving the criteria cell any text entered will automatically be enclosed in quotation marks.
Folders displayed as contain sub-folders. For example, double-clicking on the tables folder reveals a list of all the tables saved to the database fi le. Double-clicking on one of these tables reveals, in the central pane, a list of fi elds contained within the table.
Double-clicking on an item in the central or right pane adds it to the expression. Items, such as those described above, can be used in conjunction with other items listed in the following folders:
Most common mathematical and logical operators are listed on the central line of buttons in the dialogue box. Clicking on the OK button inserts the expression into the Criteria cell of the Select Query window.
If you wish to use a fi eld in your query but not have it display as part of the Dynaset click on the Show box under the fi eld name to de-select this option.
All the above examples use only a single search criterion. Below are examples of where you might want to use more than one criteria.
•
Expression Built Here Commonly Used Mathematical and Logical Operators Categories of Items Item ContentsOperators eg. +, -, / (divide), * (multiply), < (less than), > (greater than), <> (equal to), And, Or, Not, Like
Constants eg. False, True
Functions eg. Cos, StDev, Date, In
Common Expressions eg. Current Date
36
Using AND Criteria
AND criteria are useful if you wish to fi nd records based on one criterion AND another, for example, to fi nd all publications which are articles AND which have been borrowed more than fi ve times.
To use AND in your criteria add the required fi elds to the QBE grid and any criteria.
Using OR Criteria
OR criteria are useful if you wish to fi nd records based on one criterion OR another, for example, to fi nd all publications which are articles OR books.
To use OR in your criteria add the required fi elds to the QBE grid and any criteria.
Using NOT Criteria
NOT is useful if you wish to fi nd all records but NOT those which conform to a criteria, for example, to fi nd all publications which are books but have NOT been borrowed. To use NOT in your criteria add the required fi elds to the QBE grid and any criteria.
Using BETWEEN Criteria
BETWEEN is useful if you wish to fi nd all records where the data in a fi eld is BETWEEN one value and another, for example, to fi nd all records where the times a publication has been borrowed is between 3 and 6.
To include BETWEEN in your criteria enter BETWEEN and the range of acceptable values separated with And.
Using IN Criteria
IN is useful if you wish to fi nd all records where the data in a fi eld is one of a set of values specifi ed IN the criteria, for example, to fi nd all records where the author is in the list Beck, Buck or Braithwaite. To include IN in your criteria enter IN followed by the comma separated list of values you wish to search for enclosed within brackets.
There is almost no limit to the number of functions and operators which can be used in an expression. For a complete list of functions use Access Help (Section 2.2) and enter
Functions Reference.
Creating Calculated Fields
It can be useful to add a fi eld to a query which is based upon calculations using data from other fi elds. For example, you might want to create a fi eld which multiplies the Loan Period by the Times Borrowed to create a fi eld named Number of Days on Loan.
To create a calculated fi eld:
Return to the Select Query window and enter the calculation into an empty fi eld cell using the Expression Builder. You should ensure that the calculation commences with an equals symbol (=), any fi eld names used in the expression are automatically surrounded by square brackets.
Clicking on the OK button will cause Access to add its own fi eld name to the start of the expression, eg. Expr1. This can be changed to a more meaningful name if required. Criteria etc. can be added to the calculated fi eld like any other.
Using Wild Cards In Finding Text
Little fl exibility is possible in the text searches described above. Exact text must be entered in the criteria cell. To fi nd records containing text criteria no matter where in the fi eld it might be, the Wild Card characters * and ? are used in combination with example text. The * symbol can be used to represent any number of characters in the text in a fi eld, whereas the ? symbol is used to represent a single character.
For example, to search the Publication table for all publications whose author has a name beginning with the letter b, enter b* in the criteria cell. As the * symbol represents any number of characters this would fi nd both Beck and Braithwaite.
•
•
•
Calculation Entered into an Empty Field Cell
38
To use ?, the single character wild card, substitute ? for any character in the text search criteria. For example, entering b?ck would fi nd both Beck and Buck.
Specifying Totals in a Query
It can be useful to discover a total for a particular number fi eld. For example, using the sample database you might wish to fi nd out how many times several books have been borrowed. To do this from the Query window click on the Totals button from the Design
tab. A row of Total cells is added to the QBE grid and initially all the cells are fi lled with Group by. To fi nd the total in a fi eld click in the total cell of the fi eld and on the down-arrow, and from the pop-up menu choose Sum or one of the other functions available.
Modifying a Query
To edit a query fi rst ensure that the query is in Design View. A simple query can be edited directly in the criteria cell. However you may fi nd it more convenient to click in the criteria cell and edit more complex queries from the Expression Builder dialogue box. Click on the criteria and then on the button from the Design tab to open the Expression Builder. Edit the expression as normal text. See Section 4.4 for more about using the Expression Builder.
Note: On leaving the criteria cell where a wild card has been specifi ed then the criteria will be surrounded by quotes and prefi xed by Like.
SECTION 5
USING FORMS
The use of Forms provides an alternative and more accessible way of presenting and entering your data than using a datasheet. The form permits the viewing of a single record at a time, and the design of the form can be easily customised to suit your requirements. Shown below is a typical form drawn from the publication table.
The main advantages of using a form are: It is familiar, as it is similar to a paper form. It is often quicker to enter data using a form.
Data can be presented in a more attractive and accessible manner and can include graphs and pictures.
Forms can display data from a table or from a query. Forms can be designed to display only selected data. Forms can be sorted or queried just like tables.
Forms can take their data from tables, queries or can be created especially for the form. Wherever the source, the data is held in the form as objects called Controls.
Most controls are bound to fi elds from the original table or query and allow data to be changed using the form as an alternative to the datasheet eg. the ISBN and Author fi elds in the Publication table. However, some controls are just information for display purposes, eg. labels or graphics used to enhance the appearance of the form.
The Pane on the left of the window has a pop-up menu from which you can choose whether to view tables, queries, forms or reports
•
•
•
•
•
•
40
Creating a Form Automatically
The quickest way to create a form is to use the Form Wizard.
If you wish to create a form from more than one table then the answer is to create a query from which the form can be created.
Switch to Datasheet View, from the Create tab click on the More Forms button and from the pop-up menu choose Form Wizard.
From the following dialogue box choose the fi elds upon which you wish to base the form and click on Next.
•
•
Next.
The next dialogue box requests you to choose a style for your form from those listed. Click on Next when this is chosen.
In the last dialogue box enter a name for your form and choose whether you wish to
Open the form to view information or Modify the form’s design. If you choose to view the information but later decide to you wish to refi ne the form simply click on
Design View from the View button pop-up menu.
Lastly, click on the Finish button and the resulting form will opened as a columnar form or in form design view depending upon the options chosen.
Shown below is a typical columnar form displaying a single record on the form. The fi gure illustrates how to navigate using the form.
•
•
•
Note: Columnar forms are the most commonly used; other form layouts are available but these are outside the scope of this guide.
To First Record To Previous Record Record Number Total Number of Records To Next Record To Last Record
42
Refi ning the Form
To refi ne a form follow the procedure below.
Open the form in design view. The form displayed will be similar to that shown below and the Ribbon will change to show the Form Design tab.
Objects displayed on the form, like fi elds, are termed controls. Many are accompanied by a text label such as the fi eld name describing the control.
Editing Controls
To resize a control or label select the object and click and drag on the side or corners of the object. Dragging a corner diagonally will resize an object in two dimensions.
To move a control and its label together click in the centre of either and drag them to their new position.
Delete a control by selecting it and pressing the Delete (Del) key.
•
•
5.2
Label Control
Note: Several controls can be selected at one time by clicking on the fi rst and holding down the Shift ( ) key while clicking on any others. The text used in the label can be edited by clicking on the label and editing the label text as normal.
Adding a Field to a Form
If you wish to add fi elds you decided originally to exclude from the form or that you deleted accidentally, follow the method below.
From the Form Design tab, click on the Add Existing Fields button. A pane to the right of the form design window displays the fi elds you can add to your form. To select multiple fi elds click on each fi eld while holding down the Control (Ctrl) key.
Click and drag the chosen fi elds from the Field List pane to the form. The fi elds are now termed Text Controls and to the left of each is displayed a label showing the fi eld name from which the control originated.
Changing the Font, Size and Alignment of Text
Change the font, font size or alignment of text in a control by selecting it and making your choice from the formatting buttons on the Form Design tab.
Positioning Objects Precisely
Access provides several tools which assist in positioning controls and other objects precisely.
By default an invisible grid is imposed on the form and controls are aligned (snapped) to this grid. Using the grid makes the positioning of objects more precise. However, occasionally you may wish to turn off the grid. To turn the grid off or on, from the Arrange tab, click on the Snap to Grid button .
To align controls:
Select the controls you wish to align using the Ctrl key while clicking to make multiple selections.
From the Arrange tab, click on your preferred alignment.
•
•
•
•
44
Adjusting the spacing between controls:
Select the controls you wish to space evenly.
From the Arrange tab, click on your preferred spacing.
Creating Calculated Controls
On occasions it is useful to create a control which displays the result of a calculation involving one or more fi elds from a table or query.
To create a calculated control:
From the Form Design tab, click on the Text Box tool .
Click on the form where you wish the calculated control to appear and it will be displayed accompanied by a label.
Select the control and enter the calculation.
For example, as an alternative to creating the calculated fi eld Number of Days on Loan, as above in Section 4.4, a calculated control could be used. However, a calculated control cannot be used in a query. This would cause the calculated control to display the number of days to date a publication has been on loan.
The label can be renamed so as to refl ect the contents of the calculated control. Calculated controls can be moved, resized and deleted as above.
Creating Label Controls
Occasionally it can be useful to create a label on its own rather than associated with any other type of control, for example, as a title. This adds a certain degree of polish to your overall presentation.
To create a label control:
From the Form Design tab, click on the Label tool .
Click on the form where you wish the label control to be displayed. Enter the text for the label at the fl ashing insertion point.
To have text wrap on to a second line hold down the Control (Ctrl) key while pressing the Enter ( ) key.
Label controls can be moved, resized and deleted as above.
To attach a label to a control create the label as above and select the label. Click on the Cut
button from the Home tab, select the control to which you wish to attach the label, and click on the Paste button.
•
•
•
•
•
•
•
•
•
•
•
•
Note: All fi eld names used in calculations are surrounded with square brackets ( [ ] ). For further help with calculations use the Access Help (Section 2.2) and enter
Making Data Entry Even Easier
Entering data into a database can be an arduous and error prone task so whatever can be done to simplify this task and to improve accuracy should be employed. Using a form for data entry is a good starting point but there are refi nements to the form which can also help.
Changing the Tab Order
A quick way to move between fi elds in a record displayed as a form is to press the Tab ( ) key. By default the order that the tab key uses to move between fi elds is the order in which they were created. To alter this order, from the Arrange tab, click on the Tab Order button and in the dialogue box displayed click and drag the fi elds in to the required order. Click on OK to set the new tab order.
Setting Required and Default Values
The property type of a fi eld can be altered to force data to be entered into a particularly important fi eld or perhaps limit entry in some way. Also a default value can be automatically added to a fi eld for fast entry of a commonly used value. For more information see Section 2.12.
46
Providing Access to Choices
It is usually easier to choose from a predefi ned range of options than to type your choice, and it is certainly less error prone. Access provides several ways for you to make a choice of options easier.
If you have already created a control but wish it to be displayed in one of the ways below the easiest way to achieve this is to delete the control and recreate it using the method shown.
The List and Combo Box
These provide two types of lists of choices. The List Box provides a scrollable list of items from which to choose. The Combo box provides a pop-up menu listing items from which to choose.
The list box displays a list of choices which are displayed at all times. The list of choices in a combo box is displayed only when it is opened. Entering the fi rst few letters of the choice into the combo box will cause it to display the closest match in the list. Also, choices not on the list can be entered.
Click on the ListBox or Combo Box buttons from the Form Design tab as required.
Move the pointer to the location on the form where you wish the control to be created and click on the mouse button. The Wizard dialogue box is displayed.
Choose I will type in the values that I want and click on Next.
Enter 1 as the number of columns, type the values you wish to use in your list pressing
Enter ( ) between each, and click on Next.
Click on Store that value in this fi eld, choose a fi eld in which you wish to store the data, and click on Next.
Provide a meaningful title for the controls label and click on Finish. The List or Combo box will be created on the form.
There are many other complex possibilities of List and Combo boxes but these are beyond the scope of this guide.
•
•
•
•
•
•
Check Boxes, Option Buttons and Toggle Buttons
These provide ways of indicating a Yes/No choice if the values for the fi eld are defi ned as a Yes/No data type. This could apply in for example, the On Loan fi eld to indicate whether a book had been borrowed by a simple Yes or No.
Choose the type of control you wish to use, Check box , Option button or
Toggle button by selecting it on the Form Design tab.
Choose the fi eld you wish to use as the control from the Field List dialogue box and as normal click and drag this to the form to create the control.
Toggle buttons can be resized in the usual way. Text can be added to a Toggle button by moving the pointer on to the button, clicking and typing.
Option Groups
These provide a way of presenting more than two choices as Check boxes, Option buttons or Toggle buttons.
The easiest way of creating an option group is by using the Wizard. Click on the Option Group button on the Form Design tab.
Move the pointer to the location on the form where you wish the control to be created and click on the mouse button. The Wizard dialogue box is displayed.
Enter the names of the items you wish to be listed as choices, and then move between each name by using the Tab ( ) key. When this is done click on the Next button.
Choose whether you want one of the choices to be displayed as the default and click on Next.
Choose which numeric value you wish associated with each choice and click on Next. Click on Store the value in this fi eld, and choose a fi eld to store the data. In the case of our example the Type of Publication fi eld would be chosen. Click on Next.
Choose which style you wish the option button to use and click on Next.
Provide a meaningful title for the option group and click on Finish. The Option group will be created on the form.
Command buttons
These provide a way of allocating a command to a button.
Command buttons are used to initiate an action of some kind, perhaps to move on to the next record or to print a particular record. Access provides a selection of pre-defi ned command buttons for you to use in your form.
•
•
•
•
•
•
•
•
•
•
•
48
The easiest way of to create a Command button is by using a wizard. Click on the Command button on the Form Design tab.
Move the pointer to the location on the form where you wish the control to be created and click on the mouse button. The Command Wizard dialogue box is displayed. Choose the Category and then the action you require when the button is pressed and click on Next.
Choose how you wish the button to be displayed, with text or a pre-defi ned graphic and click on Next.
Provide the button with a meaningful name and click on the Finish button. The command button will be created on the form.
Although it is possible to create buttons which undertake customised actions this is beyond the scope of this guide.
Adding Graphics
The Form Design tab provides a line and rectangle tool to help you divide controls on a form into groups.
To draw a line
From the Form Design tab, click on the Line Tool , move the pointer to the position on the form where you wish to start drawing the line, and click and drag to the end of the line. When you release the mouse button the line will be drawn.
To draw a rectangle
From the Form Design tab, click on the Rectangle Tool , move the pointer to the position on the form where you wish to place one of the corners of the rectangle, and click and drag diagonally until the rectangle is the desired size. When you release the mouse button the rectangle will be drawn.
•
•
•
•
•
Hint: Holding down the Shift ( ) key while drawing a rectangle draws a square. Holding down the Shift ( ) key while drawing a line constrains the line to drawing at 90° angles.
SECTION 6
REPORTING
Reporting is how you choose to present your database as printed pages. Reports enable you to choose which fi elds will be printed out and which data should be included. Reports can also summarise data in various ways. Access gives you the opportunity to design the layout of a particular report including the position of headings, fi eld names, the data itself along with graphics such as pictures and logos. An example of a report which could be generated from our sample database would list the publications which have been borrowed and how often, perhaps providing a summary giving the total number of publications and the average number of times borrowed.
Reports can take their data from tables, queries or can be created especially for the report. The Pane on the left of the window has a pop-up menu from which you can choose whether to view tables, queries, forms or reports
Creating a Report Automatically
The quickest way to create a report is to use the Report Wizard.
If you wish to create a report from more than one table then the answer is to create a query from which the report can be created.
From the Create tab, click on the Report Wizard button .
From the following dialogue box choose the fi elds upon which you wish to base the report. When this is complete click on the Next button.
•
•
50
In the next dialogue box choose any grouping levels that you wish to use, a group or level for your report. For example, you might wish to group the report into publications grouped by publisher. Click on Next.
The next dialogue box requests that you choose the sort order and summary information you wish to include in your report. Use the down-arrows alongside the fi eld boxes to choose the fi elds you wish to order. For example, here you might wish to sort alphabetically by author. Click on Next.
In the next dialogue box chose the type of layout and orientation you would prefer for your report. Click on Next.
In the next dialogue box decide upon the style of your report and click on Next.
In the last dialogue box enter a name for your report and choose whether you wish to
Preview the report or Modify the report’s design. If you choose to preview the information but later decide to you wish to refi ne the report simply switch to Design View.
Lastly, click on the Finish button and the resulting report will previewed or in report design view depending upon the options chosen.
Shown on the left is a section of a typical report.
The report can be refi ned by using the techniques in Section 6.2.
•
•
•
•
•
•
•
Refi ning the Report
A basic report is divided into three sections – Page Header, Detail and Page Footer. Page header and footer contain data that will appear at the top or bottom of each page of the report. For example, you might wish to use this to include data about the source of the report, the date it was completed or the page number. The Detail section of the report is the most important of the sections since any controls added here display this data for every record of the database.
The sections may be adjusted in size by clicking and dragging the top edge of their title. Open the report in Design View. The report displayed will be similar to that shown below.
Creating, Editing and Refi ning Controls
The creation, editing and refi ning of controls in a report is exactly the same as for a Form. Please refer to the relevant paragraphs in Section 5.2.
Adding Page Breaks
When printing, Access will automatically insert a new page break when no more data can be fi tted on to a page. This may not always be convenient as it could result in the data contained within a record being split over two pages. To avoid this, a page break can be added.
To add a page break click on the button from the Report Design tab and click on the