sx-50”
ATTENDANT
CONSOLE
USER GUIDE
ISSUE 1
MAY 1987
CONTENTS
& : : u
f-’
OVERVIEW
Introduction ... l-l
Console Hardware ... l-2
Prompts and Softkeys ... l-3
Feature Keys ... l-5
Dial Pad/Adjustments ... l-9
Correcting Errors/Clearing the Console ... : ... l-l 1
Some Definitions ... l-l 2
BASIC CALL HANDLING
Introduction ...
Answering Incoming Calls ...
Answer Key ...
Selective Answer ...
Extending Calls ...
Call Announce ...
Swap: Alternating Between Parties ...
Both: Conferencing ...
Recalls ...
Outside Calls ...
Time Savers ...
Extension Assistance ...
ADVANCED CALL-HANDLING
introduction . . . .
t
Hold and Retrieve . . . . .
Console Hold Pickup .
Message Waiting . . . . .
Override . . . .
Paging . . . .
... ... ... ... ...
ATTENDANT FUNCTIONS
Introduction ...
Abbreviated Dialing ...
Alarms ...
Background Music ...
Bell Off ...
Call Block ...
Message Registration ...
Night Service/Unattended Operation
Overflow ...
Printer Control ...
. . . . . . . . . . . . . . . . . . . . . . . . . . . . . .
... . . . . 3-l
... . . . . 3-2
... . . . . 3-4
... . . . 3-5
... . . . . 3-8
... . . . . 3-9
. . . . 2-l . . . . 2-2 . . . . 2-3 . . . . 2-3 . . . . 2-4 . . . . 2-5 . . . . 2-6 . . . . 2-7 . . . . 2-8 . . . . 2-9 . . 2-11 . . . 2-12
... 4-l
... 4-3
... 4-6
... 4-9
... 4-10
... 4-11
... 4-12
... 4-14
... 4-16
CONTENTS
Data Dump ... ... 4-2 1
Setting Time and Date ... ... 4-22
System Status and Identification ... ... 4-24
Trunk Status ... ... 4-26
Trunk Emergency Release ... ... 4-27
Wake-up ... ... 4-28
REFERENCE
Introduction ... 5-l
Telephone Directory ... 5-2
Abbreviated Dialing List ... 5-3
Trunk Group Access Codes ... 5-4
Hunt and Ring Groups ... 5-5
Attendant Function Codes ... 5-6
Glossary ... 5-8
Attendant Notes ... 5-11
Index ... 5-13
;:; :” ..*
- . .
CHAPTER 1
OVERVIEW
INTRODUCTION
Welcome . . .
to the SX-50@ System. You will quickly discover just how easy your
job can be using the SX-50 Attendant Console.
This book is intended to serve as your guide while you learn about
basic Console operation. Soon you will only need the guide for
occasional reference for advanced procedures. Take a few minutes to
explore the guide and familiarize yourself with the book and its
organization, so that it will be a handy reference tool whenever you
need it.
This first section introduces the console hardware. You will learn what
each group of keys does, how to make basic adjustments to volume
and display contrast, and how to interpret the displays and procedures
in this guide.
Throughout this guide . . .
are illustrations of the display which you should see while performing
a procedure. Some parts of the display have been shown in bold type
to draw your attention to specific words. For example, you might see:
1246 2-FEB CALL BLOCK NIGHT BELL CWI
DIAL0
Since there are two kinds of keys . . .
(Feature Keys and Softkeys), two different conventions appear.
Feature Keys
Feature keys are indicated by the word shown in bold type. For
example:
0 Press RELEASE
Softkeys
Softkeys are indicated between square brackets. For example:
CONSOLE HARDWARE
Before operating the console . . .
be sure that the display shows time and date, and the handset is
plugged in to the left side of the console.
The cable required to connect your console to the PABX is located at
the’ rear of the console. This cable should be connected by a qualified
system installation person and should not be adjusted by unauthorized
personnel.
If any problem occurs, contact your communications department for
assistance.
Your Console consists of . . .
: : :
a moulded plastic unit which features a two-line, 40-character
alphanumeric Liquid Crystal Display, a row of fiwe unmarked Softkeys,
three rows of Feature Keys, and a standard telephone digital dial pad. A
h removable handset plugs into the left side for normal Attendant
operation.
: e.:; :::: .::-
_-
: _:.
PROMPTS AND SOFTKEYS
The Liquid Crystal Display (LCD) . . .
is the two-line screen at the top of the console.
The top line gives information about the extension or trunk to which
you are connected, and (during other procedures) may indicate the
number of calls waiting, time, date, and other information, such as
Alarm Status.
The second line is used to give “prompts” -- instructions for the five
“softkeys” directly below.
/ glr,
I
-LCD DISPLAV
- SOFTKEVS
PROMPTS AND SOnKEYS
The Softkeys are . . .
the row of five unmarked keys right below the LCD. These keys
perform different functions at different times, so their identities are
shown by the prompts which appear above them on the LCD.
During normal call-handling, the prompts indicate the types of calls
ringing in (LDN 1, LDN 2, LDN 3, DIALO, and RECALL). When you press
the softkey directly below the prompt, you will answer that particular
type of call. If a softkey does not have a prompt over it, then pressing
the key has no effect.
For example, you might see the following display:
12:Ol 2-FEB cw3
LDNI DIAL0 RECALL
In this example, you have three calls ringing you. If you:
l press the first softkey, you will answer the “Listed Directory Number
1” call -- an outside call;
l press softkey 4, you will answer a call from an extension (Dial 0);
l press softkey 5, you will answer a. rr Recall” -- a call that you have
already put through but which has returned to you when
unanswered.
l press softkeys 2 or 3, nothing will happen.
Note: If any of these terms are new to you, refer to the Glossary of
Terms in the last section of this guide.
..,^
il . . ,;-: ‘.
FEATURE KEYS
The Feature Keys . . .
provide basic attendant functions. They are the three rows of seven
keys on the left side of the console. Four keys in the bottom row
(ALARM and the HOLD keys) have small red lamps which flash to draw
your attention to the key and indicate its status.
Some of the keys have a fixed function (that is, all systems are the
same). However, seven feature keys are programmable to meet your
company’s special needs, so your system may not appear exactly as
illustrated below. These keys are:
l TRUNKS
l CALL BLOCK
l OVERFLOW
l PAGE
l WAKE-UP
l MSG REG
l OVERRIDE
The keys allow you to do whatever their names indicate. For example,
ANSWER allows you to answer incoming calls and HOLD lets you place
calls on hold. (See next page for details on each).
FEATURE KEYS
Feature Key Functions
FUNCTION
After pressing this key, you perform additional steps using the
telephone keypad for operations such as setting the console date and
time, performing maintenance functions, and switching to Night
Service.
STATUS
With each key press, various features of the system are displayed: the
software identity and access to Customer Data Entry functions; the
number of busied-out devices by type; the console bell and LED test;
and the display test.
Function Status Trunks Call Block Overflow
Wake-up Msg Reg Override Message Both swap Release
KAB455ROEC
FEATURE KEYS
TRUNKS
Shows the number of trunks busied out (removed from service, usually
because of trouble) and lets you identify each one.
CALL BLOCK
Allows the Attendant to prevent extensions from speaking to each
another.
OVERFLOW
In Night Service, calls to the console are rerouted to one or more
alternate answering point(s) (Night Bells for example). Normally, any
calls waiting to be answered at the console are automatically rerouted
to the designated answering point(s) if the attendant has not answered
before a pre-determined time. This feature is called Automatic
Overflow. The OVERFLOW key allows the attendant to override the
Automatic Overflow timer, thereby rerouting incoming calls
immediately to the alternate answering point(s).
PAGE
CANCEL
I
WAKE-UP
Allows the Attendant to be connected to the paging system, if
provided.
Allows you to clear misdialed information or to cancel a call to a
number that is busy.
Allows the Attendant to set a time for a Wake-up call to a particular
extension.
MSG REG (MESSAGE REGISTRATION)
Allows the Attendant to read out the number of telephone calls or call
units made from a particular extension.
OVERRIDE
When pressed and held down, allows the Attendant to override (intrude
into) an existing conversation.
MESSAGE
Allows the Attendant to. set and remove a message reminder for an
FEATURE KEYS
BOTH
SWAP
RELEASE
BELL
NIGHT
Allows the Attendant to speak to two calls at the Console at once.
Allows the Attendant to speak privately with one caller while holding
the other when there are two calls at the Console. Successive presses
of SWAP allows the Attendant to alternate between the two-calls.
Used for disconnecting and transferring calls.
Turns the Console ringer on or off. If the ringer is off, the word “MUTE”
appears on the display. Incoming calls are announced by the “BELL” in
the display, as well as the ringer, if it is on.
Puts the SX-50@ into Night Service in which calls are routed to
specially assigned numbers or to Night Bells. The display shows
“NIGHT”. Another press returns it to regular Day Service. This key may
also be. used to change Night Answer Points for incoming trunks.
ALARM
If the diagnostic system detects a fault, the bell rings and the ALARM
lamp flashes. Pressing ALARM silences the bells and displays the alarm
code, which is stored for later examination by the Maintenance
Engineer.
HOLD 1, 2, and 3
Allow the Attendant to place up to three calls to the console on hold.
The key lamp lights to indicate a calf on hold.
ANSWER
Allows you to answer single calls or the incoming call which has been
r
-. ‘!
_’ _:-
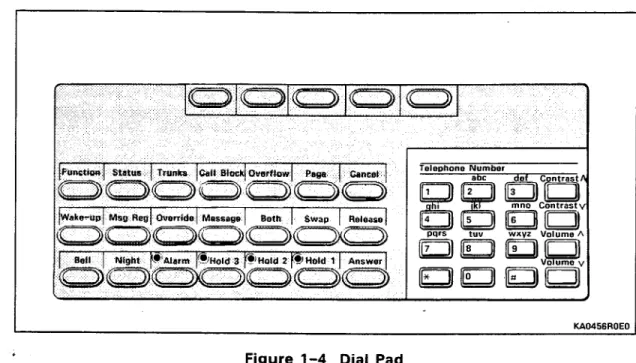
DIAL PAD/ADJUSTMENTS
The Dial Pad . . .
at the right of the console key area has a total of 16 keys, including a
standard 12-key dial pad, and two keys each for ringer volume and
display contrast adjustments.
‘b;.; :: : ._
: :
KAO456ROEO
Figure 1-4 Dial Pad
To Adjust Ringer Volume. and Display Contrast
The keys labeled “Volume A n and “Volume V “, are used to increase or
decrease the console ringer volume.
“Contrast A n and “Contrast V u make the display appear brighter or
dimmer.
l Press STATUS repeatedly
l Hold it down when- you see:
/AD/ADJUSTMENTS
The Console Bell will ring continuously.
0 Press Volume A or Volume V
l OR
l Press Contrast A or Contrast V
until desired level is reached.
l Release STATUS
To Turn Off (Mute) the Console Bell
l Press BELL
12:02 2-FEB MUTE
When the bell is muted, you are notified of incoming calls by only a
flashing indicator and the softkey prompt. The display shows, for
example:
12:02 2-FEB BELL CWI
LDN2
To Turn On the Bell 0 Press BELL
Normal operation resumes, with bell ringing to announce incoming
t calls.
You will find out more . . .
about these and other “housekeeping” functions (such as setting the
r
CORRECTING
ERRORS/CLEARING
THE CONSOLE
If you make a mistake . . .
while dialing and need to start over:
l Press CANCEL
The system cancels the misdialed call and returns you to where You
were before.
l Dial the correct number.
Hanging Up
On a standard telephone, the handset rests on a bar or switch called
the “switchhook”. When you put the handset down, you depress the
switch and the system knows that you’ve hung up. The console does
not have a switchhook, so you need to show the system that you’ve
hung up and are free to take new calls.
To Disconnect a Caller and Free the Console
When you are ready to hang up,
l Press RELEASE
The display clears and then shows time and date, indicating that the
console is free.
SOME DEFlNlTlONS
Before you start - . .
there are a few terms that you need to understand so that you know
what the system is doing and what the displays mean.
Access Code
This is a number dialed from the console dial pad or from an extension
to activate a particular system feature. For example, you dial an access
code to call a Hunt group.
Extension, or Internal Line
Each telephone in the system is called an extension and is given an
extension number. These appear on the display as “EXT-123” and so
on. Extensions can be either standard rotary dial or push-button
phones, or special SUPERSET@ feature phones.
Trunk
Trunk is the general name for both Outside Lines and Tie Trunks. It is
any line that connects your system to a local exchange or another
private system.
Outside, or External Line
This is a line that connects your system to the local telephone
exchange, and therefore to the public telephone network.
Tie Trunk
This type of line directly connects your system to another telephone
system owned by your company or organization. You do not have to
use the public telephone network to dial this location, and the general
public usually do not have access to the line.
Incoming Trunk Calls
Depending on what type of call it is, an incoming call is put into one of
three possible listed directory numbers (LDN’s) which appear at the
console display as LDN 1, 2, or 3. One of your LDN’s could consist of
numbers used by the general public, another for trunks connecting
your telephone system to several other PABX’s owned by your
company. You may have instructions on the specific manner in which
to answer calls depending on the LDN on which they appear.
Trunk Equipment Number
Every trunk is given a unique number within your system so that it can
: :_
CHAPTER 2
INTRODUCTION
:
In this chapter you will learn . . .
how to make, answer and extend calls, and what to do when a
destination is busy or unanswered. This information will be sufficient
for most of your daily tasks.
The basic call handling keys . . .
that you will need are the following:
l Softkeys -used to selectively answer calls from different sources;
l ANSWER - used to answer calls on a “first come, first served” basis;
l BOTH and SWAP - used to speak simultaneously to two callers, and
alternate between them;
l CANCEL - used to cancel a misdialed call, invalid function or invalid
entry.
l RELEASE - used for connecting a call to a destination and for
hanging up; .
ANSWERING
INCOMING
CALLS
When a call comes in . . .
to the Console, you are alerted to it by either the ringing bell or
flashing display. The number of calls waiting to be answered is shown
in the upper right corner of the display, and the softkey prompts
indicate the kinds of call.
Your display may show, for example:
12:02 2-FEB BELL CW3
LDNl LDN2 DIAL0
You can answer a call either by pressing the ANSWER key or by
selecting a particular softkey. Your company may have different
greetings for different categories and may prefer you to use Selective
Answer.
. . . . :’
ANSWERING
INCOMING
CALLS
The ANSWER Key . . .
lets you answer a single call or the longest waiting call in all
categories on a “first come, first served” basis.
For instance, if a single internal call is waiting, you will see:
12:02 2-FEB BELL CWl
DIAL0
l Press ANSWER
to be connected. The display will show information on the source of
the call, such as:
EXT-213 TALK
Selective Answer
l Press the desired softkey
to be connected to the longest-waiting call of that type. The “CW”
display remains to remind you that other calls are still waiting.
Information about the caller is displayed, such as:
TRK-12 TALK cw2
LDN3 DIAL0
l Greet the caller
0 Extend and RELEASE the call
EXTENDING
CALLS
Once you have answered a call . . .
you will usually connect the caller to -an extension. This is known as
“extending” the call.
To Connect a Call to a Free Extension
l Dial the extension number
You hear ringing, and the display shows the extension number.
Meanwhile, the outside caller is held for you without a speaking
connection. For instance, you will see:
EXT-252 RING TRK-12 HELD
@ Press RELEASE
You hear silence and the call is released from your Console and
connected to the ringing extension.
Even if an extension is busy . . .
you can release the caller to wait until the line becomes free. This is
called a “Camp On”. Two short beeps notify the extension user that a
caller is waiting. The extension user can then hang up and answer the
waiting call.
Note: If the extended call is not answered after a programmed period
of time, it returns to the console as a Recall (see EXTENDING
EXTENDING
CALLS/CALL
ANNOUNCE
Announcing A Call
When extending a call, you may wish to wait for the extension to
answer and announce the caller. Thus, the extension user knows it is
an outside call, and you know that the caller has an answer and will
not be returned to you as a recall.
However, when you are busy with several calls, you may not wish to
announce each one. This is when the recall feature is of benefit.
To Announce a Call
l Dial the extension
You hear ringing
l Wait until the call is answered
The display shows you’re talking to the extension user, and the outside
call is still held:
EXT-252 TALK TRK-12 HELD
l Announce the call
Then, if the extension user wishes to take the call,
l Press RELEASE
to release the Console from the connection, leaving the outside caller
connected to the extension.
If the extension user does not wish to take the call,
l Press CANCEL
to hang up the extension and leave you connected to the outside
EXTENDING
CALLS/SWAP
Alternating Between Parties
When you reach the called extension, you may be told that the person
to whom the caller wishes to speak is absent. You will then want to
return to the held caller to find out if there is another person to
contact, or to get more information.
Press SWAP
You are now talking to the outside caller while the extension he/she
asked for is on hold. The display shows:
EXT-252 HELD TRK-12 TALK
Press SWAP again
to return to the held party.
EXT-252 TALK TRK-12 HELD
Each time you press SWAP you reverse the calls. The held party can
never hear you or the party to whom you are speaking.
Press RELEASE
to leave the conversation and connect the two parties.
Note: If the party to whom you are currently speaking hangs up, you
will automatically be connected to the held party.
., i .
EXTENDING
CALLS/BOTH
To Speak to Both Parties (Conference)
You may want to speak to both parties at the same time.
Once you have a connection to one, and the other on temporary hold,
l Press BOTH
The display shows you’re speaking to both callers.
EXT-252 TALK TRK-12 TALK
At this point, you may: 0 Press RELEASE
to remove the Console from the call, leaving the other two connected.
Or press SWAP again
to talk to one party only.
Note: After pressing SWAP, check the display before speaking to see
which party the system has connected to you. You might need
EXTENDHUG CALLS/RECALLS
If a call remains unanswered . . .
after you release it, the system returns it to the console after a
programmed period of time (typically 20 seconds or six rings). This is
known as a “recall”.
The display will show, for instance:
12:03 2-FEB BELL CWl
RECALL
Note: Whenever a call recalls your console because the hold timer
has expired, the corresponding hold indicator will flash and
[RECALLI
is displayed. If [RECALL] is displayed without anyhold key flashing, the call is returning to your console because
the called extension did not answer.
l Press [RECALL]
Or ANSWER
to be reconnected to the caller and reminded that it is a recall.
TRK-12 TALK EXT-252 RECL
l Talk to the caller
You have a number of choices at this point. You may:
e Press RELEASE
to try the same extension again, and release the console from the
connection
Or dial a new extension and RELEASE
Or press CANCEL
Or place the caller on Hold (see HOLD)
Or page the person wanted (see PAGE)
Or set a message notification (see MESSAGE WAITING)
Note: These last three procedures are explained in detail in Advanced
OUTSIDE CALLS
: . :. .,
So far . . .
To Call an a
l
we’ve dealt with answering calls and extending them to extensions.
You can also use the console to make outside calls as described here.
Outside Number
Dial the Trunk Group Access Code
(usually 9 - fill in the code used in your organization below)
U
The system connects you to an available
tone.
trunk. You may hear dial
Dial the outside telephone number
(including area code, if needed)
The display shows the number dialed, preceeded by the trunk access
code.
TRK- 19 96135922122
The call is routed, and you hear ringing (or busy) when connected.
When the called party answers, the following is displayed:
TRK-12 TALK
If the Outside Number is Busy . . .
you will hear busy tone. You cannot “Camp-on” to a busy outside line,
so you must hang up and redial later.
l Press CANCEL
The display clears.
l Try again or press RELEASE
The system’s Last Number Redial feature can be used to save time
OUTSiDE CALLS
If all the Trunk Group lines are busy . . .
with extension users making and receiving outside calls, you will hear
busy tone, and you will see (for instance):
LEV-9 BUSY
In an emergency, you can free a trunk and gain access- to it. (See
Trunk Emergency Release 4-27.)
Normally, you will just abandon the call:
0 Press CANCEL Or RELEASE to hang up
Note: Your company may have Tie Trunks, which are private lines
connecting your location to another company location. You do
not usually have to dial a separate trunk access code to call
over a Tie Trunk. This is because the code has already been
incorporated into the numbers you were given for the other
location, and the system interprets the code by itself. Normally
you will just dial the extension number at.the other location.
:: :..
OUTSIDE CALLS/TIME
SAVERS
Save time when dialing outside numbers. . .
by using Abbreviated Dialing or Last Number Redial.
Abbreviated Dialing . . .
lets you call frequently dialed outside numbers using only 3 to 6 digits.
l Enter the Abbreviated Dialing number (3-6 digits)
While the system dials the number for you, the full number
programmed is displayed; you might see, for example:
TRK-05 96135922122
Contact your communications department for a list of the Abbreviated
Dialing numbers you can use, and record them in the Reference
section of this guide (page 5-3).
Note: You can use the console to enter Abbreviated Dialing numbers
into the system memory. For more details, see Abbreviated
Dialing (4-3).
Last Number Redial
The system stores in its memory the last outside number dialed from
the dial pad, and you can save time by having it redial this number.
l Dial #
. OR
l Dial the Abbreviated Dial Access Code, followed by “0”
While the system redials the last outside number, the display shows
the number being dialed; for example:
OUTSIDE CALLS/EXTENSION
ASSISTANCE
Making an Outside Call for an Extension
Sometimes you may be called upon to place an outside call on behalf
of an extension user. This may be for users who do not have direct
access to outside lines from their phones; or busy managers may ask
you to call someone for them and connect them once you have the
caller on the line.
THE CALLER IS WAITING ON THE LINE TO BE CONNECTED TO THE CALLED
PARTY
l Dial the trunk access code and the desired number
The extension user is now on consultation hold.
Once you have reached the person you want and have announced your
call
l Press RELEASE
to release the extension user to the called party.
If you hear busy tone after having dialed the external number
l press CANCEL
You will be automatically connected to the caller. Tell him/her that you
will have to try later.
THE CALLER WANTS YOU TO CALL RACK ONCE THE CALLED PARTY IS ON THE LINE
0 Dial the trunk access code and the desired number
Once you have reached the person you want and have announced your
call
l Dial the extension user and announce the call
0 The outside party is now on consultation hold.
l Press RELEASE
to leave the extension connected to the outside call.
If you hear busy tone after having dialed the external number
l press CANCEL
._
OUTSIDE CALLS/EXTENSION
ASSISTANCE
THE EXTENSION USER WISHES TO DIAL THE NUMBER AFTER YOU HAVE
SEIZED THE TRUNK FOR HIM/HER
With the extension on hold
l Dial the trunk access code (see NOTE below)
l Press RELEASE
The extension user can now complete the number.
Note: If the Automatic Route Selection feature is enabled on the
system, your Communications Department will let you know the
exact number of digits you will have to dial after the external
CHAPTER 3
INTRODUCTION
.) _’ i. : , : . . :
Now that you know the basics . . .
of call handling (answering, extending, and making calls), you can go
on to more advanced procedures.
These procedures are just as simple to perform as basic call handling.
They involve six of the Feature Keys:
l HOLD 1, 2 and 3 - to put a caller on Hold while you perform another
task;
l MESSAGE - to set or cancel a “Message Waiting” indication on an
extension user’s telephone;
l OVERRIDE - to intrude into an existing conversation;
l PAGE - to use your company’s public address system.
I
I
I
-
HOLD AND RETRIEVE
To Place a
TRK- 12 TALK Call on Hold
l ,
l
There will be times . . .
when you will not be able to connect an outside caller immediately.
The hold system allows you to deal with situations like this. A caller
can remain connected to the console, but not connected to you --
leaving you free to do something else such as paging the person the
caller wants to talk to.
You use one of the three HOLD keys to both put a call on hold and
retrieve it. Each key has a red lamp which indicates the state of the
calls held: unlit when no call is held; steadily lit when a call is on hold;
flashing when a held call is recalling (has been left beyond a set time).
Up to three calls can be on hold at the console at the same time. While
on hold, the caller cannot speak to anyone. Internal callers hear silence
while external callers hear either silence or music (if Music-on-Hold is
part of your system).
Hold should not be confused with the way a call is held temporarily
while you dial another number.
I I
Tell the caller that he or she is being held for a while
Press an unused HOLD key
(the red lamp must be unlit). HELD ON-451
I
The held call access code appears while you press the hold key (in our
example, the code is the default 451 for HOLD 1). The red lamp above
the chosen key lights up, showing that it is holding a call. The lamp
remains lit while you,
Continue call handling
until you can deal with the call,
Or page the extension user
to pick up a call on hold at the console. See Console Hold Pickup 3-4.
..: --
HOLD AND RETRIEVE
indicated.
‘_ ‘.d .I ‘. .;
To retrieve a call from Hold
l Press the chosen HOLD key
(with the red lamp steadily lit)
The red lamp goes out and the held caller returns to the console.
TRK-12 TALK
I
Note: If a held caller hangs up before being retrieved, the red lamp
goes out and the system frees the HOLD key for your use again.
To connect a held caller to an extension user
Once the caller is on hold and the lamp is steadily lit,
l Call extension user and announce the held call
EXT-321 TALK
I I
l Press the chosen HOLD key and announce the extension user
The key lamp goes out, and you can speak with the outside caller.
TRK-12 TALK EXT-321 HELD
*
l Press RELEASE
to connect the two and release the console.
If there is no need to announce the call . . .
l Press flashing HOLD key to retrieve the original held call
l Dial the extension number
l Press RELEASE
HOLD AND RETRIEVE/CONSOLE
HOLD PICKUP
Console Hold Pickup
When you have a call on hold, you can page the extension user, who
then dials an access code to retrieve the held call. The access codes
are programmable.
If, for instance, you have a caller who wants to speak to Janet Young,
but she is not at her extension, you could place the outside caller on
hold (HOLD 2) while you page her.
When you pressed the HOLD key, the display showed the access code:
HELD ON-452
l Press PAGE
l Announce the hold pickup number
For example, “Janet Young, please dial 452.”
When she dials 452, which is the console pickup code for HOLD 2in
our example, the system connects her to the held call and the hold
lamp goes out.
If the paged person does not call to pick up the held call, the lamp
stays on until the held call recalls to you.
j : :
__
MESSAGE WAITING
You will sometimes have to take a message . . .
for an extension user, then set up a message waiting indication on
their telephone set. A SUPERSET qTM user is notified by a small “MSG”
on the SUPERSET 4 display; on standard telephone sets, the indicator
is either a periodic ring or a flashing lamp.
To Set A Message Waiting Indicator While Connected to the Extension
l
When you
l Deliver the message
To Cancel Extension
0
.:
-,.t l
Remain connected to the busy/unanswered extension
Press MESSAGE
The display briefly shows that the indicator has been set up:
EXT- 123 MSG-ON TOTAL MSG 001
Press CANCEL
if you put the caller on Consultation Hold and want to retrieve him/her.
OR
Press RELEASE
Normal operation resumes. The extension receives message waiting
notification.
answer a call from an extension with “Message Waiting” . . .
you will see the “MSG” reminder instead of the usual “TALK”
EXT-252 MSG
a Message Waiting Indicator while you are Connected to the
Press MESSAGE
The display briefly shows that the indicator is off:
EXT-252 MSG-OFF TOTAL MSG 000
Continue the call.
Note: If a SUPERSET 4 user cancels the message notification on
MESSAGE WAITING
You can also review, set up or cancel . . .
any or all message indications while your console is idle.
To Review the Extensions with a Message Waiting
While the console is idle,
l Press and hold down MESSAGE
You will see the number of extensions with messages waiting, and the
actual extension numbers. For example, if there were 12 messages Set,
you might see:
EXT-NUMBER ? TOTAL MSG 0012
201 203 204 211 217 218 229 233
As you can see, this only gives you the identity of eight of the 12
extensions, so to see the rest . . .
l Continue to hold down MESSAGE
l Press FUNCTION if there are more numbers to display.
Now you would see:
EXT-NUMBER ? TOTAL MSG 0012
246 252 253 271
,+a Release MESSAGE
to return to idle display.
You can set and clear . . .
specific message waiting indications from the idle console by entering
1 to set and 0 to clear.
To Set Up a Message Waiting Indicator .
l Press and hold down MESSAGE
MESSAGE WAITING
Dial the desired extension number
The display shows that the extension does not have a message
waiting. For example:
EXT-200 MSG-OFF TOTAL MSG 0014
201 203 204 211 217 218 229 233
Dial 1
to turn on the message waiting indicator for that extension.
EXT-200 MSG-ON TOTAL MSG 0015
200 201 203 204 211 217 218 229
Release MESSAGE
a Message Waiting Indicator
Press and hold down MESSAGE
to see the list of all current indicators.
Dial the extension number desired
The display shows that the extension has a message waiting. For
example:
1 EXT-200 MSG-ON TOTAL MSG 0015 1
200 201 203 204 211 217 218 229
Dial 0
to turn off the indicator for that extension.
EXT-200 MSG-OFF TOTAL MSG 0014
201 203 204 211 217 218 229 233
OVERRIDE
Sometimes you might have an urgent need . . .
to speak to an extension user, but when you dial the number, you find
the person is already engaged in a call. If absolutely necessary, you
can override (intrude into) this conversation and talk to the extension
user. When you override, both parties in the conversation can hear
what you say.
Let’s assume you have an urgent message for an extension user, but
you hear busy tone and see this display: EXT- 123 BUSY
l
l
Press and hold down OVERRIDE
All the parties in the conversation hear a beep (repeated every six
seconds), and see:
EXT- 123 OVRD
I
Speak to the extension user
Both parties in the con.versation hear what you say.
Release OVERRIDE
Press RELEASE
to disconnect you from the conversation. Normal operation resumes.
Note: Some extensions may be protected against Override. When you
try to intrude on such an extension, you hear Error/Reorder
tone (fast busy tone) and the system does not connect you.
: I,:, : .., :
PAGING
If your organization has a paging system . . .
you can use it to broadcast announcements through the building. YOU
can also use it to page people to pick up a call on hold at the console.
To use the Paging System
l Press and hold down PAGE
The display shows you are connected to the paging system and can
make an announcement:
PAGER
l Make the announcement
l Release PAGE
Normal operation resumes.
Note: If the word “PAGE” appears in your display at any other time, it
means that an extension user is using the paging system. If you
press PAGE at this time, you will cut the person off from the
paging equipment, as you have priority of use. You also cut off
CHAPTER 4
INTRODUCTION
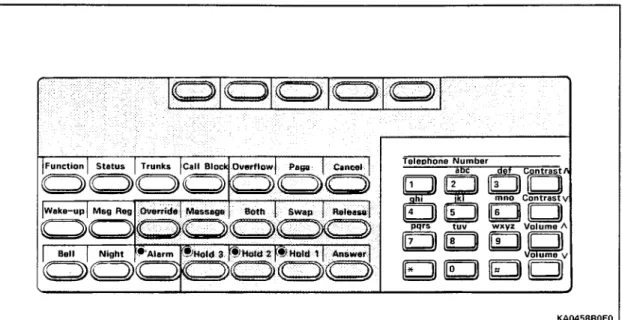
“Housekeeping” tasks . . .
will occasionally have to be performed using the console. These are
tasks that are not directly related to call handling, but concern either
your console and its operations or your company’s telephone
operation. You have already learned how to do some of these tasks,
such as turning the console bell on or off. In this .chapter, you will
learn several other functions. The keys that you will be using are
shown below.
Function Status Trunks Call Block Ovarflow
KAO458AOEO
Figure 4-l Attendant Function Keys
Function Codes . . .
need some explanation. Many of the Attendant Functions described in
this chapter can be performed using their own Feature Key, but others
involve the combined use of the FUNCTION key and a 2-digit access
code. (Some functions -- Night Service, Call Block, Wake-Up -- can be
performed using either a key or an access code.)
Maintenance personnel also use the FUNCTION key and access codes,
INTRODUCTION
To help you find . . .
what you need quickly, this chapter gives an alphabetical listing of the
various functions and procedures.
: :: :.,:. :,
:
ABBREVIATED
DIALING
To save time . . .
when dialing long or frequently used numbers, both you and extension
users can use the Abbreviated Dialing feature. The system is
programmed to substitute the full number stored in its memory for the
short number you enter.
You can enter and change the numbers programmed in the
Abbreviated Dialing memory.
Let’s look at a typical Abbreviated Dialing number so that you will
know what you are entering. The Abbreviated Dialing number, “5512”
for example, contains two parts. The first two digits (55) represent the
access code that tells the system you want to use the abbreviated
dialing feature. The other two digits tell the system which number
from its list you want it to dial. The list can have 60 entries, numbered
from 10 to 69.
So, if you dial “5512”, your system might show:
TRK-07 96135922122
I I
The system gets the instruction to go to the abbreviated dialing list
(“55”), it looks at entry “12” -- which happens to be 9-613-592-2122.
Note that if the number is an outside telephone number, the trunk
group access code (9) must be included in the entry.
The 60 entries can each have up to 26 digits, which covers even the
longest international numbers you are likely to need.
Note: Your company may use an Abbreviated Dialing Access Code
other than “55”.
To Look at an Abbreviated Dialing List Entry (Without Changing It)
l Press FUNCTION
l Dial 60
The question mark flashes to prompt you to dial the entry number.
ABBREWATED
DIALING
l Dial the entry number to be viewed
The entry number appears with the full number entered, or a blank if
there is not a number. You might see, for example,
12-
I
l Press RELEASE
I
to return the console to its idle state.
To Enter an Abbreviated Dialing Number into the System
l Press FUNCTION
l Dial 65
The question mark flashes to prompt you to dial the entry number.
CHANGE ABBREVIATED DIALING ENTRY ?
l - Dial the entry number (2-digits, from 10 to 69)
l Dial the full telephone number
(including access code and area code, if needed)
Note: If you make an error during entry, press CANCEL to clear, then
start over.
Entry number and full telephone number appear:
I
12-96135922122l Press RELEASE
to return to idle display. The system has now stored the number in its
memory for you and the extension users.
To Delete An Abbreviated Dialing Number from the System
l Press FUNCTION
l Dial 65
The question mark flashes to prompt you to dial the entry number.
ABBREVIATED
DIALING
l Dial the 2-digit entry number to be erased
Entry number appears with the rest of the display blank.
12-
:;
I
l Press RELEASE
I
to return to the idle console. The system has deleted the number from
its memory. Nothing will happen now if you or an extension user dial
ALARMS
Whenever the system diagnoses a fault . . .
in its operation, however slight, it gives you warning as an alarm. In
some cases, the system takes part of the equipment out of service
(“busies-out” the equipment) to minimize the effect of the fault on the
operation of the rest of the system.
The types of faults which may occur fall into the following categories:
l Total Power Failure
l Console Faults
l Minor Faults
Let’s look at each of these faults and how to deal with them.
Total Power Failure
If there is an electrical supply failure, the console display goes blank
and you will have no response to any key you press. Under these
conditions, the system may change, if so programmed, to a mode of
operation called “Power Failure Transfer”. This means that the system
connects a number of preselected extensions directly to outside lines
from the local public telephone network. You may have one of these
emergency telephones to use to call the maintenance department, for
example.
When the power supply returns, the system resumes operation, but the
time and date need to be reset. (See Setting Time and Date 4-22.)
Note: If the system exhibits the signs of power failure, but you know
that the electricity has not failed, there must be a fault inside
the system. Inform your communications department or
maihtenance personnel immediately.
Console Faults
A fault might occur that would make it impossible to use the console.
During system diagnostics, the display will show:
NO COMMUNICATION
In this case, the system goes into Night Service, with trunks routed to
ALARMS
l Use an extension to report the problem
to your communications department or maintenance personnel.
Console Reset
When the console is plugged in, the alarm message
CONSOLE RESET
I
appears briefly in the display. If this ever remains more than a few
seconds,
l Pull out handset or headset plug
l Plug it in again
to see if it clears the fault.
If not, the system remains in ‘Night Service.
l Use an extension to report the problem
to your communications department or maintenance personnel.
When the system is first switched on
The console displays
NO COMMUNICATION t
during a few seconds, after which the time and date are displayed.
Minor Faults
Faults of a minor nature need to be corrected, but generally do not
prevent your continued operation of the system.
When the system detects a minor fault it carries out any corrective
action, and then sends an alarm to the console. The bell rings (except
if you have muted it) and the red lamp above the ALARM key flashes.
ALARMS
To Read and Report an Alarm
l Press and hold down ALARM
The bell stops, the lamp stops flashing but remains lit, and the display
shows the alarm number and message. For example, you might see:
A 11 0017 NO TRUNK SEIZE ACK. 03/01
I
I I .
This message tells maintenance personnel that alarm number 11 has
occurred: trunk equipment number 17 (in slot 03, circuit 1) is busied
out.
Note: You do not need to know the real meaning of the alarm
message. However, you might be asked to record exactly what
you see on the display, in the case that your system is not
hooked up to a printer.
l If required, note the complete message displayed
l Release ALARM
The message disappears but the red alarm lamp remains steadily lit
until the fault is corrected. The date is displayed, unless the system
has busied-out any part of the equipment, in which case “BUSY OUT”
is displayed until the piece of equipment is returned to service.
l Telephone the alarm message
to your communications department or maintenance personnel.
Note: If your system has a printer attached, it can be used to obtain a
printed record of the alarm messages. See PRINTER
CONTROL/ALARM RECORDS for more details.
1: : . . .:
BACKGROUND
MUSIC
If you have a public address system . . .
set up with links to your telephone system, it is possible for
background music to be played through the paging loudspeakers and
to be turned on or off from the console.
To Turn Background Music On
l Press FUNCTION
l Dial 17
The display briefly shows:
MUSIC-ON
1
I I
The display reverts to its idle state and background music is playing.
To Turn Background Music Off
l Press FUNCTION
0 Dial 18
The display briefly shows:
MUSIC-OFF
I I
The Console Bell . . .
that announces incoming calls can be turned off, if desired. You will
still be advised of incoming calls by the flashing softkey prompts and
the word “BELL” in the display.
To Turn Off (Mute) the Console Bell
l Press BELL
MUTE
If a call comes in that would normally ring the bell, it remains quiet,
but you see a flashing indicator, and the softkey prompt lights. The
display shows, for example:
1202 2-FEB BELL Ctil
DIAL0
To Turn On the Bell
l Press BELL
Normal operation resumes, with the bell ringing to announce incoming
calls.
,.’ : _. .’ :.:
CALL BLOCK
: : : :‘< s
This feature prevents certain extensions . . .
from making calls to other specified extensions. This feature has
particular application in Hotels and Motels. A blocked extension can
only dial unblocked
You cannot change
feature on or off.
To Turn On Call Block
l Press CALL BLOCK
The display shows
operating normally.
extensions, the operator, or external numbers.
the list of blocked extensions, but you can turn the
blocking to be on, with the rest of the system
12:06 l-JAN CALL BLOCK
To Turn Off Call Block
l Press CALL BLOCK
MESSAGE REGISTRATION
The system keeps track of the number . . .
of local call units made from each extension (or room, as in a
hotel/motel operation). The unit information provided by the Message
Register can be used to calculate the total cost of outside calls to be
charged to the extension/room.
You can read the individual message register while speaking with the
extension or while the console is idle, and print out the contents of the
register. You can also clear and reset the message register.
To Read the Message Register while Talking to the Extension
l Press and hold down MSG REG
to display the call units in the register while you speak with the
extension user. For example, you might see:
0012 UNITS
1 ,
Note: Please note that the display does NOT show the number of
calls, but the number of call units. One call may represent
several call units.
l Release MSG REG
to return to normal operation.
io read the Message Register while the console is idle
l Press and hold down MSG REG
The display prompts you for an extension number:
EXT-NUMBER ?
I
l Dial the desired extension number
to see the call units for that message register:
0012 UNITS
l Release MS6 REG
i .; .., : i, ; ~
MESSAGE REGISTRATION
: . ;
To Clear and Reset the Message Register
l Press and hold down MSG REG
l Dial the desired extension number
to display the number of units currently used.
l Dial 0
to clear the meter and have it start numbering again from zero.
l Release MSG REG
to return to normal operation.
See MESSAGE REGISTER PRINTOUT (4-16).
The message register may also be used . . .
to prevent individual stations from making external calls, on a
temporary basis. If your Class of Service alows you to do so,
Press FUNCTION. Dial 22
VIEW MESSAGE REGISTRATION FOR EXT- ?
l
l
Enter the number of the extension that you want to prevent from
making external calls.
Dial 9
To release
l 0 l
2029999
I
In our example, extension 202 is now prevented from making any
external call, until you release the restriction.
the restriction on external calls for an extension
Press FUNCTION Dial 22
Dial the number of the extension
Dial 0
NIGHT SERVICE/UNATTENDED
OPERATION
When an Attendant is not on duty . . .
the system is put into Night Service. Outside calls that normally ring at
the console then ring at an alternate answering point. The alternate
destination could be an extension, a hunt group, the ring group or a
night bell. When the system is programmed, each outside line and
extension can be given its own destination, and groups of outside lines
and destinations can share the same destination.
A call to a night bell can be answered by anyone who hears it ringing.
The person dials the night pickup access code (called a TAFAS code:
“Trunk Answer From Any Station”) to be connected to the call.
Depending on the way your system is programmed, any DIAL 0 calls
(to the attendant) may be similarly diverted.
During Night Service, the console can still be used to make outgoing
calls, and for other operator functions.
To Activate Night Service
l Press NIGHT
Incoming calls will now ring at Night Answer Points (extensions, the
Night Bell or the console). The display shows:
112:07
NIGHTI
Tb restore normal daytime operation
l Press NIGHT
1
The system restores Day service and incoming calls ring the console
as usual. The normal idle display shows.
Note: Removing the handset or headset plugs from their socket will
automatically activate Night service. To restore normal
operation, plug handset in again. “Night” will still show in the
display, indicating that you are still in Night Service. Press
NIGHT to return to Day Service.
Flexible Night Service
To cater to changes in operation under unusual circumstances, you
NIGHT SERVICEhJNAlTENDED
OPERATION
To Change the Night Answer Point
l Press and hold down NIGHT
to display the currently programmed Night Answer Point. For instance,
you will see:
TRK-09 NIGHT ANSWER POINT BELL-57
At this point, you may want to change the night answer point for a
different trunk:
l Dial * until the desired trunk equipment number is displayed
Note: After you enter the equipment number, the system is in Night
Service. Press NIGHT to put the system in day mode.
The current night answer point flashes, to prompt you to change it.
l Enter the new answer point
(your communications department will give you the necessary number)
The new Night Answer Point will be displayed:
OVERFLOW
Sometimes you have so many incoming calls . . .
that you are overwhelmed trying to deal with them properly. Or you
may need to be away from the console for a short time. Overflow lets
you deal with both these situations by temporarily diverting all calls
from the console to a programmed alternate answering point.
To Activate Overflow
l Press OVERFLOW
The system is in overflow mode, and extension users are now able to
dial the TAFAS code to answer the calls that are ringing the console.
The display shows:
12:05 2-FEB TAFAS
Note: During the time the overflow is activated, all calls will still be
displayed at the console, so you can see what is going on. This
allows you to intervene and answer particular calls if you wish.
To Restore Normal Operation
l Press OVERFLOW
“TAFAS” disappears from the display. The system returns to normal,
and extension users are no longer able to answer calls ringing your
console by dialing the TAFAS code.
Note: TAFAS (Trunk Answer From Any Station) is the term for the
special pickup code to be used by extension users answering
overflow calls. Fill in the TAFAS access code used in your
PRINTER CONTROL
‘. : ._ : L
If a printer is attached . . .
to your system, you can obtain permanent records of a number of the
system’s features. You control the printer by dialing a code after
pressing FUNCTION. See Attendant Function Codes in Chapter 5.
The following types of printout are available (but note that your
system may not have all these features):
l Alarm Records
l SMDR reports
l Data Dumps
l Message Register
l Wake-up Records
SMDR reports and Wake-Up Records are printed out automatically and
do not concern you; however, you might be asked to control the
printer to print out message register contents, alarm records or data
dumps.
The same printer is used for all types of printout. The system can store
printout information in its memory (said to be in the print queue) and
send the print command after any current printing has finished.
General Printing Commands
This section tells you how to control the printing process. It does not
give instructions for turning the printer on and off, loading paper and
changing ribbons, and so on --for these you have to see the manual
that came with the printer itself. We assume that the printer is ON, has
enough paper and is ready to print as soon as the telephone system
gives it the message to begin.
Three commands control printing:
l SUSPEND PRINTING - means stop sending information to the printer,
and put this information in a queue instead so that it can be sent
when printing is restarted. You might need to do this, for example,
when the printer has run out of paper and you need to add more.
l PURGE PRINT QUEUE - removes all information from the print queue
so that it stops printing entirely.
l RESUME PRINTING - causes information to be sent to the printer
again; if there is anything in the print queue, this information is sent
PRINTER CONTROL/MESSAGE
REGISTRATION
To Control
l l
l
Printing
Press FUNCTION Dial 75
The display shows that system is ready to receive a printing
command:
PRINT OPTION ?
Dial *to SUSPEND PRINTING
Or dial 0 to PURGE PRINT QUEUE Or dial # to RESUME PRINTING
The system carries out the command and returns to idle console.
To Print Message Register Contents
l Press FUNCTION
l Dial 73
The display briefly confirms that the system has accepted the
command:
1 MESSAGE REGISTRATION AUDIT
Display then returns to normal operation while the contents of the
message register prints.
Note: If the printer does not start to print the message register, try
entering the RESUME PRINTING command (#). .
The register contents printed out give the extension number, and call
PRINTER CONTROL/ALARM
RECORD
Printing Alarm Records
You can print out a record of minor alarms for use by maintenance
personnel.
Three commands control alarm printouts:
l PRINT ALARM RECORDS AS THEY OCCUR - each time the system’s
diagnostic feature detects a fault, it records the alarm message and
the time of the alarm.
l STOP ALARM RECORD PRINTING - alarm records are not sent to the
printer, but alarm indications still appear at the console.
l PRINT ALL STORED ALARM RECORDS - all alarm records for
uncleared faults still affecting the system are printed out.
To Control Alarm Record Printing
l Press FUNCTION
l Dial 90
The system waits for a command, showing:
PRINT ALARM BUFFER OPTION ?
l Dial 1 to PRINT ALARMS AS THEY OCCUR
For example:
ALARM 04/l 5 8:48 0 010 0026 NO TRUNK LOOP CURRENT 04/03
The alarm record printout gives the date and time, the position of the
alarm in the alarm queue, the alarm number, the equipment number on
which the alarm occurred, the alarm record itself, and the slot and
circuit where it occurred. In our example, the alarm occurred on May
15 (04/15), at 08:48 (8:48), it is the first alarm in the queue (0) the
number of the alarm is 10 (IO), and it occurred on equipment number
26 (0026), in slot 04 and circuit number 2 (04/03 - no even circuit
PRINTER CONTROL/ALARM
RECORD
l Dial 0 to STOP ALARM PRINTING
OR
l Dial ## to PRINT ALL ALARMS
For example,
ALARM QUEUE ON 04/15 8:48
0 010 0026 NO TRUNK LOOP CURRENT 04/03 1 012 0028 NO TRUNK LOOP CURENT 04/07 ALARM PRINT FINISHED
The display returns to idle and the system performs the alarm printing
command requested.
PRINTER CONTROL/DATA
DUMP
Data Dumping
It is possible to print out a record of the information the system
contains on the way trunks, extensions, and other devices have been
set up. This is known as the system data, and printing it out is called
“dumping the data”. This function will typically be performed by
maintenance personnel.
To Dump Data
Press FUNCTION Dial 97
The system shows it is ready for the next step:
l
DATA DUMP
Dial a 4-digit access code
(Maintenance personnel will give you this code)
The display shows a sequence of numbers, from 100 upwards, as the
data starts to print. DATA DUMP CMD 100
When the system has sent all of the data to the printer, the display
returns to normal.
If a call comes in while you are dumping data . . .
you can stop the dump and answer the call.
l Press RELEASE
l Press the appropriate softkey
After you have dealt with the call,