Server Administrator
Notes, Cautions, and Warnings
NOTE: A NOTE indicates important information that helps you make better use of your computer. CAUTION: A CAUTION indicates either potential damage to hardware or loss of data and tells you how to avoid the problem.
WARNING: A WARNING indicates a potential for property damage, personal injury, or death.
Copyright
Copyright © 2014 Dell Inc. All rights reserved. This product is protected by U.S. and international copyright and intellectual property laws. Dell™ and the Dell logo are trademarks of Dell Inc. in the United States and/or other
jurisdictions. All other marks and names mentioned herein may be trademarks of their respective companies.
Contents
1
Introduction
...7
What Is New In This Release
... 7
Software Availability
...8
Systems Management Software
... 8
Server Administrator Components On A Managed System
...8
Security Features
... 10
Other Documents You Might Need
... 11
2
Preinstallation Setup
... 13
Installation Requirements
...13
Supported Operating Systems And Web Browsers
... 13
System Requirements
...13
Managed System Requirements
...13
Supported Systems Management Protocol Standards
... 14
Configuring SNMP Agents
...14
Remote Enablement Requirements
...15
Dependent RPMs For Remote Enablement
...15
Post Installation Configuration For Remote Enablement
... 16
Winbind Configuration For openwsman And sfcb For Red Hat Enterprise Linux Operating Systems
... 18
Workaround For The Libssl Issue
...18
Winbind Configuration For openwsman And sfcb For SUSE Linux Enterprise Server Operating System
... 19
3
Installing Managed System Software On Supported Linux And
VMware ESX
... 21
Software License Agreement
...22
RPM For Individual Components
...22
OpenIPMI Device Driver
...27
Degradation Of Functionality When The Server Administrator Instrumentation Service Is Started
...27
Installing Managed System Software
...27
Prerequisites For Installing Managed System Software
...28
Installing Managed System Software Using The Provided Media
... 28
Server Administrator Custom Installation Utility
... 32
Managed System Software Installation Using Third Party Deployment Software
...33
Uninstalling Managed System Software
...35
Uninstalling Managed System Software Using The RPM Command
... 35
4
Installing Systems Management Software On VMware ESXi
...37
Using The vSphere CLI
... 37
Using The VMware vSphere Management Assistant (vMA)
... 38
Using The VMware Update Manager (VUM)
... 38
Using The Power CLI
... 39
Accessing Server Administrator on VMware ESXi
...40
Enabling Server Administrator Services On The Managed System
...40
Enabling CIM OEM Providers Using vSphere Client (For VMware ESXi4.0/ESXi 4.1)
... 40
Enabling CIM OEM Providers Using vSphere CLI (For VMware ESXi 4.0/ESXi 4.1)
... 41
Enabling CIM OEM Providers Using vMA (For VMware ESXi 4.0/ESXi 4.1)
... 41
Uninstalling The Existing Systems Management VIB
... 42
Configuring The SNMP Agent On Systems Running VMware ESXi
... 42
Configuring The System To Send Traps To A Management Station Using The vSphere CLI
.... 42
Troubleshooting
...43
5
Frequently Asked Questions
...45
What ports do systems management applications use?
...45
When I run virtual media on the DRAC controller over a Wide Area Network (WAN) with low bandwidth and latency, launching Systems Management Install directly on the virtual media failed, what do I do?
...45
Do I need to uninstall the Adaptec Fast Console application installed on the system before installing the Server Administrator Storage Management Service?
... 45
Red Hat Enterprise Linux or SUSE Linux Enterprise Server
...45
After installing Server Administrator, I cannot log in.
... 45
I see the following message when I try to install Server Administrator on a guest Linux operating system.
... 45
I manually installed my Red Hat Enterprise Linux 4 64-bit operating system and can see RPM dependencies while installing Server Administrator. Where can I find these dependent RPM files?
... 46
I have performed a non-default install of the Linux operating system using the Linux operating system media, I see missing RPM file dependencies while installing Server Administrator?
... 46
Where can I find the source packages for Open Source RPMs?
... 46
What do I do when management station RAC utility installation fails due to missing RPM file?
...46
When using the rpm -e 'rpm -qa | grep srvadmin' command to remove systems management software, some RPM utility versions may schedule an uninstallation in an incorrect order, which results in users encountering misleading warning or error messages. What is the solution?
...47
Why am I getting a warning concerning the RPM package key during installation?
... 47
What are the names of all the Systems Management features under Red Hat Enterprise Linux or SUSE Linux Enterprise Server?... 47
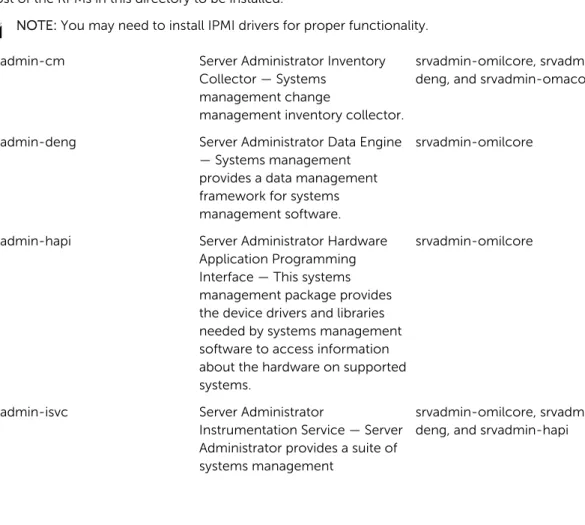
What do the directories under srvadmin/linux/custom/<operating system> contain?...48
What are the additional components that can be installed on a system that already has Server Administrator installed?... 53
What happens if I install the RPM package on an unsupported system or on anunsupported operating system?
... 53
What daemons run on Red Hat Enterprise Linux and SUSE Linux Enterprise Serveroperating systems after Server Administrator is started?
...53
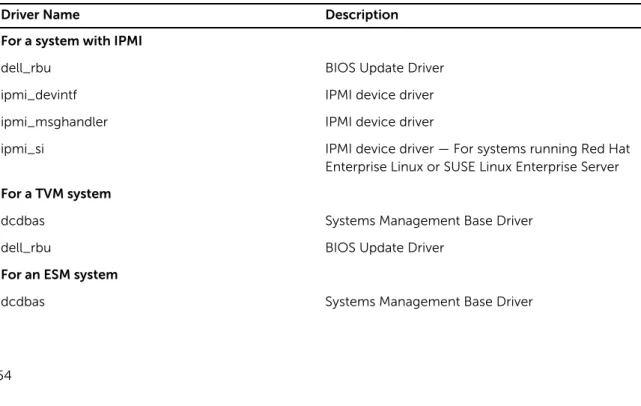
What kernel modules are loaded when Server Administrator is started?... 54
When I run srvadmin-cm (Server Administrator Inventory Collector) it displays errormessages. What do I do?
... 55
Emulex Network Adpater is not detected on Red Hat Enterprise Linux operating system. What do I do?... 55
1
Introduction
This topic provides information on:
• Installing Server Administrator on managed systems. • Installing and using the Remote Enablement feature.
• Managing remote systems using Server Administrator Web Server. • Configuring the system before and during a deployment or upgrade.
NOTE: If you are installing management station and managed system software on the same system, install identical software versions to avoid system conflicts.
What Is New In This Release
The release highlights of Server Administrator are: • Added support for the following operating systems:
– Novell SUSE Linux Enterprise Server 11 SP3 (64–bit) – VMware vSphere 5.0 U3, 5.1 U2, and 5.5
– Red Hat Enterprise Linux 6.5 (64–bit) • Added support for web browsers:
– Mozilla Firefox versions 22 and 23 – Internet Explorer version 11
– Google Chrome version 27, 28, 30, and 31 – Safari version 6.0
• Support for 64–bit Inventory Collector RPM (srvadmin-cm) on supported Linux operating system. • Support for server-based monitoring on servers installed in Dell PowerEdge FX2 series chassis. • Support for displaying Node ID in System/Server Module Summary information.
See Dell OpenManage Server Administrator Command Line Interface Guide. • Support for new values for form factor aligning to iDRAC values.
See Dell OpenManage Server Administrator Command Line Interface Guide. • Introduction of PowerEdge RAID Controller (PERC) 9 — PERC H730P Adapter
– Support for RAID Level 10 Virtual Disk Creations With Uneven Span – Support for 4K sector hard—disk drives — Advanced Format Standard
– Support for data protection using T10 Standard Protection Information (PI) — Data Integrity Field For more information on PERC H730P Adapter, see Dell OpenManage Server Administrator Storage Management User’s Guide
• A link to the complete overview of OpenManage products which provides more information on what is available in the Systems Management Tools and Documentation (SMTD) DVD, what is embedded in
the server, and what can be downloaded from dell.com/support
Software Availability
The Server Administrator software can be installed from: • Systems Management Tools and Documentation DVD
• Support site — For more information, see dell.com/support.
• VMware Update Manager (VUM) — For more information, see http://vmwaredepot.dell.com/.
• Linux Repository using YUM, rug, or zypper — For more information, see Linux Repository.
Systems Management Software
Systems management software is a suite of applications that enables you to manage the systems with proactive monitoring, notification, and remote access.
Systems management software comprises of two DVDs: • Systems Management Tools and Documentation • Server Update Utility
NOTE: For more information on these DVDs, see Systems Management Tools And Documentation <Version Number> Installation Guide.
Server Administrator Components On A Managed System
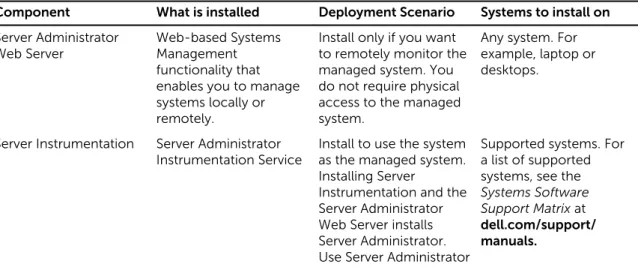
The setup program provides the following options:• Custom Setup • Typical Setup
The custom setup option enables you to select the software components you want to install. The table lists the various managed system software components that you can install during a custom installation.
Table 1. Managed System Software Components
Component What is installed Deployment Scenario Systems to install on Server Administrator
Web Server Web-based Systems Management
functionality that enables you to manage systems locally or remotely.
Install only if you want to remotely monitor the managed system. You do not require physical access to the managed system.
Any system. For example, laptop or desktops.
Server Instrumentation Server Administrator
Instrumentation Service Install to use the system as the managed system. Installing Server
Instrumentation and the Server Administrator Web Server installs Server Administrator. Use Server Administrator
Supported systems. For a list of supported systems, see the Systems Software Support Matrix at dell.com/support/ manuals.
Component What is installed Deployment Scenario Systems to install on to monitor, configure,
and manage the system. NOTE: If you choose to install only Server Instrumentation, you must also install one of the Management Interfaces or the Server
Administrator Web Server.
Storage Management Server Administrator
Storage Management Install to implement hardware RAID solutions and configure the storage components attached to the system. For more information on Storage Management, see the Server Administrator Storage Management User’s Guide in the docs directory.
Only those systems on which you have installed Server Instrumentation or the Management Interfaces. Command Line Interface (Management Interface) Command Line Interface of Server Instrumentation
Install to provide local and remote system management solutions to manage Server and Storage instrumentation data using command-line interfaces.
Supported systems. For a list of supported systems, see the Systems Software Support Matrix.
WMI (Management
Interface) Windows Management Instrumentation
Interface of Server Instrumentation
Install to provide local and remote system management solutions to manage Server data using WMI protocol.
Supported systems. For a list of supported systems, see the Systems Software Support Matrix. SNMP (Management
Interface) Simple Network Management Protocol
Interface of Server Instrumentation
Install to provide local and remote system management solutions to manage Server and Storage instrumentation data using SNMP protocol.
Supported systems. For a list of supported systems, see the Systems Software Support Matrix.
Remote Enablement (Management Interface)
Instrumentation Service and CIM Provider
Install to perform remote systems management tasks. Install Remote Enablement on one system and Server
Supported systems. For a list of supported systems, see the Systems Software Support Matrix.
Component What is installed Deployment Scenario Systems to install on Administrator Web
Server on another system. You can use the system with the Server Administrator to remotely monitor and manage the systems which have Remote Enablement installed. Operating System
Logging (Management Interface)
Operating System
Logging Install to allow local system
management-specific events logging on the operating system for Server and Storage instrumentation. On systems running Microsoft Windows, use the Event Viewer to locally view the collected events.
Supported systems. For a list of supported systems, see the Systems Software Support Matrix.
DRAC Command Line
Tools Hardware application programming interface
and iDRAC 12G or iDRAC, DRAC 5, or DRAC 4 (depending on the type of the system)
Install to receive email alerts for warnings or errors related to voltage, temperature, and fan speed. Remote Access Controller also logs event data and the most recent crash screen (available only on systems running Windows operating system) to help you diagnose the probable cause of a system crash.
Only those systems on which you have installed Server Instrumentation or Management Interface.
Security Features
Systems management software components provide these security features:
• Support for Network Information Services (NIS), Winbind, Kerberos, and Lightweight Directory Access Protocol (LDAP) authentication protocols for Linux operating systems.
• Role-based authority that allows specific privileges to be configured for each user.
NOTE: Applicable only for systems running Red Hat Enterprise Linux, SUSE Linux Enterprise Server, or VMware ESX/ESXi.
• User ID and password configuration through the web-based interface or the command line interface (CLI), in most cases.
• SSL encryption (Auto Negotiate and 128-bit or higher).
• Session time-out configuration (in minutes) through the web-based interface.
• Port configuration to allow systems management software to connect to a remote device through firewalls.
NOTE: For information about ports that the various systems management components use, see the User Guide for that component.
For information about the Security Management, see the Server Administrator User’s Guide at dell.com/
openmanagemanuals.
Other Documents You Might Need
In addition to this guide, for more information, access the following guides.
• The Lifecycle Controller 2 Version 1.00.00 User's Guide provides information on using the Lifecycle Controller.
• The Management Console User’s Guide provides information about installing, configuring, and using Management Console.
• The Systems Build and Update Utility User’s Guide provides information on using the Systems Build and Update Utility.
• The Systems Software Support Matrix provides information about the various systems, the operating systems supported by these systems, and the systems management components that can be installed on these systems.
• The Server Administrator User's Guide describes the installation and use of Server Administrator. • The Server Administrator SNMP Reference Guide documents the SNMP management information
base (MIB).
• The Server Administrator CIM Reference Guide documents the Common Information Model (CIM) provider, which is an extension of the standard management object format (MOF) file. This guide explains the supported classes of management objects.
• The Server Administrator Messages Reference Guide lists the messages that are displayed on the Server Administrator home page Alert log, or on the operating system’s event viewer. This guide explains the text, severity, and cause of each alert message that the Server Administrator displays. • The Server Administrator Command Line Interface Guide documents the complete command line
interface for Server Administrator, including an explanation of CLI commands to view system status, access logs, create reports, configure various component parameters, and set critical thresholds. • The Remote Access Controller 5 User’s Guide provides complete information about installing and
configuring a DRAC 5 controller and using DRAC 5 to remotely access an inoperable system. • The Integrated Remote Access Controller User's Guide provides complete information about
configuring and using an integrated Remote Access Controller to remotely manage and monitor the system and its shared resources through a network.
• The Update Packages User's Guide provides information about obtaining and using the Update Packages for Windows and Linux as part of the system update strategy.
• The Server Update Utility User's Guide provides information on using the Server Update Utility. • The Systems Management Tools and Documentation DVD contains readme files for applications
found on the media.
NOTE: If the product does not perform as expected or you do not understand a procedure
2
Preinstallation Setup
Ensure that you perform the following before installing Server Administrator: • Read the installation instructions for the operating system.
• Read the Installation Requirements to ensure that the system meets or exceeds the
minimum requirements.
• Read the applicable readme files and the Systems Software Support Matrix.
• Close all applications running on the system before installing the Server Administrator applications. On systems running the Linux operating system, ensure that all operating system RPM Package Manager (RPM) packages required by the Server Administrator RPMs are installed. If the system had VMware ESX factory-installed, Red Hat Enterprise Linux, or SUSE Linux Enterprise Server, see the
Dependent RPMs for Remote Enablement section for information on any RPMs that you need to manually install prior to installing managed system software. Typically, manual installation of RPMs is not required.
Installation Requirements
This section describes the general requirements of the Server Administrator and provides information on supported operating systems and web browsers.
NOTE: Prerequisites specific to an operating system are listed as part of the installation procedures.
Supported Operating Systems And Web Browsers
For information on supported operating systems and web browsers, see the Systems Software Support Matrix .
NOTE: Ensure that the web browser is configured to bypass the proxy server for local addresses.
System Requirements
Install Server Administrator on each system to be managed. You can manage each system running Server Administrator locally or remotely through a supported web browser.
Managed System Requirements
• One of the supported operating systems and web browser. • Minimum 2GB RAM.
• Minimum 512MB free hard drive space. • Administrator rights.
• TCP/IP connection on the managed system and the remote system to facilitate remote system management.
• Monitor with a minimum screen resolution of 800 x 600. The recommended screen resolution is at least 1024 x 768.
• The Server Administrator Remote Access Controller service requires remote access controller (RAC) installed on the managed system. See the relevant Remote Access Controller User’s Guide for complete software and hardware requirements.
• The Server Administrator Storage Management Service requires Server Administrator installed on the managed system. See the Server Administrator Storage Management User’s Guide for complete software and hardware requirements.
Related Link:
Supported Operating Systems and Web Browsers
Supported Systems Management Protocol Standards
Install a supported systems management protocol on the managed system before installing the management station or managed system software. On supported Linux operating system, systems management software supports:
• Common Information Model (CIM)/Windows Management Instrumentation (WMI) • Simple Network Management Protocol (SNMP)
Install the SNMP package provided with the operating system. If SNMP is installed post Server Administrator installation, restart Server Administrator services.
NOTE: For information about installing a supported systems management protocol standard on the managed system, see the operating system documentation.
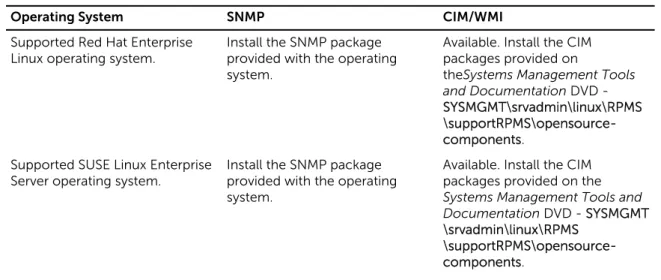
The following table shows the availability of the systems management standards for each supported operating system.
Table 2. Availability of Systems Management Protocol by Operating Systems
Operating System SNMP CIM/WMI
Supported Red Hat Enterprise
Linux operating system. Install the SNMP package provided with the operating system.
Available. Install the CIM packages provided on
theSystems Management Tools and Documentation DVD - SYSMGMT\srvadmin\linux\RPMS \supportRPMS\opensource-components.
Supported SUSE Linux Enterprise Server operating system.
Install the SNMP package provided with the operating system.
Available. Install the CIM packages provided on the Systems Management Tools and Documentation DVD - SYSMGMT \srvadmin\linux\RPMS
\supportRPMS\opensource-components.
NOTE: It is recommended to install the SFCB, SFCC, OpenWSMAN, and CMPI-Devel packages from the operating system media, if available.
Configuring SNMP Agents
The systems management software supports the SNMP systems management standard on all supported operating systems. The SNMP support may or may not be installed depending on the operating system
and how the operating system was installed. An installed supported systems management protocol standard, such as SNMP, is required before installing the systems management software.
Configure the SNMP agent to change the community name, enable set operations, and send traps to a management station. To configure the SNMP agent for proper interaction with management applications, perform the procedures described in the Server Administrator User’s Guide.
Related Links:
• Installation Requirements
• Supported Systems Management Protocol Standards
Remote Enablement Requirements
The Remote Enablement feature is currently supported on: • Red Hat Enterprise Linux
• Novell SUSE Enterprise Linux • VMware vSphere (ESX and ESXi)
Dependent RPMs For Remote Enablement
If you choose to install the Remote Enablement feature, you have to install certain dependent RPMs and configure these RPMs before installing the feature. Install the following RPMs:
• libcmpiCppImpl0 • libwsman1
• openwsman-server • sblim-sfcb
• sblim-sfcc
The dependent RPMs are available on the Systems Management Tools and Documentation DVD at srvadmin\linux\RPMS\supportRPMS\opensource-components\<OS>\<arch>.
NOTE: On supported SLES 11 and above and Red Hat Enterprise Linux 6 and preceding operating systems, it is recommended that you install the RPMs from the operating system media, if available.
Installing Dependent RPMs
To install the dependent RPMs not available on the operating system media:
1. Make sure that Pegasus RPMs are uninstalled.
2. Check if the openwsmand and sfcbd binaries are already installed using make-install. Check by
running the commands: openwsman or sfcbd or you can check the existence of the binaries in the /usr/local/sbin directory.
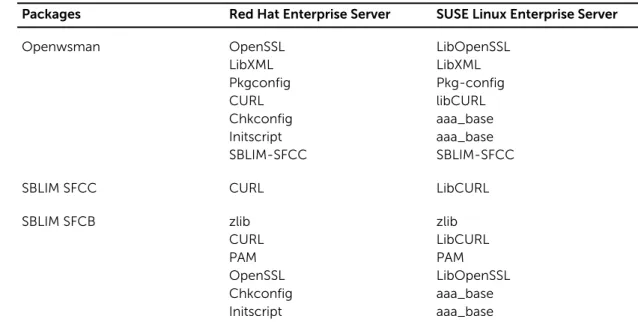
4. Check for the required dependencies for the openwsman and sfcbd RPMs listed in the following table.
Table 3. Required Dependencies
Packages Red Hat Enterprise Server SUSE Linux Enterprise Server
Openwsman OpenSSL LibXML Pkgconfig CURL Chkconfig Initscript SBLIM-SFCC LibOpenSSL LibXML Pkg-config libCURL aaa_base aaa_base SBLIM-SFCC
SBLIM SFCC CURL LibCURL
SBLIM SFCB zlib CURL PAM OpenSSL Chkconfig Initscript zlib LibCURL PAM LibOpenSSL aaa_base aaa_base
5. Install the dependent RPMs. You can install the RPMs:
– with a single command rpm -ivh rpm1 rpm2 rpm3 rpm4 … rpmN
or
– individually
NOTE: If you are installing RPMs individually, follow this sequence. rpm -ivh sblim-sfcb-x.x.x.rpm
rpm -ivh sblim-sfcc-x.x.x.rpm
NOTE: Install the libwsman and openwsman client RPMs simultaneously as they have cyclic dependency.
rpm -ivh libwsman1-x.x.x.rpm openwsman-client-x.x.x.rpm rpm -ivh openwsman-server-x.x.x.rpm
Post Installation Configuration For Remote Enablement
This section details the steps to configure the dependent RPMs if you have installed the Remote Enablement feature.
The post-installation configuration script is available at /opt/dell/srvadmin/etc/ on the server file system. After installing all the dependent RPMs and the Remote Enablement feature, execute the
autoconf_cim_component.sh script.
NOTE: The Distributed Web Server (DWS) connection does not work properly, if you have installed the sblim-sfcb RPM from SUSE Linux Enterprise Server 11 SP3 operating system DVD. To resolve
the connection issue, you must install the sblim-sfcb RPM either from SUSE Linux Enterprise Server
11 SP2 operating system DVD or from the Systems Management Tools and Documentation DVD.
Before executing the autoconf_cim_component.sh script, make sure that Systems Management is
Execute the following command to configure sfbc and openwsman as per the default configurations: ./ autoconf_cim_component.sh
NOTE: To configure openwsman on the managed node to run on a different port, use the -p
<port> option with autoconf_cim_component.sh. This is optional and by default the openwsman is configured to run on port 443.
Related Links:
Installing Managed System Software on Supported Linux and VMware ESX
Creating Server Certificate For WSMAN
You can either create a new certificate for WSMAN or reuse an existing certificate.
Creating A New Certificate
You can create a new server certificate for WSMAN by executing the owsmangencert.sh script located
at /etc/openwsman. This script is provided by the openwsman RPM. Follow the steps in the wizard to create the server certificate.
Reusing An Existing Certificate
If you have a self-signed or CA-signed certificate, you can use the same certificate for the openwsman
server by updating the ssl_cert_file and ssl_key_file values, grouped under [server] tag,
in /etc/openwsman/openwsman.conf with the existing certificate values.
Configuring CRL For The openwsman Client
You need to configure the Certificate Revocation List (CRL) used by Server Administrator Web Server. To do this:
1. Mention a valid CRL file in /etc/openwsman/openwsman_client.conf.
2. If left blank, the CRL check is ignored.
NOTE: CRL support is only present on SUSE Linux Enterprise Server version 11 and Red Hat Enterprise Linux Server version 5 update 5. For other operating systems, contact the operating system vendor to provide the required CURL library with CRL support.
Running sfcb And openwsman
Run sfcb and openwsman:
• /etc/init.d/sfcb start • /etc/init.d/openwsmand start
NOTE: On Red Hat Enterprise Linux 6, replace sfcb with sblim-sfcb.
On Red Hat Enterprise Linux 6, for the sblim-sfcb and openwsman to start automatically after a reboot
you need to change the run-levels using the chkconfig utility. For example, if you want to run
sblim-sfcb in run-levels 3 and 5, use the following command:
#chkconfig sblim-sfcb on --level 35
NOTE: For more information on chkconfig and its usage, see the operating system
documentation.
Winbind Configuration For openwsman And sfcb For Red
Hat Enterprise Linux Operating Systems
Follow the instructions mentioned below to configure openwsman and sfcb on 32-bit OMI installation. In case of a 64-bit installation, replace with .liblib64
1. Back up these files:
– /etc/pam.d/openwsman – /etc/pam.d/sfcb
– /etc/pam.d/system-auth
2. Replace the content of /etc/pam.d/openwsman and /etc/pam.d/sfcb with
auth required pam_stack.so service=system-auth auth required /lib/security/pam_nologin.so
account required pam_stack.so service=system-auth
3. Replace the content of /etc/pam.d/system-auth with
%PAM-1.0
This file is auto-generated.
User changes will be destroyed the next time authconfig is run. auth required /lib/security/$ISA/pam_env.so
auth sufficient /lib/security/$ISA/pam_unix.so likeauth nullok auth sufficient /lib/security/$ISA/pam_krb5.so use_first_pass auth sufficient /lib/security/$ISA/pam_winbind.so use_first_pass auth required /lib/security/$ISA/pam_deny.so
account required /lib/security/$ISA/pam_unix.so broken_shadow
account sufficient /lib/security/$ISA/pam_succeed_if.so uid 100 quiet account [default=bad success=ok user_unknown= ignore] /lib/security/$ISA/ pam_krb5.so
account [default=bad success=ok user_unknown= ignore] /lib/security/$ISA/ pam_winbind.so
account required /lib/security/$ISA/pam_permit.so
password requisite /lib/security/$ISA/pam_cracklib.so retry=3
password sufficient /lib/security/$ISA/pam_unix.so nullok use_authtok md5 shadow
password sufficient /lib/security/$ISA/pam_krb5.so use_authtok password sufficient /lib/security/$ISA/pam_winbind.so use_authtok password required /lib/security/$ISA/pam_deny.so
session required /lib/security/$ISA/pam_limits.so session required /lib/security/$ISA/pam_unix.so session optional /lib/security/$ISA/pam_krb5.so
Workaround For The Libssl Issue
If the required library needed by openwsman is present on the system, the
autoconf_cim_component.sh script tries to resolve the libssl.so issue. However, if the library is not present, then the script reports the same. Check if the latest version of the libssl library is installed on the system and then create a soft link with libssl.so.
For example: On a 32-bit installation, if you have libssl.so.0.9.8a and libssl.so.0.9.8b in /usr/
lib, then create soft link with the latest libssl.so.0.9.8b:
• ln -sf /usr/lib/libssl.so.0.9.8b /usr/lib/libssl.so • ldconfig
On a 64-bit installation, if you have libssl.so.0.9.8a and libssl.so.0.9.8b in /usr/lib, then create
soft link with the latest libssl.so.0.9.8b:
• ln -sf /usr/lib64/libssl.so.0.9.8b /usr/lib64/libssl.so • ldconfig
Winbind Configuration For openwsman And sfcb For
SUSE Linux Enterprise Server Operating System
Follow the instructions mentioned below to configure openwsman and sfcb on 32-bit OMI installation. In case of a 64-bit installation, replace .lib with .lib64.
1. Back up the following files:
– /etc/pam.d/openwsman – /etc/pam.d/sfcb
– /etc/pam.d/system-auth – /etc/pam.d/common-account
2. Replace the content of /etc/pam.d/openwsman/ and /etc/pam.d/sfcb with
%PAM-1.0
auth include common-auth
auth required /lib/security/pam_nologin.so account include common-account
3. Replace the content of /etc/pam.d/common-auth with
auth required pam_env.so
auth sufficient pam_unix2.so debug
auth sufficient pam_winbind.so use_first_pass debug
4. Replace the content of /etc/pam.d/common-account with
account sufficient pam_unix2.so account sufficient pam_winbind.so
3
Installing Managed System Software On
Supported Linux And VMware ESX
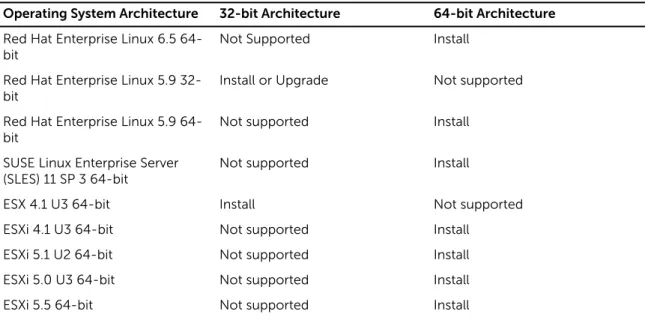
The Systems Management installer supports both 32-bit and 64-bit architecture. The following table explains the operating system installation matrix for Systems Management.
Table 4. Operating System Installation Matrix
Operating System Architecture 32-bit Architecture 64-bit Architecture Red Hat Enterprise Linux 6.5
64-bit
Not Supported Install
Red Hat Enterprise Linux 5.9
32-bit Install or Upgrade Not supported
Red Hat Enterprise Linux 5.9
64-bit Not supported Install
SUSE Linux Enterprise Server
(SLES) 11 SP 3 64-bit Not supported Install
ESX 4.1 U3 64-bit Install Not supported
ESXi 4.1 U3 64-bit Not supported Install
ESXi 5.1 U2 64-bit Not supported Install
ESXi 5.0 U3 64-bit Not supported Install
ESXi 5.5 64-bit Not supported Install
NOTE: On a Systems Management upgrade, it is recommended to upgrade to the latest open source components available on the DVD.
NOTE: If you are upgrading the operating system to a major version (from SLES 10 to SLES 11), uninstall the existing version of Systems Management and install the supported version. NOTE: Before you migrate to a 64-bit version of Systems Management software, make sure to
uninstall the 32-bit Systems Management and other OpenSource components (openwsman-server,
openwsman-client, libwsman1, sblim-sfcb, sblim-sfcc, libcmpiCppImpl0, libsmbios2, smbios-utils-bin) installed as part of the 32-bit Systems Management.
NOTE: The Inventory Collector RPM (srvadmin-cm) requires the following RPMs to be preinstalled
on servers prior to 11G running supported 64-bit Linux operating system. • glibc.i686
• compat-libstdc++.i686 • libstdc++.i686
• zlib.i686libxml2.i686
If the dependent RPMs are not installed then Inventory Collector will not function as expected and exits with error messages.
NOTE: On systems running the Red Hat Enterprise Linux 5.9 (32-bit) operating system the Emulex driver is dependent on the following RPMs:
• kernel-headers-2.6.18-346.el5.i386.rpm • glibc-headers-2.5-107.i386.rpm
• glibc-devel-2.5-107.i386.rpm • gcc-4.1.2-54.el5.i386.rpm
If any of the RPMs listed above are missing, the system experiences issues in detecting the Emulex Network Adapters.
The installation scripts and RPM packages specific to supported Linux and VMware ESX operating systems are provided to install and uninstall the Server Administrator and other managed system software
components. These installation scripts and RPMs are located in the SYSMGMT/srvadmin/linux/
supportscripts directory available in the Systems Management Tools and Documentation DVD. The install script srvadmin-install.sh allows silent or interactive installation. By including the srvadmin-install.sh script in the Linux scripts, install Server Administrator locally or across a network on single or multiple systems.
The second install method uses the Server Administrator RPM packages provided in the custom
directories and the Linux rpm command. Write Linux scripts that install Server Administrator locally or
across a network on single or multiple systems.
Using a combination of the two install methods is not recommended and may require that you manually install the required Server Administrator RPM packages provided in the custom directories, using the
Linux rpm command.
For information on supported platforms and supported operating systems, see the Systems Software Support Matrix.
Software License Agreement
The software license for the Red Hat Enterprise Linux and SUSE Linux Enterprise Server version of the Systems Management software is located on the Systems Management Tools and Documentation DVD. Read the license.txt file. By installing or copying any of the files on the provided media, you are agreeing to the terms in this file. This file is also copied to the root of the software tree where you install the Systems Management software.
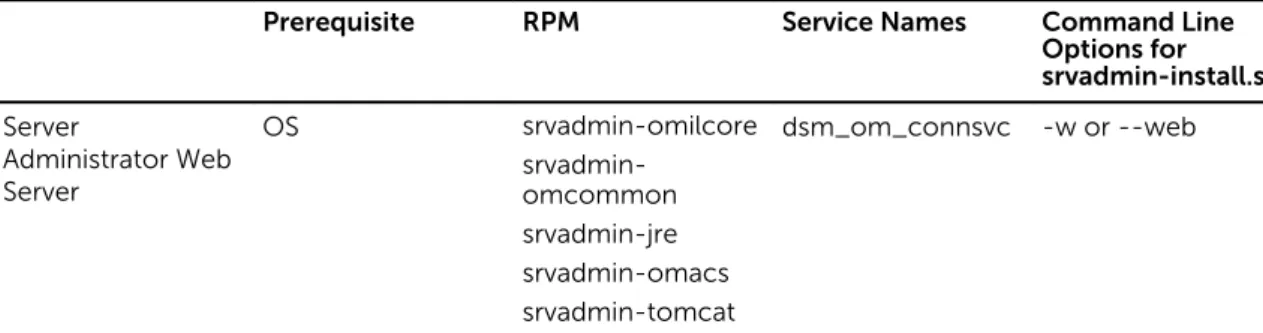
RPM For Individual Components
The following table lists the RPMs for individual components that can be used during installation:
Table 5. RPM for Individual Components
Prerequisite RPM Service Names Command Line Options for srvadmin-install.sh Server Administrator Web Server OS srvadmin-omilcore srvadmin-omcommon srvadmin-jre srvadmin-omacs srvadmin-tomcat dsm_om_connsvc -w or --web
Prerequisite RPM Service Names Command Line Options for srvadmin-install.sh srvadmin-smcommon srvadmin-smweb Server Instrumentation PE Server, OS srvadmin-omilcore srvadmin-smcommon srvadmin-omacore srvadmin-deng srvadmin-hapi srvadmin-isvc srvadmin-omcommon srvadmin-idrac-snmp srvadmin-isvc-snmp srvadmin-deng-snmp srvadmin-cm srvadmin-omacs srvadmin-ominst srvadmin-xmlsup srvadmin-rac-components dsm_sa_datamgrd dsm_sa_eventmgr d dsm_sa_snmpd dsm_sa_shrsvcd -d or --dellagent Server Instrumentation Only PE Server, OS srvadmin-xmlsup srvadmin-hapi srvadmin-omilcore srvadmin-deng srvadmin-isvc srvadmin-omcommon srvadmin-cm srvadmin-omacs srvadmin-ominst srvadmin-rac-components dsm_sa_datamgrd dsm_sa_eventmgr d dsm_sa_shrsvcd -g or --agent SNMP PE Server, OS srvadmin-xmlsup srvadmin-hapi srvadmin-omilcore srvadmin-deng srvadmin-isvc srvadmin-omcommon srvadmin-idrac-snmp dsm_sa_datamgrd dsm_sa_eventmgr d dsm_sa_snmpd dsm_sa_shrsvcd -m or --snmp
Prerequisite RPM Service Names Command Line Options for srvadmin-install.sh srvadmin-isvc-snmp srvadmin-deng-snmp srvadmin-cm srvadmin-omacs srvadmin-ominst srvadmin-rac-components
CLI PE Server, OS srvadmin-xmlsup
srvadmin-hapi srvadmin-omilcore srvadmin-deng srvadmin-isvc srvadmin-omcommon srvadmin-omacore srvadmin-cm srvadmin-omacs srvadmin-ominst srvadmin-rac-components dsm_sa_datamgrd dsm_sa_eventmgr d dsm_sa_shrsvcd -i or --cli
OS Logging Option PE Server, OS srvadmin-xmlsup
srvadmin-hapi srvadmin-omilcore srvadmin-deng srvadmin-isvc srvadmin-omcommon srvadmin-oslog srvadmin-cm srvadmin-omacs srvadmin-ominst srvadmin-rac-components dsm_sa_datamgrd dsm_sa_eventmgr d dsm_sa_shrsvcd -l or --oslog Remote
Enablement PE Server, OS, CIMOM, WSMAN
CIMOM version >= SFCB 1.3.2
(applicable for systems running VMware ESX 4.0, Red Hat Enterprise Linux, and SUSE Linux) >= Open Pegasus 2.5.1-2 srvadmin-xmlsup srvadmin-hapi srvadmin-omilcore srvadmin-deng srvadmin-rac-components srvadmin-omacs srvadmin-ominst srvadmin-idrac-snmp srvadmin-isvc-snmp dsm_sa_datamgrd dsm_sa_eventmgr d dsm_sa_snmpd dsm_sa_shrsvcd -c or --cimagent
Prerequisite RPM Service Names Command Line Options for srvadmin-install.sh (applicable for systems running VMware ESX 3.5) WSMAN Version >= OpenWSMAN 2.1 srvadmin-deng-snmp srvadmin-isvc srvadmin-omcommon srvadmin-omacore srvadmin-cm srvadmin-smcommon srvadmin-itunnelprovider Storage Agent and
Server Instrumentation srvadmin-xmlsup srvadmin-sysfsutils srvadmin-storelib-sysfs srvadmin-storelib srvadmin-hapi srvadmin-omilcore srvadmin-deng srvadmin-deng-snmp srvadmin-isvc srvadmin-isvc-snmp srvadmin-omcommon srvadmin-omacore srvadmin-omacs srvadmin-ominst srvadmin-cm srvadmin-realssd (applicable for x86_64 bit only) srvadmin-smcommon srvadmin-storage srvadmin-storage-cli srvadmin-idrac-snmp srvadmin-storage-snmp srvadmin-rac-components dsm_sa_datamgrd dsm_sa_eventmgr d dsm_sa_snmpd dsm_sa_shrsvcd -s or --storage Remote Access SA Plugin Component -> Remote access DRAC4 agent is installed if DRAC4 card is available in srvadmin-xmlsup srvadmin-hapi srvadmin-argtable2 dsm_sa_datamgrd dsm_sa_eventmgr d -r or --rac
Prerequisite RPM Service Names Command Line Options for srvadmin-install.sh core components, Server Instrumentation
the server. DRAC5 agent is installed for 9G and 10G servers. iDRAC agent is installed for 11G and 12G servers with RAC presence. srvadmin-omilcore srvadmin-deng srvadmin-deng-snmp srvadmin-isvc srvadmin-isvc-snmp srvadmin-omcommon srvadmin-omacs srvadmin-ominst srvadmin-omacore srvadmin-cm srvadmin-smcommon srvadmin-rac-components srvadmin-idracdrsc srvadmin-racdrsc srvadmin-idracadm7 srvadmin-idracadm srvadmin-racadm4 srvadmin-idrac7 srvadmin-idrac-snmp srvadmin-idrac-vmcli dsm_sa_snmpd dsm_sa_shrsvcd
Storage Agent and Server Instrumentation PE Server, OS srvadmin-xmlsup srvadmin-hapi srvadmin-omacs srvadmin-ominst srvadmin-omilcore srvadmin-deng srvadmin-isvc srvadmin-cm srvadmin-rac-components dsm_sa_datamgrd dsm_sa_eventmgr d dsm_sa_shrsvcd -t or --stragent Remote Enablement and Server Instrumentation PE Server, OS srvadmin-xmlsup srvadmin-hapi srvadmin-omilcore srvadmin-deng srvadmin-isvc srvadmin-cm srvadmin-omacs dsm_sa_datamgrd dsm_sa_eventmgr d dsm_sa_shrsvcd -z or --corecim
Prerequisite RPM Service Names Command Line Options for srvadmin-install.sh srvadmin-ominst srvadmin-itunnelprovider srvadmin-rac-components
NOTE: To manage the server, select either Server Administrator Web Server or one of the Management Interfaces – CLI, SNMP or OS LOG along with Server Instrumentation (SI) or Server Administrator Storage Management Service (OMSS).
NOTE: Command line options for [-t] and [-g] cannot be used without a management interface. These options need to be combined with management interface options such as [-w], [-i], [-z], [-l],
or [-m]. For more information on custom installations, see Server Administrator Custom Installation
Utility.
OpenIPMI Device Driver
The Server Instrumentation feature of Server Administrator requires the OpenIPMI device driver that provides IPMI-based information and functionality.
All supported Linux systems contain the required version of IPMI module in the default kernel itself. You do not have to install the IPMI RPM. For more information on supported systems, see the Systems Software Support Matrix.
Degradation Of Functionality When The Server Administrator
Instrumentation Service Is Started
After Server Administrator is installed, the Server Administrator Instrumentation Service performs a
run‑time check of the OpenIPMI device driver whenever it is started. The Server Administrator
Instrumentation Service is started whenever you run either the srvadmin-services.sh start or
srvadmin‑services.sh restart commands, or when you restart the system (during which the Server
Administrator Instrumentation Service is started.)
Server Administrator installation blocks the installation of Server Administrator packages if an appropriate version of the OpenIPMI device driver is not currently installed on the system. However, it is still possible, though not typical, that you can uninstall or replace a sufficient version of the OpenIPMI device driver after Server Administrator has been installed. Server Administrator cannot prevent this.
To account for a user uninstalling or replacing a sufficient version of the OpenIPMI device driver after Server Administrator has been installed, the Server Administrator Instrumentation Service checks the OpenIPMI device driver version whenever it is started. If a sufficient version of the OpenIPMI device driver is not found, the Server Administrator Instrumentation Service degrades itself so that it does not provide any of the IPMI-based information or functionality. Primarily, this means that it does not provide any probe data (for example, fans, temperatures, and voltage probe data.)
Installing Managed System Software
This section explains how to install managed system software using the following installation options: • Using the srvadmin-install.sh shell script
NOTE: If you have downloaded the managed system software installer (available as a .tar.gz file), the srvadmin-install.sh shell script is present as setup.sh in the root directory.
• Using the RPM command
Prerequisites For Installing Managed System Software
The prerequisites are:• Log in as root.
• The running kernel must have loadable module support enabled.
• The /opt directory must have at least 250 MB of free space, and the /tmp, /etc, and /var directories must each have at least 20 MB of free space.
• Install the ucd-snmp or net-snmp package that is provided with the operating system if you use
SNMP to manage the server. If you want to use supporting agents for the ucd-snmp or net-snmp
agent, you must install the operating system support for the SNMP standard before you install Server Administrator. For more information about installing SNMP, see the installation instructions for the operating system you are running on the system.
NOTE: When installing RPM packages, to avoid warnings concerning the RPM–GPG key, import the
key with a command similar to rpm --import <OM DVD mountpoint>/SYSMGMT/srvadmin/
linux/RPM-GPG-KEY
• In case of Red Hat Enterprise Linux 6.2 and above and SLES 11 SP2, install the wsman and sblim
packages from the operating system DVD. See, To install the wsman and sblim packages
• Install all the prerequisite RPMs required for successful installation.
If the system had VMware ESX (version 4.0 or 4.1) factory-installed, Red Hat Enterprise Linux (versions
5.x and 6.0), or SUSE Linux Enterprise Server (version 10 and 11), see the Dependent RPMs for Remote
Enablement section for information on any RPMs that you need to manually install prior to installing managed system software. Typically, you may not need to manually install any RPMs.
Installing The wsman And sblim Packages
1. In Package selection, select Basic Server.2. Select Customize now and click Next.
3. Select System Management group.
4. From the sub-category, select Web-based Enterprise Management → Optional Packages option.
The default selected packages are: openwsman-client, sblim-sfcb, sblim-wbemcli, and wsmancli Deselect the sblim-wbemcli package from the above list.
5. Select openwsman-server and click Next.
6. After the operating system installation, install libcmpiCppImpl0 package from the operating system
DVD or using the Yum utility.
Installing Managed System Software Using The Provided Media
The installer uses RPMs to install each component. The media (DVD) is divided into subdirectories to enable easy custom installation.
NOTE: On the Red Hat Enterprise Linux 5.x operating system, DVDs are auto-mounted with the
-noexec mount option. This option does not allow you to run any executable from the DVD. Manually mount the DVD and then run executables.
To review the software before you install it, follow this procedure:
1. Load the Systems Management Tools and Documentation DVD into the system's DVD drive.
2. Mount the DVD, if required.
3. When you have mounted the DVD, navigate to: <OM DVD mount point>/SYSMGMT/srvadmin/linux/
The installation script and RPM folder are available under the Linux directory.
Express Install
Use the provided shell script to perform the express installation on supported Linux and VMware ESX operating systems.
NOTE: On the Red Hat Enterprise Linux 5.x operating system, DVDs are auto‑mounted with the
-noexec mount option. This option does not allow you to run any executable from the DVD. Manually mount the DVD and then run executables.
1. Log in as root to the system running the supported operating system where you want to install the
managed system components.
2. Insert the Systems Management Tools and Documentation DVD into the DVD drive.
3. Mount the DVD, if required.
4. Navigate to <OM DVD mount point>/SYSMGMT/srvadmin/linux/supportscripts directory. Run the
srvadmin-install.sh shell script, which performs an express installation. sh srvadmin-install.sh --express
or
sh srvadmin-install.sh -x
The setup program installs the following managed system software features: – Server Administrator Web Server
– Server Instrumentation – Storage Management – Remote Access Controller
Remote enablement is not installed and Server Administrator services do not start automatically.
NOTE: The Inventory Collector RPM (srvadmin-cm) requires the following RPMs to be
preinstalled on servers prior to 11G running supported 64-bit Linux operating system. – glibc.i686
– compat-libstdc++.i686 – libstdc++.i686
– zlib.i686libxml2.i686
If the dependent RPMs are not installed then Inventory Collector will not function as expected and exits with error messages.
5. Start the Server Administrator services after the installation using the srvadmin-services.sh script by
using the sh srvadmin-services start command.
Component Specific Install Using RPM Commands
The RPMs specific to a particular OpenManage component are grouped together. To facilitate an RPM-based installation, install the RPMs from the following directories:
• SYSMGMT/srvadmin/linux/custom/<OS>/SA-WebServer/<arch> • SYSMGMT/srvadmin/linux/custom/<OS>/Server-Instrumentation/<arch > • SYSMGMT/srvadmin/linux/custom/<OS>/add-RAC4/<arch> • SYSMGMT/srvadmin/linux/custom/<OS>/add-RAC5/<arch> • SYSMGMT/srvadmin/linux/custom/<OS>/add-StorageManagement/< arch> • SYSMGMT/srvadmin/linux/custom/<OS>/add-iDRAC/<arch>
Where <OS> is the supported operating system and <arch> is 32-bit (i386) or 64-bit (x86_64).
NOTE: In case of SUSE Linux Enterprise Server version 10 and 11: 32-bit rpm packages are provided for upgrade from the previous 32-bit installs only. If you do not have an existing installation, then you cannot install a 32-bit version of the software. You must install operating system specific rpms from the 64-bit directory.
For example, if you are running Red Hat Enterprise Linux version 5, you can customize the installation by adding the RPMs from the following directories:
Table 6. RPM Directory
Directory RPM Package
SYSMGMT/srvadmin/linux/custom/
RHEL5/add-StorageManagement/<arch> Storage Management component packages
SYSMGMT/srvadmin/linux/custom/ RHEL5/
SAWebServer/<arch> Server Administrator Web Server component packages
SYSMGMT/srvadmin/linux/custom/ RHEL5/Server-Instrumentation/<arch>
Server Instrumentation packages
The DVD provides RPMs that enable repository-based installation using clients such as Yum, Zypper, and Rug. There are RPMs that install the entire set or you can select individual RPMs to install specific components. The RPMs are available at:
SYSMGMT/srvadmin/linux/RPMS/supportRPMS/metaRPMS
The following list of RPMs enables the installation of a particular RPM set.
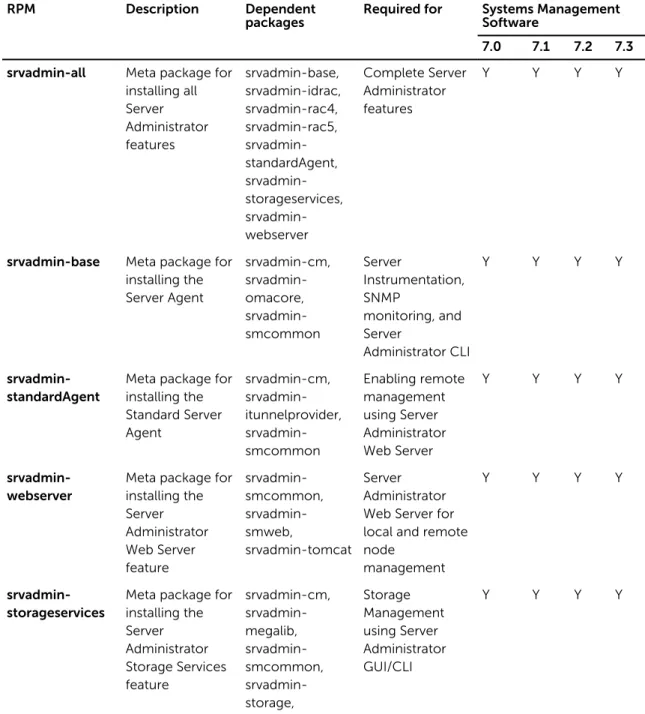
Table 7. Meta RPMs
Meta RPMs Details
srvadmin-all Installs all the components.
srvadmin-base Installs the Server Instrumentation component.
This component has to be installed before installing any of the other specific components.
srvadmin-idrac Installs the iDRAC component.
srvadmin-rac4 Installs the DRAC 4 component.
srvadmin-rac5 Installs the DRAC 5 component.
srvadmin-standardAgent Installs the Remote Enablement component.
srvadmin-storageservices Installs the storage services component.
srvadmin-webserver Installs the web server component.
srvadmin-server-snmp Installs the server Simple Network Management
Meta RPMs Details
srvadmin-server-cli Installs the server Command Line Interface (CLI)
component.
srvadmin-storageservices-snmp Installs the storage SNMP component.
srvadmin-storageservices-cli Installs the storage CLI component.
Related Links:
Linux Installer Packages
Custom RPMs Based Installation
The following is an example of custom RPMs-based installation of Server Administrator, including the installation of the Remote Enablement feature and the Storage Management Service components.
NOTE: On the Red Hat Enterprise Linux 5.x operating system, DVDs are automounted with the
-noexec mount option. This option does not allow you to run any executable from the DVD. You have to manually mount the DVD and then run executables.
1. Log in as root to the system running the supported operating system where you want to install the
managed system components.
2. Insert the Systems Management Tools and Documentation DVD into the DVD drive.
3. Navigate to the operating system specific directory corresponding to the system.
4. Type the following command:
rpm –ivh Server-Instrumentation/<arch>/*.rpm add-StorageManagement/<arch>/*.rpm
RemoteEnablement/<arch>/*.rpm
Server Administrator services do not start automatically.
NOTE: Ensure that you install Server Instrumentation or Remote Enablement before installing Remote Access Controller or Storage Management.
NOTE: If you choose to install the Remote Enablement feature, ensure that you install the dependent RPMs before installing this feature.
5. Start the Server Administrator services after the installation by using the command:
sh srvadmin-services start
NOTE: You can install Server Administrator on any system that meets operating system dependencies. However, after installation, certain Server Administrator services may not be started on unsupported systems.
NOTE: When Server Administrator is installed on a system, dependency issues related to RPMs may occur. To resolve these issues, install the missing RPMs from SYSMGMT/srvadmin/linux/ RPMS/supportRPMS/opensourcecomponents. If the RPMs are not available in this directory, install these RPMs from the operating system media. If not available on the media, search for these RPMs on the Internet.
Related Links:
Dependent RPMs for Remote Enablement
Using The Shell Script To Perform The Custom Installation
You can run the Server Administrator Custom Install script in an interactive mode. The basic usage of the script is:
Server Administrator Custom Installation Utility
The Server Administrator utility runs in an interactive mode if you do not specify any options, and runs silently if you provide one or more options.
The options are:
• [-c|--cimagent] — Installs Remote Enablement components.
• [-d|--dellagent] — Installs Server Instrumentation components. Including the granular components:
a. Server Administrator CLI Interface
b. Server Administrator SNMP Interface
c. Server Administrator Operating System Log Interface
• [-g|--agent] — Installs the Server Instrumentation agent only.* • [-h|--help] — Displays the help text.
• [-i|--cli] — Installs Server Administrator Command Line Interface.* • [-l|--oslog] — Installs operating system logging component.* • [-m|--snmp] — Installs Server Administrator SNMP component.*
• [-r|--rac] — Installs applicable RAC components and Server Instrumentation components. • [-s|--storage] — Installs Storage Management, Server Instrumentation, and Default Management
Interfaces'.
• [-t|--stragent] — Installs Server Instrumentation and Storage Management. This requires at least one management interface option in combination.*
• [-u|--update] — Updates applicable Server Administrator components. • [-w|--web] — Installs Server Administrator Web Server.
• [-x|--express] — Installs default components. Any other options passed will be ignored. The following components are installed::
a. Server Instrumentation
b. Storage Management
c. RAC, if applicable
d. Server Administrator Web Server
• [-z|--corecim] — Installs core CIM Interface.*
The following options can be used along with options stated above:
• [-a|--autostart] — Starts the installed services after components have been installed. • [-p|--preserve] — Preserves the screen without clearing the installation information.
NOTE: If you do not use the [-p | --preserve] option during the installation, the history information on the screen gets erased.
* — Options included for Linux granular installation.
Using The Shell Script To Perform The Installation In Interactive Mode
This installation procedure uses the srvadmin-install.sh to prompt you for the installation of specific
components.
1. Log in as root to the system running the supported operating system where you want to install the
managed system components.
3. Mount the DVD, if required.
4. Navigate to <OM DVD mount point>/SYSMGMT/srvadmin/linux/supportscripts.
5. Execute the script with the sh srvadmin-install.sh command and accept the terms of the
end-user license agreement.
Executing the command displays a list of component options. If any of the components are already installed, then those components are listed separately with a check mark next to them. The Server Administrator installation options are displayed.
6. Press <c>to copy, <i> to install, <r> to reset and start over, or <q> to quit. If you press <c>, you are prompted to enter the absolute destination path.
When the installation is complete, the script has an option for starting the services. 7. Press <y>to start the services or <Enter> to exit.
Using The Install Script To Run In Silent Mode
Perform these steps for a silent installation using the srvadmin‑install.sh shell script:
1. Log in as root to the system running the supported operating system where you want to install the
managed system components.
2. Insert the Systems Management Tools and Documentation DVD into the DVD drive.
3. Mount the DVD, if required.
4. Navigate to <OM DVD mount point>/SYSMGMT/srvadmin/linux/supportscripts.
5. To install the Storage Management Service components, type the command sh
srvadmin-install.sh --storage (long options) OR sh srvadmin-install.sh -s (short options) NOTE: Long options can be combined with short options, and vice-versa.
6. Start Server Administrator services after the installation by typing the command sh
srvadmin-services start.
NOTE: After installing Server Administrator, log out and then log in again to access the Server Administrator Command Line Interface (CLI).
Determining The Server Administrator Architecture
Use the following command to identify if the already installed Server Administrator is of 32-bit or 64-bit architecture
rpm -q --queryformat "%{NAME} - %{ARCH}\n" `rpm -qa | grep srvadmin`
The system displays a message identifying the architecture where, i386 refers to 32-bit and x86_64 refers to 64-bit.
Managed System Software Installation Using Third Party Deployment
Software
You can use third-party deployment software, such as Altiris Deployment Solution, VMWare Update Manager (VUM), or Linux Respository for Yellowdog Updater Modified (YUM), Rug, and Zypper, to install managed systems software on supported systems.
To distribute and install Server Administrator using Altiris Deployment Solution: 1. Start the Altiris application
2. Import OpenManage_Jobs.bin located at SYSMGMT\srvadmin\support\Altiris on the Systems
Management Tools and Documentation DVD
3. Specify a job folder to import OpenManage_Jobs.bin.
5. Schedule the job to run on the supported systems that are managed from the Altiris Deployment Solution.
NOTE: For more information on VMWare Update Manager, see Using the VMWare Update Manager
(VUM).
Linux Repository
The Linux Repository is the official repository for all related software and updates for your Linux systems. You can use this repository to complete the following tasks:
• Install Server Administrator
• Install drivers for all your Linux systems • Install BIOS and firmware updates
Setting Up The Linux Repository
Before you can start using the Linux Repository for installing software or upgrades, you must set up the
repository. For more information, see http://linux.dell.com/repo/hardware/.
Set up the repository with:
wget -q -O - http://linux.dell.com/repo/hardware/latest/bootstrap.cgi | bash NOTE: If you require 64-bit packages, uninstall the existing 32-bit packages before installing the new software. Server Administrator is designed to match your current operating system.
Installation Using Linux Repository
You can install Server Administrator using the Linux Repository by following any of the methods listed below:
NOTE: Ensure that you set up the Linux Repository before you install the software from the repository.
NOTE: Server Administrator will not install on unsupported systems. If you try installing Server Administrator on unsupported systems, you will receive a message that the system is not supported and the installation will fail.
Using YUM
NOTE: Ensure that you are using the latest version of YUM as the older versions do not support plug-ins or mirrorlists.
If you are using YUM with CentOS, or Scientific Linux, ensure that the plug-ins are enabled as the system connects to a system specific repository using a YUM plug-in. If the plug-in is not enabled, the repository will not work properly and you will not be able to install packages from the repository. Add the
plugins=1 line, to your yum.conf, if the plug-in is not enabled.
The following command line will work for Red Hat Enterprise Linux 5 and 6, CentOS, and Scientific Linux: yum install srvadmin-all
After the installation, type the following command to start the Server Administrator services: srvadmin-services start
Using RUG
You can install Server Administrator using rug for SLES 10 or higher. rug install srvadmin-base
rug install srvadmin-webserver rug install srvadmin-storageservices
NOTE: You must have setserial installed, if you want to install srvadmin-all.
Using ZYPPER
You can install Server Administrator using zypper for SLES 11 or higher. zypper install srvadmin-all
Uninstalling Managed System Software
To uninstall Managed System Software, log in as root.
Uninstalling Managed System Software Using The Uninstall Script
An uninstallation script is installed when you install Server Administrator. Execute the script by typing srvadmin-uninstall.sh and then pressing <Enter>.
Uninstalling Managed System Software Using The RPM Command
The individual components of systems management software can be uninstalled without uninstalling all of systems management.
To uninstall only the Server Administrator Web Server, use the command rpm –e `rpm -qa | grep
srvadmin-tomcat`.
During an uninstallation, files in which user settings are made are preserved with the .rpmsave file extension. Log files are also preserved after the uninstallation.
4
Installing Systems Management Software
On VMware ESXi
VMware ESXi is factory-installed on some systems. For a list of these systems, see the latest Systems Software Support Matrix. Use Server Administrator Web Server version 7.0 to access VMware ESXi 4.0 U3, VMware ESXi 4.1 U2, VMware ESXi 5.0 U1 systems.
Server Administrator is available as a .zip file for installing on systems running VMware ESXi. The zip file, OM-SrvAdmin-Dell-Web-<version>-<bldno>.VIB-ESX<version>i_<bld-revno>.zip, where <version> is the supported ESXi version.
Download VMware vSphere Command Line Interface (vSphere CLI) from vmware.com and install on the
Microsoft Windows or Linux system. Alternately, you can import VMware vSphere Management Assistant (vMA) to the ESXi host.
Using The vSphere CLI
To install systems management software on VMware ESXi using the vSphere CLI:
1. Copy and unzip the OM-SrvAdmin-Dell-Web-<version>-<bldno>.VIB-ESX<version>i_<bld-revno>.zip file to a directory on the system. For ESXi 5.0 and ESXi 5.0 P1, copy the unzipped file to the /var/log/vmware folder on the ESXi 5.0 U1 server.
NOTE: For ESX 4.x, you do not have to unzip the file.
2. Shut down all guest operating systems on the ESXi host and put the ESXi host in maintenance mode.
3. If you are using vSphere CLI on Windows, navigate to the directory where you have installed the
vSphere CLI utilities.
If you are using vSphere CLI on Linux, execute the command from any directory.
4. Execute the following command:
For VMware ESXi4.0/ESXi 4.1: vihostupdate.pl --server<IP address of ESXi host>-i -b
<path to Dell OpenManage file>
For VMware ESXi 5.0 U1: esxcli --server <IP Address of ESXi 5.0 host> software
vib install -d /var/log/vmware/<Dell OpenManage file>
NOTE: The .pl extension is not required if you are using vSphere CLI on Linux.
5. Enter the root username and password of the ESXi host when prompted.
The command output displays a successful or a failed update.
6. Restart the ESXi host system.
To get or list the information about the installed VIBs:
• For ESXi 4.x, use vihostupdate.pl --server <IP> --query or -q
• For ESXi 5.x, use esxcli --server <IP>software vib get or software vib list
• Server Administrator Instrumentation Service • Remote Enablement
• Server Administrator Storage Management • Remote Access Controller
Related Links:
Troubleshooting
Using The VMware vSphere Management Assistant (vMA)
The vMA allows administrators and developers to run scripts and agents to manage ESX/ESXi systems. For
more information on vMA, see vmware.com/support/developer/vima/.
1. Log on to vMA as an administrator and provide the password when prompted.
2. Copy and unzip the OM-SrvAdmin-Dell-Web-<version>-<bldno>.VIB-ESX<version>i_<bld-revno>.zip file to a directory on the vMA.
3. Shut down all guest operating systems on the ESXi host and put the ESXi host in maintenance mode.
4. In vMA, execute the following command:
For VMware ESXi4.0/ESXi 4.1: vihostupdate --server <IP address of ESXi Host> -i -b
<path to Dell OpenManage file>
For VMware ESXi 5.0 U1: esxcli --server <IP Address of ESXi 5.0 host> software
vib install -d /var/log/vmware/<Dell OpenManage file>
5. Enter the root username and password of the ESXi host when prompted.
The command output displays a successful or a failed update.
6. Restart the ESXi host system.
When you run the command, the following components are installed on the system: • Server Administrator Instrumentation Service
• Remote Enablement
• Server Administrator Storage Management • Remote Access Controller
Install the Server Administrator Web Server separately on a management station. After installing Server Administrator, enable the Server Administrator Services. Related Links:
• Troubleshooting
• Enabling Server Administrator Services on the Managed System
Using The VMware Update Manager (VUM)
To install Server Administrator using VUM:
1. Install VMware vSphere 5.x (vCenter Server, vSphere Client, and VMware vSphere Update Manager)
on a system running the Windows Server 2008 R2 SP1 (64-bit) operating system.
2. On the desktop, double-click VMware vSphere Client and login to vCenter Server.
3. Right-click vSphere Client host and click New Datacenter.
4. Right-click New Datacenter and click Add Host. Provide information for the ESXi server per online
5. Right-click the ESXi host added in the previous step and click Maintenance Mode.
6. From Plug-ins select Manage Plug-ins → download VMware Update Manager (The status is enabled
if the download is successful.) Follow the instructions to install the VUM client.
7. Select the ESXi host. Click Update Manager → Admin view → Patch Repository → Import Patches
and follow the online instructions to upload the patch successfully. The offline bundle is displayed.
8. Click Baselines and Groups.
9. Click create from Baselines tab, mention baseline name and select Host Extension as baseline type.
Complete the rest as per instructions.
10. Click Admin View.
11. Click Add to Baseline (against the uploaded patch name) and select the baseline name that you have
created in step 8.
12. Click Compliance view. Select the Update Manager tab. Click Attach and select the Extension
Baseline created in step 8 and follow the instructions.
13. Click Scan and select Patches & Extensions (if not selected by default) and click on Scan. 14. Click Stage, select created Host Extension and follow the instructions.
15. Click Remediate and follow the instructions once the staging is completed.
Server Administrator installation is complete.
16. Reboot the host.
NOTE: For more information on VMware Update Manager, see the VMware official website.
NOTE: You can install Server Administrator from the VUM repository, https://
vmwaredepot.dell.com/.
Using The Power CLI
To install Server Administrator using Power CLI:
1. Install the supported PowerCLI of ESXi on a supported Windows system.
2. Copy the OM-SrvAdmin-Dell-Web-<version>-<bldno>.VIB-ESX<version>i_<bld-revno>.zip file to the ESXi host.
3. Navigate to the bin directory.
4. Run Connect-VIServer and provide the server and other credentials.
5. Log on to the ESXi host using supported vSphere CLI of ESXi 5.0 U1 and create a datastore.
6. Create a folder OM-SrvAdmin-Dell-Web-<version>-<bldno>.VIB-ESX<version>I on ESXi 5.0 U1 host under /vmfs/volumes/<datastore_name> directory.
7. Copy the ESXi zip file on ESXi 5.0 U1 host
to/vmfs/volumes/<datastore_name>OM-SrvAdmin-Dell-Web-<version>-<bldno>.VIB-ESX<version>I directory.
8. Unzip the zip file in the above specified directory.
9. Run the following command in Power CLI Install-VMHostPatch -VMHost 10.94.171.97 -
HostPath /vmfs/volumes/<datastore_name>name>/OMSrvAdmin- Dell-Web-<version>-<build ID>.VIBESX<version>i/ cross_oem-dell-openmanage-esxi_<version>-0000- metadata.zip