Chapter 1 - Introduction
OverviewThe CudaTel Communications Server is an integrated hardware and software solution that is a simple, affordable, and feature-rich telephone system. The system has no per-user license fee and supports a virtually unlimited number of users. Advanced models support hundreds of concurrent calls. The system can be pure VoIP (Voice over Internet Protocol) or it can blend VoIP with traditional phone service, such as analog phone lines and PRI circuits. This guide provides concepts and general guidance the administrator needs to understand how to best configure the CudaTel Communications Server according to the organization’s deployment needs, policies and telephony infrastructure. When referring to specific feature settings, the guide will specify the name of the page in the Web UI in uppercase letters, followed by a right arrow ( > ) and the actual section name. For example, you can view system performance statistics on the SYSTEM DASHBOARD > Performance page.
‘SYSTEM DASHBOARD’ is the name of the page and ‘Performance’ is the name of the section on that page.
CudaTel Communications Server Features
Using the Web-based administration interface (UI), you can completely configure your phone system and perform administrative functions. All models of CudaTel Communications Server include these features:
• Unlimited extensions, telephones, and users • LDAP synchronization
• Local users, groups, and policies • Group calling
• Follow-me
• SIP telephones, including soft-phones • SIP providers
• Analog phone lines (model 270B) • PRI circuits (models 370B, 470B, 670B) • Trunk groups
• Inbound call queues • Multi-party conferences • Automated attendants (IVR)
• List-based and rule-based call routing • Call Monitoring, recording, and bridging • Automatic provisioning of telephone sets CudaTel Communications Server Models
Model 270 Model 370 Model 470 Model 670
Capacity Concurrent Call
Support 10 50 100 250
Conferences 2 5 15 50
User Support Unlimited Unlimited Unlimited Unlimited
Voicemail Storage 50 GB 50 GB 200 GB 200 GB
Hardware
Rackmount Chassis 1U Mini 1U Mini 1U Mini 1U Fullsize
Dimensions (in) 16.8 × 1.7 × 14 16.8 × 1.7 × 14 16.8 × 1.7 × 14 16.8 × 1.7 × 22.6 Dimensions (cm) 42.7 × 4.3 × 35.6 42.7 × 4.3 × 35.6 42.7 × 4.3 × 35.6 42.7 × 4.3 × 57.4
Weight (lbs./kg.) 12 lb/5.4kg 12 lb/5.4kg 12 lb/5.4kg 26 lb/11.8 kg
Ethernet 2 × 100 2 × 100 2 × 100 2 × Gigabit
AC Input Current
(Amps) 1A 1.2A 1.4A 1.8A
Solid State Boot Disk YES YES YES YES
Echo Cancellation YES YES YES YES
ECC Memory YES
Redundant Disk
Array (RAID) YES
Optional Phone Line
(TDM) Hardware 4 Analog (FXO) Single T1/PRI Dual T1/PRI Quad T1/PRI Features
Call Conferencing YES YES YES YES
Voicemail YES YES YES YES
Voicemail Email
Integration YES YES YES YES
Automated Attendant
(IVR) YES YES YES YES
SIP Voice/Video
Client Support YES YES YES YES
SIP Provider Support YES YES YES YES
High-Definition
Audio YES YES YES YES
Windows Active
Directory Integration YES YES YES YES
LDAP Support/User
Import YES YES YES YES
Call Recording YES YES YES YES
Performance
Monitoring YES YES YES YES
Automated Phone
Provisioning YES YES YES YES
Customizable
Chapter 2 - Getting Started
Initial SetupBegin by unpacking your new CudaTel Communication Server unit. Consult the checklist and directions in this section for instructions on how to proceed.
Unpacking checklist
• CudaTel Communcations Server • Power cord
• Ethernet cable
For model 270B, also included are two telephone Y-cables Required equipment for installation
• VGA monitor (recommended) • PS/2 keyboard (recommended)
• 1U space in 19" rack or other suitable location • Climate controlled environment
• A/C power
• Uninterruptible power supply (recommended)
Physical installation of CudaTel Communications Server
• Secure the CudaTel Communication Server in a 19" rack or other suitable location • Be careful not to block the cooling vents on the front and rear of the unit
• Connect a CAT5 or CAT6 patch cable to the LAN Ethernet port on the front of the unit
• Connect power, monitor, and keyboard • Press power button
Configure IP address and network settings • Wait for system to fully boot up
• At the Administrative Console prompt login • Username: admin Password: admin
• Use the TAB key to move and the ENTER key to select
• Configure the IP address, subnet mask, default gateway, and optional primary DNS and secondary DNS
• Save changes
Configure corporate firewall
Open up the following ports in your firewall:
Port Direction TCP UDP Usage
22 In/Out Yes Yes RemoteSupport*
53 Out Yes Yes DNS
80 Out Yes No Firmwareupdates
123 In/Out No Yes NTP
5065 In/Out Yes Yes Custom SIP port
16384-32768 In/Out No Yes RTP Ports
* Access via port 22 is required only if technical support is requested Before Configuring The PBX
Once the CudaTel Communications Server is physically installed and on the network you may start setting up the features of the phone system. The next section is a brief telephony primer for IT staffers. Following that is a set of instructions to assist the IT personnel on getting their PBX configured correctly and ready for production. The chapters thereafter can be used as a reference for the UI.
Telephony Primer
The convergence of telephones and computers has put some IT staffers in a difficult position, namely, to act as the administrator of the company telephone system. Telephone service has been around since the late 19th Century, but until recently it has been an isolated industry. Over the past decades, telephony has inspired its own set of concepts and terminology - terms that may have little meaning even for the most experienced of IT administrators. The following pages contain a brief introduction to telephony and PBX concepts that will aid the IT staff in getting up to speed quickly.
A telephoneis simply a device that lets a user establish a voice connection to another person in the office, outside the office, or to a resource such as a voice messaging system. Some telephones can be connected directly to telephone linesfrom the phone company. These are calledanalogphones and they connect toPOTS lines. (POTS stands for "Plain Old Telephone Service.") Home telephone lines are POTS lines. Other telephones are digital in nature and can only be connected to certain types of phone lines. A special kind of digital telephone is aVoIPphone. (VoIP stands for "Voice over Internet Protocol.") The CudaTel Communications Server supports VoIP phones from manufacturers such as Aastra, Cisco, Polycom, and Snom.
A PBXis a telephone system, which is a kind of server for telephones. (PBX stands for "Private Branch eXchange.") Other terms used for telephone system are key system, hybrid, andIP-PBX. There are technical differences between these types of telephone systems, however they all share a common function: they allow people to talk to each other using telephones. The telephones connected to a phone system can dialother telephones connected to the system. Usually a telephone system has one or more connections to the PSTN- the Public Switched Telephone Network. The PSTN is a network for connecting voice calls, just like the Internet is a network for connecting IP-enabled systems. Loosely
speaking, public IP addresses on the Internet are analogous to telephone numbers. (While this analogy is imperfect, it certainly conveys the idea behind the PSTN to someone familiar with the Internet.)
The CudaTel Communications Server is a unique type of IP-PBX. (An IP-PBX is an Internet Protocol-based telephone system.) Think of it as a server for your VoIP telephones. Like most servers, it has a range of configuration options. Many of these options relate to what users can do with their telephones as well as special features that go beyond what a
traditional PBX usually offers. In order to take advantage of these features, and really to set up your system most effectively, it is important to understand those features. It is also important to be familiar with some concepts and terminology that are used in the CudaTel Communications Server. Those terms and concepts are detailed below.
Phone. A phone refers to a physical telephone that sits on one's desk, or a soft-phone. A phone is a software-based telephone that runs on a computer. An example of a
soft-phone is X-Lite from CounterPath Corp.
Extension. An extension is quite simply an endpoint. It can be a physical telephone or a soft-phone but is not limited to these devices. Other resources (see below) can also be extensions, such as multi-user conferences, call queues, and automated attendants. Provisioning. Provisioning refers to the process of making the CudaTel Communications Server aware of a SIP hard phone. SIP hard phones have an option to be provisioned by a central server; the CudaTel Communications Server acts as that provisioning server and performs any necessary programming and firmware updates. When a phone gets
provisioned it receives an extension number assignment from CudaTel Communications Server and initially appears in the list of unassignedphones. An unassigned phone is available to be assigned to a user.
Extension Number. An extension number is what is actually dialed to reach an extension. In the CudaTel Communications Server, extensions and extension numbers are functionally equivalent.
Primary Extension. Each telephone has a specific extension number that is the primary extension. The primary extension number is also the voicemail box number. If a telephone has more than one extension appearing on it, the primary extension is the "main" extension number for the telephone.
External Number. An external number is a phone number supplied to you buy a telephone service provideror TSP. In the CudaTel Communications Server, external numbers alway refer to phone numbers that people outside of your organization will dial to reach your users.
Line. Lines can be a confusing concept because they are different from, but closely related to, extensions. A line is quite simply therepresentation of an extension. Physical telephones generally have one or more buttons that each correspond to a line. For example, a Polycom SoundPoint IP telephone has two line buttons(or line keys), that are by default labeled "Line 1" and "Line 2." Line 1 is always theprimary extensionassigned to the telephone, regardless of how many line keys the phone may have. The other line keys, though, can be assigned to other telephones' primary extensions. These are called shared lines. Thus, "Line 2" on your phone could be an extension of someone else in your office. Some phones
support BLF(BLF stands for "Busy Lamp Field") which means that the light on the button will turn on when that person's phone is in use.
Power Over Ethernet. Power Over Ethernet (POE) is a feature of newer network switches that allows VoIP phones to be powered over the LAN cabling instead of using a plug-in wall adapter. Both the switch and the VoIP phone must support this feature for it to be used. (Most modern VoIP phones support POE, however older models sometimes do not.)
Queue. A queue is a logical means of keeping callers on hold but in a particular order. It is identical to a traditional queue, such as at the bank, where patrons wait in line for the next available teller. While a caller is in the queue, he is on hold and can hear music and other announcements, which are customizable in the CudaTel Communications Server.
Queue Agent. A queue agent is a telephone system user whose function is to answer calls that are in queue. Agents can generally belong to more than one queue. For example, a bilingual agent could belong to two different queues, one for each language he or she speaks. The agent will receive calls from both queues.
Agent Access Extension. An agent access extension is an extension on the system that a CudaTel Communications Server user may call in order to answer the next call in a queue. Each queue on the system can have one or more agent access extensions. Any user with permission to call the agent access extension number may dial and answer a call in queue, even if the user is not an agent for that queue. Each call to the agent access extension will answer just a single call in queue.
Conference. A conference (or amulti-party conference) is an extension on the phone system that allows more than two callers to speak simultaneously. A conference may be secured with a PIN so that only those who know the PIN may enter the conference. It is common for conference participants to mute their phones when they are not speaking so that background noise does not disrupt the conference.
Automated Attendant. An automated attendant (orAA) is a menu-based call routing system. It is a form of Interactive Voice Response, or IVR. An automated attendant can answer calls and route callers. The AA will play a recorded greeting to the caller and offer him or her choices in the form of a menu. The caller dials a digit in response, and the AA routes the caller accordingly. An automated attendant may optionally allow the caller to dial a CudaTel Communications Server user's extension number and immediately transfer the caller to that extension.
List-Based Router. A list-based router is similar to an automated attendant, however it is non-interactive, meaning that the caller does not choose the actions performed. Instead, the router has a list of actions to perform for the caller. Usually the actions are playing recorded prompts and transferring the caller to another extension.
Rule-Based Router. A rule-based router is similar to a list-based router in that it is non-interactive. However, it routes the caller based upon factors such as time of day, day of week, and specific date (i.e. special routing for holidays). An example of a rule-based router is to route calls based upon a business being open or closed. During business hours the router will send callers to an automated attendant or a live operator's extension, but after hours it will send the callers to a different automated attendant that greets callers with an "after hours" recording.
Call Detail Record. A call detail record (orCDR) is a set of data fields that gets recorded for each call made or received by the phone system. Typically, all CDR's will have certain fields such as call start and end times, dialed phone number, etc. In the CudaTel Communications Server, CDRs can be exported in CSV format for importing into a spreadsheet for more detailed analysis.
SIP. SIP stands forSession Initiation Protocol. It is a protocol similar to HTTP. It allows for the creation ofmedia streams. In the CudaTel Communications Server a media stream is usually a voice call, but can also be a video call. Media streams usually conform to the RTP or Realtime Transport Protocol. SIP and RTP are well-documented protocols that can be studied further if you so desire.
ISDN.ISDN, orInteractive Systems Digital Network is a type of telephone service supplied by a traditional telephone company.
PRI. PRI stands forPrimary Rate Interface ISDN. In many countries, large enterprises have one or more PRI circuits to carry their voice traffic. In the United States and Canada, a PRI circuit can handle 23 calls simultaneously. In Europe and Mexico, PRI circuits can carry 30 simultaneous calls.
Analog Port. An analog port on the CudaTel Communications Server is where a standard telephone line connects to the system. It uses a standard 4-conductor RJ14 jack.
Digital Port. A digital port is where aPRIcircuit connect to the system. It uses a standard 8-conductor RJ45 jack.
Trunk Group. A trunk group is simply a logical group of phone lines. Both analog and digital lines can be put into a trunk group. Trunk groups are used for routing calls. An example: you have four analog phone lines in your CudaTel Communications Server. When a user on your system dials an outside phone number, the system will choose an available line from the trunk group. This prevents users from having to know which phone lines are available or are in use. Digital trunks can also be grouped together to create very large pools of phone lines. This is common in a call center environment or other enterprises where there is heavy telephone traffic.
Service Provider. In the CudaTel Communications Server, a service provider is an external entity that supplies voice connection services. It is analogous to an ISP or Internet Service Provider.VoIP Providerssupply a SIP account that allows the CudaTel Communications Server to send and receive VoIP calls on the PSTN. Traditional telephone service providers are telephone companies, or telco. These provide tradition PSTN connections such as analog phone lines or PRI circuits.
Provider Account. A VoIP provider will supply you with an account. The account has details such as user, password, host address, host port, realm, etc. These details are necessary to have when setting up a VoIP provider in the CudaTel Communications Server.
Number Route. Number routes are a means of routing inbound or outbound calls based upon the digits that are dialed. Number routes are created by using Regular Expressions. (See Appendix A for more information on Regular Expressions.) Number routes can be very specific patterns or very general patterns. An example of a specific pattern is "911". If a CudaTel Communications Server user dials the exact series of digits, 9 1 1, then this pattern is matched. (In the CudaTel Communications Server this is a predefined pattern called "emergency.") A more general pattern is something like "any seven digits" or "any ten digits" dialed. By using number routes, the system can be configured to allow or restrict certain groups of users from dialing certain patterns. Additionally, certain number routes can be assigned to specific service providers, for example domestic dialing could go to one provider and international to another.
Music On Hold. Music on hold (MOH) is a feature that allows callers who are in queue or on hold to hear music or other recorded announcements. The CudaTel Communications Server allows you to have unlimited MOH schemes. Related to MOH is the Sound Promptsfeature. You can define sound categories and upload pre-recorded sound files to your CudaTel Communications Server system. Using MOH and sound prompts it is possible to create sophisticated and caller-friendly audio prompts.
Basic PBX Configuration
Once the corporate network is properly configured (see Initial Setupearlier in this chapter) then PBX configuration can begin in earnest. The basic steps are:
* Gather user information
* Identify physical telephones to setup * Configure users and phones
* Configure features like automated attendants, queues, MOH, and conferences * Configure telephone service providers
Users And Telephones
Gather a list of users and phones to configure. If you are using Active Directory sync then you only need a list of phones. (See Active Directory/LDAP in Chapter 8 for more information.) One other feature to keep in mind is autoprovisioning. The autoprovision feature allows the CudaTel Communications Server to detect and automatically provision any SIP telephone that is plugged in to the LAN. The only drawback to this feature is that it attempts to provision everytelephone that it detects on the network, so it should not be used if you have an existing VoIP system in production on your LAN. If you are doing a "clean" install then the autoprovision feature will speed the process. (See Settings -Automatic Provisioningin Chapter 8 for more information.) If autoprovisioning is not used then you will need to manually set each phone to look for the CudaTel
Communications Server to get its provisioning information.
Once you've gathered your information about users and phones you can begin creating the users in the system and provisioning your telephones. The basic steps are as follows: * Connect telephone to network
* Manually configure phone to get provisioning information from CudaTel Communications Server
* Add new user in admin UI * Assign phone to user
Repeat the steps for each phone and user. (See Chapter 4 for detailed information on adding users and provisioning telephones.) After each user is created and has a phone assigned, he or she can then set up voicemail by dialing *98and following the voice prompts. At this point you can begin configuring queues, conferences, and automated attendants. (You can create these first if you wish, but it is easier to configure and test these features if you have at least a few users and telephones configured.) Lastly, configure your telephone service provider connections. In some cases you may need to do this after business hours, such as when migrating from a PBX that you are replacing. (See Chapter 6 for more information on managing service providers and telephone company connections.)
Chapter 3 - System Dashboard
IntroductionLike all servers on your network, the CudaTel Communications Server requires some means of monitoring activity and status. The System Dashboard provides a simple yet elegant way of quickly seeing what is happening with your telephone system. The dashboard's features are described in this chapter.
Updates and Support
This section provides important information on the status of your energize updates, firmware revision, and support information:
System - System model and serial number Firmware - System firmware revision number
Energize Updates- Energize update status, expiration information
Instant Replacement- Instant replacement service status, expiration information Premium Support - Premium support status, expiration information
Phone Status
This section displays basic information about the telephones and extensions on the system: Configured phones - Total number of telephones that have been provisioned to this system Assigned to users- Number of provisioned phones that are assigned to users
Unassigned phones- Number of provisioned phones not currently assigned to a user Phones on-line- Number of telephones that are on-line and connected to the system (includes phones that are idle and in use)
Available Extensions- Number of extension numbers available to be assigned to phones, users, etc. (Extension number ranges are configured in System Configuration > Extensionstab)
System Performance
This section displays important information about system performance: Firmware Storage - Amount of storage space available for firmware
Voice Mail Storage - Amount of storage space available for voice mail messages CPU Load- Load percentage on CPU
CPU Temp- Temperature of the CPU
System Temp -Temperature inside the system's case CPU Fan- Speed of CPU fan
System Fan- Speed of system fan
Telephone Service Providers
This section displays the status of external connections from telephone providers. If no providers are configure then there will be a clickable link that takes you to the Telephone Service Providers page. Information is available for each provider listed:
Status
Displays "Active" or "Inactive" to reflect the status of the service provider Name
Provider's name as displayed in various UI pages Direction
Indicates whether the connection is for inbound calls, outbound calls, or both. Voicemail Statistics
This section gives statistics on voicemail messages and storage.
Read- Number of read voicemail messages and storage time in minutes and seconds Saved - Number of saved voicemail messages and storage time in minutes and seconds Unread- Number of unread voicemail messages and storage time in minutes and seconds Total - Total number of voicemail messages and storage time in hours, minutes, and seconds
Active Call Information
This section shows information on all calls that are currently in progress and up to the last five completed calls.
Direction - Call direction (inbound or outbound) Caller Name- Name of calling party
Caller Number - Caller ID number (or extension number) of calling party Destination Name - Name of called party
Destination Number- Destination phone number (i.e. dialed phone number) of the called party
Network and Call Statistics
This section provides graphs for monitoring network activity over the last hour.
Sessions - Number of sessions, that is, number of call legs (a normal call has two call legs: the caller and the called party)
Chapter 4 - Managing Telephones and Users
IntroductionThe CudaTel Communications Server functions like many servers in that it serves the needs of users. Users can belong to groups, their conversations can optionally be recorded, and they can have contact information assigned to their user accounts. Administration of users and groups is therefore very important. Closely related to users are telephones and
extensions. Each user has one or more telephones, and each telephone has a primary extension number and the potential to have other line appearances. All of these are managed from thePeople, Groups, and Phonespage on the admin UI.
Adding Phones
Connecting SIP phones to your CudaTel Communications Server is very simple. After powering up a phone and connecting it to the LAN, provisioning has two steps: specify the provisioning server in the phone's configuration, and reboot the phone. The CudaTel Communications Server is the provisioning server. Each manufacturer has a different procedure for specifying the provisioning server. Instructions for Cisco, Polycom, and Snom phones are presented in this chapter.
A note regarding the provisioning of a phone: when a phone receives its provisioning from the CudaTel Communications Server it is assigned a temporary extension number. You can see this by going to the People, Groups, and Phonespage, then click the drop-down selector and choose Unassigned Phones. All of the phones listed on this page are
provisioned (that is, the CudaTel Communications Server is aware of them) but they have not been assigned to a user yet.
Figure 4.1: A list of unassigned telephones that are ready to be assigned to users.
The list shows the temporary extension number, manufacturer, and MAC address of each unassigned phone.
When provisioning a brand new phone it is recommended that you plug it in to the LAN and let it boot up completely before you start configuring it.
POLYCOM PHONES
Polycom phones are best configured via the phone itself
Boot (or reboot) the phone. Press the Setupbutton before the countdown finishes Password: Dial456
Scroll down to Server Menuand press select ChangeServer TypetoHTTP
ChangeServer Address to http://x.x.x.x/provision where x.x.x.x is the IP address of the CudaTel Communications Server
PressExit repeatedly until theExit Option menu appears. SelectSave & Reboot and let the phone reboot
The phone will reboot several times and display various messages about updating BootROM, formatting file system, etc.
Wait until the phone finishes updating before assigning it to a user
Total boot cycle can take 5-10 minutes (Newly unboxed phones generally take longer to provision because CudaTel Communications Server will update the phone's firmware)
To save time you can provision multiple phones simultaneously SNOM PHONES
NOTE: Snom phones require a minimum firmware version 7.0 - see http://wiki.snom.com/Firmware/V7/Automatic_Update for more information
Snom telephones have a simple Web server for configuring the phone.
Point a Web browser to http://x.x.x.x where x.x.x.x is the IP address of the Snom phone. The web interface will appear
Click Advanced -> Update tab
Click Update policy drop-down, select Update automatically
Setting URL: x.x.x.x/provision/{mac}.xml (x.x.x.x = IP addr of CudaTel Communications Server)
Click Save, Click Reboot
NOTE: It is not uncommon for Snom phones to require several reboots. If you see a message in the display on the phone that says "Wrong firmware, press any key" then go ahead and press any digit on the keypad. Allow the phone to reboot a few times and it will eventually get the correct firmware. Total process takes about 5 minutes.
CISCO PHONES
For Cisco phones please download the latest technical bulletin for CudaTel and Cisco phone sets
http://www.cudatel.com/support AASTRA PHONES
Aastra phones have a simple Web server for configuring the phone.
Point a Web browser to http://x.x.x.x where x.x.x.x is the IP address of the Snom phone. The web interface will appear
Log in and then click Configuration Server Select TFTP as server type
Input the IP address of the CudaTel Communications Server as the server address Click Save and then click Restart
Adding Users
Active Directory Synchronization on theSystem Configuration page. Once users are added, whether manually or by Active Directory synchronization, you may update their configurations on thePeople, Groups, and Phonespage. See Chapter 8 for more information on using the Active Directory Synchronization feature.
To add a user:
Click Add New...and selectPerson (new window appears) Enter values for first name, last name, and PIN
Select a group for this user (optional; can also add groups later)
Choose a method for assigning an extension by clicking the drop down and selecting one of the following:
Select by choosing a phone: Select a phone from the list
NOTE: The temporary extension number from the telephone will become the new user's primary extension number.
Select an extension for the person: First free extension
Single extension (manually select extension number)
Block extension (manually select range of extension numbers) Click Add
Editing Existing Users
Click thePeople, Groups, and Phonesicon Click the person's name in the list
To delete the extension: click the gray X icon
To rename the extension: click the pencil (edit) icon
To change the call recording policy: click the red record button icon To change the extension number: click the 1>2 (change extension) icon
Figure 4.2: Editing A User Assigning Phones to Users
Existing users can have one or more telephones assigned. In most cases having a single telephone assigned to a person is sufficient.
To add a phone to an existing user:
Click thePeople, Groups, and Phonesicon Click the person's name in the list
Locate theExtensionssection (The first extension listed is the primary extension) Click theAdd a Phone button (new window appears)
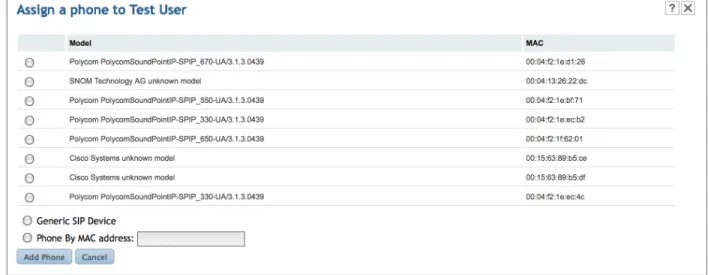
Select a phone from the list by clicking the radio button Click Add Phone
The phone will reboot and is immediately assigned to this person
Figure 4.3: Assigning A Phone To A User To add an extension or external DID to an existing user:
Click thePeople, Groups, and Phonesicon Click the person's name in the list
Locate theExtensionssection (The first extension listed is the primary extension) Under Add Extensionclick the drop-down list
Select one of the following:
Next Free Extension- Automatically choose the lowest extension number that has not yet been used
Single Extension- Manually key in the extension number for this person Block Extension- Choose an extension number range for this person
External Number- Choose an external DID phone number that will ring to this user's phone
Click Apply
NOTE: When a DID is assigned to a user's extension, outbound calls from that extension will use the DID number as the Caller ID information that is sent to the called part. This behavior can be overridden in the telephone service provider setup. See Chapter 6 for more details.
Adding A Soft Phone
Adding a soft phone in the CudaTel Communications Server is very simple. The CudaTel Communications Server will automatically create an authorization username and password for your soft phone. Simply copy and paste those values into the appropriate fields in your
soft phone configuration.
To add a soft phone to an existing user:
Click thePeople, Groups, and Phonesicon Click the person's name in the list
Locate theExtensionssection (The first extension listed is the primary extension) Click theAdd a Phone button (new window appears)
Click the radio button next to Generic SIP Device Click Add Phone
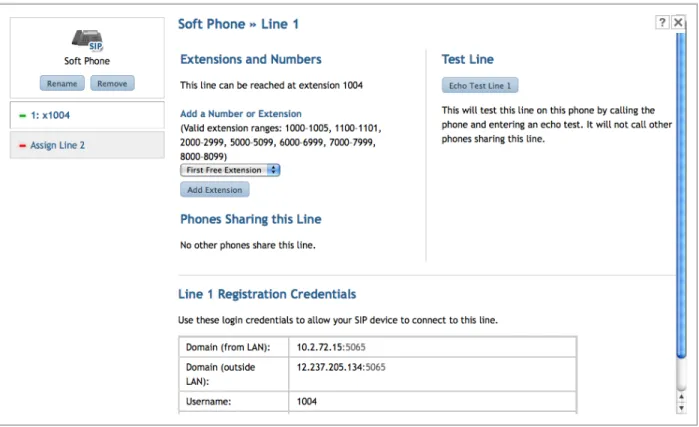
Once the phone is added it will be display in the user's list of phones Click the phone icon (new menu appears) and then click Edit Phone
Click the extension for Line 1. In figure 4.4 this would be displayed as x1004:
Figure 4.4: Details For A SIP Soft Phone (Generic SIP Device) Scroll down to see the registrations credentials for this SIP phone Adding Groups
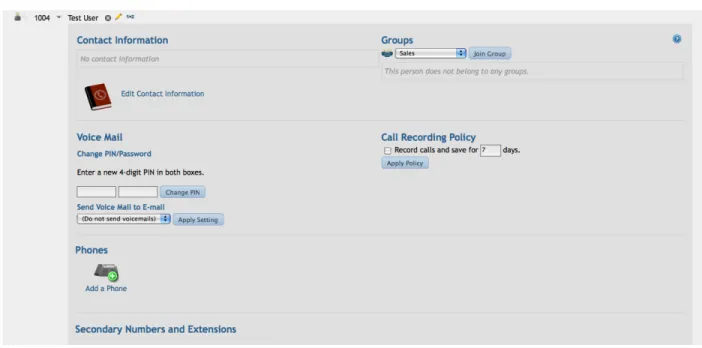
A group is a convenient way to allow a call to ring multiple telephones simultaneously. Add users to a group and assign an extension number to the group. When the group's extension number is dialed, all phones belonging to each user in the group will ring. On the People, Groups, and Phones page, click the filter drop-down and chooseGroupsto see which groups are already defined.
To add a group:
Click thePeople, Groups, and Phonesicon Click Add New...and select Group
Enter the name for the group
Select the extension number for the group Click Add
The new group will now appear in the list To add or remove a person from a group:
Click thePeople, Groups, and Phonesicon Click the person's name in the list
Locate theGroupssection
The system will list any groups that this person already belongs to To remove a person from a group:
Click the gray X icon next to the group name (user is immediately removed) To add a person to a group:
Click the drop-down list and select a group name Click Join Group(user is immediately added) Adding Contact Information
CudaTel Communications Server allows you to add optional contact information to each user.
To add a contact number:
Click thePeople, Groups, and Phonesicon Click the person's name in the list
Locate theContact Information section
The system will list any contact information that this person already has Click Edit Contact Information
Click the drop-down to select the contact information field you wish to modify Enter the contact information in the box
Click Add
Voice Mail Settings
Change the user's PIN by selecting and verifying the four-digit number
Enable voice mail to email by selecting an email address from the drop-down list NOTE: You must have at least one email address defined in the contact information Recording Policy
The CudaTel Communications Server can record all phone calls to or from this user. Recorded calls are retrieved from the CDR page. (See Chapter 7.)
CheckRecord callsand enter in the number of days for which to save this user's recordings
Chapter 5 - Features: Queues, Parking, Conferences, and
Automated Attendants
Introduction
The CudaTel Communications Server supports many features that are traditionally only associated with larger PBX installations. Among these are queues, call parking, multi-user conferences, and automated attendants. The queues feature allows you to add automatic call distribution (ACD) style routing for incoming calls. Call parking is a PBX Multi-user conferences allow many persons to share a voice connection in an audio conference room. Automated attendants give you access to advanced call routing features, such as routing based on time/date and caller ID.
Queues
The queue system in CudaTel Communications Server is a simple first-in, first-out (FIFO) queuing system. Callers transferred into an inbound call queue will be answered in the order they went in. Callers hear music on hold (MOH) while they are in queue. Also, optional break-in announcementscan be assigned to the queue. These announcements play at specified intervals. The MOH will will be interrupted by one or more recorded
announcements. This allows you to create user-friendly queues with helpful messages to play to the callers.
To add a new queue:
Click theInbound Call Queuesicon
Click Add New Queue(New window appears) Enter a name for the queue
Click theMusic On Hold drop-down and select a MOH scheme Select an extension number for the queue
Click Add
Now that the queue has been created you can add/remove agents and assign break-in announcements.
To modify a queue:
Click the queue name in the list of queues (new view appears) To delete the queue: click the gray X icon
To rename the queue: click the pencil (edit) icon
To change the extension number: click the 1>2 (change extension) icon Edit the following attributes as desired:
Agents
Music on Hold
Modify the Music on hold scheme by clicking the drop-down and selecting a new scheme name
Break-in Announcements
Click the first drop-down to select a sound file category Click the second drop-down to select a specific file
Click thePlay button to listen to the selected file (optional)
Click Addto add the file (repeat as needed - add as many sound files as required) Change the frequency of the announcements if desired (default is 15 seconds) Secondary Extensions
Add or remove secondary extensions here Agent Access Extensions
Add or remove agent access extensions here
Figure 5.1: Editing A Queue Call Parking Extensions
Call parking is the way a PBX system puts a call on hold in such a way that it can be
retrieved from another location. In the CCS a call parking extension is always assigned as a block:
The first extension in the block is an automatic parking extension. Transfer a call to this extension and the system will automatically park the call and then tell the user where to
retrieve the call.
The middle extensions in the block are manual call parking locations. Transfer a call to an unoccupied parking extension to park it. Dial the extension number to retrieve it.
The last extension in the block is an automatic retrieval extension. Calling this extension will automatically retrieve the first parked call in this call parking extension.
To add a call parking extension:
Click the Call Parking Extension icon Click Add New Parking Extension... Select the extension number range
Select the music on hold to use for callers parked here Click Apply
Figure 5.3: Editing a Call Parking Extension
Multi-User Conferences
The CudaTel Communications Server allows you to create
pre-defined multi-user conferences. Conferences can be
optionally locked with a PIN so that a caller may not enter a conference without first entering thatconference's PIN. Conferences have music on hold (MOH) that is played if there is only one person in the conference. There is no limit to the number of conferences that you can define on the system.
To add a new conference:
Click theMulti-User Conferencesicon Click Add New Conference...
Enter a name for the conference
Select an extension number for the conference
Click theMusic On Hold drop-down and select a MOH scheme Click Add
Click theMulti-User Conferencesicon
Click the conference name in the list (new view appears) To delete the conference: click the gray X icon
To rename the conference: click the pencil (edit) icon
To change the conference PIN: click the key (change PIN) icon
To change the extension number: click the 1>2 (change extension) icon Automated Attendants
The CudaTel Communications Server allows you to route calls with three related features: automated attendants, list-based routers, and rule-based routers. Automated attendants are simple voice menus that allow a caller to make a select and be routed accordingly. The routers are non-interactive, meaning that the caller does not choose the routing. A list-based router is simply a list of steps to perform on a call. A rule-list-based router is a logic tree that allows a call to be routed to different destinations based on time of day, day of week, date, etc. In a rule-based router, conditions are tested in the order they are listed. The router will act on the first condition that is met. There is also a default destination extension to which the call will be transferred if no conditions are met. Using these elements together you can build elegant call answering systems that handle holidays, business hours, and the like. An automated attendant or a call router can transfer to any extension on the system, and extensions can be user telephones, queues, conferences, or other routers and
automated attendants.
To add an automated attendant:
Click theAutomated Attendantsicon Click Add New...
Click Automated Attendant(new window appears) Enter a name for the automated attendant
Select an extension number for the automated attendant by clicking the drop-down Select files for the various greetings (see below for descriptions of each greeting type) Click Addto save the new automated attended
Follow the steps to modify the new automated attendant To modify an existing automated attendant:
Click theAutomated Attendantsicon
Click the automated attendant's name in the list (new view appears) To delete the automated attendant: click the gray X icon
To rename the automated attendant: click the pencil (edit) icon
Modify the following as needed: Sound Files
Click Configure Sound Files(new view appears)
Figure 5.2: Configuring Sound Files For An Automated Attendant
Modify these as needed:
Greeting Sound- Sound file that plays the entire greeting, including menu options (required)
Short Greeting Sound - Sound file that contains just the menu options, for example, when repeating the options to the caller (optional)
Invalid Sound - Sound to play when caller presses invalid digit (optional) Exit Sound - Sound to play when exiting the menu (optional)
Click Save to save the sound configuration or cancel to discard
Use the play andstopbuttons to listen to the sound file on your computer Keypad Entries
Click on a digit on the keypad to modify the action for that keypress. For example, to change what happens when the caller presses the digit 5, click the 5on the keypad. You will see "When The Caller Presses 5" in the display.
Click the drop-down menu and select an action: Do nothing- this key is an invalid option
Go to the top menu - Navigate back to the top of an autoattenant menu tree Go up one menu - Navigate back to the menu which sent the call to this menu Hang up - Disconnect the caller
Transfer to Extension or Number - Transfer the call to an extension number (can be an extension, queue, conference, etc.)
Go to another menu - Transfer to another menu. Select the target menu from the drop-down box
Click theAllow Dialing an Extension check box to allow callers to manually dial an extension when connected to this automated attendant (caller will be transferred to the extension number dialed, if valid)
Click theShow Summarylink to see a list of all key presses and their respective actions; clickHide Summaryto collapse the summary view
To add a list-based router:
Click theAutomated Attendantsicon Click Add New...
Click List-based Call Router(new window appears) Enter a name for the list-based router
Select an extension number for the list-based router by clicking the drop-down Click Addto save the new list-based router
Follow the steps to modify the new list-based router To modify an existing list-based router:
Click theAutomated Attendantsicon
Click the list-based router's name in the list (new view appears) To delete the list-based router: click the gray X icon
To rename the list-based router: click the pencil (edit) icon
To change the extension number: click the 1>2 (change extension) icon
A list of actions is displayed; use the up and down arrows next to the actions to change the order in which they are processed
Click the small gray X icon next to an action to delete it
Click theAdd new action drop-down to select one of these actions:
Enable Silent Hold - This action will prevent the system from sending out music on hold for the duration of the outbound call. Instead, the system will not send out any sounds at all, effectively sending silence. This is useful, for example, when calling into a conference. When putting a conference on hold it is good not to flood the entire conference with your system's music on hold.
Voice Mail Logon- Transfer the caller to a dialog letting him or her log in to a voice mail box.
Perform an Echo Test- Transfer the caller to an echo test extension. This is useful for testing a new phone or doing other troubleshooting.
Set Caller-ID- Set the caller ID name and caller ID number for the outbound call. This permits customized caller ID sending on an as-needed basis.
Try Calling An Extension- This action will attempt to connect the caller to an extension. If the transfer is not successful then the next action on the list will be processed.
Timeout - Select the number of seconds to ring the destination extension before giving up
Confirm - Requires the called party to press digit 1 in order to receive call Extension - Select a destination extension number from the list
Insert- Click the drop down to select the position in the list for this action Click Add Actionto save this action to the list
Try Calling one or more Phone Numbers - This action will call, sequentially, any number of extensions or phone numbers. The timeoutvalue specified will be the number of seconds to ring each destination. If a destination does not answer then the next number in the sequence is dialed. NOTE: Voicemail and answering machines will "answer" the call, so be sure to have a timeout that is short enough to stop ringing a destination before voicemail answers. The default timeout is 15 seconds.
Timeout - Select the number of seconds to ring the destination extension before giving up
Confirm - Requires the called party to press digit 1 in order to receive call
Phone Number/List - A comma-separated list of extension and/or phone numbers to dial
Insert- Click the drop down to select the position in the list for this action Click Add Actionto save this action to the list
Play a sound file - Play a sound file and then move to the next action
Sound File- Click the first drop-down to select the sound file category and then click the second drop-down to select the sound file name (use the play and stop buttons to listen to the sound file on your computer)
Insert- Click the drop down to select the position in the list for this action Click Add Actionto save this action to the list
Transfer to Phone Number or Extension - Unconditionally transfer to the specified phone number or extension. The list will immediately stop processing after the transfer, regardless of what happens with the transfer.
Phone Number or Extension - Enter the destination extension number or telephone number
Insert- This action ends the list processing, therefore it can only be the last action on the list
Click Add Actionto save this action to the list
Transfer to a User's Voice Mail- Unconditionally transfer the caller into the destination user's voice mail box so that the caller may leave a message. The list will immediately stop processing after the transfer.
User - Select the user from the drop-down list
Insert- This action ends the list processing, therefore it can only be the last action on the list
Click Add Actionto save this action to the list
Disconnect the Call - Hang up the call. This will, of course, end the list processing. Click Addto save this action to the list.
Send to Gateway - Transfer the call to a service provider to be sent to an off-site extension or phone number.
To add a rule-based router:
Click theAutomated Attendantsicon Click Add New...
Click Rule-based Call Router(new window appears) Enter a name for the rule-based router
Select an extension number for the rule-based router by clicking the drop-down Click Addto save the new rule-based router
Follow the steps to modify the new rule-based router To modify an existing rule-based router:
Click theAutomated Attendantsicon
Click the rule-based router's name in the list (new view appears) To delete the rule-based router: click the gray X icon
To rename the rule-based router: click the pencil (edit) icon
To change the extension number: click the 1>2 (change extension) icon
A list of actions is displayed; use the up and down arrows next to the actions to change the order in which they are processed
Click the small gray X icon next to an action to delete it
Default Destination Extension - This is the extension to which the caller will be transferred if no conditions are met during the processing of the rules.
Click the drop-down to select a default destination extension Click Apply to save the change
To add a new rule click the Add a Routing Rulebutton (new window appears) Years - The calendar years to match for this rule
Months - The calendar months to match for this rule
Days of the Month - The days of the month (1-31) to match for this rule
Days of the Week - The days of the week (Sunday, Monday, etc.) to match for this rule
Time Range - The starting and ending time range to match for this rule. Times are specified in quarter-hour increments
Number Rule - The number matching parameter to match for this rule. Match on the caller's area code or phone number
On Match - When the listed conditions are all met, transfer the caller to the specified extension
Apply this Rule- Specify where in the list of rules this list will be applied (You may also use the up/down arrows next to the rule number)
Chapter 6 - Managing Service Providers
Introduction
Your PBX needs a connection to the outside world, also known as the public switched telephone network or PSTN. The CudaTel Communications Server can connect to tradition telephone companies (telcos) or to VoIP providers. The phone companies provide analog phone lines or digital PRI circuits that can carry voice traffic. VoIP providers supply telephone service via your company's Internet connection(s). Each method has its
advantages. The CudaTel Communications Server gives you the flexibility of using both of these connection types, including the ability to bridge calls between the two. Before
discussing the setup of outside connections it is best to understand the concept of outbound routes.
Outbound Routes
A number route is a means of allowing (or denying) the routing of a particular phone number that has been dialed by a user. A number route is simply a means of identifying certain phone numbers or patterns of phone numbers. A number route can be very specific, e.g. "911" for emergency, or more general, such as "any seven-digit phone number." Number routes are defined by using a regular expressionthat gets evaluated against the dialed phone number. (See Appendix Afor more information on regular expressions.) The system comes with several number routes predefined:
Name: Regular Expression: Description:
Information ^411$ Match exact digits "411" Emergency (USA) ^911$ Match exact digits "911" 7 Digit Dialing ^\d{7}$ Match exactly seven digits 10 Digit Dialing ^\d{10}$ Match exactly ten digits 11 Digit Dialing ^\d{11}$ Match exactly 11 digits NANPA ^1[2-9]\d[2-9]{7}$ North American phonenumbers
An example of using a number route would be letting your users dial 411 and then allowing those calls only to go out a specific provider who charges the least for those calls. Later in this chapter you will learn about adding an outbound route to multiple providers (or analog/ digital ports) and adjusting the priority level so that you can specify fail-over routes.
NOTE: You must define at least one provider before you edit outbound routes. Click the Manage Route Definitionsbutton in the service provider setup screen to edit outbound routes.
VoIP/SIP Providers
SIP providers offer telephone service over an Internet connection. In order to establish a connection you will need the following information from your SIP provider:
Host- Host name or IP address
Port - Port number, frequently will be 5060
Username - Username assigned to you by the provider
Password- Password assigned to you by the provider
Realm- SIP realm (optional)
NOTE: If your provider uses a port number that is non-standard then you may need to configure your firewall to allow both TCP and UDP for the port number in question. The CudaTel Communications Server supports various types of SIP configurations. In the CudaTel Communications Server they are defined as:
Generic SIP - Most SIP configurations fall into this category (use this if you are not sure what type to use)
Generic SIP (Within Local NAT)- Use this when the CudaTel Communications Server and the target server both reside behind the same NAT device (such as when you have another SIP server or phone system on the same network)
Generic SIP (Use SRV Records) - Use this setting if your provider needs DNS SRV lookups
Generic SIP (No Registration) - Use this setting for any SIP provider that does not require a registration
To add a new SIP provider:
Click Telephone Service Providers
Click Set Up A New Account(new window appears) Supply the following information:
Name- The name of this provider as you would like it to appear in the CudaTel Communications Server
Provider - Selectgeneric
Host - Enter the host name or IP address
Port - Enter the port number
Username - Enter the username supplied by your provider
Password- Enter the password supplied by your provider
Realm - Enter the SIP realm if supplied by your provider
Caller ID - Specify the caller ID sent on outbound calls
normally sent on outbound calls (all calls going out on this provider will have the exact same Caller ID information sent)
Direction - Selectinbound,outbound, orboth directions
Use route- Click the drop-down to select a specific route or choose Any outbound
Requires Registration - Click this check box if your provider requires registration (usually they do)
Registration Expiration- Enter the registration expiration time (leave at default unless provider specifies value)
Click Installto save the new provider connection
You can view the status of your provider connection by clicking its name in the list, or by viewingSystem Dashboard >Telephone Service Providers.
To modify a service provider entry: Click Telephone Service Providers
Click the provider's name in the list (new view appears)
The status will be displayed as a green phone (active, ready) or a red X (offline or disconnected)
Analog and Digital Connections
CudaTel Communications Server units with the optional phone line hardware installed have additional ways to connect to the public switched telephone network (PSTN). Confirm your model to see which hardware is installed:
Model: Port Types: 270B 4 FXO (analog) 370B 1 PRI (digital) 470B 2 PRI (digital) 670B 4 PRI (digital)
The port layouts for each model are described below. Model 270B - 4 FXO, 1 FXS
The 270B has four FXO ports, delivered on two RJ14 style modular jacks. It also has a single FXS port, also delivered on a modular jack. The layout of the jacks on the back of the CudaTel Communications Server is like this:
FXS FXO 3/4 FXO 1/2
<<Replace the above with a nicer picture>>
The FXS port can connect to a single line telephone, fax machine, or modem. The FXO ports can accept dial tone from a standard telephone line. Each modular jack contains two FXO ports. In most cases you will have one line cord for each phone line, so Y-cables are provided. Plug a Y-cable into an FXO modular jack on the back of the CudaTel
Communications Server. The two jacks at the end of the Y-cable will each be a single FXO port. Connect your individual phone lines to the jacks on the Y-cables.
In the admin UI on the Telephone Service Providerspage, FXO ports 1 through 4 will appear in the providers list as Analog Port 1, Analog Port 2, etc. The FXS port will appear as Analog Port 5.
Model 370B - 1 PRI
The 370B contains a single RJ45 modular jack that accepts a single PRI connection from the telco.
<<Insert pic of the back of a 370B>>
In the admin UI on the Telephone Service Providerspage, the PRI port will appear in the providers list as Digital Port 1
Model 470B - 2 PRI
The 470B contains a two RJ45 modular jacks that each accept a single PRI connection from the telco.
<<Insert pic of the back of a 470B>>
In the admin UI on the Telephone Service Providerspage, the PRI ports will appear in the providers list as Digital Port 1 and Digital Port 2.
Model 670B - 4 PRI
The 470B contains a four RJ45 modular jacks that each accept a single PRI connection from the telco.
<<Insert pic of the back of a 670B>>
In the admin UI on the Telephone Service Providerspage, the PRI ports will appear in the providers list as Digital Port 1, Digital Port 2, Digital Port 3, and Digital Port 4.
Configuring Analog Ports
The model 270B has four FXO analog ports. Configuring the analog ports is very straightforward and takes just a few steps:
Connect the two Y-cables to the two jacks on the back of the CudaTel Communications Server. The the jack on the right has ports 1 and 2; the jack on the left has ports 3 and 4. Connect each of your phone lines to the CudaTel Communications Server with standard telephone line cords. Plug one end of the line cord into one of the Y-cable jacks and plug the other end into the telephone jack. Repeat for each phone line.
To configure an analog port:
Click Telephone Service Providers Analog ports are numbered 1 through 4
Click on the analog port you wish to configure (new view appears) Configure how incoming and outgoing calls are handled
Incoming calls:
Incoming calls for an analog port are answered by an extension Simply select an extension number from the list and click Apply
All incoming calls on this phone line will automatically be answered by the extension selected
Any extension can handle incoming calls, including conferences, automated attendants, phones, and groups
Outgoing calls:
Select the outbound routes that will be used by this analog port Normally an analog port will need these routes:
North America (NANPA), Information, Emergency, and7 digit dialing NOTE: If you do not add the Emergencyroute to at least one analog port then 911 dialing will not work!
Click the drop-down list and select a route, then click Add Route The newly added route will now appear in theCurrent Routes list Two buttons appear next to the route: Positive MatchandSet Priority Click Positive Matchto toggle positive/negative matching (most routes need "positive match")
Set the priority for this port and route by clicking Set Priority(new window appears) The window shows each port that has this route enabled
Use the up and down arrows to change the priority for the route Click Done (changes are applied immediately)
Repeat the above process for each port that has a phone line connected. See the section Configuring Outbound Route Priorities later in this chapter for more information on setting up your outbound routes, including when to use a "negative match" on a route. Verify each route by making a test call from an extension on the system: local call (seven digits), long distance call (1 + phone number), 411, and 911
NOTE: When testing 911, simply state your name to the operator and tell him or her that you are testing a new phone system installation. It is good to have the operator verify the street address.
Verify incoming call routing by dialing one of your phone numbers from a separate phone, such as a cell phone. Make sure that the call is answered by the extension that is specified on the analog port configuration.
Configuring Digital Ports
Models 370B, 470B, and 670B all come with digital ports that are programmed for connecting to PRI circuits.
Setting up a digital port has four steps: Selecting the signaling type
Selecting the default caller ID
Specifying external numbers (depends on carrier) Selecting outbound routes
SIGNALING TYPE
The CudaTel Communications Server supports three different PRI signaling types, sometimes called "protocol dialect" or "protocol variant" or even just "protocol." The signaling types supported are:
* National ISDN2 (NI-2) * Lucent 5ESS
* Nortel DMS100
NOTE: If you are ordering new service then National ISDN2 is the recommended signaling protocol. If you are connecting to an existing circuit then select the signaling type that matches the current PBX equipment. (If your PRI circuit is not configured for one of these three signaling types then you will need to contact your carrier and ask to have the protocol changed. Depending on your carrier this can take several days or weeks.)
PRI circuits allow the calling party to specify a customized caller ID to be presented to the called party. Enter the Caller ID digits that you want to be displayed by default on outgoing calls. Check the box Always Use This Caller IDif you want all outbound calls to use the specified caller ID.
EXTERNAL NUMBERS
External numbers refers to DID or Direct Inward Dialing phone numbers that are carried on this PRI circuit. In the operation of a PRI circuit, the carrier will notify the host PBX that a call is coming in and will specify which phone number was dialed. In most cases the carrier will notify the PBX in one of two ways: by sending all ten digits of the dialed phone number, or by sending just the last four digits of the dialed phone number. In either case, the
CudaTel Communications Server can route the inbound calls as needed.
If your carrier sends ten digits then simply add the range of DID numbers that is assigned to you. For example, if your DID block was 4085551000 to 4085551019 then enter
"4085551000-4085551019" in the list. Alternatively, you can list each number individually, separated by a comma or a carriage return. Once the numbers are entered they become available to be assigned as External Numbers that can be assigned to users, groups, queues, multi-party conferences, or automated attendants. (See Chapter 5 for more information.)
If your carrier sends four digits then simply create an extension range that corresponds to the DID range. For example, if the DID range is 4085551000 to 4085551019 then the carrier would simply send 1000 through 1019. Add an extension range of 1000-1019 on the System Config > Extensionspage. Calls will automatically be routed to the corresponding four digit extension. As an example, when a party calls 4085551002 the call will ring
directly to extension 1002. Extension number 1002 can be a user, queue, multi-party conference, or automated attendant. (See Chapter 8 for more information on adding extension ranges.)
OUTBOUND ROUTES
Select the outbound routes to be serviced by this digital port. Normally a digital port will need these routes:
North America (NANPA), Information, Emergency, and7 digit dialing(and if necessary, International)
NOTE: If you do not add the Emergencyroute to at least one digital port then 911 dialing will not work!
The newly added route will now appear in theCurrent Routes list Two buttons appear next to the route: Positive MatchandSet Priority Click Positive Matchto toggle positive/negative matching (most routes need "positive match")
Set the priority for this port and route by clicking Set Priority(new window appears) The window shows each port that has this route enabled
Use the up and down arrows to change the priority for the route Click Done (changes are applied immediately)
New PRI Service Checklist
The following is a brief checklist that you can use when ordering new PRI service from your carrier. Your carrier will know what these items mean.
Line encoding: B8ZS (required) Framing: ESF (required)
Protocol: NI-2 (recommended) DNIS: 10 digits (recommended)
These are the optimal settings for a PRI connected to a CudaTel Communications Server. Your carrier may have other questions. Contact your CudaTel VAR or CudaTel support if you have other questions.
Configuring Outbound Route Priorities
Outbound call routes can be applied to multiple telephone ports and telephone service providers. If a particular port or provider is in use or unavailable, the system will look for the next port or provider in the priority list for routing the call.
A good example of setting up priorities is for the model 270B which can accommodate up to four analog phone lines. Let's say you have a model 270B with four analog phone lines that are in a hunt group from the telephone company. The pilot number is line one. The second number in hunt is line two, etc. These are connected to the CudaTel Communications Server as analog ports 1, 2, 3, and 4 respectively. In this case, for outgoingcalls you want the system to start with the last phone line first, namely line 4. If line 4 is in use then the system should use line 3, then line 2, and finally line 1. (If all lines are in use then the calling party will receive an audio message saying so.)
Analog Port 4 Analog Port 3 Analog Port 2 Analog Port 1
When you add a route to a port, that port automatically becomes the highest priority for the selected route. Therefore, the quickest way to add routes is to add the lowest priority first, the second lowest priority second, and so forth. So, if you have four analog ports and you want to add the most common routes to each, with port 4 being the highest priority then follow these steps:
Click Analog Port 4
Add routesEmergency, Information, North America (NANPA), and7 Digit Dialing Click Analog Port 3
Add routesEmergency, Information, North America (NANPA), and7 Digit Dialing Click Analog Port 2
Add routesEmergency, Information, North America (NANPA), and7 Digit Dialing Click Analog Port 1
Add routesEmergency, Information, North America (NANPA), and7 Digit Dialing When you are finished you will have all the routes added to all the ports and in the correct priority.
Chapter 7 - Call Detail Reports
IntroductionCall detail reports (CDRs) are the primary means of recording information about the activity on your phone system. Each phone call made on the system will produce one CDR. The CDR contains information about the calling and called parties as well as the date, time, and duration of each call. The CudaTel Communications Server allows you to view CDRs in your browser but also allows you to export records in CSV (comma-separated values) format. The CSV files can be imported into spreadsheets or databases and have extra data fields that can be used in offline analysis.
Online CDRs
To view CDRs online, click theCall Detail Records icon. The initial view is of the 100 most recent phone records. The following features are available:
Search- Click in the search box and type a name or phone number. As you type, the list will automatically be filtered.
Pages- Click the drop-down box (upper left side of screen) to change the number of records displayed on each page.
Sort- Click the column name to toggle sorting ascending or descending by that column.
Download CSV- Download call records in CSV format. (See below.)
The following fields are displayed on the screen. (NOTE: a few more data fields are available in the CSV download; see below for details.)
Call Answered Time - Date and time that the call was answered.
Call End Time - Date and time that the call ended.
Caller Name- Caller's Name.
Caller Number - Caller's Number.
Destination Number- Dialed phone number or extension number.
Billable Time- Amount of time call was connected. Does not include time spent dialing or listening to ringing.
Recorded File - If the call was recorded then a link to that recording will appear hear.
CSV Files
CSV files contain a little more information. They are suitable for downloading into a
spreadsheet. The following fields are available. (Fields marked with * do not appear in the on-line CDRs.)
*Call Started Time - Date and time that the call was started, e.g., when caller finished dialing the phone number.
Call Answered Time - Date and time that the call was answered.
Call End Time - Date and time that the call ended.
Caller Name- Caller's Name.
Caller Number - Caller's Number.
Destination Number- Dialed phone number or extension number.
*Account Code - The account code, if any, for this call.
Billable Time- Amount of time call was connected. Does not include time spent dialing or listening to ringing.
*Duration - Total length of time call was up. Iincludes time spent dialing and listening to ringing.
*Hangup Cause- The hangup cause is a description of why the call ended. Most calls end with "Normal Clearing."