About Your USING Book
USING
is more than just a book: it’s the fastest, easiest way to
gain the technology skills you’re looking for!
Don’t just read about it: see it, hear it, with step-by-step video tutorials and
valuable audio sidebars delivered through theFree Web Editionthat comes
with everyUSINGbook. For the price of the book you get online access anywhere with a web connection—no books to carry, updated content, and the benefi t of video and audio learning.
How Do You Get Access to the Free Web Edition?
Simply visitquepublishing.com/using for information about how to register your USING book or eBook.
About the
USING
Web Edition
The Web Edition of every USING book is powered by Safari allowing you to access the video tutorials and valuable audio sidebars. Plus, you can search the contents of the book, highlight text and attach a note to that text, print your notes and highlights in a custom summary, and cut and paste directly from Safari Books Online.
800 East 96th Street, Indianapolis, Indiana 46240 USA
ii Associate Publisher Greg Wiegand Acquisitions Editor Loretta Yates Development Editor
The Wordsmithery LLC
Managing Editor Sandra Schroeder Project Editor Mandie Frank Copy Editor Barbara Hacha Indexer Erika Millen Proofreader Dan Knott Technical Editor Bob Umlas Publishing Coordina-tor Cindy Teeters Interior Designer Anne Jones Cover Designer Anna Stingley Compositor Mark Shirar
Using Microsoft® Excel® 2010
Copyright © 2011 by Pearson Education, Inc.
All rights reserved. No part of this book shall be reproduced, stored in a retrieval system, or transmitted by any means, electronic, mechanical, photocopying, recording, or otherwise, without written permission from the publisher. No patent liability is assumed with respect to the use of the information contained herein. Although every precaution has been taken in the preparation of this book, the publisher and author assume no responsibility for errors or omissions. Nor is any liability assumed for damages resulting from the use of the information contained herein.
ISBN-13: 978-0-7897-4290-2 ISBN-10: 0-7897-4290-X
Library of Congress Cataloging-in-Publication Data Syrstad, Tracy.
Using Microsoft Excel 2010 / Tracy Syrstad, Bill Jelen. p. cm.
Includes bibliographical references and index. ISBN-13: 978-0-7897-4290-2
ISBN-10: 0-7897-4290-X
1. Microsoft Excel (Computer file) 2. Business—Computer programs. 3. Electronic spreadsheets. I. Jelen, Bill. II. Title.
HF5548.4.M523S97 2011 005.54--dc22
2010028386
Printed in the United States of America First Printing: August 2010
Trademarks
All terms mentioned in this book that are known to be trademarks or service marks have been appropriately capitalized. Que Publishing cannot attest to the accuracy of this informa-tion. Use of a term in this book should not be regarded as affecting the validity of any trade-mark or service trade-mark.
Warning and Disclaimer
Every effort has been made to make this book as complete and as accurate as possible, but no warranty or fitness is implied. The information provided is on an “as is” basis. The author and the publisher shall have neither liability nor responsibility to any person or entity with respect to any loss or damages arising from the information contained in this book or from the use of the programs accompanying it.
Bulk Sales
Que Publishing offers excellent discounts on this book when ordered in quantity for bulk pur-chases or special sales. For more information, please contact
U.S. Corporate and Government Sales 1-800-382-3419
[email protected]
For sales outside of the U.S., please contact
Contents at a Glance
Introduction
1 Getting to Know the Excel Interface 2 Introducing the Excel Web App 3 Entering Data in Excel
4 Data Formatting 5 Using Formulas 6 Using Functions 7 Sorting
8 Filtering and Consolidating Data 9 Subtotals and Grouping 10 Pivot Tables
11 Creating Charts
12 SmartArt, WordArt, and Pictures 13 Macros and UDFs
Index
Media Table of Contents
To register this product and gain access to the free web edition and the audio and video files, go to quepublishing.com/using.
Chapter 1: Getting to Know the Excel Interface
Show Me Media 1.1—Adding a Command to the
Quick Access Toolbar . . . .13
Show Me Media 1.2—Freezing Columns . . . .21
Chapter 2: Introducing the Excel Web App Show Me Media 2.1—Creating a Windows Live ID . . . .31
Tell Me More Media 2.2—SkyDrive . . . .35
Chapter 3: Entering Data in Excel Show Me Media 3.1—Using the Fill Handle to Fill in a Series . . . .43
Show Me Media 3.2—Converting Formulas to Values . . . .50
Tell Me More Media 3.3—Pasting and Delimited Text . . . .51
Chapter 4: Data Formatting Show Me Media 4.1—Creating a Custom Style . . . .74
Show Me Media 4.2—Using Format Painter . . . .86
Show Me Media 4.3—Creating a New Theme . . . .89
Show Me Media 4.4—Applying Conditional Formatting . . . .91
Tell Me More Media 4.5—Using Preset Conditional Formatting Rules . . . .93
Chapter 5: Using Formulas Show Me Media 5.1—Entering a Basic Formula . . . .101
Tell Me More Media 5.2—Typing an Array Within an Array . . . .114
Show Me Media 5.3—Evaluating a Formula . . . .119
Chapter 6: Using Functions Show Me Media 6.1—Using the AutoSum Functionality . . . .125
Tell Me More Media 6.2—Using the INDEX Function . . . .130
Show Me Media 6.3—Calculating Times Over 24 Hours . . . .142
Show Me Media 6.4—Using Goal Seek to Return a Value . . . .144
Chapter 7: Sorting Show Me Media 7.1—Sorting Values with the Sort Dialog . . . .148
Show Me Media 7.2—Using the Quick Sort Buttons to Sort Multiple Columns . . . .152
Tell Me More Media 7.3—Creating Custom Lists . . . .155
Show Me Media 7.4—Rearranging Columns Using the Sort Dialog . . . .155
U s i n g M i c r o s o f t E xc e l 2 0 1 0
Chapter 8: Filtering and Consolidating Data
Show Me Media 8.1—Using the Search Function
to Include and Exclude Items in the Filtering Listing . . . .165
Show Me Media 8.2—Using the Search Function to Filter for Specific Dates . . . .168
Show Me Media 8.3—Using the Advanced Filter with Various Criteria . . . .175
Tell Me More Media 8.4—Finding Duplicates . . . .178
Chapter 9: Subtotals and Grouping Tell Me More Media 9.1—Adding Grand Totals When the Subtotals Were Manually Entered . . . .181
Show Me Media 9.2—Using the Subtotal Tool . . . .183
Show Me Media 9.3—Subtotaling by Multiple Columns . . . .191
Show Me Media 9.4—Inserting Blank Rows Between Subtotal Groups . . . .195
Chapter 10: Pivot Tables Show Me Media 10.1—Creating a Pivot Table . . . .202
Tell Me More Media 10.2—Using Other Data Sources . . . .204
Show Me Media 10.3—Grouping Dates into Months and Years . . . .212
Show Me Media 10.4—Adding Slicers to a Pivot Table . . . .226
Chapter 11: Creating Charts Tell Me More Media 11.1—The Importance of Choosing the Right Chart Type . . . .234
Show Me Media 11.2—Creating a Chart . . . .234
Show Me Media 11.3—Assigning a Series to the Secondary Axis . . . .242
Show Me Media 11.4—Creating Sparklines . . . .250
Chapter 12: SmartArt, WordArt, and Pictures Show Me Media 12.1—Inserting SmartArt . . . .257
Show Me Media 12.2—Inserting SmartArt That Includes Images . . . .258
Show Me Media 12.3—Linking SmartArt to Cells . . . .262
Tell Me More Media 12.4—Applying Styles . . . .267
Chapter 13: Macros and UDFs Tell Me More Media 13.1—Creating a Trusted Location . . . .272
Show Me Media 13.2—Getting the Most Out of the Macro Recorder by Using the Keyboard . . . .275
Show Me Media 13.3—Recording a Macro Using Relative Referencing . . . .277
Show Me Media 13.4—Creating a Simple UDF . . . .285
v
Table of Contents
Introduction . . . .1
1 Getting to Know the Excel Interface . . . .7
Customizing the Ribbon . . . .7
Removing Default Tabs and Groups . . . .7
Creating a Custom Tab . . . .8
Adding a New Group . . . .9
Adding a New Button . . . .9
Minimizing the Ribbon . . . .10
Customizing the Quick Access Toolbar . . . .11
Move the Quick Access Toolbar . . . .11
Adding Commands to the Quick Access Toolbar . . . .11
Customizing the Quick Access Toolbar for the Current Workbook . . . .14
Removing Commands from the Quick Access Toolbar . . . .15
Dialog Launchers . . . .15
Zoom . . . .16
Page Break Preview . . . .17
Changing a Page’s Column Break . . . .17
Page Layout . . . .18
Inserting the Filename and Date into the Header . . . .18
Page Numbering . . . .19
Inserting Pageof PagesPage Numbering . . . .19
Repeating Rows or Columns When Printing . . . .20
Repeating a Header Row . . . .20
Freezing Panes . . . .20
Freezing Columns and Rows at the Same Time . . . .21
Working with Custom Views . . . .22
Creating a Custom View of Filtered Data . . . .22
Arranging Windows . . . .23
Inserting Rows & Columns . . . .23
Inserting a Row . . . .24
Renaming a Sheet . . . .24
Moving or Copying Sheets . . . .24
Within the Workbook . . . .25
Between Workbooks . . . .25
Change Multiple Worksheets at One Time . . . .25
Changing Multiple Sheets . . . .26
U s i n g M i c r o s o f t E xc e l 2 0 1 0
Setting Workbook and Sheet Protection . . . .26
Setting Workbook Protection . . . .26
Setting Sheet Protection . . . .27
Unlocking Cells . . . .27
Recent Documents . . . .27
Saving as PDF . . . .28
Opening Templates . . . .28
Troubleshooting Excel Options . . . .29
2 Introducing the Excel Web App . . . .31
Requirements . . . .31
Acquiring a Windows Live ID . . . .31
Creating a Windows Live ID . . . .32
Uploading and Downloading Workbooks . . . .33
Accessing the SkyDrive . . . .34
Uploading with Windows Live . . . .34
Saving to SkyDrive from Excel . . . .35
Creating a New Workbook . . . .36
Opening a Workbook . . . .37
Saving a File to Your Local Drive . . . .37
Sharing a Workbook . . . .38
Creating a New Folder . . . .38
Setting Folder Permissions . . . .39
Simultaneous Editing . . . .40
Interacting with a Sheet Online . . . .41
3 Entering Data in Excel . . . .43
Dragging the Fill Handle to Extend a Series . . . .43
Extending a Series Containing Text . . . .44
Extending a Numerical Series . . . .44
Creating Your Own Series . . . .44
Creating a Custom List . . . .45
Joining Text . . . .45
Joining a First Name and Last Name . . . .46
Joining Dates and Text . . . .46
Fixing Numbers as Text . . . .47
Using Convert to Number on a Range . . . .48
Using Paste Special to Force a Number . . . .48
Convert Text Case . . . .48
vii
Copying Formulas Rapidly . . . .49
Filling a Formula Down a Column . . . .49
Converting Formulas to Values . . . .50
Quickly Replacing Formulas with Values . . . .50
Using Text to Columns . . . .51
Working with Delimited Text . . . .51
Working with Fixed Width Text . . . .53
Using Text to Columns to Convert Text to Numbers . . . .55
Controlling the Next Cell Selection . . . .55
Enter Versus Tab . . . .55
Moving Cell Pointer Direction . . . .56
Preselecting the Data Range . . . .56
Entering Data in a Circle . . . .56
Working with Tables . . . .57
Defining a Table . . . .57
Expanding a Table . . . .59
Adding a Total Row to a Table . . . .60
Data Validation . . . .61
Limiting User Entry to a Selection from a List . . . .62
4 Data Formatting . . . .65
Cell Formatting . . . .65
Font Group . . . .65
Alignment Group . . . .69
Justifying Text in a Range . . . .72
Reflowing Text in a Paragraph . . . .73
Cell Styles . . . .74
Creating a Custom Style . . . .74
Using Number Formats in Excel and Excel Starter . . . .74
General . . . .75
Number . . . .75
Currency . . . .75
Accounting . . . .76
Date . . . .76
Time . . . .76
Percentage . . . .76
Fraction . . . .77
Scientific . . . .77
Text . . . .77
Special . . . .78
Custom Formats . . . .78
U s i n g M i c r o s o f t E xc e l 2 0 1 0
Dealing with Formatting Issues . . . .84
Using Number Formats in Excel Web Apps . . . .84
Using the Number Format Drop-down . . . .84
Using Increase and Decrease Decimal . . . .84
Using Format Painter . . . .85
Copying the Formatting of a Range . . . .86
Adjusting Row Heights and Column Widths . . . .87
Applying One Column’s Width to Other Columns . . . .88
Using Themes . . . .88
Applying a New Theme . . . .89
Creating a New Theme . . . .89
Sharing a Theme . . . .90
Using Conditional Formatting . . . .91
Applying a Custom Icon Set . . . .92
Using Rules . . . .93
Clearing Conditional Formatting . . . .98
5 Using Formulas . . . .99
The Importance of Laying Data Out Properly . . . .99
Adjusting Calculation Settings . . . .100
Formulas Versus Values . . . .100
Entering a Formula . . . .101
Enter a Formula . . . .101
Relative Versus Absolute Formulas . . . .101
R1C1 Notation . . . .102
Using F4 to Change the Cell Referencing . . . .103
Entering Formulas . . . .104
Copying a Formula . . . .104
Copying a Formula by Using Ctrl+Enter . . . .105
Copying a Formula by Dragging the Fill Handle . . . .105
Formula Operators . . . .106
Order of Operations . . . .107
Using Names To Simplify References . . . .107
Applying and Using a Name in a Formula . . . .108
Inserting Formulas into Tables . . . .109
[image:11.433.104.371.167.607.2]Entering a Formula in a Table . . . .109
Table References in Formulas . . . .110
ix
Writing Formulas That Refer to Tables . . . .111
Using Array Formulas . . . .111
Example 1 . . . .112
Example 2 . . . .112
Example 3 . . . .113
Editing Array Formulas . . . .114
Deleting Array Formulas . . . .115
Troubleshooting Formulas . . . .115
Error Messages . . . .116
Trace Precedents and Dependents . . . .116
Watch Window . . . .118
Evaluating Formulas . . . .119
6 Using Functions . . . .121
Breaking Down a Function . . . .121
Finding Functions . . . .121
Entering Functions . . . .122
The Formula Wizard . . . .122
Using In-Cell Tips . . . .124
AutoSum . . . .125
Other Auto Functions . . . .126
Lookup Functions . . . .127
CHOOSE . . . .127
VLOOKUP . . . .127
MATCH and INDEX . . . .129
INDIRECT . . . .130
SUMIFS . . . .131
SUMPRODUCT . . . .132
Logical Functions . . . .133
IF/AND/OR/NOT . . . .134
Nested IF Statements . . . .135
IFERROR . . . .135
Date and Time Functions . . . .136
Convert and Breakdown Dates . . . .136
Convert and Breakdown Times . . . .138
Date Calculation Functions . . . .138
Troubleshooting: Calculating with Dates . . . .140
Data Analysis Tools . . . .142
Goal Seek . . . .144
U s i n g M i c r o s o f t E xc e l 2 0 1 0
Using Goal Seek . . . .145
Using the Wizard to Troubleshoot Formulas . . . .145
Troubleshooting a Formula . . . .145
7 Sorting . . . .147
Preparing Data . . . .147
Sorting in the Web App . . . .147
The Sort Dialog . . . .147
Sorting by Values . . . .148
Sorting by Color or Icon . . . .149
Doing a Case-Sensitive Sort . . . .151
Using the Quick Sort Buttons . . . .151
Quick Sorting Multiple Columns . . . .151
Random Sort . . . .152
Randomizing Data . . . .152
Sorting with a Custom Sequence . . . .153
Using a Custom List . . . .153
Rearranging Columns . . . .155
Using the Sort Dialog . . . .155
Using the Mouse . . . .156
Fixing Sort Problems . . . .157
8 Filtering and Consolidating Data . . . .159
Preparing Data . . . .159
Applying a Filter to a Dataset . . . .159
Clearing a Filter . . . .160
Reapplying a Filter . . . .161
Filtering in the Web App . . . .161
Turn Filtering on for One Column . . . .161
Filtering Options . . . .162
Filter Listing for Listed Items . . . .162
Grouped Dates Filter Listing . . . .163
Searching Functions for Listed Items . . . .165
Using the Search Function for Grouped Dates . . . .167
Using Text, Number and Date Special Filters . . . .169
Filtering by Color or Icon . . . .171
Filtering By Selection . . . .172
Using Filter Selection . . . .172
Allow Filtering on a Protected Sheet . . . .172
Using the Advanced Filter . . . .173
xi
Using the Criteria Range . . . .174
Filtering for Unique Items . . . .176
Removing Duplicates . . . .177
Removing Duplicates from a Dataset . . . .177
Consolidating Data . . . .178
Consolidating Duplicate Data by Category . . . .179
9 Subtotals and Grouping . . . .181
SUBTOTAL Function . . . .181
Subtotal Tool . . . .182
Summarizing Data Using the Subtotal Command . . . .183
Placing Subtotals Above Data . . . .184
Remove Subtotals or Groups . . . .184
Expanding and Collapsing Subtotals . . . .184
Copying Subtotals . . . .185
Copying Only the Totals to a New Location . . . .185
Formatting Subtotals . . . .186
Applying Formatting to Only the Totals . . . .186
Applying Multiple Subtotal Function Types . . . .187
Applying Multiple Subtotal Function Types . . . .187
Combining Multiple Subtotals to One Row . . . .188
Subtotaling by Multiple Columns . . . .190
Subtotaling by Multiple Columns . . . .191
Sorting Subtotals . . . .192
Sorting a Subtotaled Column . . . .192
Inserting Blank Rows . . . .192
Separating Subtotaled Rows for Print . . . .193
Separating Subtotaled Rows for Distributed Files . . . .194
Grouping and Outlining . . . .196
Manually Grouping Rows . . . .198
10 Pivot Tables . . . .199
Data Preparation . . . .199
Pivot Table Limitations . . . .200
Pivot Table Compatibility . . . .201
PivotTable Field List . . . .201
Creating a Pivot Table . . . .202
Creating a Pivot Table . . . .203
U s i n g M i c r o s o f t E xc e l 2 0 1 0
Moving Fields in a Pivot Table . . . .205
Remove a Field . . . .205
Rename a Field . . . .205
Change Calculation Type . . . .206
Change the Calculation Type of a Field Value . . . .206
Show Values Based on Other Items . . . .206
Pivot Table Sorting . . . .208
Pivot Table Quick Sort . . . .208
Pivot Table Sort (Fieldname) Dialog . . . .208
Expanding and Collapsing Fields . . . .211
Drill Down . . . .211
Grouping Dates . . . .212
Group a Date Field into Months and Years . . . .213
Summarize Weeks . . . .213
Filtering Options . . . .214
Filter Listing for Listed Items . . . .214
Search Function for Listed Items . . . .215
Special Filters . . . .218
Filter By Selection . . . .221
Filter by Manual Selection . . . .221
Clearing Filters . . . .221
Calculated Fields . . . .222
Create a Calculated Field . . . .223
Adding Color and Lines to a Pivot Table . . . .223
Hiding Totals . . . .223
Formatting Values . . . .224
Pivot Table Views . . . .225
Slicers . . . .226
Add a Slicer to a Pivot Table . . . .227
Making Data Suitable for Pivot Tables . . . .227
11 Creating Charts . . . .231
Components of a Chart . . . .231
Preparing Data . . . .232
Types of Charts . . . .233
Creating a Chart . . . .234
Creating a Chart . . . .235
Chart Styles . . . .236
xiii
Chart Layouts . . . .237
Adding a Chart Title . . . .237
Adding an Axis Title . . . .238
Adding or Moving the Chart Legend . . . .238
Moving or Resizing a Chart . . . .239
Changing a Chart’s Type . . . .239
Mixing Chart Types . . . .240
Creating a Chart with Multiple Chart Types . . . .240
Showing Numbers of Different Scale . . . .241
Chart Data of Vastly Different Scales . . . .242
Updating Chart Data . . . .242
Pasting New Data onto Existing Series . . . .243
Switching Rows and Columns . . . .243
Trendlines . . . .244
Adding a Forecasting Trendline . . . .245
Stock Charts . . . .246
Creating a Stock Chart . . . .246
Bubble Charts . . . .247
Pie Chart Issue: Small Slices . . . .247
Rotating the Pie . . . .248
Create a Bar of Pie Chart . . . .248
Sparklines . . . .250
Creating Sparklines . . . .250
Adding Points to a Sparkline . . . .250
Spacing Markers in a Sparkline . . . .251
Delete Sparklines . . . .252
Saving a Chart as a Template . . . .252
Creating a Chart Using a User-Created Template . . . .253
12 SmartArt, WordArt, and Pictures . . . .255
SmartArt . . . .255
Inserting SmartArt . . . .256
Inserting SmartArt Images . . . .257
Selecting SmartArt . . . .259
Adding and Deleting Shapes . . . .259
Reorder Components . . . .260
Formatting the Selected Layout . . . .261
Changing the Selected Layout . . . .261
Changing an Individual Component . . . .261
U s i n g M i c r o s o f t E xc e l 2 0 1 0
Linking a Cell to Smart Art . . . .262
Inserting WordArt . . . .264
Inserting Pictures . . . .265
Inserting a Picture . . . .265
Resizing and Cropping Pictures . . . .265
Corrections, Color, and Artistic Effects . . . .267
Arranging Pictures . . . .268
Reducing a Picture’s File Size . . . .270
13 Macros and UDFs . . . .271
Enabling VBA Security . . . .271
Developer Tab . . . .273
Introduction to the Visual Basic Editor . . . .273
Project Explorer . . . .274
Understanding How the Macro Recorder Works . . . .275
Navigating While Recording . . . .275
Relative References in Macro Recording . . . .276
Avoid the AutoSum Button . . . .278
Recording a Macro . . . .279
Filling in the Record Macro Dialog . . . .279
Running a Macro . . . .281
Running a Macro from the Ribbon . . . .281
Running a Macro from the Quick Access Toolbar . . . .282
Running a Macro from a Form Control, Text Box, or Shape . . . .283
User-Defined Functions . . . .284
Structure of a UDF . . . .285
How to Use a UDF . . . .287
Sharing UDFs . . . .287
Using Select Case to Replace Nested IF . . . .288
Index . . . .291 xv
About the Authors
Tracy Syrstadis the project manager for the MrExcel consulting team and also handles many of the tech support phone calls. If you have a problem with Excel or another Microsoft Office product, she’s there to listen and provide a solution.
Bill Jelenis the host of MrExcel.com. You will frequently find Bill on the road, enter-taining people with his Power Excel seminars. He is the author of many books about Microsoft Excel and is the voice of the Learn Excel from MrExcel podcast.
U s i n g M i c r o s o f t E xc e l 2 0 1 0
Dedications
Tracy:To John Syrstad
Bill:To Leo Laporte
Acknowledgments
Tracy:Thanks to Bill Jelen and Loretta Yates for the chance to write this book. It really helped strengthen my confidence in my Excel knowledge and abilities. Kristy Sharpe, Kathryn Riley, and Juan Pablo González Ruiz were vital in helping me main-tain a positive attitude through the very long days it took to get this book done so quickly. And thank you to all the MrExcel clients over the years who have asked me how to do something in Excel. Those questions helped guide me in choosing the subjects to cover.
Bill:Thanks to Tracy Syrstad for developing the content for this book. I am thrilled to be her co-author again after our successful Excel VBA books. I appreciate Bob Umlas being a great tech editor. Loretta Yates at QUE is always a pleasure to work with. At MrExcel.com, thanks to Scott Pierson, Barb Jelen, and Schar Oswald. At home, I appreciate the support and understanding of Josh, Zeke, and Mary Ellen.
xvii
We Want to Hear from You!
As the reader of this book, youare our most important critic and commentator. We value your opinion and want to know what we’re doing right, what we could do better, what areas you’d like to see us publish in, and any other words of wisdom you’re willing to pass our way.
As an associate publisher for Que Publishing, I welcome your comments. You can email or write me directly to let me know what you did or didn’t like about this book—as well as what we can do to make our books better.
Please note that I cannot help you with technical problems related to the topic of this book. We do have a User Services group, however, where I will forward specific technical questions related to the book.
When you write, please be sure to include this book’s title and author as well as your name, email address, and phone number. I will carefully review your com-ments and share them with the author and editors who worked on the book.
Email: [email protected]
Mail: Greg Wiegand Associate Publisher Que Publishing 800 East 96th Street Indianapolis, IN 46240 USA
Reader Services
Visit our website and register this book at quepublishing.com/using for convenient access to any updates, downloads, or errata that might be available for this book.
U s i n g M i c r o s o f t E xc e l 2 0 1 0
Introduction
Familiarity with Microsoft Excel is a requirement for most jobs today. Workers in every office use Excel to track and report information. Sales reps track leads, prospects, commissions, and travel expenses in Excel. Workers on the factory floor log schedules and quality data in Excel.
Excel is an amazingly flexible program. A new Excel worksheet offers a seemingly endless blank canvas of rows and columns where you can enter, summarize, and report data of any type. Charts and other data visualization tools can convert a page full of numbers to a visual snapshot. Pivot tables can summarize thousands of detailed records to a one-page summary in a few mouse clicks.
If you’ve never opened Excel, or if you’ve used Excel only to neatly arrange lists in columns, this book will get you up to speed with the real-life skills needed to sur-vive in a job that requires familiarity with Excel.
Excel Comes in Many Flavors
When a potential employer asks if you know Excel, you need to ask which version of Excel. There are a lot of products available that have Excel in the name, but offer a different subset of commands.
• Excel 2010is the most recent version of the full-featured Excel program. The full version of Excel is what you will find in use in most job environments.
• Excel Starteris a new version of Excel that ships with new PCs. This free ver-sion of Excel offers the core Excel functionality, such as formatting, formulas, sorting, and filtering. It does not offer advanced commands such as pivot tables. Before 2010, the entry-level spreadsheet program from Microsoft was called Microsoft Works, and it created nonstandard spreadsheet files. The Excel Starter version of Excel can create true Excel files. If you create a file in Excel Starter and send it to someone with Excel 2010, the recipient will be able to open and use the file in Excel 2010.
while they are out of the office. You also might expect college students to use Excel WebApp to collaborate on group projects using this free version of Excel.
• Excel 2007is similar to Excel 2010. If you learned how to use Excel 2010 and begin work where the company uses Excel 2007, you will be able to transfer most of your skills. Some new features, such as sparklines, are missing. The File menu offers far fewer choices than the Excel 2010 File menu. (In Excel 2007, the word “File” was replaced with an Office logo inside a round circle in the top-left corner of the program. This was a bad idea and Microsoft went back to the word “File” in 2010.) For the most part, you should find yourself comfortable working in Excel 2007 using the knowledge that you learn about Excel 2010 using this book.
• Excel 2003, Excel 2002, Excel 2000, and Excel 97are collectively known as the legacy versions of Excel. Although the concepts of entering data and for-mulas in the worksheet are the same, the entire command structure is differ-ent in these versions of Excel. Instead of the intuitive Ribbon interface, you will find long text lists of commands organized on menus, such as File, Edit, View, Insert, and so on. Although the menu system is harder to learn, hun-dreds of millions of people originally learned about Excel using these menus. Nearly half of office computers are still hanging on to their legacy installa-tions of Excel. Be prepared to have a steep learning curve as you try to find where the Excel 2010 commands are located in the old Excel menus.
If this is your first experience with Excel, going to work in an office that is still using Excel 2003 is going to present some frustrations for you and the employer as you try to adjust to the older version of Excel. If the company is still using Excel 2003, it either means that they didn’t have the money to upgrade or that the people at the company are firmly entrenched with and know the old Excel very well. Be up front with your manager. Explain that you learned Excel using Excel 2010. That manager resisted upgrading to Excel 2010 because he or she didn’t want to take the time to get up the learning curve to learn the new Rib-bon interface. As someone who learned on Excel 2010, it will be just as intimi-dating to learn where familiar commands are in the old Excel environment.
This book allows you to customize your own learning experience. The step-by-step instructions in the book give you a solid foundation in using Excel 2010, and rich and varied online content, including video tutorials and audio sidebars.
How This Book Is Organized
This book teaches you the important functions and uses for Microsoft Excel. You should be able to turn to any page and learn a task that will help you in your job using Excel.
Additional content, such as video tutorials, demonstrate key concepts.
Using Excel 2010will teach you the following:
• How to tell the difference between Excel 2010, Excel Starter, and Excel Web Apps.
• How to use the Excel Ribbon Interface.
• Faster ways to enter data in Excel.
• Formatting your data in Excel.
• Entering formulas to perform calculations in Excel.
• Using Excel functions to perform special calculations such as loan payments.
• How to sort your data so that you can see the earliest, latest, largest, or small-est items at the top of your report.
• How to filter your data so that you can find records that match a certain value.
• How to summarize data with subtotals or pivot tables.
• Creating charts and other visualizations from your data.
• Using Excel’s presentation layer to add pictures and diagrams to your reports.
• Learn about the macro recorder so that you can start to build new com-mands in Excel.
• Many other tips and tricks to make your use of Excel more efficient.
The concepts in this book will allow you to get started by entering data and formu-las in Excel. However, the later chapters on pivot tables and charting will provide you with enough advanced techniques to allow you to thrive in any job requiring Excel.
3
After you get up to speed with entering data and formulas in Excel, you might have a tendency to leave this book on the shelf. As your experience with Excel grows, you should come back to peruse the later chapters. Remember that there are usually five ways to accomplish every task in Excel. While you could success-fully add subtotals to a data set using the formula skills from Chapter 5, “Using Formulas,” there is a good chance that using the Subtotal function from Chapter 9, “Subtotals and Grouping,” will allow you to accomplish the same task in a frac-tion of the time. Although you might not realize that you have a need for pivot tables at this moment, as you begin doing more tasks in Excel, it is likely that you will discover that Chapter 10, “Pivot Tables,” can dramatically simplify an oth-erwise tedious task. By revisiting this book once every few weeks, you may dis-cover faster ways to solve real tasks that you encounter at work.
Using This Book
This book allows you to customize your own learning experience. The step-by-step instructions give you a solid foundation in using Excel 2010, and rich and varied online content, including video tutorials and audio sidebars, provide the following:
• Demonstrations of step-by-step tasks covered in the book
• Additional tips or information on a topic
• Practical advice and suggestions
• Direction for more advanced tasks not covered in the book
Here’s a quick look at a few structural features designed to help you get the most out of this book.
• Chapter objective—At the beginning of each chapter is a brief summary of topics addressed in that chapter. This objective enables you to quickly see what is covered.
• Notes—Notes provide additional commentary or explanation that doesn’t fit neatly into the surrounding text. Notes give detailed explanations of how something works, alternative ways of performing a task, and other tidbits to get you on your way.
• Tips—This element gives you shortcuts, workarounds, and ways to avoid pit-falls.
• Cross-references—Many topics are connected to other topics in various ways. Cross-references help you link related information, no matter where that information appears in the book. When another section is related to one you are reading, a cross-reference directs you to a specific page in the book on which you can find the related information.
Let Me Try It
Tasks are presented in a step-by-step sequence so you can easily follow along.
Show Me
Video walks through tasks you’ve just got to see—including bonus advanced techniques.
Tell Me More
Audio delivers practical insights straight from the experts.
Special Features
More than just a book, your USING product integrates step-by-step video tutorials and valuable audio sidebars delivered through the free web edition that comes with every USING book. For the price of the book, you get online access anywhere with a web connection—no books to carry, content is updated as the technology changes, and you benefit from video and audio learning.
About the USING Web Edition
The web edition of every USING book is powered by Safari Books Online, allowing you to access the video tutorials and valuable audio sidebars. Plus, you can search the contents of the book, highlight text and attach a note to that text, print your notes and highlights in a custom summary, and cut and paste directly from Safari Books Online.
To register this product and gain access to the free web edition and the audio and video files, go to quepublishing.com/using.
5
1
Getting to Know the Excel Interface
This chapter shows you how to customize the ways
you interact with and see your work in Excel, both
online and on paper.
Customizing the Ribbon
When Microsoft released the new Ribbon interface in Excel 2007, users couldn’t make changes to the tabs as they could the menus in legacy Excel. If there was a function you wanted quick access to in Excel 2007, you had to add it to the Quick Access toolbar.
With the release of Excel 2010, Microsoft returned the capability to customize the Ribbon. You can modify the existing tabs or create your own.
Removing Default Tabs and Groups
You can customize the Ribbon by hiding tabs or removing groups you don’t think you need.
LET ME TRY IT
Hiding a Tab
To hide a tab, follow these steps:
1. Right-click any tab and select Customize the Ribbon.
2. The list of existing tabs is on the right side of the Customize the Ribbon dialog (see Figure 1.1).
LET ME TRY IT
Removing a Group
You can’t customize the default groups, but you can remove them, making room for your own custom group. To remove a group, follow these steps:
1. Right-click any tab and select Customize the Ribbon.
2. The list of existing tabs is on the right side of the Customize the Ribbon dialog (refer to Figure 1.1).
3. Expand the tab containing the group you want to remove.
4. Select the group to remove and click Remove.
If you remove a group and later decide you want it back, you have two choices: use the Reset option on the Customize the Ribbon dialog, or add the group using the steps from the section “Adding a New Group.”
Creating a Custom Tab
The default tabs and groups in Excel may not be the ones best for you or for a par-ticular situation you are working in. You can insert a custom tab into the Main Tabs group or the Tool tabs group. After the tab has been added, you can add the groups and buttons most useful to you.
C h a p t e r 1
|
G e t t i n g t o K n o w t h e E xc e l I n t e r f a c e [image:28.433.39.398.62.274.2]8
9
C u s t o m i z i n g t h e R i b b o n
LET ME TRY IT
Inserting a New Tab
To create a custom tab in Excel to which you can add groups and buttons that you find most useful, follow these steps:
1. Right-click any tab and select Customize the Ribbon.
2. Select where you want your tab to be from the list on the right side of the dialog. The new tab will be placed below your selection.
3. Click New Tab. Excel creates a new tab with a new group, both with (Cus-tom) after the name.
4. Highlight the new group and click Rename to rename the group.
5. Highlight the new tab and click Rename to rename the tab.
Adding a New Group
Although not required, grouping similar buttons together can make them easier to find, especially if you’re helping someone else find a specific function. When you create a new tab, Excel automatically adds a new group for you, but you may need another group. A custom group is the only way to add buttons to a default tab.
You can also add one of the predefined groups found on the default tabs. These predefined groups are located under the Main Tabs and Tool Tabs commands in the list on the left side of the dialog.
LET ME TRY IT
Adding a Group to an Existing Tab
To add a custom group to an existing tab, follow these steps:
1. Right-click any tab and select Customize the Ribbon.
2. In the list on the right side of the dialog, navigate to where you want to add a new group. The new group will be placed below your selection.
3. Click New Group. Excel creates a new group.
4. Highlight the new group and click Rename to rename the group.
Adding a New Button
C h a p t e r 1
|
G e t t i n g t o K n o w t h e E xc e l I n t e r f a c e [image:30.433.42.396.204.435.2]10
Figure 1.2 Select the command from the list on the left that you want to add to the selected group in the right list box.
LET ME TRY IT
Adding a New Button to a Custom Group
To add a new button to a custom group, follow these steps:
1. Right-click any tab and select Customize the Ribbon.
2. In the list on the right side of the dialog, navigate to the custom group where you want to add the new button. The new button will be placed below your selection, as shown in Figure 1.2.
3. In the list on the left side of the dialog, find the button you want to add.
4. Click Add to add the button to the group.
Minimizing the Ribbon
11
C u s t o m i z i n g t h e Q u i c k A c c e s s To o l b a r
Figure 1.3 When you minimize the Ribbon, only the tab names are visible.
Figure 1.4 Click the arrow by the Help button to minimize the Ribbon. Click it again to make the Ribbon normal again.
To toggle the Ribbon between being minimized and normal, press Ctrl+F1 on the keyboard or click the up/down arrow by the Help button in the upper-right corner of the screen (see Figure 1.4).
Customizing the Quick Access Toolbar
The Quick Access toolbar is located in the upper-left corner of Excel, above the Rib-bon. It is always visible, even when the Ribbon is minimized and, unlike the Ribbon, the commands aren’t dependent on what you are doing in Excel, such as working with a chart.
Move the Quick Access Toolbar
You can move the Quick Access toolbar below the Ribbon by right-clicking the toolbar and selecting Show Quick Access Toolbar Below the Ribbon, as shown in Figure 1.5.
Figure 1.5 You can place the Quick Access toolbar above or below the Ribbon.
Adding Commands to the Quick Access Toolbar
C h a p t e r 1
|
G e t t i n g t o K n o w t h e E xc e l I n t e r f a c e [image:32.433.39.397.92.301.2]12
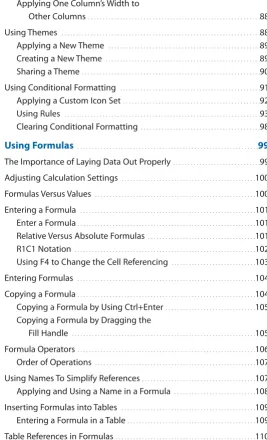
Figure 1.6 The drop-down on the toolbar offers some predefined commands you can use to customize your Quick Access toolbar
Figure 1.7 Customize the Quick Access toolbar through the Customize the Quick Access Toolbar dialog.
• Right-click a button on the toolbar and select Customize Quick Access Toolbar to bring up the Customize the Quick Access Toolbar dialog shown in Figure 1.7. You can customize the Quick Access toolbar in three ways:
[image:32.433.40.396.362.594.2]13
C u s t o m i z i n g t h e Q u i c k A c c e s s To o l b a r
Figure 1.8 If you see Add to Quick Access Toolbar when you right-click a Ribbon item, the command can be added to the Quick Access toolbar.
SHOW ME
Media 1.1—Adding a Command to the Quick Access ToolbarYou can watch a free video of this task when you log on to my.safaribooksonline. com/9780132182287/media.
LET ME TRY IT
Adding a Command to the Quick Access Toolbar
Follow these steps to add a command to the Quick Access toolbar:
1. Right-click a button on the toolbar and select Customize Quick Access Toolbar.
2. Navigate the list on the left side of the dialog box to find the command you want to add to the toolbar.
3. Select the Command and click Add to copy the command over to the Quick Access toolbar.
C h a p t e r 1
|
G e t t i n g t o K n o w t h e E xc e l I n t e r f a c e14
Figure 1.9 Select the workbook you want the custom button for.
Customizing the Quick Access Toolbar for the
Current Workbook
You can add commands to the Quick Access toolbar that will appear only when a specific workbook is open. This can be especially useful if your workbook contains macros you want to activate with buttons.
LET ME TRY IT
Add a Macro Button That Appears Only in the Current
Workbook
Follow these steps to add a macro button to the Quick Access toolbar that only appears when the current workbook is open:
1. Right-click a button on the toolbar and select Customize Quick Access Toolbar.
2. Select the current workbook from the drop-down on the right side of the dialog, as shown in Figure 1.9.
3. Select Macros from the drop-down on the left side of the dialog.
4. Select the macro you want to assign to the toolbar and click Add.
15
D i a l o g L a u n c h e r s
Figure 1.10 Add a command that appears only with the current workbook.
Removing Commands from the Quick Access
Toolbar
You can remove a command from the Quick Access toolbar in three ways:
• Click the drop-down arrow on the right end of the toolbar and deselect the command from the list of predefined commands.
• Right-click any button on the toolbar or Ribbon and select Customize Quick Access Toolbar to bring up the Customize the Quick Access Toolbar dialog. Select the command from the list on the right side of the dialog and click Remove.
• Right-click the command button itself in the Quick Access toolbar and select Remove from Quick Access Toolbar.
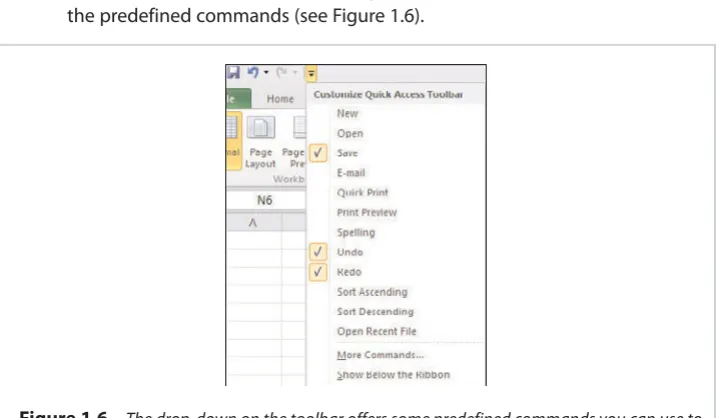
Dialog Launchers
In legacy Excel, when you selected a menu option, such as File, Format Cells, a dia-log would appear for you to interact with. With the Ribbon, many, but not all, of the options from the dialog appear on a Ribbon. It can be frustrating trying to find one of those missing commands. You can find the other commands that you knew were with it in legacy Excel, but it’s not in that group on the Ribbon.
You could customize the Ribbon to show the command you are looking for, but there may be another way. Some groups on the Ribbon have a little extra image in the lower-right corner, as shown in Figure 1.11. Click that little arrow, and the dia-log you were used to from legacy Excel will appear.
6. Select a Symbol for the button and change the Display Name that will appear when the cursor hovers over the button. Click OK.
C h a p t e r 1
|
G e t t i n g t o K n o w t h e E xc e l I n t e r f a c e16
Zoom
The capability to zoom in and out on a sheet is an often-forgotten functionality in Excel. Instead, large fonts are used when designing a sheet; then the designer later wonders why problems occur, such as the validation text being too small to see. Instead of relying on font size to make text on the sheet larger, zoom in on the sheet.
You can use three ways to change the zoom on a sheet:
• View, Zoom—On the View tab, the Zoom group contains three options for zooming on a sheet:
• Zoom—Brings up the Magnification dialog.
• 100%—Sets the zoom to 100%.
• Zoom to Selection—Zooms in on the selected range.
• Wheel Mouse—While holding down the Ctrl key, use the scroll button on your mouse to zoom in and out.
[image:36.433.40.395.60.285.2]• Zoom Slider—In the lower-right corner of the Excel window is the Zoom Slider, shown in Figure 1.12. You can use the slider or the - and + buttons to change the zoom of the active sheet.
17
[image:37.433.34.399.279.596.2]Pa g e B r e a k Pr e v i e w
Figure 1.13 Place your cursor over the dashed blue line so it becomes a double arrow.
Figure 1.14 After you’ve moved the automatically set column break, it changes from a dashed line to the solid line of a manually set break.
Page Break Preview
With Page Break Preview, you can see where columns and rows will break to print onto other pages. Dashed lines signify automatic breaks that Excel places based on settings, such as margins. Solid lines are manually set breaks.
LET ME TRY IT
Changing a Page’s Column Break
Follow these steps to change the location of a column break:
1. Select Page Break Preview from the View tab.
2. Place your cursor over the blue column line you want to move until it becomes a double arrow, as shown in Figure 1.13.
3. Hold down the left mouse button and move the blue line to where you want the column break to be.
4. Release the mouse button. The dashed blue line becomes a solid blue line, as shown in Figure 1.14.
C h a p t e r 1
|
G e t t i n g t o K n o w t h e E xc e l I n t e r f a c e18
Figure 1.15 You can edit the header directly while in Page Layout mode.
Page Layout
The Page Layout viewing mode is like an editable Print Preview—you can see what your page will look like when it prints out, but you can still enter data and make other changes. Columns and rows will move between pages as you adjust their widths or the margins of the page. You can also enter information directly into the header and footer of a page.
LET ME TRY IT
Inserting the Filename and Date into the Header
Follow these steps to enter the filename in the left header and date in the right header while in Page Layout view mode:
1. Go to View, Page Layout.
2. Move your mouse to the top of the page where it says Click to Add Head-er. As you move your mouse left and right, the different parts of the head-er will be highlighted, as shown in Figure 1.15
3. Click the left header field.
4. Go to Header & Footer Tools, Design and select File Name. The code for File Name, &[File], will be placed in the header field.
5. Click the right header field.
6. Go to Header & Footer Tools, Design, and select Current Date. The code for Current Date, &[Date], will be placed in the header field.
19
Pa g e N u m b e r i n g
Figure 1.16 Insert the file name and date in the header.
Figure 1.17 Use the dialog launcher (circled) to open the Page Setup dialog and access the Header/Footer dialog to insert page numbering.
Page Numbering
Page numbering is set up in the header or footer of a sheet. To access the Page Setup dialog, go to File, Print and click the Page Setup link at the bottom of the Settings or go to the Page Layout tab and click the dialog launcher in the lower right corner of the Page Setup group, circled in Figure 1.17. From the Page Setup dialog, select the Header/Footer tab. When you customize the header or footer, the options for inserting page numbering will be available.
LET ME TRY IT
Inserting
Page
of
Pages
Page Numbering
To insert page numbering based on the total number of pages, follow these steps:
C h a p t e r 1
|
G e t t i n g t o K n o w t h e E xc e l I n t e r f a c e20
2. Select the Header/Footer tab from the Page Setup dialog.
3. Click Custom Header or Custom Footer.
4. From the Header or Footer dialog that appears, place your cursor in the section you want the page numbering to appear.
5. Click Insert Page Number, which is the second button.
6. Type “of” (space ofspace).
7. Click Insert Number of Pages, which is the third button.
8. Click OK twice
Repeating Rows or Columns When Printing
When you have a report that spans several pages, you probably want to repeat your row or column headers on all the pages.
LET ME TRY IT
Repeating a Header Row
Follow these steps to have your header row repeat at the top of each printed page:
1. Go to Page Layout, Print Titles.
2. Click the Collapse Dialog button on the far right side of the Rows to Repeat at Top field. This minimizes the dialog and allows you to interact with the sheet.
3. Select the row(s) you want to repeat by clicking the numbered row header(s).
4. Click the button on the far right side of the Rows to Repeat at Top field to return to the dialog.
5. Click OK. The selected row(s) will now repeat at the top of each printed page.
Freezing Panes
21
Fr e e z i n g Pa n e s
Figure 1.18 Table column headers become part of the column headings so that they are always visible when you scroll down the sheet.
inconvenient when you have a lot of data and need the identifying headers. With the Freeze Panes options, you can force the top rows, leftmost columns, or both to remain visible as you scroll around the sheet.
Three options are available under Freeze Panes:
• Freeze Panes—Rows and/or columns are frozen depending on the cell you have selected at the time. This option changes to Unfreeze Panes if any rows or columns are already frozen.
• Freeze Top Row—Freezes the first visiblerow of the sheet.
• Freeze First Column—Freezes the first visiblecolumn of the sheet.
When using Freeze Top Row or Freeze First Column, the selection of one will automatically undo the selection of the other. So, if you want to freeze the top row and first column, you must use Freeze Panes.
SHOW ME
Media 1.2—Freezing ColumnsYou can watch a free video of this task when you log on to my.safaribooksonline. com/9780132182287/media.
LET ME TRY IT
Freezing Columns and Rows at the Same Time
To freeze columns and rows at the same time, follow these steps:
C h a p t e r 1
|
G e t t i n g t o K n o w t h e E xc e l I n t e r f a c e22
2. On the View tab, select Freeze Panes, Freeze Panes.
Working with Custom Views
Custom Views allow you to save the way you have a workbook set up. The hidden rows and columns, filter settings, and print settings are all saved, making it easy to switch between Data Entry mode, which shows all your data, and a Presentation mode, which hides your calculation columns and rows.
Custom views will not work if there’s a Table in the workbook.
LET ME TRY IT
Creating a Custom View of Filtered Data
Follow these steps to create a custom view with a preset filter:
1. Select a cell in your data.
2. Go to Data, Filter.
3. Set up the filters the way you want them.
4. Go to View, Custom Views, and click Add.
5. Enter the name of the view in the Name field.
6. Deselect Print Settings if you do not want the print setup saved with the view.
7. The next time you want to view your data in this configuration, go to View, Custom Views, select the view from the list, and click Show.
23
A r r a n g i n g Wi n d o w s
Figure 1.19 To insert a new row 10, right-click on the row header (the 10) and select Insert from the menu. The current row 10 and all the data after it will shift down.
Arranging Windows
Excel offers two methods for viewing data side by side In the Window group on the View tab, Arrange All opens the Arrange Windows dialog, allowing you to arrange all the current windows in a Tiled, Horizontal, Vertical, or Cascade View. In Excel 2007, View Side by Side was introduced to users. It provides a quick way of viewing two windows horizontally. You can then select Synchronous Scrolling to lock the scrollbars together and move the data on both sheets at the same time.
Inserting Rows & Columns
To insert a new row or column within an existing dataset, select the row or column where you want the insert to go and go to Home, Cells. From the Insert drop-down select to Insert Sheet Rows or Insert Sheet Columns. For a shortcut, you can right-click on the row or column header and select Insert, as shown in Figure 1.19.
C h a p t e r 1
|
G e t t i n g t o K n o w t h e E xc e l I n t e r f a c e24
Figure 1.20 Use the Move or Copy dialog, quickly accessed by right-clicking on a sheet tab, to move or copy sheets within a workbook or to a new workbook.
LET ME TRY IT
Inserting a Row
To insert a new row within an existing dataset, follow these steps. To insert the row through the Ribbon options, start at step 3, else continue to step 1 to insert a row using the right-click option.
1. Right-click over the row number’s header where you want to insert a blank row. In Figure 1.19, a blank row will be inserted in row 10, so the cursor is placed over the header 10.
2. Select Insert. The new row is inserted and the existing data moved down.
3. To insert a row through the Ribbon options, select a cell in the row where you want a new blank row to be inserted.
4. Go to Home, Cells, Insert and select Insert Sheet Rows. The new row is insert-ed and the existing data movinsert-ed down.
Renaming a Sheet
To rename the active sheet, go to Home, Cells, Format and select Rename Sheet from the drop-down. Excel will select the current sheet name in the sheet’s tab and you can then type in the new name. You can also rename a sheet by right-clicking on a sheet’s tab and selecting Rename.
Moving or Copying Sheets
25
C h a n g e M u l t i p l e Wo r k s h e e t s a t O n e T i m e
Within the Workbook
To move or copy the active sheet to a new location within the same workbook using the Move or Copy dialog, make sure the To Book field is the current work-book. If you’re making a copy of the sheet, check the Create a Copy box. Then, in the Before Sheet dialog, select the sheet you want the active sheet to be placed in front of (to the left of ). You can also reorganize the sheets in a workbook by click-ing and draggclick-ing the sheet’s tab to a new location. If you want to copy the sheet, hold down the Ctrl key as you move the sheet tab.
Between Workbooks
To move or copy a sheet to another workbook, the second workbook must already be open. Then, using the Move or Copy dialog, select the workbook to move or copy the sheet to from the To Book field. If you’re making a copy of the sheet, check the Create a Copy box. In the Before Sheet dialog, select the sheet you want the active sheet to be placed in front of (to the left of ).
When you move or copy a sheet from one workbook to another, any formulas on that sheet linked to the original workbook will remain linked.
LET ME TRY IT
Copying a Sheet to a New Workbook
To copy a sheet to a new workbook, follow these steps:
1. Open both workbooks.
2. Go to the sheet you want to copy.
3. Go to Home, Cells, Format, Move or Copy. The Move or Copy dialog appears.
4. In the To Book field, select the workbook to copy the sheet to.
5. Check the Create a Copy button.
6. Select the sheet you want to copy the sheet in front of (to the left of ).
7. Click OK.
Change Multiple Worksheets at One Time
C h a p t e r 1
|
G e t t i n g t o K n o w t h e E xc e l I n t e r f a c e26
word “Sales” in A1 of all the selected sheets. Or you can apply a bold format to cell C2 in a group of sheets.
To group sheets together, select one sheet that will be in the group, then, while holding down the Ctrl key, select the other sheets. To ungroup the sheets, either select a sheet not in the group, or right-click on any sheet tab in the group and select Ungroup Sheets.
LET ME TRY IT
Changing Multiple Sheets
To make a change to multiple sheets by just changing one sheet, follow these steps:
1. Go to one of the sheets you need to change.
2. While holding down the Ctrl key, select the sheet tabs of the other sheets you want to make the same change to. This will group the sheets together.
3. Make the changes to the active sheet.
4. To ungroup the sheets, select a sheet not in the group, or right-click on a sheet tab and select Ungroup Sheets.
Setting Workbook and Sheet Protection
Depending on what part of a workbook you want to protect from changes, you should protect the workbook or the worksheet.
Setting Workbook Protection
Protecting a workbook prevents users from adding, deleting or moving sheets. It can also prevent the user from resizing the workbook, though you can still resize the Excel window. To protect a workbook, go to Review, Protect Workbook. There are two options available:
• Structure—Prevents users from adding, deleting, hiding, unhiding, moving, renaming, inserting or copying sheets.
• Windows—Prevents the user from moving or resizing windows of the work-book.
27
R e c e n t D o c u m e n t s
Figure 1.21 You can stick the workbooks you use often and place them at the top for easy opening.
Setting Sheet Protection
Protecting a sheet prevents users from changing the content of locked cells. By default, all cells have the locked option selected and you purposefully unlock them. Sheet protection must be applied to each sheet individually.
To protect a sheet, go to Home, Format, Protect Sheet. The Protect Sheet dialog will appear from which you can select what actions a user can do to the sheet. You can also enter a password. You will have to enter it twice.
Unlocking Cells
While a sheet is still unprotected, you can unlock specific cells so that when the sheet is protected, users can still enter information in the cells you want. To change the protection of selected cells, go to Home, Cells, Format, Format Cells. In the For-mat Cells dialog, go to the Protection tab and unselect the Locked option.
Recent Documents
Under File, Recent, you can see the last several workbooks that were opened. The number of workbooks listed is an option set under File, Options, Advanced, Display, Show This Number of Recent Documents.
C h a p t e r 1
|
G e t t i n g t o K n o w t h e E xc e l I n t e r f a c e28
Figure 1.22 You can choose from a variety of options when saving your workbook as a PDF.
Saving as PDF
Even with the ease of sharing workbooks using Excel Web Apps, PDFs are still a great option because they don’t require a connection to the Internet, and users don’t have access to your workbook.
You can create a PDF from within Excel simply by saving your workbook. PDF is now a file type in the Save as Type drop-down of the Save As dialog. After you select the Save as Type, you can choose from a variety of options, as shown in Figure 1.22.
Opening Templates
Templates are a great way for keeping data in a uniform design. You could simply design your workbook and re-use it as needed, but if you accidentally save data before you have renamed the file your blank workbook is no longer clean. When using a template, there’s no risk of saving data in the template because you are working with a copy of the original file, not the file itself.
There are two possible meanings to the words “opening a template.” Depending on what you want to do with the template, the methods for opening the file differ:
• Open a template copy for creating a new workbook.
• Double-click the file from its saved location.
• Right-click the file and select New.
29
Tr o u b l e s h o o t i n g E xc e l O p t i o n s
Table 1.1 Possible Situations and Solutions
Situation Check This Setting The minitoolbar is missing or you need to hide the
minitool-bar.
General, User Interface Options, Show Mini Toolbar on Selection
Column headings A, B, C have been replaced with 1, 2, 3. Formulas, Working with Formulas, R1C1 Reference Style You are unable to drag cell contents; the Fill handle is gone. Advanced, Editing Options, Enable Fill Handle, and Cell
Drag-and-Drop You are unable to edit directly in a cell; you can edit only in
the formula bar.
Advanced, Editing Options, Allow Editing Directly in Cells AutoComplete no longer appears when you enter data in a
cell.
Advanced, Editing Options, Enable AutoComplete for Cell Values; also ensure there are no blank rows separating your new entry and previous entries
Instead of moving the sheet up/down when you scroll the mouse, the sheet zooms in/out. You want the sheet to zoom in/out when you use the wheel on the mouse.
Advanced, Editing Options, Zoom on roll with the IntelliMouse
Multiple workbooks are open, but only one Excel item shows in the task bar.
Advanced, Display, Show All Windows in the Taskbar The formula bar has disappeared, or you want to hide the
for-mula bar.
Advanced, Display, Show Formula Bar or View tab, Formula Bar
Instead of the calculated values, the formulas are showing in the cells.
Advanced, Display Options for This Worksheet, Show Formulas in Cells Instead of Their Calculated Results or press Ctrl+~
When you double-click to open a workbook, Excel opens, but remains blank.
Advanced, General, Ignore Other Applications That Use Dynamic Data Exchange (DDE)
• Open the template original to make changes.
• Right-click the file and select Open.
• Go to File, Open.
Troubleshooting Excel Options
2
Introducing the Excel Web App
This chapter shows you how to upload and
down-load workbooks to and from the Windows
SkyDrive.
This chapter will help you get started working on and sharing your Excel files online. For a more in-depth coverage of Microsoft Office Web Apps and using SkyDrive, refer to Using the Microsoft Office Web Apps(ISBN 0-7897-4486-4) by Paul McFedries.
Requirements
You don’t need much to get started with the Excel Web App:
• A current browser (minimum: Internet Explorer 7, Mozilla Firefox 3, or Safari 3)
• A Windows Live ID
• An Internet connection
With these three items, you can view your Excel workbooks anywhere in the world where you can access Windows Live.
Acquiring a Windows Live ID
With a Windows Live ID, you can access the Windows Live SkyDrive online storage where you can store, view, edit, and share your Excel workbooks.
You don’t need a Windows Live ID if you are accessing someone else’s SkyDrive and it’s set up to not require a login. But if you want to upload your own files or access a SkyDrive requiring login, you will need a Windows Live ID.
SHOW ME
Media 2.1—Creating a Windows Live IDC h a p t e r 2
|
I n t r o d u c i n g t h e E xc e l We b A p p [image:52.433.40.397.303.561.2]32
Figure 2.1 Go to https://signup.live.com to create your Window Live ID account.
LET ME TRY IT
Creating a Windows Live ID
A Windows Live ID enables you to log in to a variety of websites, such as Windows Live, Hotmail, and Xbox Live, using one account. If you already log into a Microsoft-owned site, it is possible you already have a Windows Live ID. You can create the account using an existing email address or obtain a new email address through the live.com or hotmail.com domains, as shown in Figure 2.1. Follow these steps to cre-ate a Windows Live ID:
33
A c q u i r i n g a Wi n d o w s L i v e I D
2. If you have an existing email address you want to use, type it into the Use Your E-Mail Address field, press the Tab key, and skip to step 6. Otherwise, click the Or Get a Windows Live E-Mail Address link to create a new email address and continue to step 3.
3. In the Windows Live ID domain list drop-down, select the domain you want to have the address for (live.com or hotmail.com).
4. In the Windows Live ID text field, type the username you want.
5. Click Check Availability to see if your username and domain combination is available.
6. If Windows Live informs you that the ID isn’t available, repeat steps 3–5; otherwise, if the ID is available, continue to step 7.
7. Type your password into the Create a Password field.
8. Type the same password again into the Retype Password field.
9. If you aren’t using an existing email address to create the Live ID account, tell Windows Live what you want to do in case you forget your password:
• Use the Alternate E-Mail Address if you want Windows Live ID to email you password reset information. The email address must be different from your Windows Live ID.
• Select the Or Choose a Security Question for Password Reset link if you want to verify your identity online. Select a predefined question from the Question list and enter the correct response in the Secret Answer field. The response must be at least five characters.
10. Fill in the rest of the requested information: name, location, gender and birth year.
11. In the Characters field, type the characters you see in the image.
12. Click I Accept. Windows Live will create your new ID.
Uploading and Downloading Workbooks
C h a p t e r 2
|
I n t r o d u c i n g t h e E xc e l We b A p p34
Only unprotected workbooks can be opened online.
Accessing the SkyDrive
You can sign into your Windows Live account from any site that supports the accounts, such as MSN.com or Bing