User Guide
From Getting Started... To Getting More From Your Store
ii
Important Notice
Magento reserves the right to make corrections, modifications, enhancements, improvements, and other changes to its products and services at any time and to discontinue any product or service without notice. Customers should obtain the latest relevant information before placing orders and should verify that such information is current and complete. All products are sold subject to Magento‘s terms and conditions of sale supplied at the time of order acknowledgment. Magento warrants performance of its products to the specifications applicable at the time of sale in accordance with Magento‘s standard warranty. Testing and other quality control techniques are used to the extent Magento deems necessary to support this warranty. Except where mandated by government requirements, testing of all parameters of each product is not necessarily performed.
Magento assumes no liability for applications assistance or customer product design. Customers are responsible for their products and applications using Magento components. To minimize the risks associated with customer products and applications, customers should provide adequate design and operating safeguards.
Magento does not warrant or represent that any license, either express or implied, is granted under any Magento patent right, copyright, mask work right, or other Magento intellectual property rights relating to any combination, machine, or process in which Magento products or services are used. Information published by Magento regarding third-party products or services does not constitute a license from Magento to use such products or services or a warranty or endorsement thereof. Use of such information may require a license from a third party under the patents or other intellectual property of the third party, or a license from Magento under the patents or other intellectual property of Magento.
Resale of Magento products or services with statements different from or beyond the parameters stated by Magento for that product or service voids all express and any implied warranties for the associated Magento product or service and is an unfair and deceptive business practice.
Magento is not responsible or liable for any such statements.
All company and brand products and service names are trademarks or registered trademarks of their respective holders.
Magento® is a registered trademark of Magento, Inc. Copyright © 2012 Magento, Inc.
Table of Contents
Table of Contents
ABOUT THIS GUIDE
1
SUPPORT AND CONTACT INFORMATION
2
CONVENTIONS USED IN THIS GUIDE
2
1
INTRODUCING MAGENTO COMMUNITY EDITION
3
1.1
W
HAT ISM
AGENTOCE?
3
1.2
M
AGENTOCE
L
ICENSE3
1.3
M
AGENTOCE
F
RONTEND ANDB
ACKEND3
F
RONTEND(T
HEW
EBS
TOREF
RONT)
4
B
ACKEND(T
HEB
ACKO
FFICE)
5
1.4
M
AGENTOCE
C
ONCEPTS5
1.5
A
DVANCEDM
AGENTOCE
C
USTOMIZATIONO
PTIONS8
2
INSTALLING MAGENTO CE
9
2.1
S
YSTEMR
EQUIREMENTS9
2.2
I
NSTALLINGM
AGENTOCE
10
S
TEP1:
D
OWNLOADINGM
AGENTOCE
10
S
TEP2:
D
OWNLOADINGS
AMPLED
ATA11
S
TEP3:
U
PLOADING TOY
OURS
ERVER12
S
TEP4:
G
RANTINGF
ILEA
CCESSP
ERMISSIONS13
S
TEP5:
S
ETTINGU
P THEW
EBS
TORED
ATABASE13
S
TEP6:
I
NSTALLINGM
AGENTOCE
14
3
BASIC CONFIGURATION
23
3.1
A
CCESSING THEB
ACKEND23
3.2
S
TOREH
IERARCHY25
W
EBSITES25
S
TORES25
S
TOREV
IEWS25
3.3
S
TOREP
AGESG
ENERALC
ONFIGURATION25
Table of Contents
iv
3.4
S
TOREC
ONTACTSC
ONFIGURATION29
W
EBS
TOREE
MAILS29
C
ONTACTS30
S
ALESE
MAILS31
3.5
S
HIPPINGS
ETTINGS32
3.6
C
OOKIER
ESTRICTIONM
ODE35
E
NABLING ANDC
ONFIGURINGC
OOKIER
ESTRICTIONM
ODE36
C
OOKIER
ESTRICTIONM
ODE:
I
MPLEMENTATIOND
ETAILS36
C
OOKIESU
SED INM
AGENTO37
4
INTRODUCING THE FRONTEND
41
4.1
O
VERVIEW41
4.2
F
INDING THER
IGHTP
RODUCTS42
C
ATEGORIES42
F
ILTERING THED
ISPLAY OFP
RODUCTS43
P
OPULART
AGS45
S
EARCHING46
C
OMPARINGP
RODUCTS46
S
ORTINGP
RODUCTS47
G
RID/L
ISTV
IEW48
R
ECENTLYV
IEWED49
4.3
P
ROMOTIONALI
NFORMATION49
P
RODUCTL
ISTB
ANNERS50
P
ROMOTIONALP
AGES50
U
P-
SELLP
RODUCTS51
R
ELATEDP
RODUCTS52
C
ROSS-
SELLP
RODUCTS52
P
RODUCTP
AGES53
4.4
W
EBS
TOREP
AGEH
EADER ANDF
OOTER54
T
HEH
EADER55
T
HEF
OOTER55
4.5
P
URCHASINGF
UNCTIONALITY56
4.6
M
ANAGINGC
USTOMERR
ELATIONS60
C
USTOMERE
MAILS60
R
ATINGS ANDR
EVIEWS60
C
OMMUNITYP
OLLS61
Table of Contents
5.1
U
NDERSTANDINGS
COPE63
5.2
M
ANAGINGA
DMINISTRATORM
ESSAGES64
5.3
S
UPERVISINGW
EBS
TOREA
CTIVITIES65
C
HART65
L
EFTI
NFORMATIONP
ANEL66
B
OTTOMI
NFORMATIONT
ABS66
5.4
M
ANAGINGO
RDERS66
V
IEWING THEO
RDERS INY
OURW
EBS
TORE67
V
IEWING ANO
RDER’
SD
ETAILS68
C
OMMENTH
ISTORYP
AGE70
T
RANSACTIONSP
AGE70
C
REATINGN
EWO
RDERS70
5.5
M
ANAGINGR
ATINGS ANDR
EVIEWS71
5.6
G
ENERATINGR
EPORTS71
6
SETTING UP YOUR CATALOG
73
6.1
O
VERVIEW73
6.2
S
ETTINGU
PC
ATALOGD
EFAULTS74
F
RONTEND74
S
ITEMAP76
P
RODUCTR
EVIEWS76
P
RODUCTA
LERTS76
P
RODUCTA
LERTSR
UNS
ETTINGS77
P
RODUCTI
MAGEP
LACEHOLDERS77
R
ECENTLYV
IEWED/C
OMPAREDP
RODUCTS77
P
RICE78
L
AYEREDN
AVIGATION78
C
ATEGORYT
OPN
AVIGATION78
S
EARCHE
NGINEO
PTIMIZATIONS78
C
ATALOGS
EARCH79
D
OWNLOADABLEP
RODUCTSO
PTIONS80
D
ATE ANDT
IMEC
USTOMO
PTIONS81
6.3
M
ANAGINGC
ATEGORIES81
D
ISPLAYINGC
ATEGORIES82
C
REATINGC
ATEGORIES83
Table of Contents
vi
P
RICEL
AYEREDN
AVIGATION90
6.4
M
ANAGINGP
RODUCTA
TTRIBUTES92
W
HAT IS ANA
TTRIBUTE INM
AGENTO?
92
C
REATINGA
TTRIBUTES93
6.5
C
REATINGA
TTRIBUTES
ETS96
C
REATING AN
EWA
TTRIBUTEG
ROUP98
6.6
M
ANAGINGP
RODUCTS99
P
RODUCTT
YPES100
C
REATING AN
EWP
RODUCT100
6.7
T
HES
PECIALP
RICE FIELD IS USED FOR DISCOUNTING OR PROMOTIONS,
ASDESCRIBED IN
“A
UTO-G
ENERATINGC
OUPONC
ODES104
A
UTO-G
ENERATINGC
OUPONC
ODESQ
UICKR
EFERENCEE
RROR!
B
OOKMARK NOTDEFINED
.
C
ONFIGURINGC
OUPONC
ODESA
UTO-G
ENERATIONS
ETTINGSE
RROR!
B
OOKMARK NOT DEFINED.
A
UTO-G
ENERATING,
E
XPORTING,
ANDM
ANAGINGC
OUPONC
ODESE
RROR!
B
OOKMARK NOT DEFINED.
T
RACKING THEU
SAGE OFC
OUPONC
ODESE
RROR!
B
OOKMARK NOT DEFINED.
M
ASS-C
HANGINGP
RODUCTS128
6.8
C
REATINGV
ARIATIONS OF AP
RODUCT128
6.9
I
MPORTING ANDE
XPORTINGP
RODUCTD
ATA131
W
ORKING WITHCSV
F
ILES131
I
MPORTINGP
RODUCTD
ATA132
E
XPORTINGP
RODUCTD
ATA133
7
SETTING UP YOUR STORE HIERARCHY
135
8
TAXES
137
8.1
G
ENERALT
AXATIONS
ETTINGS137
8.2
P
RODUCTT
AXC
LASS139
8.3
C
USTOMERT
AXC
LASS140
8.4
T
AXZ
ONES ANDR
ATES141
8.5
T
AXM
ANAGEMENTR
ULES142
9
SHIPPING
145
Table of Contents
9.2
F
LATS
HIPPINGR
ATES145
9.3
O
NLINER
ATES147
9.4
O
FFERINGF
REES
HIPPING148
9.5
A
CQUIRINGA
DDITIONALS
HIPPINGM
ODULES149
10
PAYMENT
151
10.1
P
AYP
AL151
10.2
P
AYP
ALA
DVANCED153
G
ENERALC
ONCEPT153
C
ONFIGURINGP
AYP
ALP
AYMENTSA
DVANCED153
S
ETTINGP
AYP
ALP
AYMENTSA
DVANCEDO
PTIONS IN THEM
AGENTOA
DMINP
ANEL154
S
ETTING THEP
AYP
ALP
AYMENTSA
DVANCEDA
CCOUNTO
PTIONS ON THEP
AYP
ALM
ANAGERW
EBSITE155
P
AYP
ALP
AYMENTSA
DVANCEDM
ETHOD:
C
USTOMERE
XPERIENCE156
O
RDERP
ROCESSINGW
HEN THEP
AYP
ALA
DVANCEDP
AYMENTM
ETHODI
SU
SED156
10.3
P
AYP
ALE
XPRESSC
HECKOUT157
S
AVING THEC
USTOMER’
SB
ILLINGA
DDRESS157
O
RDERT
RANSACTIONS INP
AYP
ALE
XPRESS159
10.4
O
THERP
AYMENTM
ETHODS161
S
AVEDC
REDITC
ARDS161
C
HECKS ANDM
ONEYO
RDERS164
O
THERP
AYMENTM
ETHODS165
11
DESIGN AND CONTENT
167
11.1
O
VERVIEW167
11.2
T
ERMINOLOGY167
11.3
C
HANGING THEW
EBS
TORE’
ST
HEME168
11.4
M
ANAGINGCMS
P
AGES172
11.5
C
USTOMIZINGT
RANSACTIONALE
MAILS175
11.6
F
ACEBOOKO
PENG
RAPHE
XTENSION2.0
FORM
AGENTO177
C
OMPATIBILITY177
D
OWNLOADING ANDI
NSTALLING177
I
NSTALLING177
Table of Contents
viii
12
PROMOTIONS
187
12.1
O
VERVIEW187
12.2
U
P-
SELLING,
R
ELATEDP
RODUCTS,
ANDC
ROSS-
SELLING187
U
P-S
ELLS188
R
ELATEDP
RODUCTS190
C
ROSS-
SELLS191
12.3
C
ATALOG ANDS
HOPPINGC
ARTP
RICER
ULES192
C
ATALOGP
RICER
ULES192
S
HOPPINGC
ARTP
RICER
ULES197
E
XAMPLE:
D
EFINING AB
UY2
G
ET1
F
REEP
ROMOTION201
12.4
A
UTO-G
ENERATINGC
OUPONC
ODES202
A
UTO-G
ENERATINGC
OUPONC
ODESQ
UICKR
EFERENCE202
C
ONFIGURINGC
OUPONC
ODESA
UTO-G
ENERATIONS
ETTINGS203
A
UTO-G
ENERATING,
E
XPORTING,
ANDM
ANAGINGC
OUPONC
ODES203
T
RACKING THEU
SAGE OFC
OUPONC
ODES204
12.5
S
PECIALP
RICES205
12.6
T
IERP
RICING206
12.7
M
INIMUMA
DVERTISEDP
RICE208
M
INIMUMA
DVERTISEDP
RICE–
G
ENERALC
ONCEPT208
M
INIMUMA
DVERTISEDP
RICE–
AQ
UICKV
IEW209
S
ETTINGU
PMAP
213
S
ETTING UPMAP
ON THE GLOBAL LEVEL213
S
ETTINGU
PMAP
ON THEP
RODUCTL
EVEL215
H
OWMAP
I
SA
PPLIED FORD
IFFERENTP
RODUCTT
YPES215
H
OWMAP
I
SA
PPLIED FORD
IFFERENTP
RICES
ETTINGS216
12.8
P
RODUCTG
ROUPP
RICE216
T
ERMINOLOGY216
S
ETTING AG
ROUPP
RICE FOR AP
RODUCT217
G
ROUPP
RICEI
MPLEMENTATIOND
ETAILS217
12.9
N
EWSLETTERS218
N
EWSLETTERT
EMPLATES219
N
EWSLETTERQ
UEUES221
N
EWSLETTERR
EPORTS221
13
MANAGING ORDERS AND CUSTOMERS
223
13.1
M
ANAGINGC
USTOMERS223
Table of Contents
A
DDING AC
USTOMER224
M
ANAGINGC
USTOMERG
ROUPS224
C
HECKINGO
NLINEC
USTOMERS225
C
USTOMERR
EPORTS226
I
MPORTING ANDE
XPORTINGC
USTOMERI
NFORMATION226
13.2
M
ANAGINGO
RDERS227
O
RDERST
ERMINOLOGY228
C
REATINGN
EWO
RDERS229
C
LEARING THES
HOPPINGC
ART232
R
EFUNDING233
14
MANAGING CUSTOMER-GENERATED CONTENT
235
14.1
M
ANAGINGR
ATINGS ANDR
EVIEWS235
A
DDING AC
USTOMR
ATING236
A
PPROVINGR
EVIEWS FORP
UBLICV
IEWING237
14.2
M
ANAGINGT
AGS238
A
DDINGT
AGS239
A
PPROVINGT
AGS239
14.3
M
ANAGINGP
OLLS240
E
DITING AP
OLL242
15
MONITORING AND IMPROVING THE WEB STORE
243
15.1
R
EPORTS243
G
ENERATINGR
EPORTS243
R
EFRESHINGS
ALESR
EPORTS
TATISTICS244
A
VAILABLER
EPORTS244
15.2
S
EARCHS
YNONYMS ANDR
EDIRECTS246
15.3
G
OOGLEA
NALYTICS247
16
KEEPING YOUR STORE HEALTHY
249
16.1
B
ACKUPS ANDR
OLLBACKS249
B
ACKUP ANDR
OLLBACKQ
UICKR
EFERENCE249
C
REATING ANDM
ANAGINGB
ACKUPS249
R
OLLINGB
ACK THES
YSTEM250
L
IMITINGA
CCESS TO THEB
ACKUP ANDR
OLLBACKF
UNCTIONALITY FORA
DMINU
SERS250
C
REATING AB
ACKUP FROM THEM
AGENTOC
ONNECTM
ANAGER251
Table of Contents
x
16.3
U
PDATINGM
AGENTOCE
253
16.4
E
XTENDINGM
AGENTO255
16.5
CAPTCHA
257
CAPTCHA:
Q
UICKR
EFERENCE257
E
NABLING ANDC
ONFIGURINGCAPTCHA
FOR THEB
ACKEND258
E
NABLING ANDC
ONFIGURINGCAPTCHA
FOR THEF
RONTEND259
CAPTCHA:
U
SERE
XPERIENCE260
17
GETTING HELP
263
K
NOWLEDGEB
ASE263
W
EBINARA
RCHIVE264
S
CREEN CASTS264
M
AGENTOD
ESIGNER’
SG
UIDE264
M
AGENTOB
LOG264
M
AGENTO ONT
WITTER264
T
ECHNICALD
OCUMENTS ANDM
AGENTOC
OREAPI
264
APPENDIX: VAT ID VALIDATION
265
VAT
ID
V
ALIDATIONQ
UICKR
EFERENCE265
C
ONFIGURINGVAT
ID
V
ALIDATION266
C
REATING THEVAT-R
ELATEDC
USTOMERG
ROUPS266
C
ONFIGURING THEVAT-R
ELATEDT
AXR
ULES266
E
NABLING ANDC
ONFIGURING THEVAT
ID
V
ALIDATIONF
UNCTIONALITY268
C
ONFIGURINGA
DDITIONALS
ETTINGS FOR THEVAT
ID
V
ALIDATIONF
EATURE270
VAT
ID
V
ALIDATIONI
MPLEMENTATIOND
ETAILS:
C
USTOMERE
XPERIENCE270
A
SSIGNINGC
USTOMERG
ROUPSB
ASED ONVAT
ID
V
ALUE DURINGR
EGISTRATION270
A
PPLYING ANDA
SSIGNINGC
USTOMERG
ROUPSD
URINGC
HECKOUT271
VAT
ID
V
ALIDATIONI
MPLEMENTATIOND
ETAILS:
A
DMINE
XPERIENCE273
T
HEVAT
N
UMBERC
USTOMERA
DDRESSA
TTRIBUTE273
D
ISABLINGA
UTOMATICC
USTOMERG
ROUPC
HANGE273
VAT
ID
V
ALIDATION INC
USTOMERA
CCOUNTS IN THEA
DMINP
ANEL274
VAT
ID
V
ALIDATIOND
URINGO
RDERC
REATION IN THEA
DMINP
ANEL275
About This Guide
Welcome to the Magento Community Edition User Guide, which provides an overview of the Magento Community Edition (CE) eCommerce platform developed by Magento, Inc.
This guide is intended for web storeowners and first-time users of Magento CE. It provides a quick guide through the most important steps for getting your web store up and running and ready for selling online. The options described in this user guide enable you to generate a feature-rich and attractive eCommerce interface without the need for advanced technical expertise.
This guide first introduces Magento CE and its key concepts, and then describes how to install Magento CE. The following two chapters introduce the daily experience that a customer can have in a Magento web store and the daily management tasks that a storeowner would perform. The rest of the chapters that follow walk you through the process of setting up your Magento CE web store; customizing its behavior to your requirements; entering products; managing orders, invoices and shipments; and achieving the best turnover and profits from your web store. The guide includes the following chapters:
Chapter 1 “Introducing Magento Community Edition,” page 3, introduces
Magento CE and describes its basic components and the workflow for using it.
Chapter 2 “Installing Magento CE,” page 9, describes Magento CE system
requirements and how to install and configure it.
Chapter 3 “Basic Configuration,” page 23, describes how to configure the basic
information for your web store.
Chapter 4 “Introducing the Frontend,” page 41, describes the browsing and
purchasing features provided for your customers by a web store created using Magento CE.
Chapter 5 “Introducing the Backend,” page 63, describes the ongoing
management tasks that you can perform in the backend while running your Magento CE web store on a day-to-day basis.
Chapter 6 “Setting Up Your Catalog,” page 73, describes how to create a
catalog for your Magento CE web store, how to add products and how to define attributes for them.
Chapter 7 “Setting Up Your Store Hierarchy,” page135, describes how to
prepare your web store to start selling products by defining tax charges and how products are shipped and funds accepted.
Chapter 8 “Taxes,” page 137, describes how to set up the automatic calculation
of applicable transaction taxes.
Chapter 9 “Shipping,” page 145, describes how to configure shipping methods.
Support and Contact Information
2
Chapter 11, “Design and Content,” page 167, describes how to customize the
look-and-feel of your web store by applying easy to use options that are provided in the Magento CE backend.
Chapter 12, “Promotions,” page 187, describes a variety of ways to promote
your products.
Chapter 13, “Managing Orders and Customers,” page 223, describes how to
manage customers and orders from the backend.
Chapter 14, “Managing Customer-Generated Content,” page 229, describes
how to manage customer-generated content, such as ratings, reviews, tags, and polls.
Chapter 15, “Monitoring and Improving the Web Store,” page 243, describes
how to monitor and improve your store by defining reports, search terms, synonyms, redirects, and Google Analytics.
Chapter 16, “Keeping Your Store Healthy,” page 249, describes how to keep
your store healthy by using a staging environment, updating Magento CE, and extending Magento CE.
Chapter 17, “Getting Help,” page 263, describes Magento's resources for
providing you with help.
Support and Contact Information
We at Magento are dedicated to providing our customers with the best possible service. We would love to hear from you.
For feedback on this book and all other inquiries, please use our contact form at: http://www.magentocommerce.com/company/contact-us/
Conventions Used in this Guide
The following style conventions are used in this document:
Note: This is a note.
1
Introducing Magento Community
Edition
This chapter introduces Magento Community Edition (CE), its basic components, and the workflow for using it.
1.1
What is Magento CE?
Magento CE is a feature-rich eCommerce platform, built on open-source technology that provides online merchants with unprecedented flexibility and control over the look, content, and functionality of their eCommerce store. Magento CE’s intuitive
administration interface features powerful marketing, search engine optimization, and catalog management tools to give merchants the power to create sites that are tailored to their unique business needs. Designed to be completely scalable, Magento CE offers companies a stable, secure, customizable eCommerce solution.
1.2
Magento CE License
Magento CE is licensed under the Open Software License (OSL) v3.0, an open source certified license. More information about Magento’s licenses can be found at
http://www.magentocommerce.com/license/
1.3
Magento CE Frontend and Backend
The following sections provide an overview of the two visible interfaces of Magento CE: the frontend and the backend.
Introducing Magento Community Edition
4
Frontend (The Web Store Front)
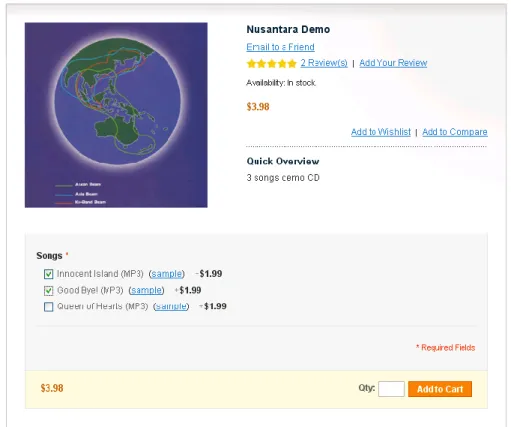
The frontend is the public view of your web store with which your customers can interact through a standard web browser. It presents your products, product categories, and promotions, and provides your customers with ordering, payment, and purchase tracking features.
An example is shown in Figure 1.
Magento CE Frontend Figure 1.
Introducing Magento Community Edition
Backend (The Back Office)
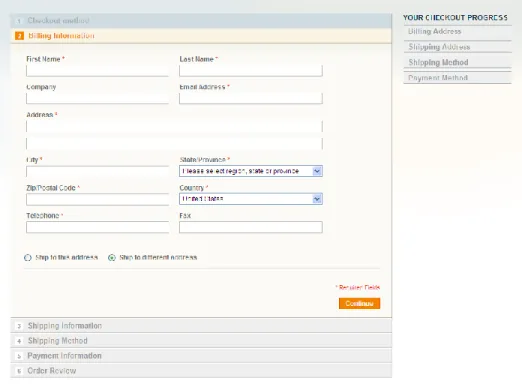
The backend is the password-protected view of the back office features that enable a web store administrator to setup the products and purchasing options and to manage orders and all other store functionalities. You can navigate the Admin Panel using the menu on the top of the page (Magento top menu). A view of the backend is shown in Figure 2.
Magento CE Backend Figure 2.
1.4
Magento CE Concepts
To use Magento CE effectively, you should be familiar with the following terms and concepts.
Attribute: A characteristic of a product. For example, an attribute of a digital camera could be “resolution,” and the value of this attribute for a particular digital camera could be “10 megapixels.” Customers can filter a list of products by values of one or more attributes.
Introducing Magento Community Edition
6
Attribute Set: A collection of attributes, customized to fit a certain type of product. For example, if you sell several different kinds of T-shirts on your website, you can create the T-shirts attribute set which will include the simple attributes commonly shared by all of your T-shirts. This may include color, size, gender, and brand.
Bundle product: This product is composed of components that are presented in different ways and are made from existing products. A good example of a bundle is a complete computer. For this computer, you can configure how much RAM or what kind of monitor is included with this computer in your store.
Category: A user-defined product classification. A category can have any number of levels of subcategories.
Configurable product: This product enables your customers to select the variant that they want by choosing options. For example, you can sell T-shirts in two colors and three sizes. You would have to create six variants as individual products (each with its own SKU) and then add these six to a configurable product where customers can choose the size and color, and then add it to their cart.
Credit memo: A credit memo is a statement of credits; for example, a credit for returned merchandise generates a credit memo. According to your store policy, you can apply the credit to future orders or refund the customer’s payment method.
Cross-sell: Cross-sell products appear next to the shopping cart. When a customer navigates to the shopping cart page, these products are displayed as cross-sells to the items already in the shopping cart. They are similar to impulse buys, like magazines and candy at the cash registers in grocery stores.
Downloadable product: A product, such as a media file, that the customer downloads from the store after purchase. These downloadable files can reside on your server or be provided as URLs to any other server.
Grouped product: This option enables you to display several similar products on a single page. For example, if you are selling chefs’ knives and you have the same knife in four sizes, you can make a grouped product to display all four of these sizes. Customers can select the size(s) that they want and add them to the cart from this page.
Invoice: An invoice in Magento CE represents a confirmation of payment. More than one invoice can be associated with a single order. If the products in an order are shipped in multiple shipments, then an invoice is generated for each shipment for the products in that shipment.
Order: An order is a request for goods.
Order status: The order status indicates where it is in the order cycle. In Magento CE, the system order status values are the following:
Pending - Pending orders are brand new orders that have not been processed.
Introducing Magento Community Edition
On Hold - The user cannot proceed to order processing if the order is in this
state. This is convenient if, for example, some data must be verified.
Pending PayPal (possible for PayPal orders only) - Pending PayPal orders are
brand new orders that have not been cleared by PayPal. When using PayPal as a payment method, customers are redirected to the PayPal website. If they have not paid for the order, orders will be marked as Pending PayPal. It is not recommended to process these orders without referencing PayPal first to see if payment has been made.
Payment Review - As long as an external payment gateway is verifying the
payment information from a sales order, the order is assigned the Payment Review status both in the payment system and in Magento CE.
Processing - Processing means that the order has been either invoiced or
shipped, but not both.
Suspected Fraud (possible for PayPal orders only) – The order transaction did
not pass one or more of the PayPal fraud filters and the system receives the response from PayPal that the transaction is under review by Fraud Service
Complete - Orders marked as complete have fully been invoiced and have
shipped.
Canceled - The order can be of this status if the customer calls your web store
and asks to cancel an order if the order has not been paid for.
The store administrator can create custom order statuses, assign them to order states and set default status values for order states.
Product type: Magento CE classifies products as one of several predefined product types: Simple Product, Virtual Product, Downloadable Product, Grouped Product,
Configurable Product, Bundle Product.
Related product: Related products are offered to the customer for purchase in addition to the item that the customer is viewing.
Scope: Scope describes the extent of your store hierarchy to which a given setting is effective. A setting can have a scope of Global (all websites, stores, and store views), Website (the selected website and all stores and store views under it), Store (the selected store and all store views under it), and Store View (the selected store view). Some settings that are set at a higher level can be overridden at a lower level.
Search Engine Optimization (SEO): The set of techniques and strategies that ensure that your site is listed prominently in search engine results, thereby increasing the likelihood that customers will find your site.
Simple product: This is the most basic product type. It is suitable for all kinds of physical (shipped) products.
Introducing Magento Community Edition
8
Shopping cart: The set of products that a customer has selected to purchase, but has not yet purchased.
Store: The second level of your store hierarchy. A website can have multiple stores (each, potentially, with its own root category), and a store can have multiple store views. Store View: The lowest level of your store hierarchy. Typically, a store view is created for each locale or language. All store views under a given store share the same catalog. Customers use a drop-down list on the frontend to switch from one store view to another.
Tax rule: A combination of a product tax class, customer tax class, and tax rate. This rule defines which tax calculation is applied.
Up-sell: An up-sell item is one that is offered to the customer as an alternative to the product the customer is viewing. These products may be more expensive, of higher quality, or more popular, or produce a higher profit margin.
Virtual Product: This is a product that does not require shipping or inventory. It is generally used for warranties or services.
Website: The highest level of your store hierarchy. You can have multiple websites, and each website can have a different domain name. Websites can be set up to share customer data, or to not share data. Typically, each website has different lines of products and may have different customer bases.
1.5
Advanced Magento CE Customization Options
The options described in this user guide can get you up and running with an extremely feature-rich and attractive interface without the need for technical expertise.If you would like to take your web store one step further, Magento CE provides a variety of advanced options for customizing the look-and-feel and functionality of your site. These include:
Custom Themes and Skins
Extension Modules
…and more.
See the Magento website at http://www.magentocommerce.com for a description of these options, as well as for access to resources that can assist you with their implementation.
2
Installing Magento CE
This chapter describes Magento CE system requirements and how to download and install it.
2.1
System Requirements
The following provides a short list of the server requirements for running Magento CE properly. You can also view these specifications at:
http://www.magentocommerce.com/system-requirements.
Supported Operating Systems: Linux server x86, x86-64
Supported Web Servers: Apache 1.3.x or Apache 2.x
PHP Compatibility: 5.2.13 and above with Safe mode off
MySQL: 4.1.20 and above
If you are unsure whether your hosting company supports these specifications, please check with them or your company’s system administrator. Alternatively, to download a script that verifies whether your server is compatible or not, refer to the following web page: http://www.magentocommerce.com/knowledge-base/entry/how-do-i-know-if-my-server-is-compatible-with-magento.
Installing Magento CE
10
2.2
Installing Magento CE
After you have verified that your hosting environment meets Magento’s system requirements, as specified above, you can download and then install Magento to your server.
The following is the workflow for downloading and installing Magento:
page 10 page 11 page 12 page 13 page 13 page 14
Step 1: Downloading Magento CE
Magento CE can be downloaded free of charge from the Magento community site. Tip: You can download Magento whether you have registered on the
community site or not. We recommend registering so that you can later access the various valuable resources that the community has to offer, such as forums, a wiki, groups, and screencasts.
To download Magento Community Edition:
1.
Use your web browser to navigate to http://www.magentocommerce.com/download and log in, or go to http://www.magentocommerce.com and select Downloads > Download Magento to display Download page as shown in Figure 3.Step 1 Step 2 Step 3 Step 4 Step 5 Step 6
Downloading Sample Data
Uploading to Your Server
Granting File Access Permissions
Setting Up the Web Store Database
Installing Magento Downloading Magento
Installing Magento CE
Magento Download Page (Magento Downloader) Figure 3.
Note: This page will appear slightly differently on the web after a newer version is released.
2.
We recommend that you select the Downloader option, as shown above. The instructions in this chapter are written for the downloader.Multiple compressed formats are provided. If you are unsure which version to download, use the .zip format.
3.
Click the Download button and save the file to the location of your choice.Step 2: Downloading Sample Data
Magento enables you to load a few basic products and information into your web store to populate your web store frontend and backend with some initial sample data. Even though you will later delete these products, it may help orient you while getting started. This step is recommended, but not mandatory.
To download Sample Data for your Magento web store:
Installing Magento CE
12
Magento Download Page (Magento Sample Data) Figure 4.
Note: This page will appear slightly differently on the web after a newer version is released.
2.
Select a format for downloading Sample Data. Multiple compressed formats are provided. If you are unsure of which version to download, then use the .zip format.3.
Click the Download button and save the file to the location of your choice.Step 3: Uploading to Your Server
After you have downloaded the Magento downloader and Magento Sample Data, you must upload these packages to your server.
To upload to your server:
1.
The file names are: magento-downloader-x.x.x.zip (or .tar.gz or .tar.bz2, depending on the format that you downloaded) for the Magento downloader andmagento-sample-data-x.x.x.zip for the Magento Sample Data. Extract (unzip) the files to a directory of your choice.
2.
Use your favorite FTP/SFTP program to copy the contents of the magento folder from the Magento downloader package to the server’s root WWW directory (which is usually named public_html) or any other subdirectory of your choice, such as /store.Installing Magento CE
Step 4: Granting File Access Permissions
The top-level Magento directory on the server (the directory to which you uploaded the decompressed files) and all Magento directories under it must have the correct
permissions in order for the Magento Installer to operate properly.
To grant file access permissions:
1.
Navigate to your Magento directory on the server using your FTP/SFTP client.2.
Use the Change Permissions or the Change Mode function of your FTP/SFTP clientto grant permission to the web server to write to these files and folders. There are two typical ways of representing file permissions in Linux:
As a number (for example, 755)
As a series of permissions categorized into user, group or other
If your FTP client uses the first representation (as a number), set the permissions on the directory to 777 or 0777. If your FTP client uses the second representation, set the permissions as shown in Figure 5.
Directory Permission Settings Figure 5.
Ensure that you select the Recursive option in order to set the proper permissions on all subdirectories.
Note: Some servers have the correct permissions already set and, therefore, no changes need to be made in this case.
Step 5: Setting Up the Web Store Database
To create and set up the database to be used by your web store:
1.
Using a database management application such as phpMyAdmin, or a tool provided by your hosting provider, create a new, empty database and assign users and permissions to it.2.
If you want to use the sample data, do the following:a. Using an FTP or SFTP tool, transfer the extracted sample data file to a directory on the server. The file name will be similar to
Installing Magento CE
14
c. To add sample images to the sample products in your store, copy the contents of the Media folder from the Sample Data package onto the new Media folder on your server
You are now ready to install Magento!
Step 6: Installing Magento CE
In this step you install Magento CE using the Downloader tool.
To install Magento:
1.
Use a standard web browser to navigate to the location on your server where you uploaded the Magento downloader. If everything has been set up correctly as described up until now, the Magento Installation Wizard Welcome page is displayed, as shown in Figure 6.Magento Downloader Welcome Page Figure 6.
Installing Magento CE
Magento Downloader Validation Page Figure 7.
This page tests your environment to determine if it will support Magento. If error warnings are displayed, correct the errors and click Check Again.
3.
When there are no more errors, specify the host, user name, and user password for the database server in the Database Connection box. To check the authorization data for connecting to the database server and to the data storage, click the Check InnoDB support button. The installation will not proceed if the information entered in any of these fields is invalid.Installing Magento CE
16
Magento Downloader Connect Manager Deployment Figure 8.
Page
5.
Choose whether Magento Connect Manager will be downloaded via the HTTP or the FTP protocol. We recommend that you choose HTTP because it takes less time than using the FTP protocol. If outgoing HTTP connections are not allowed in your hosting environment, then choose FTP.6.
In the Magento Connect Manager Version Stability drop-down list, select the Stable option. The available options are stable, beta, or alpha.7.
For Deployment Type, select either Local Filesystem or FTP Connection to indicate whether Magento Connect Manager will be deployed on your file system or via an FTP connection. We recommend that you deploy using FTP. Deploying Magento Connect Manager through the FTP connection resembles the process of a customer personally uploading files on the server and it does not require changingpermissions for reading, writing, and executing files. With file system deployment, because of the permissions that the Apache account provides when deploying this way, deployed files are more vulnerable to permissions problems. In this case, you should contact the server administrator in order to change the file permissions after the installation is completed.
Note: The Local Filesystem option will be unavailable if the system account of the web server does not have permission to write to the directory when Magento CE is installed.
Installing Magento CE If you select the FTP Connection option as a deployment type, a number of other options become available, including the host name of the FTP server and the credentials for connecting to the FTP server. For these fields, use the values that were provided by the FTP server administrator. In the Installation Path field, specify the path to where Magento CE will be installed. (This should be the same directory into which you uploaded the downloader.php file.)
To check the connection to the FTP server, click Check FTP. If any of the FTP parameters under Deployment Type is invalid, Magento Connect Manager will not be deployed via FTP.
8.
Click Continue to install the Magento Connect Manager.9.
When you see the message “Magento has been downloaded successfully,” click Continue to proceed to the Installer wizard.Magento Installation Wizard Welcome Page Figure 9.
10.
In the Magento Connect Channel Protocol drop-down list, select the same protocol that you selected in step 5.11.
In the Custom Permissions field choose how the execute, read, and write permissions will be applied to the Magento downloaded folders and files on the server.
Yes – The Magento CE administrator will be able to execute, write, and read
files in the downloaded folders. In the Folders and Files fields that appear, specify values in the octal number system which will denote the permissions that the Magento administrator will have for folders and files, respectively, on the server.
Installing Magento CE
18
o For folders – 0777 (permissions for read, write, and execute) o For files – 0666 (permissions for read and write)
12.
Select the Deployment type that you selected in step 7. The types must match or an error will occur during installation.13.
Click Start the download process. A series of messages is displayed to indicate the progress of the download process, as shown in Figure 10.Installation Progress Figure 10.
After this is completed, the following message is displayed at the bottom of the page:
Note: If you were unable to complete the download process through this interface due to a connection error, try to upload the Full Magento Package from the Community download page.
14.
Click Continue Magento installation to proceed.15.
Read and agree to the terms of Magento’s license. More information is provided about this subject in the Magento License section on page 3. Click Continue.Installing Magento CE
16.
On the Localization page (Figure 11), select your locale, time zone, and defaultcurrency. These are default values for any web stores and web store views you create; when you set these up, you can select localization preferences for each one.
Magento Installation Wizard Localization Page Figure 11.
Note: Localization settings can be changed later if needed.
Click Continue to proceed to the next page.
17.
On the Configuration page (Figure 12), change the default values as needed according to your requirements and database information.Installing Magento CE
20
Magento Installation Wizard Configuration Page Figure 12.
The first two options make purchasing and administration more secure. Usually, you can leave the other options as they are.
We strongly recommend setting the following options if your server has an SSL certificate installed:
Select the Use secure URLs (SSL) check box; additional settings become
available to configure this option.
Specify the complete base URL for the SSL connection in the Secure Base URL
field and select the Run the admin interface with SSL check box.
Installing Magento CE Note: SSL settings can be changed later if needed.
When you are finished, click Continue.
18.
The Create Admin Account page enables you to specify access information, as follows:
Specify the administrator's name and email.
Create a user name and password.
Specify the encryption key, or Leave the Encryption Key field empty to display
the key on the next page.
Click Continue to proceed to the next page.
19.
The You’re All Set page shows your encryption key.Tip: Write down the encryption key and keep it in a safe place. If you need or want to move your store data to a new Magento CE site, you will need this encryption key to recover the encrypted data.
Congratulations! You have now completed the installation of Magento
CE!
Installing Magento CE
22
Note: If you want to run through the Setup Wizard again, you do not have to download all the Magento CE files again. Simply delete the
app/etc/local.xml file and any files and directories in the var/ directory.Go back to http://www.yourDomain.com/magento-directory with your browser. The Setup Wizard will run automatically again.
You can visit your new Magento storefront by selecting the Go to Frontend button or by specifying the URL of your store in your browser.
You can also access the administration backend and begin configuring your new web store, as described in the Accessing the Backend section on page 23.
Tip: You can easily open the backend by clicking the Go to Backend button on the last page of the Magento Installation Wizard, shown above. We recommend that you bookmark this page for easy access.
Tip: The process described above sets you up with a single website, single store and three store views for different languages. This is most probably all you need. However, if you would like to create a more sophisticated web store with multiple options, then see “Setting Up Your Store Hierarchy,” page 135.
3
Basic Configuration
This chapter describes how to configure the basic information for your web store. The other aspects of your web store to be configured are described in the subsequent chapters of this guide.
3.1
Accessing the Backend
All of the basic configuration tasks are performed in the Magento CE backend. The following describes how to access and log in to the Magento CE backend.
Tip: Immediately after you install Magento CE, you can easily open the backend by clicking the Go to Backend button on the last page of the Magento Installation Wizard. We recommend that you bookmark the backend page for easy access.
To access the Magento backend administration environment:
1.
Use a standard web browser to navigate to the backend by entering the URL that you specified in the Magento Installation Wizard with the addition of the suffix /admin (or the one that you specified during installation). For example, if you specified mywebstore.com as the base URL, then usehttp://www.mywebstore.com/admin to access your backend.
Note: The Magento CE Demo Store backend can be accessed at: http://demo-admin.magentocommerce.com/admin
The Log in to Admin Panel page is displayed, as shown in Figure 13.
Backend Login Page Figure 13.
2.
Log in using the user name and password that you created during the installation process.Note: The backend of the Magento Demo Store can be accessed using the User Name: admin and Password: 123123
Basic Configuration
24
Magento CE Backend Figure 14.
4.
After you log in, the Magento messages that you have not yet read are displayed, such as the one shown in Figure 15.Incoming Message Notice Figure 15.
Additionally, information about other messages is shown in a bar just under the menu (see Figure 16). See “Managing Administrator Messages,” page 64, for more information about managing these messages.
Message Bar Figure 16.
Basic Configuration
3.2
Store Hierarchy
Among the first things you will want to do is plan your store hierarchy, that is, the arrangement of websites, stores, and store views. When Magento CE is installed, a “Main Website,” a default store, and a default store view are created. You will want to create additional websites, stores, and store views, depending on the breadth of the items you are selling and the composition of your target markets.
To be able to create these entities, you need to create at least one root category first. See “Managing Categories,” page 81, for more information about creating root categories. For now, determine how you want your store hierarchy set up.
Websites
Suppose you want to sell machine shop equipment online, and your spouse wants to sell handmade baskets. It is unlikely that you would sell both of these product lines in a single store, but in a single Magento CE installation, you can do both by setting up separate websites. Each website can have its own domain name. The websites can be set up to share customer data, or not to share any data.
Stores
For your handmade baskets website, you might want to set up two stores, one specializing in wicker and one for other materials. You can set up two root categories (one for wicker items and one for other items) and assign one to each store. (See
“Managing Categories,” page 81, for more information about setting up root categories). Several stores of one website can have different independent domain names as well, but it should be configured on the store view level of each store.
Store Views
Your market research indicates that about half of your potential customer base speaks English, and the other half speaks Spanish. Within each store, you can create separate store views, one for English and one for Spanish. The store views share the same catalog, but each is presented in its respective language. Customers use a drop-down list on the frontend to switch from one store view to another.
3.3
Store Pages General Configuration
This section describes how to configure general aspects of your frontend pages. These configurations are performed in the Configuration area of the Admin Panel.
Basic Configuration
26
To access the Configuration section, select System > Configuration. The tabs in the left column provide access to configuration options for different aspects of your Magento CE instance. The Current Configuration Scope drop-down list in the upper left corner of the page enables you to select the hierarch level (website, store, store view) to which the configuration will be applied. To apply configuration settings at the global level (that is, for all your websites, stores, and store views), leave Default Config selected.
To open the options for configuring your store pages design click the Design tab in the left column. The Design page opens with a number of field sets.
Design Configuration Page Figure 17.
HTML Head Field Set
The settings in the HTML Head field set on the Design tab are used to define general information about your store’s pages. These settings may not be visible to your
customers, but they are important for things such as traffic analytics and search engine optimization.
To define general page features:
Basic Configuration
HTML Head Field Set Figure 18.
Note: The words in square brackets (for example, [STORE VIEW]) indicate the scope of the associated option.
2.
Click the Browse button and select an icon file (on your local computer) to use as a “favicon.” This small icon appears in the address bar of your customers’ browsers.3.
In the Default Title field, specify the page title to be displayed in browsers for thoseBasic Configuration
28
4.
In the Title Prefix and Title Suffix fields, specify a prefix and a suffix to be appended to the pages of your web store that have their own title, such as a prefix of My Web Store.5.
In the Default Description and Default Keywords fields specify words that describe your web store to be used by search engines when page-specific information is not provided. Keywords must be separated by commas.6.
Optional. Select Display Demo Store Notice to display a notice at the top of every page that indicates that this is a demo store and that no transactions will beprocessed. This option is useful while you are setting up your store prior to opening for business.
7.
Click the Save Config button on the top right of the page.Header Field Set
The options on the Header field set define the look of the top of each page in your store.
To define the header of each web store page:
1.
Click the Header tab to expand the section as shown in Figure 19.Header Field Set Figure 19.
2.
In the Logo Image Src field, specify the logo graphic file to appear on the top left of each page of your web store, as shown in Figure 20 for the Magento Demo Store. Make sure that you name your logo something other than logo.gif, so it does not get overwritten in future upgrades.Page Header Section Figure 20.
Note: You will need to upload the image file using an FTP client to the skin/frontend/default/default/images/ directory or to your own skin folder in your Magento CE installation.
3.
In the Logo Image Alt field, specify the alternative text to be displayed when your customers hover their mouse cursors over the logo image in your web store.4.
In the Welcome Text field, specify the welcome message to be displayed on the topright of your web store for customers that are not logged in, as shown in Figure 20.
Basic Configuration
5.
Click Save Config to save your changes.Footer Field Set
The options in the Footer field set define what is displayed at the bottom of each web page in your store.
To define the footer of your web store pages:
1.
Select the Footer option to expand the page to display the footer options, as shown in Figure 21.Footer Field Set Figure 21.
2.
In the Copyright field, specify your web store’s copyright information.3.
In the Miscellaneous HTML field, specify the custom HTML code to be added to the end of the page code that is generated by Magento CE. This area is usually used for adding tracking scripts that track your customers’ activity on the site.4.
Click Save Config to save your changes.3.4
Store Contacts Configuration
This section describes how to configure store email addresses that are used for internal and external email communications and the Contact Us feature.
Web Store Emails
The Store Email Address page of the system configuration enables you to specify email addresses and contact names to be used when sending email to customers upon registration and at all steps of the order lifecycle. These email address are also used for
Basic Configuration
30
To define web store email addresses:
1.
In the Admin panel, select System > Configuration > GENERAL >Store Email Address. Here you can configure the various email addresses used for sending emails from your web store to your customers.Store Email Addresses Page Figure 22.
2.
In the Current Configuration Scope drop-down list in the left upper left corner, select the scope for which you want these configurations to apply. All fields on this page can have different values for each store view.3.
In each Sender Name field, specify the name of the sender or department from which the emails are sent.4.
In the Sender Email field specify the email address used for sending the emails.5.
Click Save Config to save your changes.Note: See “Customizing Transactional Emails,” page 175 for more information about emails.
Contacts
These options define the email to which customers send requests when using the Contact Us option at the bottom of the pages of your web store.
To define your web store contact information:
1.
In the Admin Panel, select System > Configuration > GENERAL >Contacts to display the Contacts page, as shown in Figure 23.Basic Configuration
Contacts Page Figure 23.
2.
In the Current Configuration Scope drop-down list in the left upper left corner, select the scope for which you want these configurations to apply.3.
In the Enable Contact Us drop-down list, select Yes to enable customers to contact you by email with the Contact Us link, or select No to disable this communication method.4.
In the Send Emails To field, specify the email that is used for receiving feedback when a customer uses the Contact Us option in the store.5.
In the Email Sender drop-down list, select the email address from which feedback messages are sent.6.
In the Email Template drop-down list, select the template to be used for the Contact Us form displayed on the frontend. You can create custom email templates. For more information, see “Customizing Transactional Emails,” page 175.7.
Click Save Config to save your changes.Sales Emails
You can configure Magento CE to send emails that confirm an order, invoice, shipment, or credit memo to both registered customers and store guests.
To configure sales emails sent to customers:
1.
In the Admin Panel, select System > Configuration > SALES > Sales Emails.2.
In the Current Configuration Scope drop-down list in the left upper left corner,select the scope for which you want these configurations to apply.
Basic Configuration
32
Sales Emails Page Figure 24.
4.
In the Order field set, configure the following options:
In the Enabled drop-down list, select Yes to enable new order confirmation
emails to be sent.
In the New Order Confirmation Email Sender drop-down list, select the email
address to be used for sending the new order confirmation.
In the New Order Confirmation Template drop-down list, select the template to
be used for the for the order confirmation emails sent to registered customers.
In the New Order Confirmation Template for Guest drop down- list, select the
template to be used for the for the order confirmation emails sent to guest customers.
In the Send Order Email Copy To field, specify the email address to which a
copy of the new order confirmation email is sent. This feature helps you to keep track of the new orders that come in.
5.
Configure the options on the other field sets on this page.6.
Click Save Config to save your changes.3.5
Shipping Settings
This section describes how to specify shipping options, such as the origin used for shipping rate calculations and whether to enable the multiple shipping destinations feature.
Basic Configuration Configuring shipping settings and shipping methods enables you to provide
customers a selection of shipping methods with shipping rates during checkout. Magento CE includes extensive integration with major shipping carriers; for USPS, DHL, FedEx, and UPS you can create shipment orders and print shipping labels right from the Magento CE Admin Panel. See “
Shipping,” page 145, for details about shipping system integration.
To define general shipping options:
1.
In the Admin Panel, select System > Configuration > SALES > Shipping Settings.2.
In the Current Configuration Scope drop-down list in the left upper left corner,select the scope for which you want these configurations to apply.
3.
Click the Origin and Options tabs to expand the page to display the shipping options, as shown in Figure 25.Shipping Settings Page Figure 25.
4.
Configure the options to match your store.5.
Click Save Config to save your changes.See “General Shipping Settings,” page 145, for details about configuring shipping methods.
3.6
Cookie Restriction Mode
Magento can notify store customers about cookies that are being used by a. The feature is called Cookie Restriction Mode. It is aimed at helping store owners to comply with the European Union Privacy and Electronic Communications Directive and its amendment. According to these documents, websites cannot use cookies until a user consents.
Basic Configuration
36
Enabling and Configuring Cookie Restriction Mode
To enable the cookie restriction mode:
1.
Log in to the Magento Admin Panel.2.
Navigate to System > Configuration > GENERAL > Web.3.
In the Current Configuration Scope in the upper-left corner of the page select the desired website.4.
Expand the Session Cookie Management filed set.5.
In the Cookie Restriction Mode field select Yes.6.
To save the changes click the Save Config button.Important Note (for Magento Enterprise Edition only): Enabling the cookie restriction mode enables the notification of customers about cookies being used by a store. To actually stop using cookies which are related to customer private information, such as cookies storing the customer ID or recently compared products list, you need to disable the Full Page Cache (FPC) functionality. FPC can be disabled under System > Cache
Management. For more information about full page cache, see the Magento Enterprise Edition User Guide.
Cookie Restriction Mode: Implementation Details
After the cookie restriction mode is enabled, a message is displayed on the top of each page in the store front. The message informs customers that the website requires cookies to provide all of its features and requests users to confirm that they are informed and consent. See Figure 26.
Basic Configuration
A warning message is displayed in the frontend when Figure 26.
the cookie restriction mode is enabled
The message contains a link to the Privacy Policy page, which provides a list of cookies being collected and explains on how they are used. The default content of this page can be changed under CMS > Pages > Manage Content > Privacy Policy.
After a customer clicks Allow, the message disappears.
If a customer does not click Allow, the message persists, but the store functionality is available as usual. However, Google Analytics cookies are not stored in this case, even if the Google Analytics functionality is enabled.
Cookies Used in Magento
The following table lists cookies, which are always stored by Magento on the customer’s side.
Cookie Name Cookie Description
USER_ALLOWED_SAVE_COOKIE Indicates whether a customer is allowed to use cookies external_no_cache A flag which indicates whether caching is disabled
Basic Configuration
38
Stf If links to a product were sent to friends, this cookie stores the timestamps in the '$timeStamp1, $timestamp2, ..., $timestampN' format.
pollN A poll ID to indicate that the poll has been already voted.
frontend Session ID
guest-view Allows guests to edit their orders.
The following table contains a list of cookies, which Magento additionally stores on customers side if the Full Page Cache functionality is enabled.
Cookie Name Cookie Description
CUSTOMER Hashed value of a customer ID in the 'customer_$customerId' format CUSTOMER_INFO Hashed value of a customer group ID in the
'customer_group_$customerGroupId' format NEWMESSAGE Indicates whether a new message has been received CART Hashed value of a quote ID in the '$quoteId' format
COMPARE List of product IDs added by customer to compare list in the '$productId 1, $productId 2, ..., productId N' format
POLL ID of a recently voted poll
RECENTLYCOMPARED A customer's list of recently compared product IDs in the '$productId 1, $productId 2, ..., productId N' format
WISHLIST Hashed list of products added to wishlist in the '$productId 1_$productId 2_..._productId N' format
WISHLIST_CNT Hashed number of items in the customer's wishlist in the 'wishlist_item_count_$productCount' format
CUSTOMER_AUTH Indicates whether a customer is logged in. A hashed value of 'customer_logged_in_0|1'
CATEGORY_INFO Stores the category info on the page. This allows displaying pages more quickly.
LAST_CATEGORY Recently visited category ID in the '$categoryID' format VIEWED_PRODUCT_IDS Recently viewed product IDs in '$productId 1, $productId 2, ...,
productId N' format
currency Code of the currency selected by a customer ('USD', 'UAH', 'GBP', etc.)
store Store view code