Kerio Connect
User Guide
updates reserved.
For current versions of the product and related manuals, check
http://www.kerio.com/support/kerio-connect.
Information regarding registered trademarks and trademarks are provided in the appendixA.
Contents
Introduction . . . 9
1 Kerio WebMail . . . 11
1.1 Web browsers . . . 11
1.2 Authentication to Kerio WebMail . . . 11
1.3 Integration with Windows/Mac OS X/Linux . . . 15
1.4 The Kerio WebMail environment . . . 15
1.4.1 Folder tree . . . 16
1.4.2 The main pane . . . 16
1.4.3 Today page . . . 19
1.4.4 The Kerio WebMail pop-up menu . . . 20
1.4.5 Moving and copying items . . . 21
1.5 Specific features and technical limitations . . . 23
1.6 Email . . . 25
1.6.1 Message list . . . 25
1.6.2 Message reading . . . 27
1.6.3 Message writing . . . 31
1.6.4 Spellchecker . . . 37
1.6.5 Spam filter . . . 38
1.6.6 Automatic check for email addresses . . . 40
1.6.7 Looking up messages . . . 42
1.6.8 Interrupted connection between the server and the browser . . . 45
1.7 Contacts . . . 46
1.7.1 Contacts display . . . 46
1.7.2 New contact . . . 47
1.7.3 Private contacts . . . 48
1.7.4 Searching in contacts . . . 49
1.7.5 Contacts forwarding . . . 50
1.7.6 Public contacts . . . 51
1.7.7 Distribution lists . . . 51
1.8 Calendar . . . 54
1.8.1 Calendar view . . . 55
1.8.2 Creating and editing events . . . 58
1.8.3 Private Events . . . 61
1.8.4 All (multiple) day event . . . 62
1.8.5 Recurred event . . . 63
1.8.6 Exceptions from repeated events . . . 64
1.9 Mailing Lists . . . 76
1.9.1 Member Subscription/Unsubscription . . . 76
1.9.2 Message posting . . . 77
1.9.3 Aliases within Mailing Lists . . . 77
1.10 Tasks . . . 78
1.10.1 Task list display . . . 78
1.10.2 Creating and editing tasks . . . 79
1.10.3 Private Tasks . . . 85
1.10.4 Forwarding tasks attached to email . . . 85
1.11 Notes . . . 86
1.11.1 Viewing the note list . . . 86
1.11.2 Create and edit notes . . . 87
1.11.3 Forwarding notes attached to email . . . 88
1.12 Folder Administration . . . 88
1.12.1 Root folder . . . 89
1.12.2 Creating folders . . . 90
1.12.3 Folder tools . . . 91
1.12.4 Folder content options . . . 94
1.12.5 Shared and public folders . . . 97
1.12.6 Folder subscription . . . 99
1.12.7 Folder synchronization with mobile devices . . . 100
1.13 Kerio WebMail configuration . . . 101
1.13.1 User Settings . . . 101
1.13.2 Out of office . . . 110
1.13.3 Change of password . . . 112
1.13.4 Integration with Windows/Mac OS X/Linux . . . 113
1.13.5 Keyboard shortcuts used in the Kerio WebMail . . . 113
1.14 Message filtering . . . 114
1.14.1 List of filtering rules . . . 114
1.14.2 Creating or changing a rule . . . 116
1.14.3 Cellular phone notification . . . 120
1.15 Time zones . . . 121
1.15.1 Change of a time zone . . . 121
1.15.2 Events in different time zones . . . 122
2 Kerio WebMail Mini . . . 123
2.1 User folders . . . 124
2.2 Toolbar . . . 127
2.3 Mail folders . . . 129
2.4 Contacts . . . 134
2.6 Quota . . . 141
3 Kerio WebMail on mobile devices . . . 142
3.1 Message reading . . . 143
3.1.1 Toolbar . . . 144
3.1.2 Message header and body . . . 144
3.2 Message writing . . . 145
3.2.1 Toolbar . . . 145
3.2.2 Message header and contents . . . 146
3.3 Contact list editing . . . 146
3.3.1 Create and edit contacts . . . 147
3.3.2 Creating and editing distribution lists . . . 148
3.4 Folder Administration . . . 149
3.5 User Settings . . . 151
4 Data synchronization with mobile devices . . . 152
4.1 Supported mobile devices . . . 152
4.2 SSL Certificates . . . 152
4.3 Windows Mobile 5.0 . . . 154
4.4 Windows Mobile 5.0 AKU2 . . . 154
4.4.1 ActiveSync settings in Pocket PC Edition . . . 155
4.4.2 ActiveSync settings in Smartphone Edition . . . 160
4.5 Windows Mobile 6.0 . . . 165
4.6 Nokia Eseries . . . 166
4.6.1 Mail For Exchange Settings . . . 167
4.7 Nokia N73 and N95 . . . 174
4.8 RoadSync . . . 175
4.9 Apple iPhone . . . 175
4.9.1 Apple iPhone 2.0 . . . 175
4.9.2 Apple iPhone 3.0 . . . 177
4.9.3 Apple iPhone 4.0 . . . 181
4.10 Apple iOS . . . 182
5 Kerio Outlook Connector (Offline Edition) . . . 185
5.1 Installation . . . 186
5.1.1 Installation on computers where Kerio Outlook Connector has been installed . . . 186
5.1.2 Profile and Email account settings . . . 187
5.1.3 Automatic updates . . . 190
5.2 The Online/Offline mode . . . 190
5.2.1 Offline mode settings . . . 191
5.2.2 Synchronization . . . 191
5.3 Contacts . . . 193
5.4.2 Resources . . . 197
5.5 Tasks . . . 200
5.5.1 How to create tasks . . . 200
5.6 Notes . . . 201
5.7 Rules for incoming messages . . . 201
5.7.1 Creating or changing a rule . . . 202
5.7.2 The Out Of Office rule . . . 208
5.7.3 Junk E-Mail rule . . . 209
5.8 Spam filter . . . 211
5.9 Folder Administration . . . 212
5.9.1 Folder Sharing . . . 212
5.9.2 Public folders . . . 215
5.10 Sender details settings . . . 215
6 Kerio Outlook Connector . . . 217
6.1 Software requirements . . . 217
6.2 Installation . . . 217
6.2.1 Creating a new profile and Kerio account settings . . . 218
6.2.2 Data file settings . . . 224
6.3 Upgrade of the Kerio Outlook Connector . . . 225
6.4 Changing of user password . . . 226
6.5 Shared and public folders . . . 227
6.5.1 Sharing and mapping of folders . . . 227
6.5.2 Public folders . . . 229
6.6 Rules for incoming messages . . . 230
6.6.1 Creating or changing a rule . . . 231
6.6.2 Out of office . . . 236
6.7 Spam filter . . . 237
6.7.1 The Spam tab . . . 238
6.8 Address books and contacts . . . 239
6.8.1 Searching in address books via the MAPI interface . . . 239
6.9 Appointments . . . 241
6.9.1 Creating a meeting using the Free/Busy server . . . 242
6.10 Resources . . . 244
6.11 Private items . . . 247
6.12 Notes . . . 248
6.13 Troubleshooting . . . 248
6.13.1 Spam/Not Spam buttons displaying problems . . . 248
6.13.2 Installation and configuration of MS Outlook 2000 . . . 248
6.13.3 Messages signed in MS Outlook . . . 249
6.13.5 Problems with displaying of Free/Busy information . . . 250
7 Support for Windows Calendar . . . 253
7.1 Subscription to calendars . . . 253
7.2 Calendar publishing . . . 256
7.3 Sharing of calendars . . . 258
8 Kerio Connect Account Assistant for Mac OS X . . . 260
9 MS Entourage support . . . 263
9.1 Basic account settings . . . 264
9.2 Connection to the LDAP server . . . 268
9.3 Scheduling of meetings . . . 270
9.4 Resources . . . 271
9.5 Spam . . . 275
9.6 Delegation and subscription of folders . . . 275
9.7 Public folders . . . 280
9.8 Out Of Office . . . 280
9.9 Secure communication of Kerio Connect with MS Entourage . . . 281
10 Support for Microsoft Outlook for Mac 2011 . . . 287
10.1 Manual Configuration of Microsoft Outlook for Mac . . . 287
10.2 Public folders . . . 289
11 Apple iCal Support . . . 290
11.1 CalDAV support . . . 290
11.1.1 Automatic configuration . . . 291
11.1.2 Manual configuration . . . 293
11.1.3 Synchronization . . . 295
11.1.4 Appointments . . . 296
11.1.5 Resources . . . 298
11.1.6 Availability . . . 301
11.1.7 Delegation of calendars . . . 302
11.1.8 Private events . . . 305
11.2 Support for the iCal standard . . . 306
12 Apple Address Book Support . . . 312
12.1 LDAP searching settings . . . 312
12.1.1 Mac OS X 10.2 Jaguar . . . 312
12.1.2 Mac OS X 10.5 Leopard and higher . . . 313
12.2 Synchronization of contacts . . . 314
12.2.1 Mac OS X 10.5 Leopard . . . 315
13.1.1 Exchange account in Apple Mail . . . 323
13.1.2 IMAP account in Apple Mail . . . 324
13.1.3 Learning of the antispam filter . . . 324
13.2 Apple Mail 10.5 . . . 327
13.2.1 Exchange account . . . 327
13.2.2 IMAP account . . . 327
13.2.3 Learning of the antispam filter . . . 328
Introduction
This document provides detailed setting guidance for all applications and modules (email clients, calendars and address books, data synchronization) supported byKerio Connect. While some of these applications are supported directly (i.e. no additional installations are needed, it is only necessary to perform specific settings), others require installation of supportive modules and extensions.
In addition to external applications, this document also addresses theKerio WebMail interface which is used to access user data and email accounts stored in the mailserver via the most wide-spread web browsers, such asInternet Explorer,Firefox orSafari.
This guide addresses features and configuration of the following applications and interfaces:
Kerio WebMail
Kerio WebMail is a comfortable web interface which can be used to maintain email, calendars, contacts and other folders saved in mailboxes on a particular server.
Kerio WebMailis available in two versions:
• Kerio WebMail — full version designed for most of supported browsers (see chapter1).
• Kerio WebMail Mini — a special, lite edition designed for unsupported browsers or for computers with slow Internet connection (see chapter 2) and for mobile devices (see chapter3).
Microsoft Outlook
Support for Microsoft Outlook is allowed by two extension modules which enable better exploitation ofKerio Connect’s groupware features:
• Kerio Outlook Connector (Offline Edition) — is an extension for MS Outlook
allowing smoother cooperation of MS Outlook and Kerio Connect. Kerio Out-look Connector (Offline Edition)supports groupware features of MS Outlooksuch as planning of meetings and task assignment. In addition to these features, other are included such as message grouping, searching in message bodies and offline mode which allows users working withMS Outlook even without Internet connection. This feature is helpful especially for notebook users.
In detail,Kerio Outlook Connector (Offline Edition)is described in chapter5.
• Kerio Outlook Connector — an extension toMS Outlook. It allows scheduling and sharing different types of data. Thanks to this module,MS Outlookis able to work with groupware data (contacts, calendar, tasks, notices) stored in Kerio Connect. In detail,Kerio Outlook Connector is described in chapter6.
Windows Calendar
Windows Calendar is an Microsoft Corporation’s application used for management of calendars. Support for Kerio Connect allows publishing of calendars on the server or subscription of anyKerio Connectcalendar.
Data synchronization with mobile devices
Kerio Connect supports data synchronization with mobile devices via the ActiveSync protocol. ActiveSync allows direct synchronization of data stored in email accounts with mobile devices (it is not necessary to connect to a desktop synchronization application). The ActiveSync protocol can use various applications on mobile devices (ActiveSync in
Windows Mobile systems, the VersaMail email client on Palm Treo devices, Mail for Exchange applications on Nokia Eseries and Nseries, the RoadSync application, Apple iPhone2.0 to 4.0, etc.). Chapter4provides detailed information on which folders can be synchronized and how the synchronization should be configured on individual devices.
Microsoft Entourage
Microsoft Entourageis anMS Office for Macemail client which also supports management of personal information and groupware functions. The support provided by Kerio Con-nect is described in detail in chapter9.
Apple Mail
Apple Mail is an email client developed by Apple Computer. The support provided by
Kerio Connect allows displaying of calendar and contact folders in this client (for details, see chapter13).
Apple iCal
Apple iCal is an Apple Computer’s application used for management of calendars. The support fromKerio Connectworks as follows:
• Since version Mac OS X 10.5, Apple iCal supports CalDAV which enables subscription and viewing of calendars saved in Kerio Connect. The protocol also supports meeting scheduling (Free/Busy and invitations) and delegating of calendars to other users (for details, refer to section11.1).
• Apple iCal calendars can be published inKerio Connect and it is also possible to subscribe to anyKerio Connect calendar. Calendars are created and saved in the standardiCalendarformat (for details, see chapter11).
Apple Address Book
Apple Address Book is an application developed by Apple Computer that is used as a standard address book (contact manager) in Mac OS X operating systems. Contacts can be synchronized with theKerio Connect’s store by the methods described below:
• The address book can be synchronized with contacts stored inKerio Connect by usingApple iSync(for details, refer to chapter12).
• since Mac OS X 10.6, it is possible to use synchronization via the CardDAV protocol (for details, see section12.2.2).
Chapter 1
Kerio WebMail
The Kerio WebMailis a Web interface that allows users to comfortably access their email and workgroup features from any location using a web browser. Users can read, write or delete messages, move them to and from folders, manage contacts, administer folders (create or delete folders, set access rights, etc.) and change user settings such as passwords, message filters, Kerio WebMail appearance, work with calendar, free time information (Free/Busy
calendar), tasks and notes.
Kerio WebMailenables users to work with email, calendars, tasks, notes and contacts in a way similar to a mail client using the IMAP protocol (all items are stored in folders on the server and the client opens only the selected item, i.e. a particular message, event, etc.).
1.1 Web browsers
List of browsers supported by the full version of the Kerio WebMailinterface can be found at
Kerio Technologies.
For technical reasons, the full version ofKerio WebMailcannot be run in older versions of the listed browsers or in non-listed browsers, but it is possible to run the simplified versionKerio WebMail Mini (for more information, see chapter 2). Kerio WebMail Mini is run automatically in older versions of browsers, in text-based browsers such asLynx orLinks, in web browsers designed for mobile devices (this view type is described in chapter3). Kerio WebMail Minidoes not require CSS and JavaScript.
To use the secured access to the Kerio WebMail interface (by HTTPS protocol), the browser must support SSL encryption. If it can be configured (e.g. inInternet Explorer), it is recommend to enable support for SSL 3.0 and TLS 1.0 versions.
1.2 Authentication to Kerio WebMail
To access the Kerio WebMail interface service using a web browser, insert the IP address (or the name if it is contained in DNS) of the computer where Kerio Connect is running. A protocol has to be specified in the URL — either HTTP for non-secured access or HTTPS for SSL-encrypted access. The URL can have the following form: http://192.168.1.1 or
https://mail.company.com.
It is recommended to use the HTTPS protocol for remote access to the service (simple HTTP can be tapped and the user login data can be misused). By default, the HTTP and HTTPS services use the standard ports (80 and 443). If the standard ports are changed, specify the port number in the URL address, like http://192.168.1.1:8000 or
Note:
The description above focuses accessing email via mobile devices. If it is not possible to connect to Kerio Connect, insert URL following one of these formats:
http://server_name/pdaorhttp://ip_address/pda.
If the URL has been entered correctly, a login page will be displayed in the browser. Enter the username and password on this page (if the user does not belong to the primary domain, a complete email address is required).
Figure 1.1 Login page
Full and simplified interface
After the username and password has been entered, users can decide whether to use the full version ofKerio WebMailor the simplified versionKerio WebMail Mini will be used:
The full version ofKerio WebMailis recommended for users with fast internet connection who require high performance and functionality. The capabilities of the full version include:
• email folders management,
• calendars management,
• contacts management,
• tasks management,
• notes management,
1.2 Authentication to Kerio WebMail
• folder management (creating, removing, moving, sharing and subscriptions),
• user’s settings of the interface.
Kerio WebMail Mini is optimized for slower internet connection types, for all browser types as well as for mobile devices. The capabilities of the simplified version include:
• email folders management,
• contacts management,
• viewing of email and contact public folders,
• folder management (creating, removing, moving, sharing and subscriptions),
• user’s settings of the interface.
In detail,Kerio WebMail Mini is described in chapter2.
Connection from Windows Internet Explorer 7.0
Windows Internet Explorer 7.0 requires the new browser settings before the first connection to theKerio WebMailinterface. The change to be done addresses configuration of security areas. Brief help guidelines are available through the Recommended browser settings link available on theKerio WebMail’s login page. If you miss the link, the helplines are as follows:
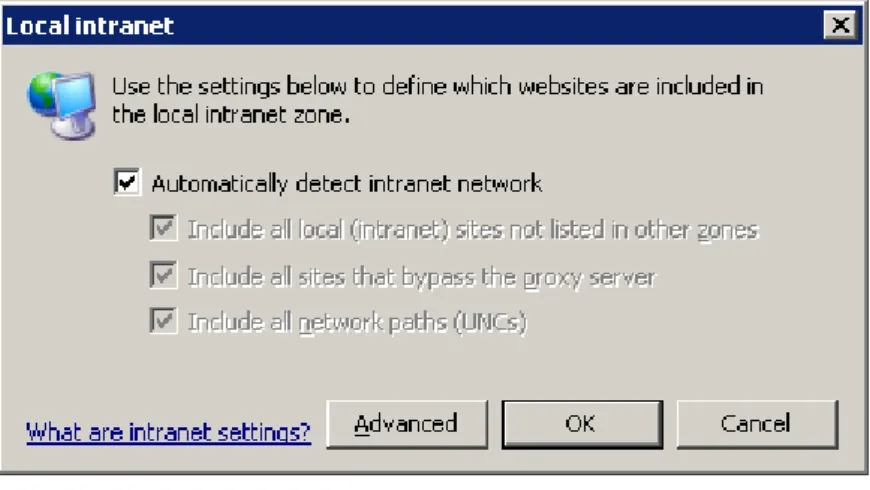
1. Click onTools→Internet Options and select theSecuritytab (see figure1.2).
2. On theSecuritytab, click onLocal intranet and then use theSitesbutton. 3. In theLocal intranetdialog just opened, click onAdvanced(see figure1.3).
Figure 1.3 The Local intranet dialog
4. In the Add this Web site to the zone textfield, specify Kerio Connect’s URL address (e.g.
http://mail.company.comorhttps://mail.company.com, see figure1.4).
Figure 1.4 URL addresses can be specified in the Local intranet dialog
This setting removes the address line displayed in header of everyWindows Internet Explorer 7 window.
Log out
Users should always log out when they finish working in Kerio WebMail. To log out, use the
Logout link in the upper right corner of the window. After logout, users get immediately disconnected fromKerio Connect, which prevents misuse of such connection.
1.3 Integration with Windows/Mac OS X/Linux
Note:
By disconnection, all windows associated withKerio Connectare closed.
1.3 Integration with Windows/Mac OS X/Linux
Integration with Windows/Mac OS X/Linuxis a handy tool that helps useKerio Connect and its features even more effectively and in a more comfortable way. It is a web page where you can find for example:
• Kerio Outlook Connector download link,
• the script for automatic creation of profiles in MS Outlook extended with the Kerio Outlook Connector,
• URL address of yourCalendar personal folder (it can be used for subscription of the calendar in another calendar supporting application),
• a link for download of the certificate for mobile devices,
• a link for download of theApple Address Bookautoconfig file (forMac OS X 10.6 Snow Leopardand higher).
• a link for download of the Microsoft Outlook for Mac autoconfig file (for Mac OS X 10.5.8 and higher).
The content of the page depends on the operating system from which it is accessed. Apart from the operating system, it depends also on other circumstances, such as the fact that the page is opened in a mobile device’s browser or that HTTP or HTTPS protocol is being used. One of the options how the page can be opened is starting it from theKerio WebMail’s login page (see figure1.1).
Another option to open theIntegration with Windows/Mac OS X/Linux is to log inKerio Web-Mailand go toSettings→Integration with Windows/Mac OS X/Linux. This method is also more
comfortable, because once you connect to the server you do not have to authenticate again.
1.4 The Kerio WebMail environment
Once you are successfully connected toKerio WebMail, a special user interface resembling of usual email clients is opened in the browser (see figure1.5). Basically,Kerio WebMail consists of three functional parts:
• hierarchically sorted folder tree,
• the main pane with content of the selected folder,
• toolbar (depending on folder type),
Figure 1.5 The first connection to Kerio WebMail
1.4.1 Folder tree
The left pane of the Kerio WebMail window provides the folder tree. The tree includes all folders of the mailbox. Clicking on any folder displays its contents in the main pane (message list, calendar, etc.).
The folder tree allows manipulation with individual folders. This means that folders can be moved, renamed, created and removed here. Folders and possible options are focused in chapter1.12.
In addition to the basic operations, in the folder tree it is also possible to add or remove access rights to users as well as subscribe folders of other users. Sharing and subscription of folders is addressed in section1.12.5.
1.4.2 The main pane
The main pane ofKerio WebMail displays contents of a folder currently selected in the folder tree. To view content of the folder in the main pane, click on the particular folder in the tree. The way of display in the main pane depends on folder type. Kerio WebMailsupports viewing of the following folder types:
In case of email folders, the main pane consists of three sections. These include a list of messages, a special reading pane where the message body is displayed and a toolbar where several email tools can be found (see figure1.6).
1.4 The Kerio WebMail environment
Figure 1.6 Email
Email folders and their manipulation are addressed in chapter1.6.
• Calendar
The layout of the calendar’s main pane depends on view mode. The figure1.7 show the calender in a week view. Beside this mode, day and month views are available, as well as two types of lists, distinguishing events with and without recurrence.
Figure 1.7 Calendar
For detailed information on calendars, see chapter1.8.
• Contacts
Like calendars, contact folders also allow various view modes. The modes available for calendars are either address cards or a list of contacts (at figure1.8, the address cards mode is shown).
For detailed information on contacts and their management, see chapter1.7.
• Tasks
In case of tasks, the main pane provides a list of created tasks and a toolbar allowing comfortable administration of tasks (see figure1.9).
Figure 1.8 Contacts
Figure 1.9 Tasks
For detailed information on tasks, see chapter1.10.
• Notes
The main pane of theNotesfolder provides a list of notes (see figure1.10). The notes use customizable colors to distinguish various topics. The main pane also includes a toolbar allowing creation of new notes, their removal, printing, etc.
1.4 The Kerio WebMail environment
For detailed information on notes, see chapter1.11.
1.4.3 Today page
The “Today” page provides overview of the current status of the mailbox. It shows current number of unread messages in Inbox (Settings allow to add more folders for which this information will be shown) as well as tasks and events for the current day. It also includes a quota for disk space reserved for the particular mailbox (if the quota has been set by the server administrator). This section also provides information about current free and occupied space in the mailbox so the user can always easily recognize how much of the mailbox is currently available.
To open the “Today” page, click on the root folder (at figure 1.11, the root folder is
In the user interface it is possible to set the “Today” page as an introductory page that would be displayed upon each connection to Kerio WebMail (for details on these settings, see chapter1.13.1). Thus the users can see right at the start what should be done on that day and they do not have to surf through individual folders. Individual items at the “Today” page are formatted as links which can be simply clicked to view the particular event, task or email folder.
Figure 1.11 Today page
The “Today” page is divided into four parts. The information in individual sections vary (events, tasks, quota and number of unread messages):
• Calendar — this section includes a list of events scheduled for the current day. In
“Today” page. For details on where and how number of days to be displayed can be set, see chapter1.13.1.
• Tasks— by default, this section shows a list of tasks set for the current day. However, in the user interface it is possible to change the “Today” page settings so that all tasks included in the particular folder are always displayed. The settings are addressed in chapter1.13.1.
To make manipulation with tasks even more comfortable, various types of information are also displayed, such as priority (an exclamation mark or a blue arrow), information on uncompleted tasks where the due date has already expired (items marked red), etc. These attributes are shown at figure1.11.
• Quota — server administrators can set a so-called quota and apply it to particular mailboxes. The quota is a limit for number of messages and for diskspace reserved for the mailbox. The Quota section informs users if quota is set and how much of the reserved mailbox capacity is left. When the mailbox is full, the server generates an automatic message recommending to remove some messages in the mailbox and sends it to the corresponding user. If the user ignores this warning, other mail will not be delivered to the mailbox since no more capacity is left.
• Messages — by default, this section shows all unread email in Inbox. In the Kerio WebMail user settings, it is possible to allow also displaying of other email folders. Details on where and how these settings can be done are addressed in chapter1.13.1.
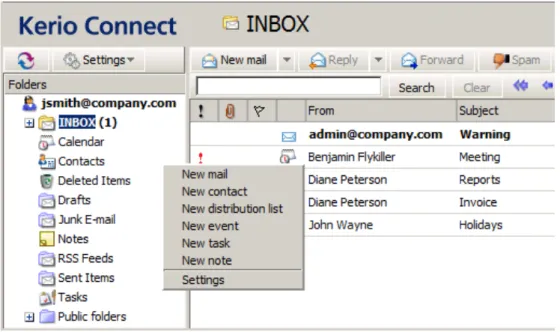
1.4.4 The Kerio WebMail pop-up menu
The Kerio WebMail’s pop-up context menu, opened by right-clicking on an object (folder, message, note, etc.), provides a list of actions. The pop-up menu is always associated with a particular object. This implies that right-clicking on an email message opens a menu (this menu is shown at figure1.12) which includes options different from the options included the pop-up menu associated with theTasksfolder (opened by right-clicking onTasksin the folder tree).
1.4 The Kerio WebMail environment
The Kerio WebMail’s pop-up context menu generally includes the same items as found on toolbars of individual folders.
Note:
• If a new contact, event, task or another item is created through the pop-up context menu (see figure 1.13), these items are added automatically in the default folders (Contacts, Calendar, Tasks). Default folders are folders included inKerio WebMail by the moment where the particular account is created (such asInbox) and they cannot be removed.
• On Apple Macintosh computers, click the mouse button and hold the Ctrl key to simulate the right mouse button behavior. On the standard two-button mouse, the right mouse button shows the context menu.
Figure 1.13 The pop-up menu for creation of a new item (message, contact, event, etc.)
1.4.5 Moving and copying items
Kerio WebMail allows moving and copying of items between folders. Variety of methods can be used for this purpose and it depends on the user’s choice which one they feel more comfortable with. The methods are described in the following section:
The Drag & Drop method
The Drag & Drop method is a simple system tool to move and copy an item by using the left mouse button:
1. Put the mouse pointer over the item to be moved. Hold the left mouse button and drag the item over the destination folder. Release the mouse button.
Note:
To copy the selected item(s), hold theCtrlkey (orAlton Mac OS X).
2. Hold down the mouse button (and the Ctrl key, when copying) and drag the item to another folder.
Figure 1.14 Moving items by the Drag & Drop method
3. A green tick icon appears when the item is ready to move (see figure1.14) or a blue+icon when ready for copying (see figure1.15).
Figure 1.15 Copying items by the Drag & Drop method
4. Let hold of the button to move the item to the selected folder immediately.
Note:
Unless the item is dragged over a folder where it can be moved (i.e. any mail folder with corresponding access rights in the folder tree), a red icon is displayed meaning it is impossible to move the item to the particular location.
Using the Move or copy button
The toolbar includes a clickableMove or copy icon. Items can be move or copied by using this button as described below:
1. Highlight the selected item and use theMove or copy button in the toolbar.
2. In the Folder selection dialog just opened, select the folder where you want to move or copy the item and click onMoveorCopy.
1.5 Specific features and technical limitations
Pop-up menu
Items can be moved or copied also by a special option in the pop-up menu:
1. Right-click on an item. to open a context pop-up menu and selectMove or copy.
2. This opens theFolder selectiondialog where you can select a folder where the item will be move or copied. Click onMove/Copy.
1.5 Specific features and technical limitations
Automatic logout
For security reasons, Kerio WebMail logs out users automatically after a preset idleness timeout or after the timeout set for the maximal length of connection to the Kerio Web-Mail interface. By default, the length of inactivity period is set to 2 hours. By default, the maximal length of connection to theKerio WebMail interface is set for 312 hours. Kerio Con-nect administrators can change this value.
When any of these timeout expires, clicking on any link or button returns the user to the login page and the user has to log in again.
Pop-up killers
If any pop-up blocker (pop-up killer) is installed on the computer where Kerio WebMail is running, it is necessary to create an exceptional rule inKerio WebMailor to connect via secure connections (see chapter 1.2). Otherwise, event and task reminders will not work in Kerio WebMail.
If the pop-up blocker is embedded in the web browser, create an exception for Kerio WebMail
or disable the pop-up blocker completely.
Message size limits
Size of any outgoing email message (event, task or contact) must not exceed the limit set by
Kerio Connect administrator (for detailed information, see theKerio Connect administrator’s guide). Otherwise, the particular message will not be delivered. No limit applies to incoming mail.
Duplication of default folders
After certain period of using, some default folders, such asDeleted items,Junk email, etc., may be duplicated in theKerio WebMail’sfolder tree.
This problem occurs under the following circumstances:
• besides Kerio WebMail, a user connects to his/her mailbox also via an email client which is not directly supported byKerio Connect(e.g. MS Outlook Express),
• this unsupported email client is not in English,
• client applications connects to the server via IMAP.
If the conditions described above are met, the mail client might create its own set of special folders (they cannot be found at the server since their names are in English there). These changes are copied byKerio WebMail.
InMS Outlook Express, the problem can be removed by renaming the critical folders (Sent Items
andDrafts) underTools→Accounts:
1. Click on the particular email account and clickProperties.
2. Select the bottom IMAP folder and change the Sent Items and Drafts folder names (for details, see figure1.16).
Figure 1.16 Renaming folder names in MS Outlook Express
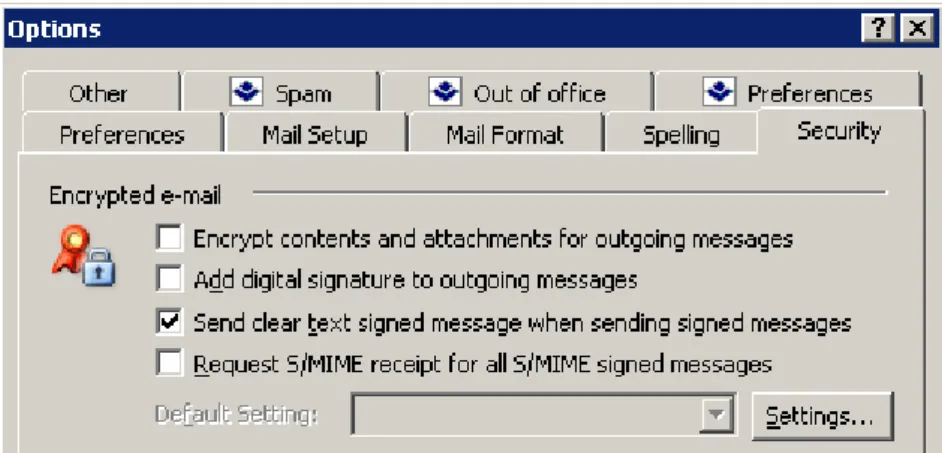
Messages signed in MS Outlook
Senders who useMS Outlookwith theKerio Outlook Connector (however, this problem can arise even if some obsolete email clients are used) can send digitally signed messages in a format that is not supported by Kerio WebMail. This problem can be solved by allowing sending of digitally-signed email messages inMS Outlookas clear text messages.
If your messages are digitally signed, in MS Outlook check the Send clear text signed mes-sage when sending signed mesmes-sages option under Tools→ Options on the Security tab (see
1.6 Email
Figure 1.17 Setting verification of digitally signed messages in MS Outlook
Note:
The settings shown here applies to MS Outlook 2003. For other versions of MS Outlook, the settings may differ slightly. InMS Outlook 2007, this setting can be found underTools→Trust Center→E-mail Security.
Problems with Back and Forward buttons
Also note that the Back and Forward buttons located in the toolbar of the web browser will not work properly inKerio WebMail. Therefore, it is recommended not to use these buttons in
Kerio WebMail.
1.6 Email
This chapter will provide you with an overview of options and features of mail folders, i.e. folders where email messages are kept. Number of email folders in a mailbox is not limited. The most essential folder isInbox. By default, new messages are delivered to this folder. It is also possible to make the server deliver messages sorted by certain criteria to other folders, however, this issue will be addressed in chapter1.14.
Another basic email folder isSent Items. Here, copies of all messages sent from the mailbox are stored.
Another email folder to be mentioned isDrafts. This folder stores any messages which have been started or even completed but not sent.
The three basic folders described above cannot be removed as they belong to so-called default folders. Details on default folders as well as on other folder types are focused in chapter1.12.
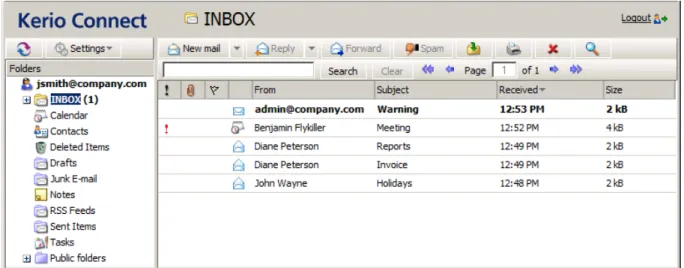
1.6.1 Message list
In this section, you will be provided with information on basic structure of email folders. The mail folders are arranged in a table (list). Each row contains one message and available information. Information to selected messages are listed in the columns. Each line may include icons referring to other features of the particular message (the description provided below addresses them in the order from left as they may appear in the line):
Figure 1.18 The Inbox email folder
• Priority— this icon represents the importance of the message. High priority is marked by a red exclamation mark, whereas a blue downward arrow stands for a low priority message. Priority is set by the message sender (see section1.6.3).
• Attachment — the paperclip icon indicates that the message contains an attachment (i.e. an attached file).
• Flag— flags are represented by a little red flag icon used to highlight messages (so it is later easier to find them).
• Icon — these icons indicate different types of messages (forwarded message, spam, invitation, etc.).
• From— the address of the sender.
• Subject— the subject of the message.
• To— the address(es) of the recipient(s).
• Cc— the address(es) of the copy recipients.
• Received — the date/time when the message was received. On the day of receipt, this column shows only the time data; from the next day on, the date is displayed as well.
• Date— the day when the message was sent. If the message is received on the same day, only time data are shown. From the next day on, the date is displayed as well.
• Size— the size of the message in kilobytes.
By default, up to 20 messages are listed on one page. To change number of messages displayed on a single page, use theSettingssection inKerio WebMail(see chapter1.13.1).
1.6 Email
icon Description
high priority messages low priority messages attachment
message flag unread message read message unread spam read spam
messages already replied forwarded messages
event (meeting invitation or a reply to an invitation)
task (notice informing of the user’s participation on a task or a reply to such a notice)
Table 1.1 Overview of icons used in message lists
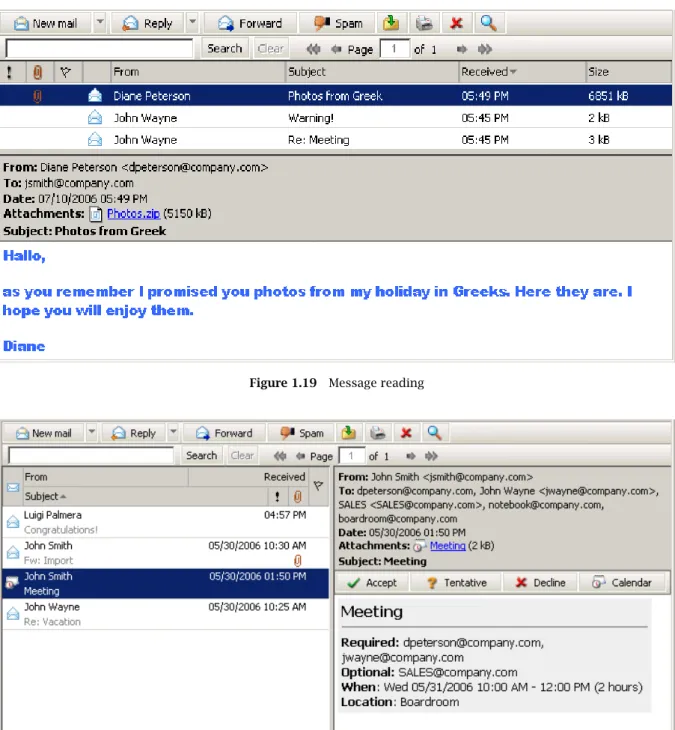
1.6.2 Message reading
New messages are delivered to theInboxfolder by default (folders for incoming messages can be specified in the rules— see chapter1.14). The unread messages are marked in bold. The number of unread messages is indicated in parentheses next to the folder name. Double-click selected message to open it in a new window (or select a message in the list and pressEnter). The reading pane is an area where the message body is displayed (message body, images, etc.). It can be located in the upper or lower part of the window (down, on the right see figures1.19
and 1.20) or hidden. If the window is hidden, message contents are displayed in separate windows. The reading pane can be enabled or disabled inSettings. User settings are described in detail in chapter1.13.1.
Figure 1.19 Message reading
Figure 1.20 The reading pane is located on the right from the list of messages
Message list editing
• Adding and deleting columns
The appearance of the message table can be changed depending on the information shown. Kerio WebMail enables users to display or hide any of the columns. Columns can be set as follows:
1.6 Email
1. Right-click on the column captions.
2. The pop-up menu that appears contains theChange columns option.
3. Click on Change columns to open theSelect fields dialog box and select columns to be shown in the list of messages.
Users can select (check) the columns they want to include in the table. Checked columns will be displayed in the table, unchecked columns will be hidden.
• Sorting messages by columns
The detailed information on individual messages is displayed in the columns. Each column enables sorting messages by information. Click the column heading to sort tasks in the ascending or descending order (see the arrow next to the column name) by alphabet, numbers or time (depending on the column contents).
Note:
For sorting by subject or by sender, items are sorted by the alphabet of the language set inSettingsas preferred (theGeneraltab) inKerio WebMail — see chapter1.13.1. In result, if for example English is set as preferred and subjects are in German, subjects will be ordered by English alphabet and some specific national characters may also cause problems in sorting.
• Adjusting the column width
The width of the message table can be adjusted the same way as in the spreadsheet programs. To change the column width, click between two columns in the table header and drag the cursor right or left as needed (see figure1.21).
Figure 1.21 Adjusting the column width
Note:
Settings of column width is not remembered. Next time opened, the columns return to their default state.
Attachments
Each incoming message may include one or more attachments. The attachments are files of various types (text, images, audio, video, archived compressed folders, etc.), that can be attached to a message and sent to the recipient.
If you receive an attachment in a message, you can open it, view it and also save it to a folder (by using the pop-up menu opened by right-clicking on the attachment). This opens a standard
dialog where the attachment can be saved. Users can also use the pop-up menu of the link (theSave asoption).
Reply to a message
It is possible to reply directly to any message. This can be done by theReply button available on the toolbar (see figure1.22). The button includes a menu where it is possible to select from two options (Reply to send the reply only to the sender or Reply All to send the reply to all addresses included in the original message). Click on one of these buttons to compose the reply message. The email address of the person who has sent the original message is entered automatically in the To field. Note also that the subject of the message now contains the Re
string. This string indicates reply to previous message.
Figure 1.22 The Reply button menu
The message can be also forwarded to other recipients. Click onForwardto edit the selected message where theToandCcfields are left blank, because the system does not know who do you intend to forward the message to.
If you receive a message with the Fw: string prefixing the subject, you’ll know that it is a forwarded message (. Fw: detailed information regarding the today’s meeting).
Message flag
Each of the received messages can be marked by a flag in Kerio WebMail. It is a little colored flag symbol that reminds users of the message it was appended to. Flags help us look up messages easily.
Click the column with the flag image to add a flag to/from a message (see image 1.23). The same method can be followed to remove a flag. Simply click on the flag you wish to remove.
1.6 Email
Note:
Image flags can be added to messages even inMS Outlook. The flags appended to messages in this application will be displayed also inKerio WebMail and vice versa. The problem is, that
MS Outlookenables users to add flags of different colors. Kerio WebMailshows all flags in one color.
1.6.3 Message writing
InKerio WebMail, new messages can be composed in the special window designed for message editing. To open this window, use theNew mailbutton on the toolbar.
The window for creating new messages is divided into several sections. The first one allows editing of addressees and message subject (name). This part is called message header. The second section allows insertion of the message. This part is called body. Another section is the toolbar in the upper part of the window. Several functions are included that can be used to manipulate with the current message.
E-mail header
The message header (see figure1.24) provides the following options:
Figure 1.24 E-mail header
From
This item is displayed only if you use an address different from the default email address (setting of default user address is described in section1.13.1).
The selected address will be treated as sender address.
To
Enter the email address of the recipient in this field. More than one email address is allowed; the addresses must be separated by commas (see picture1.24).
Cc
The same function as theTo field. However, this item is used in special cases where the message includes multiple addressee, some of them only being informed of the issue by the message. The addressees included in this section are not expected to reply to the message.
Bcc
The address entered in this field is hidden for the other recipients. Blind copy is useful especially when a message is to be sent to more email addresses and you want to protect the privacy of one or more users.
Subject
The subject stands for the message’s name. It should provide clear hint on the message content (helpful for later reference).
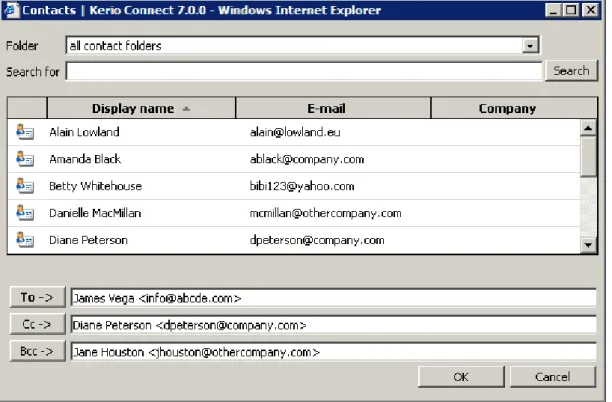
Next to the fields for recipients’ addresses, the To, Cc and Bcc buttons are available (see figure1.24). These buttons open the search dialog (see figure1.25) where first and last names can be used to easily filter out particular email address to which the message would be sent. The look-up dialog scans only through the addresses included in the account’s contact folders. Below, you can find detailed description of the look-up feature:
Figure 1.25 Searching in contacts
Folder
The addresses of recipients can be selected from the personal address book or from other contact folders that the user has connected to. In menu, select folders where the search will be performed.
Search for:
Enter at least the first letters of the searched contact (first name, last name or a part of email address) which will be used as a searching criteria string.
1.6 Email
Note:
The look-up is not case-sensitive.
Click theSearchbutton to start searching using the parameters previously defined.
Toolbar
The toolbar includes several buttons allowing basic operations such as message sending or saving:
Send
The message will be sent to the addresses entered into theTo,CcandBccfields.
Save as Draft
The message will be saved to theDraftsfolder, where it can be opened, edited and sent.
Attach
Use this button to attach a file to a message. More than one file can be attached to the message. Press the Attach morebutton multiple times and select the files you want to attach to the message.
If an undesirable file has been attached to the message by mistake, remove it by clicking on theRemovelink next to the attachment.
Warning:
Each attachment appended must not exceed the limit set by the administrator in
Kerio Connect. Otherwise, the particular message will not be delivered.
Spelling
Use theSpellingbutton to perform a spellcheck of the written text (for more information on spellchecker, see section1.6.4).
Check
TheCheck for namesbutton completes addresses by using connected contact folders. By default, the default personal contact folder is set for checking for names. In addition, other contact folders can be added in Settings (for details, see section1.6.6). As well as theCheck for namesbutton, theCtrl+Kshortcut can be used for the same purpose (see section1.6.6).
Priority
Press the exclamation mark icon to send the message with high priority.
Options
The Options button opens a dialog box where some of the message parameters can be set, e.g. its priority or delivery confirmation request.
• Message format — messages can be sent either as plain text or in HTML format. Users cannot use formatting in the plain text message and the formatting toolbar is disabled.
Figure 1.26 New mail options
These settings apply only to a single message. General settings can be defined in
Settings(chapter1.13.1).
• Priority — priority of a message. The priority is indicated by an exclamation mark or an arrow.
• Request aread receipt — if this option is enabled, the recipient’s client sends the sender an automatic alert that their message has already been read (if conformed by the reader). This option can be therefore used also in cases where an answer is not explicitly demanded but it is important to know whether the message has been read.
• Request adelivery receipt— check this option to request an automatic notification of the message’s successful delivery. The notification does not provide the information of if the message has been read.
Message body
The message body consists of the text and attachments (if any).
The message body can be sent as plain or formatted text. Text formatting is allowed thanks to an embedded HTML editor that supports text formatting functionality. However, writing of the email messages in this editor is not supported by some of the browsers:
• Firefox — HTML editor is functional, only some of the buttons are disabled (Cut, Copy and Paste icons). Users can use keyboard shortcuts instead of these buttons (chapter1.13.5).
To format the message text inKerio WebMail, use icons in the toolbar above the text field.
1.6 Email
Edits
The dialog box contains standard Cut, Copy and Paste tools. It is possible to use standard key shortcuts (Ctrl+C for copying, Ctrl+V for pasting and Ctrl+X for cutting of the selected object) or the first three icons on the toolbar.
Besides the buttons, the Drag & Drop method can be applied when moving or copying text a message. Simply select part of the text and drag it to the desired position while holding the mouse button. Hold down theCtrlkey to copy the text.
Font
The font can be changed the same way as in other editors. Users can select different fonts, sizes, colors and styles:
• Fonts — in Kerio WebMail, some basic fonts are available: Arial (Black),Courier,
Times New RomanandVerdana.
• Font size— click the appropriate icon in the toolbar to change the font size.
• Font color — click the appropriate icon in the toolbar to change the font color.
• Font style — standard icons for selecting a font style are available in the editor:
bold,italic,underlined.
• Remove formatting — clicking on the icon removes all formatting from the selected text.
Paragraph
The text paragraphs can be aligned right, left and centered, as well as indented from the left margin. Use the standard icons in the toolbars to change the appearance of the paragraph.
Bullets and numbering
Standard icons for creating bullets and numbered lists are available in the toolbar. Click the selected text to enable the bullets/numbering. When users click the icon again, the bullets/numbering are disabled.
Text highlighting
The selected text can be highlighted in one of the colors of the Highlight palette in the toolbar (the last item).
Hypertext
A hyperlink is an active portion of a text, usually underlined and marked by a different color, that direct users to an intranet or Internet site. The hyperlink is used for directing to web pages, downloading files, sending email or accessing discussion groups.
Use theCreate linkicon in the toolbar to enter the URL for the hyperlink.
Use theRemove linkicon to delete the hyperlink.
The following example illustrates how to use the hyperlinks:
One portion of the message text is: “I am sending you a link to aninteresting website”. The “interesting website” part can be used as a hyperlink.
Solution:
Mark the words “interesting website” by cursor and click theCreate linkbutton. A dialog box for creating a link appears. Specify the URL entry with corresponding URL address.
Warning:
If an email composition takes longer, connection between the server and the browser may be lost. If this happens, finish the message and enter your user password in the dialog which is opened upon attempting toSend orSave the message. Then the attempted action will be performed.
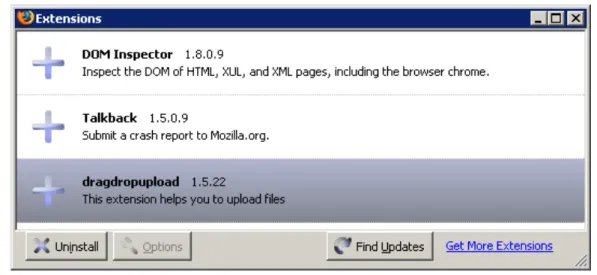
Moving message attachments by the Drag & Drop method in Firefox
Firefox supports moving of attachments to the message editor’s window by the Drag & Drop method. The dragdropupload plugin is required for this action (available at
https://addons.mozilla.org/firefox/2190/).
After installation, it is necessary to check whether the plug-in was installed successfully. 1. In theToolsmenu, selectExtension.
Figure 1.29 The Extensions dialog
2. This opens the Extensions dialog. After successful installation, the dialog contains the
1.6 Email
The plug-in allows to attach one or more files to email messages by the Drag & Drop method in one of the following ways:
1. Open the message editor. To attach files to a message, left-click on them, hold the mouse button and drag them to theAttachmenttoolbar button. This adds the attachments to the message.
2. Open the message editor. Click on Attachment. This opens an empty entry for specification of the attachment path. Simply left-click on the files to be attached, drag them to the blank entry and release the mouse button. This attaches the files to the message.
1.6.4 Spellchecker
Use the Spellcheck button in the New mail toolbar to start the spellcheck. If an error is detected, a dialog is displayed with the incorrect phrase highlighted (see figure 1.30). The following options are available:
• Select a correct phrase in theSuggestionsdialog box and clickOK to confirm.
• Insert the correct phrase manually in theChange to dialog box and click Change to confirm.
• If the phrase was entered correctly, clickSkipto skip the phrase.
• Use theSkip all button, if the phrase appears frequently in the text. All occurrences of the phrase in the text will be skipped.
• ClickAdd to add the phrase in the dictionary. New phrases can be also added using a special dialog box created for this purpose — see below.
• ClickDeleteto delete the phrase.
In order for the dictionary to work properly, select the correct dictionary for the written text. Users can use either theDictionary menu (the last item in the dialog) orSettings menu (chapter1.13.1).
Figure 1.30 Spellchecker
Dictionary
Kerio WebMail contains a personal custom dictionary where unknown phrases not available in the default spellcheck dictionary can be entered. Each user can thus create his/her own dictionary.
The default dictionary used for spellcheck can be amended when needed. Select theDictionary
item from the Settings menu in the spellcheck dialog. Users can add or delete words to and from the dialog box that is opened. New words and expressions can be added to the dictionary also when spellchecking a message.
1.6.5 Spam filter
Spam messages are mostly represented by advertisements. Spam are usually sent in bulk and the recipient addresses are obtained by illegal means (e.g. by tapping the network communication). In their wilder modifications, spams may also distribute and seed dangerous viruses.
Kerio Connect contains a sophisticated antispam filter. The filter is designed so that it can recognize specific attributes of spam from the message contents (spam messages usually contain specific keywords that can be recognized and counted by the filter). Each message
1.6 Email
is assigned a numeric score; if this value exceeds the limit set in Kerio Connect, the message is marked as spam.
Self-learning antispam filter
The built-in antispam filter may let some spam messages through from time to time by mistake (their score is low) and mark some regular messages as spam (their score is too high). For the reasons above, the antispam filter allows modification to the database used for recognition of spam messages. This method, however, requires user input. Users should reassign the incorrectly evaluated messages to correct types (spam / non-spam) so that the filter learns to recognize them in the future.
Kerio WebMail uses the Spam and Not spam buttons located in the toolbar to mark the messages correctly. Highlight the incorrectly marked message and click one of the buttons. The filter receives information regarding update of the database. This decreases chance for incorrect deliveries.
A rule for unwanted messages
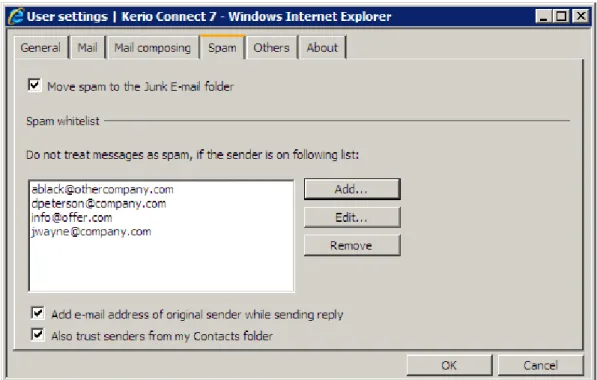
All messages marked as spam can be automatically delivered to Junk E-mail folder, created in the folder tree for this purpose. This function may be enabled when creating the email account or it can be enabled by the users themselves in their user settings, on in theSpamtab (for details, see chapter1.13.1).
To enable the spam rule, check the Move spam to the Junk E-Mail folder on theSpam tab (see figure1.31). Once the rule is enabled, it is also recommended to enable the rule which allows messages sent from addresses included in the user’s contact folders skip the antispam check.
It is also possible to add addresses to a special whitelist. Messages sent from the addresses involved in the list will be considered as non-spam. To add an address to the whitelist, users can use one of the following options:
1. On theSpamtab in user settings (see figure1.31).
2. Right-click a message in the list to open the pop-up menu and select Add user to spam whitelist.
This option prevents from moving solicited messages with some attributes of spam to the
Spamfolder.
Note:
The spam rule has higher priority than rules set in theFiltersdialog box (see chapter1.14). If the filter includes any rule which in any way handles messages marked as spam, the action set in this rule is ignored.
1.6.6 Automatic check for email addresses
Automatic check for email addresses helps to accelerate writing of addresses and ensures that the addresses entered will be correct.
Upon entering of first letters of email address in the address entry, this feature uses all contact folders to look up all addresses matching the string. The search focuses on itemsFirst Name,
Last Name, E-mail Address and Company. The offered items include also user groups with email address and distribution lists if their name (or their email address in case of groups) matches the string.
If multiple addresses matching the string are found, a menu is opened that lists all addresses, user groups and distribution lists matching the string (see figure1.32).
1.6 Email
Initiation of the look-up function depends onKerio Connectconfiguration:
• Automatic check for addresses is disabled in Kerio WebMail Settings (see section1.13.1) — to check for an address, it is necessary to click on theCheck Names
button icon available on the toolbar or to use theCtrl+Kkeyboard shortcut.
• Automatic check for addresses is enabled inSettings — detected addresses matching the string are filled in the entry when the pointer is moved to another textfield. To check for addresses while entering multiple addresses, click on theCheck for names
icon on the toolbar or use theCtrl+Kshortcut.
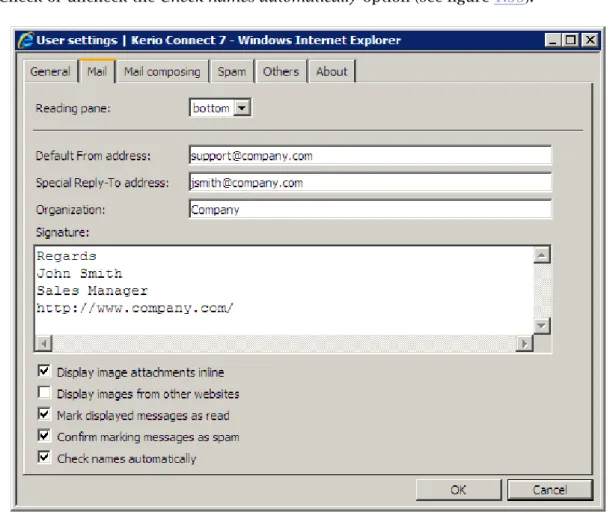
InKerio WebMail, the automatic check for addresses can be enabled/disabled underSettings: 1. Go toSettings(underSettings→Settings).
2. Switch to theMailtab.
3. Check or uncheck theCheck names automaticallyoption (see figure1.33).
Addresses are searched in contact folders where the check is enabled. By default, the check is enabled only for the default private Contact folder and the default public Contact folder. Other folders can be added as described below:
1. Go toSettings(underSettings→Settings).
2. Switch to theMail composingtab.
3. Click onChoose foldersat theSearch for contacts in selected foldersitem. 4. Check folders to be added to the scanned folders (see figure1.34).
Figure 1.34 Settings — Adding contact folders to the automatic check for names
5. ClickOK to confirm settings.
Warning:
The more folders are included in the check, the longer the search may take.
1.6.7 Looking up messages
The message look-up helps find specific messages quickly, using the criteria defined. The standard search form is used for searching messages in Kerio WebMailmail folders. Use the
1.6 Email
The search window is divided into three parts. The first part lists the folder where the search is performed (the current folder by default). To change this setting, click the Browsebutton located on the right of theFolder item.
The other part of the window contains two tabs used to define the search parameters. On the
Generaltab, users can perform the basic search by subject or sender/recipient address:
Search for:
Insert a string that will be used as a searching criteria.
Where
Choose where messages will be searched —Subject,Message bodyorSubject and message body.
Figure 1.35 Searching — General tab
Sender
Use theSender textfield to specify a string that will be used as a searching criteria applied to senders’ addresses. You can also click theSender button to open a dialog box where email addresses can be selected from your contact folders.
Recipient
Use the Recipient textfield to specify a string that will be used as a searching criteria applied to recipients’ addresses. You can also click theRecipient button to open a dialog box where email addresses can be selected from your contact folders.
It is also possible to combine searching criteria. For example, to search a particular message where you know the sender, use theSearch(searching by subject) textbox to specify a particular string and theSender field to enter an email address.
Use theAdvancedtab to specify additional criteria for searching:
Only items that are
Narrowing of items by the read/unread criteria.
Only items with
Narrowing the list of items by the flagged/non-flagged criteria.
Only items
Narrowing the list of items by the attachment/no attachment criteria.
Date
Searching messages sent or received within the selected time period.
Size
Searching messages by size.
1.6 Email
The last part contains a table with search results and a toolbar. Using this toolbar, users can handle individual messages right in the table.
Using the Search field
Another way of looking for a specific message is theSearchfield in the toolbar. Search string (a word, part of a word or a character) can be entered in this field. Messages are searched by email address, subject and message body. To exclude message body from search, check optionOnly person or subject.
The messages found will be listed directly in the message list.
1.6.8 Interrupted connection between the server and the browser
Sometimes, the connection between Kerio Connect and a web browser may be interrupted. Connection may be interrupted by a connection failure or by expiration of the session timeout set inKerio Connect1.
If the connection fails, it is necessary to reconnect by authentication by username and password.
If a message is just being edited when the connection fails, it is possible to finish it and reconnect by authenticating by username and password upon clicking on theSend button (see figure1.37).
Figure 1.37 The dialog for authentication through username
Warning:
Beware of closing the window with the edited message before the new authentication. Otherwise, the message will be lost.
Kerio Connect allows setting of timeouts for total time of sessions and for idle connections. These settings increase
1
1.7 Contacts
Most of us use or at least know address books and little notebooks where names, phone numbers and addresses of family members, friends, colleagues, business partners and other people are kept. Another possibility to remember contacts is keeping of business cards provided by people we meet. In these times of booming electronic communication where we are almost becoming slaves of time, looking contacts up in tiny pocket books and visit-card filers is too time-consuming and ineffective.
For this reason, contact folders have been developed. Actually, these folders are electronic address books replacing the old-fashioned methods of contact maintenance. In addition to the fact that all contacts are kept together, other advantages come along, such as easy look-up and automatic recognition of known email addresses while being written.
In addition to creating and maintaining of single contacts, contact folders allow creating and maintaining of distribution lists. Distribution lists are groups of contacts recognized by a single group name. This name is simply used instead of entering all included addresses separately.
1.7.1 Contacts display
The contacts inKerio WebMailcan be displayed in two ways; either as individual cards, or as a list of contacts. Use the menu in the toolbar to set the display mode (see picture1.38).
For classification by contacts, items are sorted by the alphabet of the language set inSettings
as preferred (the General tab) inKerio WebMail — for details, see chapter 1.13.1. In result, if for example English is set as preferred and subject are in German, contacts will be ordered by English alphabet and some specific national characters may also cause problems in sorting. By default, up to 20 contacts are listed on one page in contact folders. Number of messages displayed at one page can be changed, however, it is necessary to keep in mind that the same settings apply also to email and task folders. To change number of items displayed on a single page, use theSettingssection inKerio WebMail(see chapter1.13.1).
Cards
Besides other methods, the cards can be sorted by alphabet letters, available below the toolbar as links. By clicking a specific letter, the first contact starting with this character will be highlighted.
TIP
Pressing Shift-letter when searching in the row of letters, the contacts starting with this character are marked.
1.7 Contacts
Figure 1.38 Contacts
Users can also use the purple arrows to navigate between the pages with contacts.
List
In the list view mode, information to individual contacts are listed in the columns. Contacts can be sorted according to the information This view mode provides several advantages. First, columns can be sorted and ordered in accordance with information they include. Click the column heading to sort contacts in the ascending or descending order (see the arrow next to the column name) by alphabet, numbers or time (depending on the column contents).
Users can also customize the information to be displayed. The columns can be added or deleted. Right-click the table header and specify the column settings in the window where columns to be displayed can be selected. The pop-up menu contains the Change columns
option.
The width of the contacts list can be adjusted the same way as in the spreadsheet programs. To change the column width, click between two columns in the table header and drag the cursor right or left as needed. When the window is refreshed, layout of the columns is set to the default mode.
1.7.2 New contact
To create a new contact, follow these guidelines: 1. Open a contact folder.
2. Click on theNew contactbutton in the toolbar
Figure 1.39 New contact — General tab
The first tab (see figure 1.39) contains text boxes where general data about a person. (the first and last name, phone number, email address or personal web page URL can be specified).
In theAddresstab, home address data for each user are stored. In this tab, three different addresses — Business, Home and Other — can be specified. The address type can be selected in theAddressmenu. Check theThis is the postal address option to select one of the addresses as primary.
The Details tab contains additional information about the contact, such as birthday, anniversary or title.
1.7.3 Private contacts
Private contacts can be used especially for sharing of contact folders with other users. If a user shares a private contact folder with other users, it is possible to mark certain contacts as private. These contacts will not be displayed to anyone else except the user with whom the contacts are shared and even the person who shares these contacts cannot see them in the shared folder.
To mark a contact as private, do the following: 1. Double-click on the contact to show its details.
2. On theGeneraltab, enable thePrivateoption (see figure1.39). 3. Save changes by clickingSave and Close.
1.7 Contacts
Warning:
Private contacts are treated as private only if the client where the private contact folder is viewed supports this feature. In other client applications (like MS Outlook), it is possible to view and edit contacts without any restrictions by users with appropriate access rights. This implies that information included in private contacts are not well secured.
1.7.4 Searching in contacts
There are several ways of searching in contact folders based on the type of display. The cards display enables users to search for contacts using the letters under the toolbar. By clicking a specific letter, the contacts starting with this character are highlighted.
When contacts are displayed in the form of a list, only the standard ascending and descending order of messages is possible. Thus, searching for a specific contact is not very efficient, especially when there are too many contacts in the folder.
Searching for contacts using the Search window is completely different from the above procedure. Use theSearchbutton (the magnifying glass icon in the toolbar) to open the window or enter a string (a word, part of a word or a character in the message to be searched for) into theSearch for: field in the toolbar.