1
CentreVu
®
Supervisor
Version 8
Installation and Getting Started
585-210-928
Comcode 108502170
Issue 1
All Rights Reserved Printed in U.S.A.
Notice
Every effort was made to ensure that the information in this document was complete and accurate at the time of printing. However, information is subject to change.
Your Responsibility for Your System’s Security
Toll fraud is the unauthorized use of your telecommunications system by an unauthorized party, for example, persons other than your company’s employees, agents, subcontractors, or persons working on your company’s behalf. Note that there may be a risk of toll fraud associated with your telecommunications system and, if toll fraud occurs, it can result in substantial additional charges for your telecommunications services. You and your system manager are responsible for the security of your system, such as programming and configuring your equipment to prevent unauthorized use. The system manager is also responsible for reading all installation, instruction, and system administration documents provided with this product in order to fully understand the features that can introduce risk of toll fraud and the steps that can be taken to reduce that risk. Lucent Technologies does not warrant that this product is immune from or will prevent unauthorized use of common-carrier telecommunication services or facilities accessed through or connected to it. Lucent Technologies will not be responsible for any charges that result from such unauthorized use.
Lucent Technologies Fraud Intervention
If you suspect that you are being victimized by toll fraud and you need technical support or assistance, call Technical Service Center Toll Fraud Intervention Hotline at 1-800-643-2353. Trademarks
●CentreVu is a trademark of Lucent Technologies.
●DEFINITY is a registered trademark of Lucent Technologies. ●INFORMIX is a registered trademark of INFORMIX
Software, Inc.
●INTEL and Pentium are registered trademarks of Intel Corporation.
●Microsoft, MS, Windows, and NT are registered trademarks of Microsoft Corp.
●Sun and Solaris are registered trademarks of Sun Microsystems, Inc.
●SPARCserver is a registered of SPARC International licensed exclusively to Sun Microsystems, Inc.
All other product names mentioned herein are the trademarks of their respective owners.
Ordering Information
Call: Lucent Technologies Publications Center Voice: 1-800-457-1235
International Voice: +1-317-322-6416 Fax: 1-800-457-1764
International Fax: +1-317-322-6699 Write: Lucent Technologies BCS Publications Center
2855 N. Franklin Road Indianapolis, IN 46219 U.S.A.
Installation and Getting Started guide Document No.585-210-928 Comcode 108502170 Issue 1, December 1999
For additional documents, refer to the section entitled “Related Documents” in the Preface.
You can be placed on a Standing Order list for this and other documents you may need. Standing Order will enable you to automatically receive updated versions of individual documents or document sets, billed to account information that you provide. For more information on Standing Orders, or to be put on a list to receive future issues of this document, please contact the Lucent Technologies Publications Center.
Lucent Technologies National Customer Care Center Lucent Technologies provides a telephone number for you to use to report problems or to ask questions about your call center. The support telephone number is 1-800-242-2121. Document Support Telephone Number
Lucent Technologies provides telephone numbers for you to use to report errors or to ask questions about the information in this document. The support telephone numbers are:
Voice: 1-888-584-6366 and International Voice: +1-317-322-6848. European Union Declaration of Conformity
Lucent Technologies Business Communications Systems declares that the equipment specified in this document conforms to the referenced European Union (EU) Directives and Harmonized Standards listed below:
EMC Directive 89/336/EEC Low Voltage Directive 73/23/EEC
The “CE” mark affixed to the equipment means that it conforms to the above Directives.
Disclaimer
Intellectual property related to this product (including trademarks) and registered to AT&T Corporation has been transferred to Lucent Technologies Incorporated. Any references within this text to American Telephone and Telegraph Corporation or AT&T should be interpreted as references to Lucent Technologies Incorporated. The exception is cross references to books published prior to December 31, 1996, which retain their original AT&T titles.
Heritage Statement
Lucent Technologies—formed as a result of AT&T’s planned restructuring—designs, builds, and delivers a wide range of public and private networks, communication systems and software, consumer and business telephone systems, and microelectronics components. The world-renowned Bell Laboratories is the research and development arm for the company.
Warranty
DEFINITIONS
l “Lucent” means Lucent Technologies Inc.
l “You”, “Your”, or “Licensee” means the person or business entity who purchased this License to use this Client Software or for whom such License was purchased.
l “Client Software” means a software application that operates on a computer system that provides resources to Client Software.
l “Documentation” means the manual and any other printed material provided by Lucent with the Client Software.
l “License” means the License purchased and granted pursuant to this Agreement.
LICENSE AND PROTECTION
1. License Grant. Lucent grants to You, subject to the following terms and conditions, a nonexclusive, nontransferable right to use the Client Software on multiple single user devices, maximum simultaneous users of the Client Software being limited to the number Licensed and authorized by Lucent. THE SERVER SOFTWARE AUTOMATICALLY PREVENTS SIMULTANEOUS USE BY MORE THAN THE AUTHORIZED NUMBER OF USERS. Lucent reserves all rights not expressly granted to You.
2. Protection of Software. You agree to take all reasonable steps to protect the Client Software and Documentation from unauthorized copy or use. The Client Software source code represents and embodies trade secrets of Lucent and/or its licensors. The source code and embodied trade secrets are not licensed to You and any modification, addition, or deletion is strictly prohibited. You agree not to disassemble, decompile, or otherwise reverse engineer the Client Software in order to discover the source code and/or the trade secrets contained in the source code or for any other reason.
To the extent that the Client Software is located in a Member State of the European Community and You need information about the Client Software in order to achieve interoperability of an independently created software program with the Client Software, You shall first request such information from Lucent. Unless Lucent refuses to make such information available, You shall not take any steps, such as reverse assembly or reverse compilation, to derive a source code equivalent to the Client Software. Lucent may charge You a reasonable fee for the provision of such information.
3. Copies. You may make multiple copies of the Client Software, provided You do not receive any payment, commercial benefit, or other consideration for reproduction or use. You may not copy Documentation unless it carries a statement that copying is permitted. All proprietary rights notices must be faithfully reproduced and included on all copies.
4. Ownership. Ownership of, and title to, the Client Software and Documentation (including any adaptations or copies) remains with Lucent and/or its licensors.
6. Termination. This Agreement shall automatically terminate if You breach any of the terms or conditions of this Agreement. You agree to destroy the original and all copies of the Client Software and Documentation, or to return them to Lucent, upon Termination of this License.
LIMITED WARRANTY AND LIMITED LIABILITY
1. Compatibility. The Client Software is only compatible with certain computers and operating systems. THE SOFTWARE IS NOT WARRANTED FOR NONCOMPATIBLE SYSTEMS.
2. Software. Lucent warrants that if the Client Software fails to substantially conform to the specifications in the Documentations and if the Client Software is returned to the place from which it was purchased within one (1) year from the date purchased, then Lucent will either replace the Client Software or offer to refund the License Fee to You upon return of all copies of the Client Software and Documentation to Lucent. In the event of a refund, the License shall terminate.
3. DISCLAIMER OF WARRANTIES. Lucent makes NO WARRANTY, REPRESENTATION OR PROMISE NOT EXPRESSLY SET FORTH IN THIS AGREEMENT. LUCENT DISCLAIMS AND EXCLUDES ANY AND ALL IMPLIED WARRANTIES OF
MERCHANTABILITY OR FITNESS FOR A PARTICULAR PURPOSE. LUCENT DOES NOT WARRANT THAT THE CLIENT SOFTWARE OR DOCUMENTATION WILL SATISFY YOUR REQUIREMENTS OR THAT THE CLIENT SOFTWARE OR
DOCUMENTATION ARE WITHOUT DEFECT OR ERROR OR THAT THE OPERATION OF THE SOFTWARE WILL BE UNINTERRUPTED. Some states or countries do not allow the exclusion of implied warranties or limitations on how long an implied warranty lasts, so the above limitation may not apply to You. This warranty gives You specific legal rights which vary from state to state.
1. Governing Law. This Agreement shall be governed by, and interpreted in accordance with, the substantive laws of the State of New Jersey of the United States of America.
2. Entire Agreement. This Agreement sets forth the entire understanding and agreement between You and Lucent and may be amended only in a writing or writings signed by You and Lucent. NO VENDOR, DISTRIBUTOR, DEALER, RETAILER, SALES PERSON OR OTHER PERSON IS AUTHORIZED TO MODIFY THIS AGREEMENT OR TO MAKE ANY WARRANTY, REPRESENTATION OR PROMISE WHICH IS DIFFERENT THAN, OR IN ADDITION TO, THE REPRESENTATIONS OR PROMISES OF THIS
AGREEMENT ABOUT THE SOFTWARE.
3. Export. Licensee hereby agrees that it will not knowingly, directly or indirectly, without prior written consent, if required, of the Office of Export Licensing of the U.S. Department of Commerce, Washington D.C. 20230, export or transmit any of the Products to any group Q, S, W, Y, or Z country specified in the Export Administration Regulations issued by the U.S. Department of Commerce or to any country which such transmission is restricted by applicable regulations or statues.
4. U.S. Government Restricted Rights. Use, duplication, or disclosure by the United States Government is subject to restrictions as set forth in FAR 52.227-14 (June 1987) Alternate III (g)(3) (June 1987), FAR 52.227-19 (June 1987), or DFARS 52.227-7013 (c)(1)(ii) (June 1988), as applicable Contractor/Manufacturer is Lucent Technologies Inc. 11900 North Pecos Street, Westminster, Colorado 80234.
5. Assignment. Lucent may without your consent or notice to You, assign this Agreement to an entity to which it transfers ownership of the Client Software. Upon the effective date of such assignment, You agree that Lucent shall be released and discharged from all obligations and liabilities under this Agreement.
Table of Contents
vii
CentreVu
Supervisor
Preface . . . P-1
Overview . . . P-1 Contents of This Document . . . P-3 Conventions Used in This Document . . . P-5 Related Documents . . . P-6
Introduction . . . 1-1
About CentreVu Supervisor . . . 1-1 About CentreVu CMS . . . 1-4 Types of Installation . . . 1-5 Checking Package Contents . . . 1-6 Installation Support . . . 1-7 Tips . . . 1-7 Online Help . . . 1-8 Help Topics . . . 1-8 Learning to Use Help . . . 1-9 What You Need on Your PC . . . 1-10 Other Requirements . . . 1-11 What You Need for Your CentreVu CMS Server . . . 1-12 CMS System Capacities . . . 1-13 Number of Supervisor Windows Allowed . . . 1-13 Number of Simultaneous Instances Allowed . . . 1-13 Number of PCs Allowed to Run Supervisor . . . 1-14 Performance . . . 1-14 Reliability/Availability. . . 1-14 Security . . . 1-15
Installing CentreVu Supervisor on a Local PC . . . 2-1
Overview . . . 2-1 Installation Procedures . . . 2-2 Preparing the Network Folder . . . 2-2 Setting Up the PC . . . 2-3
Installing CentreVu Supervisor on a Shared Network Drive . . . 3-1
CentreVu Supervisor Version 8 Installation and Getting Started
viii
Uninstalling CentreVu Supervisor . . . 4-1
Overview . . . 4-1 Performing the Uninstall . . . 4-2
Getting Started with CentreVu Supervisor . . . 5-1
ix
Completing Input Windows . . . 5-40 Completing Input Fields . . . 5-42 Using the Browse Button. . . 5-43 Single Entity Input . . . 5-43 Multiple Entries Input . . . 5-44 Using the History List . . . 5-46 Closing Supervisor Windows . . . 5-47
Performing CMS Operations . . . 6-1
Overview . . . 6-1 Running an Operation . . . 6-3 Operations Menus . . . 6-6 Actions Menu. . . 6-6 Edit Menu. . . 6-8 Adding Items to the CMS Database . . . 6-10 Finding Items in the CMS Database . . . 6-11 List All. . . 6-11 Find one . . . 6-12 Modifying Items in the CMS Database . . . 6-13 Deleting Items from the CMS Database . . . 6-15
Using CentreVu Supervisor Reports . . . 7-1
CentreVu Supervisor Version 8 Installation and Getting Started
x
Data Labels Tab . . . 7-37 Minimizing Report Output Windows . . . 7-39 Minimized Report Thresholds . . . 7-41 Right Mouse Button Pop-Up Menus . . . 7-42 Rotating a 3D Chart . . . 7-46 Exporting Report Data . . . 7-47 Copying Chart Reports . . . 7-50 Resizing Report Windows . . . 7-51 Standard CMS Reports . . . 7-51 Graphical Reports . . . 7-51 Changing Column Widths. . . 7-52 Selecting a Printer . . . 7-53 Using Page Setup . . . 7-54 Setting Report Threshold Highlights . . . 7-56 Tips for Setting Report Threshold Highlights . . . 7-60 Available Agent Threshold Settings . . . 7-62 Available Split/Skill Threshold Settings . . . 7-67 Available VDN Threshold Settings . . . 7-70 Report Options . . . 7-72 Options General Tab . . . 7-73 Options Report Colors Tab . . . 7-75 Options Threshold Colors Tab . . . 7-76 Options Name Format Tab . . . 7-77 Creating a New Report Color Scheme . . . 7-78 Creating a New Threshold Color Scheme . . . 7-82 Creating a New Name Format. . . 7-85 Exiting and Restarting Reports . . . 7-86
Installing and Using CentreVu Terminal Emulator. . . 8-1
xi
Communications Tab . . . 8-18 Network Connection Settings . . . 8-18 Serial and Modem Connection Settings . . . 8-19 Modem Tab . . . 8-20 Font Tab . . . 8-21 Terminal Messages . . . 8-23 Error Messages . . . 8-23 Unable to connect to the remote host. . . 8-23 The connection to the remote host was lost.. . . 8-23 The profile {name} does not exist. . . 8-23 Information Messages . . . 8-24 The profile {name} exists, replace?. . . 8-24 Save changes to {name}? . . . 8-24 A connection is active, exit anyway?. . . 8-24
Troubleshooting . . . 9-1
Overview . . . 9-1 Troubleshooting Tips . . . 9-2 Installation Error Messages. . . 9-2 Login Error Messages . . . 9-4 OCX and DLL Incompatibilities. . . 9-11 Windows Swap Files . . . 9-11 Installing CentreVu Supervisor . . . 9-11 Preserving CentreVu Supervisor User Profiles . . . 9-12 Resolving TCP/IP Host Name . . . 9-12 Proper Operation of Networking Software . . . 9-13 Problems with Serial/Modem Connections. . . 9-13 Using a Secondary System Password on the CMS Server . . . 9-14
Saving as HTML . . . A-1
Overview . . . A-1 Using Save as HTML . . . A-2 Output Files. . . A-4 Using Templates . . . A-5 Not Using Templates . . . A-5 Using Existing Templates . . . A-6 Save as HTML Template Tags . . . A-6 Fonts . . . A-7
Glossary . . . GL-1
CentreVu Supervisor Version 8 Installation and Getting Started
Overview
P-1
CentreVu Supervisor
Preface
0Overview
1The CentreVu® Supervisor Installation and Getting Started document includes
the following information:
● Instructions for installing CentreVu Supervisor (Supervisor) on a local PC
from a network server or CD-ROM
● Procedures for installing Supervisor to a Shared Network Drive ● Procedures for uninstalling Supervisor
● Instructions for using Supervisor
● Procedures for installing and using CentreVu Terminal Emulator
● Guidelines for responding to error messages that may be displayed while
installing Supervisor or logging into the CentreVu Call Mangement System (CMS) server.
NOTE:
CentreVu Terminal must be separately installed; it is not automatically installed
CentreVu Supervisor Version 8 Installation and Getting Started
Overview
P-2
This document is intended for anyone who is installing the CentreVu Supervisor software on the DEFINITY® Enterprise Communications Server (ECS). It
assumes that you are familiar with your PC and the Microsoft* Windows†95 or 98 or Windows NT‡4.0 operating systems, including standard Windows conventions.
The following sections are included in this Preface:
● Contents of this Document
● Conventions Used in this Document ● Related Documents.
Contents of This Document
P-3
Contents of This Document
1The document is organized into the following chapters:
Chapter 1 Introduction
This chapter introduces the CentreVu Supervisor application. It provides information on the following:
● The two methods of installation
● The items provided in the CentreVu Supervisor
package
● The equipment required to run CentreVu
Supervisor
● The Helpline numbers.
Chapter 2 Installing CentreVu Supervisor on a Local PC
This chapter walks you through the process of installing
CentreVu Supervisor from a CD-ROM or the network
onto a PC that will not access Supervisor over the network.
Chapter 3 Installing CentreVu Supervisor on a Shared Network Drive
This chapter describes the steps required to install the Supervisor application files (executables and default files) to a shared read-only folder on the network server.
Chapter 4 Uninstalling CentreVu Supervisor
This chapter describes the steps required to uninstall the
CentreVu Supervisor Version 8 Installation and Getting Started
Contents of This Document
P-4
Chapter 5 Getting Started with CentreVu Supervisor
This chapter walks you through the process of starting Supervisor, logging into a CMS server, logging out of a CMS server, and exiting Supervisor. It also teaches you how to change your connection settings and gives you information about getting help with the Supervisor product.
Chapter 6 Performing CMS Operations
This chapter defines how to use windows that display as a result of selecting an item from any Operations tab, including detailed information on the Actions menu items in Operations input windows.
Chapter 7 Using CentreVu Supervisor Reports
This chapter defines how reports are displayed in Supervisor and teaches you how to format and print reports, including selecting run dates and times. This chapter also gives detailed information on the Actions menu items available in report output windows and teaches you how to export report information to another
Windows application.
Chapter 8 Installing and Using CentreVu Terminal
This chapter gives you general information about the
CentreVu Terminal application and explains how to install
the CentreVu Terminal application and how to set it up to connect to the CMS server.
Chapter 9 Troubleshooting
Conventions Used in This Document
P-5
Conventions Used in This Document
1The following conventions are used in this document:
*Whenever you are asked to click or double click the mouse button, click button 1 (the left-most mouse button or primary button), unless button 2 (the right-most button or secondary button) is specified.
Convention Description
Bold Text Menu names, options, and icon names are shown in bold text. For example: Choose Save from the File menu.
Initial Capital Letters
Names of windows, dialog boxes, and keyboard keys. For example: This field is in the Manual Login window.
Courier
Text
Text you are asked to enter and system commands. For example: Enter this
command.
< > Variable text is marked by less-than/greater-than signs. For example: Couldn’t create <filename>.
KEY+KEY Key combinations for which you must press and hold down one key and then press another. For example: ALT+4.
Italic Text References to other documents, trademarks, and for emphasis.
“ “ Sections and chapters that are referenced. For example: See Chapter 1, “Introduction,” for an outline of the information in this book.
Click and Double click
*Button 1 (left-most mouse button or primary button).
Microsoft Windows
or Windows
These terms are used to refer to both Microsoft
CentreVu Supervisor Version 8 Installation and Getting Started
Related Documents
P-6
Related Documents
1The following documents include additional information about the Call Management System or Supervisor:
● CentreVu® Supervisor Version 5 User Guide (585-215-829)
● CentreVu® Call Management System Release 3 Version 8 Administration (585-210-910)
● CentreVu® Supervisor Version 8 Reports (585-210-929)
● CentreVu® Call Management System Release 3 Version 8 Database Items
and Calculations (585-210-939)
● CentreVu® Call Management System Release 3 Version 5 Custom Reports (585-215-822)
● Lucent Version 8 Call Center Change Description (585-210-925) ● CentreVu® Call Management System Release 3 Version 8 External Call
History Interface (585-210-912)
● CentreVu® Advocate User Guide (585-210-927)
● CentreVu® Call Management System Release 3 Version 8 Upgrades and
Migrations (585-210-913)
● CentreVu® Report Designer Version 8 User Guide (585-210-930)
● CentreVu® Call Management System Release 3 Version 8 Hardware
Maintenance and Troubleshooting (585-210-919)
● CentreVu® Call Management System Release 3 Version 6 Software
Installation and Maintenance (585-215-866)
● CentreVu® Call Management System Release 3 Version 8 Planning,
Configuration, and Implementation (585-210-920)
● Sun SPARCserver Hardware Installation documentation, connectivity
About CentreVu Supervisor
1-1
CentreVu Supervisor
Introduction
1About CentreVu Supervisor
1The Lucent Technologies CentreVu® Supervisor (Supervisor) software is a graphical user interface to the Lucent CentreVu Call Management System Release 3 Version 8 (CentreVu CMS R3V8) or Call Management System Release 3 Version 6 (CentreVu CMS R3V6) software.
The Supervisor software runs on an Intel* 486-compatible processor (a Pentium processor is preferred) that is running one of the following Microsoft Windows operating systems (see page 1-10 for more detailed requirements):
● Windows 95†
● Windows 98‡
● Windows NT** 4.0 with Service Pack 4.
CentreVu Supervisor Version 8 Installation and Getting Started
Introduction
About CentreVu Supervisor
1-2
NOTE:
Supervisor is not supported for all languages of Windows operating systems. For information about which versions of Supervisor are supported for which
Windows operating systems, see the table on the following page.
The following table shows which language-versions of Supervisor are supported with which Windows operating systems ( indicates that the operating system is supported).
W
ind
ow
s
OS
Language English Dutch French German Italian Portuguese Spanish Japanese
E
n
gl
is
h
Windows 95
About CentreVu Supervisor
1-3
Po rt u g u es e Windows 95 Windows 98 Windows NT 4.0 Spani sh Windows 95 Windows 98 Windows NT 4.0 Japa n ese Windows 95 Windows 98 Windows NT 4.0 W ind ow s OSCentreVu Supervisor Version 8 Installation and Getting Started
Introduction
About CentreVu CMS
1-4
About CentreVu CMS
1CentreVu Call Management System (CMS) is a software product used by
Types of Installation
1-5
Types of Installation
1There are several ways of installing the CentreVu Supervisor software. This manual discusses the following methods:
● Local installation. With this type of installation, all of the Supervisor
software is installed locally on each PC from a CD-ROM or from a network server. When installing from the network, the network administrator first copies the Supervisor installation files to a shared
installation folder that resides on the network. Then, the user runs a client
setup from the installation folder to install Supervisor to disk space local to the PC. See Chapter 2, “Installing CentreVu Supervisor on a Local PC,” for details.
● Shared network installation. With this type of installation, the CentreVu
CentreVu Supervisor Version 8 Installation and Getting Started
Introduction
Checking Package Contents
1-6
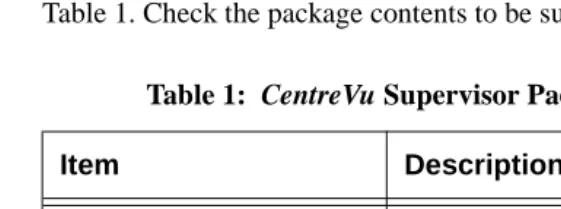
Checking Package Contents
1The CentreVu Supervisor software package includes the items listed in Table 1. Check the package contents to be sure all items are included.
If any of the items are missing or damaged, contact your Lucent Account Team. International customers should contact their Lucent representative or
distributor.
Table 1: CentreVu Supervisor Package Contents
Item Description
CentreVu Supervisor
Software
CD-ROM
CentreVu® Supervisor Installation and Getting Started document
Installation Support
1-7
Installation Support
1If you have difficulty installing CentreVu Supervisor, refer to the following sources:
● System requirements in “What You Need on Your PC” on page 1-10. ● The online Help option provided with the installation program. (See
“Online Help” on page 1-8.)
● The tips in the readme.txt file on the CD-ROM. Use an editor such as
Microsoft Windows Notepad to read the file.
● The Install Status dialog box will display a list of all files installed for
CentreVu Supervisor Release 8. Review this list to see that all files were
successfully installed.
● Chapter 9, “Troubleshooting.”
If you have further questions, contact the Lucent Technologies National Customer Care Center on 1-800-242-2121. For international support, call your Lucent representative or distributor for assistance.
Tips
1The CD-ROM in your package includes a graphical installer to help you install your copy of CentreVu Supervisor.
The CD-ROM also supports the Microsoft Windows AutoPlay feature. If AutoPlay is enabled on the PC, insert the CD-ROM into the drive and the
CentreVu Supervisor Setup program starts automatically.
NOTE:
See your system administrator for information on how to enable or disable AutoPlay on your PC.
CentreVu Supervisor Version 8 Installation and Getting Started
Introduction
Installation Support
1-8
Online Help
1CentreVu Supervisor provides online Help to assist you in installing and using
Supervisor. This Help is divided into main categories (books), as shown on the Help Contents tab shown below:
Help Topics
1Installation Support
1-9
Learning to Use Help
1You can get information from Supervisor Help in a number of ways. The method you use often depends on the type of information you are searching for. The following methods of accessing Help are available:
● Help Contents: Displayed by clicking on the Help menu from the
Supervisor Controller Window and selecting Contents.
● Help on open windows: With a window open, you can press the F1 key to
get help on that window.
● Help on a specific topic: Choosing the Find tab from the Help Topics
dialog box displays a window in which you can search for topics that contain a specific term or phrase.
● What’s This Help: With a dialog box open that displays the icon in the
title bar, help topics are available for each area or individual item in the dialog box. Click the icon, followed by the item or area on which you want help. You can also right-click certain items and select “What’s This?”
CentreVu Supervisor Version 8 Installation and Getting Started
Introduction
What You Need on Your PC
1-10
What You Need on Your PC
1To install and run CentreVu Supervisor, you need the following recommended configuration:
● A Pentium* 133 MHz processor.
NOTE:
The minimum supported PC configuration is an Intel 486-compatible 66 MHz processor. If you have this configuration, expect to experience slower response time.
● A hard disk drive with 50 MB of free space. If you are installing Supervisor
in more than one language, you will need an additional 5 MB of disk space for each language installed.
● A CD-ROM drive.
● Minimum of 32 MB RAM. If simultaneous Supervisor instances are
running in the background, additional memory may be required to maintain acceptable performance.
● An SVGA monitor and adapter set to at least 800x600x256 colors graphics
resolution.
● Microsoft Windows 95 or 98 or Windows NT 4.0 operating system with
Service Pack 4.
NOTE:
If you are installing Supervisor on a Windows NT 4.0 operating system, you must first install the Microsoft Service Pack 4 or later version.
● A mouse compatible with the supported Windows operating systems. ● For Network Connection
— WinSock 1.1 compliant TCP/IP stack
— Ethernet communications board.
What You Need on Your PC
1-11
● For Serial Connection
— Serial cable correctly wired to support hardware flow control and a 16550A UART communications port
— Available COM port.
● For Modem Connection—at least a 19.2 Kbps modem and a 16550A
UART communications port. If the modem is external, then the cable must be correctly wired to support hardware flow control.
Other Requirements
1If you are upgrading from Supervisor 1.0 or 5.0 and you are running Windows 3.1, Windows for Workgroups 3.11, or Windows NT 3.51, you must upgrade your PC operating system to Microsoft Windows 95 or 98 or Windows NT 4.0 before you can install CentreVu Supervisor R8.
If you are installing Supervisor on a Windows 95 or 98 operating system that does not have Internet Explorer 4.0, you need to install Dcom95 before installing CentreVu Supervisor. To install Dcom95, run the dcom95.exe program located in the Dcom95 folder on your CentreVu Supervisor CD-ROM, or in the Supervisor folder on the network server. Dcom95 requires you to reboot your PC, so you need to close any open applications before running it.
If you are running Windows NT 4.0 and do not have Service Pack 4 installed, you must install it before installing CentreVu Supervisor.
CentreVu Supervisor Version 8 Installation and Getting Started
Introduction
What You Need for Your CentreVu CMS Server
1-12
What You Need for Your CentreVu CMS Server
1To install and run CentreVu Supervisor, you need the following:
● Sun* SPARCserver† computer
● CentreVu Call Management System Release 3 Version 8 or Version 6
(CentreVu CMS R3V8 or R3V6).
NOTE:
If you are upgrading from Supervisor 1.0 or 5.0, you must upgrade your CMS server before you upgrade Supervisor. When logging into CentreVu CMS, you must have both Supervisor Version 8 and CentreVu CMS R3V8 or R3V6 or the login will fail, and an error message will appear.
CentreVu Supervisor R8 will run with CentreVu CMS R3V6. You will be
given the option to choose a version of CMS to use when logging into
CentreVu Supervisor.
*Sun is a registered trademark of Sun Microsystems, Inc.
CMS System Capacities
1-13
CMS System Capacities
1The CMS system capacities are unchanged by the Supervisor software. If you are putting your CentreVu Supervisor users on a LAN, then your network must support the additional network traffic.
Number of Supervisor Windows Allowed
1Supervisor allows users to open as many as 12 windows simultaneously. This limit is set for each user by the CMS system administrator. Windows that do not directly use CMS data, such as the color customization data, are not included in this limit. Windows that have been opened for other applications also are not included in this limit.
The Supervisor application can connect to a single CMS. Supervisor does not provide the capability to combine data from more than one CMS.
Number of Simultaneous Instances Allowed
1With the recommended configuration listed in “What You Need on Your PC”
on page 1-10, you can run as many as four simultaneous Supervisor instances.
With an Intel 486-compatible processor, you are limited to one instance of Supervisor with one report.
With Windows 95, you are limited to one instance of Supervisor with six reports running or four instances of Supervisor with one report each.
CentreVu Supervisor Version 8 Installation and Getting Started
Introduction
CMS System Capacities
1-14
Number of PCs Allowed to Run Supervisor
1The number of PCs running CentreVu Supervisor is limited by the number of simultaneous users contracted for in the site-licensing agreement with Lucent. The CMS software will count the number of active CentreVu Supervisor clients that are logged in, and limit the number of simultaneous users to the number purchased by the customer.
A client may be logged into a CMS server once per user ID on a single PC.
Performance
1When you are using Supervisor you may experience slightly slower response times for some actions. This could be for a variety of reasons. The following are a few possible reasons for slower performance:
● The PC’s configuration, processor speed, Level 2 cache, hard disk speed,
and video RAM could affect the response time.
● If the Supervisor application is running simultaneously with other
applications, performance of the Supervisor application could be affected by those other applications.
● Two or more Supervisor instances running simultaneously could result in
slightly slower than user response time.
● If Supervisor is running in a LAN environment, Supervisor will generate
additional network traffic. For example, if 250 Supervisor instances were running two real-time reports each, then Supervisor could require approximately 20% of the LAN’s capacity. Therefore, ensure that your LAN has been engineered appropriately.
● In a LAN environment, network backups could cause congestion on the
network, adversely affecting its performance.
Reliability/Availability
1CMS System Capacities
1-15
Security
1CentreVu Supervisor Version 8 Installation and Getting Started
Introduction
Overview
2-1
CentreVu Supervisor
Installing CentreVu
Supervisor on a Local PC
2Overview
2Local installation means that you install all of the files necessary to run
CentreVu® Supervisor on disk space within a PC. You can perform this installation from either a CD-ROM or on a network server.
If you are installing Supervisor from the network, you must first copy the Supervisor installation files from the CD-ROM onto the network. Then you install Supervisor onto each client PC from the network.
You must have administrator privileges to install Supervisor on a PC running
Windows NT* 4.0.
This chapter includes the following sections:
● Installation Procedures ● Preparing the Network Folder ● Setting Up the PC.
CentreVu Supervisor Version 8 Installation and Getting Started
Installing CentreVu Supervisor on a Local PC
Installation Procedures
2-2
Installation Procedures
2Use these procedures to install CentreVu Supervisor on a PC that will run the application from a local disk drive. If you are installing Supervisor on each PC using the network, start with the “Preparing the Network Folder” section below. If you are installing Supervisor on each PC using the CD-ROM, go to “Setting Up the PC” on page 2-3.
NOTE:
For installation requirements, see “Other Requirements” on page 1-11.
Preparing the Network Folder
2Installing CentreVu Supervisor over a network is a two-step process that consists of preparing the installation folder and then installing Supervisor on each PC.
To prepare the network folder, do the following:
1. At a PC that is connected to the network, insert the CentreVu Supervisor CD-ROM into the CD-ROM drive.
2. If AutoPlay is enabled on the PC, the CentreVu Supervisor Setup program will start automatically after you insert the CD-ROM into the drive. Choose the Cancel button in the dialog box that displays, and then continue with Step 3.
NOTE:
See your system administrator for information on how to enable or disable AutoPlay on your PC.
3. Open Windows Explorer.
4. Create a folder on the network drive, and record the path to the folder for later use.
Installation Procedures
2-3
6. Verify that the network drive where you copied the contents of the distribution medium is available to each PC that will be installing Supervisor from the network.
7. Go to “Setting Up the PC” below.
Setting Up the PC
21. Before starting the installation, close all running programs on the PC.
2. On the Supervisor distribution medium (CD-ROM or installation folder), locate and double-click on the Readme.txt file to view last minute installation tips on CentreVu Supervisor.
The file will be displayed in Windows Notepad, as shown below:
3. To exit the readme file, close the Notepad application.
4. To begin the installation, select the appropriate following step:
CentreVu Supervisor Version 8 Installation and Getting Started
Installing CentreVu Supervisor on a Local PC
Installation Procedures
2-4
b. If installing from CD-ROM and AutoPlay is not enabled, follow Steps5 and 6, insert the CD and then proceed with Step10.
c. If installing from the network, go to Step 5, and then proceed with Step 7.
5. Click Start on the taskbar and select Run. The Run dialog box appears.
6. In the Open text box, enter the drive from which you are installing
Installation Procedures
2-5
7. In the Run dialog box, select the Browse button. The Browse dialog box appears.
8. In the Browse dialog box, navigate to the drive and directory containing the
CentreVu Supervisor files.
NOTE:
If the drive containing the Supervisor installation files is not mapped to the PC, you need to map a drive letter to where Supervisor has been installed on your network. To do this, open Windows Explorer and select Map
Network Drive from the Tools drop-down menu. Select any available
drive letter and enter the appropriate description in the path field; for example, \my_server\folder_name.
CentreVu Supervisor Version 8 Installation and Getting Started
Installing CentreVu Supervisor on a Local PC
Installation Procedures
2-6
10. After a short wait, the CentreVu Supervisor 8.0 Installation Welcome window appears.
Installation Procedures
2-7
12. The Type of Location dialog box appears.
13. Select Install to Local PC to install CentreVu Supervisor to a stand-alone client PC or on the client’s own Local Area Network (LAN) drive.
14. If the setup program finds a previous installation of Supervisor
CentreVu Supervisor Version 8 Installation and Getting Started
Installing CentreVu Supervisor on a Local PC
Installation Procedures
2-8
15. Select Next. Then select one of the following, depending on which dialog appears:
● If the Replace CentreVu Supervisor 5.0 dialog box appears, it means
that the setup program did not find a previous installation of Supervisor Version 8 or Version 6, but it found an installation of Supervisor Version 5. Go to Step 16.
● If the Replace CentreVu Supervisor 1.0 dialog box appears, it means
that the setup program did not find a previous installation of Supervisor Version 8 or Version 6, but it found an installation of Supervisor Version 1. Go to Step 19. (Either Supervisor Version 5 or Version 1 could exist, but not both.)
● If the Select Location dialog box appears, it means that the setup
program did not find any previous installation of Supervisor. Go to Step 22.
16. The Replace CentreVu Supervisor 5.0 dialog box appears.
17. Select one of the following:
● Replace Existing—the setup program will delete the existing
Installation Procedures
2-9
● Keep Existing—the setup program will keep the existing installation
of Supervisor and prompt to install Supervisor Version 8 in a different folder.
NOTE:
If you decide to keep the previous installation of Supervisor
Version 5, you can uninstall it later using the uninstall executable file on the Supervisor CD-ROM. This file is named removeV5.exe.
18. Select Next.
19. The Replace CentreVu Supervisor 1.0 dialog box appears.
20. Select one of the following:
● Replace Existing—the setup program will delete the existing
installation of Supervisor Version 1 and install Supervisor Version 8 in its place.
● Keep Existing—the setup program will keep the existing installation
CentreVu Supervisor Version 8 Installation and Getting Started
Installing CentreVu Supervisor on a Local PC
Installation Procedures
2-10
NOTE:
If you decide to keep the previous installation of Supervisor
Version 1, you can uninstall it later using the uninstall executable file on the Supervisor CD-ROM. This file is named removeV1.exe.
21. Select Next.
22. The Select Location dialog box appears. If you are replacing the existing version of Supervisor, the Browse button will be disabled.
23. Assure that you have enough disk space to install the application to the specified drive.
NOTE:
The information on the bottom of the dialog box indicates the Current Free Disk Space and the Free Disk Space After Install.
24. Choose one of the following:
● If you want to install the Supervisor files in the default installation
path displayed, go to Step 28.
● If you want to install the CentreVu Supervisor files in a different drive
Installation Procedures
2-11
25. Use the Browse option to display the Select Destination Directory dialog box.
26. In the Select Destination Folder dialog box, do one of the following:
● Navigate to the drive and folder where you want to install the files.
Double click on the folder to select it.
● Type the drive and folder where you want to install the files. If the
folder does not exist, the Setup program creates it.
CentreVu Supervisor Version 8 Installation and Getting Started
Installing CentreVu Supervisor on a Local PC
Installation Procedures
2-12
28. Select Next. The Type of Install dialog box appears.
29. In the Type of Install dialog box, select one of the following:
● Typical—this selection installs all of the basic options in English,
which is required, and all of the basic options in the language of your
Windows operating system. Go to Step 33.
● Custom—this selection lets you choose which options and language
versions to install. Go to Step 30.
NOTE:
Installation Procedures
2-13
30. If you selected Custom, the Select Components dialog box appears. This dialog box lets you select or deselect the components and language versions you want to install.
31. Before making your selections, read the bottom half of the dialog box. It provides you with the following information:
● The total space required to install the options you selected
● The total space available on the specified drive (both the destination
drive and the drive on which Windows exists).
32. Place a check mark in front of the components in the list box that you want to install.
NOTE:
CentreVu Supervisor Version 8 Installation and Getting Started
Installing CentreVu Supervisor on a Local PC
Installation Procedures
2-14
33. Select Next. The Select Folder dialog box appears.
34. The Select Folder dialog box lets you select a folder in which to put
CentreVu Supervisor shortcuts. Do one of the following:
● Choose the default folder displayed.
● Enter a different folder name in the text box. The Supervisor setup
program creates the folder.
● Select a folder name from the list of existing groups.
Installation Procedures
2-15
The Ready to Install dialog box appears.
36. Select Install to begin the installation. A progress indicator shows what percentage of the files are being installed.
CentreVu Supervisor Version 8 Installation and Getting Started
Installing CentreVu Supervisor on a Local PC
Installation Procedures
2-16
When the installation is complete, the Install Successful dialog box appears.
37. Select Finish to return to your desktop.
Overview
3-1
CentreVu Supervisor
Installing CentreVu
Supervisor on a Shared
Network Drive
3Overview
3This chapter explains how to install the CentreVu® Supervisor application
software for use in a shared application folder configuration on the network drive. With this type of installation, the Supervisor executable files reside on the application server and are shared by multiple computers.
You must have administrator privileges to install Supervisor on a PC running
Windows NT* 4.0.
You must first do a network setup to install Supervisor onto the network. Then, from each client workstation, you do a client setup to allow users to access Supervisor from their workstations.
This chapter includes the following sections:
● Installation Procedures ● Network Setup ● Client Setup.
CentreVu Supervisor Version 8 Installation and Getting Started
Installing CentreVu Supervisor on a Shared Network Drive
Installation Procedures
3-2
Installation Procedures
3Installing CentreVu Supervisor to a shared application folder is a two-step process that consists of the following:
● Performing the network setup
● Performing a client setup at each client PC.
The network setup expands all program files and all language options into the network directory. In addition, this setup transfers a client setup program and its associated files to the network directory. You can do this setup from either the network installation folder or from a CD-ROM.
The client setup program allows clients to access Supervisor from the network server. Client setup creates a folder on the client PC. The icons in the folder point to the executable files on the application server. In addition, client setup allows you to identify where you want to put the user-specific files (these files can be located on the client’s local drive or on the network).
NOTE:
For installation requirements, see “Other Requirements” on page 1-11.
Network Setup
3To perform a network setup, you must have administrative privileges on a workstation that is running Windows. Then do the following:
1. Log on to the PC as a user with administrative privileges.
2. Before starting the installation, close all running programs on the PC.
3. Create a folder on the network drive to hold the Supervisor application files, and make it read-only and shared.
4. Verify that the network drive containing the application folder is connected to each client PC.
Installation Procedures
3-3
The file will be displayed in Windows Notepad, as shown below:
6. To exit the readme file, close the Notepad application.
7. Insert the CentreVu Supervisor CD-ROM into the CD-ROM drive. One of the following will occur:
● If AutoPlay is enabled, setup starts automatically when you insert the
CD-ROM. Go to Step 10.
● If AutoPlay is not enabled, proceed with Step 8.
CentreVu Supervisor Version 8 Installation and Getting Started
Installing CentreVu Supervisor on a Shared Network Drive
Installation Procedures
3-4
9. In the Open text box, enter your CD-ROM drive, followed by setup, and then select OK. In the following example, the “d:” drive is selected.
NOTE:
You can also install Supervisor from an installation folder on the network drive. If the drive containing the Supervisor installation files is not mapped to your PC, you need to type the network path in the Open text box of the Run dialog box to map it to your PC.
Installation Procedures
3-5
11. Select Next. The Type of Location dialog box appears.
12. Select Install on Shared Network Drive to install the CentreVu Supervisor application files to a folder on a shared network server.
CentreVu Supervisor Version 8 Installation and Getting Started
Installing CentreVu Supervisor on a Shared Network Drive
Installation Procedures
3-6
The setup program expands all program files and all language versions into the network directory specified in the Select Network Location dialog box.
14. Check the Current Free Disk Space and the Free Disk Space After Install to assure that you have enough disk space to install the application to the specified drive.
15. Choose one of the following:
● If you want to install the Supervisor files in the default installation
path displayed, go to Step 19.
● If you want to install the CentreVu Supervisor files in a different drive
or folder, go to Step 16.
16. In the Select Network Location dialog box, use the Browse option to display the Select Destination Folder dialog box.
17. Navigate to the drive containing the folder you created in Step 3, and double-click on the folder to select it.
NOTE:
Installation Procedures
3-7
18. Select OK. The drive and folder where Supervisor will be installed appears in the Select Network Location dialog box.
19. Select Next. The Ready to Install dialog box appears.
CentreVu Supervisor Version 8 Installation and Getting Started
Installing CentreVu Supervisor on a Shared Network Drive
Installation Procedures
3-8
When the installation is complete, the Install Successful dialog box appears.
21. Select Finish to return to your desktop.
22. CentreVu Supervisor installation is complete. Go to Chapter 5, “Getting Started with CentreVu Supervisor,” to learn how to establish a connection to the CentreVu CMS server.
NOTE:
Installation Procedures
3-9
Client Setup
3The client setup program sets up the client computer to access CentreVu Supervisor from the network server. Supervisor setup installs the application files on the network, while client setup installs on the client PC only the user-specific files needed to run Supervisor.
NOTE:
You must run client setup from the physical PC that the client will use to access Supervisor. If you simply log into the network as each user and then run client setup, the program will not install properly.
To set up a client PC, do the following:
1. Before starting the installation, close all running programs on the PC.
2. In Windows Explorer or Network Neighborhood (Windows 95 or 98 or
Windows NT 4.0), navigate to the directory where CentreVu Supervisor is
installed.
3. Locate and then double-click on the setupclt.exe file.
4. After a short wait, the CentreVu Supervisor 8.0 Installation Welcome window appears.
CentreVu Supervisor Version 8 Installation and Getting Started
Installing CentreVu Supervisor on a Shared Network Drive
Installation Procedures
3-10
6. If the setup program finds a previous installation of Supervisor
Version 6 or Version 8, the Previous Version Found dialog box appears. Select OK to continue with the installation.
7. If the setup program did not find a previous installation of Supervisor Version 8, one of the following dialog boxes appears:
● If the Replace CentreVu Supervisor 5.0 dialog box appears, it means
that the setup program did not find a previous installation of
Supervisor Version 8, but it found an installation of Supervisor Version 5. Go to Step 8.
● If the Replace CentreVu Supervisor 1.0 dialog box appears, it means
that the setup program did not find a previous installation of Supervisor Version 8 or Version 6, but it found an installation of Supervisor Version 1. Go to Step 11. (Either Supervisor Version 5 or Version 1 could exist, but not both.)
● If the Select Location dialog box appears, it means that the setup
Installation Procedures
3-11
8. The Replace CentreVu Supervisor 5.0 dialog box appears.
9. Select one of the following:
● Replace Existing—the setup program will delete the existing
installation of Supervisor Version 5 and install Supervisor Version 8 in its place.
● Keep Existing—the setup program will keep the existing installation
of Supervisor and prompt to install Supervisor Version 8 in a different folder.
NOTE:
If you decide to keep the previous installation of Supervisor
Version 5, you can uninstall it later using the uninstall executable file on the Supervisor CD-ROM. This file is named removeV5.exe.
CentreVu Supervisor Version 8 Installation and Getting Started
Installing CentreVu Supervisor on a Shared Network Drive
Installation Procedures
3-12
11. The Replace CentreVu Supervisor 1.0 dialog box appears.
12. Select one of the following:
● Replace Existing—the setup program will delete the existing
installation of Supervisor Version 1 and install Supervisor Version 8 in its place.
● Keep Existing—the setup program will keep the existing installation
of Supervisor and prompt to install Supervisor Version 8 in a different folder.
NOTE:
If you decide to keep the previous installation of Supervisor
Version 1, you can uninstall it later using the uninstall executable file on the Supervisor CD-ROM. This file is named removeV1.exe.
Installation Procedures
3-13
14. The Select Destination Directory dialog box appears. If you are replacing the existing version of Supervisor, the Browse button will be disabled.
NOTE:
The Select Destination Directory dialog box lets you choose where you want to install user-specific files. If a previous user file location is not detected, the default location is c:\Lucent\CentreVu\Supervisor. If a previous user file location is detected, the client setup displays the user file path that was used for the previous installation.
15. Choose one of the following:
● If you want to install the Supervisor files in the default installation
path displayed, go to Step 19.
● If you want to install the Supervisor files in a different drive or folder,
CentreVu Supervisor Version 8 Installation and Getting Started
Installing CentreVu Supervisor on a Shared Network Drive
Installation Procedures
3-14
16. Use the Browse option to display the Select Destination Folder dialog box.
17. In the Select Destination Folder dialog box, do one of the following:
● Navigate to the drive and folder where you want to install the files.
Double click on the folder to select it.
● Type the drive and folder where you want to install the files. If the
folder does not exist, the Setup program creates it.
NOTE:
The user files can be located on the client’s local drive or on the network.
Installation Procedures
3-15
19. Select Next. The Type of Install dialog box appears.
20. In the Type of Install dialog box, select one of the following:
● Typical—this selection installs all of the basic options in English,
which is required, as well as all of the basic options in the language of your Windows operating system. Go to Step 23.
● Custom—this selection lets you choose which options and language
versions to install. Go to Step 21.
NOTE:
CentreVu Supervisor Version 8 Installation and Getting Started
Installing CentreVu Supervisor on a Shared Network Drive
Installation Procedures
3-16
21. If you selected Custom, the Select Components dialog box appears. This dialog box lets you select or deselect the components and language versions you want to install.
22. Place a check mark in front of the components in the list box that you want to install.
NOTE:
The English versions of Supervisor and on-line help are always installed. If you are running a supported non-English version of Windows, Setup will also install Supervisor and on-line help in the language that matches your
Installation Procedures
3-17
23. Select Next. The Select Folder dialog box appears.
24. The Select Folder dialog box lets you select a folder in which to put
CentreVu Supervisor shortcuts. Do one of the following:
● Choose the default folder displayed.
● Enter a different folder name in the text box. The Supervisor setup
program creates the folder.
CentreVu Supervisor Version 8 Installation and Getting Started
Installing CentreVu Supervisor on a Shared Network Drive
Installation Procedures
3-18
25. Select Next. The Ready to Install dialog box appears.
26. Select Install to begin the setup. A progress indicator shows what percentage of the files are being installed.
Installation Procedures
3-19
When the installation is complete, the Install Successful dialog box appears.
27. Select Finish to return to your desktop.
28. CentreVu Supervisor installation is complete. Go to Chapter 5, “Getting Started with CentreVu Supervisor,” to learn how to establish a connection to the CentreVu CMS server.
NOTE:
CentreVu Supervisor Version 8 Installation and Getting Started
Installing CentreVu Supervisor on a Shared Network Drive
Overview
4-1
CentreVu Supervisor
Uninstalling CentreVu
Supervisor
4Overview
4You can easily uninstall the CentreVu® Supervisor Version 8 application using
the Microsoft Windows* Add/Remove Programs wizard. Uninstall removes the Supervisor files and folders from the PC. Uninstall will not remove
components, registry entries, files that are being used by other applications, or a folder that is not empty.
NOTE:
A registry is a Windows database that holds information about the system and its applications, including system settings, client, and server information.
This chapter explains how to perform a CentreVu Supervisor Version 8 uninstall.
CentreVu Supervisor Version 8 Installation and Getting Started
Uninstalling CentreVu Supervisor
Performing the Uninstall
4-2
Performing the Uninstall
4To uninstall the CentreVu Supervisor application, do the following:
1. Close all running programs on the PC.
2. Select Settings and then Control Panel in the Windows Start menu.
3. Double click on the Add/Remove Programs icon. The Add/Remove Programs Properties window opens.
4. Select the Install/Uninstall tab.
Performing the Uninstall
4-3
6. Select the Add/Remove button. The following message displays:
CentreVu Supervisor Version 8 Installation and Getting Started
Uninstalling CentreVu Supervisor
Performing the Uninstall
4-4
A progress indicator indicates the percentage of the files that are being removed.
NOTE:
If you press Cancel at this time, it will cancel the uninstall process, but because some files will have been deleted, Supervisor will not run. Also, if you try to uninstall Supervisor again after canceling the uninstall, you will not be able to do it.
Overview
5-1
CentreVu Supervisor
Getting Started with
CentreVu Supervisor
5Overview
5This section familiarizes you with the main components of the Supervisor Controller window and teaches you a few basic skills you will use every time you work with the application. You will learn how to do the following:
● Open the Supervisor application ● Log into the CMS server ● Log off the CMS server ● Get help.
You will also learn about the following components of Supervisor Controller:
● Menus
CentreVu Supervisor Version 8 Installation and Getting Started
Getting Started with CentreVu Supervisor
Overview
5-2
Establishing
CentreVu
CMS Server Connection
Settings
5You must establish connection settings in order to connect to the CMS server. If you have already established connection settings, go to the following sections:
● “Logging Into the CMS Server — First Time” on page 5-9
● “Logging Into CMS Server — After First Time” on page 5-10.
There are three connection options:
● Network ● Serial
● Modem.
You can set these options to connect to the CMS server one of two ways:
● Automatic—used to login to the CMS server directly from Supervisor ● Manual—used to login to the CMS server by way of the server’s Solaris*
system. You would use manual login for the following reasons:
— You need to access
cmssvc
andcmsadm
menus— You are instructed to do so for troubleshooting purposes
— Your version of Supervisor resides in a different Solaris system than the CMS server.
NOTE:
For more information about your Solaris system, see your Solaris system administrator.
Now you are ready to open Supervisor and establish a connection to the CMS server. See “Opening the CentreVu Supervisor Application” on page 5-3.
Overview
5-3
Opening the
CentreVu
Supervisor Application
5To open the Supervisor application, do the following:
1. Select Programs and then Lucent CentreVu Supervisor 8.0 from the
Windows Start menu.
2. In the Lucent CentreVu Supervisor menu, select CentreVu
Supervisor-English.
At this point, the Supervisor application is open, but you are not logged into the CMS server. If you have not yet established connection settings to a CMS server, the Supervisor Controller appears, along with an open Options dialog box, as shown below.
3. Next, you need to establish connection settings. See “Establishing the
Connection” on page 5-4.
1. Supervisor Controller 2. Options icon 3. Login icon 4. Options window
4
2 3
CentreVu Supervisor Version 8 Installation and Getting Started
Getting Started with CentreVu Supervisor
Overview
5-4
Establishing the Connection
5To establish conn