Technical Bulletin
Stratagy Hospitality Application Software
The Stratagy Voice Processing Hospitality Application software, available for use on all Stratagy systems, enables automatic programming of mailboxes required for the basic Stratagy HMIS messaging application. This bulletin provides you with information on integrating the Stratagy and HMIS products, installation instructions for installing the HMIS on the Stratagy, and examples of User ID mailboxes.
Note Due to configuration considerations, we do not recommend using the Stratagy 4 Lite with this application.
Features
There are two features to the basic Stratagy HMIS Application program:
♦ Stratagy Guest Messaging – Enables callers to leave messages for hotel guests. When the guest checks for messages, he/she can only listen to, save or delete the messages. The guests do not have access to any of the normal features available to the Stratagy business user.
♦ Delete All Messages – When a guest checks out of the room, this application enables the Strata HMIS system to automatically delete all messages in the guest room mailbox. This application can also be run manually by the hotel staff without the Strata HMIS system.
Stratagy Hospitality Application Call Flow
Calls route to the user mailbox via standard Strata DK call forwarding, using the standard Simplified Message Desk Interface (SMDI) Call Forward integration packet for the guest room telephone. Whenever a guest checks into the hotel, the Strata HMIS system resets the call forwarding on the guest room telephone to Call Forward Busy/No Answer (CFBNA). When the guest room telephone receives a call and the telephone is in CFBNA mode, the call forwards to the guest room mailbox, enabling the caller to leave a message.
If a guest chooses to not be disturbed, Call Forward-All Calls (CFAC) can be enabled on an individual room basis from the front desk terminal using the Strata HMIS system.
TB40-0022
(Revised TB40-0018 Bulletin) August 24,1998
Preli
m
ina
ry an
d Co
nfid
enti
al
Installation and Configuration Procedures
Before You Start
1. Prior to inserting the disk into the Strata HMIS PC floppy-disk drive, check the blank, formatted disk for viruses. Once the Stratagy Hospitality Application has been copied to the floppy disk, the disk should be write protected to prevent it from being infected by a virus.
2. Copy the Stratagy Hospitality Application software program from the Strata DK HMIS CD-ROM to a floppy disk. Double-click on the SG_ap folder (for PC-based Stratagy systems) or the SGDK_ap folder (for Stratagy DK) and copy all the files in the folder to a floppy disk.
3. The Stratagy must be configured for SMDI integration when first setting up the Stratagy Voice Processing system. This sets all the proper message waiting notification for the user mailboxes.
It is also recommended that you:
♦ Back up your database prior to starting this procedure (for instructions for PC-based systems, see the Stratagy Installation and Maintenance Manual, Chapter 16 - Backup and Restore, or for Stratagy DK users, the Stratagy Admin Tools Backup Utility in the Stratagy DK Installation Guide).
♦ Make a copy of the installation disks as a backup.
Step 1: Install HMIS
PC-based Stratagy Systems
Note At any time during the installation, you can press Esc to abort the installation process.
➤
To install HMIS on PC-based Stratagy systems1. From the Main Menu, select Shutdown by pressing Alt+S.
Stratagy prompts: Password?
2. Type the password and press
Enter. (The default password is Stratagy, with the first letter uppercase.)
Stratagy prompts:
Shutdown the entire system? [NY]
3. Type N to cancel shutdown and return to the Main Menu or type Y to continue.
Stratagy reconfirms:
Preli
m
ina
ry an
d Co
nfid
enti
al
4. Type N to cancel shutdown andreturn to the Main Menu or type Y to continue.
Stratagy starts shutdown. If any ports are in use, Stratagy delays shutting down the system for 60 seconds. At that time, Stratagy completes shutdown, cutting off any callers or users that are still active.
When shutdown is complete, the system displays the Stratagy Configuration Utility Menu.
5. Press Ctrl+C simultaneously. The message “Terminate batch job (N/Y)?” displays.
6. Type Y. The C:\STRATAGY> prompt appears on the screen.
7. Insert the Stratagy HMIS Application software disk into the floppy-disk drive.
8. At the C:\STRATAGY>
prompt, type a:install and press Enter.
The Stratagy HMIS application software is copied to the Stratagy system’s C: hard drive. An introduction screen appears.
9. Press Esc to quit or any other key to continue.
The screen displays the following messages:
Stratagy Configuration Utility
1. Stratagy Backup Utility
2. Stratagy System Configuration
3. Install from A: Drive
4. Toshiba Plug and Play
5. Toshiba Switch Integration
6. Other Switch Integrations
Select which type of installation should be performed:
Preli
m
ina
ry an
d Co
nfid
enti
al
10. Press Enter. The screen displays:You are now required to enter the first User ID mailbox in which to create the Hospitality application (default value = 1100). The software creates 16 consecutively numbered mailboxes, starting with the number entered.
11. Press Enter to use the default 1100 series mailboxes
Important! Any existing 1100 series mailboxes are overwritten.
...or to enter a different number, press Esc and the field is cleared. Enter a new User ID and press Enter.
Stratagy Hospitality Application software is ready to install the new mailbox database. You are asked if you want to continue.
12. Press Esc to quit, or any other key to continue.
The software begins to create the Hospitality application mailboxes beginning with the number entered in Step 11 above.
When the installation is compete, the
C:\STRATAGY> prompt displays.
13. Type STRATAGY and press
Enter or reboot the system and Stratagy comes on-line.
Once the Stratagy Hospitality Application software has been loaded, you must record the mailbox greetings.
Important! You must complete Steps 2~4 for proper operation of the Stratagy Hospitality Application software.
Enter a beginning User ID for the application. Note: The program will start at this User ID and
then create 15 additional mailboxes in numerical order. If there are existing mailboxes within the range they will be overwritten.
Press the [Enter] key to accept the default value.
Press the [Esc] key once to erase and enter a new value.
Press the [Esc] key twice to exit the program.
Preli
m
ina
ry an
d Co
nfid
enti
al
Stratagy DK Systems
Note It is recommended that you make a sub-directory within the Stratagy Admin\Backup directory on your PC (e.g., C:\ADMIN3\BACKUP\HMISAPP) where the files can reside. This will make access easier.
➤
To install HMIS on a Stratagy DK system1. Copy the Stratagy Hospitality Application files to the hard drive of your Stratagy Admin PC.
2. Connect the Stratagy Admin PC to COM Port 2 on the Stratagy DK and start the Stratagy Admin software.
The Main Menu displays.
3. Select Tools by pressing
Alt+T simultaneously.
You are prompted to enter your password.
4. Enter the system’s [Password] and press Enter.
The Tools Menu displays.
5. Select option 2 (Restore Utility).
The Restore Utility menu displays.
6. Select option 3 (Restore Database, Names & Greetings).
You are prompted to enter the source directory.
Tools
1. Backup Utility
2. Restore Utility
3. Upgrade Stratagy software
4. Telephone System Configuration
5. Toshiba Plug and Play
6. Stratagy System Configuration
7. Retrieve Trace File
8. Filecopy
Restore
1. Restore Database
2. Restore Names & Greetings
Preli
m
ina
ry an
d Co
nfid
enti
al
7. Enter the sub-directory/directory where the Stratagy Hospitality Application resides and press Enter.
For example: C:\ADMIN3\BACKUP\HMISAPP.
You are prompted to enter a beginning mailbox number.
8. Enter mailbox 0 and press
Enter.
You are prompted to enter an ending mailbox number.
9. Enter mailbox 1116 and press
Enter.
You are prompted with the amount of time it will take to restore the application and are asked if you want to continue.
10. Press Y to continue
...or N to quit.
The backup of the Stratagy Hospitality Application is loaded onto the Stratagy DK.
When the restore is complete, the following status message is displayed.
11. Press Y to reboot Stratagy. The portable/desktop computer returns to the
C:\ADMIN3\BACKUP\HMISAPP DOS prompt.
Once the Stratagy Hospitality Application software has been loaded, you must record the mailbox greetings.
Important! You must complete Steps 2~4 for proper operation of the Stratagy Hospitality Application software.
Restore time 22 min. 37 sec. Continue? [NY]
Preli
m
ina
ry an
d Co
nfid
enti
al
Step 2: Configure the Integration Packets
The Stratagy Hospitality Application enables the user limited access to user features (i.e., listen, save, delete) by using Stratagy’s Token Programming language. The hotel guest never actually logs onto the guest room mailbox. Instead, to pick up messages, the guest dials the Master Distributed Hunt Directory Number of the Stratagy Voice Processing system. Using one of several customized SMDI integration packets, which must be added to the Stratagy and busy chain of the guest room mailbox, the hotel guest’s call is sent to the “Mailbox Log On” User ID (default mailbox 1100) of the Stratagy Hospitality Application. For proper operation of the Hospitality Application software, the Stratagy and the Strata DK telephone system must be integrated using SMDI integration. For detailed information on configuring the Stratagy for SMDI integration, see the Stratagy Installation and Maintenance Manual, Chapter 4 – Configuring Stratagy.
Integration Packets
To operate the Stratagy Hospitality Application properly, you must:
♦ Modify the default integration packets.
♦ Add several custom integration packets.
Use the following procedure to add custom integration packets, once the Stratagy system has been configured for SMDI integration with the proper Strata DK telephone system.
Important! When first setting up the Stratagy Voice Processing system for installation, the Stratagy must be configured for SMDI integration. This sets all the proper message waiting notification for the user mailboxes.
If the integration packets do not appear in the same order as shown in Figure 1, the Hospitality Application still functions; however, some minor problems do arise.
For example, the Stratagy system may identify some messages as having come from the operator’s mailbox instead of from an outside party. This can be caused by having multiple integration packets that match the type of forwarding used. For instance, the first packet recognized by the Stratagy system had a “0,” where another integration packet didn’t.
Add the Custom Integration Packets
PC-based Stratagy Systems
1. From the Main Menu, select Shutdown by pressing Alt+S.
Stratagy prompts: Password?
2. Type the password and press
Enter. (The default password is Stratagy, with the first letter uppercase.)
Stratagy prompts:
Shutdown the entire system? [NY]
3. Type N to cancel shutdown and return to the Main Menu or type
Y to continue.
Stratagy reconfirms:
Preli
m
ina
ry an
d Co
nfid
enti
al
4. Type N to cancel shutdown andreturn to the Main Menu or type
Y to continue.
Stratagy starts shutdown. If any ports are in use, Stratagy delays shutting down the system for 60 seconds. At that time, Stratagy completes shutdown, cutting off any callers or users that are still active.
When shutdown is complete, the system displays the Stratagy Configuration Utility Menu.
5. From the Stratagy Configuration Utility Menu, press 6 or use the arrow keys (↑↓) to highlight the selection and press Enter.
The Other Switch Integration Menu displays:
6. From the Other Switch
Integration Menu, press 3 or use the arrow (↑↓) keys to highlight the option and press Enter.
The System Integration Patterns screen displays (see Figure 1 on Page 10).
7. Using the arrow (↑↓) keys, highlight the first line that contains an SMDI integration packet.
The line should look like: Axxxrrrr0000000.
8. Press Enter. The line is moved to the upper left corner of the screen.
9. Change the line to:
Nxxx3rrrxxxssss.
10. Press Enter again. The line is restored to its original location.
11. Repeat Substeps 7~10 for all required integration packets until the System Integration Patterns table looks like Figure 1.
12. Press Esc twice to return to the Stratagy Configuration Utility.
Stratagy Configuration Utility
1. Stratagy Backup Utility
2. Stratagy System Configuration
3. Install from A: Drive
4. Toshiba Plug and Play
5. Toshiba Switch Integration
6. Other Switch Integrations
Other Switch Integration
1. Telephone System Dial Codes
2. Telephone System Tone Patterns
Preli
m
ina
ry an
d Co
nfid
enti
al
Stratagy DK Systems
Important! If you installed the Stratagy DK using the SGDK_HMIS file, this procedure was automatically performed for you. Proceed to “Step 3: Set up the Hospitality Application User ID Mailboxes” on Page 11.
13. Press Esc again to reboot Stratagy and return to the Main Menu.
1. From the Main Menu, select Tools by pressing Alt+T
simultaneously.
You are prompted to enter your password.
2. Enter the system’s [Password] and press Enter.
The Tools Menu displays.
3. Select option 4 (Telephone System Configuration).
The Telephone System Configuration Menu displays.
4. Select option 2 (Edit System Integration Patterns).
The System Integration Patterns screen displays (see Figure 1 on Page 10).
5. Using the arrow (↑↓) keys, highlight the first line that contains an SMDI integration packet.
The line should look like: Axxxrrrr0000000.
6. Press Enter. The line is moved to the upper left corner of the screen.
7. Change the line to:
Nxxx3rrrxxxssss.
Tools
1. Backup Utility
2. Restore Utility
3. Upgrade Stratagy software
4. Telephone System Configuration
5. Toshiba Plug and Play
6. Stratagy System Configuration
7. Retrieve Trace File
8. Filecopy
Telephone System Configuration
1. Edit System Dial Codes
Preli
m
ina
ry an
d Co
nfid
enti
al
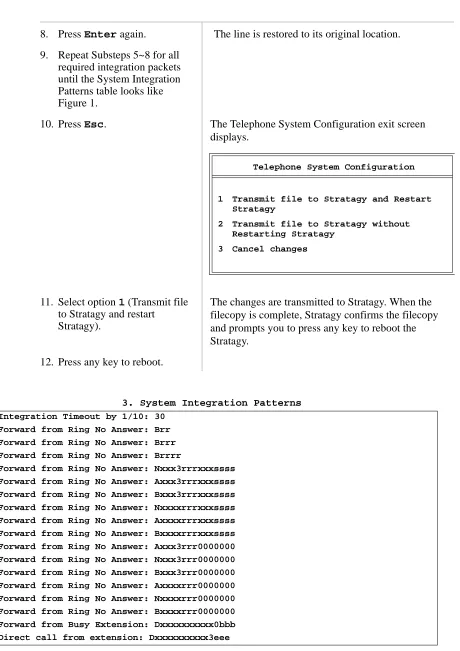
8. Press Enter again. The line is restored to its original location.9. Repeat Substeps 5~8 for all required integration packets until the System Integration Patterns table looks like Figure 1.
10. Press Esc. The Telephone System Configuration exit screen displays.
11. Select option 1 (Transmit file to Stratagy and restart
Stratagy).
The changes are transmitted to Stratagy. When the filecopy is complete, Stratagy confirms the filecopy and prompts you to press any key to reboot the Stratagy.
12. Press any key to reboot.
3. System Integration Patterns
Integration Timeout by 1/10: 30
Forward from Ring No Answer: Brr
Forward from Ring No Answer: Brrr
Forward from Ring No Answer: Brrrr
Forward from Ring No Answer: Nxxx3rrrxxxssss
Forward from Ring No Answer: Axxx3rrrxxxssss
Forward from Ring No Answer: Bxxx3rrrxxxssss
Forward from Ring No Answer: Nxxxxrrrxxxssss
Forward from Ring No Answer: Axxxxrrrxxxssss
Forward from Ring No Answer: Bxxxxrrrxxxssss
Forward from Ring No Answer: Axxx3rrr0000000
Forward from Ring No Answer: Nxxx3rrr0000000
Forward from Ring No Answer: Bxxx3rrr0000000
Forward from Ring No Answer: Axxxxrrr0000000
Forward from Ring No Answer: Nxxxxrrr0000000
Forward from Ring No Answer: Bxxxxrrr0000000
Forward from Busy Extension: Dxxxxxxxxxx0bbb
Direct call from extension: Dxxxxxxxxxx3eee
Telephone System Configuration
1 Transmit file to Stratagy and Restart Stratagy
2 Transmit file to Stratagy without Restarting Stratagy
Preli
m
ina
ry an
d Co
nfid
enti
al
Step 3: Set up the Hospitality Application User ID Mailboxes
This section lists the Hospitality Application software User ID mailboxes in numerical order (starting with 1100) along with, as a reference, the description in the Comment field. Each User ID mailbox includes the tokens being used and an explanation of each token’s operation. In addition, sample greetings are included for User ID mailboxes that require recorded greetings. You may want to word the greeting differently; however, we recommend that you retain the substance of the sample greetings.
All of the User ID mailboxes for the Stratagy Hospitality Application should have the following options set, unless otherwise noted:
Do Not Disturb: OFF
Group 1: 99 (ensures User ID Mailboxes start at mailbox 1100)
Group 2: 0 (except for User ID Mailbox 1100)
Note The following Hospitality Application software User ID mailboxes are based on the default value. If they have been altered during installation of the software (in PC-based Stratagy Systems – Substep 11 or Stratagy DK Systems – Substep 8), use the altered User IDs instead.
User ID Mailboxes 1109, 1112, and 1114
The token string for the SMDI integration packet (to turn off the message waiting light on the guest room telephone) in these sample User ID mailboxes uses COM port 2 as the RS-232 connection to the Strata DK telephone system and a three-digit guest room extension.
If your installation uses a different COM port or a four-digit room extension, you must modify this token string.
If the Stratagy Hospitality Application was installed on the Stratagy system using the
automated build disk, you must verify that the token string in the above User ID mailboxes is correct. The script used to install the application consolidates the token strings to remove any spaces. The space (see required space in example above) must be in the token string to ensure the message waiting light is turned off on the guest room telephone.
Stratagy Guest Messaging
User ID Mailbox 1100: Mailbox Log On
Comment MailboxLogOn
Group 2 1 (Allows access to this mailbox from other mailboxes.)
Extension @=(%S0,%P)=(%S9,1)
@ Suppress normal process.
=(%S0,%P) Create %S0 as the number of the previously accessed User ID Mailbox. =(%S9,1) Create %S9 with a value of 1. %S9 is the message number played.
Done Chain 1111
RNA Chain 1101
For example: @=(%S9,1)S(2,’RMV:MWI 0000%S0!\D’)G(1110)
COM Port 2
Preli
m
ina
ry an
d Co
nfid
enti
al
User ID Mailbox 1101: Initial MenuUser ID Mailbox 1102: Message Menu
User ID Mailbox 1103: Decrement Message Number
User ID Mailbox 1104: Increment Message Number Comment InitialMenu
Extension @P(M,%S0)M(G1,2,40)
@ Suppress normal process.
P(M,%S0) Play the number of messages in User ID Mailbox %S0. M(G1,2,40) Play greeting 1 and wait for menu choice.
Done Chain 1107
RNA Chain 999
Menu 1 1105
Menu 9 999
Greeting 1 “To play your messages press 1. To quit press 9.”
Comment MessageMenu
Extension @M(G1,2,40)
@ Suppress normal process.
M(G1,2,40) Play greeting 1 and wait for menu choice.
RNA Chain 999
Menu 1 1106
Menu 2 1105
Menu 3 1104
Menu 9 999
Greeting 1 “Press 1 to delete this message. Press 2 to hear this message again. Press 3 to hear the next message. Press 9 to quit.”
Comment DecrementMsgNmbr
Extension @I(%S9,=,1,1108)+(%S9,-1)
@ Suppress normal process.
I(%S9,=,1,1108) If the value of %S9 is 1, go to User ID Mailbox 1108. +(%S9,-1) Decrease the value of %S9 by 1.
RNA Chain 1105
Comment IncrementMsgNumbr
Extension @+(%S9,1)
@ Suppress normal process. +(%S9,1) Increase the value of %S9 by 1.
Preli
m
ina
ry an
d Co
nfid
enti
al
User ID Mailbox 1105: Play MessageUser ID Mailbox 1106: Delete Message
User ID Mailbox 1107: End of Messages Comment PlayMessage
Extension @P(MN%S9,%S0)
@ Suppress normal process.
P(MN%S9,%S0) Play message number %S9 out of User ID Mailbox %S0.
Done Chain 1109
RNA Chain 1102
Comment DeleteMessage
Extension @KD(%S9,N,%S0)P(G1)M(G2,2,40)
@ Suppress normal process.
KD(%S9,N,%S0) Delete message number %S9 from User ID Mailbox %S0. P(G1) Play greeting 1.
M(G2,2,40) Play greeting 2 and wait for menu choice.
RNA Chain 999
Menu 1 1105
Menu 9 1112
Greeting 1 “Message deleted.”
Greeting 2 “Press 1 to hear the next message or press 9 to quit.”
Comment EndOfMessages
Extension @+(%S9,-1)M(G1,2,40)
@ Suppress normal process. +(%S9,-1) Decrease the value %S9 by 1.
M(G1,2,40) Play greeting 1 and wait for menu choice.
RNA Chain 999
Menu 1 1109
Menu 9 1112
Preli
m
ina
ry an
d Co
nfid
enti
al
User ID Mailbox 1108: Start Of MessagesUser ID Mailbox 1109: Replay Messages
Note See “User ID Mailboxes 1109, 1112, and 1114” on Page 11 for additional information on this mailbox.
User ID Mailbox 1110: Verify There Are Saved Messages Comment StartOfMessages
Extension @M(G1,2,40)
@ Suppress normal process.
M(G1,2,40) Play greeting 1 and wait for menu choice.
RNA Chain 999
Menu 1 1109
Menu 9 999
Greeting 1 “End of messages. Press 1 to hear your saved messages or press 9 to quit.”
Comment ReplayMessages
Extension @=(%S9,1)S(2,’RMV:MWI 0000%S0!\D’)G(1110)
@ Suppress normal process. =(%S9,1) Reset value %S9 to 1.
S(2,’RMV:MWI 0000%S0!\D’) Turn off message waiting for User ID Mailbox %S0. G(1110) Go to User ID Mailbox 1110.
Comment VerifyMessages
Extension @I(%M(%S0),=,0,1111)
@ Suppress normal process.
I(%M(%S0),=,0,1111) If the number of messages in User ID Mailbox %S0 equal 0, go to User ID Mailbox 1111.
Preli
m
ina
ry an
d Co
nfid
enti
al
User ID Mailbox 1111: No Saved MessagesUser ID Mailbox 1112: Turn Off Message Waiting
Note See “User ID Mailboxes 1109, 1112, and 1114” on Page 11 for additional information on this mailbox.
Delete All Messages
The following group of User ID Mailboxes deletes all messages from the guest room User ID Mailboxes when the guest checks out. To protect against accidental access to this application, group 1 for all of these mailboxes is 98. All other groups for these mailboxes are 0 except for User ID Mailbox 1113. User ID Mailbox 1113 has group 1 as 98 and group 2 is 1. This ensures the user accesses this application only from the beginning User ID Mailbox of 1113.
User ID Mailbox 1113: Delete Messages Main Comment NoMessages
Extension @P(G1)G(999)
@ Suppress normal process. P(G1) Play greeting 1.
G(999) Go to User ID Mailbox 999 for hang up.
Greeting 1 “You have no messages to listen to.”
Comment TurnOffMWI
Extension @S(2,’RMV:MWI 0000%S0!\D’)
@ Suppress normal process.
S(2,’RMV:MWI 0000%S0!\D’) Turn off message waiting for User ID Mailbox %S0.
Done Chain 999
RNA Chain 999
Comment DeleteMsgsMain
Extension @R(G1,%S0,70)P(G2)P(%S0)M(G3,2,40)
@ Suppress normal process.
R(G1,%S0,70) Play greeting 1. Store DTMF response from the caller as value %S0. P(G2) Play greeting 2.
P(%S0) Play value %S0.
M(G3,2,40) Play greeting 3 and wait for menu choice.
RNA Chain 999
Menu 1 1114
Menu 2 1113
Menu 9 999
Greeting 1 “Please enter the room number to delete all messages from.”
Greeting 2 “You entered ...”
Preli
m
ina
ry an
d Co
nfid
enti
al
User ID Mailbox 1114: Initialize ValuesNote See “User ID Mailboxes 1109, 1112, and 1114” on Page 11 for additional information on this mailbox.
User ID Mailbox 1115: Delete Messages
User ID Mailbox 1116: All Messages Deleted Comment InitializeValues
Extension @=(%S5,1)=(%S6,%M(%S0))I(%S6,=,0,1116) S(2,’RMV:MWI 0000%S0!\D’)
@ Suppress normal process. =(%S5,1) Create %S5 with a value of 1.
=(%S6,%M(%S0)) Add the number of messages in User ID Mailbox %S0 to value %S6. I(%S6,=,0,1116) If value %S6 equals 0, go to User ID Mailbox 1115.
S(2,’RMV:MWI 0000%S0!\D’) Turn off message waiting for User ID Mailbox %S0.
RNA Chain 1115
Comment DeleteMessages
Extension @KD(1,N,%S0)+(%S5,1)I(%S5,>,%S6,1116)
@ Suppress normal process.
KD(1,N,%S0) Delete message 1 from User ID Mailbox %S0. +(%S5,1) Increase the value of %S5 by 1.
I(%S5,>,%S6,1116) If the value of %S5 is greater than the value of %S6, go to User ID Mailbox 1116.
RNA Chain 1115
Comment AllMsgsDeleted
Extension @P(%S6)P(G1)P(%S0)M(G2,1,70)
@ Suppress normal process. P(%S6) Play value %S6.
P(G1) Play greeting 1. P(%S0) Play value %S0.
M(G2,1,70) Play greeting 2 and wait for menu choice.
Done Chain 999
RNA Chain 999
Menu 1 1113
Menu 9 999
Greeting 1 “Messages deleted from mailbox...”
Preli
m
ina
ry an
d Co
nfid
enti
al
Step 4: Set up Guest Room User ID Mailboxes
Note It is recommended that the guest room’s mailbox number match the guest room number.
All of the User ID mailboxes for the corresponding guest rooms should have the Saved Message Queue set to NO.
User ID Mailbox XXX: Guest Room XXX (where XXX = guest room number)
Step 5: Set up Hotel Administration Phones
User ID Mailbox XXX: Hotel Administration Phones
Comment GuestRoomXXX
Extension XXX (where XXX = guest room extension number)
Busy Chain 1100
Caller Menu NO
Saved Msg Que NO
Comment AdminRoomXXX
Extension 3XXX (where XXX = admin extension number)
Notify Method
MSG ON @S(2,’OP:/MWI 0003%U!\D’)