)
®
DOS
Reference
Borland®
C++
Borland may have patents andbr pending patent applications covering subject matter in this document. The furnishing of this document does not give you any license to these patents.
COPYRIGHT © 1987, 1993 by Borland International. All rights reserved. All Borland products are trademarks or registered trademarks of Borland International, Inc. Other brand and product names are trademarks or registered trademarks of their respective holders.
Borland International, Inc.
100 Borland Way, Scotts Valley, CA 95067-3249
PRINTED IN THE UNITED STATES OF AMERICA
Contents
Introduction 1 Floating-point options ... 29
What's in this book ... 1 Emulating the 80x87 chip ... 30
Chapter 1 DOS memory management 3 Running out of memory ... 3
Memory models ... 3
Using 80x87 code ... -... 30
No floating-point code ... 30
Fast floating-point option ... : .... 30
The 87 environment variable ... 31
The 8086 registers ... 4
. General-purpose registers ... 4
Segment registers ... 4
Special-purpose registers ... 5
The flags register ... 5
Memory segmentation ... '" .... 6
Address calculation ... 6
Registers and the 80x87 ... 31
Disabling floating-point exceptions ... 32
Using complex types ... 32
Using bcd types ... 33
Converting bcd numbers " ... 34
Number of decimal digits ... 35
Pointers ... 7 Chapter 3 Video functions 37 Near pointers ... 8 Video modes ... 37
Far pointers ... 8 Windows and viewports ... 38
. Huge pointers ... 9 Programming in graphics mode ... 38
The six memory models ... 10 The graphics library functions ... 39
Mixed-model programming: Addressing Graphics system control ... 40
modifiers ... 14 A more detailed discussion ... 41
Segment pointers ... 15 Drawing and filling ... 42
Declaring far objects ... 16 Manipulating the screen and viewport .... 43
Declaring functions to be near or far ... 16 Text output in graphics mode ... 44
Declaringpointers to be near, far, or huge .... 17 Color control ... 46
Pointing to a given segment:offset address . 18 Pixels and palettes ... : . . . 46
Using library files ... 19 Background and drawing color ... 47
Linking mixed modules ... 19 Color control on a CGA ... 47
Overlays (VROOMM) for DOS ... 20 Color control on the EGA and VGA ... 49
How overlays work ... 20 Error handling in graphics mode ... 49
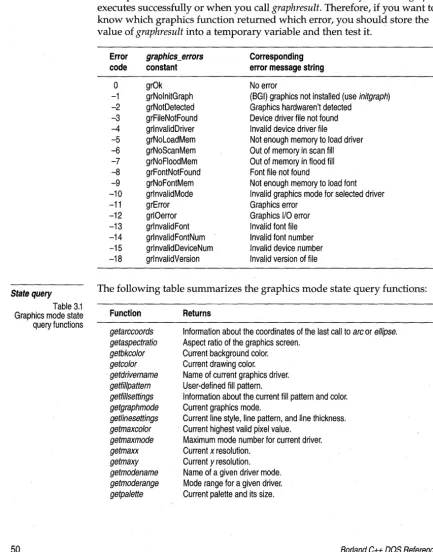
Guidelines for using Borland C++ overlays State query ... " ... 50
effectively ... 22
Requirements ... 22
Exception handling and overlays ... 23
Using overlays ... 24
Overlay example ... 24
Over laid programs ... 25
The far call requirement ... 25
Buffer size .. , .... ~ ... 25
What not to overlay ... 25
Debugging overlays ... 26
External routines in overlays ... 26
Swapping ... 27
Chapter 4 Borland graphics interface 53 arc .. '" ... 53
bar ... '" ... " ... 53
bar3d ... 54
circle .... , ... 54
c1eardevice ... 55
c1earviewport ... 55
closegraph ... 55
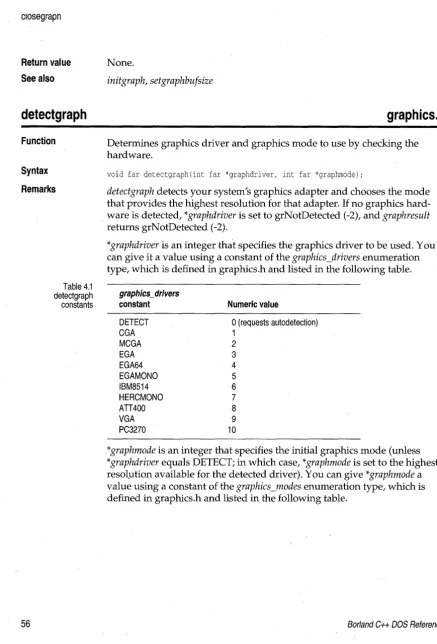
detectgraph ... 56
drawpoly ... ; ... 58
ellipse ... 58
fillellipse ...
58-Chapter 2 Math 29 fillpoly ... 59
getarccoords ... 59 setallpalette ... 84
getaspectratio ... ; ... 60 setaspectratio ... 85
getbkcolor ... 60 setbkcolor ... ' ... , ... 85
getcolor ... 61 setcolor ... '~ ... ~ . . . 86
getdefaultpalette ... 61 setfillpattern ... 87
getdrivername ... 61 setfillstyle ... 88
getfillpattern ... 62 setgraphmode ... 88
getfillsettings ... 62 setgraphbufsize ... 89
getgraphmode ... 63 setlinestyle ... 89
getimage ... 64 setpalette ... 91
getlinesettings ... 64 setrgbpalette . . . ... ',' . . . 92
getmaxcolor ... 65 settex~ustify . . . 92
getmaxmode ... 65 settextstyle ... 93
getmaxx ... 66 setusercharsize . . . 94
getmaxy ... 66 setviewport ... 95
getmodename ... 66 setvisualpage ... 95
getmoderange ... 67 setwritemode ... 96
getpalette ... 67 textheight ... 96
getpalettesize ... 68 textwidth ... , ... 97
getpixel ... 68
gettextsettings ... 68
getviewsettings ... 69
getx ... , ... 69
gety ... 70
graphdefaults ... 70
grapherrormsg ... 70
_graphfreemem ... 71
_graphgetmem ... 71
graphresult ... 71
imagesize ... 72
initgraph ... 73
installuserdriver ... 76
installuserfont ... 77
line ... 77
linerel ... 77
lineto ... 78
moverel ... 78
moveto ... 78
outtext ... 78
outtextxy .. '." ... ' ... 79
pieslice ... 79
putimage ... 80
putpixel ... 81
rectangle ... 81
registerbgifont ... 81
registerbgidriver ... 82
restorecrtmode ... : ... 83
Chapter 5 DOS-only functions 99 absread ... 99
abswrite ... '100
allocmem, _dos_allocmem ... 100
bios com ... 101
bios disk ... 102
_bios_disk ... 105
bioskey ... 106
_bios_keybrd ... 107
biosprint ... 109
_bios_printer ... 109
_bios_serialcom ... 110
brk ... 112
coreleft . . . 112
delay ... , ... 113
farcoreleft ... 113
farheapcheck ... 113
farheapcheckfree ... 114
farheapchecknode ... 114
farheapfillfree ... 115
farheapwalk ... 115
freemem, _dos_freemem ... 115
harderr, hard resume, hardretn ... 116
_harderr ... 117
_hardresume ... 118
_hardretn ... 118
keep, _dos_keep ... 119
_OvrInitExt ... 120 Graphics routines ... 126
randbrd ... 121 Interface routines ... 127
randbwr ... 121 Memory routines .. " ... '" .... 127
sbrk ... " ... '" . '" ... 122 Miscellaneous routines ... 128
setblock, _dos_setblock ... 122
sound ... 123 Appendix B DOS global variables 129 _heaplen ... 129
Appendix A DOS libraries 125 _ovrbuffer ... ~ ... 130
The run-time libraries ... 125 _stklen ... 130
The DOS support libraries ... 126
Tables
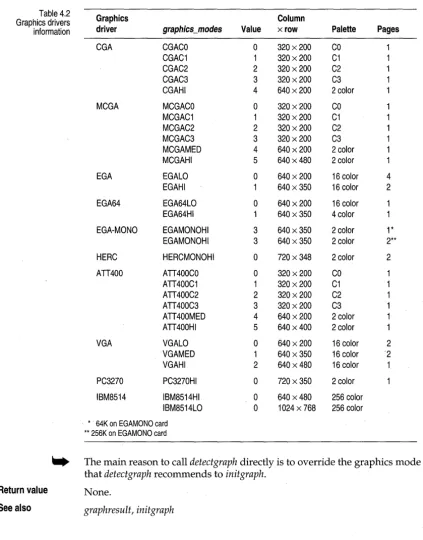
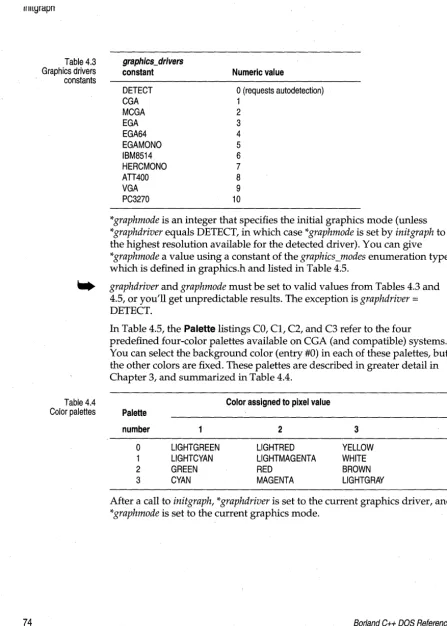
1.1 Memory models ... 14 4.3 . Graphics drivers constants ... 74
1.2 Pointer results ... 15 4.4 Color palettes ... 74
3.1 Graphics mode state query functions ... 50 45 Graphics modes ... 75
4.1 detectgraph constants ... 56 4.6 Actual color table ... 84
Figures
1.1 8086 registers ... ; ... 4
1.2 Flags register ofthe 8086 ... 6
1.3 Tiny model memory segmentation ... 11
1.4 Small model memory segmentation ... 11
1.5 Medium model memory segmentation ... 12
1.6 Compact model memory segmentation . ; .. 12
1.7 Large model memory segmentation . . . 13
1.8 Huge model memory segmentation ... 13
For a more complete overview of the Borland C++ documentation set, read the Introduction in the Users Guide.
Introduction
This manual provides information you might need to develop 16-bit appli- . cations that are targeted to run DOS. The following manuals in this
documentation set also discuss DOS-related issues:
• The User's Guide provides a description of all the programming options that can be used to develop applications on any platform supported by Borland C++ 4.0.
• The Programmer's Guide describes the Borland C++ implementation and extensions to the C and C++ programming languages. Much of the infor-mation in the Programmer's Guide (for example, information regarding exception-handling, RTTI, and other recent additions to the C++ language) is applicable to 16-bit DOS programming.
• The Library Reference provides a complete reference to all Borland C++ routines, including classes, functions, and macros, many of which are marked as being available to DOS programs.
Typefaces and icons used in these books are described in the User's Guide.
What's in this book
Chapter 1: DOS memory management describes memory models, overlays, and mixed-model programming. Remember that in DOS-only applications you can use any of the six memory models (the tiny and huge memory models aren't supported in Windows applications). Overlays are supported only in DOS applications.
Chapter 2: Math covers floating-point issues and how to use the bcd and
complex math classes. Much of the information regarding math options is
specific to DOS applications. The discussion of bcd and complex isn't specific to DOS and is available to applications on Windows and OS/2 platforms.
Chapter 3: Video functions discusses graphics in Borland C++. The topics discussed in this chapter are available only for 16-bit DOS applications.
Chapter 4: Borland graphics interface is a reference to the functions declared in the graphics.h header file. The functions discussed in this chapter are available only for 16-bit DOS applications. Sample programs for these functions are available in the online Help. .
addi-tional functions and C++ classes that can be used in DOS applications (and are also available to other platforms). Those additional functions are documented in the Library Reference. The online Help provides many sample programs for the functions that are referenced here and in the
Library Reference.
Appendix A: DOS . libraries provides an overview of the libraries and global variables that are available only for 16-bit DOS applications.
c
H A p T E RDOS memory management
This chapter discusses
• What to do when you receive "Out of memory" errors.
• What memory models are: how to choose one, and why you would (or wouldn't) want to use a particular memory model.
• How overlays work, and how to use them.
• How to overlay modules with exception-handling constructs.
1
Running out of memory
Borland C++ does not generate any intermediate data structures to disk when it is compiling (Borland c++ writes only .OBJ files to disk); instead it uses RAM for intermediate data structures between passes. Because of this, you might encounter the message "Out of memory" if there isn't enough memory available for the compiler.
The solution to this problem is to make your functions smaller, or to split up the file that has large functions.
Memory models
See page 1
o
for a summary of each memory model.The 8086 registers
Figure 1.1 8086 registers
General-purpose registers
The following figure shows some of the registers found in the 8086 processor. There are other registers-because they can't be accessed directly, they aren't shown here.
General-purpose registers accumulator (math operations)
AX AH
I
ALbase (indexing)
BX BH
l
BL count (indexing)CX CH
I
CL data (holding data)ox OH
l
OLSegment address registers
CS code segment pOinter
OS data segment pOinter
SS stack segment pointer
ES extra segment pointer
Special-purpose registers
SP stack pOinter
BP base pointer
SI source index
01 destination index
The general-purpose registers are the registers used most often to hold and manipulate data. Each has some special functions that only it can do. For example,
• Some math operations can only be done using AX. • BX can be used as an index register.
• ex
is used by LOOP and some string instructions.• DX is implicitly used for some math operations.
[image:13.513.29.464.46.616.2]Segment registers
Special-purpose registers
The flags register
The segment registers hold the starting address of each of the four segments. As described in the next section, the 16-bit value in a segment register is shifted left 4 bits (multiplied by 16) to get the true 20-bit address of that segment.
The 8086 also has some special-purpose registers:
• The SI and DI registers can do many of the things the general-purpose registers can, plus they are used as index registers. They're also used by Borland C++ for register variables.
• The SP register points to the current top-of-stack and is an offset into the stack segment.
• The BP register is a secondary stack pointer, usually used to index into the stack in order to retrieve arguments or automatic variables.
Borland C++ functions use the base pointer (BP) register as a base address for arguments and automatic variables. Parameters have positive offsets from BP, which vary depending on the memory modeL BP points to the saved previous BP value if there is a stack frame. Functions that have no arguments will not use or save BP if the Standard Stack Frame option is
Off.
Automatic variables are given negative offsets from BP. The offsets depend on how much space has already been assigned to local variables.
The 16-bit flags register contains all pertinent information about the state of the 8086 and the results of recent instructions;
For example,if you wanted to know whether a subtraction produced a zero result, you would check the zero flag (the Z bit in the flags register)
Figure 1.2 Flags register of the
8086
Memory segmentation
31 23
Virtual 8086 Mode Resume
Nested Task
1/0 Protection Level Overflow
Direction Interrupt ~nable
Trap Sign
15
Zero Auxiliary Carry
Parity Carry
I
o
I I I I I I I I I I I I I I IvlRI INllOPlololllTlslzl IAI Ipi lei
'~ ____________ ~I ____________ ~A~~I __ ~ ________ -'I ________ ~/
80386 only 80286 All 80x86 processors 80386
Other flags control the 8086 operation modes. The direction flag controls the direction in which the string instructions move, and the interrupt flag
controls whether external hardware, such as a keyboard or modem, is allowed to halt the current code temporarily so that urgent needs can be serviced. The trap flag is used only by software that debugs other software.
The flags register isn't usually modified or read directly. Instead, the flags register is generally controlled through special assembler instructions (such as CLD, STI, and CMC) and through arithmetic and logical instructions that modify certain flags. Likewise, the contents of certain bits of the flags register affect the operation of instructions such as JZ, RCR, and MOVSB. The flags register is not really used as a storage location, but rather holds the status and control data for the 8086.
The Intel 8086 microprocessor has a segmented memory architecture. It has a total address space of 1 MB, but is designed to directly address only 64K of memory at a time. A 64K chunk of memory is known as a segment; hence the phrase "segmented memory architecture."
• The 8086 keeps track of four different segments: code, data, stack, and
extra. The code segment is where the machine instructions are; the data
segment is where information is; the stack is, of course, the stack; and the extra segment is also used for extra data .
• The 8086 has four 16-bit segment registers (one for each segment) named CS, DS, SS, and ES; these point to the code, data, stack, and extra
segments, respectively .
Address calculation
This whole section is applicable only to real mode under DOS. You can safely ignore it for Windows development.
A chunk of 16 bytes is known as a paragraph, so you
could say that a segment always starts on a paragraph boundary.
Pointers
A complete address on the 8086 is composed of two 16-bit values: the segment address and the offset. Suppose the data segment address-'-the value in the DS register-is 2F84 (base 16), and you want to calculate the actual address of some data that has an offset of 0532 (base 16) from the start of the data segment: how is that done?
Address calculation is done as follows: Shift the value of the segment register 4 bits to the left (equivalent to one hex digit), then add in the offset.
The resulting 20-bit value is the actual address of the data, as illustrated here:
DS register (shifted): 0010 1111 1000 0100 0000 2F840
Offset: 0000 0101 0011 0010 00532
Address: 0010 1111 1101 0111 0010 = 2FD72
The starting address of a segment is always a 20-bit number, but a segment register only holds 16 bits-so the bottom 4 bits are always assumed to be all zeros. This means segments can only start every 16 bytes through memory, at an address where the last 4 bits (or last hex digit) are zero. So, if
the DS register is holding a value of 2F84, then the data segment actually starts at address 2F840.
The standard notation for an address takes the form segment:offset; for example, the previous address would be written as 2F84:0532. Note that since offsets can overlap, a given segment:offset pair is not unique; the following addresses all refer to the same memory location:
0000:0123 0002:0103 0008:00A3 0010:0023 0012:0003
Segments can overlap (but don't have to). For example, all four segments could start at the same address, which means that your entire program would take up no more than 64K--'-but that's all the space you'd have for your code, your data, and your stack.
Near pointers
Far pointers
A near pointer (16-bits) relies on one of the segment registers to finish calculating its address; for example, a pointer to a function would add its 16-bit value to the left-shifted contents of the code segment (CS) register. In a similar fashion, a near data pointer contains an offset to the data segment (DS) register. Near pointers are easy to manipulate, since any arithmetic (such as addition) can be done without worrying about the segment.
A far pointer (32-bits) contains not only the offset within the segment, but also the segment address (as another 16-bit value), which is then left-shifted and added to the offset. By using far pointers, you can have multiple code segments; this, in turn, allows you to have programs larger than 64K. You can also address more than 64K of data.
When you use far pointers for data, you need to be aware of some potential problems in pointer manipulation. As explained in the section on address calculation, you can have many different segment:offset pairs refer to the same address. For example, the far pointers 0000:0120, 0010:0020, and 0012:0000 all resolve to the same 20-bit address. However, if you had three different far pointer variables-a, b, and c-containing those three values respectively, then all the following expressions would be false:
if (a == b) if (b == c) • • •
if (a == c) • • •
A related problem occurs when you want to compare far pointers using the >, >=, <, and <= operators. In those cases, only the offset (as an unsigned) is used for comparison purposes; given that a, b, and c still have the values previously listed, the following expressions would all be true:
if (a > b) if (b > c) • • •
if (a > c) • • •
The equals (==) and not-equal (!=) operators use the 32-bit value as an unsigned long (not as the full memory address). The comparison operators «=, >=, <, and » use just the offset.
The == and != ope,rators need all 32 bits, so the computer can compare to the NULL pointer (0000:0000). If you used only the offset value for equality checking, any pointer with 0000 offset would be equal to the NULL pointer, which is not what you want.
Huge pointers
example, if you add 1 to 5031:FFFF, the result would be 5031:0000 (not 6031:0000). Likewise, if you subtract 1 from 5031:0000, you would get 5031:FFFF (not 5030:000F).
If you want to do pointer comparisons, it's safest to use either near pointers-which all use the same segment address-or huge pointers, described next.
Huge pointers are also 32 bits long. Like far pointers, they contain both a segment address and an offset. Unlike far pointers, they are normalized to avoid the problems associated with far pointers.
A normalized pointer is a 32-bit pointer that has as much of its value in the segment address as possible. Since a segment can start every 16 bytes (10 in base 16), this means that the offset will only have a value from 0 to 15 (0 to F in base 16).
To normalize a pointer, convert it to its 20-bit address, then use the right 4 bits for your offset and the left 16 bits for your segment address. For example, given the pointer 2F84:0532, you would convert that to the absolute address 2FD72, which you would then normalize to 2FD7:0002. Here are a few more pointers with their normalized equivalents:
0000:0123 0040:0056 500D:9407 7418:D03F
0012:0003 0045:0006 594D:0007 811B:OOOF
There are three reasons why it is important to always keep huge pointers normalized:
1. For any given memory address there is only one possible huge address (segment:offset) pair. That means that the == and != operators return correct answers for any huge pointers.
2. In addition, the >, >=, <, and <= operators are all used on the full 32-bit value for huge pointers. Normalization guarantees that the results of these comparisons will also be correct.
3. Finally, because of normalization, the offsetin a huge pointer
The six memory models
10
~
There is a price for using huge pointers: additional overhead. Huge pointer arithmetic is done with calls to special subroutines. Because of this, huge pointer arithmetic is significantly slower than that of far or near pointers.
Borland C++ gives you six memory models for 16-bit DOS programs: tiny, small, medium, compact, large, and huge. Your program requirements determine which one you pick. (See Chapter 8 in the Programmer's Guide for information on choosing a memory model for Windows modules.) Here's a brief summary of each:
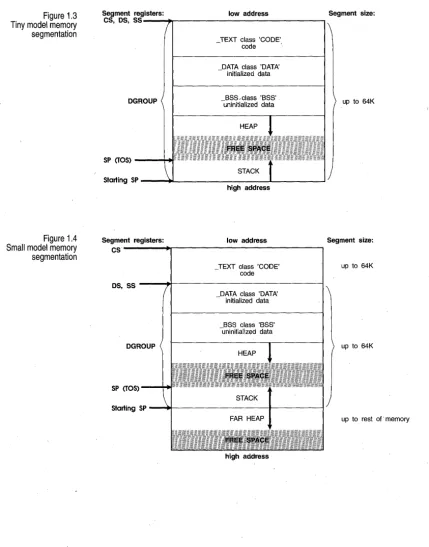
• Tiny. As you might guess, this is the smallest of the memory models. All four segment registers (CS, DS, SS, ES) are set to the same address, so you have a total of 64K for all of your code, data, and stack. Near pointers are always used. Tiny model programs can be converted to .COM format by linking with the It option. Use this model when memory is at an absolute premium.
• Small. The code and data segments are different and don't overlap, so you have 64K of code and 64K of data and stack. Near pointers are always used. This is a good size for average applications.
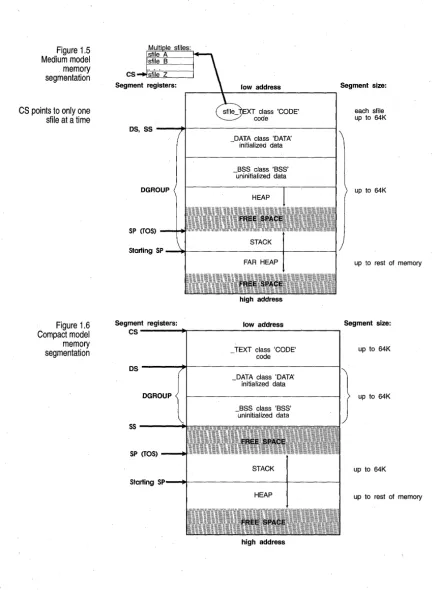
• Medium. Far pointers are used for code, but not for data. As a result, data plus stack are limited to 64K, but code can occupy up to 1 MB. This model is best for large programs without much data in memory.
• Compact. The inverse of medium: Far pointers are used for data, but not for code. Code is then limited to 64K, while data has a 1 MB range. This model is best if code is small but needs to address a lot of data.
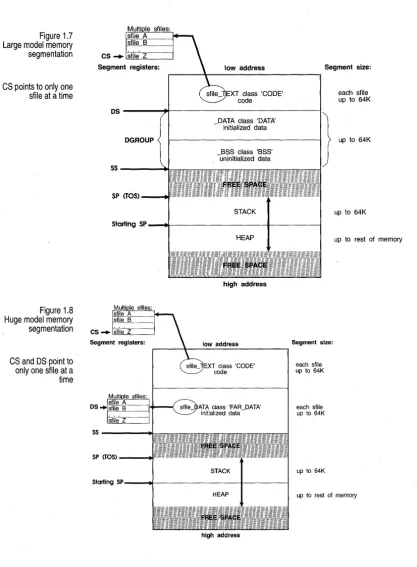
• Large. Far pointers are used for both code and datal giving both a 1 MB range. Large and huge are needed only for very large applications. • Huge. Far pointers are used for both code and data. Borland C++
normally limits the size of all static data to 64K; the huge memory model sets aside that limit, allowing data to occupy more than 64K.
Figure 1.3 Tiny model memory segmentation
Segment registers: low address Segment size:
Figure 1.4 Small model memory segmentation
CS, OS, SS----~r_---__.
OGROUP
SP (TOS) --...,. .. ,.,.;; '."
TEXT class 'CODE'
- code .
DATA class 'DATA' - initialized data
_BSS,class 'BSS' uninitialized data
Starting SP ---i~---....,...----L---I
high address
Segment registers: low address CS
TEXT class 'CODE' - code
OS, SS ----~r_---~
SP (TOS)
_DATA class 'DATA' initialized data
Starting SP - ... ~---I---t
high address
up to 64K
Segment size:
up to 64K
up to 64K
[image:20.513.32.461.61.607.2]Figure 1.5 Medium model memory segmentation
CS pOints to only one stile at a time
Figure 1.6 Compact model memory segmentation
class 'CODE'
os, SS ----~r_---~
Segment registers:
CS
DATA class 'DATA' - initialized data
_BSS class 'BSS' uninitialized data
high address
low address
TEXT class 'CODE' - code
Segment size:
each sfile up to 64K
up to 64K
up to rest of memory
Segment size:
up to 64K
os
----+f----'---I}.
up to 64K DATA class 'DATA'- initialized data
BSS class 'BSS' -uninitialized data
5 5 - - - - + 1
SP (TOS)
up to 64K
Starting SP---.ot---+---I
up to rest of memory
Figure 1.7 Large model memory segmentation
[image:22.510.34.452.41.609.2]CS points to only one sfile at a time
Figure 1.8
Huge model memory segmentation
CS and DS pOint to only one sfile at a
time
XT class 'CODE' code
Segment size:
each stile up to 64K
DS---~~---_i}
DATA class 'DATA' upt064K- initialized data DGROUP
BSS class 'BSS' -uninitialized data
SS----"""""=
SP (TOS) --..r"
up to 64K
Starting SP - ... I l - - - ' - - - I - - - I
high address
~----~---~
55----...
high address
Segment size:
each sfile up to 64K
each sfile up to 64K
up to 64K
up to rest ot memory
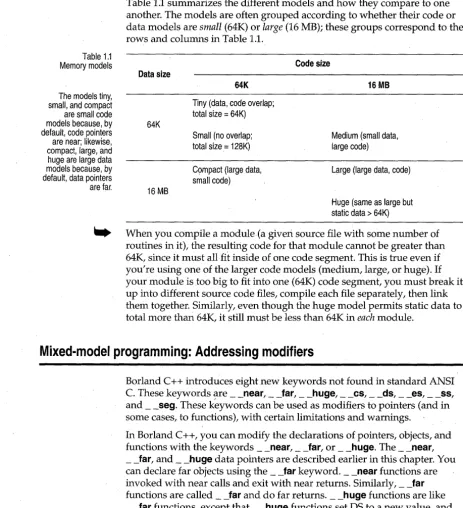
Table 1.1 Memory models
The models tiny, small, and compact are small code
Table 1.1 summarizes the different models and how they compare to one another. The models are often grouped according to whether their code or data models are small (64K) or large (16 MB); these groups correspond to the
rows and columns in Table 1.1.
Code size Data size
64K 16 MB
Tiny (data, code overlap; total size = 64K) models because, by 64K
default, code pointers Small (no overlap; Medium (small data,
large code) are near; likewise,
compact, large, and total size = 128K) huge are large data
models because, by C9mpact (large data, Large (large data, code) default, data pointers small code)
are far. 16 MB
Huge (same as large but static data> 64K)
. . . When you compile a module (a given source file with some number of routines in it), the resulting code for that module cannot be greater than 64K, since it must all
fit
inside of one code segment. This is true even if you're using one of the larger code models (medium, large, or huge). Ifyour module is too big to fit into one (64K) code segment, you must break it up into different source code files, compile each file separately, then link them together. Similarly, even though the huge model permits static data to total more than 64K, it still must be less than 64K in each module.
Mixed-model programming: Addressing modifiers
Borland C++ introduces eight new keywords not found in standard ANSI C. These keywords '!lre __ near, __ far, __ huge, __ cs, __ ds, __ es, __ ss, and __ seg. These keywords can be used as modifiers to pointers (and in some cases, to functions), with certain limitations and warnings.
[image:23.510.9.473.63.572.2]Table 1.2 Pointer results
Segment pointers
There are also four special __ near data pointers: __ cs, __ ds, __ es, and __ ss. These are 16-bit pointers that are specifically associated with the corresponding segment register. For example, if you were to declare a pointer to be
char _ss *Pi
then p would contain a 16-bit offset into the stack segment.
Functions and pointers within a given program default to near or far, depending on the memory model you select. If the function or pointer is near, it is automatically associated with either the CS or DS register.
The next table shows how this works. Note that the size of the pointer corresponds to whether it is working within a 64K memory limit (near, within a segment) or inside the general 1 MB memory space (far, has its own segment address).
Memory model Function pointers Data pointers
Tiny near, _cs near, _ds
Small near, _cs near, _ds
Medium far near, _ds
Compact near, _cs far
Large far far
Huge far far
Use __ seg in segment pointer type declarators. The resulting pointers are 16-bit segment pointers. The syntax for __ seg is:
datatype _seg *identifier;
For example,
int _seg *namei
Any indirection through identifier has an assumed offset of
o.
In arithmetic involving segment pointers the following rules hold true:1. You can't use the ++,- -, +=, or -= operators with segment pointers. 2. You cannot subtract one segment pointer from another.
3. When adding a near pointer to a segment pointer, the result is a far pointer that is formed by using the segment from the segment pointer and the offset from the near pointer. Therefore, the two pointers must either point to the same type, or one must be a pointer to void. There is no multiplication of the offset regardless of the type pointed to.
Declaring far objects
Declaring functions to be near or far
5. When adding or subtracting an integer operand to or from a segment pointer, the result is a far pointer, with the segment taken from the segment pointer and the offset found by multiplying the size of the , object pointed to by the integer operand. The arithmetic is performed as
if the integer were added to or subtracted from the far pointer. 6. Segment pointers can be assigned, initialized, passed into and out of
functions, compared and so forth. (Segment pointers are compared as if
their values were unsigned integers.) In other words, other than the above restrictions, they are treated exactly like any other pointer.
You can declare far objects in Borland C++. For example,
int far x = 5; int far z;
extern int far y = 4; static long ji
The command-line compiler options -zE, -zF, and -zH (which can also be set using #pragma option) affect the far segment name, class, and group, respectively. When you change them with #pragma option, you can change them at any time to make them apply to any ensuing far object
declarations. Thus you could use the following sequence to create a far object in a specific segment:
#pragma option -zEmysegment -zHmygroup -zFmyclass int far Xi
#pragma option -zE* -zH* -zF*
This will put X in segment MYSEGMENT 'MYCLASS' in the group
'MYGROUP', then reset all of the far object items to the default values. Note that by using these options, several far objects can be forced into a single segment:
#pragma option -zEcombined -zFmyclass int far Xi
double far Yi
#pragma option -zE* -zF*
Both X and
y
will appear in the segment COMBINED 'MYCLASS' with nogroup.
On occasion, you'll want (or need) to override the default function type of your memory model.
Declaring pointers to be near, far, or huge
double power(double x,int exp) if (exp <= 0)
return(l) ; else
return(x * power (x, exp-l));
Every time power calls itself, it has to do a far call, which uses more stack space and clock cycles. By declaring power as __ near, you eliminate some of the overhead by forcing all calls to that function to be near:
double __ near power(double x,int exp)
This guarantees that power is callable only within the code segment in which it was compiled, and that all calls to it are near calls.
This means that if you're using a large code model (medium large, or huge), you can only call power from within the module where it is defined. Other modules have their own code segment and thus cannot call __ near functions in different modules. Furthermore, a near function must be either defined or declared before the first time it is used, or the compiler won't know it needs to generate a near call.
Conversely, declaring a function to be far means that a far return is generated. In the small code models, the far function must be declared or defined before its first use to ensure it is invoked with a far call.
Look back at the power example at the beginning of this section. It is wise to also declare power as static, since it should be called only from within the current module. That way, being a static, its name will not be available to any functions outside the module.
You've seen why you might want to declare functions to be of a different model than the rest of the program. For the same reasons given in the preceding section, you might want to modify pointer declarations: either to avoid unnecessary overhead (declaring __ near when the default would be __ far) or to reference something outside of the default segment (declaring __ far or __ huge when the default would be __ near).
There are, of course, potential pitfalls in declaring functions and pointers to be of nondefault types. For example, say you have the following small model program:
void myputs(s) char *s;; int i;'
If you're going to explicitly declare pointers to be of type __ far or __ near, be sure to use function prototypes for any functions that might use them.
POinting to a given segment:offset address
main() {
char near *mystri
mystr = "Hello, world\n" i
myputs (mystr) ;
}
This program works fine. In fact, the __ near declaration on mystr is redundant, since all pointers, both code and data, will be near.
But what if you recompile this program using the compact (or large or huge) memory model? The pointer mystr in main is still near (it's still a 16-bit pointer). However, the pointer s in myputs is now far, because that's the default. This means that myputs will pull two words out of the stack in an effort to create a far pointer, and the address it ends up with will certainly not be that of mystr.
How do you avoid this problem? The solution is to define myputs in modern
C
style, like this:void myputs(char *s) { /* body of myputs */
}
Now when Borland C++ compiles your program,it knows that myputs
expects a pointer to char; and since you're compiling under the large model, it knows that the pointer must be __ far. Because of that, Borland C++ will push the data segment (DS) register onto the stack along with the 16-bit value of mystr, forming a far pointer.
How about the reverse case: arguments to myputs declared as __ far and compiled with a small data model? Again, without the function prototype, you will have problems, because main will push both the offset and the segment address onto the stack, but myputs will expect only the offset. With the prototype-style function definitions, though, main will only push the offset onto the stack.
You can make a far pointer point to a given memory location (a specific segment:offset address). You can do this with the macro MK_FP, which
takes a segment and an offset and returns a far pointer. For example,
MK_FP(segment_value, offset_value)
Given a __ far pointer, fp, you can get the segment component with
FP _SEG(fp) and the offset component with FP _OFF(fp). For more
information about these three Borland C++ library routines, refer to the
Using library files
Linking mixed, modules
Borland C++ offers a version of the standard library routines for each of the six memory models. Borland C++ is smart enough to link in the
appropriate libraries in the proper order, depending on which model you've selected. However, if you're using the Borland C++ linker, TLINK, directly (as a standalone linker), you need to specify which libraries to use. See Chapter 9 in the User's Guide for details on how to do this.
Suppose you compiled one module using the small memory model and another module using the large model, then wanted to link them together. This would present some problems, but they can be solved.
The files would link together fine, but the problems you would encounter would be similar to those described in the earlier section, "Declaring functions to be near or far." If a function in the small module called a function in the large module, it would do so with a near call, which would probably be disastrous. Furthermore, you could face the same problems with pointers as described in the earlier section, "Declaring pointers to be near, far, or huge," since a function in the small module would expect to pass and receive _ --.:.near pointers, and a function in the large module would expect _ _ far pointers.
The solution, again, is to use function prototypes. Suppose that you put
myputs into its own module and compile it with the large memory model.
Then create a header file called myputs.h (or some other name with a.h extension), which would have the following function prototype in it:
void far myputs(char far *s) i
Now, put main into its own module (called MYMAIN.C), and set things up
like this: .
#include <stdio.h> #include "myputs .h"
main () {
char near *mystri
mystr = "Hello, world\n" i myputs (mystr) i
}
What if, on top of all this, you need to link in library routines? Your best bet is to use one of the large model libraries and declare everything to be __ far. To do this, make a copy of each header file you would normally include (such as stdio.h), and rename the copy to something appropriate (such as fstdio.h).
Then edit each function prototype in the copy so that it is explicitly __ far, like this:
int far cdecl printf(char far * format, ... );
That way, not only will __ far calls be made to the routines, but the pointers passed will also be __ far pointers. Modify your program so that it includes the new header file:
#include <fstdio.h>
void main() { char near *mystr; mystr = "Hello, world\n"; printf (mystr) ;
Compile your program with the command-line compiler BCC then link it with TLINK, specifying a large model library, such as CL.LIB. Mixing models is tricky, but it can be done; just be prepared for some difficult bugs if you do things wrong.
Overlays (VROOMM) for DOS
How overlays work
Overlays are used only in 16-bit DOS programs; you can mark the code segments of a Windows application as discardable to decrease memory consumption. Overlays are parts of a program's code that share a common memory area. Only the parts of the program that are required for a given function reside in memory at the same time. See Chapter 9 in the User's
Guide.
Overlays can significantly reduce a program's total run-time memory requirements. With overlays, you can execute programs that are much larger than the total available memory, since only parts of the program reside in memory at any given time.
unit can call other routines in the same unit and routines in the base, but not routines in other units. The overlay units are overlaid against each other; that is, only one overlay unit can be in memory at a time, and each unit occupies the same physical memory. The total amount of memory needed to run the program is the size of the base plus the size of the largest overlay.
This conventional scheme is quite inflexible. It requires complete under-standing of the possible calling dependencies in the program, and requires you to have the overlays grouped accordingly. It might be impossible to break your program into overlays if you can't split it into separable calling dependencies.
VROOMM's scheme is quite different. It provides dynamic segment swapping.
The basic swapping unit is the segment. A segment can be one or more modules. More importantly, any segment can call any other segment.
Memory is divided into an area for the base plus a swap area. Whenever a function is called in a segment that is neither in the base nor in the swap area, the segment containing the called function is brought into the swap area, possibly displacing other segments. This is a powerful approach-it is like software virtual memory. You no longer have to break your code into static, distinct, overlay units. You just let it run!
Suppose a segment needs to be brought into the swap area. If there is room for the segment, execution continues. If there is not, then one or more segments in the swap area must be thrown out to make room.
The algorithm for deciding which segment to throw out is quite sophisti-cated. Here's a simplified version: if there is an inactive segment, choose it for removal. Inactive segments are those without executing functions. Otherwise, pick an active segment and swap it out. Keep swapping out segments until there is enough room available. This technique is called
dynamic swapping.
The more memory you provide for the swap area, the better the program performs. The swap area acts like a cache; the bigger the cache, the faster the program runs. The best setting for the size of the swap area is the size of the program's working set.
Once an overlay is loaded into memory" it is placed in the overlay buffer, which resides in memory between the stack segment and the far heap. By default, the size of the overlay buffer is estimated and set at startup, but you can change it using the global variable _ovrbuffer (see Appendix B). If there isn't enough available memory, an error message is displayed by DOS ("Program too big to fit in memory") or by the C startup code ("Not
One important option of the overlay manager is the ability to swap the modules to expanded or extended memory when they are discarded from the overlay buffer. Next time the module is needed, the overlay manager can copy it from where the module was swapped to instead of reading from the file. This makes the overlay manager much faster.
[image:31.509.37.462.113.628.2]When using overlays, memory is used as shown in the next figure.
Figure 1.9: Memory maps for overlays
MEDIUM MODEL LARGE MODEL HUGE MODEL
{
These segments are generated automatically by the linker
Near heap and stack share data segment
Guidelines for using
Borland C++
overlays effectively
See page 25 for more information on setting the size of the overlay buffer.
Requirements
~-"'Q,. ... ,,,,,~,,,,,,,,,,~,'>.~--.,,,w,w ... , .... ,, .... ~,,,,,,,,,,,,_,,, ... -, ... """''''''''--.''' ... ,''''''''''''' .... '''''''''' .... ''''" ... ,'''
class CODE Resident code class CODE Resident code class CODE
Overlay Overlay
control data control data
One stub One stub
class STUBSEG segment for class STUBSEG segment for class STUBSEG each overlay
each overlay
segment segment
... 'w."'w, .... "'w."'~....,"""''''',,,''''''''''''''''>NM,,, .... '''''v ~"''''','''',,,''''''''''v..''''''~'''''''' .... ''''''''''''''''''''''''''''''''''
DATA DATA Multiple
class-DATA class-DATA data segments
NEAR HEAP
Separate Separate
stack segment stack segment
STACK STACK STACK
,
.... """", .... , ... ,-"""', .. "'"" .... , ... ,,"'''''_ ... ,,,'''' ... ' ,.,_",,,,_ ... ,..., ... """"',,, ... ,., ... ,.,,,,,..,,.w;.,,,,,' .. ',.,, ...
"' ... _ _ " ... ,_". .... ""',,,"', .... _ ... , ... ,w.. ... _ ... ," __ .... _ ... ~'Oo.-.."_"_"' .... ''' .. ,."..,,_-.. ... _''' ..
FAR HEAP FAR HEAP FAR HEAP
To get the best out of Borland C++ overlays,
• Minimize resident code (resident run-time library, interrupt handlers, and device drivers are a good starting point).
• Set overlay buffer size to be a comfortable working set (start with 128K and adjust up and down to see the speed/ size tradeoff).
• Think versatility and variety: take advantage of the overlay system to provide support for special cases, interactive help, and other end-user benefits you couldn't consider before.
To create overlays, you'll need to remember a few rules:
Exception handling and overlays
• Overlaid applications must use the medium, large, or huge programming models; the tiny, small, and compact models are not supported.
• Normal segment merging rules govern overlaid segments. That is, several .OBJ modules can contribute to the same overlaid segment.
The link-time generation of overlays is completely separated from the run-time overlay management; the linker does not automatically include code to manage the overlays. In fact, from the linker's point of view, the overlay manager is just another piece of code that gets linked in. The only assump-tion the linker makes is that the overlay manager takes over an interrupt vector (typically INT 3FH) through which all dynamic loading is con-trolled. This level of transparency makes it very easy to implement custom-built overlay managers that suit the particular needs of each application.
If you overlay a C++ program that contains exception-handling constructs, there are a number of situations that you must avoid. The following program elements cannot contain an exception-handling construct:
• Inline functions that are not expanded inline • Template functions
• Member functions of template classes
Exception-handling constructs include user-written try/catch and _ _ try / _ _ except blocks. In addition, the compiler can insert exception handlers for blocks with automatic class variables, exception specifications, and some new / delete expressions.
If you attempt to overlay any of the above exception-handling constructs, the linker identifies the function and module with the following message:
Error: Illegal local public in function_name in module module_name
When this error is caused by an inline function, you can rewrite the
function so that it is not inline. If the error is caused by a template function, you can do the following:
• Remove all exception-handling constructs from the function • Remove the function from the overlay module
You need to pay special attention when overlaying a program that uses multiple inheritance. An attempt to overlay a module that defines or uses class constructors or destructors that are required for a multiple inheritance class can cause the linker to generate the following message:
Using overlays
Overlays can be used only in 16-bit DOS programs
Overlay example
See the User's Guide for information on programming with overlays.
When such a message is generated, the module identified by the linker message should not be overlaid.
The container classes (in the BIDS? .LIB) have the exception-handling mechanism turned off by default. However, the diagnostic version of BIDS throws exceptions and should not be used with overlays. By default, the
string class can throw exceptions and should not be used in programs that
use overlays. See the Library Reference for a discussion of BIDS and the
string class.
To overlay a program, all of its modules must be compiled with the-Y compiler option enabled. To make a particular module into an overlay, it needs to be compiled with the -Yo option. (-Yo automatically enables -Y.)
The -Yo option applies to all ~modules and libraries that follow it on the command line; you can disable it with -Yo-. These are the only command line options that are allowed to follow file names. For example, to overlay the module OVL.C but not the library GRAPHICS. LIB, either of the following command lines could be used:
Bee
-ml -Yo ovl.c -Yo- graphics.lib orBee
-ml graphics.lib -Yo ovl.cIf TLINK is invoked explicitly to link the .EXE file, the b linker option must be specified·on the linker command line or response file. See Chapter 9 in
the User's Guide for details on how to use the b option.
Suppose that you want to overlay a program consisting of three modules: MAIN.C, Ol.C, and 02.C. Only the modules Ol.C and 02.C should be made into overlays. (MAIN.C contains time-critical routines and interrupt handlers, so it should stay resident.) Let's assume that the program uses the large memory model.
The following command accomplishes the task:
Bee
-ml -Y main.c -Yo ol.c 02.cOverlaid programs
The 'areall requirement
Buffer size
What not to overlay
This section discusses issues vital to well-behaved overlaid applications.
Use a large code model (medium, large, or huge) when you want to compile an overlay module. At any call to an overlaid function in another module, you must guarantee that all currently active functions are far.
You must compile all overlaid modules with the
-v
option, which makes the compiler generate code that can be overlaid.Failing to observe the far call requirement in an overlaid program will cause unpredictable and possibly catastrophic results when the program is executed.
The default overlay buffer size is twice the size of the largest overlay. This is adequate for some applications. But imagine that a particular function of a program is implemented through many modules, each of which is overlaid. If the total size of those modules is larger than the overlay buffer, a substantial amount of swapping will occur if the modules make frequent calls to each other.
The solution is to increase the size of the overlay buffer so that enough memory is available at any given time to contain all overlays that make frequent calls to each other. You can do this by setting the _ovrbuffer global variable (see Appendix B) to the required size in paragraphs. For example, to set the overlay buffer to 128K, include the following statement in your code:
unsigned _ovrbuffer = Ox2000;
There is no general formula for determining the ideal overlay buffer size.
Exception-handlmg constructs in overlays require special attention. See page 23 for a discussion of exception handling.
Don't overlay modules that contain interrupt handlers, or small and time-critical routines. Due to the non-reentrant nature of the DOS operating system, modules that might be called by interrupt functions should not be overlaid.
Debugging overlays
Overlays should not be used with any diagnostic version of the BIDS libraries.
External routines in overlays
Most debuggers have very limited overlay debugging capabilities, if any at all. Not so with Borland C++'s Turbo Debugger, the standalone debugger. The debugger fully supports single-stepping and breakpoints in overlays in a manner completely transparent to you. By using overlays, you can easily engineer and debug huge applications-all by using Turbo Debugger.
Like normal C functions, external assembly language routines must observe certain programming rules to work correctly with the overlay manager.
If an assembly language routine makes calls to any overlaid functions, the assembly language routine must be declared FAR, and it must set up a stack frame using the BP register. For example, assuming that OtherFunc is an overlaid function in another module, and that the assembly language routine ExternFunc calls it, then ExternFunc must be FAR and set up a stack frame, as shown:
ExternFunc PROC push bp mov sub
call
mov pop RET
bp, sp sp,LocalSize
OtherFunc
sp,bp bp
ExternFunc ENDP FAR
;Save BP
;Set up stack frame ;Allocate local variables
;Call another overlaid module
;Dispose local variables ;Restore BP
; Return
where LocalSize is the size of the local variables. If LocalSize is zero, you can omit the two lines to allocate and dispose local variables, but you must not omit setting up the BP stack frame even if you have no arguments or variables on the stack.
These requirements are the same if ExternFunc makes indirect references to overlaid functions. For example, if OtherFunc makes calls to overlaid functions, but is not itself overlaid, ExternFunc must be FAR and still has to set up a stack frame.
In the case where an assembly language routine doesn't make any direct or indirect references to overlaid functions, there are no special requirements; the assembly language routine can be declared NEAR. It does not have to set up a stack frame.
Swapping
are lost when the overlay is disposed. Likewise, pointers to objects based in an overlaid code segment cannot be expected to remain valid across calls to other overlays, since the overlay manager freely moves around and
disposes overlaid code segments.
If you have expanded or extended memory available, you can tell the overlay manager to use it for swapping. If you do so, when the overlay manager has to discard a module from the overlay buffer (because it should load a new module and the buffer is full), it can store the discarded module in this memory. Any later loading of this module is reduced to in-memory transfer, which is significantly faster than reading from a disk file.
In both cases there are two possibilities: the overlay manager can either detect the presence of expanded or extended memory and can take it over by itself, or it can use an already detected and allocated portion of memory. For extended memory, the detection of the memory use is not always successful because of the many different cache and RAM disk programs that can take over extended memory without any mark. To avoid this problem, you can tell the overlay manager the starting address of the extended memory and how much of it is safe to use.
c
H A p T E RMath
This chapter describes the floating-point options and explains how to use
complex and bed numerical types.
2
Floating-point 1/0
Floating-point output requires linking of conversion routines used by
print!, scan!, and any variants of these functions. To reduce executable size,
the floating-point formats are not automatically linked. However, this linkage is done automatically whenever your program uses a mathematical routine or the address is taken of some floating-point number. If neither of these actions occur, the missing floating-point formats can result in a run-time error.
The following program illustrates how to set up your program to properly execute.
/* PREPARE TO OUTPUT FLOATING-POINT NUMBERS. */ #include <stdio.h>
#pragma ext ref _floatconvert
void main () {
printf("d = %f\n", 1.3);
}
Floating-point options
There are two types of numbers you work with in C: integer (int, short, long, and so on) and floating point (float, double, and long double). Your computer's processor can easily handle integer values, but more time and effort are required to handle floating-point values.
If you have an 80486 or Pentium processor, the numeric coprocessor is probably already built in.
Emulating the 80x87 chip
_ Using 80x87 code
No floating-point code
Fast floating-point option
The 80x87 is a special hardware numeric processor that can be installed in your PC. It executes floating-point instructions very quickly. If you use floating point a lot, you'll probably want a coprocessor. The CPU in your computer interfaces to the 80x87 via special hardware lines.
The default Borland C++ code-generation option is emulation (the-f command-line compiler option). This option is for programs that might or might not have floating point, and for machines that might or might not have an 80x87 math coprocessor.
Withthe emulation option, the compiler will generate code as if the 80x87 were present; but will also link in the emulation library (EMU.LIB). When the program runs, it uses the 80x87 if it is present; if no coprocessor is present at run time, it uses special software that emulates the 80x87. This software uses 512 bytes of your stack, so make allowance for it when using the emulation option and set your stack size accordingly.
If your program is going to run only on machines that have an 80x87 math coprocessor, you can save a small amount in your .EXE file size by omitting the 80x87 autodetection and emulation logic. Choose the 80x87 floating-pointcode-generation option (the -f87 command-line compiler option). Borland C++ will then link your programs with FP87.LIB instead of with EMU.LIB.
If there is no floating-point code in your program, you can save a small amount of link time by choosing None for the floating-point
code-generation option (the -f-command-line compiler option). Then Borland C++ will not link with EMU.LIB, FP87.LIB, or MATHx.LIB.
Borland C++ has a fast floating-point option (the -ff command-line compiler option). It can be turned off with -ff-on the command line. Its· purpose is to allow certain optimizations that are technically contrary to correct C semantics. For example,
double x;
x = (float) (3.5*x).;
To execute this correctly, x is multiplied by 3.5 to give a double that is truncated to float precision, then stored as a double in x. Under the fast
The 87 environ-ment variable
Registers and the 80x87
If you build your program with 80x87 emulation, which is the default, your program will automatically check to see if an 80x87 is available, and will use it if it is.
There are some situations in which you might want to override this default autodetection behavior. For example, your own run-time system might have an 80x87, but you might need to verify that your program will work as intended on systems without a coprocessor. Or your program might need to run on a PC-compatible system, but that particular system returns incorrect information to the auto detection logic (saying that a nonexistent 80x87 is available, or vice versa).
Borland C++ provides an option for overriding the start-up code's default autodetection logic; this option is the 87 environment variable.
You set the 87 environment variable at the DOS prompt with the SET command, like this:
C> SET 87=N
or like this:
C> SET 87=Y
Don't include spaces on either side of the
=.
Setting the 87 environment variable to N (for No) tells the start-up code that you do not want to use the 80x87, even though it might be present in the system.Setting the 87 environment variable to Y (for Yes) means that the
coprocessor is there, and you want the program to use it. Let the programmer
beware: If you set 87 = Y when, in fact, there is no 80x87 available on that
system, your system will hang.
If the 87 environment variable has been defined (to any value) but you want to undefine it, enter the following at the DOS prompt:
C> SET 87=
Press Enter immediately after typing the equal sign.
When you use floating point, make note of these points about registers:
• In 80x87 emulation mode, register wraparound and certain other 80x87 peculiarities are not supported .
Disabling floati ng-poi nt exceptions
enough free registers exist, you might need to save and pop the 80x87 registers before calling functions that use the coprocessor.
By default, Borland C++ programs abort if a floating-point overflow or divide-by-zero error occurs. You can mask these floating-point exceptions by a call to _control87 in main, before any floating-point operations are performed. For example,
#include <float.h> main () {
_contro187 (MCW_EM/MCW_EM) i
You can determine whether a floating-point exception occurred after the fact by calling _status87 or _clear87. See the Library Reference entries for these functions for details.
Certain math errors can also occur in library functions; for instance, if you try to take the square root of a negative number. The default behavior is to print an error message to the screen, and to return a NAN (an IEEE not-a-number). Use of the NAN is likely to cause a floating-point exception later, which will abort the program if unmasked. If you don't want the message to be printed, insert the following version of _matherr into your program:
#include <math.h>
int _matherr(struct _exception *e)
{
return Ii /* error has been handled */
Any other use of _matherr to intercept math errors is not encouraged; it is considered obsolete and might not be supported in future versions of Borland C++.
Using complex types
Complex numbers are numbers of the form x + yi, where x and yare real numbers, and i is the square root of -1. Borland C++ has always had a type
struct complex
{
double x, Yi
See the Library Reference, Chapter 8, for more information.
defined in math.h. This type is convenient for holding complex numbers, because they can be considered a pair of real numbers. However, the limita-tions of C make arithmetic with complex numbers rather cumbersome. With the addition of C++, complex math is much simpler.
A significant advantage to using the Borland C++ complex numerical type is that all of the ANSI C Standard mathematical routines are defined to operate with it. These mathematical routines are not defined for use with the C struct complex.
To use complex numbers in C++, all you have to do is to include
complex.h. In complex.h, all the following have been overloaded to handle complex numbers:
• All of the binary arithmetic operators. • The input and output operators, »and «. • The ANSI C math functions.
The complex library is invoked only if the argument is of type complex.
Thus, to get the complex square root of -1, use
sqrt(complex(-l))
and not
sqrt(-l)
The following functions are defined by class complex:
double arg(complex&); complex conj (complex&) ; double imag(complex&); double norm (complex&) ; double real(complex&);
II angle in the plane II complex conjugate II imaginary part
II square of the magnitude II real part
II Use polar coordinates to create a complex. complex polar(double mag, double angle = 0);
Using bed types
See the Library Reference, Chapter 8, for more information.
Borland C++, along with almost every other computer and compiler, does arithmetic on binary numbers (that is, base 2). This can sometimes be confusing to people who are used to decimal (base 10) representations. Many numbers that are exactly representable in base la, such as 0.01, can only be approximated in base 2.
Binary numbers are preferable for most applications, but in some situations the round-off error involved in converting between base 2 and 10 is
Converting bed numbers
application, where the pennies are supposed to add up. Consider the following program to add up 100 pennies and subtract a dollar:
#include <stdio.h> int i;
float x = 0.0;
for (i = 0; i < 100; +ti) x += 0.01;
x -= 1.0;
printf("100*.01 - 1 = %g\n",x);
The correct answer is 0.0, but the computed answer is a small number close to 0.0. The computation magnifies the tiny round-off error that occurs when converting 0.01 to base 2. Changing the type of x to double or long double reduces the error, but does not eliminate it.
To solve this problem, Borland C++ offers the C++ type bcd, which is
declared in bcd.h. With bcd, the number 0.01 is represented exactly, and the
bed variabl~ x provides an exact penny count.
#include <bcd.h> int i;
bcd x = 0.0;
for (i = 0; i < 100; t+i) x += 0.01;
x -= 1.0;
cout « "100*.01 - 1 = " « x « "\n";
Here are some facts to keep in mind about bed:
• bed does not eliminate all round-off error: A computation like 1.0/3.0 will still have round -off error.
• bed types can be used with ANSI C math functions.
• bed numbers have about 17 decimal digits precision, and a range of about
1 x 10-125 to 1 X 10125.
bed is a defined type distinct from float, double, or long double; decimal arithmetic is performed only when at least one operand is of the type bed.
The bed member function real is available for converting a bed number back
to one of the usual formats (float, double, or long double), though the conversion is not done automatically. real does the necessary conversion to
long double, which can then be converted to other types using the usual C conversions. For example, a bed can be printed using any of the following
four output statements with eout and printf.
Number of decimal digits
This method of rounding is specified by IEEE.
#include <bcd.h> #include <iostream.h> #include <stdio.h>
void main(void) { bcd a = 12.1i
double x = real(a); II This conversion required for printf().
printf("\na = %g", Xli
printf("\na = %1g", real(a)) i .
printf("\na =%g", (double)real(a))i
cout « "\na = " « ai II The preferred method.
}
Note that since printf doesn't do argument checking, the format specifier must have the L if the long doublevalue real(a) is passed.
You can specify how many decimal digits after the decimal point are to be carried in a conversion from a binary type to a bed. The number of places is
an optional second argument to the constructor bed. For example, to
convert $1000.00/7 to a bed variable rounded to the nearest penny, use
bcd a = bcd(1000.00/7, 2)
where 2 indicates two digits following the decimal point. Thus,
1000.00/7 142.85714 ...
bcd(1000.00/7, 2) 142.860
bcd(1000.00/7, 1) 142.900
bcd(1000.00/7, 0) 143.000
bcd(1000.00/7, -1 ) 140.000
bcd(1000.00/7, -2) 100.000
The number is rounded using banker's rounding, which rounds to the nearest whole number, with ties being rounded to an even digit. For example,
bcd(12.335, 2) bcd(12.345, 2) bcd(12.355, 2)
Video modes
c
H A p T E RVideo functions
Borland C++ comes with a complete library of graphics functions, so you can produce onscreen charts and diagrams. The graphics functions are available for 16-bit DOS-only applications. This chapter briefly discusses video modes and windows, then explains how to program in graphics mode.
3
Your PC has some type of video adapter. This can be a Monochrome Dis-play Adapter (MDA) for text-only disDis-play, or it can be a graphics adapter, such as a Color/Graphics Adapter (CGA), an Enhanced Graphics Adapter (EGA), a Video Graphics Array adapter (VGA), or a Hercules Monochrome Graphics Adapter. Each adapter can operate in a variety of modes; the mode specifies whether the screen displays 80 or 40 columns (text mode only), the display resolution (graphics mode only), and the display type (color or black and white).
The screen's operating mode is defined when your program calls one of the mode-defining functions textmode, initgraph, or setgraphmode .
• In text mode, your PC's screen is divided into cells (80- or 40-columns wide by 25, 43, or 50 lines high). Each cell consists of a character and an attribute. The character is the displayed ASCII character; the attribute specifies how the character is displayed (its color, intensity, and so on). Borland C++ provides a full range of routines for manipulating the text screen, for writing text directly to the screen, and for controlling cell attri-butes .
In text modes, the upper left corner of the screen is position (1,1), with x-coordinates increasing from left to right, and y-x-coordinates increasing from screen-top to screen-bottom. In graphics modes, the upper left corner is position (0,0), with the x- and y-coordinate values increasing in the same manner.
Windows and viewports
Borland c++ provides functions for creating and managing windows on your screen in text mode (and viewports in graphics mode). If you aren't familiar with windows and viewports, you should read this brief overview. Borland C ++'s window- and viewport-management functions are explained in the "Programming in graphics mode" section.
A window is a rectangular area defined on your PC's video screen when it's
in a text mode. When your program writes to the screen, its output is restricted to the active window. The rest of the screen (outside the window) remains untouched.
The default window is a full-screen text window. Your program can change this