MCPD 70-518
Exam Ref:
Designing and Developing Windows
®Applications Using Microsoft
®.NET
Framework 4
Tony Northrup
Copyright © 2011 by Tony Northrup and Matthew Stoecker
All rights reserved. No part of the contents of this book may be reproduced or transmitted in any form or by any means without the written permission of the publisher.
ISBN: 978-0-7356-5723-6 1 2 3 4 5 6 7 8 9 QG 6 5 4 3 2 1
Printed and bound in the United States of America.
Microsoft Press books are available through booksellers and distributors worldwide. If you need support related to this book, email Microsoft Press Book Support at [email protected]. Please tell us what you think of this book at http://www.microsoft.com/learning/booksurvey.
Microsoft and the trademarks listed at http://www.microsoft.com/about/legal/ en/us/IntellectualProperty/Trademarks/EN-US.aspx are trademarks of the Microsoft group of companies. All other marks are property of their respec-tive owners.
The example companies, organizations, products, domain names, email ad-dresses, logos, people, places, and events depicted herein are fictitious. No association with any real company, organization, product, domain name, email address, logo, person, place, or event is intended or should be inferred. This book expresses the author’s views and opinions. The information con-tained in this book is provided without any express, statutory, or implied warranties. Neither the authors, Microsoft Corporation,
nor its resellers, or distributors will be held liable for any damages caused or alleged to be caused either directly or indirectly by this book.
Acquisitions and Developmental Editor: Ken Jones Production Editor: Holly Bauer
Editorial Production: S4Carlisle Publishing Services Technical Reviewer: Bill Chapman
Copyeditor: Susan McClung Indexer: Potomac Indexing, LLC
Cover Composition: Karen Montgomery Illustrator: S4Carlisle Publishing Services
Contents at a Glance
Introduction xv
Preparing for the Exam
xviii
ChAPTER 1 Designing the Layers of a Solution 1
ChAPTER 2 Designing the Presentation Layer 89
ChAPTER 3 Designing the Data Access Layer 173
ChAPTER 4 Planning a Solution Deployment 225
ChAPTER 5 Designing for Stability and Maintenance 265
Index 303
v What do you think of this book? We want to hear from you!
Microsoft is interested in hearing your feedback so we can continually improve our books and learning resources for you. To participate in a brief online survey, please visit:
www.microsoft.com/learning/booksurvey/
Contents
Introduction xv
Microsoft Certified Professional Program xv
Acknowledgments xvi
Support and Feedback xvi
Preparing for the Exam
xviii
Chapter 1 Designing the Layers of a Solution
1
Objective 1.1: Design a Loosely Coupled Layered Architecture . . . 2
Designing Service-Oriented Architectures 2
Providing Separation of Concern 4
Designing a System Topology 4
Choosing Between Presentation and Business Logic 6
Using WCF Routing 8
Understanding BizTalk Server 10
Objective Summary 11
Objective Review 11
Objective 1.2: Design Service Interaction . . . 13
Designing Service and Method Granularity 14
Choosing Protocols and Binding Types 16
Using REST 18
Using Message and Data Contracts 19
Using Custom SOAP Headers 22
Managing Data Integrity 24
Choosing a Message Exchange Pattern 25 Versioning 25
Hosting WCF Services 27
Objective Summary 28
Objective Review 28
Objective 1.3: Design the Security Implementation . . . 30
Planning for User Account Control 31
Designing for Least Privilege 31
Understanding Process Identity 35
Understanding Impersonation and Delegation 36
Implementing Authorization 41
Planning Role Management 44
Using Cryptography 45
Objective Summary 49
Objective Review 50
Objective 1.4: Design for Interoperability with External Systems . . . 52
Accessing Assemblies from Unmanaged Code 52
Accessing COM Objects 53
Objective Summary 54
Objective Review 54
Objective 1.5: Design for Optimal Processing . . . 56
Planning for Long-Running Processes 56
Scaling Applications 60
Moving to the Cloud 63
Using Queuing 63
Minimizing Latency 64
Using a Service Bus 65
Objective Summary 66
Objective Review 66
Objective 1.6: Design for Globalization and Localization . . . 69 Choosing Between CurrentCulture and CurrentUICulture 70
Format Text for Differing Cultures 71
Translating Applications 72
vii Contents
Comparing Data 73
Designing Databases for Globalization 74
Objective Summary 75
Objective Review 75
Chapter Summary . . . 78 Answers . . . 80
Objective 1.1: Review 80
Objective 1.1: Thought Experiment 81
Objective 1.2: Review 81
Objective 1.2: Thought Experiment 82
Objective 1.3: Review 82
Objective 1.3: Thought Experiment 83
Objective 1.4: Review 84
Objective 1.4: Thought Experiment 84
Objective 1.5: Review 85
Objective 1.5: Thought Experiment 86
Objective 1.6: Review 86
Objective 1.6: Thought Experiment 87
Chapter 2 Designing the Presentation Layer
89
Objective 2.1: Choose the Appropriate Windows Technology . . . 90
Windows Forms 90
WPF 90
Choosing Between Windows Forms and WPF 92
Interoperating Between Windows Forms and WPF 92
Choosing a Presentation Pattern 97
Objective Summary 99
Objective Review 99
Objective 2.2: Design the UI Layout and Structure . . . 100
Evaluate the Conceptual Design 100
Designing for Inheritance and the Reuse of Visual Elements 101
Creating a Resource Dictionary 108
Designing for Accessibility 109
Objective Summary 112
Objective Review 112
Objective 2.3: Design Application Workflow . . . 113
Implementing User Navigation 114
Navigation Applications in WPF 117
Using PageFunction Objects 124
Simple Navigation and Structured Navigation 125
Designing for Different Input Types 126
Objective Summary 127
Objective Review 127
Objective 2.4: Design Data Presentation and Input . . . 129
Designing Data Validation 129
Design a Data Binding Strategy 134
Managing Data Shared Between Forms 139
Managing Media 140
Objective Summary 140
Objective Review 141
Objective 2.5: Design Presentation Behavior . . . 143 Determine Which Behaviors Will Be Implemented and How 143
Creating Attached Behaviors 147
Implementing Drag-and-Drop Functionality 148
Objective Summary 154
Objective Review 154
Objective 2.6: Design for UI Responsiveness . . . 155 Offloading Operations from the UI Thread and
Reporting Progress 156
Using Dispatcher to Access Controls Safely on Another
Thread in WPF 161
Avoiding Unnecessary Screen Refreshes 162
Determining Whether to Sort and Filter Data on the
Client or Server 163
Addressing UI Memory Issues 164
Objective Summary 165
Objective Review 165
ix Contents
Answers . . . 168
Objective 2.1: Review 168
Objective 2.1: Thought Experiment 168
Objective 2.2: Review 168
Objective 2.2: Thought Experiment 169
Objective 2.3: Review 169
Objective 2.3: Thought Experiment 170
Objective 2.4: Review 170
Objective 2.4: Thought Experiment 171
Objective 2.5: Review 171
Objective 2.5: Thought Experiment 171
Objective 2.6: Review 172
Objective 2.6: Thought Experiment 172
Chapter 3 Designing the Data Access Layer
173
Objective 3.1: Choose the Appropriate Data Access Strategy . . . 174 Understanding .NET Data Access Technologies 174
Supporting Different Data Sources 177
Choosing a Data Access Strategy 178
Objective Summary 179
Objective Review 179
Objective 3.2: Design the Data Object Model . . . 181
Mapping to Persistent Storage 182
Designing a Schema Change Management Strategy 184
Abstracting from the Service Layer 185
Objective Summary 187
Objective Review 187
Objective 3.3: Design Data Caching . . . 189
Understanding Caching 189
Using MemoryCache 190
Caching Web Services 190
Objective Summary 191
Objective 3.4: Design Offline Storage and Data Synchronization . . . 194 Determining the Need for Offline Data Storage 194
Using Sync Framework 195
Designing Synchronization 198
Objective Summary 201
Objective Review 201
Objective 3.5: Design for a Concurrent Multiuser Environment . . . 203
Planning for Multiuser Conflicts 203
Understanding Deadlock Conflicts 205
Designing Concurrency for Web Services 206
Using Cross-Tier Distributed Transactions 207
Objective Summary 208
Objective Review 208
Objective 3.6: Analyze Data Services for Optimization . . . 210
Understanding ORM Performance 211
Understanding Lazy and Eager Loading 211
Optimizing Round-Trips 213 Objective Summary 214 Objective Review 214 Chapter Summary . . . 216 Answers . . . 217 Objective 3.1: Review 217
Objective 3.1: Thought Experiment 218
Objective 3.2: Review 218
Objective 3.2: Thought Experiment 219
Objective 3.3: Review 219
Objective 3.3: Thought Experiment 220
Objective 3.4: Review 220
Objective 3.4: Thought Experiment 221
Objective 3.5: Review 221
Objective 3.5: Thought Experiment 222
Objective 3.6: Review 222
xi Contents
Chapter 4 Planning a Solution Deployment
225
Objective 4.1: Define a Client Deployment Strategy . . . 226
Understanding Installation Methods 226
Choosing an Installation Method 231
Deploying the .NET Framework 232
Deploying COM Objects 234
Objective Summary 235
Objective Review 235
Objective 4.2: Plan a Database Deployment . . . 237
Understanding Database Deployment Files 237
Using SQL Scripts 237
Using the Vsdbcmd.exe Tool 238
Using Data-Tier Projects 239
Using SQL Server Database Projects 239
Publishing Databases from Server Explorer 240 Publishing Databases with a WCF Web Service 241
Understanding Deployment Conflicts 242
Deploying an Embedded Database Privately 242
Objective Summary 244
Objective Review 244
Objective 4.3: Design a Solution Update Strategy . . . 246
Updating ClickOnce Applications 247
Updating with Windows Installer 248
Packaging Shared Components 248
Checking for Windows Installer Updates 249
Updating Shared Components 249
Designing Web Services for Updates 249
Objective Summary 251
Objective Review 251
Objective 4.4: Plan for N-Tier Deployment . . . 253
Designing a Physical Topology 254
Determining Component Installation Order 256
Objective Summary 256
Chapter Summary . . . 259 Answers . . . 260
Objective 4.1: Review 260
Objective 4.1: Thought Experiment 260
Objective 4.2: Review 261
Objective 4.2: Thought Experiment 262
Objective 4.3: Review 262
Objective 4.3: Thought Experiment 263
Objective 4.4: Review 263
Objective 4.4: Thought Experiment 264
Chapter 5 Designing for Stability and Maintenance
265
Objective 5.1: Design for Error Handling . . . 265
Designing an Exception Handling Strategy 266
Handling Exceptions Across Tiers 267
Collecting User Feedback 270
Creating Custom Exception Classes 272
Processing Unhandled Exceptions 272
Objective Summary 273
Objective Review 274
Objective 5.2: Evaluate and Recommend a Test Strategy . . . 275 Understanding Black Box and White Box Testing 276
Understanding Functional Tests 277
Understanding UI Tests 279
Understanding Performance Tests 281
Understanding Code Coverage 282
Objective Summary 283
xiii Contents
What do you think of this book? We want to hear from you! Microsoft is interested in hearing your feedback so we can continually improve our books and learning resources for you. To participate in a brief online survey, please visit:
www.microsoft.com/learning/booksurvey/ Objective 5.3: Design a Diagnostics and Monitoring Strategy . . . 285
Providing Monitoring Information 285
Providing Usage Reporting 291
Choosing Distributed or Centralized Logging 292 Designing a Diagnostics and Monitoring Strategy 293
Profiling .NET Applications 294
Objective Summary 295
Objective Review 295
Chapter Summary . . . .298 Answers . . . .299
Objective 5.1: Review 299
Objective 5.1: Thought Experiment 299
Objective 5.2: Review 300
Objective 5.2: Thought Experiment 300
Objective 5.3: Review 301
Objective 5.3: Thought Experiment 302
xv
Introduction
M
ost development books take a very low-level approach, teaching you how to use individual classes and accomplish fine-grained tasks. Like the Microsoft 70-518 certification exam, this book takes a high-level approach, building on your knowledge of lower-level Microsoft Windows application development and extending it into application design. Both the exam and the book are so high-level that there is very little coding involved. In fact, most of the code samples this book provides simply illustrate higher-level concepts.The 70-518 certification exam tests your knowledge of designing and developing Windows applications. By passing this exam, you will prove that you have the knowledge and experience to design complex, multitier Windows applications using Microsoft technologies. This book will review every concept described in the exam objective domains, such as the following:
■
■ Designing the layers of a solution ■
■ Designing the Presentation layer ■
■ Designing the Data access layer ■
■ Planning a solution deployment ■
■ Designing for stability and maintenance
This book covers every exam objective, but it does not necessarily cover every exam question. Microsoft regularly adds new questions to the exam, making it impossible for this (or any) book to provide every answer. Instead, this book is designed to supplement your relevant independent study and real-world experience. If you encounter a topic in this book that you do not feel completely comfortable with, you should visit any links described in the text and spend several hours researching the topic further using MSDN, blogs, and support forums. Ideally, you should also create a practical application with the technology to gain hands-on experience.
Microsoft Certified Professional Program
Microsoft certifications provide the best method for proving your command of current Microsoft products and technologies. The exams and corresponding certifications are developed to validate your mastery of critical competencies as you design and develop, or implement and support, solutions with Microsoft products and technologies. Computer professionals who become Microsoft-certified are recognized as experts and are sought after industrywide. Certification brings a variety of benefits to the individual and to employers and organizations.
More Info Other MicrOsOft certificatiOns
For a full list of Microsoft certifications, go to www.microsoft.com/learning/mcp/ default.asp.
Acknowledgments
First and foremost, I’d like to thank Ken Jones at O’Reilly for his work to design the Exam Ref book series, for choosing me (once again) as an author, and for his work as an editor. It’s been great to work with you, as always, Ken!
I’d also like to thank Bill Chapman, the technical reviewer, Holly Bauer, the production editor, Dan Fauxsmith, the production manager, and Susan McClung, the copyeditor.
Finally, I must thank my friends and family for their support, especially Chelsea and Madelyn Knowles (for their support, patience, and companionship) and John and Linda Antonino (for always being gracious hosts).
Support and Feedback
The following sections provide information on errata, book support, feedback, and contact information.
Errata
We’ve made every effort to ensure the accuracy of this book and its companion content. Any errors that have been reported since this book was published are listed on our Microsoft Press site:
http://www.microsoftpressstore.com/title/ 9780735657236
If you find an error that is not already listed, you can report it to us through the same page.
If you need additional support, email Microsoft Press Book Support at [email protected].
Please note that product support for Microsoft software is not offered through the addresses above.
xvii Introduction
We Want to hear from You
At Microsoft Press, your satisfaction is our top priority, and your feedback our most valuable asset. Please tell us what you think of this book at:
http://www.microsoft.com/learning/booksurvey
The survey is short, and we read every one of your comments and ideas. Thanks in advance for your input!
Stay in Touch
Let’s keep the conversation going! We’re on Twitter: http://twitter.com/MicrosoftPress
Preparing for the Exam
M
icrosoft certification exams are a great way to build your resume and let the world know about your level of expertise. Certification exams validate your on-the-job experience and product knowledge. Although there is no substitute for on-the-job experience, prepara-tion through study and hands-on practice can help you prepare for the exam. We recom-mend that you augment your exam preparation plan by using a combination of available study materials and courses. For example, you might use the Exam Ref and another study guide for your “at home” preparation, and take a Microsoft Official Curriculum course for the classroom experience. Choose the combination that you think works best for you.89
C h A P T E R 2
Designing the Presentation
Layer
T
he Presentation layer is the layer that directly interacts with the user. The user must be able to assimilate the data presented to him quickly and easily through the Presentation layer and also must be able to input data efficiently into the application. The Presentation layer itself is responsible for validating user input, maintaining responsiveness, and providing cues that enable an easy and accessible user experience. In this chapter, you will learn some of the important aspects of designing a Presentation layer. You will learn to choose between Windows Forms and Windows Presentation Foundation (WPF) for the technology used to build the Presentation layer, to design application layout and workflow, to handle data within the Presentation layer, and to develop a well-crafted and responsive user experience.Objectives in this chapter:
■■ Objective 2.1: Choose the appropriate Windows technology ■
■ Objective 2.2: Design the UI layout and structure ■
■ Objective 2.3: Design application workflow ■
■ Objective 2.4: Design data presentation and input ■
■ Objective 2.5: Design presentation behavior ■
■ Objective 2.6: Design for UI responsiveness
Real World
T
he Presentation layer is the only layer of a distributed application that the user sees, and thus from a user standpoint is the most important. When building a Presentation layer, I always try to know my audience and keep the needs of my users paramount. The slickest, best-looking application is useless if it doesn’t do what the users need.Objective 2.1: Choose the Appropriate Windows
Technology
When creating applications for the desktop, today’s developer has two technologies to choose from: Windows Forms and WPF. Each technology provides its own set of advantages and drawbacks. In this section, you will learn the primary differences between the two technologies and how to decide which is most appropriate for your business situation.
This objective covers how to:
■
■ Choose between Windows Forms and WPF. ■
■ Identify areas for possible interoperation between WPF and Windows Forms.
Windows Forms
Windows Forms are the basis for most Microsoft Windows applications and can be configured to provide a variety of user interface (UI) options. The developer can create forms of various sizes and shapes and customize them to the user’s needs. Windows Forms is the older of the two Windows development technologies currently supported by Microsoft, and many skilled developers are available for creating and maintaining Windows Forms projects.
Windows Forms are the basic building blocks of the UI. They provide a container that hosts controls and menus and allow you to present an application in a familiar and consistent fashion. Forms can receive user input in the form of keystrokes or mouse interactions and can display data to the user through hosted controls. Most applications that require sustained user interaction will include at least one Windows Form, and complex applications frequently require several forms to allow the program to execute in a consistent and logical fashion.
Windows Forms have no inherent support for changing styles. Thus, if the look and feel of the application must change according to conditions on a particular client desktop, considerable coding will be required.
However, Windows Forms do provide excellent support for localization and globalization. You can create applications easily that display alternate strings and images based on the locations of deployment.
Navigation in Windows Forms typically involves switching between multiple individual forms. While this allows for parts of the application to be parceled out and presented to the user as discrete functional units, it can also create a disjointed kind of user experience. A more cohesive user experience is possible with Windows Forms using Multiple Document Interface (MDI) Forms.
WPF
WPF is the successor to Windows Forms for desktop application development. WPF applications differ from traditional Windows Forms applications in several ways. The most notable of these is that the code for the UI is separate from the code for application
Objective 2.1: Choose the Appropriate Windows Technology Chapter 2 91 functionality. Although the code for the functionality of a project can be defined using
familiar languages such as Microsoft Visual Basic .NET or Microsoft Visual C#, the UI of a WPF project typically is defined using a relatively new declarative syntax called Extensible Application Markup Language (XAML).
Three basic types of applications can be created with WPF: ■
■ Windows applications The most similar to Windows Forms applications. Windows applications are Windows-driven and provide a user experience that is familiar to Windows users and developers alike. Multiple windows can be open at any given time, and there is no built-in sense of navigation or history.
■
■ Navigation applications Provide a page-based user experience, similar to the experience of using a website. Typically, only a single page can be open at any given time, and the journal functionality keeps a record of pages visited and allows back-and-forth navigation. Unlike a website, however, a Navigation application is a compiled application that runs on your desktop computer and, like a Windows application, has full access to the resources of your computer.
■
■ XAML Browser Applications (XBAPs) Similar to Navigation applications, but they are designed to run in Windows Internet Explorer. These applications can be deployed to a server or to a website and are downloaded when instantiated. Applications of this type do not have full access to a computer’s resources. XBAPs run under a partial-trust environment, and resources such as the file system and the registry are inaccessible by XBAPs.
The choice of an application type depends upon several factors, the two most important of which are user experience and application requirements.
■
■ user experience Determines whether you choose a Windows application or a page-based application. For a user experience that most closely resembles a traditional Windows Forms application, a Windows application is the best choice. This application type allows you to create a menu-driven, multiwindow application that combines the rich functionality of a desktop application with the rich user experience that WPF provides. For a user experience that more closely resembles a website, you should choose a page-based application. Navigation applications and XBAPs provide built-in navigational functionality that allows you to structure the application paralleling a task, such as in an Internet shopping application or a wizard.
■
■ Application requirements If an application requires access to system resources that fall outside the Internet security zone, then an XBAP is not a good choice—a better choice would be a Windows application or a Navigation application. On the other hand, XBAPs allow you to deploy the application to a web server and have users start it from a hyperlink, thus making it easily accessible to a large-scale audience. If your application does not require access to system resources, an XBAP might be a good choice.
All types of WPF applications provide built-in support for changing styles and themes. Thus, if you want your application to respond to the style or theme of the desktop, it is a fairly simple matter to incorporate that functionality.
WPF applications have good support for localization and globalization, but support for this functionality is not as built-in as it is for Windows Forms. Thus, localizing an extensive WPF application will take more time and developer resources than a similarly scoped Windows Forms application.
Choosing Between Windows Forms and WPF
When choosing a technology for a client application, you must take into account several considerations. What are the skills of your developer force? Must the application be localized? What kind of support for styles and themes is needed? What sort of navigational experience is required? The following table illustrates the relative strengths of Windows Forms and WPF to help you make that decision.
TABLE 2-1 Important Properties of the Style Class
Criterion Windows Forms WPF
Adoption among the developer
community Strong Growing
Support for localization and
globalization Excellent Fair
Support for changing styles and
themes No Excellent
Support for a traditional
Windows-based client application Yes Yes Support for navigation through a
page-based interface No Yes, through WPF Navigation applications Support for navigation through a
multiple document interface (MDI application)
Yes No
Interoperating Between Windows Forms and WPF
In some cases, you might want to use WPF elements in a Windows Forms application, or Windows Forms elements in a WPF application. You can use the built-in interoperation functionality of the Microsoft .NET Framework easily to incorporate these elements as you choose.
Incorporating WPF Elements into a Windows Forms Application
You might want to incorporate WPF elements into your existing Windows Forms application (for example, a user control developed using WPF that takes advantage of specialized WPF behaviors in what is otherwise a Windows Forms application). You can add preexisting WPF user controls to your Windows Forms project by using the ElementHost control. As the name implies, the ElementHost control hosts a WPF element.
The most important property of ElementHost is the Child property. The Child property indicates the type of WPF control to be hosted by the ElementHost control. If the WPF control to be hosted is in a project that is a member of the solution, you can set the Child property
Objective 2.1: Choose the Appropriate Windows Technology Chapter 2 93 in the Property Grid. Otherwise, the Child property must be set to an instance of the WPF
control in code, as shown here: Sample of Visual Basic.NET Code
Dim aWPFcontrol As New WPFProject.UserControl1 ElementHost1.Child = aWPFcontrol
Sample of C# Code
WPFProject.UserControl1 aWPFcontrol = new WPFProject.UserControl1; ElementHost1.Child = aWPFcontrol;
Some of the ambient properties of Windows Forms controls have WPF equivalents. These ambient properties are propagated to the hosted WPF controls and exposed as public properties on the ElementHost control. The ElementHost control translates each Windows Forms ambient property to its WPF equivalent. For more information, see Windows Forms and WPF Property Mapping at http://msdn.microsoft.com/library/ms751565.aspx in the online MSDN library.
Incorporating Windows Forms Elements in a WPF Application
Although WPF provides a wide variety of useful controls and features, you might find that some familiar functionality that you used in Windows Forms programming is not available. Notably absent are controls such as MaskedTextBox and PropertyGrid, as well as simple dialog boxes. Fortunately, you still can use many Windows Forms controls in your WPF applications.
Using Dialog Boxes in WPF Applications
Dialog boxes are one of the most notable things missing from the WPF menagerie of controls and elements. Because dialog boxes are separate UIs, however, they are relatively easy to incorporate into your WPF applications.
File Dialog Boxes
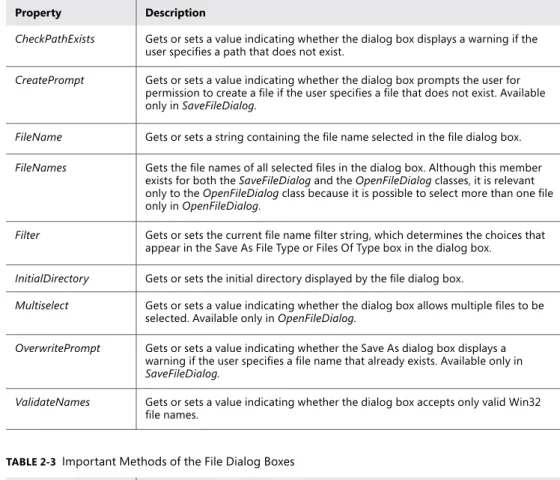
The file dialog box classes, OpenFileDialog and SaveFileDialog, are components that you want to use frequently in your applications. They allow you to browse the file system and return the path to the selected file. The OpenFileDialog and SaveFileDialog classes are very similar and share most important members. Important properties of the file dialog boxes are shown in Table 2-2, and important methods are shown in Table 2-3.
TABLE 2-2 Important Properties of the File Dialog Boxes
Property Description
AddExtension Gets or sets a value indicating whether the dialog box automatically adds an extension to a file name if the user omits the extension.
CheckFileExists Gets or sets a value indicating whether the dialog box displays a warning if the user specifies a file name that does not exist.
Property Description
CheckPathExists Gets or sets a value indicating whether the dialog box displays a warning if the user specifies a path that does not exist.
CreatePrompt Gets or sets a value indicating whether the dialog box prompts the user for permission to create a file if the user specifies a file that does not exist. Available only in SaveFileDialog.
FileName Gets or sets a string containing the file name selected in the file dialog box. FileNames Gets the file names of all selected files in the dialog box. Although this member
exists for both the SaveFileDialog and the OpenFileDialog classes, it is relevant only to the OpenFileDialog class because it is possible to select more than one file only in OpenFileDialog.
Filter Gets or sets the current file name filter string, which determines the choices that appear in the Save As File Type or Files Of Type box in the dialog box.
InitialDirectory Gets or sets the initial directory displayed by the file dialog box.
Multiselect Gets or sets a value indicating whether the dialog box allows multiple files to be selected. Available only in OpenFileDialog.
OverwritePrompt Gets or sets a value indicating whether the Save As dialog box displays a warning if the user specifies a file name that already exists. Available only in SaveFileDialog.
ValidateNames Gets or sets a value indicating whether the dialog box accepts only valid Win32 file names.
TABLE 2-3 Important Methods of the File Dialog Boxes
Method Description
OpenFile Opens the selected file as a System.IO.Stream object. For OpenFileDialog objects, it opens a read-only stream. For SaveFileDialog objects, it saves a new copy of the indicated file and then opens it as a read-write stream. You need to be careful when using the SaveFileDialog.OpenFile method to keep from overwriting preexisting files of the same name.
ShowDialog Shows the dialog box modally, thereby halting application execution until the dialog box has been closed. Returns a DialogResult.
To use a file dialog box in a WPF application, follow these steps:
1. In Solution Explorer, right-click the project name and choose Add Reference. The Add Reference dialog box opens.
2. On the .NET tab, select System.Windows.Forms, and then click OK.
3. In code, create a new instance of the desired file dialog box, as shown here: Sample of Visual Basic Code
Objective 2.1: Choose the Appropriate Windows Technology Chapter 2 95 Sample of C# Code
System.Windows.Forms.OpenFileDialog aDialog = new System.Windows.Forms.OpenFileDialog();
4. Use the ShowDialog method to show the dialog box modally. After the dialog box is shown, you can retrieve the file name that was selected from the FileNames property. An example is shown here:
Sample of Visual Basic Code
Dim aResult As System.Windows.Forms.DialogResult aResult = aDialog.ShowDialog()
If aResult = System.Windows.Forms.DialogResult.OK Then ' Shows the path to the selected file
MessageBox.Show(aDialog.FileName) End If Sample of C# Code System.Windows.Forms.DialogResult aResult; aResult = aDialog.ShowDialog(); if (aResult == System.Windows.Forms.DialogResult.OK) {
// Shows the path to the selected file MessageBox.Show(aDialog.FileName); }
Note
It is not advisable to import the System.Windows.Forms namespace because this leads to naming conflicts with several WPF classes.
WindowsFormsHost
While using dialog boxes in WPF applications is fairly straightforward, using controls is a bit more difficult. Fortunately, WPF provides an element specifically designed to ease this task, which is called WindowsFormsHost.
WindowsFormsHost is a WPF element that is capable of hosting a single child element that is a Windows Forms control. The hosted Windows Forms control automatically sizes itself to the size of the WindowsFormsHost. You can use the WindowsFormsHost to create instances of Windows Forms controls declaratively, and you also can set properties on hosted Windows Forms declaratively.
Adding a Windows Forms Control to a WPF Application
To use the WindowsFormsHost element in your WPF applications, first you must add to the XAML view a reference to the System.Windows.Forms.Integration namespace in the WindowsFormsIntegration assembly, as shown here. (This line has been formatted as two lines to fit on the printed page, but it should be on a single line in your XAML.)
xmlns:my="clr-namespace:System.Windows.Forms.Integration; assembly=WindowsFormsIntegration"
If you drag a WindowsFormsHost from the Toolbox to the designer, this reference is added automatically. You also must add a reference to the System.Windows.Forms namespace, as shown here:
xmlns:wf="clr-namespace:System.Windows.Forms;assembly=System.Windows.Forms"
Then you can create an instance of the desired Windows Forms control as a child element of a WindowsFormsHost element, as shown here:
<my:WindowsFormsHost Margin="48,106,30,56" Name="windowsFormsHost1">
<wf:Button Text="Windows Forms Button" />
</my:WindowsFormsHost>
Setting Properties of Windows Forms Controls in a WPF Application
You can set properties on a hosted Windows Forms control declaratively in XAML as you would any WPF element, as shown in bold here:<my:WindowsFormsHost Margin="48,106,30,56" Name="windowsFormsHost1"> <wf:Button Text="Windows Forms Button" />
</my:WindowsFormsHost>
Although you can set properties declaratively on a hosted Windows Forms control, some of those properties will not have any meaning. For example, properties dealing with layout, such as Anchor, Dock, Top, and Left, have no effect on the position of the Windows Forms control. This is because its container is the WindowsFormsHost and the Windows Forms control occupies the entire interior of that element. To manage layout for a hosted Windows Forms control, you should set the layout properties of the WindowsFormsHost, as highlighted in bold here:
<my:WindowsFormsHost Margin="48,106,30,56" Name="windowsFormsHost1"> <wf:Button Text="Windows Forms Button" />
</my:WindowsFormsHost>
Setting Event handlers on Windows Forms Controls in a WPF
Application
Similarly, you can set event handlers declaratively in XAML, as shown in bold in the following example:
<my:WindowsFormsHost Margin="48,106,30,56" Name="windowsFormsHost1"> <wf:Button Click=”Button_Click” Name="Button1" />
</my:WindowsFormsHost>
Note that events raised by Windows Forms controls are regular .NET events, not routed events, and therefore they must be handled at the source.
Objective 2.1: Choose the Appropriate Windows Technology Chapter 2 97
Obtaining a Reference to a hosted Windows Forms Control in Code
In most cases, using simple declarative syntax with hosted Windows Forms controls is not sufficient—you have to use code to manipulate hosted Windows Forms controls. Although you can set the Name property of a hosted Windows Forms control, that name does not give you a code reference to the control. Instead, you must obtain a reference by using the WindowsFormsHost.Child property and casting it to the correct type. The following code example demonstrates how to obtain a reference to a hosted Windows Forms Button control: Sample of Visual Basic Code
Dim aButton As System.Windows.Forms.Button
aButton = CType(windowsFormsHost1.Child, System.Windows.Forms.Button)
Sample of C# Code
System.Windows.Forms.Button aButton;
aButton = (System.Windows.Forms.Button)windowsFormsHost1.Child;
Choosing a Presentation Pattern
A presentation pattern separates the UI from its behavior and state. Compared to a
traditional three-layer architecture, this results in separating the Presentation layer code from the Business Logic and Data code. Using a presentation pattern makes your code easier to maintain and test. Perhaps most important, it allows you to replace or extend the UI easily.
You certainly can develop a WPF or Windows Forms application without using a presentation pattern; that is exactly what Windows developers have been doing for most of the time Windows has existed. In fact, for a simple “Hello, world” application, using a presentation pattern would increase the complexity and decrease the code readability. When you create more complex enterprise applications that need to be tested and maintained, using a presentation pattern can reduce development costs greatly over time.
For .NET Framework applications, you can choose from three different presentation patterns:
■
■ Model-View-Controller (MVC) Designed for web applications, this model uses views that consist of HTML and .NET Framework code to create the UI by formatting and displaying data from the model. The model stores the data and interacts with the database. The Controllers process requests and user input.
■
■ Model-View-ViewModel (M-V-VM) Designed for WPF applications, this model closely resembles the MVC model. However, this model uses views that consist of XAML code to create the UI. The ViewModel is an abstraction of the view; it resides between the model and the view to present the model in a way that more closely resembles how the user will see it (thus reducing the amount of code required in the view itself). Views bind to the data they display by specifying the ViewModel as their DataContext, and views send data to the ViewModel using Commands that typically execute a ViewModel method.
■
■ Model-View-Presenter (MVP) Designed for WPF applications, this model closely resembles both M-V-VM and MVC. The user interacts with the view, and the view raises events that the presenter responds to. The presenter interacts with the model and updates the values shown in the view.
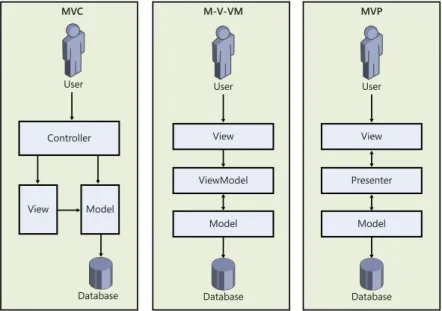
Figure 2-1 visually compares the three architectures. In particular, notice that the user interacts solely with the controller in the MVC architecture, and then the view collects information from the controller about the user’s request and retrieves data directly from the model. In the M-V-VM and MVP models, the user interacts directly with the view, and the ViewModel or presenter communicates with the model to prepare the data for the view.
Currently, MVC is the best choice for web applications. If you are creating a WPF application, you can choose either M-V-VM or MVP.
The key difference between M-V-VM and MVP is the way the ViewModel/presenter
connects to the view. As illustrated by the directions of the arrows in Figure 2-1, this relationship is one-way for M-V-VM and two-way for MVP. Therefore, the M-V-VM View Model is loosely coupled with the view, whereas the MVP presenter is tightly coupled to the view.
To clarify, with the MVP model, the presenter needs a reference to the view because the presenter is responsible for manipulating the state of the view. With the M-V-VM model, the ViewModel is completely unaware that the view exists. With M-V-VM, the view sets a ViewModel as its DataContext and binds to properties on the ViewModel. Any changes to values in the ViewModel are reflected automatically on the view through that binding.
While the M-V-VM and MVP presentation patterns are very similar, M-V-VM is specialized to simplify WPF and Microsoft Silverlight development. Their structure is very similar, but there is simply better support for M-V-VM than for MVP. Therefore, M-V-VM is the best choice for WPF and Silverlight applications.
ViewModel Model View Database M-V-VM User User Controller View Model Database MVC Presenter Model View Database MVP User
Objective 2.1: Choose the Appropriate Windows Technology Chapter 2 99 More Info Understanding Presentation Patterns
For more information, read “WPF Apps With The Model-View-ViewModel Design Pattern” at http://msdn.microsoft.com/magazine/dd419663.aspx.
Objective Summary
■
■ Windows Forms is a well-known technology that has a host of developers for development projects and provides excellent support for globalization and localization. However, it is not as good for changing styles, and it has no inherent navigation capability.
■
■ WPF is a relatively new technology with very powerful style and navigation features. However, because the technology is fairly new, it has not been adopted by as many developers, and support for globalization and localization is not as good as for Windows Forms.
■
■ Interoperability between WPF and Windows Forms is possible through the ElementHost and WindowsFormsHost controls.
Objective Review
Answer the following questions to test your knowledge of the information in this objective. You can find the answers to these questions and explanations of why each answer choice is correct or incorrect in the “Answers” section at the end of the chapter.
1. What class allows you to host a WPF control in a Windows Forms application? A. WindowsFormsHost
B. ElementHost C. Grid D. Form
2. You are designing a Presentation layer for an application. You want this application to be responsive to changes in the style of the desktop so that it blends seamlessly with the appearance of the desktop, and you need this application to collect a variety of specially formed data via the MaskedTextBox control. What is the best development strategy for your Presentation layer?
A. Build using Windows Forms. B. Build using WPF.
C. Build using Windows Forms that incorporate WPF controls. D. Build using WPF and incorporate Windows Forms controls.
ThoughT ExpErimEnT
Designing the Presentation Layer
I
n the following thought experiment, design a Presentation layer for an application that will be distributed throughout the United States, Great Britain, and the English-speaking parts of Canada. This application is part of a large-scale psychology study. The application will stream videos in the UI and collect user input responses to the video stream in real time. Furthermore, processing behind the scenes in response to the user’s real-time input changes the look and feel of the application in accordance with the user’s perceived mood. The input collected from the user will be stored locally and uploaded to a data tier after the user has completed the test.You can find answers to these questions in the “Answers” section at the end of this chapter.
1. What technology, Windows Forms or WPF, should be used to implement this application and why?
2. How can we maintain responsiveness in the UI while performing processing in the background?
Objective 2.2: Design the uI Layout and Structure
The layout of an application can mean the difference between an application that is easy to use and efficient and an application that is complicated and frustrates the user. Careful evaluation of the application design is vital to serving the needs of your users. In this section, you will learn how to make decisions that are important to the design of the layout.This objective covers how to:
■
■ Evaluate the conceptual design. ■
■ Design for inheritance and the reuse of visual elements. ■
■ Design for accessibility. ■
■ Decide when custom controls are required.
Evaluate the Conceptual Design
The design of your UI should fulfill the needs of the application, the client, and the user. The interface should enable the user to complete tasks in the application quickly and easily and without distraction. A good UI will be internally and externally consistent and allow the user
Objective 2.2: Design the UI Layout and Structure Chapter 2 101 to learn how to use the application intuitively. In their book Software for Use: A Practical
Guide to the Models and Methods of Usage-Centered Design, authors Larry Constantine and Lucy Lockwood describe the following principles for UI design:
■
■ Design for structure A well-structured UI is logical, consistent, and intuitive. Use a model when designing your UI. Put elements with related functionality together in logically organized groups. Functional groups should be easily recognizable by the user, and dissimilar items or functional groups should be easily differentiated. A well-structured UI will not have users hunting blindly for desired functionality but will allow them to find what they need intuitively.
■
■ Design for simplicity A well-designed UI is simple and easy to use. Common tasks are easy to access, and navigation to more infrequently used tasks is uncomplicated and intuitive. The use of menu items for common tasks is an example of incorporating simplicity into a UI.
■
■ Design for visibility A good UI will have necessary functional units easily visible and accessible to the user. It is good to keep simplicity in mind with this principle, however, as an overly visible UI is likely to be cluttered, presenting the user with too many options and thwarting the intent of being easy to use.
■
■ Design for feedback A good UI will keep the user informed as to changes in the state of the application. Errors that are relevant to the user or actions that need to be performed by the user should be communicated clearly and concisely. Conversely, the internal state of the application, if it does not require user input, should not be unnecessarily exposed.
■
■ Design for tolerance Users make mistakes. A well-designed UI will allow the user to recover quickly and easily from mistakes. User interfaces should allow for faulty input to be easily and rapidly corrected and for mistaken changes to be rolled back. ■
■ Design for reuse A UI should be consistent. Components and visual styles should be reused whenever possible. Not only does this reduce the amount of time spent coding but it also helps your UI to be consistent and purposeful.
Designing for Inheritance and the Reuse of Visual Elements
Both Windows Forms and WPF allow you to extend and reuse controls and forms in your application. Windows Forms allows extending existing controls and forms through visual inheritance, and WPF takes it further by allowing the visual appearance and behavior of every WPF element to be modified through the use of styles. WPF further allows the reuse of components designated as resources.
Creating Extended Controls in Windows Forms
Extended controls are user-created controls that extend a preexisting .NET Framework control. By extending existing controls, you can retain all the functionality of the control but add properties and methods and, in some cases, alter the rendered appearance of the control.
Extending a Control
You can create an extended control by creating a class that inherits the control in question. The following example demonstrates how to create a control that inherits the Button class: Sample of Visual Basic.NET Code
Public Class ExtendedButton
Inherits System.Windows.Forms.Button End Class
Sample of C# Code
public class ExtendedButton : System.Windows.Forms.Button {}
The ExtendedButton class created in the previous example has the same appearance, behavior, and properties as the Button class, but now you can extend this functionality by adding custom properties or methods. You also can override existing methods to incorporate custom functionality.
Extending a Form
To create a cohesive look and feel to your application, you might want to start with a base form that all other forms in the application derive from. You can extend preexisting forms in the same way that you extend controls. The following example shows how to inherit from a previously created form named BaseForm:
Sample of Visual Basic.NET Code
Public Class ExtendedForm Inherits MyProject.BaseForm ' Implementation omitted End Class
Sample of C# Code
public class ExtendedForm : MyProject.BaseForm {
// Implementation omitted }
Creating Custom Dialog Boxes
Dialog boxes are commonly used to gather information from the application user. Microsoft Visual Studio provides prebuilt dialog boxes that enable the user to select a file, font, or color. You can create custom dialog boxes to collect specialized information from the user. For example, you might create a dialog box that collects user information and relays it to the main form of the application.
A dialog box generally includes an OK button, a Cancel button, and whatever controls are required to gather information from the user. The general behavior of an OK button is to accept the information provided by the user and then to close the form, returning a result
Objective 2.2: Design the UI Layout and Structure Chapter 2 103 of DialogResult.OK. The general behavior of the Cancel button is to reject the user input and
close the form, returning a result of DialogResult.Cancel.
A modal dialog box is a dialog box that pauses program execution until the dialog box is closed. Conversely, a modeless dialog box allows application execution to continue. You can display any form as a modal dialog box by calling the ShowDialog method.
Using Styles in WPF
Styles can be thought of as analogous to cascading style sheets as used in HTML pages. Styles basically tell the Presentation layer to substitute a new visual appearance for the standard one. They allow you to make changes easily to the UI as a whole and to provide a consistent look and feel for your application in a variety of situations. Styles enable you to set properties and hook up events on UI elements through the application of those styles. Further, you can create visual elements that respond dynamically to property changes through the application of triggers, which listen for a property change and then apply style changes in response.
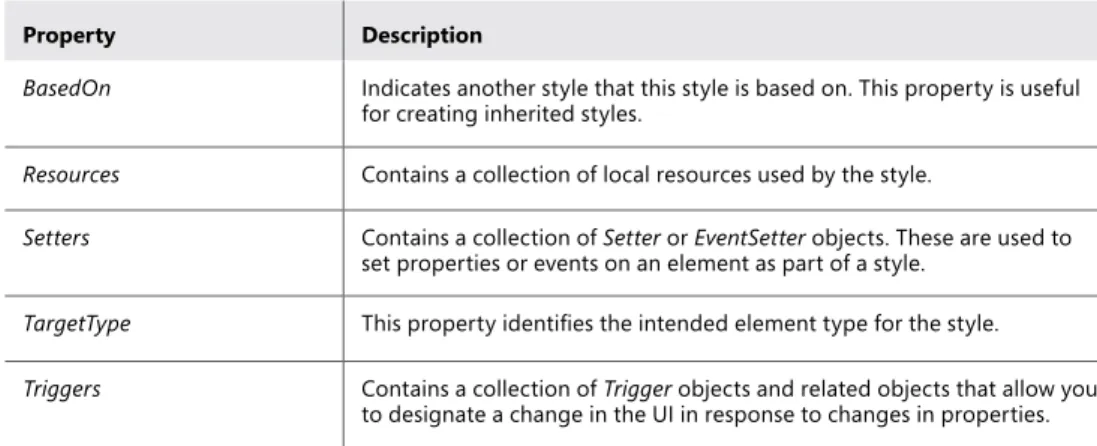
The primary class in the application of styles is, unsurprisingly, the Style class. The Style class contains information about styling a group of properties. A Style can be created to apply to a single instance of an element, to all instances of an element type, or across multiple types. The important properties of the Style class are shown in Table 2-4.
TABLE 2-4 Important Properties of the Style Class
Property Description
BasedOn Indicates another style that this style is based on. This property is useful for creating inherited styles.
Resources Contains a collection of local resources used by the style.
Setters Contains a collection of Setter or EventSetter objects. These are used to set properties or events on an element as part of a style.
TargetType This property identifies the intended element type for the style.
Triggers Contains a collection of Trigger objects and related objects that allow you to designate a change in the UI in response to changes in properties. The basic skeleton of a <Style> element in XAML markup looks like the following:
<Style>
<!-- A collection of setters is enumerated here --> <Style.Triggers>
<!-- A collection of Trigger and related objects is enumerated here --> </Style.Triggers>
<Style.Resources>
<!-- A collection of local resources for use in the style --> </Style.Resources>
SETTERS
The most common class you will use in the construction of styles is the Setter. As their name implies, Setters are responsible for setting some aspect of an element. Setters come in two flavors: property setters (or just Setters, as they are called in markup), which set values for properties; and event setters, which set handlers for events.
PROPERTY SETTERS
Property setters, represented by the <Setter> tag in XAML, allow you to set properties of elements to specific values. A property setter has two important properties: the Property property, which designates the property that is to be set by the Setter, and the Value property, which indicates the value to which the property is to be set. The following example demonstrates a Setter that sets the Background property of a Button element to Red:
<Setter Property="Button.Background" Value="Red" />
The value for Property must take the following form:
Element.PropertyName
If you want to create a style that sets a property on multiple different types of elements, you could set the style on a common class that the elements inherit, as shown here:
<Style>
<Setter Property="Control.Background" Value="Red" /> </Style>
This style sets the Background property of all elements that inherit from the Control to which it is applied.
EVENT SETTERS
Event setters (represented by the <EventSetter> tag) are similar to property setters, but they set event handlers rather than property values. The two important properties for an EventSetter are the Event property, which specifies the event for which the handler is being set; and the Handler property, which specifies the event handler to attach to that event. An example is shown here:
<EventSetter Event="Button.MouseEnter" Handler="Button_MouseEnter" />
The value of the Handler property must specify an extant event handler with the correct signature for the type of event with which it is connected. Similar to property setters, the for-mat for the Event property is <Element>.<EventName>, where the element type is specified, followed by the event name.
Using Resources in WPF
Logical resources allow you to define objects in XAML that are not part of the visual tree but are available for use by WPF elements in your UI. Elements in your UI can access the resource as needed. An example of an object that you might define as a resource is a Brush used to provide a common color scheme for the application.
Objective 2.2: Design the UI Layout and Structure Chapter 2 105 By defining objects that are used by several elements in a Resources section, you gain
a few advantages over defining the object each time you use it. First, you gain reusability because you define your object only once rather than multiple times. You also gain flexibility—by separating the objects used by your UI from the UI itself, you can refactor parts of the UI without having to redesign it completely. For example, you might use different collections of resources for different cultures in localization or for different application conditions.
Any type of object can be defined as a resource. Every WPF element defines a Resources collection, which can be used to define objects that are available to that element and the elements in its visual tree. Although it is most common to define resources in the Resources collection of the Window, you can define a resource in any element’s Resources collection and access it, so long as the accessing element is part of the defining element’s visual tree.
Declaring a Logical Resource
You declare a logical resource by adding it to a Resources collection, as seen here:
<Window.Resources>
<RadialGradientBrush x:Key="myBrush">
<GradientStop Color="CornflowerBlue" Offset="0" /> <GradientStop Color="Crimson" Offset="1" /> </RadialGradientBrush>
</Window.Resources>
If you don’t intend a resource to be available to the entire Window, you can define it in the Resources collection of an element in the Window, as shown in this example:
<Grid>
<Grid.Resources>
<RadialGradientBrush x:Key="myBrush">
<GradientStop Color="CornflowerBlue" Offset="0" /> <GradientStop Color="Crimson" Offset="1" /> </RadialGradientBrush>
</Grid.Resources> </Grid>
The usefulness of this is somewhat limited, and the most common scenario is to define resources in the Window.Resources collection. One point to remember is that when using static resources, you must define the resource in the XAML code before you refer to it. Static and dynamic resources are explained later in this section.
Every object declared as a Resource must set the x:Key property. This is the name that will be used by other WPF elements to access the resource. There is one exception to this rule: Style objects that set the TargetType property do not need to set the x:Key property explicitly because it is set implicitly, behind the scenes. In the previous two examples, the key is set to myBrush.
The x:Key property does not have to be unique in the application, but it must be unique in the Resources collection where it is defined. Thus, you could define one resource in the Grid.
Resources collection with a key of myBrush and another in the Window.Resources collection with the same key. Objects within the visual tree of the Grid that refer to a resource with the key myBrush refer to the object defined in the Grid.Resources collection, and objects that are not in the visual tree of the Grid but are within the visual tree of the Window refer to the object defined in the Window.Resources collection.
Application Resources
In addition to defining resources at the level of the element or Window, you can define resources that are accessible by all objects in a particular application. You can create an application resource by opening the App.xaml file (for C# projects) or the Application.xaml file (for Visual Basic projects) and adding the resource to the Application .Resources collection, as shown in bold here:
<Application x:Class="WpfApplication2.App"
xmlns="http://schemas.microsoft.com/winfx/2006/xaml/presentation" xmlns:x="http://schemas.microsoft.com/winfx/2006/xaml"
StartupUri="Window1.xaml">
<Application.Resources>
<SolidColorBrush x:Key="appBrush" Color="PapayaWhip" /> </Application.Resources>
</Application>
Accessing a Resource in XAML
You can access a resource in XAML by using the following syntax:
{StaticResource myBrush}
In this example, the markup declares that a static resource with the key myBrush is accessed. Because this resource is a Brush object, you can plug that markup into any place that expects a Brush object. This example demonstrates how to use a resource in the context of a WPF element:
<Grid Background="{StaticResource myBrush}"> </Grid>
When a resource is referred to in XAML, the Resources collection of the declaring object first is searched for a resource with a matching key. If one is not found, the Resources collection of that element’s parent is searched, and so on, up to the Window that hosts the element and to the application Resources collection.
Static and Dynamic Resources
In addition to the syntax described previously, you can refer to a resource with the following syntax:
Objective 2.2: Design the UI Layout and Structure Chapter 2 107 The difference between the syntax of DynamicResource and the syntax of StaticResource
lies in how the resources are retrieved by the referring elements. Resources referred to by the StaticResource syntax are retrieved once by the referring element and used for the lifetime of the resource. Resources referred to with the DynamicResource syntax, on the other hand, are acquired every time the referred object is used.
It might seem intuitive to think that if you use the StaticResource syntax, the referring object does not reflect changes to the underlying resource, but this is not necessarily the case. WPF objects that implement dependency properties automatically incorporate change notification, and changes made to the properties of the resource are picked up by any objects using that resource. Take the following example:
<Window x:Class="WpfApplication2.Window1"
xmlns="http://schemas.microsoft.com/winfx/2006/xaml/presentation" xmlns:x="http://schemas.microsoft.com/winfx/2006/xaml"
Title="Window1" Height="300" Width="300"> <Window.Resources>
<SolidColorBrush x:Key="BlueBrush" Color="Blue" /> </Window.Resources>
<Grid Background="{StaticResource BlueBrush}"> </Grid>
</Window>
This code renders the Grid in the Window with a Blue background. If the color property of the SolidColorBrush object defined in the Window.Resources collection were changed in code to Red, for instance, the background of the Grid would render as Red because change notification would notify all objects using that resource that the property had changed.
The difference between static and dynamic resources comes when the underlying object changes. If the Brush defined in the Windows.Resources collection were accessed in code and set to a different object instance, the Grid in the previous example would not detect this change. However, if the Grid used the following markup, the change of the object would be detected and the Grid would render the background with the new Brush:
<Grid Background="{DynamicResource BlueBrush}"> </Grid>
Accessing resources in code is discussed in the not found “Retrieving Resources in Code” section later in this chapter.
The downside of using dynamic resources is that they tend to decrease application performance. Because the resources are retrieved every time they are used, dynamic resources can reduce the efficiency of an application. The best practice is to use static resources unless there is a specific reason for using a dynamic resource. Examples of when you would want to use a dynamic resource include when you use the SystemBrushes, SystemFonts, and SystemParameters classes as resources, or any other time when you expect the underlying object of the resource to change.
Creating a Resource Dictionary
A resource dictionary is a collection of resources that reside in a separate XAML file and can be imported into your application. They can be useful for organizing your resources in a single place or for sharing resources between multiple projects in a single solution. The following procedure describes how to create a new resource dictionary in your application: To create a resource dictionary
1. From the Project menu, choose Add Resource Dictionary. The Add New Item dialog box opens. Choose the name for the resource dictionary and click Add. The new resource dictionary is opened in XAML view.
2. Add resources to the new resource dictionary in XAML view. You can add resources to the file in XAML view, as shown in bold here:
<ResourceDictionary
xmlns="http://schemas.microsoft.com/winfx/2006/xaml/presentation" xmlns:x="http://schemas.microsoft.com/winfx/2006/xaml">
<SolidColorBrush x:Key="appBrush" Color="DarkSalmon" />
</ResourceDictionary>
Merging Resource Dictionaries
For objects in your application to access resources in a resource dictionary, you must merge the resource dictionary file with a Resources collection that is accessible in your application, such as the Windows.Resources or Application.Resources collection. You merge resource dictionaries by adding a reference to your resource dictionary file in the ResourceDictionary. MergedDictionaries collection. The following example demonstrates how to merge the resources in a Windows.Resources collection with the resources in resource dictionary files named Dictionary1.xaml and Dictionary2.xaml:
<Window.Resources> <ResourceDictionary> <ResourceDictionary.MergedDictionaries> <ResourceDictionary Source="Dictionary1.xaml" /> <ResourceDictionary Source="Dictionary2.xaml" /> </ResourceDictionary.MergedDictionaries>
<SolidColorBrush x:Key="BlueBrush" Color="Blue" /> </ResourceDictionary>
</Window.Resources>
Note that if you define additional resources in your Resources collection, they must be defined within the bounds of the <ResourceDictionary> tags.
Choosing Where to Store a Resource
You have seen several options regarding where resources should be stored. The factors that should be weighed when deciding where to store a resource include ease of accessibility by referring elements, readability and maintainability of the code, and reusability.
Objective 2.2: Design the UI Layout and Structure Chapter 2 109 For resources to be accessed by all elements in an application, you should store resources
in the Application.Resources collection. The Window.Resources collection makes resources available only to elements in that Window, but that is typically sufficient for most purposes. If you need to share individual resources over multiple projects in a solution, your best choice is to store your resources in a resource dictionary that can be shared among different projects.
Readability is important for enabling maintenance of your code by other developers. The best choice for readability is to store resources in the Window.Resources collection because this allows developers to read your code in a single file rather than having to refer to other code files.
If making your resources reusable is important, then the ideal method for storing them is to use a resource dictionary. This allows you to reuse resources among different projects and to extract those resources easily for use in other solutions as well.
Designing for Accessibility
The workforce contains a significant number of people with accessibility requirements, requiring applications that meet the broad demands of today’s business environment. Accessible
applications begin in the design phase. When you plan for accessibility in application design, you can integrate the principles of accessibility into the UI. Some of these principles are:
■
■ Flexibility ■
■ Choice of input and output methods ■
■ Consistency ■
■ Compatibility with accessibility aids
An accessible program requires flexibility. Users must be able to customize the UI to suit their specific needs—for example, by increasing font sizes. A user also should have a choice of input methods, such as keyboard and mouse devices. That is, the application should provide keyboard access for all important features and mouse access for all main features. A choice of output methods also renders an application more accessible, and the user should have the ability to choose among visual cues, sounds, text, and graphics. An accessible application should interact within its own operation and with other applications in a consistent manner, and it should be compatible with existing accessibility aids.
Support Standard System Settings
For your application to be accessible, it must support standard system settings for size, color, font, and input. Adopting this measure will ensure that all users' applications have a consis-tent UI that conforms to the system settings. Users with accessibility needs can thus configure all their applications by configuring their system settings.
You can implement standard system settings in your appli