www.netiq.com/documentation
PlateSpin
®
Forge 11.0
User Guide
February 2015
Legal Notice
THIS DOCUMENT AND THE SOFTWARE DESCRIBED IN THIS DOCUMENT ARE FURNISHED UNDER AND ARE SUBJECT TO THE TERMS OF A LICENSE AGREEMENT OR A NON-DISCLOSURE AGREEMENT. EXCEPT AS EXPRESSLY SET FORTH IN SUCH LICENSE AGREEMENT OR NON-DISCLOSURE AGREEMENT, NETIQ CORPORATION PROVIDES THIS DOCUMENT AND THE SOFTWARE DESCRIBED IN THIS DOCUMENT "AS IS" WITHOUT WARRANTY OF ANY KIND, EITHER EXPRESS OR IMPLIED, INCLUDING, BUT NOT LIMITED TO, THE IMPLIED WARRANTIES OF MERCHANTABILITY OR FITNESS FOR A PARTICULAR PURPOSE. SOME STATES DO NOT ALLOW DISCLAIMERS OF EXPRESS OR IMPLIED WARRANTIES IN CERTAIN TRANSACTIONS; THEREFORE, THIS STATEMENT MAY NOT APPLY TO YOU.
For purposes of clarity, any module, adapter or other similar material ("Module") is licensed under the terms and conditions of the End User License Agreement for the applicable version of the NetIQ product or software to which it relates or interoperates with, and by accessing, copying or using a Module you agree to be bound by such terms. If you do not agree to the terms of the End User License Agreement you are not authorized to use, access or copy a Module and you must destroy all copies of the Module and contact NetIQ for further instructions.
This document and the software described in this document may not be lent, sold, or given away without the prior written permission of NetIQ Corporation, except as otherwise permitted by law. Except as expressly set forth in such license agreement or non-disclosure agreement, no part of this document or the software described in this document may be reproduced, stored in a retrieval system, or transmitted in any form or by any means, electronic, mechanical, or otherwise, without the prior written consent of NetIQ Corporation. Some companies, names, and data in this document are used for illustration purposes and may not represent real companies, individuals, or data.
This document could include technical inaccuracies or typographical errors. Changes are periodically made to the information herein. These changes may be incorporated in new editions of this document. NetIQ Corporation may make improvements in or changes to the software described in this document at any time.
U.S. Government Restricted Rights: If the software and documentation are being acquired by or on behalf of the U.S. Government or by a U.S. Government prime contractor or subcontractor (at any tier), in accordance with 48 C.F.R. 227.7202-4 (for Department of Defense (DOD) acquisitions) and 227.7202-48 C.F.R. 2.101 and 12.212 (for non-DOD acquisitions), the
government’s rights in the software and documentation, including its rights to use, modify, reproduce, release, perform, display or disclose the software or documentation, will be subject in all respects to the commercial license rights and restrictions provided in the license agreement.
© 2014 NetIQ Corporation. All Rights Reserved.
Contents 3
Contents
About NetIQ Corporation 7
About This Guide 9
1 Product Overview 11
1.1 About PlateSpin Forge . . . 11
1.2 Supported Configurations . . . 11
1.2.1 Supported Windows Workloads. . . 11
1.2.2 Supported Linux Workloads. . . 12
1.2.3 Supported VM Containers . . . 13
1.3 Security and Privacy . . . 14
1.3.1 Security of Workload Data in Transmission . . . 14
1.3.2 Security of Credentials. . . 14
1.3.3 User Authorization and Authentication . . . 15
1.4 Performance. . . 15
1.4.1 About Product Performance Characteristics . . . 15
1.4.2 Data Compression . . . 15
1.4.3 Bandwidth Throttling . . . 16
1.4.4 RPO, RTO, and TTO Specifications . . . 16
2 PlateSpin Forge Application Configuration 17 2.1 Product Licensing. . . 17
2.1.1 Obtaining a License Activation Code . . . 17
2.1.2 Online License Activation . . . 17
2.1.3 Offline License Activation. . . 18
2.2 Setting Up User Authorization and Authentication . . . 18
2.2.1 About PlateSpin Forge User Authorization and Authentication . . . 18
2.2.2 Managing PlateSpin Forge Security Groups and Workload Permissions . . . 20
2.3 Access and Communication Requirements across your Protection Network . . . 21
2.3.1 Access and Communication Requirements for Workloads . . . 21
2.3.2 Protection Across Public and Private Networks Through NAT . . . 22
2.3.3 Overriding the Default bash Shell for Executing Commands on Linux Workloads . . . 23
2.4 Configuring PlateSpin Forge Default Options . . . 23
2.4.1 Setting Up Automatic Email Notifications of Events and Reports . . . 23
2.4.2 Language Setup for International Versions of PlateSpin Forge . . . 26
2.4.3 Configuring PlateSpin Server Behavior through XML Configuration Parameters . . . 26
2.4.4 Configuring Support for VMware vCenter Site Recovery Manager . . . 28
3 Appliance Setup and Maintenance 31 3.1 Setting up Appliance Networking . . . 31
3.1.1 Setting up Appliance Host Networking . . . 31
3.2 Physically Relocating the Appliance . . . 32
3.2.1 Scenario 1 - Relocating Forge (New IP Address Known) . . . 32
3.2.2 Scenario 2 - Relocating Forge (New IP Address Unknown) . . . 33
3.3 Using External Storage Solutions with PlateSpin Forge. . . 34
3.3.1 Using Forge with SAN Storage . . . 34
3.3.2 Adding a SAN LUN to Forge . . . 35
3.4 Accessing and Working with the Forge Management VM in the Appliance Host. . . 36
3.4.2 Launching the vSphere Client and Accessing the Forge Management VM. . . 36
3.4.3 Starting and Shutting Down the Forge Management VM. . . 37
3.4.4 Managing Forge Snapshots on the Appliance Host. . . 37
3.4.5 Manually Importing VMs into the Appliance Host’s Datastore . . . 37
3.4.6 Guidelines for Applying Security Updates to the PlateSpin Forge Management VM . . . 38
3.5 Resetting Forge to Factory Defaults. . . 38
4 Up and Running 43 4.1 Launching the PlateSpin Forge Web Interface. . . . 43
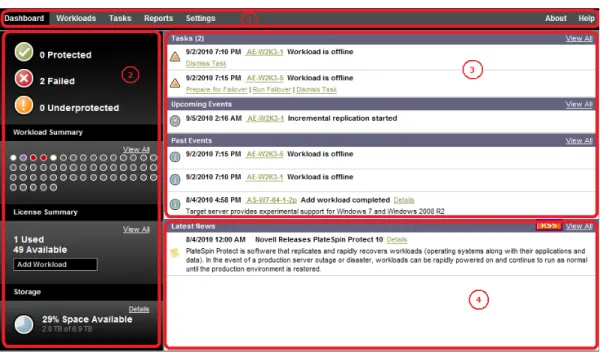
4.2 Elements of the PlateSpin Forge Web Interface . . . 44
4.2.1 Navigation Bar . . . 45
4.2.2 Visual Summary Panel. . . 45
4.2.3 Tasks and Events Panel. . . 46
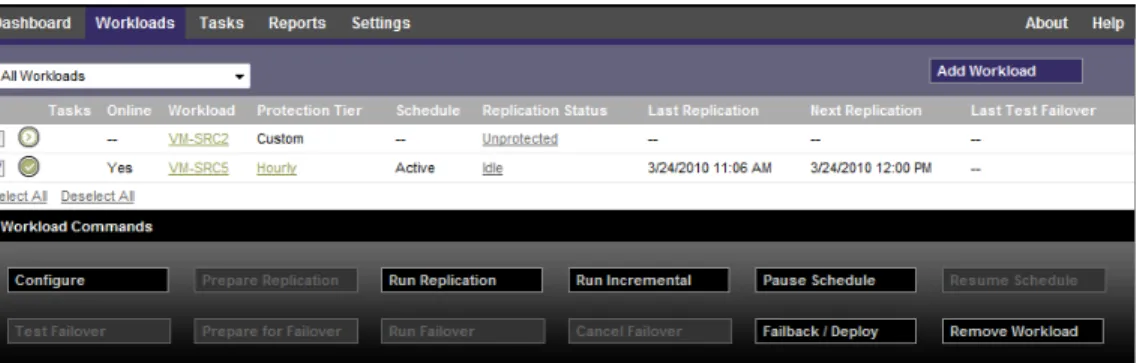
4.3 Workloads and Workload Commands . . . 46
4.3.1 Workload Protection and Recovery Commands . . . 47
4.4 Managing Multiple Instances of PlateSpin Protect and PlateSpin Forge . . . 48
4.4.1 Using the PlateSpin Forge Management Console . . . 48
4.4.2 About PlateSpin Forge Management Console Cards . . . 48
4.4.3 Adding Instances of PlateSpin Protect and PlateSpin Forge to the Management Console . . . 49
4.4.4 Managing Cards on the Management Console . . . 50
4.5 Generating Workload and Workload Protection Reports . . . 51
5 Workload Protection 53 5.1 Basic Workflow for Workload Protection and Recovery . . . 53
5.2 Adding Workloads for Protection . . . 54
5.3 Configuring Protection Details and Preparing the Replication . . . 55
5.3.1 Workload Protection Details. . . . 56
5.4 Starting the Workload Protection . . . 58
5.5 Aborting Commands . . . 58
5.6 Failover . . . 59
5.6.1 Detecting Offline Workloads . . . 59
5.6.2 Performing a Failover . . . 60
5.6.3 Using the Test Failover Feature . . . 60
5.7 Failback . . . 61
5.7.1 Automated Failback to a VM Platform . . . 61
5.7.2 Semi-Automated Failback to a Physical Machine . . . 64
5.8 Reprotecting a Workload . . . 65
6 Essentials of Workload Protection 67 6.1 Workload License Consumption. . . 67
6.2 Guidelines for Workload Credentials . . . 67
6.3 Data Transfer . . . 68
6.3.1 Transfer Methods. . . 68
6.3.2 Data Encryption . . . 69
6.4 Protection Tiers . . . 69
6.5 Recovery Points . . . 70
6.6 Initial Replication Method (Full and Incremental) . . . 71
6.7 Service and Daemon Control . . . 72
6.8 Using Freeze and Thaw Scripts for Every Replication (Linux) . . . 72
6.9 Volumes . . . 73
6.10 Networking . . . 75
Contents 5
6.11.1 Downloading the PlateSpin Boot ISO Images . . . 75
6.11.2 Injecting Additional Device Drivers into the Boot ISO Image . . . 75
6.11.3 Registering Physical Machines as Failback Targets with PlateSpin Forge . . . 76
6.12 Advanced Workload Protection Topics. . . 77
6.12.1 Protecting Windows Clusters . . . 77
6.12.2 Using Workload Protection Features through the PlateSpin Forge Web Services API . . . . 79
7 Auxiliary Tools for Working with Physical Machines 81 7.1 Managing Device Drivers . . . 81
7.1.1 Packaging Device Drivers for Windows Systems . . . 81
7.1.2 Packaging Device Drivers for Linux Systems . . . 81
7.1.3 Uploading Drivers to the PlateSpin Forge Device Driver Database. . . 82
7.1.4 Using the Plug and Play (PnP) ID Translator Feature . . . 84
8 Troubleshooting 87 8.1 Troubleshooting Workload Inventory (Windows) . . . 87
8.1.1 Performing Connectivity Tests . . . 88
8.1.2 Disabling AntiVirus Software . . . . 90
8.1.3 Enabling File/Share Permissions and Access . . . 90
8.2 Troubleshooting Workload Inventory (Linux) . . . 91
8.3 Troubleshooting Problems during the Prepare Replication Command (Windows) . . . 91
8.3.1 Group Policy and User Rights . . . 91
8.4 Troubleshooting Workload Replication. . . 92
8.5 Generating and Viewing Diagnostic Reports . . . 93
8.6 Removing Workloads . . . 94
8.7 Post-Protection Workload Cleanup . . . 94
8.7.1 Cleaning Up Windows Workloads . . . 94
8.7.2 Cleaning Up Linux Workloads . . . 95
8.8 Shrinking the PlateSpin Forge Databases . . . 96
A Linux Distributions Supported by Forge 97 A.1 Analyzing Your Linux Workload . . . 97
A.1.1 Determining the Release String . . . 97
A.1.2 Determining the Architecture . . . 98
A.2 Pre-compiled “blkwatch” driver (Linux). . . 98
B Synchronizing Serial Numbers on Cluster Node Local Storage 109 C Documentation Updates 111 C.1 February 23, 2015 . . . 111 C.2 October 24, 2014 . . . 111 C.3 October 14, 2014 . . . 111 C.4 September 11, 2014 . . . 112 Glossary 113
About NetIQ Corporation 7
About NetIQ Corporation
We are a global, enterprise software company, with a focus on the three persistent challenges in your environment: Change, complexity and risk—and how we can help you control them.
Our Viewpoint
Adapting to change and managing complexity and risk are nothing new
In fact, of all the challenges you face, these are perhaps the most prominent variables that deny you the control you need to securely measure, monitor, and manage your physical, virtual, and cloud computing environments.
Enabling critical business services, better and faster
We believe that providing as much control as possible to IT organizations is the only way to enable timelier and cost effective delivery of services. Persistent pressures like change and complexity will only continue to increase as organizations continue to change and the technologies needed to manage them become inherently more complex.
Our Philosophy
Selling intelligent solutions, not just software
In order to provide reliable control, we first make sure we understand the real-world scenarios in which IT organizations like yours operate — day in and day out. That's the only way we can develop practical, intelligent IT solutions that successfully yield proven, measurable results. And that's so much more rewarding than simply selling software.
Driving your success is our passion
We place your success at the heart of how we do business. From product inception to
deployment, we understand that you need IT solutions that work well and integrate seamlessly with your existing investments; you need ongoing support and training post-deployment; and you need someone that is truly easy to work with — for a change. Ultimately, when you succeed, we all succeed.
Our Solutions
Identity & Access Governance
Access Management
Security Management
Systems & Application Management
Workload Management
Contacting Sales Support
For questions about products, pricing, and capabilities, contact your local partner. If you cannot contact your partner, contact our Sales Support team.
Contacting Technical Support
For specific product issues, please contact our Technical Support team.
Contacting Documentation Support
Our goal is to provide documentation that meets your needs. The documentation for this product is available on the NetIQ Web site in HTML and PDF formats on a page that does not require you to log in. If you have suggestions for documentation improvements, click comment on this topic at the bottom of any page in the HTML version of the documentation posted at www.netiq.com/
documentation. You can also email [email protected]. We value your input and look forward to hearing from you.
Contacting the Online User Community
NetIQ Communities, the NetIQ online community, is a collaborative network connecting you to your peers and NetIQ experts. By providing more immediate information, useful links to helpful resources, and access to NetIQ experts, NetIQ Communities helps ensure you are mastering the knowledge you need to realize the full potential of IT investments upon which you rely. For more information, visit
http://community.netiq.com.
Worldwide: www.netiq.com/about_netiq/officelocations.asp
United States and Canada: 1-888-323-6768
Email: [email protected]
Web Site: www.netiq.com
Worldwide: +1-416-203-4799
North America: +1-800 -858-4000
Email: [email protected]
About This Guide 9
About This Guide
This User Guide provides information about using PlateSpin Forge. provides conceptual information about the PlateSpin Forge product. It also defines terminology and includes troubleshooting
information.
Intended Audience
This guide is intended for IT staff, such as data center administrators and operators, who use PlateSpin Forge in their ongoing workload protection projects.
Other Information in the Library
The library provides the following information resources:
Getting Started Guide
Provides information about the basic steps required for setting up your PlateSpin Forge appliance.
Upgrade Guide
Provides conceptual information about upgrading the PlateSpin Forge Appliance from version 3.1, 3.3 or 3.4 to version 11.0.
Rebuild Guide
Provides information about rebuilding and reconfiguring the PlateSpin Forge 11 Hardware Appliance by using the Forge 11.0.0 Field Rebuild Kit.
Help
Provides embedded guidance to assist users with common tasks as they access the user interface.
Documentation Updates
The most recent version of this guide can be found at PlateSpin Forge 11 Online Documentation Web Site (https://www.netiq.com/documentation/platespin_forge_11/).
1
Product Overview 11
1
Product Overview
This section includes the following information:
Section 1.1, “About PlateSpin Forge,” on page 11 Section 1.2, “Supported Configurations,” on page 11 Section 1.3, “Security and Privacy,” on page 14 Section 1.4, “Performance,” on page 15
1.1
About PlateSpin Forge
PlateSpin Forge is a consolidated recovery hardware appliance that protects physical and virtual workloads (operating systems, middleware, and data) by using embedded virtualization technology. If there is a production server outage or disaster, workloads can be rapidly powered on within the PlateSpin Forge recovery environment and continue to run as normal until the production environment is restored.
PlateSpin Forge enables you to:
Quickly recover workloads upon failure
Simultaneously protect multiple workloads (10 to 50, depending on the model)
Test the failover workload without interfering with your production environment
Fail back failover workloads to either their original or to completely new infrastructures, physical or virtual
Take advantage of existing external storage solutions, such as SANs
With internal, prepackaged storage, Forge has a total storage capacity of up to 20 terabytes, although the capacity is almost unlimited when external storage configurations are used by adding iSCSI or Fibre Channel cards.
1.2
Supported Configurations
Section 1.2.1, “Supported Windows Workloads,” on page 11 Section 1.2.2, “Supported Linux Workloads,” on page 12 Section 1.2.3, “Supported VM Containers,” on page 13
1.2.1
Supported Windows Workloads
PlateSpin Forge supports most Windows-based workloads.
Both file-level and block-level replication are supported, with certain restrictions. See Section 6.3, “Data Transfer,” on page 68.
Table 1-1 Supported Windows Workloads
The following are examples of Forge behavior when protecting and failing back between UEFI and BIOS-based systems:
When transferring a UEFI-based workload to a VMware vSphere 4.x container (which does not support UEFI), Forge transitions the workload’s UEFI firmware at failover time to BIOS firmware. Then, when failback is selected on a UEFI-based physical machine, Forge reverses the firmware transition from BIOS to UEFI.
If you attempt to failback a protected Windows 2003 workload to a UEFI-based physical machine, Forge analyzes the choice and notifies you that it is not valid (that is, the firmware transition from BIOS to UEFI is not supported – Windows 2003 does not support the UEFI boot mode).
When protecting a UEFI-based source on a BIOS-based target, Forge migrates the UEFI system’s boot disks, which were GPT, to MBR disks. Failing back this BIOS workload to a UEFI-based physical machine converts the boot disks back to GPT.
1.2.2
Supported Linux Workloads
PlateSpin Forge supports a number of Linux distributions.
Replication of protected Linux workloads occurs at the block level. PlateSpin Forge software includes pre-compiled versions of the blkwatch module/driver. These are only for non-debug kernels of the following Linux distributions (both 32 and 64 bit):
Operating System Remarks Server Class workloads
Windows Server 2012 R2 Windows Server 2012
Windows Server 2008 R2 (64-bit) Windows Server 2008 (64-bit)
Windows Server 2008 latest SP (32-bit)
Including domain controllers (DC) and Small Business Server (SBS) editions
Windows Server 2003 R2 (64-bit) Windows Server 2003 R2 (32-bit) Windows Server 2003 latest SP (64-bit) Windows Server 2003 latest SP (32-bit)
Windows 2003 requires SP1 or higher for block-based replication.
Windows 2008 R2 Server-based Microsoft Failover Cluster
Workstation Class workloads
Windows 8.1 Windows 8
WARNING: You must select the High Performance power plan on the Windows 8 source so that the workload failover and failback function correctly.
To configure this power plan from the Windows Control Panel:
1. Select All Control Panel Items > Power Options.
2. In the Choose or customize power plan dialog box, select Show additional plans > High Performance.
Product Overview 13
Table 1-2 Linux Distributions that have a corresponding, pre-compiled blkwatch module/driver
Supported Linux file systems: EXT2, EXT3, EXT4, REISERFS, and NSS (OES 2 workloads).
NOTE: Encrypted volumes of workloads on the source are decrypted in the failover VM.
For a list of Linux distributions for which Forge software has pre-compiled versions of the blkwatch
module please, see Appendix A, “Linux Distributions Supported by Forge,” on page 97.
If a pre-compiled blkwatch driver doesn’t exist for your distribution, you might able to create a
customblkwatch driver by following the steps found in KB Article 7005873 (https://www.netiq.com/ support/kb/doc.php?id=7005873).
1.2.3
Supported VM Containers
A VM container is the VM host that contains the failover workload (a protected workload’s bootable virtual replica). PlateSpin Forge ships with a VMware ESXi 5.5.0 Update 1, as the protection VM container.
The following table lists the supported VM failback containers.
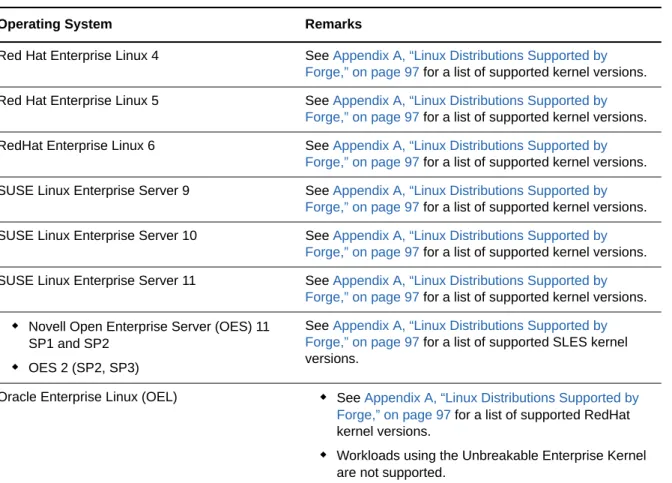
Operating System Remarks
Red Hat Enterprise Linux 4 See Appendix A, “Linux Distributions Supported by Forge,” on page 97 for a list of supported kernel versions.
Red Hat Enterprise Linux 5 See Appendix A, “Linux Distributions Supported by Forge,” on page 97 for a list of supported kernel versions.
RedHat Enterprise Linux 6 See Appendix A, “Linux Distributions Supported by Forge,” on page 97 for a list of supported kernel versions.
SUSE Linux Enterprise Server 9 See Appendix A, “Linux Distributions Supported by Forge,” on page 97 for a list of supported kernel versions.
SUSE Linux Enterprise Server 10 See Appendix A, “Linux Distributions Supported by Forge,” on page 97 for a list of supported kernel versions.
SUSE Linux Enterprise Server 11 See Appendix A, “Linux Distributions Supported by Forge,” on page 97 for a list of supported kernel versions.
Novell Open Enterprise Server (OES) 11 SP1 and SP2
OES 2 (SP2, SP3)
See Appendix A, “Linux Distributions Supported by Forge,” on page 97 for a list of supported SLES kernel versions.
Oracle Enterprise Linux (OEL) See Appendix A, “Linux Distributions Supported by Forge,” on page 97 for a list of supported RedHat kernel versions.
Workloads using the Unbreakable Enterprise Kernel are not supported.
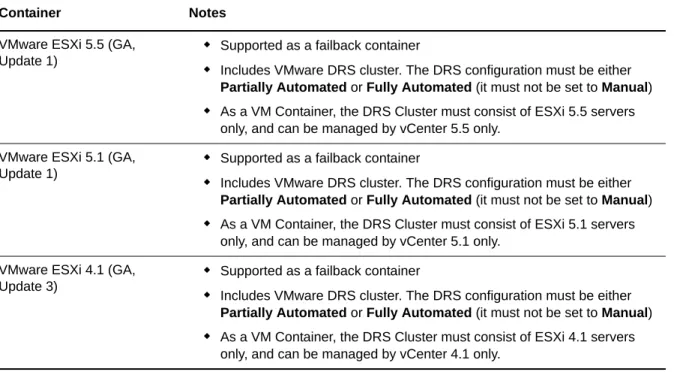
Table 1-3 Platforms Supported as VM Failback Containers
NOTE: ESXi versions must have a paid license; protection is unsupported with these systems if they are operating with a free license.
1.3
Security and Privacy
PlateSpin Forge provides several features to help you safeguard your data and increase security.
Section 1.3.1, “Security of Workload Data in Transmission,” on page 14 Section 1.3.2, “Security of Credentials,” on page 14
Section 1.3.3, “User Authorization and Authentication,” on page 15
1.3.1
Security of Workload Data in Transmission
To make the transfer of your workload data more secure, you can configure the workload protection to encrypt the data. When encryption is enabled, data replicated over the network is encrypted by using AES (Advanced Encryption Standard).
You can enable or disable encryption individually for each workload. See Section 5.3.1, “Workload Protection Details,” on page 56.
1.3.2
Security of Credentials
Credentials that you use to access various systems (such as workloads and failback targets) are stored in the PlateSpin Forge database and are therefore covered by the same security safeguards that you have in place for your Forge VM.
In addition, credentials are included within diagnostics, which are accessible to accredited users. You should ensure that workload protection projects are handled by authorized staff.
Container Notes
VMware ESXi 5.5 (GA, Update 1)
Supported as a failback container
Includes VMware DRS cluster. The DRS configuration must be either
Partially Automated or Fully Automated (it must not be set to Manual)
As a VM Container, the DRS Cluster must consist of ESXi 5.5 servers only, and can be managed by vCenter 5.5 only.
VMware ESXi 5.1 (GA, Update 1)
Supported as a failback container
Includes VMware DRS cluster. The DRS configuration must be either
Partially Automated or Fully Automated (it must not be set to Manual)
As a VM Container, the DRS Cluster must consist of ESXi 5.1 servers only, and can be managed by vCenter 5.1 only.
VMware ESXi 4.1 (GA, Update 3)
Supported as a failback container
Includes VMware DRS cluster. The DRS configuration must be either
Partially Automated or Fully Automated (it must not be set to Manual)
As a VM Container, the DRS Cluster must consist of ESXi 4.1 servers only, and can be managed by vCenter 4.1 only.
Product Overview 15
1.3.3
User Authorization and Authentication
PlateSpin Forge provides a comprehensive and secure user authorization and authentication mechanism based on user roles, and controls application access and operations that users can perform. See Section 2.2, “Setting Up User Authorization and Authentication,” on page 18.
1.4
Performance
Section 1.4.1, “About Product Performance Characteristics,” on page 15 Section 1.4.2, “Data Compression,” on page 15
Section 1.4.3, “Bandwidth Throttling,” on page 16
Section 1.4.4, “RPO, RTO, and TTO Specifications,” on page 16
1.4.1
About Product Performance Characteristics
The performance characteristics of your PlateSpin Forge product depend on a number of factors, including:
Hardware and software profiles of your source workloads
The specifics of your network bandwidth, configuration, and conditions
The number of protected workloads
The number of volumes under protection
The size of volumes under protection
File density (number of files per unit of capacity) on your source workloads’ volumes
Source I/O levels (how busy your workloads are)
The number of concurrent replications
Whether data encryption is enabled or disabled
Whether data compression is enabled or disabled
For large-scale workload protection plans, you should perform a test protection of a typical workload, run some replications, and use the result as a benchmark, fine-tuning your metrics regularly
throughout the project.
1.4.2
Data Compression
If necessary, PlateSpin Forge can compress the workload data before transferring it over the network. This enables you to reduce the overall amount of data transferred during replications.
Compression ratios depend on the type of files on a source workload’s volumes, and might vary from approximately 0.9 (100MB of data compressed to 90 MB) to approximately 0.5 (100MB compressed to 50MB).
NOTE: Data compression utilizes the source workload’s processor power.
Data Compression can be configured individually for each workload or in a Protection Tier. See
1.4.3
Bandwidth Throttling
PlateSpin Forge enables you to control the amount of network bandwidth consumed by direct source-to-target communication over the course of workload protection; you can specify a throughput rate for each protection contract. This provides a way to prevent replication traffic from congesting your production network and reduces the overall load of your PlateSpin Server.
Bandwidth throttling can be configured individual for each workload or in a Protection Tier. See
Section 6.4, “Protection Tiers,” on page 69.
1.4.4
RPO, RTO, and TTO Specifications
Recovery Point Objective (RPO): Describes the acceptable amount of data loss measured in time. The RPO is determined by the time between incremental replications of a protected workload and is affected by current utilization levels of PlateSpin Forge, the rate and scope of changes on the workload, your network speed, and the chosen replication schedule.
Recovery Time Objective (RTO): Describes the time required for a failover operation (bringing a failover workload online to temporarily replace a protected production workload).
The RTO for failing a workload over to its virtual replica is affected by the time it takes to configure and execute the failover operation (10 to 45 minutes). See Section 5.6, “Failover,” on page 59.
Test Time Objective (TTO): Describes the time required for testing disaster recovery with some confidence of service restoration.
Use the Test Failover feature to run through different scenarios and generate benchmark data. See “Using the Test Failover Feature” on page 60.
Among factors that have an impact on RPO, RTO, and TTO is the number of required concurrent failover operations; a single failed-over workload has more memory and CPU resources available to it than multiple failed-over workloads, which share the resources of their underlying infrastructure. You should determine average failover times for workloads in your environment by doing test failovers at various times, then use them as benchmark data in your overall data recovery plans. See
2
PlateSpin Forge Application Configuration 17
2
PlateSpin Forge Application
Configuration
This section includes the following information:
Section 2.1, “Product Licensing,” on page 17
Section 2.2, “Setting Up User Authorization and Authentication,” on page 18
Section 2.3, “Access and Communication Requirements across your Protection Network,” on page 21
Section 2.4, “Configuring PlateSpin Forge Default Options,” on page 23
2.1
Product Licensing
This section provides information about activating your PlateSpin Forge software.
Section 2.1.1, “Obtaining a License Activation Code,” on page 17 Section 2.1.2, “Online License Activation,” on page 17
Section 2.1.3, “Offline License Activation,” on page 18
2.1.1
Obtaining a License Activation Code
For product licensing, you must have a license activation code. If you do not have a license activation code, request one through the Customer Center Web site (http://www.netiq.com/center/). A license activation code will be emailed to you.
The first time you log into PlateSpin Forge, the browser is automatically redirected to the License Activation page. You have two options for activating your product license: Online License Activation
or Offline License Activation.
2.1.2
Online License Activation
For online activation, PlateSpin Forge must have Internet access.
NOTE: HTTP proxies might cause failures during online activation. Offline activation is recommended for users in environments that use HTTP proxy.
To activate an online license:
1 In the PlateSpin Forge Web Interface, click Settings > Licenses > Add License. The License Activation page is displayed.
2 Select Online Activation, specify the email address that you provided when placing your order and the activation code you received, then click Activate.
2.1.3
Offline License Activation
For offline activation, you obtain a license key over the Internet by using a machine that has Internet access.
NOTE: To obtain a license key, you must have an eLogin account. If you are an existing PlateSpin customer and you don’t have an eLogin account, you must first create one. Use your existing PlateSpin username (a valid email address registered with PlateSpin) as input for your eLogin account username.
To activate an offline license:
1 Click Settings > License, then click Add license. The License Activation page is displayed.
2 Select Offline Activation and copy the hardware ID shown.
3 Use a Web browser on a computer that has internet access to navigate to the PlateSpin Product Activation Web Site (http://www.platespin.com/productactivation/ActivateOrder.aspx). Log in with your Novell username.
4 Enter in the appropriate fields:
the activation code that you received
the email address that you provided when placing your order
the hardware ID that you copied in Step 2 5 Click Activate.
The system generates a license key file and prompts you to save it.
6 Save the generated license key file, transfer it to the product host that does not have internet connectivity, and use it to activate the product.
2.2
Setting Up User Authorization and Authentication
Section 2.2.1, “About PlateSpin Forge User Authorization and Authentication,” on page 18 Section 2.2.2, “Managing PlateSpin Forge Security Groups and Workload Permissions,” on
page 20
2.2.1
About PlateSpin Forge User Authorization and
Authentication
The user authorization and authentication mechanism of PlateSpin Forge is based on user roles, and controls application access and operations that users can perform. The mechanism is based on Integrated Windows Authentication (IWA) and its interaction with Internet Information Services (IIS). The role-based access mechanism enables you to implement user authorization and authentication in several ways:
Restricting application access to specific users
Allowing only specific operations to specific users
Granting each user access to specific workloads for performing operations defined by the assigned role
PlateSpin Forge Application Configuration 19
Every PlateSpin Forge instance has the following set of operating system-level user groups that define related functional roles:
Workload Protection Administrators: Have unlimited access to all features and functions of the application. A local administrator is implicitly part of this group.
Workload Protection Power Users: Have access to most features and functions of the application, with some limitations such as restrictions in the capability to modify system settings related to licensing and security.
Workload Protection Operators: Have access to a limited subset of system features and functions, sufficient to maintain day-to-day operation.
When a user attempts to connect to PlateSpin Forge, the credentials provided through the browser are validated by IIS. If the user is not a member of one of the Workload Protection roles, connection is refused.
Table 2-1 Workload Protection Roles and Permission Details
In addition, PlateSpin Forge software provides a mechanism based on security groups that define which users should have access to which workloads in the PlateSpin Forge workload inventory. Setting up a proper role-based access to PlateSpin Forge involves two tasks:
1. Adding users to the required user groups detailed in Table 2-1 (see your Windows documentation).
2. Creating application-level security groups that associate these users with specified workloads (see Section 2.2.2, “Managing PlateSpin Forge Security Groups and Workload Permissions,” on page 20).
Workload Protection Role Details Administrators Power Users Operators
Add Workload Allowed Allowed Denied
Remove Workload Allowed Allowed Denied
Configure Protection Allowed Allowed Denied
Prepare Replication Allowed Allowed Denied Run (Full) Replication Allowed Allowed Allowed
Run Incremental Allowed Allowed Allowed Pause/Resume Schedule Allowed Allowed Allowed
Test Failover Allowed Allowed Allowed
Failover Allowed Allowed Allowed
Cancel Failover Allowed Allowed Allowed
Abort Allowed Allowed Allowed
Dismiss (Task) Allowed Allowed Allowed
Settings (All) Allowed Denied Denied
Run Reports/Diagnostics Allowed Allowed Allowed
Failback Allowed Denied Denied
2.2.2
Managing PlateSpin Forge Security Groups and Workload
Permissions
PlateSpin Forge provides a granular application-level access mechanism that allows specific users to carry out specific workload protection tasks on specified workloads. This is accomplished by setting up security groups.
To set up a security group:
1 Assign a PlateSpin Forge user a Workload Protection Role whose permissions best suit that role in your organization.
2 Access PlateSpin Forge as an administrator by using the PlateSpin Forge Web Interface, then click Settings > Permissions.
The Security Groups page opens:
3 Click Create Security Group.
4 In the Security Group Name field, type a name for your security group.
5 Click Add Users and select the required users for this security group.
If you want to add a PlateSpin Forge user that was recently added to the Forge VM, it might not be immediately available in the user interface. In this case, first click Refresh User Accounts.
6 Click Add Workloads and select the required workloads:
Only users in this security group will have access to the selected workloads.
7 Click Create.
The page reloads and displays the your new group in the list of security groups. To edit a security group, click its name in the list of security groups.
PlateSpin Forge Application Configuration 21
2.3
Access and Communication Requirements across
your Protection Network
Section 2.3.1, “Access and Communication Requirements for Workloads,” on page 21 Section 2.3.2, “Protection Across Public and Private Networks Through NAT,” on page 22 Section 2.3.3, “Overriding the Default bash Shell for Executing Commands on Linux Workloads,”
on page 23
2.3.1
Access and Communication Requirements for Workloads
The following software, network, and firewall requirements are for workloads that you intend to protect by using PlateSpin Forge.
Table 2-2 Access and Communication Requirements for Workloads
Workload Type Prerequisites Required Ports (Defaults)
All workloads Ping (ICMP echo request and response) support
All Windows workloads
Microsoft .NET Framework version 2.0, 3.5 SP1, 4.0, or 4.5
Windows Vista and later
Built-in Administrator or domain administrator account credentials (membership only in the local Administrators group is insufficient). On Vista, the account must be enabled (it is disabled by default).
The Windows Firewall configured to allow File and Printer Sharing. Use one of these options:
Option 1, using Windows Firewall: Use the basic
Windows Firewall Control Panel item (firewall.cpl) and select File and printer Sharing in the list of exceptions. - OR -
Option 2, using Firewall with Advanced Security: Use the
Windows Firewall with Advanced Security utility (wf.msc) with the following Inbound Rules enabled and set to Allow:
File and Printer Sharing (Echo Request - ICMPv4In)
File and Printer Sharing (Echo Request - ICMPv6In)
File and Printer Sharing (NB-Datagram-In)
File and Printer Sharing (NB-Name-In)
File and Printer Sharing (NB-Session-In)
File and Printer Sharing (SMB-In)
File and Printer Sharing (Spooler Service - RPC)
File and Printer Sharing (Spooler Service - RPC-EPMAP) TCP 3725 NetBIOS 137 - 139 SMB (TCP 139, 445 and UDP 137, 138) TCP 135/445
2.3.2
Protection Across Public and Private Networks Through
NAT
In some cases, a source, a target, or PlateSpin Forge itself, might be located in an internal (private) network behind a network address translator (NAT) device, unable to communicate with its
counterpart during protection.
PlateSpin Forge enables you to address this issue, depending on which of the following hosts is located behind the NAT device:
PlateSpin Server: In your server’s PlateSpin Server Configuration tool, record the additional IP addresses assigned to that host. See “Configuring the Application to Function through NAT” on page 23.
Workload: When you are attempting to add a workload, specify the public (external) IP address of that workload in the discovery parameters.
Failed-over VM: During failback, you can specify an alternative IP address for the failed-over workload in Failback Details (Workload to VM) (page 63).
Failback Target: During an attempt to register a failback target, when prompted to provide the IP address of the PlateSpin Server, provide either the local address of the Protect Server host or one of its public (external) addresses recorded in the server’s PlateSpin Server Configuration
tool (see PlateSpin Server above).
Windows Server 2003 (including SP1 Standard, SP2 Enterprise, and R2 SP2 Enterprise)
NOTE: After enabling the required ports, run the following command at the server prompt to enable PlateSpin remote administration:
netsh firewall set service RemoteAdmin enable
For more information about netsh, see the Microsoft TechNet article,
http://technet.microsoft.com/en-us/library/ cc785383%28v=ws.10%29.aspx. (http://technet.microsoft.com/en-us/ library/cc785383%28v=ws.10%29.aspx). TCP: 3725, 135, 139, 445 UDP: 137, 138, 139 Windows Server 2000; Windows XP
Windows Management Instrumentation (WMI) installed
WMI (RPC/DCOM) can use TCP ports 135 and 445 as well as random or dynamically assigned ports above 1024. If problems occur when adding the workload, consider temporarily placing the workload in a DMZ or temporarily opening the firewalled ports while adding the workload to PlateSpin Forge.
For additional information, such as guidance in limiting the port range for DCOM and RPC, see the following Microsoft technical articles.
Using DCOM with Firewalls (http://msdn.microsoft.com/en-us/ library/ms809327.aspx)
Configuring RPC dynamic port allocation to work with firewalls (http://support.microsoft.com/default.aspx?scid=kb;en-us;154596)
Configuring DCOM to work over a NAT-based firewall (http:// support.microsoft.com/kb/248809) TCP 3725 NetBIOS 137 - 139 SMB (TCP 139, 445 and UDP 137, 138) RPC (TCP 135) All Linux workloads
Secure Shell (SSH) server TCP 22, 3725
Workload Type Prerequisites Required Ports (Defaults)
PlateSpin Forge Application Configuration 23
Configuring the Application to Function through NAT
To enable the PlateSpin Server to function across NAT-enabled environments, you must record additional IP addresses of your PlateSpin Server in the PlateSpin Server Configuration tool’s database that the server reads upon startup.
For information on the update procedure, see Section 2.4.3, “Configuring PlateSpin Server Behavior through XML Configuration Parameters,” on page 26.
2.3.3
Overriding the Default bash Shell for Executing Commands
on Linux Workloads
By default, the PlateSpin Server uses the /bin/bash shell when executing commands on a Linux source workload.
If required, you can override the default shell by modifying the corresponding registry key on the PlateSpin Server.
See KB Article 7010676 (https://www.netiq.com/support/kb/doc.php?id=7010676).
2.4
Configuring PlateSpin Forge Default Options
Section 2.4.1, “Setting Up Automatic Email Notifications of Events and Reports,” on page 23 Section 2.4.2, “Language Setup for International Versions of PlateSpin Forge,” on page 26 Section 2.4.3, “Configuring PlateSpin Server Behavior through XML Configuration Parameters,”
on page 26
Section 2.4.4, “Configuring Support for VMware vCenter Site Recovery Manager,” on page 28
2.4.1
Setting Up Automatic Email Notifications of Events and
Reports
You can configure PlateSpin Forge to automatically send notifications of events and replication reports to specified email addresses. This functionality requires that you first specify a valid SMTP server for PlateSpin Forge to use.
“SMTP Configuration” on page 23
“Setting Up Automatic Event Notifications by Email” on page 24 “Setting Up Automatic Replication Reports by Email” on page 25
SMTP Configuration
Use the PlateSpin Forge Web Interface to configure SMTP (Simple Mail Transfer Protocol) settings for the server used to deliver email notifications of events and replication reports.
Figure 2-1 Simple Mail Transfer Protocol Settings
To configure SMTP settings:
1 In your PlateSpin Forge Web Interface, click Settings > SMTP.
2 Specify an SMTP server Address, a Port (the default is 25), and a Reply Address for receiving email event and progress notifications.
3 Type a Username and Password, then confirm the password.
4 Click Save.
Setting Up Automatic Event Notifications by Email
To set up automatic event notifications:
1 Set up an SMTP server for PlateSpin Forge to use. See “SMTP Configuration” on page 23.
2 In your PlateSpin Forge Web Interface, click Settings > Email > Notification Settings.
3 Select the Enable Notifications option.
4 Click Edit Recipients, type the required email addresses separated by commas, then click OK.
5 Click Save.
To delete listed email addresses, click Delete next to the address that you want to remove. The following events trigger email notifications:
Event Remarks
Workload Online Detected Generated when the system detects that a previously offline
workload is now online.
Applies to workloads whose protection contract’s state is not
Paused.
Workload Offline Detected Generated when the system detects that a previously online
workload is now offline.
Applies to workloads whose protection contract’s state is not
Paused.
Full Replication Successfully Completed Full Replication Failed
Full Replication Missed Similar to the Incremental Replication Missed event.
Incremental Replication Successfully Completed
PlateSpin Forge Application Configuration 25
Setting Up Automatic Replication Reports by Email
To set up PlateSpin Forge to automatically send out replication reports by email:
1 Set up an SMTP server for PlateSpin Forge to use. See “SMTP Configuration” on page 23.
2 In your PlateSpin Forge Web Interface, click Settings > Email > Replication Reports Settings.
3 Select the Enable Replication Reports option.
4 In the Report Recurrence section, click Configure and specify the required recurrence pattern for the reports.
5 In the Recipients section, click Edit Recipients, type the required email addresses separated by commas, then click OK.
6 (Optional) In the Protect Access URL section, specify a non-default URL for your PlateSpin Server (for example, when your Forge VM has more than one NIC or if it is located behind a NAT server). This URL affects the title of the report and the functionality of accessing relevant content on the server through hyperlinks within emailed reports.
7 Click Save.
For information on other types of reports that you can generate and view on demand, see
Section 4.5, “Generating Workload and Workload Protection Reports,” on page 51.
Incremental Replication Failed
Incremental Replication Missed
Generated when any of the following applies:
A replication is manually paused while a scheduled incremental replication is due.
The system attempts to carry out a scheduled incremental replication while a manually-triggered replication is underway.
The system determines that the target has insufficient free disk space.
Test Failover Completed Generated upon manually marking a Test Failover operation a
success or a failure.
Prepare Failover Completed Prepare Failover Failed Failover Completed Failover Failed
2.4.2
Language Setup for International Versions of PlateSpin
Forge
PlateSpin Forge provides National Language Support (NLS) for Chinese Simplified, Chinese Traditional, French, German, and Japanese.
To use the PlateSpin Forge Web Interface and integrated help in one of these languages, the corresponding language must be added in your Web browser and moved to the top of the order of preference.
To add a language to your Web browser:
1 Access the Languages setting in your Web browser:
Internet Explorer: Click Tools > Internet Options > General tab > Languages.
Firefox: Click Tools > Options > Content tab > Languages.
2 Add the required language and move it up the top of the list.
3 Save the settings, then start the client application by connecting to your PlateSpin Forge Server. See Section 4.1, “Launching the PlateSpin Forge Web Interface,” on page 43.
NOTE: (For users of Chinese Traditional and Chinese Simplified versions) Attempting to connect to the PlateSpin Forge Server with a browser that does not have a specific version of Chinese added might result in Web server errors. For correct operation, use your browser’s configuration settings to add a specific Chinese language (for example, Chinese [zh-cn] or Chinese [zh-tw]). Do not use the culture-neutral Chinese [zh] language.
The language of a small portion of system messages generated by the PlateSpin Forge Server depends on the operating system interface language selected in your Forge VM.
To change the OS language: 1 Access your Forge VM.
See Section 3.4, “Accessing and Working with the Forge Management VM in the Appliance Host,” on page 36.
2 Start the Regional and Language Options applet (click Start > Run, type intl.cpl, and press Enter), then click the Languages (Windows Server 2003) or Keyboards and Languages
(Windows Server 2008) tab, as applicable.
3 If it is not already installed, install the required language pack. You might need access to your OS installation media.
4 Select the required language as the interface language of the operating system. When you are prompted, log out or restart the system.
2.4.3
Configuring PlateSpin Server Behavior through XML
Configuration Parameters
Some aspects of your PlateSpin Server’s behavior are controlled by configuration parameters that you set on a configuration Web page residing on your Forge VM (https://Your_Forge_VM/
platespinconfiguration/).
Under normal circumstances you should not need to modify these settings unless you are advised to do so by PlateSpin Support. This section provides a number of common use cases along with information on the required procedure.
PlateSpin Forge Application Configuration 27 To change and apply any configuration parameters:
1 On your Forge VM, go to the indicated directory.
2 Locate the required server parameter and change its value.
3 Save and your settings and exit the page.
No reboot or restart of services is required after the change is made in the configuration tool. The following topics provide information on specific situations, in which you might need to change product behavior using an XML configuration value.
“Optimizing Data Transfer over WAN Connections” on page 27 “Setting up Support for SRM” on page 28
Optimizing Data Transfer over WAN Connections
You can optimize data transfer performance and fine tune it for WAN connections. You do this by modifying configuration parameters that the system reads from settings you make in a configuration tool residing on your Forge VM. For the generic procedure, see Section 2.4.3, “Configuring PlateSpin Server Behavior through XML Configuration Parameters,” on page 26.
Use these settings to optimize data transfers across a WAN. These settings are global and affect all replications using the file-based and VSS replications.
NOTE: If these values are modified, replication times on high-speed networks, such as Gigabit Ethernet, might be negatively impacted. Before modifying any of these parameters, consider consulting PlateSpin Support first.
Table 2-3 lists the configuration parameters with the defaults and with the values recommended for optimum operation in a high-latency WAN environment.
Table 2-3 Default and Optimized Configuration Parameters in https://Your_Forge_VM/ platespinconfiguration/
Parameter Default Value Optimized Value
fileTransferMinCompressionLimit
Specifies the packet-level compression threshold in bytes.
0 (disabled) max 65536 (64 KB)
fileTransferCompressionThreadsCount
Controls the number of threads used for packet-level data compression. This is ignored if compression is disabled. Because the compression is CPU-bound, this setting might have a performance impact.
Setting up Support for SRM
Workloads replicated by PlateSpin Forge and managed on VMware vCenter Site Recovery Manager (SRM) can behave seamlessly if you configure the product to support SRM. Some of the
configuration requires a change to the XML configuration parameters of the PlateSpin Server. For information about these configuration changes, see the complete section: Section 2.4.4, “Configuring Support for VMware vCenter Site Recovery Manager,” on page 28
2.4.4
Configuring Support for VMware vCenter Site Recovery
Manager
You might use PlateSpin Forge to protect your workloads locally and then use some additional method to replicate those workloads to a remote location, such as a SAN. For example, you might choose to use VMware vCenter Site Recovery Manager (SRM) to replicate an entire datastore of replicated target VMs to a remote site. In this case, specific configuration steps are needed to ensure that the target VMs can be replicated and behave correctly when powered on at the remote site. Configuration for Forge SRM support consists of the following adjustments:
Configure a setting to keep the PlateSpin Forge ISO and floppies on the same datastore as the VMware .vmx and .vmdk files.
Prepare the PlateSpin Forge environment to copy VMware Tools to the failover target. This involves some manual file creation and copying in addition to making some configuration settings that expedite the VMware Tools installation process.
To make sure the workload files are kept on the same datastore:
1 From any Web browser, open https://Your_PlateSpin_Server/platespinconfiguration/
to display the configuration Web page.
2 On the configuration Web page, locate the CreatePSFilesInVmDatastore server parameter and change its value to true.
NOTE: The person configuring the replication contract is responsible to ensure that the same datastore is specified for all target VM disk files.
3 Save your settings and exit the page.
fileTransferSendReceiveBufferSize
TCP/IP window size setting for file transfer connections. It controls the number of bytes sent without TCP acknowledgement, in bytes.
When the value is set to 0, the default TCP window size is used (8 KB). For custom sizes, specify the size in bytes. Use the following formula to determine the proper value:
((LINK_SPEED(Mbps)/8)*DELAY(sec))*1000*1000
For example, for a 100 Mbps link with 10 ms latency, the proper buffer size would be:
(100/8)*0.01*1000*1000 = 125000 bytes
0 (8192 bytes) max 5242880 (5 MB)
PlateSpin Forge Application Configuration 29
VMware Tools setup packages can be copied to the failover target during replication so that they can be installed by the configuration service when the VM is booted. This happens automatically when the failover target is able to contact the PlateSpin Forge Server. In cases where this cannot happen, you need to prepare your environment prior to replication.
To prepare your environment:
1 Retrieve the VMware Tools packages from an ESXi host:
1a Secure copy (scp) the windows.iso image from the /usr/lib/vmware/isoimages
directory on an accessible VMware host to a local temporary folder.
1b Open the ISO and extract its setup packages, saving them to an accessible location:
VMware 5.5: The setup packages are setup.exe and setup64.exe.
VMware 5.0 and 5.1: The setup packages are setup.exe and setup64.exe.
VMware 4.0 and 4.1: The setup packages are VMware Tools.msi and VMware
Tools64.msi.
2 Create OFX packages from the setup packages you extracted from the VMware Server:
2a Zip the package you want, making sure that the setup installer file is at the root of the .zip
archive.
2b Rename the .zip archive to 1.package so that it can be used as an OFX package.
NOTE: If you want to create an OFX package for more than one of the setup packages, remember that each setup package must have its own unique .zip archive.
Because each package must have the same name (1.package), if you want to save multiple .zip archives as OFX packages, you need to save each in its own unique subdirectory.
3 Copy the appropriate OFX package (1.package) to
%ProgramFiles(x86)%\PlateSpin\Packages\%GUID% on the PlateSpin Server. The value of
%GUID% depends on the version of your VMware Server and its VMware Tools architecture. The following table lists the server versions, VMware Tools architecture and the GUID identifier you need to copy the package to the correct directory:
VMware Server Version VMware Tools Architecture GUID 4.0 x86 D052CBAC-0A98-4880-8BCC-FE0608F0930F 4.0 x64 80B50267-B30C-4001-ABDF-EA288D1FD09C 4.1 x86 F2957064-65D7-4bda-A52B-3F5859624602 4.1 x64 80B1C53C-6B43-4843-9D63-E9911E9A15D5 5.0 x86 AD4FDE1D-DE86-4d05-B147-071F4E1D0326 5.0 x64 F7C9BC91-7733-4790-B7AF-62E074B73882 5.1 x86 34DD2CBE-183E-492f-9B36-7A8326080755 5.1 x64 AD4FDE1D-DE86-4d05-B147-071F4E1D0326 5.5 x86 660C345A-7A91-458b-BC47-6A3914723EF7 5.5 x64 8546D4EF-8CA5-4a51-A3A3-6240171BE278
Expediting the Configuration Process
After the failover target boots, the configuration service launches to prepare the VM for use, but sits inactive for several minutes, waiting for data from the PlateSpin Server or looking for VMware Tools on the CD ROM.
To shorten this wait time:
1 On the configuration Web page, locate the ConfigurationServiceValues configuration setting, and then change the value of its WaitForFloppyTimeoutInSecs subsetting to zero (0).
2 On the configuration Web page, locate the ForceInstallVMToolsCustomPackage and change the value to true.
With these settings in place, the configuration process takes less than 15 minutes: the target machine reboots (up to two times), the VMware tools are installed, and SRM accesses the tools to help it configure networking at the remote site.
3
Appliance Setup and Maintenance 31
3
Appliance Setup and Maintenance
This section provides information about appliance setup and maintenance tasks that you might need to complete on a regular basis.
Section 3.1, “Setting up Appliance Networking,” on page 31 Section 3.2, “Physically Relocating the Appliance,” on page 32
Section 3.3, “Using External Storage Solutions with PlateSpin Forge,” on page 34
Section 3.4, “Accessing and Working with the Forge Management VM in the Appliance Host,” on page 36
Section 3.5, “Resetting Forge to Factory Defaults,” on page 38
3.1
Setting up Appliance Networking
This section provides information about customizing the networking settings of your appliance host.
Section 3.1.1, “Setting up Appliance Host Networking,” on page 31
3.1.1
Setting up Appliance Host Networking
Your PlateSpin Forge appliance has six physical network interfaces configured for external access:
External Test Network: To isolate network traffic when testing a failover workload with the Test Failover feature.
Internal Test Network: For testing a failover workload in complete isolation from the production network.
Replication Network: To provide the system with networking designated for ongoing traffic between your production workload and its replica in the Management VM.
Production Network: For real-life business continuity networking when performing a failover or a failback.
Forge VM Management Network: The management network that hosts the Forge management VM.
Management Network: Hypervisor management network. This network is unavailable for selection in the PlateSpin Forge Web Client.
By default, PlateSpin Forge ships with all 6 physical network interfaces mapped to one vSwitch in the hypervisor. You can customize the mapping to better suit your environment. For example, you can protect a workload that has two NICs, one of which is used for production connectivity, and the other strictly for replications. For additional information, see KB Article 7921062 (https://www.netiq.com/ support/kb/doc.php?id=7921062).
In addition, to further fine-tune the control of your network traffic, consider assigning a different VLAN ID to each of these individual port groups. This ensures that your production network is not interfered with by traffic from workload protection and recovery operations. See KB Article 21057 (https:// www.netiq.com/support/kb/doc.php?id=7921057).
3.2
Physically Relocating the Appliance
Relocating your PlateSpin Forge appliance (version 3) involves changing the IP addresses of its components to reflect the new environment. These are the IP addresses you specified during the initial setup of the appliance (see your Forge Getting Started Guide).
Before starting the relocation procedure:
1 Pause all replication schedules, ensuring that at least one incremental has run for each workload:
1a In your PlateSpin Forge Web Client, select all workloads, click Pause, then click Execute.
1b Ensure that the status Paused is displayed for all the workloads.
The specifics of the relocation process vary depending on whether the new IP address of the appliance at the target site is known (scenario 1) or unknown (scenario 2).
Section 3.2.1, “Scenario 1 - Relocating Forge (New IP Address Known),” on page 32 Section 3.2.2, “Scenario 2 - Relocating Forge (New IP Address Unknown),” on page 33
3.2.1
Scenario 1 - Relocating Forge (New IP Address Known)
To relocate the Forge Appliance Hardware when you know its new IP address: 1 Pause all replications. See Step 1a and Step 1b above.
2 Launch the Forge Appliance Configuration Console (Forge ACC): open a browser and go to
http://<Forge_IP_address>:10000.
3 Log in using the forgeuser account and click Configure Host.
4 Enter the new network parameters and click Apply.
5 Wait for the configuration process to complete and for the browser window to display the Configuration Successful popup window.
NOTE: The link in the popup window for the new Forge ACC address will not work until you physically disconnect your appliance and connect it to the new subnet.
6 Shut down the appliance:
6a Shut down the Forge Management VM. See Section 3.4.3, “Starting and Shutting Down the Forge Management VM,” on page 37.
6b Shut down the Appliance Host:
6b1 At the Forge Console, switch to the ESX Server console by pressing Alt-F2.
6b2 Log in as the superuser (user root with the associated password).
6b3 Type the following command and press Enter:
shutdown -h now
6c Power down the appliance.
7 Disconnect your appliance, move it to the new site, attach it to the new subnet, and power it on. The new IP address should now be valid.
8 Launch the Forge ACC and log in using the forgeuser account, click Configure Forge VM, specify the required parameters, then click Apply.
Appliance Setup and Maintenance 33 NOTE: If you configured the Forge VM to use DHCP, do the following after the relocation: 1. Determine the Forge VM’s new IP address (use the vSphere Client program to access the Forge VM and look it up in the VM’s Windows interface. See Section 3.4.2, “Launching the vSphere Client and Accessing the Forge Management VM,” on page 36).
2. Use the new IP address to launch the PlateSpin Forge Web Interface and refresh the container (click Settings > Containers > then click ).
10 Resume the paused replications.
3.2.2
Scenario 2 - Relocating Forge (New IP Address Unknown)
To relocate the Forge Appliance Hardware when its new IP address is unknown: 1 Pause all replications. See Step 1a and Step 1b on page 32.
2 Shut down the appliance:
2a Shut down the Forge Management VM. See Section 3.4.3, “Starting and Shutting Down the Forge Management VM,” on page 37.
2b Shut down the Appliance Host:
2b1 At the Forge Console, switch to the ESX Server console by pressing Alt-F2.
2b2 Log in as the superuser (user root with the associated password).
2b3 Type the following command and press Enter:
shutdown -h now
2c Power the appliance off.
3 Disconnect your appliance, move it, attach to the new network, then power it on.
4 Set up a computer (notebook computer recommended) so that it is able to communicate with Forge at its current IP address (the IP address at the old site), then connect it to the appliance. See “Appliance Configuration Procedure” in the PlateSpin Forge 11.0 Getting Started Guide.
5 Launch the Forge ACC: open a browser and go to http://<Forge_IP_address>:10000.
6 Log in using the forgeuser account and click Configure Host.
7 Enter the new network parameters and click Apply.
8 Wait for the configuration process to complete and for the browser window to display the Configuration Successful popup window.
NOTE: The link in the popup window for the new Forge ACC address will not work until you now physically disconnect your appliance and connect it to the new subnet.
9 Disconnect the computer from the appliance and connect the appliance to the new subnet. The new IP address should now be valid.
10 Launch the Forge ACC and log in using the forgeuser account, click Configure Forge VM, specify the required parameters, then click Apply.
11 Verify that the setting are correct, click Continue, and wait for the process to complete.
NOTE: If you configured the Forge VM to use DHCP, do the following after the relocation: 1. Determine the Forge VM’s new IP address (use the vSphere Client program to access the Forge VM and look it up in the VM’s Windows interface. See “Launching the vSphere Client and Accessing the Forge Management VM” on page 36).
2. Use the new IP address to launch the PlateSpin Forge Web Interface and refresh the container (click Settings > Containers > then click ).
12 Resume the paused replications.
3.3
Using External Storage Solutions with PlateSpin
Forge
The following sections contain information to help you with the setup and configuration of external storage for PlateSpin Forge.
Section 3.3.1, “Using Forge with SAN Storage,” on page 34 Section 3.3.2, “Adding a SAN LUN to Forge,” on page 35
3.3.1
Using Forge with SAN Storage
PlateSpin Forge supports existing external storage solutions, such as Storage Area Network (SAN) implementations. Both Fibre Channel and iSCSI solutions are supported. SAN support for Fibre Channel and iSCSI HBAs allows a Forge appliance to be connected to a SAN array. You can then use SAN-array LUNs (Logical Units) to store workload data. Using Forge with a SAN improves flexibility, efficiency, and reliability.
Each SAN product has its own nuances and differences that do not migrate from one hardware manufacturer to the next. This is especially true when considering how these products connect and interact with the Forge Management VM. As such, specific configuration steps for each possible environment and context are beyond the scope of this guide.
The best place to find this type of information is from your hardware vendor or your SAN product sales representative. Many hardware vendors have support guides available describing these tasks in detail. You can find a wealth of information at the following sites:
The VMware Documentation Web site (http://www.vmware.com/support/pubs/).
The Fibre Channel SAN Configuration Guide discusses the use of ESX Server with Fibre Channel storage area networks.
The iSCSI SAN Configuration Guide discusses the use of ESX Server with iSCSI storage area networks.
The VMware I/O Compatibility Guide lists the currently approved HBAs, HBA drivers, and driver versions.
The VMware Storage/SAN Compatibility Guide lists currently approved storage arrays.
The VMware Release Notes give information about known issues and workarounds.
The VMware Knowledge Bases have information on common issues and workarounds. The following vendors provide storage products that have all been tested by VMware:
3PAR (http://www.3par.com) Bull (http://www.bull.com) (FC only)
Compellent (http://www.compellent.com) Dell (http://www.dell.com)
EMC (http://www.emc.com)
Appliance Setup and Maintenance 35 Fujitsu (http://www.fujitsu.com)
HP (http://www.hp.com)
Hitachi (http://www.hitachi.com) and Hitachi Data Systems (http://www.hds.com) (FC only)
IBM (http://www.ibm.com)
NEC (http://www.nec.com) (FC only)
Network Appliance (NetApp) (http://www.netapp.com) Nihon Unisys (http://www.unisys.com) (FC only)
Pillar Data (http://www.pillardata.com) (FC only)
Sun Microsystems (http://www.sun.com) Xiotech (http://www.xiotech.com) (FC only)
You can also learn more about iSCSI by visiting the Storage Networking Industry Association Web site at http://www.snia.org/tech_activities/ip_storage/iscsi/.
3.3.2
Adding a SAN LUN to Forge
PlateSpin Forge supports the use of Storage Area Network (SAN) storage, but before Forge can access an existing SAN, a SAN Logical Unit (LUN) needs to be added to Forge’s ESX.
To add a SAN LUN to Forge:
1 Set up and configure your SAN system.
2 Access the appliance host (see “Downloading the vSphere Client Program” on page 36).
3 In the vSphere Client interface, click the root (top-level) node in the Inventory panel, then click the Configuration tab.
4 Click the Add Storage hyperlink in the upper right.
5 In the Add Storage Wizard, click Next until you are prompted to specify datastore information.
6 Specify a datastore name and click Next in the subsequent wizard pages. When the wizard finishes, click Finish.
7 Click Storage under Hardware to see the Forge datastores. The newly added SAN LUN should appear in the window.
8 Quit the vSphere Client program.
In the PlateSpin Forge Web Client, the new datastore does not appear until the next replication runs and the Application Host is refreshed. You can force a refresh by selecting Settings > Containers