CHAPTER 4
4.1 OVERVIEW ... 4-5 4.2 DESIGN-BID-BUILD AND DESIGN-BUILD ... 4-5 4.3 SUBSURFACE EXPLORATION PROGRAM DEVELOPMENT ... 4-5 4.3.1 Terrain Reconnaissance ... 4-5 4.3.1.1 Developing a Terrain Reconnaissance Report ... 4-6 4.3.2 Methods of Subsurface Exploration ... 4-9 4.3.2.1 Test Pits ... 4-9 4.3.2.2 Test Borings ... 4-9 4.3.2.3 In-Situ Sampling Methods ... 4-10 4.3.2.4 In-Situ Soil Testing Methods ... 4-10 4.3.2.4.1 Standard Penetration Test ... 4-10 4.3.2.4.2 Dynamic Cone Penetrometer ... 4-11 4.3.2.4.3 Cone Penetrometer Test ... 4-11 4.3.2.4.4 Flat Plate Dilatometer Test ... 4-12 4.3.2.4.5 Pressuremeter Test ... 4-12 4.3.2.4.6 Field Vane Shear Test ... 4-13 4.3.2.5 Geophysical Testing Methods... 4-15 4.3.2.5.1 Surface Wave Methods ... 4-15 4.3.2.5.2 Downhole Shear Wave Velocity Methods ... 4-15 4.3.2.5.3 Crosshole Shear Wave Velocity Methods ... 4-15 4.3.2.5.4 Seismic Refraction ... 4-16 4.3.2.5.5 Seismic Reflection ... 4-16 4.3.2.5.6 Resistivity ... 4-16 4.3.2.6 Falling Weight Deflectometer... 4-16 4.3.2.7 Hydraulic Conductivity Testing Methods ... 4-17 4.3.2.7.1 Percolation Test ... 4-17 4.3.2.7.2 Well Pumping Tests ... 4-18 4.3.2.7.3 Seepage Tests ... 4-18 4.3.2.7.4 Packer Permeability Tests ... 4-18 4.3.2.7.5 Other Tests ... 4-19 4.4 PHASING OF SUBURFACE INVESTIGATIONS ... 4-19 4.5 SUBSURFACE EXPLORATION CRITERIA ... 4-20 4.5.1 Bridge Foundations ... 4-21 4.5.2 Retaining Walls ... 4-22 4.5.3 Embankments ... 4-24 4.5.4 Large Cuts and Excavations ... 4-24 4.5.5 Culverts ... 4-25 4.5.6 Noise Barrier Walls ... 4-26 4.5.7 Overhead Signs, Traffic Signals, and Light Standards ... 4-27 4.5.8 Pavement Structures ... 4-28 4.5.9 Infiltration Basins and Wetland Mitigations ... 4-28 4.5.10 Trenchless Pipe Installation ... 4-29
4.5.11 Other Applications ... 4-29 4.6 SUBSURFACE EXPLORATION AND SAMPLE TYPES ... 4-29 4.6.1 Identification System for Subsurface Explorations ... 4-30 4.6.2 Identification System for Individual Soil and Rock Samples ... 4-31 4.7 FIELD EXPLORATIONS AND SAMPLING ... 4-32 4.7.1 Soil and Rock Sampling in Test Borings ... 4-32 4.7.1.1 Bulk Samples ... 4-32 4.7.1.2 Split-Barrel Sampling ... 4-32 4.7.1.2.1 Progressing the Test Boring for Sampling ... 4-33 4.7.1.2.2 Obtaining a Sample ... 4-33 4.7.1.2.3 Packaging and Identification of Samples ... 4-34 4.7.1.3 Thin-Walled Tube Sampling... 4-34 4.7.1.3.1 Progressing the Test Boring for Sampling ... 4-34 4.7.1.3.2 Obtaining a Sample ... 4-34 4.7.1.3.3 Packaging, Identification, and Transporting of Samples ... 4-36 4.7.1.4 Rock Core Sampling ... 4-36 4.7.1.4.1 Obtaining a Rock Core ... 4-36 4.7.1.4.2 Packaging and Identification of Rock Cores ... 4-37 4.7.2 Test Boring Logs ... 4-37 4.8 REFERENCES ... 4-40
4.1 OVERVIEW
This Chapter addresses the geotechnical field investigation, including the development of the subsurface exploration program, the methods of generating subsurface information, and the criteria to be applied for test borings in the various conditions that will be encountered. It is organized by activities and policies involved prior to, during, and after exploration.
4.2 DESIGN-BID-BUILD AND DESIGN-BUILD
The requirements of this Chapter shall be applied to projects designed In-House, projects designed by Consultants, and Design-Build projects.
When the subsurface exploration program is being prepared by the Departmental Geotechnical Engineers, previous soil borings in the vicinity of the project, nearby utilities and structures, USDA soils maps, USGS topographic maps, aerial photographs, and wetland inventory maps as described in NYSDOT GDM Chapter 2, will be considered in the development of the program. The Regional Geotechnical Engineer is responsible for determining site accessibility and potential impacts to sensitive environmental areas. In addition, the Regional Geotechnical Engineer is responsible for coordination of all traffic control needs, and issues regarding access permits and right-of-entry notifications to impacted property owners.
When the subsurface exploration program is being prepared by a Geotechnical Engineering Consultant, the Consultant shall submit to the Regional Geotechnical Engineer, for review and acceptance, a detailed subsurface exploration plan and proposal prior to the commencement of any field operations. The program shall describe the anticipated soil or rock stratification used as the basis of the planned explorations. The program shall outline proposed exploration methods, and locations and termination criteria for all explorations. The subsurface exploration plan shall conform to the requirements of this Manual and of the applicable NYSDOT specifications. Where explorations must be conducted in sensitive environmental areas or in high hazard traffic areas, the exploration program shall describe any special access or traffic control requirements necessary to protect the interests of the Department during the field exploration phase. The Consultant is responsible for all access requirements, access permits, right-of-way notifications, and traffic control. All traffic control shall conform to the latest Department guidelines.
4.3 SUBSURFACE EXPLORATION PROGRAM DEVELOPMENT
In the development of a subsurface exploration program, the existing site conditions, available and applicable exploration methods, and available and applicable in-situ testing methods must be considered. This section discusses such considerations.
4.3.1 Terrain Reconnaissance
Terrain reconnaissance is the operation of reviewing available information from various sources and reconnoitering the landscape, to view it with regard to its suitability for engineering
purposes, describing the extent and characteristics of the areas encountered, and making an engineering interpretation of the findings.
Terrain reconnaissance and appraisal operations are performed for the following purposes: 1. To serve as a basis for the appraisal of terrain conditions by correlating the characteristics
of the various soil areas with the past construction experiences and performances of existing highways on similar areas.
2. To indicate to the highway planning and location Engineers the relative merits and potential design and construction problems for the mapped areas of different terrain conditions along the general route, so that, if feasible, the optimum areas be occupied and the adverse areas avoided.
3. To serve as a guide in establishing the optimum grade line relative to topography and subsurface conditions.
4. To serve as a general guide for the efficient planning of the necessary subsurface exploration, testing and analysis program for the line finally selected. This reduces the surveys in the "good" areas to an efficient minimum, and permits effective concentrations in the problem areas.
5. To indicate the general earthwork construction material situation, and to indicate the probable locations of borrow and granular materials so that those areas may be explored and sampled for specification and cost purposes.
Refer to NYSDOT GDM Chapter 2 for related discussion. 4.3.1.1 Developing a Terrain Reconnaissance Report
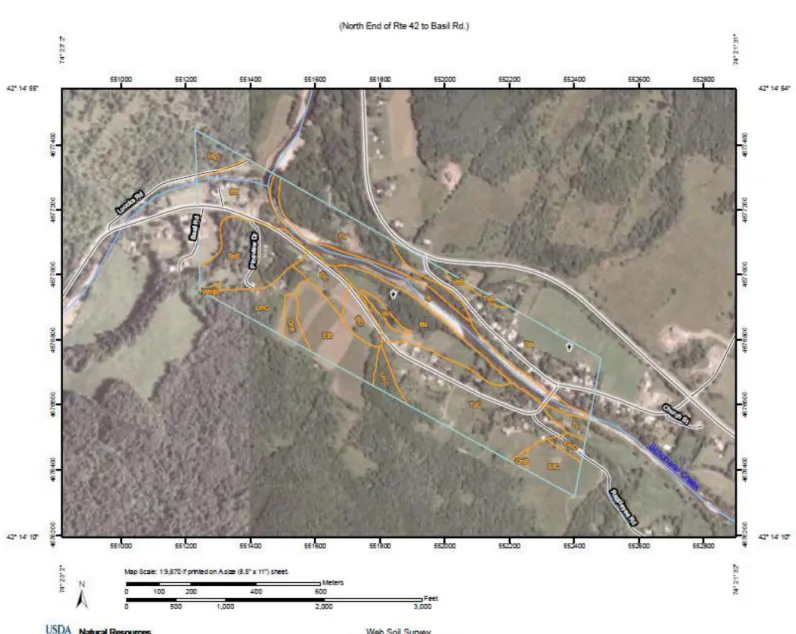
A Terrain Reconnaissance Report describes the anticipated soils to be encountered along a length of proposed roadway. Most of the soil data and information is derived from the National
Cooperative Soil Survey, accessed through the USDA National Resources Conservation Service. Information from this source considers the near-surface (within 8 feet) soils. Any preliminary or record logs are also included in the analysis.
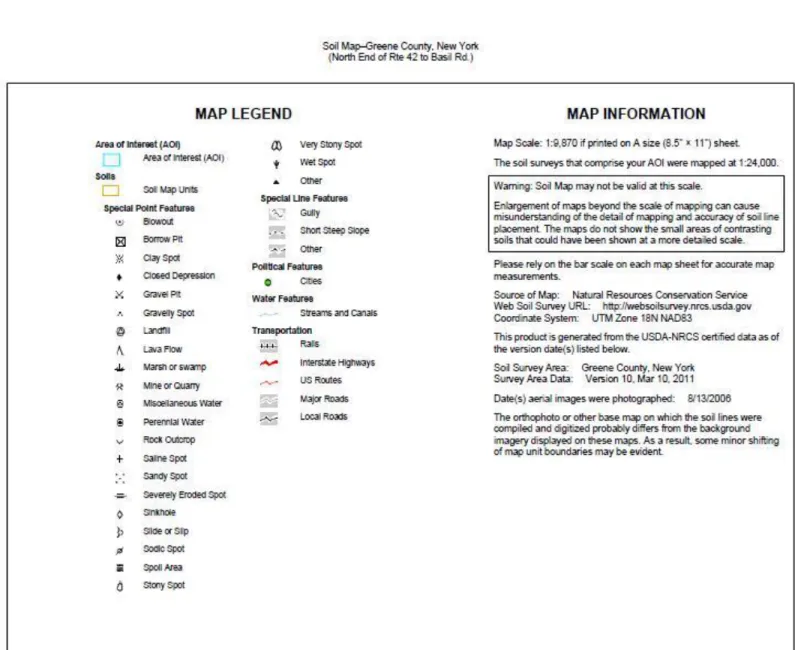
Subject areas are delineated into Areas of Interest (AOI’s). The AOI’s are depicted in maps and Engineering Properties, Water Features, Particle Size & Coarse Fragments, and Physical Soil Properties are presented for the soil types mapped in each AOI. Descriptions of the mapped types are typically presented at the end of the report.
Typically, for the initial geotechnical field investigation, an examination of the site for the development of the Terrain Reconnaissance Report is essential. The site examination is a visual assessment of the territory. When viewing the landscape in the field, a logical comparison may be made with the soil map of that location. In many of the new soil maps, geologic origin is neglected in favor of a slope percentage. For example:
• A Palmyra soil located on an esker may be mapped Palmyra 15-20% slope. However, an outwash terrace face may also be mapped Palmyra 15-20% slope.
• A soil mapped as Alluvial land in the uplands, which may actually be an inwash soil over glacial till and not a flood plain soil.
4.3.2 Methods of Subsurface Exploration
Assuming access and utility clearances have been obtained and a survey base line has been established in the field, field explorations are begun. Many methods of field exploration exist; some of the more common are described below. These methods are often augmented by in-situ testing. The testing described in this Chapter provides the Departmental Geotechnical Engineer with soil and rock parameters determined in-situ. This is important, especially on those projects involving soft clays, loose sands, and/or sands below the water table, due to the difficulty of obtaining representative samples suitable for laboratory testing. For each test included, a brief description of the equipment, the test method, and the use of the data is presented.
4.3.2.1 Test Pits
Test Pits are the simplest methods of inspecting subsurface soils. Test pits consist of excavations performed by hand, backhoe, or dozer. Hand excavations are often performed with shovels or posthole diggers. Test pits offer the advantages of speed and ready access for sampling. However, test pits are severely hampered by limitations of depth and by the fact that
advancement through soft or loose soils or below the water table can be extremely difficult. Test pits are used to examine large volumes of near surface soils and can be used to obtain bulk samples for additional testing.
4.3.2.2 Test Borings
The term “Test Boring” applies to a bored hole method of subsurface investigation that involves the in-situ sampling and/or testing of soil, rock, and water. The test boring may be progressed as an open hole that utilizes soil or rock boring methods to allow sampling or testing at various depths, or it may be progressed continuously by sampling or testing equipment. If open holes are utilized, the sampling and/or testing is usually performed below the depth which has been
disturbed by the hole progression. Various methods of soil and rock boring methods for open holes are discussed below:
• Hand Augers – Hand auger borings are advanced using hand held equipment, typically in areas where access for standard drilling equipment is restricted. Hand auger borings are limited in depth by the presence of ground water or collapsible soils that cause caving in the borehole.
• Hollow-Flight Augers – Hollow-flight augers consist of a continuous flight auger surrounding a hollow drill stem, which is advanced by rotation. Split spoon and
undisturbed samples are obtained through the hollow drill stem, which acts like a casing to hold the hole open, so removal of the auger is not necessary for sampling. Refer to ASTM D6151 - Standard Practice for Using Hollow-Stem Augers for Geotechnical Exploration and Soil Sampling (AASHTO T306 - Standard Method of Test for Progressing Auger Borings for Geotechnical Explorations).
• Wash Rotary Method – In a Wash Rotary Boring, a downward pressure is applied during rapid rotation of hollow drill rods to which a cutting bit is attached. The drill bit cuts the material and drilling fluid washes the cuttings from the borehole. In most cases this is the fastest method of advancing a borehole and can be used in any type of soil, although soils containing considerable amounts of large gravel or boulders could be
problematic. Drilling mud or casing can be used to keep the borehole open. Split spoon and undisturbed samples are obtained through the drilling fluid, which holds the borehole open.
• Rock Boring/Coring - Rock boring through boulders or rock is accomplished by advancing a core barrel through the rock by the application of downward pressure during rotation. Circulating water removes ground-up material from the hole while also cooling the bit. Rock coring involves careful sampling of rock in which the rate of advance is controlled so as to obtain the maximum possible core recovery. Refer to ASTM D2113 –
Standard Practice for Rock Core Drilling and Sampling of Rock for Site Investigation. 4.3.2.3 In-Situ Sampling Methods
situ sampling methods are used to obtain a portion of the subsurface material for analysis. In-situ methods include soil sampling by SPT, rock core sampling, and undisturbed sampling. These methods are described in Section 4.3.2.4.1 Standard Penetration Test, Section 4.7.1.4 Rock Core Sampling, and Section 4.7.1.3 Thin-Walled Tube Sampling respectively.
4.3.2.4 In-Situ Soil Testing Methods
In-situ soil testing methods are used to obtain general strength, friction, and pore water
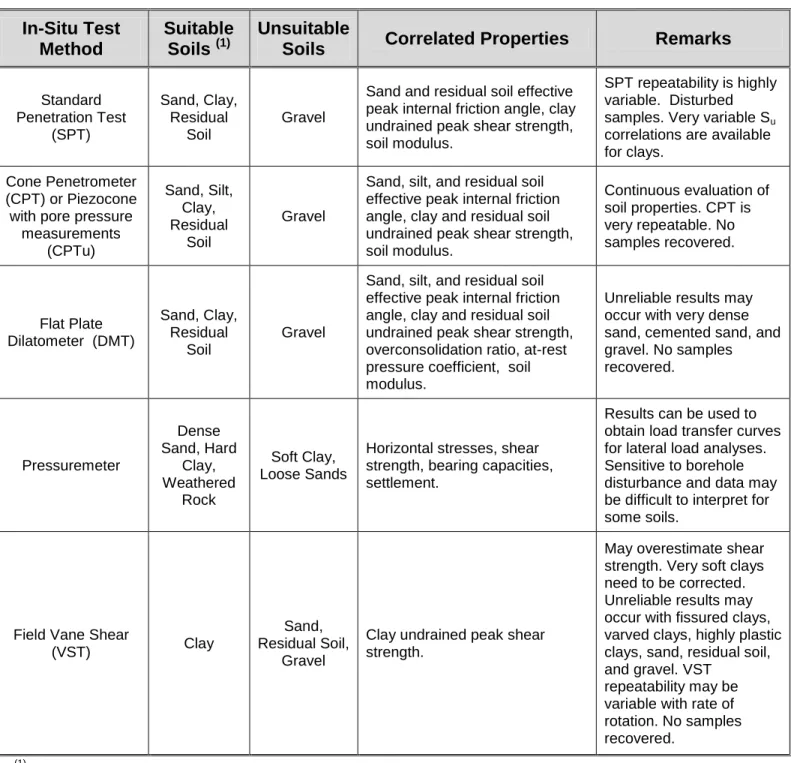
information for soils in their existing state. The methods result in disturbance and displacement of the soil. In many cases the information obtained can be correlated to other design parameters. Various testing methods are described below and the suitability of the methods to various soil types is presented in Table 4-1.
4.3.2.4.1 Standard Penetration Test
The Standard Penetration Test (SPT) is the most widely used field test, having the advantages of simplicity, a wide variety of correlations for its data, and the fact that a sample is obtainable with each test. As discussed previously, a standard split-barrel sampler attached to a drill rod is advanced into the soil by impacts from a 140-pound (625 N) automatic or safety hammer
dropping from a height of 30 inches (750 mm). The sampler is advanced a total of 18 inches (450 mm), and the number of blows required to advance the sampler for each of three 6-inch (150 mm) increments is recorded. The sum of the number of blows for the second and third increments is called the Standard Penetration Value, or more commonly, N-value, which is reported in blows per foot (300 mm). Tests shall be performed in accordance with ASTM D1586
- Standard Test Method for Penetration Test and Split-Barrel Sampling of Soils (AASHTO T206 - Standard Method of Test for Penetration Test and Split-Barrel Sampling of Soils).
The number of blows for each 6-inch increment (150 mm) is recorded on the Soil Test Boring Logs, along with the type of hammer used and any notes regarding the driving effort (e.g., the sampler was advanced under the weight of the rods or hammer without blows, if the sampler was plugged, refusal before completing 6-inch increment, etc.). Refer to NYSDOT GDM Chapter 8 for related discussion.
4.3.2.4.2 Dynamic Cone Penetrometer
The Dynamic Cone Penetrometer is a dynamic method of measuring a soil’s in-situ resistance to penetration. In the test, a 17.6 lb (8 kg) weight is repeatedly dropped from a height of 22.6 in (575 mm), driving a cylindrical rod with a cone-shaped point into the ground. The penetration per blow is measured and test data can be correlated to bearing capacity, in-situ density, and other parameters. The equipment used for the test is man portable and is commonly performed in conjunction with hand auger borings. The standard for Dynamic Cone Penetrometer testing is the procedure presented by Sowers and Hedges (1966). The penetrometer resistance values can be correlated to Nmeas by performing an SPT adjacent to the penetrometer test.
4.3.2.4.3 Cone Penetrometer Test
The Cone Penetrometer Test (CPT) is a quasi-static penetration test in which a cylindrical rod with a conical point is advanced through the soil at a constant rate. The cone penetrometer measures the resistance to penetration at the tip of the penetrometer, the end-bearing component of resistance. The equipment used is generally truck or trailer mounted. A series of tests
performed at varying depths at one location is commonly called a sounding.
The penetrometer can be used in sands or clays, but not in rock or other extremely dense soils. Since soil samples are not generally obtained with penetrometer soundings, they should be augmented by SPT borings or other borings with soil samples taken, and the CPT correlated to the in-situ soils.
Several types of penetrometer are in use, including mechanical (Dutch) cone, mechanical friction-cone, electric cone, electric friction-cone, and electro-piezocone. Regarding the various types:
• Friction-cone penetrometers are equipped with a friction sleeve, which provides the added capability of measuring the side friction component of resistance.
• Mechanical penetrometers have telescoping tips allowing measurements to be taken incrementally, generally at intervals of 8 inches (200 mm) or less.
• Electronic penetrometers use electronic force transducers to obtain continuous measurements with depth.
• Electro-piezocones are also capable of measuring pore water pressures during penetration.
Of these, the only cone penetrometer type allowed is the electro-piezocones or some variation thereof (e.g., seismic electro-piezocones).
Cone dimensions of a 60-degree tip angle and a 1.55 in2 (10 cm2) projected end area are standard. The outside diameter of the friction sleeve is the same as that of the base of the cone. Penetration rates are between 10 to 20 mm/sec. The appropriate test method is described in ASTM D5778 - Standard Test Method for Performing Electronic Friction Cone and Piezocone Penetration Testing of Soils (electro-piezocones).
The electro-piezocones can also be used to measure the dissipation rate of the excessive pore water pressure. This type of test is useful for soils that are very sensitive to sampling techniques, such as fibrous peat, muck, or soft clays. In such an application, the cone is equipped with a pressure transducer that is capable of measuring the induced water pressure. Pore water pressures are measured immediately and at several time intervals thereafter. Electro-piezocones can be fitted with other instrumentation above the friction sleeve (e.g., geophone, inclinometer, nuclear density equipment, etc.).
Cone penetrometer data is plotted showing the tip stress, the friction resistance, and the friction ratio vs. depth. Pore pressures can also be plotted with depth and correlations of test results have been made to other soil parameters. See NYSDOT GDM Chapter 5 for presentation of CPT data. 4.3.2.4.4 Flat Plate Dilatometer Test
A Flat Plate Dilatometer is a 3.75-inch wide and 0.55-inch thick stainless steel blade with a thin 2.4-inch diameter expandable metal membrane on one side. With the membrane flush with the blade surface (unexpanded), the blade is either pushed or driven into the soil using a drill rig. Rods carry pneumatic and electrical lines from the membrane to the surface. At the test elevation (typically depth intervals of 12 inches), pressurized gas is applied to expand the membrane. Both the pressure required to begin membrane movement and that required to expand the membrane into the soil 0.04 inches (1.1 mm) are measured. Additionally, the pressure corresponding to the return of the membrane to its original position upon venting may be recorded. Through
developed correlations, information can be deduced concerning material type, pore water pressure, in-situ horizontal and vertical stresses, void ratio or relative density, modulus, shear strength parameters, and consolidation parameters.
Compared to the pressuremeter, the flat dilatometer has the advantage of reduced soil
disturbance during penetration. Tests shall be performed in accordance with ASTM D6635 -
Standard Test Method for Performing the Flat Plate Dilatometer. 4.3.2.4.5 Pressuremeter Test
A Pressuremeter Test is performed by inserting a cylindrical probe into an open borehole to the test depth, then inflating the probe’s flexible membrane laterally to push against the borehole’s soil wall. The measured volume change of the membrane is plotted against the applied pressure. Results are interpreted based on semi-empirical correlations from past tests and observation. In-situ horizontal stresses, shear strength, bearing capacities, and settlement can be estimated using these correlations. The pressuremeter test results can be used to obtain load transfer curves (p-y curves) for lateral load analyses.
While tests can be done in soft clay or loose sands, the test is best used in dense sands, hard clays and weathered rock which cannot be tested with push equipment. The pressuremeter test is very sensitive to borehole disturbance and the data may be difficult to interpret for some soils. Tests shall be performed in accordance with ASTM D4719 - Standard Test Method for Prebored Pressuremeter Testing in Soils.
4.3.2.4.6 Field Vane Shear Test
A Field Vane Shear Test consists of advancing a four-bladed vane to the test depth and applying a measured torque at a constant rate until the soil fails in shear along a cylindrical surface. The torque measured at failure provides the undrained shear strength of the soil. A second test run immediately after remolding at the same depth provides the remolded strength of the soil and thus information on soil sensitivity. Tests shall be performed in accordance with ASTM D2573 -
Standard Test Method for Field Vane Shear Test in Cohesive Soil (AASHTO T223 - Standard Method of Test for Field Vane Shear Test in Cohesive Soil).
This method is commonly used for measuring shear strength in soft clays and organic deposits. It should not be used in stiff and hard clays. Results can be affected by the presence of gravel, shells, roots, or sand layers. Shear strength may be overestimated in highly plastic clays and a correction factor should be applied.
In-Situ Test Method
Suitable Soils (1)
Unsuitable
Soils Correlated Properties Remarks
Standard Penetration Test (SPT) Sand, Clay, Residual Soil Gravel
Sand and residual soil effective peak internal friction angle, clay undrained peak shear strength, soil modulus.
SPT repeatability is highly variable. Disturbed samples. Very variable Su correlations are available for clays.
Cone Penetrometer (CPT) or Piezocone with pore pressure
measurements (CPTu) Sand, Silt, Clay, Residual Soil Gravel
Sand, silt, and residual soil effective peak internal friction angle, clay and residual soil undrained peak shear strength, soil modulus. Continuous evaluation of soil properties. CPT is very repeatable. No samples recovered. Flat Plate Dilatometer (DMT) Sand, Clay, Residual Soil Gravel
Sand, silt, and residual soil effective peak internal friction angle, clay and residual soil undrained peak shear strength, overconsolidation ratio, at-rest pressure coefficient, soil modulus.
Unreliable results may occur with very dense sand, cemented sand, and gravel. No samples recovered. Pressuremeter Dense Sand, Hard Clay, Weathered Rock Soft Clay, Loose Sands
Horizontal stresses, shear strength, bearing capacities, settlement.
Results can be used to obtain load transfer curves for lateral load analyses. Sensitive to borehole disturbance and data may be difficult to interpret for some soils.
Field Vane Shear
(VST) Clay
Sand, Residual Soil,
Gravel
Clay undrained peak shear strength.
May overestimate shear strength. Very soft clays need to be corrected. Unreliable results may occur with fissured clays, varved clays, highly plastic clays, sand, residual soil, and gravel. VST
repeatability may be variable with rate of rotation. No samples recovered.
(1)
Residual soils frequently have a dual USCS description of SM-ML and behave as both cohesive soils and cohesionless soils because the residuum soil is close to the opening size of the U.S. No. 200 Sieve (0.075 mm).
Table 4-1 Soil Suitability of In-Situ Testing Methods
4.3.2.5 Geophysical Testing Methods
Geophysical testing methods are non-destructive testing procedures applying wave and electrical current technologies which can provide general information on the subsurface profile, depth to bedrock or water, location of granular borrow areas, peat deposits or subsurface anomalies, etc., and can provide an indication of certain material properties (e.g., shear wave velocity).
Geophysical testing methods are not limited to subsurface conditions, but can also be used to evaluate existing structures, foundations, and pavements. Refer to FHWA-IF-04-021,
Application of Geophysical Methods to Highway Related Problems, for additional information on the use of geophysical test methods for applications other than subsurface conditions. 4.3.2.5.1 Surface Wave Methods
Surface wave methods consist of Spectral Analysis of Surface Waves or Multi-channel Analysis of Surface Waves. Both methods are used to measure the thickness, depth, and shear wave velocity of a layer. While Spectral Analysis will typically have 2 geophones, Multi-channel will have additional geophones spread over a larger area.
The shear wave velocity is more of a general velocity, rather than a discrete velocity of a layer. Discrete shear wave velocity may be determined by crosshole or downhole methods. Typically the surface wave profiles are limited to a depth of approximately 130 feet using man portable equipment. Additional depth can be achieved, but heavier motorized equipment is required. 4.3.2.5.2 Downhole Shear Wave Velocity Methods
Downhole methods for determining shear wave velocity differ from surface methods in that equipment is placed below the ground surface. In downhole methods, either geophone is lowered into the casing placed in the ground or a seismic cone penetrometer (SCPT) is pushed into the ground, with a geophone typically mounted above the friction sleeve on the cone. With either method, a shear wave is induced at the ground surface and the time for arrival is measured at the geophone.
If casing is used, care must be taken during construction to assure that the casing is plumb. A major limitation of the SCPT is refusal to advance in dense soils.
4.3.2.5.3 Crosshole Shear Wave Velocity Methods
In Crosshole Shear Wave Velocity testing, shear wave velocities are determined between a series of vertical cased holes. A downhole hammer and geophone are lowered to the same depth in different holes. The hammer is tripped and the time for the shear wave to travel to the geophone is recorded. The major limitation to the crosshole method is the expense of installing the required casings. Also, care must be taken during installation of the casings to assure that they are plumb and that equal depths are within the same horizontal plane.
4.3.2.5.4 Seismic Refraction
Seismic refraction is used to determine the depth to bedrock. The basic operation of a seismic refraction survey uses one or two 200 ft. cables, each having connections for 12 equally spaced geophones. The cables are hooked up to a seismograph. A seismic energy source is required for producing seismic waves. A sledge hammer is typically used for depths less than 50 feet and either a drop weight or a black powder charge is used for depths between 50 and 100 feet. The seismic compression waves penetrate the overburden material and refract along the bedrock surface. After each shot, the time it takes for the compression wave to arrive at each geophone is recorded by the seismograph.
A seismic refraction survey works well for depths less than 100 feet. It can be used for up to 4 soil or rock layers; however, each layer must have a higher shear wave velocity than the overlying layer. The method can be used to investigate structure foundations, highway cuts, highway drainage, and aquifer delineation, and has applications in determining shear wave velocity and the thickness of organics.
4.3.2.5.5 Seismic Reflection
Seismic reflection uses a surface seismic wave source to create seismic waves that can penetrate the subsurface. The waves are reflected at interfaces that have either a change in shear wave velocity and/or a change in density (termed impedance contrasts). At impedance contrasts, a portion of the seismic wave is reflected back to the ground surface and a portion continues into the subsurface, where it continues to the next impedance contrast. Seismic reflection techniques can obtain information in excess of 100 feet.
4.3.2.5.6 Resistivity
Resistivity testing is used to find the depth to bedrock, applying the premise that soil and rock typically have different electrical resistances. Resistivity is affected by the moisture content of the soil and the presence or lack of metals, salts, and clay particles. Resistivity surveys can be used to model ground water flow through the subsurface, and may also be used to determine the potential for corrosion of foundation materials. Resistivity surveys can reach depths of 160 feet, with the depth of the survey typically 1/3 of the electrode spacing (e.g., to reach a depth of 50 feet an electrode spacing of 150 feet is required).
4.3.2.6 Falling Weight Deflectometer
The Falling-Weight Deflectometer (FWD) is a trailer-mounted device that exerts a load on the pavement and records the response of the pavement structure to this loading. The recorded data is analyzed to determine the competency of the existing pavement structure and to determine parameters, such as resilient modulus, to assist in pavement design and evaluation. The FWD testing is performed by the NYSDOT Highway Data Services Bureau. Resilient modulus, Mr, is
4.3.2.7 Hydraulic Conductivity Testing Methods
In general design practice, hydraulic conductivity is estimated based on grain size characteristics of the soil strata. In more critical applications, hydraulic conductivity can be better defined through in-situ testing. In-situ test methods utilized to determine hydraulic conductivity include the following:
• Percolation Test • Well pumping tests • Seepage Tests
• Packer permeability tests
• Other - Slug tests, Piezocone tests, Flood tests
A discussion of field measurement of permeability is presented in Sabatini, et al. (2002)and Mayne, et al. (2002), and ASTM D 4043 presents a guide for the selection of various field methods.
4.3.2.7.1 Percolation Test
Percolation is defined as the gravity flow of groundwater through the pore spaces in rock or soil. A percolation test is typically used as a test to determine the suitability of a soil for the
installation of a domestic sewage-disposal system, in which a hole is dug and filled with water and the rate of water-level decline is measured. The Department utilizes percolation data to determine infiltration rates. To provide national consistency, the NRCS Soil Surveys evaluated percolation rates of about 900 soils to define permeability classes (Uhland and O’Neal (1951)). As the surveys evolved, the NRCS transitioned from permeability to the term saturated hydraulic conductivity. The NRCS recommended that the term “saturated hydraulic conductivity” be used for data expressed as a velocity and obtained by analysis using Darcy’s Law on saturated cores”. The percolation test involves, as described in NAVFAC Design Manual DM-7.1 Soil Mechanics, digging a hole (generally 2 ft. square), or drilled (4 in. min.) to a depth of the proposed
absorption trench, cleaned of loose debris, filled with coarse sand or fine gravel over the bottom 2 in., and saturated for a specified time. To eliminate any smearing during the excavation, the sidewalls should be scratched or scarified to provide open, natural soil which water may
percolate. The percolation rate measurement is obtained by filling the hole to a prescribed level (usually 6 in.) and then measuring the drop over a set time limit (usually 30 minutes). In sandy soils, the time limit may be only 10 minutes.
Limitations: Attempt to conduct the percolation test in clement weather. If there is heavy rain, snow, ice or freezing rain, the test should be re-scheduled. Typically, depending on the depth, the absorption trenches are dug with a backhoe. The scheduling to obtain the equipment and hauling to the site should be a consideration. The depth of the absorption trench needs to be evaluated to determine it’s safe and practical based on site constraints. Typically, a limit on the depth of an absorption trench is 5 ft. (4 ft. test pit with a 1 ft. infiltration test hole). As with all subsurface explorations, the locations are to be identified and cleared as per 16 NYCRR Part 753 Protection of Underground Facilities.
4.3.2.7.2 Well Pumping Tests
Well pumping tests can be used to provide an estimate of the overall hydraulic conductivity of a geologic formation, and since it is in essence a full scale test, directly accounts for the layering and directionality of the hydraulic characteristics of the formation. The data provided can be used to determine the requirements for construction dewatering systems for excavations or the capacity of a well. The test method presented in ASTM D4050 applies. Pump tests can be expensive and can take a significant amount of time to complete. Care must be exercised when conducting this type of test if potentially contaminated zones could be mobilized during
pumping, adjacent facilities such as drinking wells could be impacted, or dewatering could result in local ground subsidence.
4.3.2.7.3 Seepage Tests
Seepage tests can be used in soils with lower hydraulic conductivities than is generally
considered suitable for pumping tests and does not require disposal of large volumes of water. Data from seepage tests only reflect the hydraulic conditions near the borehole. Tests can be performed intermittently as the borehole is advanced.
Three types of seepage tests are commonly used: falling head, rising head and constant water level methods. Typically either the rising or falling level methods should be used if the hydraulic conductivity is low enough to permit accurate determination of the water level. In the falling head method, the borehole or piezometer is filled with water that is allowed to seep into the soil. The rate of drop of the water surface in the casing is monitored. The rising head method consists of bailing the water out of the borehole and observing the rate of rise until the change becomes negligible. The constant water level method is used if soil is too permeable to allow accurate measurement of the rising or falling water level.
In general, the rising head test is preferred because there is less chance of clogging soil pores with suspended sediment, although there is the danger of the soil at the bottom of the borehole becoming loosened or “quick” if too great a gradient is imposed. General guidance on these types of tests is provided in Mayne, et al. (2002).
4.3.2.7.4 Packer Permeability Tests
Packer permeability tests can be used to measure the hydraulic conductivity of a specific soil or rock unit. The information obtained is used primarily in seepage studies. This test is conducted by inserting the packer units to the desired test depth, which has been determined from cores and geophysical logs of the borehole, after the cased boring has been properly cleaned out. The packers are expanded to seal off the zone being tested, and water is injected into the borehole under constant pressure. Measurements of the flow rate are taken at regular time intervals. Upon completion of testing at a particular depth, the packers can be moved to a new test depth. See Mayne, et al. (2002) for additional information on this type of test.
4.3.2.7.5 Other Tests
• Slug Test - Short duration test that can be performed in a borehole in which a screened pipe has been installed. The hydraulic conductivity can be estimated by monitoring the rate of rise or fall of the water level in the borehole as a solid object is lowered into or removed from the pipe. ASTM D 4044 describes the appropriate test method. Slug tests are not very reliable and may underestimate hydraulic conductivity.
• Piezecone Test - Performed in conjunction with a Cone Penetrometer Test, the test involves advancing a cylindrical rod with a conical point through the soil to the desired depth, followed by recording pore pressures while the cone is held stationary. Details of the equipment and methodology used to conduct the piezocone test are provided in Sabatini, et al. (2002). Piezocone data can be useful to estimate the hydraulic
conductivity of silts and clays, but is subject to a large amount of uncertainty, and should be used only as a preliminary estimate of permeability.
• Flood Test - Or pilot infiltration test, are applied mainly in the design of infiltration facilities. Given that tests are performed in test pits approximately 100 ft2 (9 m2) in size, they are not always feasible. Generally only used where unusual site conditions that are poorly modeled by correlation to soil gradation characteristics are encountered, and there is plenty of water available to conduct the test.
4.4 PHASING OF SUBSURFACE INVESTIGATIONS
Subsurface investigations are typically conducted in two phases - preliminary and final. The preliminary phase of subsurface investigation should be conducted early enough in the design process to assist in the selection of foundation types and in the determination of bridge/structure location and length. The preliminary phase should also consider scour, seismic site class, and similar specific concerns, where appropriate. Where possible, the testing locations for the preliminary phase should be readily accessible and within the current Department right-of-way (ROW). The final phase of subsurface investigation supplements the preliminary, expanding on information that was obtained, filling in gaps of information where none was obtained, and/or adjusting to a modified project scope. The information collected during the final phase and any additional laboratory analyses will be used to finalize foundation and earthwork
4.5 SUBSURFACE EXPLORATION CRITERIA
This section discusses the various applications of test borings within a subsurface exploration program. It presents the minimum number of borings required, and the locations and anticipated depths of the borings, for each of the applications.
The frequency and spacing of soil borings indicated in the following are the minimum requirements. Engineering judgment should be applied to address anticipated or potential variation in subsurface conditions and the type of facility to be designed. GPS coordinates (latitude and longitude) and ground elevation must be established at all soil borings.
Test boring criteria is based on the use of the Standard Penetration Test (SPT) to obtain soil samples. Unless directed otherwise, SPTs shall be conducted continuously in the upper 10 feet of the subsurface and every 5 feet below that depth. If the Drill Crew encounters soft material (sampler advances with little to no hammer blows) and the site/structure characteristics warrant, undisturbed samples will be required. The term “blow(s)” used herein refers to hammer blows recorded during an SPT.
4.5.1 Bridge Foundations
All bridges shall have sufficient test borings taken at each proposed abutment and pier to meet the minimum geotechnical site investigation indicated below:
Criteria for Test Boring Termination Number and Locations
of Test Borings
General
Continuous 40 ft. (12 m) of 40 blow material
or
Continuous 50 ft. (15 m) of 25 blow material
(blows resulting from Standard Penetration Test)
2 borings per
substructure, located near the ends of the proposed substructure One boring at each
bridge should be driven casing
Where top of rock elevation or soil
conditions are variable, additional borings may be warranted
The above criteria will apply unless Rock is
encountered (see below)
Criteria begins below anticipated bottom of footing
elevation, unless at a Water Crossing (see below)
Downstate Seismic Criteria: One boring at each
bridge shall be drilled to a minimum 100 ft. (30 m) depth
Spread footing on Soil
Continuous sampling for top 15 ft. (4.5 m) below anticipated bottom of footing elevation
Water Crossing
Criteria begins a minimum of 25 ft. (7.5 m) below bottom of stream bed (to account for extreme scour event)
Rock
Minimum of 10 ft. (3 m) of NX rock core with at least 85% recovery
Minimum of 20 ft. (6 m) of NX rock core where rock socketed drilled shafts or micropiles might be used Minimum of 10 ft. (3 m) of NX core below anticipated bottom of footing elevation where rock is encountered above anticipated bottom of footing
Minimum of 15 ft. (4.5 m) of NX rock core with at least 85% recovery in the last 5 ft (1.5 m) where boulders exceeding 5 ft. (1.5 m) are probable
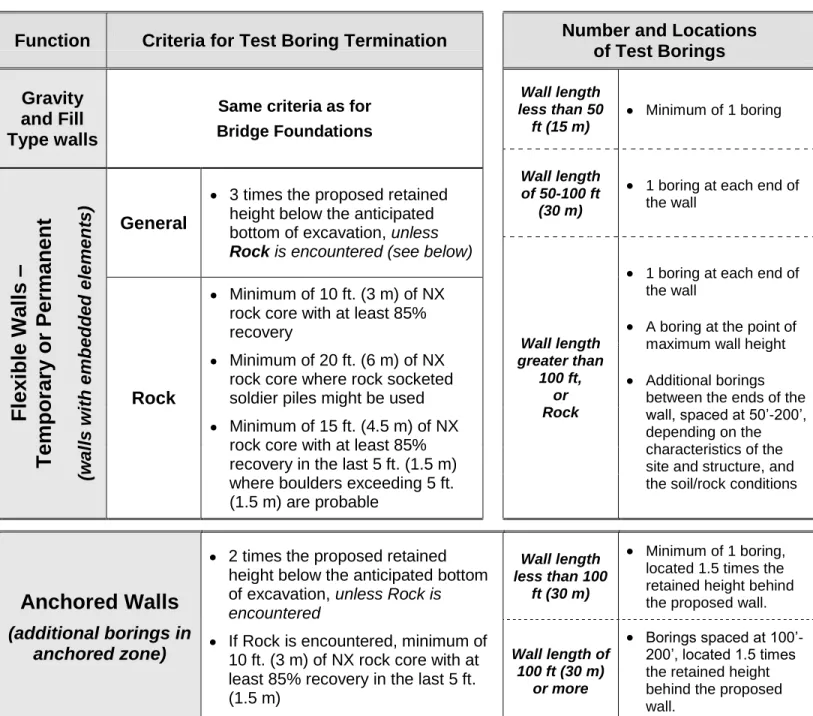
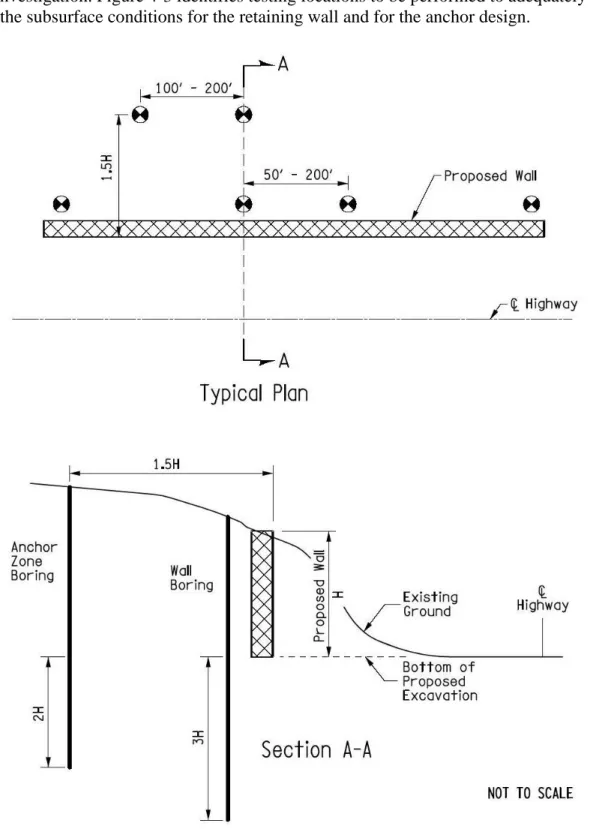
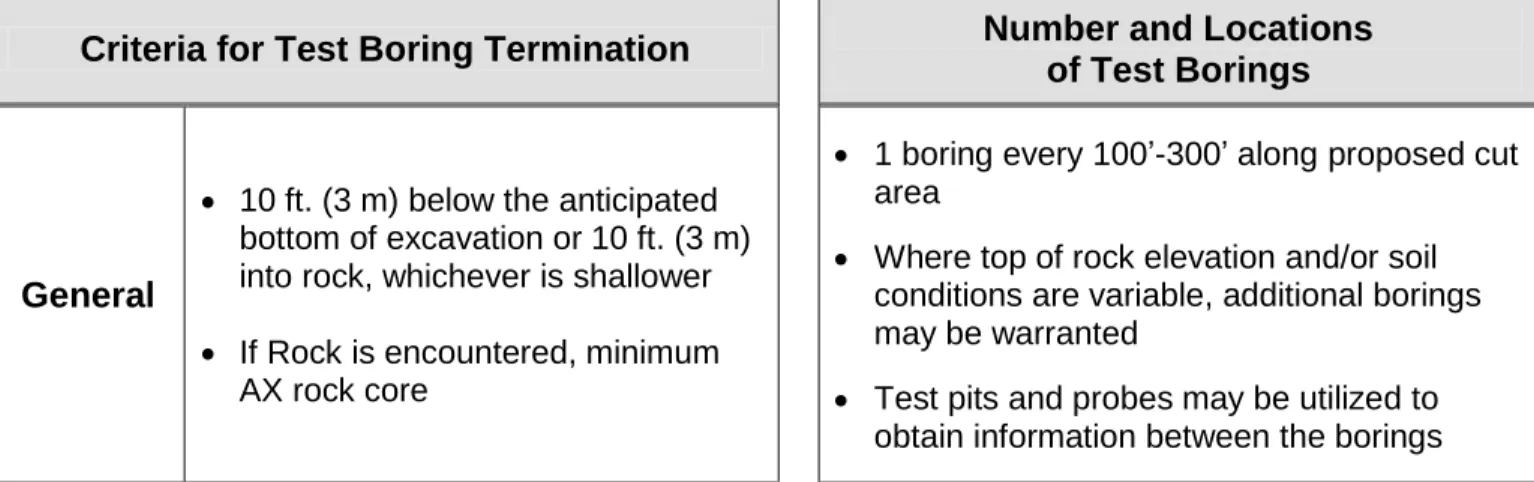
4.5.2 Retaining Walls
All retaining walls shall have sufficient test borings taken along the proposed line of the wall to meet the minimum geotechnical site investigation indicated below. Note that anchored walls require additional borings in the anchored zone, as depicted in Figure 4-3.
Function Criteria for Test Boring Termination Number and Locations
of Test Borings Gravity
and Fill Type walls
Same criteria as for Bridge Foundations Wall length less than 50 ft (15 m) Minimum of 1 boring Wall length of 50-100 ft (30 m)
1 boring at each end of the wall
F
lexi
b
le
W
a
ll
s
–
T
emp
o
rar
y
o
r
Per
man
en
t
(wal ls wi th e mbe dd e d e le m e nt s ) General3 times the proposed retained height below the anticipated
bottom of excavation, unless
Rock is encountered (see below)
Wall length greater than
100 ft, or Rock
1 boring at each end of the wall
A boring at the point of maximum wall height Additional borings
between the ends of the wall, spaced at 50’-200’, depending on the characteristics of the site and structure, and the soil/rock conditions
Rock
Minimum of 10 ft. (3 m) of NX rock core with at least 85% recovery
Minimum of 20 ft. (6 m) of NX rock core where rock socketed soldier piles might be used Minimum of 15 ft. (4.5 m) of NX rock core with at least 85% recovery in the last 5 ft. (1.5 m) where boulders exceeding 5 ft. (1.5 m) are probable
Anchored Walls
(additional borings in anchored zone)
2 times the proposed retained height below the anticipated bottom
of excavation, unless Rock is
encountered
If Rock is encountered, minimum of 10 ft. (3 m) of NX rock core with at least 85% recovery in the last 5 ft. (1.5 m)
Wall length less than 100
ft (30 m)
Minimum of 1 boring, located 1.5 times the retained height behind the proposed wall.
Wall length of 100 ft (30 m)
or more
Borings spaced at 100’-200’, located 1.5 times the retained height behind the proposed wall.
For example, retaining walls which are known to require ground anchors for support require further investigation. Figure 4-3 identifies testing locations to be performed to adequately explore the subsurface conditions for the retaining wall and for the anchor design.
4.5.3 Embankments
All roadway embankments shall have sufficient test borings taken along the proposed line of the embankment to meet the minimum geotechnical site investigation indicated below.
Criteria for Test Boring Termination Number and Locations
of Test Borings
General
2 times the maximum proposed fill height, unless Organic or Plastic soil is encountered, or if Rock is encountered
If Organic or Plastic (not till) soil is encountered, 10 ft. (3 m) below the Organic/Plastic deposit, or to 4 times the proposed fill height, whichever is shallower
If Rock is encountered, 5 ft. (1.5 m) of minimum AX rock core
Undisturbed sampling in soft plastic deposits
1 boring every 200’-500’ along the centerline or line of
maximum fill height
1 boring every 200’-500’ at toe of existing embankment or beyond
In all areas where soft or unsuitable foundation soils may be encountered
Table 4-4 Embankments - Minimum Requirements
4.5.4 Large Cuts and Excavations
All large cuts and excavations shall have sufficient test borings taken along the proposed cut area to meet the minimum geotechnical site investigation indicated below.
Criteria for Test Boring Termination Number and Locations
of Test Borings
General
10 ft. (3 m) below the anticipated bottom of excavation or 10 ft. (3 m) into rock, whichever is shallower If Rock is encountered, minimum AX rock core
1 boring every 100’-300’ along proposed cut area
Where top of rock elevation and/or soil conditions are variable, additional borings may be warranted
Test pits and probes may be utilized to obtain information between the borings
4.5.5 Culverts
All culverts (pipe, box, floorless, etc) shall have sufficient test borings taken along the proposed line of the culvert to meet the minimum geotechnical site investigation indicated below. Large Culverts are culverts having an interior width greater than 5 feet, but no greater than 20 feet (greater than 20 feet is considered a bridge). Small Culverts are culverts having an interior width of 5 feet or less.
Criteria for Test Boring Termination Number and Location
of Test Borings
Large Culverts
Same criteria as for bridge foundations
1 boring at each end of the culvert Additional borings between the ends of the culvert, spaced at 100’-300’ For culvert extensions, 1 boring every 50’-100’ (minimum 1)
Small Culverts
10 ft. (3 m) below anticipated invert elevation
In soil, continuous sampling for top 10 ft. (3 m) below anticipated invert elevation
If Rock is encountered, minimum AX rock core
1 boring every 100’-300’ along the line of the proposed culvert
For culvert extensions, 1 boring every 50’-100’ (minimum)
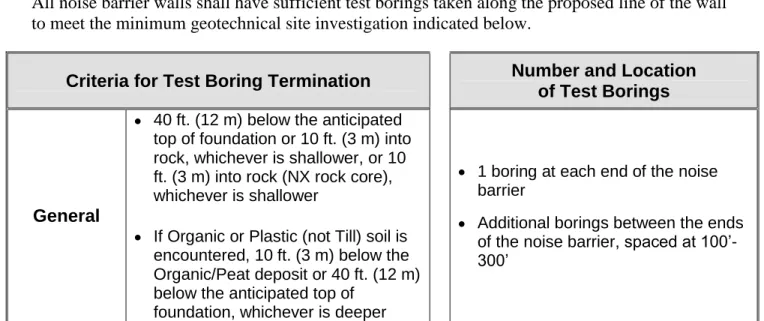
4.5.6 Noise Barrier Walls
All noise barrier walls shall have sufficient test borings taken along the proposed line of the wall to meet the minimum geotechnical site investigation indicated below.
Criteria for Test Boring Termination Number and Location
of Test Borings
General
40 ft. (12 m) below the anticipated top of foundation or 10 ft. (3 m) into rock, whichever is shallower, or 10 ft. (3 m) into rock (NX rock core), whichever is shallower
If Organic or Plastic (not Till) soil is encountered, 10 ft. (3 m) below the Organic/Peat deposit or 40 ft. (12 m) below the anticipated top of
foundation, whichever is deeper
1 boring at each end of the noise barrier
Additional borings between the ends of the noise barrier, spaced at 100’-300’
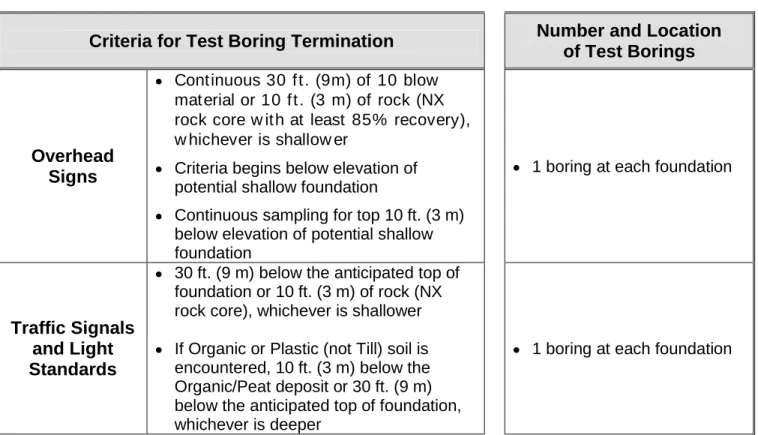
4.5.7 Overhead Signs, Traffic Signals, and Light Standards
Overhead signs, traffic signals, and light standards are typically constructed on drilled shaft foundations, with design sheets for overhead signs allowing for shallow footings. All overhead signs, traffic signals, light standards, and similar structures shall have sufficient test borings taken at each proposed foundation to meet the minimum geotechnical site investigation indicated below.
Criteria for Test Boring Termination Number and Location
of Test Borings
Overhead Signs
Continuous 30 ft . (9m) of 10 blow material or 10 ft . (3 m) of rock (NX rock core w ith at least 85% recovery), w hichever is shallow er
Criteria begins below elevation of potential shallow foundation
Continuous sampling for top 10 ft. (3 m) below elevation of potential shallow foundation
1 boring at each foundation
Traffic Signals and Light Standards
30 ft. (9 m) below the anticipated top of foundation or 10 ft. (3 m) of rock (NX rock core), whichever is shallower If Organic or Plastic (not Till) soil is encountered, 10 ft. (3 m) below the Organic/Peat deposit or 30 ft. (9 m) below the anticipated top of foundation, whichever is deeper
1 boring at each foundation
4.5.8 Pavement Structures
Subsurface investigation requirements for pavement structure design vary with location, traffic level, and project size. At a minimum, the subsurface exploration program must determine the composition of the pavement structure, the thickness of the subbase layer, and the character of the subgrade/embankment material. All pavement structures shall have sufficient test borings taken within the proposed area of pavement work to meet the minimum geotechnical site investigation indicated below.
Criteria for Test Boring Termination Number and Location
of Test Borings
General
Minimum 10 ft. (3 m) below top of pavement
Continuous sampling for top 5 ft. (1.5 m) or to bottom of former pavement layers, whichever is deeper.
Borings spaced at 100 ft. – 300 ft., depending on the characteristics of the proposed area of pavement work
Where conditions are diverse, additional pavement cores and borings at multiple locations may be warranted
Table 4-9 Pavement Structure - Minimum Requirements
4.5.9 Infiltration Basins and Wetland Mitigations
Subsurface investigation requirements for infiltration basins or wetland mitigations vary with application, site conditions, and facility geometry. All infiltration basins and wetland mitigations shall have sufficient test borings taken within the proposed area of the facility to meet the
minimum geotechnical site investigation indicated below.
Criteria for Test Boring Termination Number and Location
of Test Borings
General
Continuous sampling for top 10 ft. (3 m) below anticipated bottom elevation or 10 ft. (3 m) into rock (minimum AX rock core), whichever is shallower
1 boring every acre within the proposed area of the facility
Additional borings in irregular shaped or separate areas that may be less than 1 acre Additional borings, test pits, or percolation tests may be utilized to obtain information between the borings
4.5.10 Trenchless Pipe Installation
Subsurface investigation requirements for trenchless pipe installations must consider the
complexity of the installation, the size and depth of the jacking and receiving pits, the design of dewatering system, and construction methods of the various installation techniques. All
trenchless pipe installations shall have sufficient test borings taken within the proposed area of the pipe installation to meet the minimum geotechnical site investigation indicated below.
Criteria for Test Boring Termination Number and Location
of Test Borings
General
15 ft (4.5 m) below anticipated pipe invert
If Rock is encountered, minimum 10 ft. (3 m) below anticipated pipe invert and minimum 5 ft. (1.5 m) of rock
(minimum AX rock core)
1 boring every 50’-200’ within the proposed area of trenchless pipe installation
Where conditions are diverse, additional borings may be warranted
Jacking and Receiving
Pits
25 ft. (7.5 m) below anticipated pipe invert
If Rock is encountered, minimum 10 ft. (3 m) below anticipated pipe invert and minimum 5 ft. (1.5 m) of rock
(minimum AX rock core)
1 boring at the anticipated pit locations
Table 4-11 Trenchless Pipe Installation - Minimum Requirements
4.5.11 Other Applications
Various other applications for subsurface explorations will be encountered, including, but not limited to, landslide mitigation, environmental contamination, groundwater monitoring, structural integrity, etc. Every application and each site will be different. It will be the
responsibility of the geotechnical engineer to establish an exploration program that provides the information needed for efficient design and construction. The experience of the engineer and the requirements presented in this section can serve as guidelines in developing the program.
4.6 SUBSURFACE EXPLORATION AND SAMPLE TYPES
NYSDOT has a protocol for identifying each type of subsurface exploration (e.g., cased drill holes, test pits, seismic points, etc.), and each individual soil sample and rock core. Presented in this section is an outline of the procedure to be used in identifying the type of subsurface
exploration progressed, the design element for which the exploration was progressed, and the type of sample obtained.. The type of exploration utilized is typically based on project specific information and the site conditions.
4.6.1 Identification System for Subsurface Explorations
Table 4-12 provides abbreviations and symbols that are to be used to identify all subsurface explorations on all State projects:
Abbreviation Type of Exploration
DA 2½ in. (65 mm) Cased Hole
DN 4 in. (100 mm) Cased Hole
FH Hollow Flight Auger
DM Drilling Mud
PA Power Auger
AH Hand Auger
CP Cone Penetrometer
PH Probe
RP 1 in. (25 mm) Sampler (Retractable Plug)
TP Test Pit
PT Percolation Test Hole
SP Seismic Point
The abbreviation ‘PA’ is used for borings progressed with augers having solid stem or single helix.
Table 4-12 Abbreviations for Various Types of Subsurface Explorations If a drill hole is started by one drilling method and finished by another method, it should be identified by the second method. Any changes of drilling method or casing size should be noted on the driller’s field log.
The subsurface explorations in the DA, DN, FH, and DM category shall further be identified by the abbreviations provided in Table 4-13.
Abbreviation Design Element B Bridge C Cut D Dam F Fill K Culvert W Wall X Miscellaneous
The abbreviation ‘X’ is used when none of the other designations apply at the time the exploration is made.
Table 4-13 Abbreviations for Various Design Elements
Each exploration shall be numbered sequentially. However, if a planned exploration is not made, a gap in consecutive numbers is permitted. If past explorations will be incorporated into the project design, new explorations shall be numbered to avoid repeating the identifying numbers of past explorations.
If a subsurface exploration is ended prior to reaching the required termination criteria, an
adjacent continuation exploration should be designated with a lower case letter, starting with “a”, added to the number of the original exploration.
The name of the structure, the road crossing, the stream, river or creek shall be shown in the space provided on the bottom of the log. For example:
• Mainline Southbound over Morris Road • West Avenue over Penn Central
• Culvert at Roaring Brook
The following are examples of proper subsurface exploration identification:
DA-C-1 This is a 2½ in. (65 mm) diameter boring progressed for a cut.
DN-B-2 This is a 4 in. (100 mm) diameter boring progressed for a bridge.
DN-B-2a This is an adjacent continuation of boring DN-B-2.
4.6.2 Identification System for Individual Soil and Rock Samples Each jar, tube, bag or other container shall be identified by the following:
• PIN
• Exploration Number • Individual Sample Number
A typical sample number would be 3102.00-DA-B-1-J1. This number identifies the first jar sample from a 2½ in. (65 mm) boring designated as DA-B-1 on project number 3102.00.
The abbreviation “J” is used to identify samples placed in jars and “T” is used to identify tube samples. The “J” and “T” refer to the container that the sample is in when it leaves the field. If a tube is pressed and the soil sample is put into a jar, it would be a "J" sample.
Number all soil samples in each exploration consecutively, i.e., J1, J2, T3, J4, T5, etc.Number all rock core runs in each exploration as a separate consecutive sequence, i.e., R1, R2, R3, etc. Likewise number all boulder runs as a separate consecutive sequence, i.e., B1, B2, B3, etc., or J1, J2, B1, J3, B2, J4, etc. (when boulders are embedded among soil samples).
4.7 FIELD EXPLORATIONS AND SAMPLING
This section discusses items related to various methods of subsurface exploration, soil and rock sampling, sample storage and transport, and in-situ field testing.
4.7.1 Soil and Rock Sampling in Test Borings
ASTM and AASHTO have procedures that must be followed for the collection of field samples. All samples must be properly obtained, protected, and transported to a laboratory facility in accordance with these procedures in order to preserve the samples in their original sampled condition as best as possible. Methods used for collecting samples are described below. 4.7.1.1 Bulk Samples
Bulk samples are highly disturbed samples typically obtained from auger cuttings or test pits. The quantity of the sample depends on the soil properties to be determined, but sample sizes can range up to 50 lb (25 kg) or more. Typical laboratory testing performed on bulk samples include natural moisture content, grain-size distribution, density relationship, and moisture-plasticity relationship.
4.7.1.2 Split-Barrel Sampling
The most commonly used soil sampling method is the split-barrel, or split-spoon, sampler. The samplers are typically 18” (450 mm) or 24” (600 mm) in length, and have a 2” (50 mm) OD and a 1.5” (38 mm) or 1.375” (35 mm) ID. The sampler is driven into soil by means of hammer blows. This method is used in conjunction with the Standard Penetration Test. This type of sampling is adequate for moisture content, grain-size distribution, Atterberg Limits tests, and visual identification.
Refer to ASTM D1586 - Standard Test Method for Penetration Test and Split-Barrel Sampling of Soils (AASHTO T206 - Standard Method of Test for Penetration Test and Split-Barrel Sampling of Soils).
4.7.1.2.1 Progressing the Test Boring for Sampling
The hole for the test boring is progressed by one or combinations of the following methods: • Advancing flush-joint casing by rotary drilling or by driving with a hammer
• Utilizing hollow flight augers to create a cased opening • Opening a stable, uncased hole using a drilling mud process
Prior to sampling, the drill hole or casing is cleaned to the sampling elevation by using equipment that will not disturb the material to be sampled. Bottom discharge bits, including samplers, shall not be used for this operation. "N" size drill rods are typically used in casing having an ID of 3” or larger.
When casing is advanced by driving, the blow count per foot should be recorded. Casing refusal is considered as 300 blows for less than 12 in. of penetration. When refusal is encountered, the casing is cleaned and coring then begins, unless otherwise directed by the Departmental Geotechnical Engineer.
4.7.1.2.2 Obtaining a Sample
The sampler is placed on the bottom of the cleaned out hole, then driven the length of the sampler using a 140 lb (625 N) hammer falling freely 30” (750 mm). The number of blows required to drive the sampler each increment of 6” (150 mm) is recorded. The sum of the number of blows required for the second and third 6” (150 mm) increments of penetration is termed the "standard penetration resistance" or the "N-value".
Sampler refusal is 50 hammer blows for less than 6” of penetration. If refusal is encountered before the desired sample length is attained, the sampler is removed from the hole and core drilling started. When less than 6” of sample is retrieved in a split barrel sampler, the sampler may be immediately re-driven in an attempt to obtain more material. Only the first set of blows is recorded on the boring log, but a note is included under remarks indicating that a second sampling attempt was made. A basket or other spring type retainer may be used on any or all sampling attempts. When sampling material below the water table, the hole is kept full of fluid during the removal of tools to prevent flow of soil into the casing.
After driving is completed, the sampler is retrieved and the soil sample is removed, then packaged and identified as described in the following subsection.
Standard penetration tests and collection of samples is typically done at 5-foot intervals, although continuous sampling in the upper 10-15 feet is common. Samples should also be taken at every change in stratum. Specific sampling requirements may be directed by the Regional
4.7.1.2.3 Packaging and Identification of Samples
Samples are placed in tied plastic storage bags and placed in jars in such a manner so as to maintain the sampled condition of the soil. The side of the jar is labeled to show the project name, PIN, hole number, sample number, the depth from which the sample was taken, and any remarks that might pertain to that sample. Jars are placed in cartons clearly labeled to identify its contents, specifically the project name, PIN, test boring numbers, enclosed jar sample numbers, etc.
Samples must be protected from freezing or extreme heat. Refer to ASTM D4220 - Standard Practices for Preserving and Transporting Soil.
4.7.1.3 Thin-Walled Tube Sampling
Thin-walled tube samples are taken to obtain undisturbed samples of fine grained soils
containing silt and clay, and of some organic materials. To obtain a sample, a thin-walled metal tube, e.g., 3” dia. x 36” long (75 mm x 900 mm), is pressed into the soil at the sample depth. The sampler is removed from the bore hole and immediately sealed, then taken to a laboratory
facility. It is extremely important that the samples be pressed, handled, and transported with a minimum amount of disturbance. Careless handling of samples can cause misleading test results that could result in inadequate designs.
This process allows the sample to be as undisturbed as possible and is suitable for fine-grained or organic soils that require strength and consolidation tests. Refer to ASTM D1587 - Standard Practice for Thin-Walled Tube Sampling of Soils for Geotechnical Purposes (AASHTO T207 -
Standard Method of Test for Thin-Walled Tube Sampling of Soils) and ASTM D6519 - Sampling of Soil Using the Hydraulically Operated Stationary Piston Sampler.
4.7.1.3.1 Progressing the Test Boring for Sampling
The hole shall be a minimum of 4 inches in diameter. Drilling mud may be used if permitted by the Departmental Geotechnical Engineer. Hollow stem augers are not allowed. The hole shall be cleaned using methods and equipment which will not disturb the soil to be sampled. Bottom discharge bits, including samplers, will not be allowed as hole cleanout tools.
The 2-1/2 inches of soil directly above the sampling elevation shall be removed with a cleanout jet auger without the use of water. "N" size drill rods or larger shall be used.
4.7.1.3.2 Obtaining a Sample
At the elevation to be sampled, the tube is pressed into the soil with a continuous motion a distance of 18 inches. Care is taken to allow air and water to flow freely through the vent, thus preventing compression of the soil sample. After pressing the tube to the required depth and waiting a minimum of 5 minutes, the sampler is carefully rotated and removed from the hole.
Thin-walled tube samples are taken in the strata identified by the Departmental Geotechnical Engineer. Samples are recovered with a stationary piston type sampler or a hydraulically operated piston sampler, modified to accept the thin-walled tubes. Samplers with piston rods extending to the ground surface must be provided with clamps which positively lock the piston against upward travel while lowering the sampler to the sampling depth. During the press the piston rods are locked in a stationary position to eliminate any movements either up or down. In addition, the sampler is provided with positive locks to secure the piston rods prior to removal of the sampler after penetration.
During the removal of the sampler, the hole is kept full of fluid. Before the thin-walled tube is removed from the piston, the piston rod is backed off to admit air past the flattened threads to break the vacuum. For other approved types of equipment, the necessary vacuum breaking measures are taken. The length of sample in the tube and also the distance pressed is measured, recorded, and indicated on the tube label.
If a thin-walled sample can not be retained or a tube cannot be pressed, a 2-inch diameter split barrel sampler is driven to obtain a sample.
A wax seal (consisting of a combination of 3 parts paraffin and 5 parts bees wax, or a wax of the same consistency as this mixture) is used to keep the sample from drying. The bottom of the sample is carefully squared off at least 1 in. back from the end of the tube and a wax seal, approximately 1 in. thick, is poured in the bottom end of the tube. The soil at the top of the tube is carefully squared off and a wax seal, approximately 1/2 in. thick, is poured. It is desirable to have a thinner wax seal at the top than the bottom for ease of extruding soil sample. Any space remaining at the top or bottom of the sample tube is filled with sawdust or paper after the wax has hardened. The ends of the tubes are sealed with snugly fitting plastic caps which are secured in place with friction tape. Wax is not placed on the outside of the tube. Labels shall be placed on the tube below center and secured with strips of tape.
Geotechnical Engineering Manual GEM-8Techniques to Improve Undisturbed Sampling was created to evaluate the effects of sampling disturbance on plastic clays. Therein, by comparing the results of good and bad sampling procedures it was concluded that two main causes of unsatisfactory undisturbed samples are improper cleanout and inaccurate measurements. The information in the manual is presented to assist the Departmental Geotechnical Engineer and drilling personnel in obtaining the highest quality undisturbed sample
4.7.1.3.3 Packaging, Identification, and Transporting of Samples
Thin-walled tubes are labeled to show the project name, PIN, Location, hole number, sample number, depths from which the sample was taken, amount pressed, amount recovered, and any remarks that might pertain to that sample. The samples are handled, stored, and transported using care to prevent the samples from being subjected to freezing, drying, jarring, and any other disturbance. The tubes properly packaged are stored and transported in an upright position at all times.
4.7.1.4 Rock Core Sampling
The most common method for progressing a test boring through rock is diamond core drilling. As the core advances through the rock, a core sample of the rock can be collected in a core barrel. There are three basic types of core barrels: single tube, double tube, and triple tube. Refer to ASTM D2113 - Standard Practice for Rock Core Drilling and Sampling of Rock for Site Investigation (AASHTO T225 - Standard Method of Test for Diamond Core Drilling for Site Investigation).
4.7.1.4.1 Obtaining a Rock Core
The hole is progressed through the overburden until refusal on the casing or soil sampler is encountered. Unless directed otherwise, continuous core drilling should then be progressed in boulders and ledge rock to depths determined by the Departmental Geotechnical Engineer. Cores having a diameter of 1-1/6 in. to 2-1/6 in. (30 mm to 55 mm) are typically obtained using a double tube, swivel type, core barrel capable of continuous coring lengths of 5 feet (1.5 m). If at any time the core barrel is withdrawn by more than 1 inch (25 mm), the core barrel is removed from the hole and the core removed from the barrel.
Rock core recoveries of less than 85% of each run are typically considered unacceptable and coring shall continue for another 5 foot (1.5 m) run, unless in the judgment of the Departmental Geotechnical Engineer, the necessary information has been obtained.
4.7.1.4.2 Packaging and Identification of Rock Cores
The rock core is placed in a wooden core box and secured to maintain it in its sampled condition. Rock cores and the core box are labeled in accordance with the Geotechnical Engineering
Bureau drawing entitled "Instructions for Labeling Rock Cores". Where sections of the core contain numerous small pieces, the pieces shall be bagged and placed back into their original position within the core length. The bagged pieces shall be numbered as a “singular” piece within the rock core.
4.7.2 Test Boring Logs
All information obtained during the progression of a test boring is recorded in the field on a Drillers Field Log (Fig 4-5). All information from the field log shall be included in a finalized drill log (Fig 4-6). A log will be prepared for each boring. In addition to the information identified for inclusion on the log, the following should also be noted, if encountered:
1. Groundwater - where it was encountered
2. Artesian - where it was encountered and the height of flow
3. Boulders, cobbles, and other obstructions - where they were encountered 4. Voids and/or gas pockets - where they were encountered