Application Packaging
Self-Service
User Manual
Contents
1 Product overview ... 3
2 Getting started ... 4
2.1 Signing up for APS ... 4
3 Working with APS... 5
3.1 Projects and Dashboards ... 5
3.1.1 Creating a project ... 5
3.1.2 Dashboards ... 8
3.1.3 Project Page ... 8
3.1.4 Project Settings ... 9
3.2 Uploading Sources and Downloading Results ... 10
3.2.1 Source requirements ... 10
3.2.2 Uploading via web ... 10
3.2.3 Project Sharing ... 11
3.2.4 Network Share folders ... 12
3.3 Package page ... 13
3.3.1 Package Settings ... 15
3.3.2 Prerequisites ... 15
3.3.3 Packaging and testing Tasks ... 15
3.4 Packaging and testing workflow ... 16
3.4.1 Statuses ... 16
3.4.2 Operations ... 16
3.4.3 Testing workflow ... 17
3.5 Installation Modes ... 18
3.5.1 Automatic Installation Mode ... 18
3.5.2 Manual Installation Mode ... 19
3.6 Packaging Deliverables ... 20
3.7 Testing deliverables ... 21
3.7.1 Test Report ... 21
3.7.2 Advanced reports ... 22
1
Product overview
Application Packaging Self-Service (APS) is an innovative cloud solution that provides smart application packaging, testing and documenting. APS enables a user to focus on making decisions by reducing routine packaging tasks.
With a number of unique features, APS helps to significantly increase comfort and performance and reduce human efforts for application packaging.
Key features and benefits of APS:
Full automation of routine operations
Package batch processing with nearly no user interaction
Installing and configuring applications through the web interface
Access to a virtual packaging OS through the web interface
Automated source packages installation option
Processing multiple applications and providing multiple outputs per application at once.
APS can be accessed as the public cloud service or deployed as a boxed solution inside your IT infrastructure.
2
Getting started
To start working with Application Packaging Self-Service (APS), you need to create your account and log in to the system.
2.1
Signing up for APS
To create an account, follow the steps below.
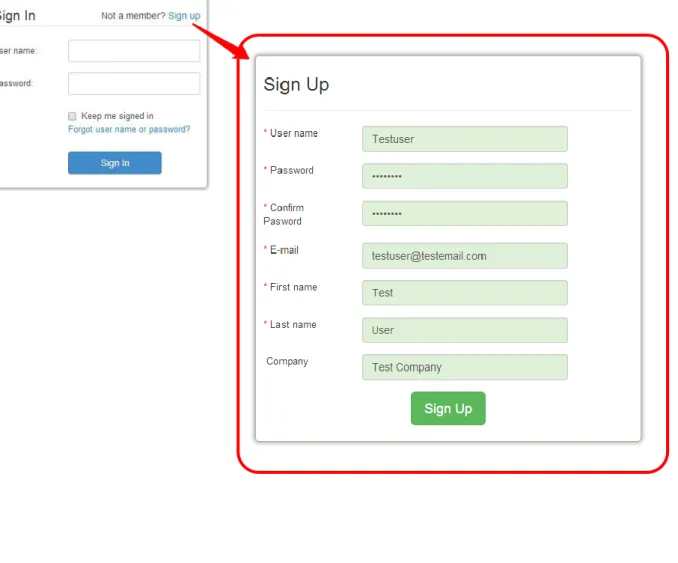
1. Go to APS web address in your browser and click Sign Uplink. Fill in the registration form (See Figure 1).
NOTE: A valid email has to be specified because an activation link will be sent to it. Additionally, only corporate emails are supported.
2. Go to your mailbox and click an activation link sent to you in an e-mail.
3. Now you’re able to log in to APS with your user name and password at any time.
3
Working with APS
3.1
Projects and Dashboards
All the packages you produce or test with APS are grouped by projects. A project defines default settings, packaging platforms and package format options to be applied to its packages.
To start packaging or testing, you need to create at least one project.
3.1.1
Creating a project
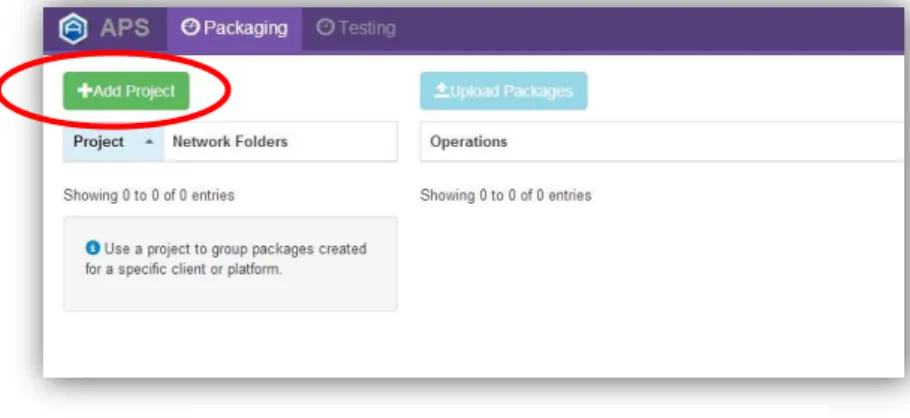
Log in to APS and your Dashboard will be shown (Figure 2). Click Add Project button.
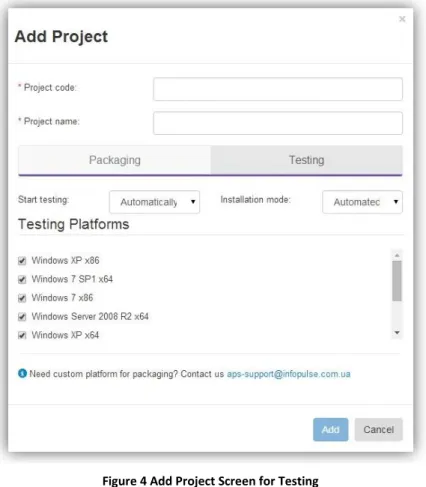
In Add Project form, fill in details and settings of your project.
Figure 2 APS Dashboard, Add Project button
Project code – a short identifier of the project. It is recommended to use an easily recognizable code. Please note, that project code cannot be changed later.
Project Name – name of the project.
Installation mode – choose an installation mode to be applied to incoming sources during packaging by default:
Automated – APS will attempt to install the source installations automatically with default options;
Manual – uploaded source applications will be installed and configured by user. See Installation Modes for details.
Start Packaging – choose an option of starting packaging when a new source installation has been uploaded:
Automatically – APS will start packaging process automatically when a new source installation has been uploaded;
Manually – each package will wait for you to review its settings and trigger packaging start.
See Managing Packaging process for more info.
Platforms for packaging – Select the platforms packages to be created for. It is recommended to uncheck the platforms you’re not going to use in your project. Custom platforms (your virtual machines) can be used as well – please contact APS support for guidance.
Package types – select output package types for the project: MSI Generator project, MSI/MST,
App-v 4.6 and/or App-V 5. MSI Generator project is a default option and cannot be unchecked.
NOTE: MSI type implies creation of transforms (MST) for detected vendor MSI products as well.
If you will go to Testing tab you will be able to choose settings for testing.
Start testing – you may choose in drop-down menu how to start your testing process:
Automatically – APS will start testing process automatically when a new package has been uploaded.
Manually - each package will wait for you to review its settings and trigger testing start. Installation mode – choose an installation mode to be applied to incoming sources during testing by default:
Automated – APS will attempt to install the sources automatically;
Manual – uploaded source applications will be installed and configured by user. See Installation Modes for details.
Testing Platforms – Select the platforms testing packages to be created for. It is recommended to uncheck the platforms you’re not going to use in your project. Custom platforms (your virtual machines) can be used as well – please contact APS support for guidance.
3.1.2
Dashboards
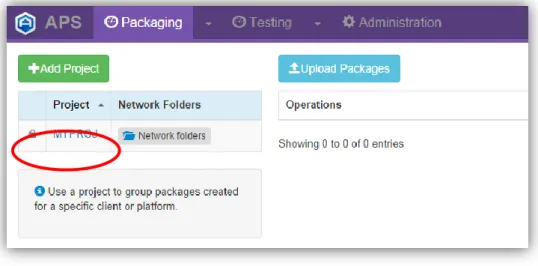
When created, a project appears in Projects list on the Packaging Dashboard (Figure 5).
The Project also appears on Testing Dashboard (Figure 6 Testing Dashboard, Projects List).
3.1.3
Project Page
Project page allows managing settings of a project and view and controlling its packages. To access it, click project name or code on the Dashboard (see Figure 5).
Figure 5 Packaging Dashboard, Projects List
Project Page displays settings panel in the left and Packages List in the right (Figure 7).
3.1.4
Project Settings
Project page allows you to specify the following installation-related settings:
Project Sharing – this option allows you to share your project with users which are the members of your group.
Prerequisites – this option allows you to perform manual virtual machine pre-configuration before packaging process (e.g. to install prerequisites).
Manual installation timeout – how long will APS wait for a user to perform a manual installation in case the package has been switched to Manual installation mode (See Installation Modes). When this timeout is exceeded, the package will be paused to free up a Virtual Machine.
Company Name and User Name – registration details to be automatically specified in installation dialogs (for sources installed in Automatic mode);
Default Installation Mode, Start Packaging, Platforms, Package Types can also be changed (see Creating a project for reference of them);
MSI Options – view and update default MSI/MST creation options for the project. Please note that these options are compatible with MSI Generator profiles - you can download or upload a profile.
Figure 7 Project Page
3.2
Uploading Sources and Downloading Results
3.2.1
Source requirements
To get packaging started, you need to upload your sources into a Project. The following types of source files can be uploaded to APS:
Installation executables (EXE, MSI etc.);
Archives and disk images (ZIP, RAR, 7Z, ISO etc.).
IMPORTANT! Each uploaded file is considered as a separate package. Therefore, please make sure any source consisting of multiple files is compressed into a single archive. Include any prerequisites, patches or documentation to the same archive as well.
You can upload sources to APS in two ways (either a single source or multiple sources at once): Via web interface
Via Network Share folders
3.2.2
Uploading via web
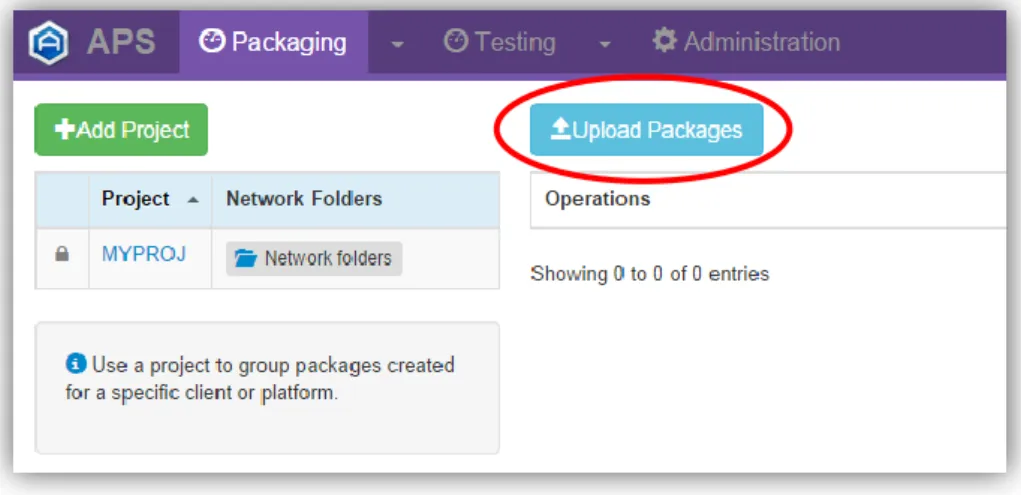
To upload sources in a web, click Upload Packages button on the Packaging Dashboard or on Project Page
(see Figure 9).
In Upload Source Packages Form (Figure 10), click Browse Files, select files to upload and click Upload.
NOTE: It is not recommended to upload large sources (500 mb and more) via web. Please use Network Share Folders instead.
3.2.3
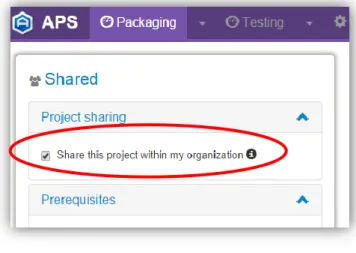
Project Sharing
If your user account is assigned to an organization or a group, you can share your Project in read-only mode with other organization/group members. To do so, select the respective checkbox on project page:
Visibility of a project can be distinguished by its icon (see Figure 12).
Figure 10 Upload Source Packages web form
Icon Description
Project is created by you and is visible only to you.
Project is shared by you within your organization/group. Other users can view statuses and download results.
Project is shared to you by other user (you can only view statuses and download results).
3.2.4
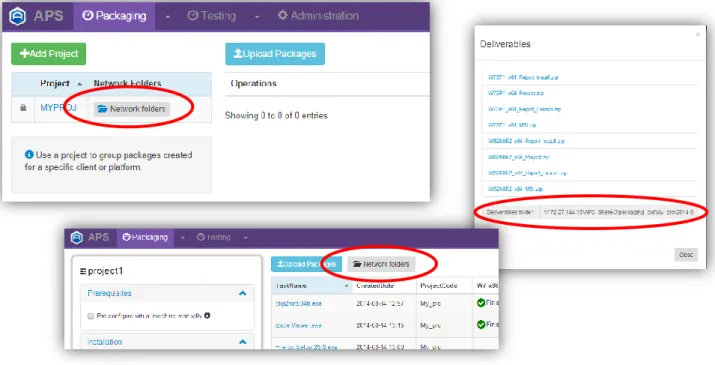
Network Share folders
To enable convenient file transfers Network Share folder is automatically created to upload sources and download deliverables of each project in APS.
These folders can be accessed via the following addresses:
Table 1 APS project Network Share folders
Folder Type Network Share Address
Sources for packaging \\<aps_host>\APS_Share\<serialnumber>\packaging_in\<project_code>\
Packaging results \\<aps_host>\APS_Share\<serialnumber>\packaging_out\<project-_code>\
Input for testing \\<aps_host>\APS_Share\<serialnumber>\testing_in\<project_code>\
Testing results \\<aps_host>\APS_Share\<serialnumber>\testing_out\<project_code>\ Use username and password that were granted to you by your system administrator to access the folders. As an alternative to uploading sources via web, simply copy them to packaging_in or testing_in network share folders of your project.
When a package is created or tested by APS, its deliverables appear in packaging_out or testing_out
folders of a project and can be downloaded from there.
Network Share folders of a project as well as a specific package deliverables can be quickly accessed from APS Dashboard, Deliverables or Project Page. Just copy necessary link and paste it to your address bar of your local folder (see Figure 13).
3.3
Package page
To view full information about a specific package and manage its settings, go to the Package page by clicking on package name in Dashboard Packages list or Project packages list.
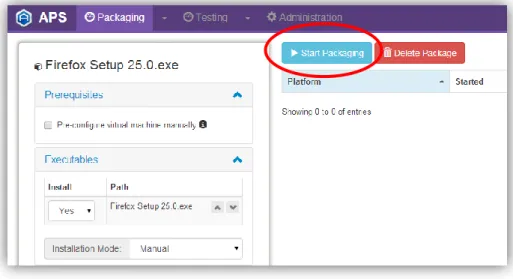
When a new source file is uploaded, a new package appears in packages list on the Packaging or Testing Dashboards and Project Page.
Packaging process will either be started automatically (If Start Packaging option is specified as
Automatically in project’s settings) or require a user to click Start Packaging button on a the Package Page
(see Figure 14).
NOTE: Packaging will NOT start automatically if multiple executables are found in a source. In such case you are required to configure the package’s settings (select required executables and their execution order) and trigger packaging start.
3.3.1
Package Settings
Package page allow you to manage the following package-related data and settings (Figure 15):
Prerequisites – this option allows you to perform virtual machine pre-configuration before packaging and testing processes.
Executables – This section shows executable files detected in the source. For each one, specify the following options: Install – Select Yes to include this installation to the package, No to ignore (not to install).
Use buttons to change an order of files execution. Installation Mode – select an Automatic or Manual Installation mode for the package (See Installation Modes). Platforms – Change a set of platforms a package to be created for;
Package types – change output package types;
MSI Options – view and update MSI package creation and MSI Transform creation options for the package;
Asset Dir – specify an Asset Directory name for output App-V package.
3.3.2
Prerequisites
‘Prerequisites’ option allows you to configure virtual machine before testing or packaging processes. If you enable this option you will be able to enter VNC session and perform necessary actions before packaging or testing.
3.3.3
Packaging and testing Tasks
For each platform a single package is targeted for, a separate Packaging (Testing) Task is run. Tasks that belong to a package are displayed on its page (Figure 16). Each task can be set to an individual Installation Mode.
Figure 14 Link to a session for manual prerequisites installation
For example, the package on Figure 16 is set to Automatic installation mode on Windows XP and Manual on Windows Server 2008 to enable non-default settings to be specified in installer dialogs by user.
3.4
Packaging and testing workflow
3.4.1
Statuses
A status of each package is always shown in the Status column in Packages List (see Figure 17).
Status Name Description
Pending Package is awaiting in a queue and will be started as soon as possible.
In Progress Package is being processed. Hover the the status with mouse pointer to see more details of current operation.
Finished Packaging is finished, all deliverables are available.
Need prerequisites VM is awaiting for for a pre-configuration bu user (e.g. installation of any prerequisites). Click the status to access VM via web browser and perform the reuqitred actions.
Need manual install VM is awaiting for user to install the source software. Click the status to access VM via web browser and perform the reuqitred actions.
Canceled Package was cancelled by user.
Error Error was encountered during while processing the package. Hover the status the see details.
3.4.2
Operations
A package or a particular packaging task can be canceled or restarted (e.g. with changed options) at any time. To do so, use buttons in Packages/Tasks list or on top of a Package Page (see Figure 16 above).
To completely remove a package from APS, click Delete Package button in packages list or on package page.
Figure 16 Packaging Tasks List on a Package Page
3.4.3
Testing workflow
Testing wokflow depends on installation mode selected. See Installation Modes to learn how to manage these modes.
3.4.3.1 Automatic mode
Step Mode
1. A VM of a selected platform is launched at “Testing” snapshot Automatic
2. Manual session to pre-configure a VM or install prerequisites Manual,
Optional
3. First system snapshot is made Automatic
4. Package is installed under System account, all automantic actions are recordes and logs are collected.
Automatic
5. Second system snapshot is made, MSI Generator project of “Installed” state is created.
Automatic 6. All installed shortcuts are launched, appropriate reports are created Automatic
7. Repair Automatic
8. Package is uninstalled under System account, all automatic actions are recorded and logs are collected.
Automatic 9. Third system snapshot is made, MSI Generator project of “Uninstalled” state is
created.
Automatic
3.4.3.2 Manual mode
Step Mode
1. A VM of a selected platform is launched at “Testing” snapshot Automatic 2. Manual session to pre-configure a VM or install prerequisites Manual,
Optional
3. First system snapshot is made Automatic
4. A manual session to install a package, do any manual tests, then uninstall it Manual 5. Second system snapshot is made, MSI Generator project of “Uninstalled” state
is created.
Automatic
3.5
Installation Modes
An Installation Mode defines the way a source installation is installed during packaging or testing. The Installation Mode can be set per Project, per Package and per a Packaging or Testing Task (see Figure 19).
3.5.1
Automatic Installation Mode
PackagingIn Automatic installation mode a package source is attempted to be installed automatically. APS will try to launch the installation and automatically click through an installation user interface using default settings. A Packaging Task is automatically restarted and forced to Manual mode in case APS could not automatically follow through installation dialogs (e.g. because of user’s choice required on some dialog).
Testing
See Testing workflow for details about installation modes for testing.
3.5.2
Manual Installation Mode
PackagingFor packaging tasks in Manual installation mode, APS does everything except clicking through installation dialogs. This task is delegated to a user.
Select Manual mode for packages requiring specific configuration to be performed during or after installation (for example, you need non-default setting to be specified during the installation).
Testing
See Testing workflow for details about installation modes for testing.
When a Manual-mode packaging or testing task is ready for you connect and to follow up an installation, you’ll receive an email notification. To perform a manual installation click status name on a dashboard or a project/package page (Figure 20).
A web-based desktop session will be opened right in your browser. Manual mode allows you:
- Reboot System and continue installing necessary software; - Reboot system and finish;
- Finish if done (Figure 21).
Messages on a virtual machine’s desktop will give you guidance during your session.
Launch the installation and apply any required configuration. When done, click Finish (or Reboot and Finish) button right on the VM’s desktop. After this you can close your session while APS will catch up creating the package.
3.6
Packaging Deliverables
To access deliverables, click green “Download” button for any package or task (see Figure 22), or navigate to a respective output folder via Windows Explorer (see Network Share folders for details).
APS creates the following deliverables, for each Platform and according to Package Type specified
Deliverable name Description
Project MSI Generator project. Can be edited with MSI Generator and built into any package type. Enables to review and manage all included and excluded resources and any other package options.
Figure 21 Web-based session for manual installation
MSI A whole installation repackaged into an MSI package.
MST An MSI transform created for a vendor’s MSI file (if found in source
installation).
AppV4 App-V 4.6 package.
AppV5 App-V 5.0 package.
Report_Install Automatic source installation report with screenshots and logs.
Report_Launch Automatic application luach report with screenshots.
Report_Manual_Install Report of manual steps taken to install source installation with screenshots and logs.
Having multiple deliverable types created for an application, you have more freedom to make decisions and select the best approach for each application.
A <PackageName> folder contains all package deliverables ZIP-archived. See an example output folder contents on Figure 23.
3.7
Testing deliverables
To access deliverables, click green “Download” button for any package or task (see Figure 22 above), or navigate to a respective output folder via Windows Explorer (see Network Share folders for details).
3.7.1
Test Report
All results of testing of a package are gathered into an excel-based testing report. The report is available on a dashboard and on a package page (see pictures below). The report is automatically filled in by APS on-the-fly. This means that you can view current results even when a task is not finished.
3.7.2
Advanced reports
In addition to testing report, the following results are available:
Deliverable name Description
Report_Install Installation report with screenshots and logs.
Report_Launch Application launch report with screenshots and logs.
Figure 26 Test report on package page Figure 25 Testing report on a dashboard
Report_Manual_Install (for Manual mode) Report of the sequence of manual installation actions – with screenshots and logs.
Report_Uninstall Unstallation report with screenshots and logs.
Report_Repair Repair report with screenshots and logs (avaialalble for MSI package only).
Project_Installed Comparison of system state before installation vs after installation.
Shows installed resources. Format: MSI Generator project.
Project_Repaired Comparison of system state after installation vs after repair.
Shows if all resources were repaired. Format: MSI Generator project.
Project_Uninstalled Comparison of system state before installation vs after uninstallation.
Shows resources that were not removed. Format: MSI Generator project.
These deliverables are available on package page (use “Download” button), and on Network Share folders.
3.8
User Profile
To view and edit your User Profile or to purchase additional packages allowance, click User profile link at the top right corner of the page (Figure 28).
Figure 27 Contents of test results folder
On User Profile page, you can edit your personal information, change your password, and enter a new License Key enabling you to extend your packages limit (see Figure 29).