Web Protection Services
Setup Guide
Product Version: Web Protection
Release Date: November, 2010 Document Version: 0.3
RESTRICTION ON USE, PUBLICATION,
OR DISCLOSURE OF PROPRIETARY
INFORMATION.
Copyright © 2010 McAfee, Inc.
This document contains information that is
proprietary and confidential to McAfee. No
part of this document may be reproduced,
stored in a retrieval system, or transmitted, in
any form or by any means (electronic,
mechanical, photocopying, recording, or
oth-erwise) without prior written permission
from McAfee. All copies of this document
are the sole property of McAfee and must be
returned promptly upon request.
McAfee, Inc.
9781 South Meridian Blvd., Suite 400
Englewood, CO 80112 USA
Direct +1 720-895-5700
Fax +1 720-895-5757
Contents
Overview . . . 1
Introduction . . . .1
Requirements . . . .1
Supported Environments: . . . .1
Web Protection Service . . . 3
Determine Web Protection Authentication . . . .3
Add Users to Account Management (Explicit User or Transparent Authentication) . . . .4
Add IP Address(es) for IP Range Authentication . . . .5
WDS Connector (Transparent Authentication) . . . .5
Download the WDS Connector Guide . . . .5
To begin installation: . . . .5
Proxy Configuraton . . . 7
How to configure a static proxy setting in your browser: . . . .8
How to configure a static proxy on all your computers using Group Policy . . . .10
Manually configuring proxy on one computer: . . . .11
Locking down your proxy . . . .11
Delivering the Mozilla.cfg file and auto-configuring Mozilla Firefox through a login script . . .16
How to create a Proxy Automatic Configuration (PAC) file or Web Proxy Auto-Detect(WPAD) file. . . .18
Basic WPAD or PAC file Example . . . .18
Web Server Setup required to use a PAC file . . . .20
WPAD Setup for DHCP. . . . .23
Common Configuration Issues . . . .28
Check a hard-coded proxy setting first . . . .28
Upper Case: . . . .28
Setup Policy Sets . . . 32
Sample Policy Sets . . . .32
Default Web Policies . . . .34
Threat Tab . . . .34
Content tab . . . .34
Trusted Sites . . . .35
Blocked Sites . . . .36
Notifications . . . .37
Forensics . . . 40
Filters . . . .40
Field Description . . . .40
Sort Search . . . .41
Field Description . . . .42
Web Protection Setup Guide
Overview
Introduction
The Web Protection Service provides real-time protection against web-borne threats and inappropriate content at the network perimeter before they can enter the internal network. The Browser traffic for users is redirected to Web Protection. As each request for web content is received, Web Protection checks the content against defined policies and, if enabled, checks for know worms and viruses. Only the content that does not violate those policies and is clean of known threats is returned to the user. You can enable or disable specific web content policies in the Control Console, the comprehensive graphical interface into the Web Protection Service.
Requirements
The Web Protection Service stops threats before they reach your network. After defining your Web filtering policies via your Control Console, Web Protection will redirect company Web traffic to a proxy server to initiate protections. End-user Web sessions are filtered by way of blocking viruses and spyware before they reach your network.
The following must be completed prior to using the Web Protection Service: • Subscribed to Web Protection
• Customer must be created. • Domains must be created.
Important: You may want to consider implementing the Directory Integration feature within Account Management prior to using WDS Connector. In this way, you greatly increase the likelihood that user email addresses in Active Directory match the email addresses in the Web Protection Control Console.
Supported Environments:
The Control Console and Web Protection continues to support the following browsers: • Internet Explorer 6.x on XP
• Firefox 2.x on XP
• Internet Explorer 7.x on XP • Internet Explorer 7.x on Vista • Firefox 2.x on Vista
Web Protection Setup Guide
The following is a list of supported browsers for Web Protection: • Internet Explorer 7.x on Vista
• Internet Explorer 7.x on XP • Internet Explorer 6.x on XP • Firefox 3.x on Vista
• Firefox 3.x on XP • Firefox 3.x on OS X 10.5 • Firefox 3.x on OS X 10.4 • Firefox 2.x on Vista • Firefox 2.x on XP • Firefox 2.x on OS X 10.5 • Firefox 2.x on OS X 10.4
• Safari 3.x on OS X 10.5 (Web Defense End user only) • Safari 3.x on OS X 10.4 (Web Defense End user only)
• All modern Web browsers that use HTTP are compatible with the Web Defense Service filtering.
Web Protection Setup Guide Determine Web Protection Authentication
Web Protection Service
The Web Protection Service stops threats before they reach the corporate network. Once the Web Protection Filtering Policies are defined, web traffic must be redirected to a proxy server and protection then is initiated. Systematically, end-user web sessions are also filtered by Web Protection to block viruses and spyware before they reach the network, if the threat service was purchased.
Determine Web Protection
Authentication
The Access Controls window allows you to define the manner in which users will be authenticated when accessing the Web. For example, you can register a list of accepted IP addresses for your organization.
Choose from one of the three mechanisms provided that allows you into the Web Protection system.:
Note: More than one authentication can be used in conjunction, if desired. IP Range Authentication
Advantages:
• No user login required
• No passwords need to be maintained for users • No software to install
• Can be deployed at the edge of the network using routing
Disadvantages:
• Group policies cannot be applied (all users have one policy)
• No individual reporting, all reporting is grouped by the external IP address
Explicit User Authentication
Advantages:
• Group policies can be applied (different users can have different policies) • Individual reporting on a per user basis
• No software to install
Disadvantages:
• Requires users to log in once per browser session
Web Protection Setup Guide Add Users to Account Management
(Ex-Transparent Authentication (WDS Connector)
Advantages:
• No user login required
• No passwords need to be maintained for users in the Web Protection system • Group policies can be applied (different users can have different policies) • Individual reporting on a per user basis
Disadvantages:
• Requires software to be installed on the corporate infrastructure
• Requires Active Directory and NTLM authentication to recognize users • Requires that each user has an email address in active directory that matches a
corresponding email address in the Web Protection Control Console. • Requires that users log on to the domain interactively
• Requires all browser traffic to route through the WDS Connector
Add Users to Account Management
(Explicit User or Transparent
Authentication)
Account Management is a set of administrative screens you use to configure and manage, in a single location, the entities in the Web Protection Service (Web Protection).
These entities include: • • Domains
• • Users
• • Other administrators, including other Customer Administrators, Domain Administrators, Quarantine Managers, and Reports Managers
In addition, you use Account Management to administer groups of users that share a common email filtering policy.
To setup the users who will be using Web Protection Services use the Account Management Adminstration Guide by going to:
1 http://www.mxlogic.com
2 Click Support.
3 Click Eservices Login
4 Click https://www.mxlogic.com/mxl_support/
5 Click the Account Management Administration Guide
6 Follow the instructions provided to you in the Account Management Administration Guide
Web Protection Setup Guide Add IP Address(es) for IP Range
Authen-Add IP Authen-Address(es) for IP Range
Authentication
1 Log into Console
2 Click the Web Protection tab 3 Click the Setup Tab
4 Add the public (external) IP address for the Corporate infrustructure including: • Single IP
• Two IPs as a CIDR /31 (1.2.3.4 and 1.2.3.5 = 1.2.3.4/31) • A Class C CIDR /24 (1.2.3.0/24)
WDS Connector (Transparent
Authentication)
The WDS ConnectorSM, which is an enhancement to Web Protection Service (Web Protection), allows users to access the web through the Web Protection using existing local network domain credentials. This capability, sometimes known as transparent
authentication, eliminates the need for Web Protection to authenticate a user each time the user opens a browser. Instead, Web Protection validates the user automatically whenever the user opens a browser. Administrators of the Web Protection service can continue to apply group policies to users, as well as track individual web usage, threats, and more.
Download the WDS Connector Guide
The WDS Connector window allows you to download the WDS Connector software so you can install the software and start using the WDS Connector.
5 Click the WDS Connector link.
To begin installation:
6 Click the Download WDS Connector button to download and install the WDS Connector software.
If you accessed the Web Protection Control Console from the Windows server that you are using as the WDS Connector proxy server, you can run installation of the sofware when you download it. In this case, select Run when the first installer window pops up. If you access the Web Protection Control Console from a computer other than the WDS Connector proxy server, you must save the software to a memory stick, a CD-ROM or some other means, transfer the software to the WDS Connector proxy server, and then install the software.
Web Protection Setup Guide WDS Connector (Transparent
Web Protection Setup Guide
Proxy Configuraton
After configuring Web Protection and installing the WDS Connector, (if necessary) on your server and verifying that it can talk to your Active Directory controller and to the Internet, there are several additional things you need to do to configure your clients to be able use the porxy. There are three main ways of doing this:
1 Manually configure clients to point to Web Protection and/or the WDS Connector using Internet Explorer or Firefox’s proxy settings. This is a very effective way of locking down the computers to point to Web Protection. However the main issue with this setup is that it is not very flexible so it is only recommended for small sites or sites where the majority of users are on desktops, not laptops. Also, any configuration of the local computer opens up the possibility that the user will just reverse this
configuration after the IT person walks away. In this section we also go over how to lock down Internet Explorer and Firefox so the user cannot easily change or remove the proxy settings. Finally we show how you can use Group Policy to hard-code your users’ proxies and remove their ability to change them.
2 Use a Proxy Auto Configuration file (PAC file) to script how a user’s web browser will find and use web proxies on your network. Manually configuring clients to be hard-coded to a proxy is very problematic for users on laptops as that proxy is not available unless they are on the company network either through a wired connection or VPN. A PAC file allows you to fix this issue by controlling where the browser will go for proxy information and possibly simply ignoring the proxy and going directly to the Internet when the proxy cannot be found. Another great thing about PAC files is that you can define what will be proxied and what won’t. For instance, while general web browsing is typically better sent through Web Protection, you may not want your critical web based applications to be funneled through a proxy. With a PAC file you can add some intelligence to how the user’s browser decides to route traffic.
3 Finally you may choose to use the Web Proxy Auto-Detect Protocol (WPAD) so that little to no changes are necessary on the client, but rather the browser uses the “Automatically Detect” Setting to look for your configuration file on a web server. If it can’t find the WPAD settings or server, the browser quickly adjusts and goes directly to the Internet. This setting is by far the easiest on the client, but is more intense for the Systems Admin because it includes configuring Web, DHCP and DNS servers. Thankfully the format of the WPAD.DAT file is identical to the PAC file and we provide examples that you can copy and paste as needed in this section.
Please note that this document assumes that you have previously installed the WDS Connector on a computer in your office and have tested that it does function, that it can talk to your domain controller and allows you to get out to the Internet.
Disclaimer: These instructions are provided for your education only and while we have attempted to be as complete and error free as possible, we cannot guarantee this. McAfee does not support, configure or maintain our customer’s networks nor are we responsible for anything you may choose to do after following these instructions. We highly recommend any changes to your network, servers, workstations, laptops, Group Policy, DNS, DHCP and other systems be done first in a safe test environment before being rolled into your live, production or
Web Protection Setup Guide How to configure a static proxy setting in your browser:
corporate environment. Either way, you are completely responsible for your use or misuse of these instructions.
How to configure a static proxy
setting in your browser:
Hard-wiring the Internet Explorer or Firefox settings works fine for small sites, and sites where the computers are mostly desktops. However, this setting does not work well for users on laptops that work locally and remotely as they will not have access to the Internet if they cannot get to the proxy server. Also there is no intelligent routing or fail over should the proxy be unreachable. Finally this configuration assumes that the client and server are not configured to block port 3128 and/or 8080.
Manual configuration of Internet Explorer to point to your WDS Connector Proxy or Web Protection Proxy Servers:
Open Internet Explorer 4 Click Tools – Options
5 Go to the “Connections tab” (For Cabled Connections (Computers plugged into a net cable).
6 Click “LAN Settings”
7 Select the check mark “Use a proxy server for your LAN…”
If Using the WDS Connector follow steps 8 - 9.
8 Enter the Fully Qualified Domain Name (Preferred) or DNS resolvable server name of the server where the WDS Connector is installed.
9 Enter 3128 in the port field
Otherwise complete the following:
Web Protection Setup Guide How to configure a static proxy setting in your browser:
• Port 8080 in Port Field
If not using the WDS Connector continue with the following:
10 We recommend you check “Bypass proxy server for local addresses”. 11 When you are done it should look something like this:
Where “proxy server” is the name of the server you installed the WDS Connector. We recommend using a Fully Qualified Domain Name like proxyserver.yourdomain.com instead of just a server name.
A If on the connections tab you also have entries in the “Dial up and Virtual Network Settings” box, you will need to configure them for the proxy as well. The setup is pretty much the same as above
1.
On the Internet Explorer – Tools – Settings – Connection tab, Highlighthe VPN setting you want to configure and click Settings
2 Select the check mark “Use a proxy server for this connection”
If Using the WDS Connector follow steps 3 - 4.
3 Enter the Fully Qualified Domain Name (Preferred) or DNS resolvable server name of the server where the WDS Connector is installed.
4 Enter 3128 in the port field
Otherwise complete the following:
• Proxy entry provided in Activation Kit • Port 8080 in Port Field
If not using the WDS Connector continue with the following:
Web Protection Setup Guide How to configure a static proxy on all your computers using Group Policy
Manual Proxy Configuration of Mozilla Firefox to use the WDS Connector
To set the proxy configuration in Mozilla Firefox 1 Click on Tools – Options
2 Click on the Advanced button 3 Click on the Network Tab
4 On Configure how Firefox connects to the network, click “Settings”. 5 Click “Manually configure proxy”
6 In the HTTP Proxy box, enter your server name 7 Select port 3128
8 Select “Use this proxy for all protocols”
In the “No Proxy for” box we recommend you enter “localhost,127.0.0.1” and the subnet of your local office to keep the proxy from attempting to proxy things on your local LAN. The example below assumes you don’t want to proxy a 10.x.x.x subnet.
Where “server” is the name of the server where your WDS Connector is installed or the Web Protection proxy host from the Activation Kit.
How to configure a static proxy on
all your computers using Group
Policy
It is possible to configure all the machines in your Microsoft domain to have a “Hard-Coded” proxy setting by using Group Policy. However at the time this document was written, Mozilla does not offer a Group Policy based solution for managing Firefox. There are some “unofficial” ways to do this but we wouldn’t implement a hack in our
Web Protection Setup Guide How to configure a static proxy on all your computers using Group Policy
production Active Directory Group Policy and hope you feel the same way about yours. This document does include information on how to use a login script and configuration file to manage Firefox proxy
.
Manually configuring proxy on one
computer:
Locking down one computer so that the user cannot easily change the proxy settings follows the same instructions as locking down your domain. The difference is where you run the GPEDIT program. If you run GPEDIT.MSC on your local computer, then you are editing your local computers policy. If you run it through Active Directory Users and Computers or Group Policy Management you are editing the group policy on your domain controller for your entire domain. Either way, please be careful!
Locking down your proxy
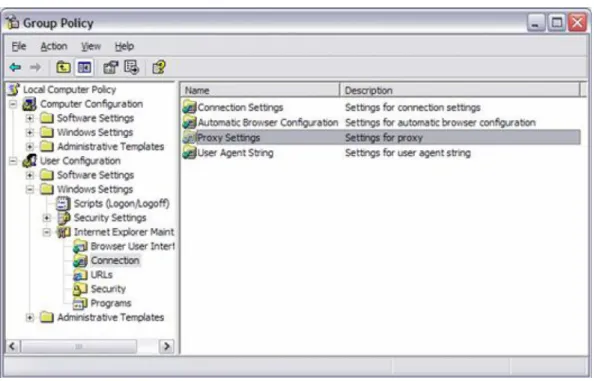
Instead of requiring all of your users to individually configure their proxy settings, you can implement a group policy on a Windows machine for Internet Explorer only. 9 From the Start menu in Windows, select Run… The Run dialog appears. 10 Enter gpedit.msc and click OK. The Group Policy window appears.
Navigate to User Configuration > Windows Settings > Internet Explorer Maintenance > Connection.
Web Protection Setup Guide How to configure a static proxy on all your computers using Group Policy
11 Double-click the Proxy Settings option to the right. The Proxy Settings dialog appears.
12 Select the Enable proxy settings check box.
13 See your Welcome Letter for the proxy server address to enter in the HTTP field. If you are provisioned on portal.mxlogic.com, then use
<yourdomainhere.com>.web01.mxlogic.net
If you are provisioned on console.mxlogic.com, then use
<yourdomainhere.com>.web02.mxlogic.net
Edit <yourdomainhere.com> so that it is specific to your organization.
14 In the Port field, enter 8080.
15 Select the Use the same proxy server for all addresses check box.
Figure 3: Group Policy Proxy Settings Dialog
Note: McAfee Web Protection Service Proxy servers cannot connect to Web servers on your organization’s private corporate network (LAN). In order to be able to access these private websites, you must bypass the Web proxy server as follows:
16 In the Exceptions group box, enter addresses of websites for which traffic must not be filtered. You can enter partial domains or IP addresses, such as
*.yourdomain.com;10.*;192.168.*. Each entry should be separated by a semi-colon. 17 Ensure the Do not use proxy server for local (intranet) addresses check box is
selected.
Web Protection Setup Guide How to configure a static proxy on all your computers using Group Policy
How to lock down Internet Explorer’s Proxy settings so your users cannot turn them off.
There are a couple of ways you can turn off your user’s ability to manage their proxy settings in Internet Explorer by using GPEDIT.MSC on their computer, or by creating a Group Policy Object on your domain.
The group policy setting “Disable Changing Proxy Settings” will keep a user from changing their proxy settings. To make this change:
19 In Group Policy (local or on your domain) 20 Under “User Configuration”
21 You can also do this under “Computer Configuration” to have it set regardless of the user.
22 Open “Administrative Templates” 23 Open “Windows Components” 24 Open “Internet Explorer”
25 Find the “Disable Changing Proxy Settings” policy (You can sort the policies to make this setting easier to find by clicking on the top of the “settings” column)
26 Open “Disable Changing proxy settings” by double clicking it 27 Select “Enable” and click ok.
Web Protection Setup Guide How to configure a static proxy on all your computers using Group Policy
If you did this using GPEDIT.MSC locally, the next time you open your Internet Explorer browser and go to Tools – Options – Connections – LAN Settings button you should see that your manually configured proxy items are now grayed out. However if you made this change to your domain policy you will either need to refresh your local policy or wait for it to replicate to your computer. When successful, it should look like this:
Note that “Server” and port are grayed out. However a user can still select “Automatic Detect” or enter an automatic configuration script, these options are not grayed out. This is a Microsoft issue or by design depending on who you talk to.
Web Protection Setup Guide How to configure a static proxy on all your computers using Group Policy
Another way to lock out users trying to change their proxy settings is to just make the “Settings” buttons on the Internet Explorer “Connections” grayed out. To do this: 28 In Group Policy (local or on your domain)
29 Under “User Configuration” (You can also do this under “Computer Configuration” to have it set regardless of the user.)
30 Open “Administrative Templates” 31 Open “Windows Components” 32 Open “Internet Explorer”
33 Find the “Disable Changing Connection Settings” policy (You can sort the policies to make this setting easier to find by clicking on the setting column)
34 Double click this policy and enable it. When done on the local computer you will see this change immediately. If done on a domain you will need to refresh your policy or just wait for it to be updated. Once updated your connections tab will look like this:
How to lock down Firefox so users cannot edit proxy settings:
Because there is no official Firefox tool for locking down Firefox proxy settings using Group policy at the time of the writing of this documentation, the following method can be used to edit Firefox’s preferences by use of a login script and a Mozilla.cfg file.
Firefox looks in three locations for preferences. • The prefs.ini file found in …\username\application
data\mozilla\firefox\profiles\<string>.
• C:\Program Files\Mozilla Firefox in two locations • The file defaults\pref\firefox.js
• And for our purposes Greprefs\all.js
You need to create a Mozilla.cfg file with your proxy settings, and then edit the “all.js” file to point to the new preferences file. Finally, write a login script that looks for this file, and if it does not exist, it will drop it and edit the all.js file automatically.
To make Mozilla Firefox automatically detect your proxy and then lock it down so a user cannot change it
Create a new file called Mozilla.txt using Notepad and copy/paste the following script: //
lockPref("app.update.enabled", false); lockPref("network.proxy.type", 4);
lockPref("network.proxy.no_proxies_on", "localhost, 127.0.0.1, 10.0.0.0"); lockPref("network.proxy.share_proxy_settings", false);
• This file must start with // otherwise it won’t work.
• Using the “lockpref” command both sets and LOCKS the setting from a user changing it.
• “app.update.enabled, false” keeps firefox from updating this config. • “network.proxy.type, 4” tells it to Auto Detect the proxy
Web Protection Setup Guide How to configure a static proxy on all your computers using Group Policy
Other configs:
• 0 – Connect directly to the Internet
• 1 – Manual config, which requires the following commands: • lockPref(“network.proxy.http”, “server.domain.com”) • lockPref(“network.proxy.http_port”, 3128)
• 2 – use a proxy pac file, which requires the following command • lockPref("network.proxy.autoconfig_url", "http://mysite.com/");
• “network.proxy.no_proxies_on” tells it to not proxy the following names or subnets.
• “network.proxy.share_proxy_settings, false” is like the command “Use proxy server for all protocols”
Save your new configuration file as Mozilla.txt in your C:\Program Files\Mozilla Firefox directory, then close Notepad.
You now need to do a bit adjustment on the file and save it as Mozilla.cfg. This provides a layer of security to the proxy configuration.
35 Go to
http://www.alain.knaff.lu/howto/MozillaCustomization/cgi/byteshf.cgi
36 In the “Upload Mozilla.txt to get a Mozilla.cfg box, browse to find the Mozilla.txt file, then click “convert Mozilla.txt to Mozilla.cfg”
37 Save the resulting Mozilla.cfg file to c:\Program Files\Mozilla Firefox
38 Right Click and Edit the all.js file in “c:\Program Files\Mozilla Firefox\greprefs” and add the following to the bottom line on a new line.
A pref("general.config.filename", "mozilla.cfg");
39 Close and open Firefox.
40 Go to tools – Options – Advanced Tab – Network and click on the Settings button. The proxy should now be set and locked down!
Delivering the Mozilla.cfg file and
auto-configuring Mozilla Firefox through a
login script
This is one of many ways you could choose to deliver this file and edit the all.js file through a login script. The login script first checks to see if Firefox is installed, then it checks for the Mozilla.cfg file. If Firefox is installed but the Mozilla.cfg file does not exist, it copies in the file and edits the all.js file by adding a new line, and then adding the pref command to the all.js file so it knows to look to the Mozilla.cfg file. Finally
everything this script does is written to a log file so you know the full details regarding whether the install was successful. There is no impact to the user, the next time they close and open the browser, they will be locked to your proxy config.
1 Copy the Mozilla.cfg file to a share that all users can access on your network (Read only)
Web Protection Setup Guide How to configure a static proxy on all your computers using Group Policy
2 Edit your login script as follows: (Don’t forget to change \\server\share to your server and share name!)
:: Firefox Proxy Config file drop and all.js adjustment GOTO Check
:Check
:: First check to see if Firefox is installed, then see if the config file is there IF NOT EXIST "C:\Program Files\Mozilla Firefox" GOTO Lognofirefox IF NOT EXIST "C:\Program Files\Mozilla Firefox\mozilla.cfg" GOTO Update GOTO Logalreadyinstalled
GOTO End :Update
:: Drop the config file and adjust all.js
copy \\server\share\mozilla.cfg "C:\Program Files\Mozilla Firefox" ::
::Create a new line at the bottom of the all.js file
ECHO. >> "C:\Program Files\Mozilla Firefox\greprefs\all.js" ::
::Add a pref to point to the new CFG file to the end of all.js
ECHO pref("general.config.filename", "mozilla.cfg"); >> "C:\Program Files\Mozilla Firefox\greprefs\all.js"
GOTO Loginstalled :Lognofirefox
Echo %date% %time% user %username% on %computername% does not have FireFox installed >> \\server\share \log.txt
GOTO End
:Logalreadyinstalled
Echo %date% %time% user %username% on %computername% already has mozilla.cfg downloaded >> \\server\share\log.txt
GOTO End :Loginstalled
Web Protection Setup Guide How to configure a static proxy on all your computers using Group Policy
Echo %date% %time% user %username% on %computername% SUCCESS!! FireFox Proxy installed! >> \\server\share\log.txt
GOTO End :End ::All done!
NOTE: Always test the login script on one or two boxes before putting it into production!
On computers that you do not want to lock down, drop the Mozilla.cfg file manually, but do not update the all.js file. This will cause the script to ignore that computer and assume it is already updated.
Content credit goes to
www.petri.co.il
and many other sites for this information. A full listing of Firefox Preferences can be found in this excellent document:http://www.pcc-services.com/kixtart/firefox-lockdown.html
How to create a Proxy Automatic
Configuration (PAC) file or Web Proxy
Auto-Detect(WPAD) file.
A Proxy Automatic Configuration (PAC) file and a Web Proxy Auto-Detect file are both simple files hosted on an internal web server that use JavaScript to tell the browser what to do before it attempts to load a web page. The beauty behind PAC and WPAD files is that they help you add intelligence to your proxy configuration so it can adjust when the computer is not connected to your network, or the proxy is down. Another handy thing you can do with PAC and WPAD files is decide which sites will and won’t be proxied so that business critical websites will never be effected by the proxy. Here’s a sample of a basic PAC or WPAD file:
Basic WPAD or PAC file Example
function FindProxyForURL(url, host) {return "PROXY proxyserver.example.com:3128” }
Assuming your Internet Information Server or Apache Web Server and Internet Explorer are configured correctly (We’ll get to that below), when your browser attempts to load a webpage, it will run this script and know to look for the proxyserver on port 3128. If it can’t find it, it will send the browser directly to the Internet.
This was a pretty simple example. What if you decided you wanted your proxy file to ignore your local network and computer? You can script that as well:
Web Protection Setup Guide How to configure a static proxy on all your computers using Group Policy
WPAD or PAC file that does not proxy the local host or network
function FindProxyForURL(url, host) { if (
isPlainHostName(host) ||
localHostOrDomainIs(host, "127.0.0.1")|| isInNet(host, "10.0.0.0", "255.0.0.0"))
return "DIRECT";
else return ""PROXY proxyserver.example.com:3128"; }
If you would like to configure your PAC file to ignore specific websites, you would add the shExpMatch(url,”www.myspecificsitenottoproxy.com). Please see the example below:
WPAD or PAC file that ignores specific websites
function FindProxyForURL(url, host) { if (
isPlainHostName(host) ||
localHostOrDomainIs(host, "127.0.0.1")|| isInNet(host, "10.0.0.0", "255.0.0.0")
shExpMatch(url, "*.mxlogic.*")) // Don’t proxy mxlogic.* return "DIRECT";
else return ""PROXY proxyserver.example.com:3128"; }
Finally, if you would like to configure your proxy server to have more intelligence in what to do if it can’t find the proxy, you can provide multiple proxies or just tell it go directly to the Internet.
….
else return "PROXY proxyserver.example.com:3128; proxy domain.com.web02.mxlogic.net:8080; DIRECT";
}
In this example we are telling the browser to try the local proxy. If that fails, attempt to go directly to McAfee for proxying. Then if that fails, go directly to the Internet.
There are lots of different options you can use in your PAC and WPAD files. Microsoft Technet has quite a few on their article at
http://technet.microsoft.com/en-us/library/
dd361918.aspx
. There is also a great write up on different PAC and WPAD file options here:http://jcurnow.home.comcast.net/~jcurnow/WritingEffectivePACFiles.html
Web Protection Setup Guide How to configure a static proxy on all your computers using Group Policy
Worth Noting!
One important thing to remember is that Internet Explorer does not provide any error checking for a PAC or WPAD file. If you missed a closing brace, parenthesis or mistyped a command, your browser isn’t going to tell you, it’s just going to go directly to the Internet. So when you are creating your PAC file, no proxy (And you’ve already confirmed a direct connection to your proxy works) may mean there is an error in your script somewhere.
Also note that the browser may cache this file locally so changes to the PAC or WPAD file on the server may not result in any changes on the client until they turn off their proxy configuration and turn it back on again in Internet Explorer or Firefox.
Web Server Setup required to use a PAC
file
To use a PAC or WPAD file to configure your proxies you need to configure several things on your network. The PAC file is much simpler then the WPAD setup because with the PAC file you are telling your browser where to find the file so you just need to place it in the root of a web server and tell that server how to load it. However the WPAD setup uses DHCP and DNS to figure out where the file is when the user’s browser is set to
“Automatically detect settings” so you will need to put the file in a web server AND update DHCP and DNS so the browser knows where to look for it.
The PAC and WPAD file must be placed on a web server. We highly recommend an internal web server instead of an Internet facing server; we also recommend making the file read-only to keep a hacker from redirecting all your Internet traffic to their favorite spyware site. For more information about possible security issues with using a PAC file or the WPAD protocol, please see
http://www.microsoft.com/technet/security/advisory/
945713.mspx
Web Server Configuration for a PAC file:
1 Copy your proxy.pac file to the root document directory on your web server. • Must be the root document directory, not some sub-site or lower directory • Must be the default virtual server or active virtual server.
• MUST be lower-case file name. PROXY.PAC will not function, all lower case proxy.pac will.
2 Add a MIME entry to your Web Servers configuration so it knows how to open the file
In Microsoft Internet Information Server
3 Open IIS Manager on the web server
4 Right Click the website you want to add a MIME type for 5 Click “Properties”
6 On the HTTP Headers Tab, click the MIME types button 7 Click New
Web Protection Setup Guide How to configure a static proxy on all your computers using Group Policy
8 In the Extension field, enter the file name extension: pac
A In my Mime Type box, enter: application/x-javascript-config
B Click ok and then restart the IIS Service (When appropriate to do so, depending on what else this web server does.)
In Apache
For Apache versions 1.x, 9 edit /etc/apache/httpd.conf 10 add the following line:
A AddType application/x-javascript-config pac
For Apache version 2.x
11 Edit /etc/apache2/mods-available/mime.conf 12 Add the following line:
A AddType application/x-javascript-config pac
i Restart the Apache Web Server. (When appropriate to do so, depending on what else this web server does.)
13 Test by opening http://yourwebserver.domain.com/proxy.pac. If your web browser asks you how you would like to open the proxy.pac file, then you have completed this step correctly.
Configure your browser to point to the proxy.pac file in Internet Explorer by… i Click on Tools – Options
ii Connections Tab
Web Protection Setup Guide How to configure a static proxy on all your computers using Group Policy
iv In the “Automatic Configuration Script” field enter the URL of your web server
Web server configuration for a WPAD.DAT file:
14 Copy the wpad.dat file to the root document directory on your web server. A Must be the root document directory, not some subsite or lower directory B Must be the default virtual server or active virtual server.
C MUST be lower-case file name. WPAD.dat will not function, wpad.dat will. 15 Add a MIME entry to your Web Servers configuration so it knows how to open the file
In Microsoft Internet Information Server
16 Open IIS Manager on the web server
17 Right Click the website you want to add a MIME type for 18 Click “Properties”
19 On the HTTP Headers Tab, click the MIME types button 20 Click New
21 In the Extension field, enter the file name extension: pac (for PAC files), dat for DAT files.
22 In my Mime Type box, enter: application/x-javascript-config
23 Click ok and then restart the IIS Service (When appropriate to do so, depending on what else this web server does.)
In Apache
For Apache versions 1.x, 24 vi /etc/apache/httpd.conf
25 add the following line: (dat for wpad, pac for .pac) A AddType application/x-javascript-config dat For Apache version 2.x
26 Edit /etc/apache2/mods-available/mime.conf 27 Add the following line: (dat for wpad, pac for .pac)
A AddType application/x-javascript-config dat
i Restart the Apache Web Server. (When appropriate to do so, depending on what else this web server does.)
28 Test by opening
http://webserver/wpad.dat
using your Internet browser. If your web browser asks you how you would like to open the wpad.dat, (AKA with Notepad) then you have completed this step correctly.Web Protection Setup Guide How to configure a static proxy on all your computers using Group Policy
29 After completing the DNS and DHCP setup instructions below, configure your browser to “Automatically Detect Proxy Settings”
A Open Internet Explorer B Click on Tools – Options C Click on the connections tab
D Click on LAN settings if wired to the network, settings to configure a VPN E Check the box “Automatically detect settings”.
WPAD Setup for DHCP.
When you are using the Web Proxy Auto-Detect Protocol, the browser will look first to DHCP to provide it with the server information where your wpad.dat file is located. If it cannot find it in DHCP, then it will look to DNS before giving up and just going straight out to the Internet. You will need to configure the DHCP server to provide this
information.
There are two steps to configure a Microsoft DHCP server to provide the WPAD option. The first is to add option 252 if it doesn’t already exist, and the second is to configure Option 252 to point to the web server and that is hosting your WPAD configuration file you want to use. While editing this option and setting it in your DHCP server or scope is pretty straight forward, you may not see an Option 252 and its not obvious how to create this option. If you don’t have an Option 252 to edit and select, this is how you create it.
Adding Option 252 to DHCP:
On the server running DHCP (Or using MMC on your machine)
30 Open DHCP using Start – Programs – Administrative Tools – DHCP
31 RIGHT click on the DHCP server you want to edit and click “Set Predefined Options” 32 Look for 252, if it doesn’t exist:
Web Protection Setup Guide How to configure a static proxy on all your computers using Group Policy
A Click Add to add a new option B In name type WPAD
C In code type 252
D In data type select string and press ok
33 Assuming it already existed or you just created it, click on the down arrow for “Option Name” and scroll down and select option “252 WPAD”
34 In “String”, type: http://mywebserver:3128/wpad.dat
35 Where mywebserver is the name of the webserver that you placed your wpad.dat configuration file.
Note that this string MUST be all lower case or it will not work. A Click OK to save the change
Web Protection Setup Guide How to configure a static proxy on all your computers using Group Policy
Worth Noting: Once you make this change, this wpad information will be published with each new IP address. So make sure it’s correct in the DHCP server, that the script is functional, and to release/renew your IP address so you can test it after pressing
OK!
Configuring your DHCP Server to use Option 252
Now that you have completed the step above where you added Option 252 to your DHCP server, you have the choice of setting this for your entire DHCP server or specific scopes, or both.
To Set Option 252 for your entire DHCP Server,
36 Right Click Server options and click “Configure Options” 37 Check Option 252
38 Make sure it has the correct web server information, port, and file name
Note: It must all be in lower-case or it may fail!
Web Protection Setup Guide How to configure a static proxy on all your computers using Group Policy
Configuring your scope to use Option 252
To Set Option 252 for your DHCP Scope
40 Open the scope in question
41 Right click on “Scope Options” and click “Configure Options” 42 Put a check mark next to Option 252
43 Fill in the server name with the name of your web server, port and wpad.dat file.
Note: It must all be in lower-case or it may fail!
44 Click OK.
DNS Configuration of for your WPAD script.
Internet Explorer will look to DHCP option 252 if the “Automatically detect” button is selected, so you may be wondering why we recommend you make this change to DNS as well. There are several reasons why you may want to do this:
45 You want your proxy configuration file to work on machines that have a static IP. 46 You have other browsers that may prefer a DNS entry over DHCP like Firefox 47 You are concerned that your Automatically Detect setting is going to force the
browser to hunt until it finds a config file, possibly in the wrong domain!
A For instance, if you have Automatically Detect Proxy option set on your browser, but your browser cannot find the wpad.dat file for dallas.mydomain.com, it will look for wpad information at wpad.mydomain.com, and then wpad.com before giving up. Should it find it, it will happily run the script found in any of those domains creating an obvious security and configuration issue.
Web Protection Setup Guide How to configure a static proxy on all your computers using Group Policy
The assumption is that you want to provide wpad information for your local domain. So assuming your local domain is mydomain.info you would edit the DNS server for mydomain.info and add a cname record called wpad that points to the webserver that holds the file.
How to configure DNS to point to your WPAD Server:
48 Open DNS in MMC or by going to Administrative tools on the domain controller hosting your DNS
49 Expand Forward Lookup Zones
50 Right Click your forward lookup zone and click “New Alias (CNAME)” 51 In the Alias name box enter wpad
52 Lower case is required
53 Enter the fully qualified domain name of the server that is hosting your WPAD file. 54 Click ok
55 Click ok
Test by setting the “Automatically detect” option in Internet Explorer. Your browser should try to find a page called wpad.yourdomain.com. Once it finds it, your proxy information will be automatically updated.
56 After completing the DNS and DHCP setup instructions below, configure your browser to “Automatically Detect Proxy Settings”
A Open Internet Explorer B Click on Tools – Options C Click on the connections tab
57 Click on LAN settings if wired to the network, settings to configure a VPN 58 Check the box “Automatically detect settings”.
Web Protection Setup Guide Common Configuration Issues
Common Configuration Issues
Check a hard-coded proxy setting first
To start determining what is wrong with your proxy configuration, enter your server name and port manually into Internet Explorer or Firefox’s proxy configuration, close and reopen the browser and then attempt to access a webpage. If you can access a web page that means the proxy worked. If you can access
http://garbage.microsoft.com
and get a Web Protection “Page not found” error message, then you know you are being filtered by the service.If you cannot get to a webpage then you know your proxy server has an issue
If you can get to a web page but are not being filtered, then a script or other automatic configuration piece is broken.
Upper Case:
As noted in several sections above, several WPAD configurations in DNS, DHCP and in the file name of your wpad.dat file require lower case in some/most systems. Please check these areas carefully, silly as this may be, it will cause it to not work.
A lack of error checking in Internet Explorer and Firefox:
Internet Explorer may run a proxy.pac or wpad.dat file, but it won’t tell you if it ran across an error, it’ll just give up and go straight to the Internet. Test your scripts using the alerts as mentioned in
http://jcurnow.home.comcast.net/~jcurnow/
WritingEffectivePACFiles.html
Various Microsoft errors and bugs
See
http://technet.microsoft.com/en-us/library/cc302643.aspx
Firewalls
Your desktops and laptops must be able to get to your proxy server where the McAfee WDS Connector is running.
They will attempt to access it using port 3128. Because of this, the firewall configuration on these computers must allow port 3128 out to the proxy server.
The router and switches at your company between the clients and the proxy server must allow the desktops and laptops to talk to the proxy server on port 3128.
Your proxy server where the McAfee WDS Connector is installed must allow inbound port 3128 connections.
Your proxy server where WDS Connector is installed must allow A LOT of port 3128 connections. Any firewall or windows configuration that limits connections can reduce the number of machines that can proxy at once resulting in a situation where some machines are proxied and others are not.
Web Protection Setup Guide Common Configuration Issues
Finally the proxy server must be able to talk to McAfee on port 3128 (squid) to be able to filter requests. If a server firewall or border (Router) firewall is blocking this port the proxy will not be able to function.
WDS Connector Service issues:
Verify the WDS Connector service is running on the proxy server. In a WPAD environment, users will likely go directly to the Internet if this service is stopped or unavailable. In a hard-coded proxy config, or a PAC environment with no “DIRECT”, the Web Protection service being off will cause an page not found error.
NOTE: If using other authentication methods, ensure port 8080 is open for outbound connections.
Domain Controller and user issues
Your proxy server where the WDS Connector was installed must be able to communicate with the domain controller specified during the install. If this domain controller has been firewalled off, removed, uninstalled or otherwise is not available, users will get an authentication error. The WDS Connector cannot fail over to another domain controller at this time. If you need to reset or work on the domain controller that the WDS Connector is pointing to, we recommend stopping the connector service first if you are in a PAC or WPAD environment. If you are hard-coded to this proxy server, turning off the WDS Connector or working on the DC may cause an Internet Outage.
WDS Connector Domain user issues
The proxy server where the WDS Connector was installed must be able to communicate with the domain controller specified during the install using the user account specified during the setup process. If this user account was deleted, has expired or is locked out, users will get an authentication error.
User Not Setup on McAfee’s Console
If a user is not created on the McAfee Console and attempts to proxy through the WDS Connector they will get an Authentication error. All users should be setup in advance of installing the WDS Connector. Please consider using McAfee’s Directory Sync to automatically update your users between your Active Directory and the McAfee Console.
User Bad Password, account locked out, Account expired in Active Directory
The WDS Connector looks to your Active Directory for its user information. However if that user logged into a computer locally they will received a login prompt before logging into the network. Also if that users AD account is expired, locked out or has been deleted, this user will be asked to log in before getting a web page, and may receive an
Web Protection Setup Guide Common Configuration Issues
Non Domain Login
If a user logs in locally to a laptop or desktop, they will receive a login prompt before they are allowed to access a website, just like they would had they attempted to access a server resource.
Program issues
Some programs cannot authenticate using NTLM or do not like to be proxied and may cause the user to see a login box instead of an error message. We typically see this on non-business related Java Apps. Sometimes clicking several times will allow it to get past this. Other times an administrator may need to unselect auto-config on the proxy.
Windows Updates
While we recommend using WSUS to provide updates to your desktop and laptop computers, if you are attempting to go to update.microsoft.com you may find that the detection phase hangs and eventually returns an error message if you are going through the proxy. This is a known issue with the Microsoft Windows Update site and proxy servers including their own IAS server. The quick way around this is to turn off “automatically detect” before going to Windows Update. Another option is to exclude the Windows Update servers in your WPAD.DAT or Proxy.pac file. You can do this by using the shExpMatch(url, "website") command in your script to have it not proxy the following sites: • http://download.windowsupdate.com • https://*.windowsupdate.microsoft.com • http://*.windowsupdate.microsoft.com • http://*.update.microsoft.com • http://*.download.windowsupdate.com • http://update.microsoft.com • http://*.windowsupdate.com • http://download.microsoft.com • http://windowsupdate.microsoft.com • http://ntservicepack.microsoft.com • http://wustat.windows.com • https://*.update.microsoft.com • https://update.microsoft.com
The website that discusses this issue and provides a work around is
http://
support.microsoft.com/kb/885819
Web server not configured correctly
Test your ability to opening
http://webserver/wpad.dat
using your Internet browser. If your web browser asks you how you would like to open the wpad.dat, (AKA with Notepad) then you have completed this step correctly.]Web Protection Setup Guide Common Configuration Issues
PAC/WPAD File Errors
The PAC file contains a JavaScript function. Syntax errors in the JavaScript will prevent the PAC file from executing and will not set the proxy appropriately. The default behavior for most browsers is to set no proxy, so traffic will be direct to the Internet with no filtering. To test for syntax errors, use a JavaScript validation tool. A simple one can be found at
http://javascriptlint.com/online_lint.php
- simply copy and paste the contents of the PAC file into the text area and run the test. Warnings can generally be ignored, but any syntax or other errors must be addressed in order for the PAC file to function properly.Web Protection Setup Guide Sample Policy Sets
Setup Policy Sets
The Policy Sets tab lists the currently defined Web browsing policies for the designated Enterprise Customer, including default and sample policies, and allows you to open the specific policy configuration tab to modify the policies.
1 Click the Policies tab
The Policy Configuration screen displays.
Sample Policy Sets
There are three sample policy sets that you can use as a starting point for creating custom policy sets:
• Lenient Policy- Contains the least strict set of policies. • Moderate Policy - Contains a moderately strict set of policies. • Strict Policy- Contains the strictest set of policies.
You can do any of the following:
• Accept the policy configurations in the default policy sets • Create, update, or delete customized policy sets.
• Customize or delete a sample policy set.
To create a customized policy set (only available to certain user roles), do the following: 1 On the Policy Sets tab, click New
Web Protection Setup Guide Sample Policy Sets
2 Enter a Policy Name for the new policy set
3 Enter a brief Description of what the policy set will entail
4 From the Copy From drop-down list, select the existing policy set from which to copy the policy configurations for the new policy set.
5 All the policy set's configurations will automatically be copied except for the following, which have to be selected manually by selecting the respective check boxes:
• Copy Trusted Sites • Copy Blocked Sites
6 Click Save when you are done. Once the new policy set is created, you can then customize the configurations in that policy set.
To customize an existing sample policy set, do the following:
1 On the Policy Sets tab, highlight the Existing Policy you wish to configure. 2 Click Edit.
Web Protection Setup Guide Default Web Policies
.
3 Change the Policy Name for the policy set
4 Enter a brief Description of what the policy set will entail 5 Click Save when you are done.
Default Web Policies
Threat Tab
The Threat tab allows you to enable or disable anti-phishing and anti-spyware filtering. By default, the anti-virus filter is always enabled and may not be disabled.
1 Uncheck the default settings if needed. 2 Click Apply.
Content tab
The Content tab allows you to select categories of Web sites that you do not want your users to access while browsing. By enabling Safe Search, you can prevent leading search engines from presenting links to material that are deemed unacceptable or contain sexually explicit by the search engine filter.
Note: Safe Search is a feature offered by many search engines. The Safe Search functionality in the Web Protection service merely tells the search engine to use its internal Safe Search
Web Protection Setup Guide Trusted Sites
filtering, but be advised, the Web Protection functionality does not control the responses returned by the search engine when making a Safe Search filtered query.
Note: Content information is NOT case sensitive.
1 Check the box to enable or disable the following policies: • Enable content filtering for this policy
• Enable safe search for this policy
2 Click Apply once you have selected your categories. Web sites are categorized as follows:
Trusted Sites
The Trusted Sites tab allows you to create a list of specific Web sites that will be allowed even if you have blocked access to their associated categories. The exception to this are any sites caught by Antivirus scanning, which will always be blocked.
Web Protection Setup Guide Blocked Sites
Clicking the More Options button displays additional fields that allow you to upload or download files.
You can upload a file with a predefined list of Domain names (e.g.,
yourcompanyURL.com) and/or IP addresses. The file containing the list must be in the following format:
• Must be a text file • One entry per line
• Must be available for your browser to access • Must not exceed 250 entries
• To ensure all possible URL entries are allowed, include both possible entries for an existing site. For example: include both www.google.com and google.com.
You also can download your Trusted Sites list by clicking the Download Trusted Sites List button. You can save the list to a file in CSV format
Blocked Sites
The Blocked Sites tab allows you to create a list of specific Web sites that will always be blocked. Access to these sites will be blocked even if you have allowed access to their associated categories.
Clicking the More Options... button displays additional fields that allow you to upload or download files.
You can upload a file with a predefined list of domains or IP addresses. The file containing the list must be in the following format:
• Must be a text file • One entry per line
• Must be available for your browser to access • Must not exceed 250 entries
• To ensure all possible URL entries are blocked, include both possible entries for an existing site. For example: include both www.google.com and google.com.
Web Protection Setup Guide Notifications
You also can download a list to your local drive by clicking the Download Blocked Sites List button. It downloads the list to a file in CSV format and can be opened in Microsoft Excel.
Notifications
The Notifications tab is an editing tool for modifying standard Block Messages. These messages may vary depending on the Customer's Policies. You may modify your block notification by using the icons located on the tool bar.
Note: If you wish to format the information in a tag within your Notification message (i.e.
highlighting, bolding, underlining) you must include the tag in its entirety, meaning include the brackets surrounding the description within the tag. For example: bolding the entire tag including the brackets is correct {MFE_URL}. Only bolding the text, excluding the brackets is incorrect. {MFE_URL}.
Note: You may not use Javascript within your Notification.
To insert a URL or email address within your Notification message, complete the following steps:
1 In the body of your notification message, type either your URL reference you wish to use, or type the reference to the email address you will be inserting.
2 Highlight the URL name or Email reference you wish to link.
3 Click the hyperlink icon in the toolbar. A pop-up window displays with the default http://.
4 Type either the URL or, type the email you are linking using one of the following example formats:
• http://www.yoururl.com • mailto:[email protected]
Web Protection Setup Guide Policy Scheduling
5 Click Apply to set your links.
Important: Anytime you make changes to your Notifications message, click Apply to save your changes.
Policy Scheduling
The Policy Scheduling link allows the customer to define different policies and/or rules for their users at different times of day or days of the week. For example, different sites may be allowed at lunch rather than during standard working hours.
To set the days and time to allow customers access to specific sites complete the following:
6 From the drop-down list, select the Available Group you wish to set. 7 Click New Subscription or use the available table.
8 From the drop-down, choose the time settings
Web Protection Setup Guide Policy Scheduling
Web Protection Setup Guide
Forensics
The Web Forensics tab allows customer administrators to delve into the available log data to review their service. Administrators can filter, sort and export data from the logs to determine specifically what any or all users, the resulting action, the bandwidth usage, the virus detection, etc. Data can be filtered by date, user, category, resulting action and more and can be sorted appropriately. This function allows the most in-depth data available to a customer about the Web Filtering Service.
Filters
When using the Filter, you may use up to five fields to conduct your search. 1 Click on the Filter pane to collapse or expand this panel.
2 Click the Reset to clear your information for a subsequent search.
Note: Input information is case sensitive.
• Required fields are marked with an asterisk (*).
• The Search button is disabled until all Required fields are populated with valid entries. • Only one Search can run at a time.
Field Description
Note: The Calendar icon allows you to select a date using a visual aid.
Start Date: Choose a Start Date for the requested URL. The Date is based on your timezone.
Web Protection Setup Guide
Note: The Date Search ranges are not limited to dates for which only data is available. Any available search appropriate data will be returned once the search executes. Please note that choosing a date does not imply that data is available for that entire date range.
Start Time: From the dop-down list, select a Start Time for the requested URL. The Date is based on your timezone.
End Date: Choose an End Date for the requested URL. The Date is based on your timezone.
Note: The Date Search ranges are not limited to dates for which only data is available. Any available search appropriate data will be returned once the search executes. Please note that choosing a date does not imply that data is available for that entire date range.
End Time: From the drop-down list, select an End Time for the requested URL. The Date is based on your timezone.
User Name: The name of the exact, authenticated User who requested the URL.
URI Scheme: .The Universal Resource Identifier (URI) Scheme lists the http, https, fttp protocol.
Requested Host: The Host name of the URL request (ex. www.smooth.com).
Requested Path: The Path of the URL request.(ex. /images/logo.gif).
Category: The returned Category of the URL (i.e.Business, Economy, etc.)
Result: The URL was either Observed or Denied.
Server to Client Bytes: The number of bytes in the response (downloaded Bandwidth).
Client to Server Bytes: Data sent to the Internet (uploaded or requested Bandwidth).
Source IP: The IP address that McAfee recognizes was requested (the initiated IP).
HTTP Action: The http request definition (ex. Get, Post, Connect).
Virus: The Virus Identifier if a virus was detected.
Sort Search
When using the Sort criteria, you may use all or any one of the fields to conduct your search.
Web Protection Setup Guide
Field Description
Sort By: From the drop-down list select the Filter you wish to start your search.
Order: From the drop-down list select whether your Sort Criteria list in either Descending or Ascending order.
Then By: From the drop-down list select the Filter you wish to use as your second sort criteria that may include:
• Request Time Stamp • User Name
• Requested host • Category • Result
• Server to Client Bytes • Client to Server Bytes
Order From the drop-down list select whether your Search Criteria list in either Descending or Ascending order.
Then By: From the drop-down list select the Filter you wish to use as your third search criteria that may include:
• Request Time Stamp • User Name
• Requested host • Category • Result
• Server to Client Bytes • Client to Server Bytes
Order From the drop-down list select whether your Search Criteria list in either Descending or Ascending order.
Web Protection Setup Guide
Search Results
Your search results will only display the first 1000 results according to your chosen filters. To view more data, click the Download CSV button to generate a .csv file containing all of the search results.
Note: Large data sets may take an exceptionally long time to download, so it is recommended that you refine your search as best possible to limit your wait time.