~I
AST recently introduced multifunction boards with no
(0 kilobytes) on-board memory. When you purchase a board with no memory chips, you have the option of purchasing a memory upgrade kit from your authorized AST reseller or purchasing chips separately. Refer to your user's manual for a list of approved chips.
For information on how to install chips, refer to your user's manual. Line up the notch on the chip with the notch on the socket on the board.
INTRODUCING SUPERPAK ... ix
Product Overview ... x
SuperPak Operation ... x
ABOUT THIS MANUAL ...•... xiii
How to Find Information ... xiii
Format Notation ... xiv
Related Documentation ... xv PART I. USING SUPERPAK
1. BEFORE YOU BEGIN ...•... 1-1 1.1 SuperPak DiskE;!tte Contents ... 1-1 1.2 Compatibility and System Requirements ... 1-1 1.3 What You Need to Know Before You Start ... 1-2
2.2 VDISK-Compatible fASTdisk Device Command ... 2-5 2.3 Rules for Using fASTdisk ... 2-7 2.4 Examples of fASTdisk Commands ... 2-7 2.4.1 Single fASTdisk Command Examples ... 2-7 2.4.2 Dual fASTdisk Command Examples ... 2-9 2.5 Application Notes ... 2-11
2.5.1 fASTdisk Compatibility ... 2-11 2.5.2 Using fASTdisk with Modular Software ... 2-12 2.5.3 Protecting Important Data Files ... 2-12
3. SUPERS POOL ... 3-1 3.1 Using the SuperSpool Command ... 3-1 3.1.1 Printing with SuperSpool ... 3-2 3.1.2 SuperSpool Help ... , ... 3-2 3.2 Using SuperSpool with Parallel Printers ... 3-3 3.2.1 Printer Port Controls ... 3-3 3.2.2 Memory Allocation Options ... 3-4 3.2.3 Printer Control Options ... 3-7 3.3 Using SuperSpool with Serial Printers ... 3-10 3.3.1 Serial Port Controls ... 3-11 3.4 SuperSpool Examples ... 3-14
4. SUPER DRIVE ... 4-1
4.1 Entering the SuperDrive Command ... 4-1 4.1.1 Creating a SuperDrive with Default Settings ... 4-1 4.1.2 Inserting a SuperDrive ... 4-2 4.1.3 SuperDrive Help ... .4-3 4.2 SuperDrive Options ... 4-3 4.2.1 Drive Configuration Options ... , ... 4-4 4.2.2 Memory Configuration Options ... 4-4 4.3 SuperDrive Examples ... 4-7 4.3.1 Drive Configuration Examples ... 4-7 4.3.2 SuperDrive Memory Configuration Examples ... .4-9 4.4 SuperDrive Application Notes ... 4-11
4.4.1 Creating SuperDrive A from an AUTO EXEC File ... 4-11 4.4.2 Single-Drive Systems ... 4-12 4.5 Error Messages ... 4-13
5. ASTCLOCK ... 5-1
5.1 Installing ASTCLOCK. ... 5-1 5.2 Setting the Time and Date ... 5-3 6. USING SUPERPAK UTILITIES TOGETHER ... 6-1
PART II. APPENDICES
A. MEMORY ALLOCATION ... A-1 A.1 Memory Configuration ... A-1 A.2 How SuperPak Utilities Allocate Memory ... A-2 A.3 Memory Allocation Options ... A-4 A.3.1 Allocating Memory to a Utility ... A-5 A.3.2 Reserving Memory for a Program ... A-6 A.3.3 Enabling and Disabling Memory Regions ... A-7 A.4 Memory Allocation for Conventional Memory ... A-8 B. CREATING AUTOEXEC.BAT AND CONFIG.SYS FILES ... B-1 B.1 Creating an AUTOEXEC.BAT File ... B-1 B.2 Modifying an AUTOEXEC.BAT File ... B-2 B.3 Creating or Modifying a CONFIG.SYS File ... B-3 C. PATCHING DOS FOR ADDITIONAL DRiVES ... C-1
C.1 Patching DOS 2.0 for Additional Drives ... C-3 C.2 Patching DOS 2.1 for Four Drives ... C-4 C.3 Patching DOS 3.0 for Four Drives ... C-5
FIGURE
Figure A-1. Memory Allocation Example ... A-3
TABLES
Table 2-1. Sector and Directory Size Parameters ... 2-2 Table 2-2. Memory Allocation Parameters ... 2-3 Table 2-3. Memory Region Options ... 2-4 Table 2-4. VDISK-Compatible Command Parameters ... 2-6 Table 3-1. Memory Allocation Parameters ... 3-5 Table 3-2. Memory Region Controls ... 3-6 Table 3-3. Printer Format and Control Options ... 3-8 Table 3-4. SuperSpool Communications Parameters ... 3-13 Table 4-1. SuperDrive Configuration Options ... 4-4 Table 4-2. Memory Allocation Parameters ... 4-5 Table 4-3. Memory Region Controls ... 4-6 Table C-1. Variable Values for Setting
SuperPak™ is a collection of memory resident programs that take advantage of your AST board's special features. SuperPak software enables you to use the clock/calendar on boards like SixPakPlus ® , install random access memory (RAM) disks and
print spoolers on extended memory boards like Advantage ® /2
and Advantage/2-386, and run expanded memory software on expanded memory boards like Rampage ® /2, Rampage 286, and
Rampage/2-286.
The SuperPak installation program (called INSTALL or ASTART, depending on the AST board), enables you to select basic configurations of your SuperPak utilities. For most applications, these configurations are all you ever need.
The SuperPak utilities can be modified for greater compatibility or to take advantage of their special features. You may do this by entering commands from the disk operating system (DOS) or by changing the statements in the AUTOEXEC.BAT and
CONFIG.SYS files.
Product Overview
The SuperPak utilities include these programs:
• The AST Expanded Memory software, which enables Expanded Memory Specification (EMS) and Enhanced Expanded Memory SpeCification (EEMS) application programs to use your board's expanded memory. • SuperSpoolTM, a print spooling buffer that enables you to
continue using your computer while your files print. • fASTdisk™, a RAM disk that emulates a fixed disk drive.
You may install up to two fASTdisks in your system, if memory permits.
• SuperDrive™, a RAM disk that emulates a diskette drive. This feature is available only for PC-, XT -, or
AT -compatible computers.
• ASTCLOCK™, a clock/calendar program that keeps track of the time and date even when your computer is off. You can use ASTCLOCK for AST boards with clock/calendars.
SuperPak Operation
SuperPak programs are memory-resident. Once you load them, they continue to work in memory as you use other applications. You can install these programs so they will be loaded each time you boot your system.
AUTOEXEC.BAT is a. batch file containing commands that are automatically executed when you start up your computer. CONFIG.SYS contains the software drivers that allow devices external to your computer (such as the AST expanded memory software and fASTdisk) to function.
You can modify SuperPak statements in the AUTOEXEC.BAT and CONFIG.SYS files by editing them in a text editor or word
processor. The program options listed in this manual enable you to configure the SuperPak utilities for greater compatibility and to use special features.
This manual will show you how to configure the SuperPak utilities for advanced applications. Part I, Using SuperPak, provides instructions and examples of SuperPak configurations. Part II, Appendices, provides background technical information. For instructions on using the installation program to configure and install SuperPak utilities, see the SuperPak Instalfation Supplement included with your AST board.
How to Find Information
For information on compatibility and system requirements: Section 1 provides important considerations for installing SuperPak utilities.
To configure and use fASTdisk:
Section 2 shows you how to modify the fASTdisk configuration and use it with overlay software. To configure and use SuperSpool:
Section 3 gives you instructions on configuring
SuperSpooi and lists the commands to control printing. To configure and use SuperDrive:
To use SuperPak utilities together:
Section 6 provides important considerations for using SuperPak utilities together.
For aflocating memory:
Appendix A gives suggestions on using SuperPak utilities with different memory configurations.
For instructions on creating AUTOEXEC.BAT and CONFIG.syS files:
Appendix B shows how to create and modify the AUTO EXEC. BAT and CONFIG.SYS files.
For instructions on patching DOS to support additional disk drives:
Appendix C tells you how to modify DOS to support additional disk drive designations. This is useful if you are using fASTdisk and SuperDrive.
For instructions on using the installation program:
The SuperPak Installation Supplement gives detailed instructions on using your SuperPak installation program. For information on using the expanded memory software:
The user's manual for your AST board explains how expanded memory software works and how to modify it, if necessary.
Format Notation
The following format notation is used in this manual:
• Boldface characters indicate information you enter.
• Lowercase characters represent parameters you define. These parameters must satisfy the conditions of the command descriptions.
• Angle brackets
«
» tell you to press a key. For example, < Esc> means to press the Esc key. You will only press the Enter key when you see the instruction< Enter>.
• Hyphens between keys tell you to press them
simultaneously. For example, < Clrl > -< All> -< Del> tells you to hold down Ctrl and Alt while pressing the Del key.
• Square brackets ({]) indicate an optional term you may omit. Do not enter the brackets.
• Color indicates prompts and messages you see on the screen.
• A leading zero and trailing lowercase "/7" indicate a hexadecimal number (for example, 02COh).
Related Documentation
1. Before You Begin 2. fASTdisk
3. SuperSpool 4. SuperDrive 5. ASTCLOCK
This section presents information you will need before you install SuperPak.
1.1 SuperPak Diskette Contents
In addition to the SuperPak utilities, there may be other software included on your SuperPak diskette. Information about each software product is contained in a file on the SuperPak diskette. To display the file, boot your computer with DOS, place your SuperPak diskette (or a copy) in drive A and type the following command:
README
< Enter>Follow the instructions on the screen to view the information.
1.2 Compatibility and System Requirements
1.3 What You Need to Know Before You Start
This section tells you what you need to know before installing SuperPak. A checklist appears in Section 1.3.1. Fill out the checklist as you answer each question.
Since SuperPak programs are memory-resident, the amount of memory installed in your system will determine which utilities you can use. Section 1.3.2 provides a general overview of memory requirements. For more detailed information, see Appendix A. In most cases, you will be able to use the configurations provided by the SuperPak installation program. For some configurations, you may need to modify the SuperPak configurations. See Section 1.3.3 for information.
A. In what computer are you installing SuperPak?
SuperPak is designed to work with AST Premium™ computers (Premium/286, Premium/386, and Premium Workstation), IBM R Personal Computers (PC, XT, and
AT), IBM Personal System/2™ (PS/2TM) computers (Models 25,30,50,60, and 80), and compatible computers.
The type of computer and expansion boards you have determines the SuperPak utilities you can install. For example, SuperDrive is compatible with PC, XT, and AT computers, but not the PS/2.
C.
How much expanded and extended memory is in the computer?Memory above DOS's 640-KB limit can be used as extended or expanded. Extended memory is located above 1 megabyte (MB) and can be used by print spoolers and RAM disks (such as SuperDrive, fASTdisk and SuperSpool).
Expanded (or paged) memory swaps segments of memory (called pages) in and out of conventional and high memory. The expanded memory software included in SuperPak enables you to use paged memory.
You can use expanded memory with programs that meet EMS or EEMS specifications. Expanded memory can also emulate extended memory for RAM disks and print spoolers.
The SuperPak expanded memory drivers are compatible only with AST expanded memory boards. They are not compatible with boards from other manufacturers. D. Which boards are installed in your computer?
Select SuperPak utilities appropriate for the expansion boards in your computer.
For computers with AST expanded memory boards (such as Advantage Premium or Rampage/2-286), run the SuperPak installation program to configure memory. To use fASTdisk, SuperSpool, and SuperDrive with
expanded memory boards, allocate memory on the board as conventional and extended.
In order to use SuperSpool, your computer must have a printer port (either serial or parallel). If you have a serial printer, direct the output from a parallel to a serial port (Section 3).
E.
Which SuperPak utilities do you want to use?Install SuperPak utilities that are best suited for your computer's configuration.
If you have an AST expanded memory board, such as Rampage 286, Rampage/2, or Rampage/2-286, run the SuperPak installation program to install the AST software . that makes expanded memory available.
If you have an AST board with a clock/calendar. such as SixPakPlus and SixPakPremium, install the ASTCLOCK software.
If your computer has more than 256 KB conventional memory; extended memory, or emulated extended memory, you may install fASTdisk, SuperSpool, and· SuperDrive.
F. Do you have RAM disks or print spoolers already installed on your boot disk?
If so, remove them before installing SuperPak.
G.
Do you have AUTOEXEC.BAT and CONFIG.SYS files on your boot disk?pertaining to SuperPak will not be changed. For
example, if you have an AUTOEXEC.BAT file set up to log you onto a local area network (LAN), the installation program will add the necessary SuperPak statements and leave your network commands alone.
If you run the installation program more than once and specify the same configuration, the CONFIG.SYS and AUTO EXEC. BAT files will contain duplicate entries. Delete the redundant commands with a
text
editor or word processor.1.3.1 Configuration Checklist
A. In what computer are you installing SuperPak?
o
AST Premium computer (or compatible)o
IBM PC or XT (or.compatible)o
IBM PC AT (or compatible)o
IBM Personal System/2 (or compatible)B. How much conventional memory is in the computer? _ _ KB (640 KB maximum.)
C. How much extended and expanded memory is in the computer?
Extended memory: KB
D. Which boards do you have installed in your computer? Expanded memory boards?
0
Yes0
NoName Amount of Memory
Extended memory boards?
0
Yes0
NoName Amount of Memory
AST clock/calendar installed?
0
Yes0
No Printer port installed?0
Yes0
NoCheck which port is used for the printer:
o
LPT1o
LPT2o
LPT3o
Other LPT_OCOM1 OCOM2 OCOM3
o
OtherCOM_E. Which SuperPak utilities do you want to use? OfASTdisk
o
SuperDriveo
SuperS poolo
ASTCLOCK1.3.2 Memory Requirements
An important consideration in installing SuperPak is the amount of memory in your computer. For example, you may want to set up the following SuperPak utilities:
• One 512-KB fASTdisk. • One 64-KB SuperS pool.
To do so, you will need a minimum of 576 KB of memory, not counting memory needed for application programs. You can skip over creating a fASTdisk, SuperDrive, or SuperSpool, if you want. Install the AST expanded memory software to use paged memory on an AST expanded memory board.
For more information on allocating memory, see Appendix A.
1.3.3 Modifying SuperPak Utilities
In most cases, the basic configurations provided by the
installation program will suit your needs. You may need to modify your SuperPak configuration to enhance compatibility or perform special functions, such as the following:
• Configuring SuperDrive to emulate an AT-compatible 1.2 megabyte (MB) diskette drive.
• Routing SuperS pool's printer output to a serial or second parallel port.
• Stopping SuperSpool printer output and reprinting the previous page.
For example, to redirect SuperSpool's printing from the first parallel port (LPT1) to the first serial port (COM 1) and set the baud rate to 9600, enter:
SUPERSPL LPTl:=COMl:/RATE=9600
You can execute this command upon starting by adding it to the AUTOEXEC.BAT file. First, use the installation program to copy the SuperSpool software to your boot disk and add the basic SUPERSPL command to your AUTOEXEC.BAT file. Then, use a text editor or word processor to modify your AUTOEXEC.BAT file to this form of the command.
You may also execute a command at any time by entering it at the DOS prompt. For example, if you have a parallel dot matrix printer and a serial laser printer, you can enter this command to switch printers. If you do not want to type in the entire command each time, you can incorporate it in a batch file. (See your DOS
This section gives you the full set of optional fASTdisk parameters in the standard format and in an alternate VDISK-compatible format. Sample commands illustrate how the fASTdisk parameters work.
2.1 Complete fASTdisk Device Statement
The fASTdisk statement is located in the CONFIG.SYS file. To set up a fASTdisk in its default configuration, enter this command in your CONFIG.SYS file:
DEVICE=FASTDISK.SYS
The FASTDISK.SYS file can be in any directory as long as you specify the drive and path in the DEVICE statement. If you are booting from a diskette, it must contain both CONFIG.SYS and the fASTdisk driver FASTDISK.SYS.
If the fASTdisk is to run in emulated extended memory, the DEVICE = FASTDISK.SYS statement must appear after the commands for the REMM.SYS and REX.SYS expanded memory drivers.
The complete form for the fASTdisk DEVICE command is as follows:
DEVICE=FASTDISK.SYS [/SSIZE=xxx][/DIR=xxx]
[/M[=xxx]] [/U=xxx] [/EXTM[=xxxx[,yyyy]]]
[/DEXTM] [/TSIZE=xxxx] [/DL] [/DH] [/DNC]
Enter the DEVICE command on one continuous line. Use a slash
(I) to separate the options, not a comma. Parameters shown in brackets are optional and can be entered in any order.
These commands are divided into three types of options, which are covered in the following sections:
• Sector and directory sizes: See Section 2.1.1 for the options ISSIZE and IDIR.
• Memory allocation: See Section 2.1.2 for the options
1M,
/U, /EXTM, IDEXTM, and /TSIZE.
• Disabling memory regions: See Section 2.1.3 for the options IDH, IDL, and IDNC.
2.1.1 Sector and Directory Size Options
[image:27.396.32.332.376.513.2]Sector and directory size parameters enable fASTdisk to emulate attributes of different types of hard disks. Table 2-1 shows the available parameters:
Table 2-1. Sector and Directory Size Parameters.
Parameter Default Description
/SSIZE= 128 Sets the sector size in bytes. Allowable sizes are 128,256. and 512.
2.1.2 Memory Allocation Options
Memory allocation parameters reserve areas of memory for fASTdisk and other applications and enable fASTdisk to operate in extended memory. You may use these options if fASTdisk's default configuration conflicts with the memory requirements of other programs. Table 2-2 lists the parameters.
Table 2-2. Memory Allocation Parameters.
Parameter Default Description
/M= all memory Sets the size of the fASTdisk in KB. If just /M is specified. all available linear memory is used for the fASTdisk.
/u= 64 Reserves a minimum amount of memory for applications other than the current fASTdisk. /EXTM= 0.1024 Enables fASTdisk to use extended memory
over 1024 KB. The first value specifies the maximum size for fASTdisk. (The default value 0 indicates no limit.) The second value specifies fASTdisk's starting address in KB. ranging from 1024 KB to the maximum amount of extended memory.
/DEXTM none Specifies that a second fASTdisk be installed in conventional memory. This parameter avoids conflicts with a fASTdisk already installed in extended memory.
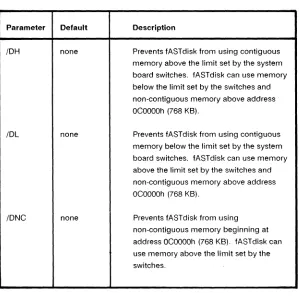
[image:28.396.72.369.210.551.2]2.1.3 Disabling Memory Regions
The options shown in Table 2-3 apply to older pes and XTs that determine memory allocation by switch settings. Older
[image:29.396.27.326.189.488.2]computers divide conventional memory into contiguous and non-contiguous ranges. (For more information on memory types, see Appendix A.)
Table 2-3. Memory Region Options
Parameter Default Description
IDH none Prevents fASTdisk from using contiguous memory above the limit set by the system board switches. fASTdisk can use memory below the limit set by the switches and non-contiguous memory above address OeOOOOh (768 KB).
IDL none Prevents fASTdisk from using contiguous memory below the limit set by the system board switches. fASTdisk can use memory
above the limit set by the switches and
non-contiguous memory above address OeOOOOh (768 KB).
IDNe none Prevents fASTdisk from using
2.2 VDlSK-Compatible fASTdisk Device Command
An alternate form of the DEVICE = FASTDISK.SYS command is similar to that of the IBM VDISK RAM disk. This format is for applications that require compatibility with VDISK.
The parameters in the fASTdisk's VDISK command format are the same as those for the regular format. Their order has been changed to maintain compatibility with VDISK.
The VDISK-compatible format of the DEVICE = FASTDISK.SYS command is as follows:
OEVICE=FASTOISK. SYS [aaa [
bbb[ ccc]]]
[IE [:
t]] [lOEXTM] [lU=xxx] [/OH] [lOl]
[/ONC]
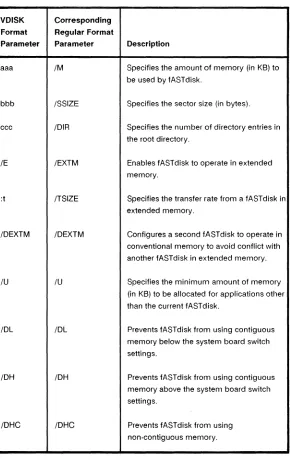
Table 2-4. VDISK-Compatible Command Parameters
VDISK Corresponding Format Regular Format
Parameter Parameter Description
aaa 1M Specifies the amount of memory (in KB) to be used by fASTdisk.
bbb ISSIZE Specifies the sector size (in bytes). ccc IDIR Specifies the number of directory entries in
the root directory.
IE IEXTM Enables fASTdisk to operate in extended memory.
:t /TSIZE Specifies the transfer rate from a fASTdisk in extended memory.
IDEXTM IDEXTM Configures a second fASTdisk to operate in conventional memory to avoid conflict with another fASTdisk in extended memory.
IU IU Specifies the minimum amount of memory (in KB) to be allocated for applications other than the current fASTdisk.
2.3 Rules for Using fASTdisk
Follow these rules as you configure fASTdisk:
• If you are installing the REMM.SYS and REX.SYS drivers for expanded memory, put the DEVICE statement for the drivers before the DEVICE = FASTDISK.SYS statement in the CONFIG.SYS file. The SuperPak installation program will write the commands in their proper order.
• The computer installs fASTdisk before installing
SuperSpool and SuperDrive. If fASTdisk uses the /EXTM option, so will the other SuperPak utilities (unless they disable it with the /DEXTM option).
• If your computer has extended memory, there is no noncontiguous memory and the [IDNC] option is not used.
2.4 Examples of fASTdisk Commands
This section provides examples of the DEVICE = FASTDISK.SYS command. You may use these examples to help you configure fASTdisk for your system.
2.4.1 Single fASTdisk Command Examples
The following examples show how to configure one fASTdisk.
Example 1
To allocate all extended memory above 1 MB to a fASTdisk, enter this command:
This command performs the following:
• The
1M
parameter indicates that all available memory will be used for the fASTdisk.• The IEXTM parameter indicates that the fASTdisk is to use extended memory. No offset is indicated, therefore fASTdisk will start at 1024 KB.
Exampl~ 2
To create one fASTdisk that uses all available conventional and extended memory, except for 512 KB reserved for applications, and has 128 root directory entries, enter this command:
DEVICE=FASTDISK.SYS /M/EXTM/DIR=128/U=512
This command performs the following:
• The
1M
parameter indicates all available memory will be used for the fASTdisk.• The IEXTM parameter enables fASTdisk to use extended memory.
• The IOlR = 128 parameter indicates that 128 entries can be used in the fAST disk root directory.
2.4.2 Dual fASTdisk Command Examples
The following examples show you how to install two fASTdisks.
Example 1
To create one 200-KB fASTdisk in extended memory and a second 100-KB fASTdisk, enter these commands in this order in the CONFIG.SYS file:
DEVICE=FASTDISK.SYS 200 /E
DEVICE=FASTDISK.SYS /M=100
The first command, entered in VDISK format, does the following: • The number 200 allocates 200 KB for the fASTdisk. • The
IE
parameter instructs fASTdisk to operate inextended memory.
• Since no other parameters have been specified, fASTdisk will use defaults for those values.
The second command, entered in the regular fASTdisk format, does the following:
• The parameter
1M
= 100 allocates 100 KB for the fASTdisk.• Since the first fASTdisk was created in extended memory, the second fASTdisk will be also. (To configure tile second fASTdisk in conventional memory, use the IDEXTM parameter.)
Example 2
To create one 50-KB fASTdisk in conventional memory with 128 root directory entries and a second fASTdisk in extended memory. enter the following commands in this order:
DEVICE=FASTDISK.SYS SO/DIR=128
DEVICE=FASTDISK.SYS /EXTM
The first command. written in VDISK format, does the following: • The number 50 allocates 50 KB for the first fASTdisk. • The IDIR = 128 parameter indicates that fASTdisk will
have a maximum of 128 root directory entries.
• Since the
IE
parameter was not specified, memory for the first fASTdisk will come from conventional memory.• Since no other parameters were specified. fASTdisk will use defaults for those values.
The second command. written in regular fASTdisk format, does the following:
• The IEXTM parameter indicates that the second fASTdisk will operate in extended memory.
2.5 Application Notes
This section provides suggestions on using fASTdisk to the best advantage.
2.5.1 fASTdisk Compatibility
fASTdisk functions as an already formatted hard disk. You can use DOS commands and applications witll it.
Any program you can copy to a diskette or hard disk can also be copied to a fASTdisk. If your program is copy-protected, you will not be able to copy it to a fASTdisk.
If you want to run an application on a fASTdisk from the AUTOEXEC.BAT file, you must enter commands to copy the program to the fASTdisk before executing it. For example, to copy and run Microsoft R Word, enter these commands in your
AUTOEXEC.BAT file:
COpy A:*.* D:
D:
WORD
These commands copy the Word program files from floppy drive A to fASTdisk D. The AUTOEXEC.BAT file then changes to drive D and executes Word.
2.5.2 Using fASTdisk with Modular Software
You can enhance the speed and performance of disk-intensive or modular software by installing it on a fASTdisk.
For example, if you have a word processor with a spelling checker, you can copy the dictionary files to the fASTdisk. This will speed up the time the spelling checker requires to search for words. Likewise, you can copy to the fASTdisk applications broken into different modules (such as accounting software, word processors, and other large programs). You will not have to keep your program disk in the drive or wait for software modules to load.
Keep your data on a diskette or hard disk so you do not lose any information if the computer is turned off.
2.5.3 Protecting Important Data Files
Since fASTdisk is a part of the computer's memory, any data stored on the fASTdisk will be lost if the computer is turned off or rebooted. Therefore, do not store files you cannot afford to lose on your fASTdisk. The best way to use fASTdisk is to run your application programs on it and keep your data files on your diskettes or hard disk.
The following sample AUTOEXEC.BAT file copies the program and data from the diskette in drive A to the fASTdisk drive D and runs the application. After you quit the program, the batch file continues by copying the contents of the RAM disk back to drive A.
COpy A:*.* D:
D:
program
COpy D:*.* A:
Replace program with the file name of the application to run from drive D.
This AUTOEXEC.BAT does the following:
• The COpy A:*.* D: command copies all the files on drive A, presumably the program diskette, to the fASTdisk drive D.
• The D: command makes fAST disk the default drive. • The third line executes the program. Replace the variable
program with the name of your application file.
• After you exit from the application, AUTOEXEC.BAT continues. The COpy 0:*.* A: command copies the fASTdisk's contents to the diskette in drive A.
This section provides the options that you can use to modify or control the SuperS pool printer spooler. Sample commands and application notes will demonstrate how the options work.
3.1 Using the SuperSpool Command
To set up a SuperS pool each time you boot the computer, use the SuperPak installation program to add the SuperSpool command to your AUTOEXEC.8AT file by using the SuperPak installation program or by typing commands at the DOS prompt. If you are using SuperS pool with parallel port LPT1 or any serial port, enter the following command before running SuperS pool :
MODE LPTl:
This command initializes LPT1 and enables SuperS pool to print from DOS and other applications using LPT1. Do not use the MODE LPT1: command if you are using another parallel port. To set up SuperS pool in its default configuration for a parallel port, enter this command:
SUPERSPL LPTp:
Substitute p for the parallel port number.
To set up SuperSpool in its default configuration for a serial port, enter this command:
SUPERSPL LPTl:=COMs:
There are different versions of the SUPERSPL command for configuring SuperSpool with parallel and serial ports. To use SuperSpool with a parallel printer,see Section 3.2. To use SuperS pool with a serial printer, see Section 3.3.
3.1.1 Printing with SuperSpooi
To use SuperSpool from DOS, use the COpy command to direct the
file
to the printer port used for SuperS pool. Do not use the DOS PRINT command because it uses the DOS print buffer. For example, to print the file SAMPLE.TXT to a SuperSpool set up for LPT2, enter the following:COPY SAMPLE. TXT LPT2:
< Enter>The text for SAMPLE.TXT will print on the printer attached to LPT2.
With applications, use your normal printing procedures. Configure SuperS pool for the port to which you normally send your printing. When you print, the output will go to SuperSpool before going to the printer. If your application comes with a print spooler, be sure to disable it before using SuperS pool.
3.1.2 SuperS pool Help
3.2 Using SuperSpool with Parallel Printers
The complete form of the SuperS pool command for parallel printers is as follows:
SUPERSPL LPTp:[/?] [/U=xxx] [/M[=xxx]]
[/EXTM[=xxxx[,yyyy]]][/DEXTM] [TSIZE=xxxx]
[/DH] [/DL]
[/DNC] [/DBI] [/DMMGMT] [/LPP=xx]
[IFF]
[/STRING=xxx[, xxx, ... ]]
[IS] [lC] [/P]
[/B] [/R]
[/RP] [lPINT [=X]]
Lowercase letters represent variables for the different parameters. Enter the command on one continuous line. Use a slash to separate the options, not a comma. Enter the optional parameters in any order.
These commands are divided into three types of options, which are covered in the following sections:
• Printer port controls: See Section 3.2.1 for the options LPTp: and IPINT.
• Memoryallocation: See Section 3.2.2 for the options IU, 1M, IEXTM, IDEXTM, /TSIZE, 10H, 10L, lONe. lOBI. and 10MMGMT.
• Printer controls: See Section 3.2.3 for the options ILPP, IFF, ISTRING,
IS, Ie, IP, IB, IR,
and IRP.3.2.1 Printer Port Controls
By default, SuperSpool sends the output to LPT1. You may use another printer port with SuperS pool by typing its DOS name after the SUPERSPL command. To direct SuperSpool output to LPT2, enter the following:
NOTE
The PS/2 designates parallel ports as
PARALLEL _1, PARALLEL _2, and so forth. Under DOS, these ports are called LPT1 and LPT2. Be sure to use the DOS names for parallel ports in the SUPERSPL command.
By default, SuperSpool uses the interrupt request (IRO) number for the port you specify. If you configured your port for another IRO number, use the /PINT option to specify it. You may use any value from 0 to 7, but IRO values other than 7 are used with specially designed printer hardware.
To specify IR07 and LPT1, enter the following SuperSpool command:
SUPERSPL LPTl: /PINT=7
See your printer's user manual for more information on IRO assignments.
3.2.2 Memory Allocation Parameters
Table 3-1. Memory Allocation Parameters.
Parameter Default Description
/M= all memory Sets the size of the SuperSpool in KB. Entering only /M uses all available linear memory for the SuperSpool.
/U= 64 Reserves a minimum amount of memory for applications other than the current
SuperSpool.
/EXTM= 0,1024 Enables SuperSpool to use extended memory over 1024 KB. The first value specifies the maximum size for SuperSpool. (The default value 0 indicates no limit.) The second value specifies SuperSpool's starting address in KB. ranging from 1024 KB to the maximum amount of extended memory. /DEXTM none Disables SuperSpool's use of extended
memory after it has been installed with the /EXTM command.
/TSIZE= 2048 Sets in bytes the maximum amount of data that can transferred to and from a
SuperSpool in extended memory. Acceptable values range from 16 to 32.000 bytes. Enter a value that is a multiple of 16. /DMMGMT none Prevents SuperSpool from using additional unallocated memory. Disables SuperSpool's calls to DOS memory management. /DBI none Disables the block transfer interface to avoid
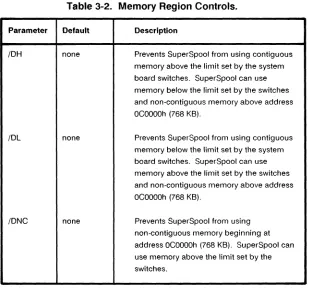
Table 3-2 lists options that apply to older pes and XTs which determine memory allocation by switch settings. Older
[image:45.396.24.334.148.436.2]computers divide conventional memory into contiguous and non-contiguous ranges. (For more information on memory types, see Appendix A.)
Table 3-2. Memory Region Controls.
Parameter Default Description
IDH none Prevents SuperSpool from using contiguous memory above the limit set by the system board switches. SuperSpool can use memory below the limit set by the switches and non-contiguous memory above address OeOOOOh (768 KB).
IDL none Prevents SuperSpool from using contiguous memory below the limit set by the system board switches. SuperSpool can use memory above the limit set by the switches and non-contiguous memory above address OeOOOOh (768 KB).
3.2.3 Printer Control Options
The options in this section enable you to control printing, set print format, and send text strings to the printer.
You may use these commands to control the printer from DOS. You do not have to enter the entire SUPERSPL command. For example, type the following to stop printing.
SUPERSPL
/S<Enter>
To continue printing, type the following command.
SUPERSPL
/e
< Enter>Table 3-3. Printer Format and Control Options.
Parameter Default Description
ILPP= 66 Sets the number of lines per page. Default value prints an 11 inch page with 6 lines per inch.
IFF none Sends a form-feed character to the printer. ISTRING= none Sends a series of decimal ASCII codes to the
printer. List each code in order (up to three digits) and separate them with commas. You may include control and character codes. The printer will interpret and print them.
IS none Stops printing. No data will be lost. To restart printing, use the SUPERSPL/C command.
IC none Continues printing from where it was stopped by the SUPERSPL IS command.
IP none Purges all data from the SuperSpool. Any data stored there will be lost.
Do not combine the
18
option with theIR
or IRP options in the same line. The18
option is to be used when first initializing your spool buffer. TheIR
and IRP options are for use only after printing has already begun.Use the
IR
and IRP options in this sequence: STEP 1Set up a buffer: 8efore printing, use the
18
parameter to set up a buffer for reprinting pages, as shown in this command:SUPERSPl
18
STEP 2
Stop printer output: From DOS, enter this command to stop printer output:
SUPERSPl
IS
STEP 3Set the paper at the top of the form: Use the printer's top-of-form control to place the print head at the top of the next page.
STEP 4
Continue printing: Enter the following command to restart printing at the current or previous page. respectively.
3.3 Using SuperSpool with Serial Printers
The complete form of the SuperS pool command for serial ports is as follows:
SUPERSPl
lPTp:=COMs:[/?] [/RATE=baud[,parity
[, databi ts [, stopbi ts]]]] [lU=xxx] [lM=xxx]
[/EXTM[=xxxx[,yyyy]]] [/OEXTM] [/ON=option]
[/OFF=option] [/TSIZE=xxxx] [/OH] [/Ol] [/ONC]
[lOBI] [/OMMGMT] [/LPP=xx] [IFF]
[/STRING=xxx [, xxx, .. . ]]
[IS]
[lC]
[lP] [lB]
[/R]
[/RP] [/SINT[=X]]
Lowercase characters represent variables for the different parameters.
Enter the command on one continuous line. Use a slash to separate the options, not a comma. Parameters shown in the brackets are optional and can be entered in any order. Many serial port options are the same as for the parallel port. Refer to the following sections for these options:
• Memory allocation options: See Section 3.2.2 for the options
IU, 1M,
IEXTM, IDEXTM, /TSIZE,IDH, IDL, IDNC,
IDBI, and IDMMGMT.
• Printer controls: See Section 3.2.3 for the options ILPP, IFF, ISTRING,
IS, IC, IP, IB, IR,
and IRP.3.3.1 Serial Port Controls
To work with serial printers, SuperSpool requires you to redirect printing from LPT1 to the serial port of your choice. This enables SuperSpool to use < Print Screen> and other print commands specific to LPn.
To use SuperPak with a serial port, enter this command:
SUPERSPL LPTl:=COMs:
Substitute s for the serial port number. This command does the following:
• It redirects printing from the parallel port to the serial port you specify .
• . LPTp responds as the next available LPT port. (LPT1 becomes LPT2, LPT2 becomes LPT3, and so forth.). For example. enter the following command sets up SuperS pool to print to COM1:
SUPERSPL LPTl:=COMl:
This command redirects the output from LPT1 to COM1 and changes LPT1 to LPT2.
You must redirect printing from LPT1 to a serial port to use a serial printer with SuperSpool. The following format is not valid:
SUPERSPL COMI:
To specify IRQ4 and COM1, enter the following SuperSpool command:
SUPERSPl lPTl:=COMl: /SINT=4
See your printer's user manual for more information on IRQ assignments.
Table 3-4. SuperSpool Communications Parameters.
Parameter Default Description
IRATE none Sets the serial ports baud rate, parity, databits, and stopbits, All four values must be indicated in this parameter.
baud none Sets the serial device's baud rate, Valid rates are 110, 150,300,600, 1200,2400,4800, and 9600, If the rate is not specified, SuperSpool will use the baud rate previously configured for that device (as with the MODE
command),
parity E (even) Set the parity, Valid values are N (none), 0
(odd), and E (even), Do not spell out the values,
databits 7 Sets the number of bits in the byte used to represent characters, Valid values are 7 and 8,
stopbits 1 Sets the number of bits in the byte used to indicate the end of the character, Valid values are 0 and 1,
ION CTS,DSR Enables serial port protocol options, Valid options are XON (for XON/XOFF), DCD, DSR, and CTS,
Most printers require CTS and DSR to be on before it can receive output. For information on the serial port protocols required for your printer, see your printer's user manual. IOFF DCD,XON Disables serial port protocol options, Valid
3.4 SuperSpool Examples
The following examples show how options are used with parallel and serial printers. Specific examples are covered in the following sections:
• For parallel printer configuration examples: See Section 3.4.1.
• For serial printer configuration examples: See Section 3.4.2.
• For memory allocation examples: See Section 3.4.3.
• For printer control examples: See Section 3.4.4.
3.4.1 Parallel Printer Configuration Examples
These examples show you how to use SuperS pool with parallel printers.
Example 1
To configure SuperS pool for LPT2 each time you start the computer, add the following lines in your AUTOEXEC.BAT file:
MODE
LPTlSUPERSPL LPT2:
Since these commands are in your AUTO EXEC. BAT file, they will be executed every time you boot your computer.
Example 2
To use SuperSpool with a printer configured for LPT1 and IRQ?, enter this command:
SUPERSPL LPTl: /PINT=7
This command does the following:
• SUPERSPL LPT1 : sets up SuperSpool for LPT1.
• The (PINT =? parameter indicates the port is configured as IRQ?
3.4.2 Serial Printer Configuration Examples
These examples show you how to configure SuperS pool for the serial port.
Example 1
To set up SuperSpool for serial port COM1 each time you boot your computer and use a 9600 baud rate, even parity, 8 databits, and 1 stopbit, enter the following commands in your
AUTOEXEC.BAT file:
MODE LPn:
These commands do the following:
• MODE LPT1: initializes the printer port. Enter this command before using SuperS pool with LPT1 or a serial port.
• SUPERSPL LPT1: = COM1: directs printer output from LPT1 to COM1. LPT1 will be renamed LPT2.
• The IRATE parameter sets the serial port configuration. The values 9600, E, 8, and 1 set the baud rate, parity, databits, and stopbits respectively.
Since these commands are included in your AUTOEXEC.BAT file, they will be executed every time you boot your computer.
Example 2
To use SuperSpool with a serial port configured for COM2, IRQ3, 9600 baud, no parity, 7 databits, 1 stopbit, and CTS and DSR off, enter the following:
SUPERSPL LPTl:=COM2: /SINT=3
/RATE=9600,N,7,1/OFF=CTS/OFF=DSR
This command does the following:
• SUPERSPL LPT1: = COM2: redirects the printer output from LPH to COM2. LPT1 is renamed LPT2.
• The /OFF = CTS parameter disables the CTS signal. • The /OFF = DSR parameter disables the DSR signal.
3.4.3 Memory Allocation Examples
These examples show you how to configure SuperS pool for different memory allocations.
Example 1
To allocate 128 KB of extended memory for SuperSpool, enter the following:
SUPERSPL LPT1: /M=128/EXTM
This command does the following:
• SUPERSPL LPT1: sets up SuperS pool for a parallel port, in this case, LPT1.
• The 1M = 128 parameter allocates 128 KB for the SuperSpool.
Example 2
To create a SuperSpool for COM1 that uses all available
conventional and extended memory except for 512 KB reserved for applications, enter this command:
SUPERSPL LPTl:=COMl:
/M/EXTM/U=512
This command does the following:
• SUPERSPL LPT1: = COM1: directs printer output from LPT1 to COM1. LPT1 is renamed LPT2.
• The
1M
parameter indicates that all available memory will be used for SuperSpool.• The IEXTM parameter enables SuperSpool to use extended memory.
3.4.4 Printer Control Examples
These examples show how to use the SuperSpool printer controls.
Example 1
To set the page length to 51 lines (8.5 inches at 6 lines per inch), enter the following:
SUPERSPL /LPP=51
This command does the following:
• SUPERSPL invokes the SuperSpool program. You do not have to specify the port designation unless you are changing it.
• The /LPP = 51 parameter sets the page length to 51 lines.
Example 2
To send codes to print enhanced text on Epson®printers (27 and 69 decimal), enter the following:
SUPERSPL /STRING=27,69
This command does the following:
• SUPERSPL invokes the SuperSpool program. You do not have to specify the port designation unless you are changing it.
Example 3
To stop printing, force a form feed, and resume printing at the beginning of the previous page, enter the following commands:
SUPERSPL
IB
SUPERSPL
IS
SUPERSPL IFF
SUPERSPL IRP
These commands do the following:
• SUPERSPL
IB
sets up a buffer for storing pages to reprint.• SUPERSPL IS stops the printing.
• SUPERSPL IFF sends the form feed character to the printer.
• SUPERSPL IRP resumes printing at the start of the previous page.
3.5 SuperSpool Application Notes
The following sections discuss how to best handle particular tasks when using SuperS pool, such as checking on the SuperSpool status and changing the printer configuration.
You will see the port attached to SuperS pool and the amount of data in the buffer, as shown in the following example. (The printer port designation and amount of memory are examples and may be different from your actual configuration.)
LPT1: is ready
24653 bytes buffered for output
The status will also appear whenever you issue a SUPERSPL command at the DOS prompt. If you stop printing with the SUPERSPL IS command, you will see this message:
LPT1: is stopped
24653 bytes buffered for output
3.5.2 Changing Printer Configuration
You can change the SuperSpool-directed printer port configuration when the spool buffer is empty. To attach SuperSpool to another printer port. use the SUPERSPL
IP
command to purge the buffer before entering the command to select the port.
You can only modify the memory and buffer configuration options (1M, 1M = xxx, or IU = xxx) after rebooting the computer. These commands can be added to the AUTOEXEC.BAT file to configure memory each time you start the computer.
3.5.3 SuperS pool Compatibility
SuperSpool works with applications that send files directly to parallel and serial ports. You may use SuperS pool to print files directly from DOS with the COpy command and
Some applications, especially word processors and desktop publishing software, have custOrD printer drivers that modify data during printing. While SuperSpool may enhance the performance of these programs, their formatting routines will slow down printing.
Custom serial printer drivers may not be compatible with
SuperS pool. Refer to your application's user manual if you have questions about using printer drivers with print spoolers.
3.5.4 SuperSpool Utility Batch Files
You can Invoke the SuperS pool program from an
AUTOEXEC.BAT or other batch files. Refer to your computer's DOS Manual for more detailed information on batch files. Before you use the SUPERSPL command with LPT1 and any serial port, enter MODE LPT1 : to initialize the printer port. Add this statement to your AUTOEXEC.BAT file in a line before the command for SuperSpool. You do not have to type MODE LPT1: again until you reboot. Omit the MODE LPT1 command if you are using SuperSpool with another parallel port.
You may want to add one or more batch files to change the printer configuration or display the status. This eliminates the lengthy commands you would have to use otherwise.
Once the NEC.BAT file is on your DOS diskette, all you have to do to initialize SuperSpool for this NEC printer is type the following:
NEe
< Enter>3.5.5
UsingSuperS pool
with Other BuffersYou may use SuperSpool when there are no other print spoolers on your system. If you have another print spooler installed in your computer, disable it before using SuperSpool.
Some printers, especially laser printers. come with their own built-in buffers. Prbuilt-intbuilt-ing will slow down if both SuperS pool and the printer's buffer are active. To correct the problem, disable either SuperSpool or the printer's buffer.
Microsoft®Windows and other operating systems come with their own print spoolers. Disable SuperS pool before using an
You can configure SuperDrive to emulate a variety of drives, including single-sided, double-sided, and high-density. Like the other SuperPak utilities, SuperDrive can be set up to run in specific areas of memory.
This section provides the optional parameters you can use to modify SuperDrive. Sample commands and application notes will show you how to use the options. A list of error messages help you look for configuration problems.
NOTE
SuperDrive is not compatible with the PS/2 and not recommended for AT -compatible computers with only one diskette drive.
4.1 Entering the SuperDrive Command
To set up a SuperDrive each time you start the computer, add the SuperDrive command to your AUTO EXEC. BAT file by using the SuperPak installation program or by typing the commands. Once you set up a SuperDrive, do not modify it until you reboot your computer.
4.1.1 Creating a SuperDrive with Default Settings To create a SuperDrive in its default configuration, enter the following:
SUPERDRV drive:
To set up a SuperDrive in its default configuration as drive D, enter the following:
SUPERDRV D:
If you want to install SuperDrive on an AT -compatible computer, you must select a drive designation for an existing diskette drive. If you have two diskette drives (A and B), you may name
SuperDrive device B.
However, if you assign SuperDrive the same letter as a diskette drive, you cannot use the physical drive. If you have only Orle drive in your Premium/286 or PC AT (drive A), do not use SuperDrive. Use fASTdisk instead.
4.1.2 Inserting a SuperDrive
With the PC, XT, and compatible computers, you may assign SuperDrive the same drive designation of a physical drive without disabling it. The
II
parameter inserts SuperDrive at the drive designation you select and moves the physical drives up one letter.For example, to install SuperDrive as drive B in a two-diskette drive system, enter the following:
SUPERDRV 8:/1
This command does the following:
4.1.3 SuperDrive Help
For a complete list of SuperDrive options, type the following at the DOS prompt:
SUPERDRV
I?
< Enter>The SuperDrive commands will appear on the screen with explanations. Do not use this command in your AUTOEXEC.BAT
file.
4.2 SuperDrive Options
The complete form of the SuperDrive command is as follows:
SUPERDRV
dr;ve:
[II]
[/U=xxx] [/M=xxx]
[/EXTM[=xxxx[,yyyy]]] [/DEXTM]
[11]
[/4]
[/8]
[/15]
[/TSIZE=xxxx][/DH][/DL][/DNC]
[/DMMGMT]
Lowercase letters represent variables for the different parameters. Enter the command on one continuous line. Use a slash to separate the options, not a comma. Optional parameters can be entered in any order.
These commands are divided into two types of options, which are covered in the following sections:
• Drive configuration options: See Section 4.2.1 for the options drive: /1, /4, /8, and /15.
4.2.1 Drive Configuration Options
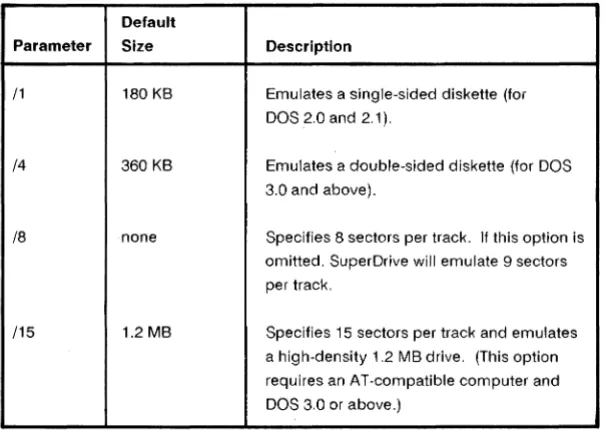
The options in this section determine the type of drive SuperDrive will emulate. (See Table 4-1.) SuperDrive's capacity depends on the type of drive emulation you select. If you configure
[image:67.397.28.331.207.422.2]SuperDrive as single-sided, it will be 180 KB. To specify a different memory size, use the 1M option described in Section 4.3.
Table 4-1. SuperDrive Configuration Options.
Default
Parameter Size Description
/1 180 KB Emulates a single-sided diskette (for DOS 2.0 and 2.1).
/4 360 KB Emulates a double-sided diskette (for DOS 3.0 and above).
/8 none Specifies 8 sectors per track. If this option is omitted. SuperDrive will emulate 9 sectors per track.
/15 1.2 MB Specifies 15 sectors per track and emulates a high-density 1.2 MB drive. (This option requires an AT-compatible computer and DOS 3.0 or above.)
Table 4-2. Memory Allocation Parameters.
Parameter Default Description
/M= 360 Sets the size of the SuperDrive in KB. /U= 64 Reserves a minimum amount of memory for
applications other than the current SuperDrive.
/EXTM= 0,1024 Enables SuperDrive to use extended memory over 1024 KB. The first value specifies the maximum size for SuperDrive. (The default value 0 indicates no limit.) The second value specifies SuperDrive's starting address in KB. ranging from 1024 KB to the maximum amount of extended memory. /DEXTM none Disables SuperDrive's use of extended
memory after it has been installed with the /EXTM command.
/TSIZE= 2048 Sets in bytes the maximum amount of data that can transferred to and from a SuperDrive in extended memory. Acceptable values range from 16 to 32.000 bytes. Enter a value that is a multiple of 16.
/DMMGMT none Prevents SuperDrive from using additional unallocated memory. Disables SuperDrive's calls to DOS memory management. /DBI none Disables the block transfer interface to avoid
Table 4-3 lists options that apply to older pes and XTs which determine memory allocation by switch settings. Older
[image:69.396.30.332.157.427.2]computers divide conventional memory into contiguous and non-contiguous ranges. (For more information on memory types, see Appendix A.)
Table 4-3. Memory Region Controls.
Parameter Default Description
/DH none Prevents Super Drive from using contiguous memory above the limit set by the system board switches. Super Drive can use memory below the limit set by the switches and non-contiguous memory above address OCOOOOh (768 KB).
/DL none Prevents Super Drive from using contiguous memory below the limit set by the system board switches. Super Drive can use memory above the limit set by the switches and non-contiguous memory above address OCOOOOh (768 KB).
IDNC none Prevents SuperDrive from using
4.3 SuperDrive Examples
This section provides examples of using SuperDrive in specific configurations. Use these examples to help you configure SuperDrive for your own applications.
4.3.1 Drive Configuration Examples
These examples show you how to configure SuperDrive for different applications.
Example 1
A PC XT has a diskette drive and a hard disk. To create an 8-track-per-sector double-sided SuperDrive as drive B. enter the following command:
SUPERDRV B: /4/8
This command does the following:
• The B: parameter specifies that SuperDrive is drive B. Since the
/1
parameter is not used, the designations of the other drives are not affected.• The /4 parameter specifies a double-sided drive. By default, SuperDrive will have a 360 KB capacity.
Example 2
A PC-compatible computer has two diskette drives. To create a single-sided SuperDrive and insert it as drive B, enter the following:
SUPERDRV B: /1/1
This command does the following:
• The B: parameter specifies that SuperDrive is drive B. • The
/1
parameter indicates SuperDrive is to be inserted inthe sequence after the first physical drive (Drive A), and the second physical drive will move down a letter to become drive C.
• The /1 parameter specifies that SuperDrive is a
single-sided 180-KB drive. Be sure to use DOS 2.0 or 2.1 with this configuration.
Example 3
A Premium/286 has two diskette drives and one hard disk. To create a 1.2 MB SuperDrive as drive B, enter the following:
SUPERDRV B: /15
This command does the following:
4.3.2 SuperDrive Memory Configuration Examples
These examples show you how to configure SuperDrive for different memory allocations.
Example 1
A PC has 512 KB of conventional memory and a single diskette drive. To set up a 128 KB double-sided SuperDrive as drive Band reserve a minimum of 256 KB for other applications, enter the following:
SUPERDRV B: /4/M=128/U=256
This command does the following:
• The B: parameter specifies SuperDrive as drive B. • The 14 parameter instructs SuperDrive to emulate a
double-sided diskette.
• The
1M
= 128 parameter sets the SuperDrive capacity to 128 KB. The computer will remind you that SuperDrive is less than the normal double-sided configuration when you boot. (See Section 4.5.)Example 2
An XT-compatible computer has 640 KB of conventional memory, 512 KB of emulated extended memory on a paged memory board, and two physical diskette drives. To create a double-sided SuperDrive as drive D in extended memory only, enter the
following:
SUPERDRV 0: /4/EXTM
This command does the following:
• The D: parameter specifies SuperDrive as drive D. • The /4 parameter specifies that SuperDrive will be
double-sided. Since no memory amount is specified, SuperDrive will use the default capacity of 360 KB. • The /EXTM parameter enables SuperDrive to use
extended memory. No offset is specified, so SuperDrive will start at 1024 KB.
Example 3
A Premium/286 has 640 KB of conventional memory, 256 KB of extended memory, and two diskette drives. To create a high-density SuperDrive that uses only extended memory, enter the following:
• The /15 parameter instructs SuperDrive to emulate a high-density diskette.
• The /EXTM parameter enables SuperDrive to run in extended memory.
• The /M = 256 parameter limits the SuperDrive capacity to 256 KB. The computer will remind you that SuperDrive is less than the normal high-density configuration when you boot. (See Section 4.5.)
4.4 SuperDrive Application Notes
This section provides suggestions on making the best use of SuperDrive with different applications.
Since any data stored on a SuperDrive is actually stored in RAM, it will be lost turn off or reboot the computer. Be sure to copy SuperDrive files regularly to a diskette or the hard disk.
4.4.1 Creating SuperDrive A from an AUTOEXEC.BAT File DOS will not let you create a SuperDrive as drive A from an AUTOEXEC.BAT file. (Appendix B describes AUTOEXEC.BAT files.) You can work around this limitation by creating a batch file called from AUTOEXEC.BAT that creates the drive A SuperDrive. Your computer needs two physical drives to perform this operation.
Use a text editor or word processor to create an AUTOEXEC.BAT file on your boot diskette or hard disk root directory. It will contain the following commands:
ASTCLOCK
MODE LPn:
B:
MAKE-A is a batch file that contains the commands for creating SuperDrive. Create it with a text editor or word processor, and copy it to your boot diskette and the program diskette you will put in drive B. A sample MAKE-A. BAT file contains the following commands:
SUPERDRV A:/I
SUPERSPL LPn:
COPY B:*.* A:
A:
program
Substitute program for the filename of the software to run from
drive A. .
When you are ready to start the computer, put in drive A the diskette contains all of the programs that you want to execute from the SuperDrive. Put in drive B the diskette with the SuperDrive and SuperSpool programs. Both the diskettes in drive A and drive B contain the MAKE-A. BAT batch file.
4.4.2 Single-Drive Systems
This section provides several suggestions for using SuperDrive with one physical diskette drive. Do not use SuperDrive with AT-compatible computers with one physical drive.
You must be aware of two things when copying files from one diskette to another:
• The DISKCOPY command can transfer the entire contents of a diskette to another diskette or SuperDrive. To copy to another diskette, type DISKCOPY A: A: and press < Enter>. You can use DISKCOPY to transfer files to and from SuperDrive if it is the same size as your diskette.
4.5 Error Messages
SuperDrive shows error messages under the conditions described below.
INVALID DRIVE SPECIFICATION .... ABORTING
Explanation: This message indicates that either the system board switches were not set for the correct number of drives (see Section 2.4), or you used an invalid drive letter in your SuperDrive command.
Action: Set the system board switches for the correct number of drives. (See your AST board user's manual.) Do not select a drive specification letter other than A, B, C,orD.
INSUFFICIENT MEMORY .... ABORTING
Explanation: This message indicates that there is not enough unallocated memory available in the system to create a SuperDrive of any size.
Action: Reduce the amount of memory allocated to other SuperPak utilities, memory-resident programs, or
SHORT XXXXXX BYTES
Explanation: This message indicates that the
SuperDrive you have just created is less than a standard sized drive. You
will
see it if you use the1M
= xxx option to create a nonstandard drive, or if there were some memory available, but not quite enough to make the drive exactly the size you specified.The SuperPak ASTCLOCK program sets and reads the time from the clock/calendar on your AST board. By adding commands for ASTCLOCK to your AUTOEXEC.BAT file, you will not have to set the date and time manually when you boot the computer. Before you begin using ASTCLOCK, make sure the clock/calendar is enabled on your AST board. For more information, refer to your AST board's user manual.
NOTE
Only use ASTCLOCK with the clock/calendar hardware on AST boards. Do not use ASTCLOCK with other manufacturer's clocks, including clocks built into the computer.
5.1 Installing ASTCLOCK
The SuperPak installation program can install the ASTCLOCK software automatically. If you have not installed the ASTCLOCK software, or if you do not have an AUTOEXEC.BAT file on your boot disk, follow this procedure:
STEP 1
Copy the SuperPak diskette: If you have not already done so, copy the ASTCLOCK.COM program from the SuperPak diskette to your boot disk.
STEP 2
Edit the AUTOEXEC.BAT file: Using a text editor or word processor, add the following command to your AUTO EXEC. BAT file:
ASTCLOCK
If your boot disk has no AUTOEXEC.BAT file, create one with a text editor or word processor, or use the following sequence to create one from the DOS prompt (the only command in the file will be ASTCLOCK).
COPY CON: AUTOEXEC.BAT<Enter> ASTCLOCK< Enter>
< F6> < Enter>
For more information about AUTO EXEC files or the DOS COPY command, see your DOS Manual.
STEP 3
NOTE
If you want ASTCLOCK to display the date in European format (dd/mm/yy) when you boot the system, substitute the command ASTCLOCKfE for ASTCLOCK in your AUTOEXEC.BAT file. The