www.novell.com/documentation
Server Installation Guide
Legal Notices
Novell, Inc. makes no representations or warranties with respect to the contents or use of this documentation, and specifically disclaims any express or implied warranties of merchantability or fitness for any particular purpose. Further, Novell, Inc. reserves the right to revise this publication and to make changes to its content, at any time, without obligation to notify any person or entity of such revisions or changes.
Further, Novell, Inc. makes no representations or warranties with respect to any software, and specifically disclaims any express or implied warranties of merchantability or fitness for any particular purpose. Further, Novell, Inc. reserves the right to make changes to any and all parts of Novell software, at any time, without any obligation to notify any person or entity of such changes.
Any products or technical information provided under this Agreement may be subject to U.S. export controls and the trade laws of other countries. You agree to comply with all export control regulations and to obtain any required licenses or classification to export, re-export or import deliverables. You agree not to export or re-export to entities on the current U.S. export exclusion lists or to any embargoed or terrorist countries as specified in the U.S. export laws. You agree to not use deliverables for prohibited nuclear, missile, or chemical biological weaponry end uses. See the Novell International Trade Services Web page (http://www.novell.com/info/exports/) for more information on exporting Novell software. Novell assumes no responsibility for your failure to obtain any necessary export approvals.
Copyright © 2007 - Novell, Inc. All rights reserved. No part of this publication may be reproduced, photocopied, stored on a retrieval system, or transmitted without the express written consent of the publisher.
Novell, Inc.
1800 South Novell Place Provo, UT 84606 U.S.A.
www.novell.com
Online Documentation: To access the latest online documentation for this and other Novell products, see the Novell Documentation Web page (http://www.novell.com/documentation).
Novell Trademarks
For Novell trademarks, see the Novell Trademark and Service Mark list (http://www.novell.com/company/legal/trademarks/ tmlist.html).
Third-Party Materials
Contents 3
Contents
About This Guide 5
1 System Requirements 7
1.1 Primary Server Requirements . . . 7
1.2 Managed Device Requirements . . . 13
1.2.1 Windows Managed Device Requirements . . . 13
1.2.2 Linux Managed Device Requirements . . . 17
1.3 Satellite Requirements . . . 18
1.3.1 Windows Device Performing Satellite Roles . . . 19
1.3.2 Linux Device Performing Satellite Roles . . . 20
1.4 Database Requirements. . . 21
1.5 LDAP Directory Requirements . . . 23
1.6 Inventoried-Only Device Requirements . . . 23
1.7 Administration Browser Requirements . . . 26
1.8 Installation User Requirements . . . 26
1.9 Supported Smart Cards and Smart Card Readers . . . 26
2 Coexistence with Other ZENworks Products 27 2.1 ZENworks Desktop Management . . . 27
2.1.1 Server Coexistence . . . 27
2.1.2 Agent Coexistence. . . 27
2.2 ZENworks Asset Management. . . 30
2.3 ZENworks Endpoint Security Management . . . 31
2.4 ZENworks Patch Management . . . 31
2.5 ZENworks Server Management . . . 31
2.6 ZENworks Linux Management . . . 31
2.7 ZENworks Handheld Management . . . 32
3 Preparation 33 3.1 Understanding What the ZENworks Installation Does . . . 33
3.2 Gathering Installation Information . . . 33
3.3 Preinstallation Tasks. . . 34
3.3.1 Verifying That the Minimum Requirements Have Been Met . . . 34
3.3.2 Creating an Installation DVD from the ISO Download . . . 35
3.3.3 Creating an External Certificate . . . 35
3.3.4 Installing an External ZENworks Database . . . 37
3.3.5 Installing Mono 2.0.1-1.17 on SLES 11 . . . 46
4 Installing the ZENworks Server 47 4.1 Performing the Installation . . . 47
4.2 Performing an Unattended Installation . . . 57
4.2.1 Creating Your Response File . . . 57
4.2.2 Performing the Installation . . . 59
4.3 Verifying Installation . . . 59
4.4.1 Tasks for All Platforms . . . 61
4.4.2 Tasks for VMware ESX . . . . 63
5 Installing the ZENworks Adaptive Agent 65 6 Uninstalling ZENworks Software 67 6.1 Correct Order for Uninstalling ZENworks Software . . . 67
6.2 Uninstalling a Windows Primary Server, Satellite, or Managed Device . . . 68
6.3 Uninstalling a Linux Primary Server . . . 71
6.3.1 Uninstalling ZENworks Software and Removing the Device from the Zone . . . 71
6.3.2 Uninstalling ZENworks Software While Retaining the Device in the Zone . . . 72
6.4 Uninstalling a Linux Satellite or Managed Device . . . . 73
6.4.1 Zone-Level Uninstallation . . . 73
6.4.2 Local Uninstallation . . . 75
A Installation Executable Arguments 77 B Installing Dependent RPM Packages on a Linux Device 79 B.1 Red Hat Enterprise Linux Server . . . 79
B.2 SUSE Linux Enterprise Server . . . 83
C Troubleshooting 87 C.1 Troubleshooting Installation . . . 87
C.2 Uninstallation Error Messages . . . 94
About This Guide 5
About This Guide
This ZENworks 11 Server Installation Guide includes information to help you successfully install Novell ZENworks 11 .
ZENworks Virtual Appliance 11 is also available as a virtual appliance that can be deployed to the supported virtual infrastructure. This virtual appliance is built on the customized SUSE Linux Enterprise Server 11 JeOS (SLES 11 SP1), and is pre-installed with ZENworks 11 .
For more information on how to deploy and manage ZENworks Appliance, see the ZENworks Virtual Appliance 11 Deployment and Administration Reference.
The information in this guide is organized as follows:
Chapter 1, “System Requirements,” on page 7
Chapter 2, “Coexistence with Other ZENworks Products,” on page 27
Chapter 3, “Preparation,” on page 33
Chapter 4, “Installing the ZENworks Server,” on page 47
Chapter 5, “Installing the ZENworks Adaptive Agent,” on page 65
Chapter 6, “Uninstalling ZENworks Software,” on page 67
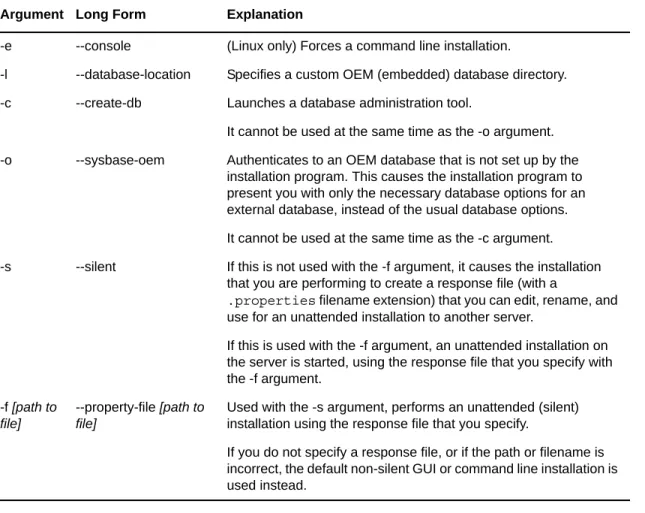
Appendix A, “Installation Executable Arguments,” on page 77
Appendix B, “Installing Dependent RPM Packages on a Linux Device,” on page 79
Appendix C, “Troubleshooting,” on page 87
Audience
This guide is intended for ZENworks administrators.
Feedback
We want to hear your comments and suggestions about this manual and the other documentation included with this product. Please use the User Comments feature at the bottom of each page of the online documentation.
Additional Documentation
ZENworks 11 is supported by other documentation (in both PDF and HTML formats) that you can use to learn about and implement the product. For additional documentation, see the .
1
System Requirements 7
1
System Requirements
The following sections provide the Novell ZENworks 11 requirements for hardware and software, for requirement specific to subsequent releases refer to “Update for ZENworks 11 SP2 - System
Requirements”:
Section 1.1, “Primary Server Requirements,” on page 7
Section 1.2, “Managed Device Requirements,” on page 13
Section 1.3, “Satellite Requirements,” on page 18
Section 1.4, “Database Requirements,” on page 21
Section 1.5, “LDAP Directory Requirements,” on page 23
Section 1.6, “Inventoried-Only Device Requirements,” on page 23
Section 1.7, “Administration Browser Requirements,” on page 26
Section 1.8, “Installation User Requirements,” on page 26
Section 1.9, “Supported Smart Cards and Smart Card Readers,” on page 26
1.1
Primary Server Requirements
The server where you install the Primary Server software must meet the following requirements: Table 1-1 Primary Server Requirements
Item Requirements Additional Details
Server Usage
Your server might be capable of handling tasks in addition to the tasks a Primary Server performs for ZENworks 11 . However, we recommend that any server where you install the Primary Server software be used only for ZENworks 11 purposes.
For example, you might not want the server to do the following:
Host Novell eDirectory
Host Novell Client32
Host Active Directory
Operating System
Windows:
Windows Server 2003 R2 SP2 x86, x86_64 (Enterprise and Standard editions)
Windows Server 2003 SP2 x86, x86_64 (Enterprise and Standard editions)
Windows Server 2008 SP1 / SP2 x86, x86_64 (Enterprise and Standard editions)
Windows Server 2008 R2 x86_64 (Enterprise and Standard editions)
Windows Server 2008 R2 SP1 x86_64 (Enterprise and Standard editions)
Linux:
SUSE Linux Enterprise Server 10 (SLES 10) x86, x86_64 (Intel and AMD Opteron processors)
Open Enterprise Server 2 (OES 2) SP2 / SP3 x86, x86_64
SLES 11 SP1 / SP2 x86, x86_64 (Intel and AMD Opteron processors)
Red Hat Enterprise Linux 5.5 x86, x86_64
All the Core and Data Center Editions of Windows Server 2003 and Windows Server 2008 are not supported as Primary Server platforms. Windows Server 2008 Core is not supported because it does not support the .NET Framework.
ZENworks 11 Configuration Management is supported on Windows Server 2003 and Windows Server 2008 editions with or without Hyper-V. Before you install a ZENworks Server on a SLES 11 x86_64 device, you must ensure that pam-32 bit libraries are installed on the device because the CASA rpms are dependent on these libraries.
To install pam-32 bit libraries:
1. Log in to the Linux device as the root user. 2. Insert the Linux installation media.
3. Run Yast to open the YaST Control Center. 4. Click Software > Software Management. 5. In the Search option, specify CASA and click OK
to list all the CASA packages.
6. Select the pam-32 package and click Install >
Apply.
NOTE: Installation on a server in a clustered environment is not supported.
IMPORTANT: Open Enterprise Server and all x86 (32-bit) operating systems will not be supported ZENworks Primary Server platforms in ZENworks 11 SP3.
Processor Minimum:
If the Primary Server is running Patch Management, we
recommend a fast processor, such as the Intel Core Duo processor. RAM 2 GB minimum; 4 GB
recommended
System Requirements 9
Disk Space 7 GB recommended for running. Depending on the amount of content you need to distribute, this number can vary greatly.
Patch Management file storage (downloaded patch content) requires at least 25 GB of additional free disk space. All content replication servers also require this same amount of additional free disk space if Patch Management is enabled. If you use Patch Management in additional languages, each server also requires this additional amount of free space for each language used.
Because the ZENworks database file and ZENworks content repository can each become very large, you might want a separate partition or hard drive available. For information on changing the default content repository location on a Windows server, see “Content Repository” in the ZENworks 11 Primary Server and Satellite Reference.
For Linux servers, you might want the /var/opt
directory to be located on a large partition. This is where the database (if embedded) and content repository are stored.
/etc directory requires less space.
Display resolution
1024 × 768 with 256 colors minimum
File System If you have installed embedded Sybase on your device, ensure that the file system of the drive where you have installed ZENworks Configuration Management supports files with size 4 GB.
DNS Resolution
The servers and workstations in the Management Zone must use properly configured DNS to resolve device hostnames, otherwise some features in ZENworks will not work properly. If the DNS is not properly
configured, the servers cannot communicate with each other, and the workstations cannot
communicate with the servers. Server names must support DNS requirements, such as not having underscores in their names, or ZENworks login fails. Acceptable characters are the letters a-z (uppercase and lowercase), numbers, and the hyphen (-). IP Address The server must have a static
IP address or a permanently leased DHCP address.
An IP address must be bound to all NICs on your target server.
Installation hangs if it is trying to use a NIC that does not have an IP address bound to it.
Microsoft .NET (Only for Windows)
The Microsoft .NET 3.5 SP1 framework and its latest updates must be installed and running on the Windows Primary Server in order to install ZENworks 11 .
On Windows Server 2003/2008, you are given the option to launch the .NET installation during the installation of ZENworks. If you select the option, .NET is automatically installed.
On Windows Server 2008 R2, .NET 3.5 SP1 is available by default. However, you need to enable it. You are given the option to enable .NET during the installation of ZENworks. If you select the option, .NET is automatically enabled.
For more information on how to enable the .NET framework, see “Enabling the .NET Framework” in the ZENworks 11 Discovery, Deployment, and Retirement Reference.
System Requirements 11
Firewall Settings: TCP Ports
80 and 443 Inbound Port:
Port 80 is for Tomcat non-secure port and Port 443 is for Tomcat secure port.
Port 443 is also used for CASA authentication. Opening this port allows ZENworks to manage devices outside of the firewall. It is a good practice to make sure that the network is configured to always allow communication on this port between the ZENworks Server and ZENworks Agents on managed devices.
If other services are running on ports 80 and 443, such as Apache, or are used by OES2, the installation program asks you for new ports to use.
If you plan to use AdminStudio ZENworks Edition, it requires that the Primary Server is using ports 80 and 443.
Outbound Port:
Primary Server downloads patch license related information and checksum data over HTTPS (port 443), and the actual patch content files over HTTP (port 80). ZENworks Patch Management license information is obtained from the Lumension licensing server (http://novell.patchlink.com), the patch content and checksum data is retrieved from an AKAMAI hosted content distribution network
(novell.cdn.lumension.com). You must make sure that the firewall rules allow outbound connections to these addresses because the patch content distribution network is a large fault tolerant network of cache servers.
Primary Server performs the ZENworks System Update Entitlement activation over HTTP (port 443) using the secure-www.novell.com (https://secure-www.novell.com) website. This rule can be turned off after successfully completing the entitlement activation.
For more information, see the ZENworks 11 System Updates Reference.
Primary Server downloads system update related information and content over HTTP (port 443) using the you.novell.com (https://you.novell.com) website. For more information see “Managing Update Downloads” in the ZENworks 11 SP2 System Administration Reference.
NOTE: You must assign the Network Interface to the firewall zone. Firewall rules are applied to this zone for managing the ports used by ZENworks 11 .
2645 Used for CASA authentication. Opening this port allows ZENworks to manage devices outside of the firewall. It is a good practice to make sure that the network is configured to always allow communication on this port between the ZENworks Server and ZENworks Agents on managed devices.
5550 Used by Remote Management Listener by default.You can change this port in the Remote Management Listener dialog box in ZENworks Control Center. Remote Management is used only with ZENworks Configuration Management.
5750 Used by Remote Management proxy.
Remote Management is used only with ZENworks Configuration Management.
5950 Used by Remote Management service by default. You can change this port in the Remote Management Settings panel of the Remote Management Configuration page in ZENworks Control Center. Remote Management is used only with ZENworks Configuration Management.
7628 Used by the Adaptive Agent for Quick Tasks.
8005 Used by Tomcat to listen to shutdown requests. This is a local port, and cannot be accessed remotely. 8009 Used by Tomcat AJP connector.
9971 Used by AMT Hello Listener to discover the Intel AMT devices.
Firewall Settings: UDP Ports
67 Used by proxy DHCP when it is not running on the same device as the DHCP server.
69 Used by the Imaging TFTP, but will not work across firewall because it opens random UDP port for each PXE device.
The Imaging TFTP is used only with ZENworks Configuration Management.
997 Used by the Imaging Server for multicasting. The Imaging Server is used only with ZENworks Configuration Management.
998 Used by the Preboot Server (novell-pbserv).
The Preboot Server (novell-pbserv) is used only with ZENworks Configuration Management.
1761 Port 1761 on the router is used to forward subnet-oriented broadcast magic packets for Wake-On-LAN.
System Requirements 13 NOTE: If a Primary Server is behind a NAT firewall, the devices on the Internet or public network cannot communicate with it. To resolve the issue, you must configure additional IP addresses or DNS names for the Primary Server through ZENworks Control Center. For more information on how to configure additional access to a Primary Server, see “Configuring Additional Access to a ZENworks Server” in the ZENworks 11 Primary Server and Satellite Reference.
1.2
Managed Device Requirements
The ZENworks Adaptive Agent is the management software that is installed on all managed devices, including Primary Servers.
Managed devices can be used as . If you want to use a managed device as a satellite, then in addition to the requirements listed in this section, make sure that the device is capable of performing the satellite functions and meets the requirements listed in Section 1.3, “Satellite Requirements,” on page 18.
Section 1.2.1, “Windows Managed Device Requirements,” on page 13
Section 1.2.2, “Linux Managed Device Requirements,” on page 17
1.2.1
Windows Managed Device Requirements
ZENworks 11 can manage any Windows workstation and server that meets the following requirements:
4011 Used for proxy DHCP when it is running on the same device as the DHCP server. Make sure that the firewall is configured to allow the broadcast traffic to the proxy DHCP service.
13331 Used by the zmgpreboot policy, but will not work across firewall because it opens random UDP port for each PXE device.
The zmgpreboot policy is used only with ZENworks Configuration Management.
Supported Hypervisors
ZENworks server software can be installed in the following virtual machine environments:
VMware Workstation 6.5
XEN (Novell SLES 10, SLES 11 and Citrix XenServer 5.x)
VMware ESX (4.1 update1)
Microsoft Hyper-V Server Windows 2008 R2
Only released versions of guest operating systems (VMs) are supported. Experimental guest operating systems are not supported.
The guest operating system must match the operating system specified when creating the VM. For example, if during creation of the VM, the guest operating system is specified as Windows Server 2003, the actual guest operating system must be Windows Server 2003.
Table 1-2 Windows Managed Device Requirements
Item Requirements Additional Details
Operating System: Windows Servers
Windows Server 2003 R2 SP2 x86, x86_64 (Enterprise and Standard editions)
Windows Server 2003 SP2 x86, x86_64 (Enterprise and Standard editions)
Windows Server 2008 SP1 / SP2 x86, x86_64 (Enterprise and Standard editions)
Windows Server 2008 R2 x86_64 (Enterprise and Standard editions)
Windows Server 2008 R2 SP1 (Enterprise and Standard editions)
All the Core Editions of Windows Server 2003 and Windows Server 2008 are not supported as a managed device platform because they do not support the .NET Framework.
ZENworks 11 Configuration Management is supported on Windows Server 2003 and Windows Server 2008 editions with or without Hyper-V.
Operating System: Windows
Workstations
Embedded XP SP2 / SP3 x86
Windows Vista SP2 x86, x86_64 (Business, Ultimate, and Enterprise versions only; Home versions are not supported)
Embedded Vista SP1 / SP2
Windows XP Professional SP2 / SP3 x86
Windows XP Tablet PC Edition SP3 x86
Windows 7 x86, x86_64 (Professional, Ultimate, and Enterprise editions)
Windows 7 SP1 x86, x86-64 (Professional, Ultimate, and Enterprise editions)
A managed device name must not exceed 32 characters. If a device name exceeds 32 characters, that device is not
inventoried. In addition, make sure that the device name is unique so that the device is recognized appropriately in the inventory reports.
Prerequisite for installing POSReady 2009 (XP): For installing an agent on
POSReady you must install the
cacls.exe comand line tool and it needs to be enabled from the add or remove components. To enable cacls.exe command line tool, see Microsoft
System Requirements 15
Operating System: Thin Client sessions
Windows Server 2003 SP2
Windows Server 2008 SP2
Windows Server 2008 R2
Windows Server 2008 R2 SP1 (Enterprise and Standard editions)
Citrix XenApp 5.0
Citrix XenApp 6.0
Windows Server 2008 Core is not supported as a managed device platform because the .NET Framework is not supported on Windows Server 2008 Core.
Hardware The following are minimum hardware requirements. Use these requirements or the hardware requirements provided with your operating system, whichever is greater.
Processor: Pentium III 700 MHz, or equivalent AMD or Intel
RAM: 256 MB minimum; recommended
Display resolution: 1024 × 768 with 256 colors
Automatic ZENworks Adaptive Agent Deployment
In order to automatically deploy the Adaptive Agent to your managed devices, the following are required:
Your firewall must allow file and print sharing
On Windows XP devices, Simple File Sharing must be turned off
Administrator credentials must be known for the devices in order to install to them
The date and time on the managed devices and ZENworks Server must be synchronized
The File and Printer Sharing for Microsoft Networks option must be enabled
For detailed information about the prerequisites, see “Prerequisites for Deploying to Windows Devices” in the ZENworks 11 Discovery, Deployment, and Retirement Reference.
Microsoft .NET The Microsoft .NET 3.5 SP1 framework and its latest updates must be installed and running on the Windows managed device in order to install ZENworks 11 .
On Windows Server 2003, Windows XP, and Windows Vista, .NET is automatically installed if you choose to deploy the
PreAgentPkg_AgentCompleteDotNet .exe standalone package. If you choose to deploy the PreAgentPkg_Agent.exe
network package or the
PreAgentPkg_AgentComplete.exe
standalone (.NET required) package, you must manually install .NET 3.5 SP1 before you begin to install the agent.
On Windows 7 and Windows Server 2008 R2, .NET is available by default. However, you must enable the .NET framework before deploying the agent on these devices. For more information on how to enable the .NET framework, see “Enabling the .NET Framework” in the ZENworks 11 Discovery, Deployment, and Retirement Reference.
Microsoft Windows Installer
The Microsoft Windows Installer 3.1 or later must be installed and running on the Windows managed device in order to install ZENworks 11 .
If you choose to deploy the
PreAgentPkg_AgentCompleteDotNet .exe standalone package, Windows Installer 3.1 is automatically installed. If you choose to deploy the
PreAgentPkg_Agent.exe network package or the
PreAgentPkg_AgentComplete.exe
standalone (.NET required) package, you must manually install Windows Installer 3.1 or later before you begin to install the agent.
TCP Ports 7628 In order to view the status in ZENworks Control Center of the ZENworks Adaptive Agent for a managed device, ZENworks automatically opens port 7628 on the device if you are using the Windows firewall. However, if you are using a different firewall, you must open this port manually.
Port 7628 must also be opened on the device if you want to send a Quick Task to the client from ZENworks Control Center. 5950 For Remote Management where the
ZENworks Adaptive Agent is running, the device listens on port 5950.
You can change the port in ZENworks Control Center (Configuration tab >Management Zone Settings > Device Management > Remote Management). Remote Management is used only with ZENworks Configuration Management.
System Requirements 17
1.2.2
Linux Managed Device Requirements
ZENworks 11 can manage any Linux workstation and server that meets the following requirements: Table 1-3 Linux Managed Device Requirements
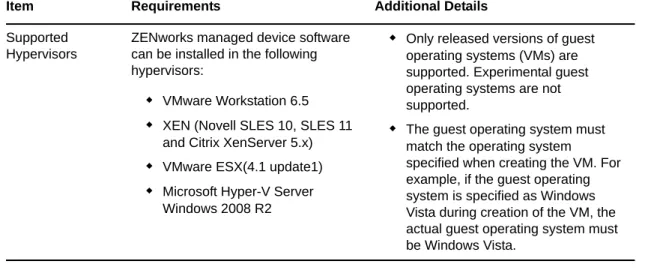
Supported Hypervisors
ZENworks managed device software can be installed in the following hypervisors:
VMware Workstation 6.5
XEN (Novell SLES 10, SLES 11 and Citrix XenServer 5.x)
VMware ESX(4.1 update1)
Microsoft Hyper-V Server Windows 2008 R2
Only released versions of guest operating systems (VMs) are supported. Experimental guest operating systems are not supported.
The guest operating system must match the operating system specified when creating the VM. For example, if the guest operating system is specified as Windows Vista during creation of the VM, the actual guest operating system must be Windows Vista.
Item Requirements Additional Details
Operating System: Servers SLES 10 SP2 / SP3 x86, x86_64 (Intel and AMD Opteron processors)
OES 2 SP2 / SP3 x86, x86_64
SLES 11 x86, x86_64 (Intel and AMD Opteron processors)
SLES 11 SP1 x86, x86_64 (Intel and AMD Opteron processors)
Red Hat Enterprise Linux 5.5 x86, x86_64 Operating System: Workstations Red Hat Enterprise Linux 5.5 x86, x86_64
SUSE Linux Enterprise Desktop 10 (SLED 10) x86, x86_64
SLED 11 SP1 x86, x86_64
Hardware Processor: Minimum - Pentium IV 2.8 GHz 32-bit (x86) and 64-32-bit (x86_64), or equivalent AMD or Intel processor
RAM: 512 MB minimum; GB recommended
Disk Space: MB minimum for installing; 4 GB recommended for running. Depending on the amount of content you need to distribute, this number can vary greatly.
Display resolution: 1024 × 768 with 256 colors minimum
1.3
Satellite Requirements
A is a managed device that can perform some of the roles that a ZENworks Primary Server normally performs, including authentication, information collection, content distribution, and imaging. A Satellite can be any managed Windows, Macintosh or Linux device (server or workstation), but not a Primary Server.
The following sections contain more information:
Section 1.3.1, “Windows Device Performing Satellite Roles,” on page 19
Section 1.3.2, “Linux Device Performing Satellite Roles,” on page 20
Hostname Resolution The server must resolve device hostnames by using a method such as DNS (recommended).
Server names must support DNS requirements, such as not having underscores in their names, or ZENworks login fails. Acceptable characters are the letters a-z (uppercase and lowercase), numbers, and the hyphen (-).
If you use DNS, it must be properly set up, or some features in ZENworks might not work. IP Address The server must have a static IP address or a
permanently leased DHCP address.
If you have multiple NIC's it is recommended to bind the IP addresses on all the NIC's. However, ZENworks works even if one IP address is configured.
TCP Ports: 7628 You must assign the Network Interface to the firewall zone. Firewall rules are applied to this zone for managing the ports used by ZENworks 11 . Supported Hypervisors ZENworks server software can be installed in the
following hypervisors:
VMware Workstation 6.5
XEN (Novell SLES 10, SLES 11 and Citrix XenServer 5.x)
VMware ESX (4.1 update1)
Microsoft Hyper-V Server Windows 2008 R2 In addition, the following requirements apply:
Only released versions of guest operating systems (VMs) are supported. Experimental guest operating systems are not supported.
The guest operating system must match the operating system specified when creating the VM. For example, if the guest operating system is specified as SLES 10 during creation of the VM, the actual guest operating system must be SLES 10.
System Requirements 19
1.3.1
Windows Device Performing Satellite Roles
In addition to their usual functions, Windows devices can be used as satellites. Make sure that when you use these managed devices for satellites, they are capable of performing the satellite functions. A Windows device performing satellite roles must meet the minimum requirements of a Windows managed device listed in Section 1.2.1, “Windows Managed Device Requirements,” on page 13 with the following exceptions:
Windows Embedded XP is not a supported workstation operating system for Satellite devices.
Satellite devices require additional TCP and UDP ports to be open.
The following table lists the additional TCP and UDP ports that must be open on a Satellite device: Table 1-4 Additional Ports Required for a Managed Device Performing Satellite Roles
Item Requirements Additional Details
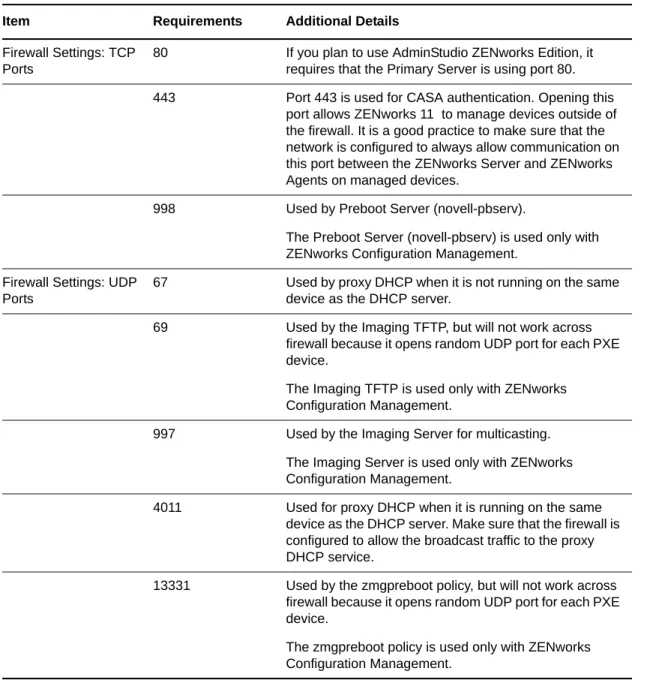
Firewall Settings: TCP Ports
80 If you plan to use AdminStudio ZENworks Edition, it requires that the Primary Server is using port 80. 443 Port 443 is used for CASA authentication. Opening this
port allows ZENworks 11 to manage devices outside of the firewall. It is a good practice to make sure that the network is configured to always allow communication on this port between the ZENworks Server and ZENworks Agents on managed devices.
998 Used by Preboot Server (novell-pbserv).
The Preboot Server (novell-pbserv) is used only with ZENworks Configuration Management.
Firewall Settings: UDP Ports
67 Used by proxy DHCP when it is not running on the same device as the DHCP server.
69 Used by the Imaging TFTP, but will not work across firewall because it opens random UDP port for each PXE device.
The Imaging TFTP is used only with ZENworks Configuration Management.
997 Used by the Imaging Server for multicasting. The Imaging Server is used only with ZENworks Configuration Management.
4011 Used for proxy DHCP when it is running on the same device as the DHCP server. Make sure that the firewall is configured to allow the broadcast traffic to the proxy DHCP service.
13331 Used by the zmgpreboot policy, but will not work across firewall because it opens random UDP port for each PXE device.
The zmgpreboot policy is used only with ZENworks Configuration Management.
1.3.2
Linux Device Performing Satellite Roles
A Linux device performing satellite roles must meet the minimum requirements of a Linux managed device listed in Section 1.2.2, “Linux Managed Device Requirements,” on page 17.
The following table lists the additional TCP and UDP ports that must be open on a Satellite device: Table 1-5 Linux Device Performing Satellite Roles Requirements
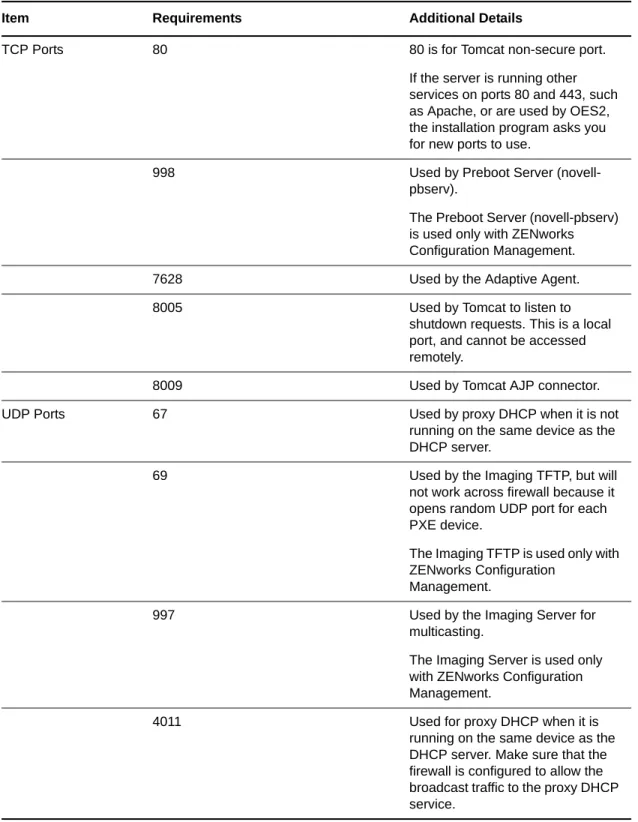
Item Requirements Additional Details
TCP Ports 80 80 is for Tomcat non-secure port. If the server is running other services on ports 80 and 443, such as Apache, or are used by OES2, the installation program asks you for new ports to use.
998 Used by Preboot Server (novell-pbserv).
The Preboot Server (novell-pbserv) is used only with ZENworks Configuration Management. 7628 Used by the Adaptive Agent. 8005 Used by Tomcat to listen to
shutdown requests. This is a local port, and cannot be accessed remotely.
8009 Used by Tomcat AJP connector. UDP Ports 67 Used by proxy DHCP when it is not
running on the same device as the DHCP server.
69 Used by the Imaging TFTP, but will not work across firewall because it opens random UDP port for each PXE device.
The Imaging TFTP is used only with ZENworks Configuration
Management.
997 Used by the Imaging Server for multicasting.
The Imaging Server is used only with ZENworks Configuration Management.
4011 Used for proxy DHCP when it is running on the same device as the DHCP server. Make sure that the firewall is configured to allow the broadcast traffic to the proxy DHCP service.
System Requirements 21
1.4
Database Requirements
If you choose to use a database for the ZENworks database other than the embedded Sybase SQL Anywhere database that is available as the default for ZENworks 11 SP2, the other database must meet the following requirements:
Table 1-6 Database Requirements
13331 Used by the zmgpreboot policy, but will not work across firewall because it opens random UDP port for each PXE device.
The zmgpreboot policy is used only with ZENworks Configuration Management.
Item Requirements Additional Details
Item Requirement
Database Version Microsoft SQL Server 2008 (not extensively tested) Microsoft SQL Server 2008 R2 SP1
Oracle 11g R2
NOTE: Oracle Real Application Clusters (Oracle RAC) is not supported. For more information, see:
Oracle RAC One Node with Oracle 11.2.0.1 Solution for ZCM (http:// www.novell.com/communities/node/13805/oracle-rac-one-node-11201-solution-zcm)
Oracle RAC Two Node with Oracle 11.2.0.1 Solution for ZCM (http:// www.novell.com/communities/node/13806/oracle-rac-11201-2-node-cluster-solution-zcm)
Sybase SQL Anywhere 12
New in 11.2.3: Microsoft SQL Server 2008 R2 SP2 and Microsoft SQL Server 2008 SP2 (not extensively tested)
Database Hostname The database hostname should be resolvable by the Domain Name Server Service
TCP ports The server must allow Primary Server communication on the database port. For MS SQL, make sure to configure static ports for the database server. The default ports are:
1433 for MS SQL
2638 for Sybase SQL
1521 for Oracle
IMPORTANT: You can change the default port number if you have a conflict. However, you must make sure that the port is opened for the Primary Server to talk to the database.
UDP Ports 1434 for MS SQL (If ZENworks uses named instance of the database) WAN consideration Primary Servers and the ZENworks database must reside on the same network
segment. Primary Servers cannot write across a WAN to the ZENworks database.
Default Character Set For Sybase, the UTF-8 character set is required.
For MS SQL, ZENworks Configuration Management does not require any specific character set. ZENworks Configuration Management supports all character sets supported by MS SQL.
For Oracle, the NLS_CHARACTERSET parameter must be set to AL32UTF8 and the NLS_NCHAR_CHARACTERSET parameter must be set to
AL16UTF16.
Collation ZENworks 11 Configuration Management is not supported with a case-sensitive instance of the MS SQL database. Hence, you must make sure that the database is case insensitive before setting it up.
Database User Make sure that there is no restriction for the ZENworks database user to connect to a remote database.
For example, if the ZENworks database user is an Active Directory user, make sure that the Active Directory policies allow the user to connect to a remote database.
Database Settings For MS SQL, set the READ_COMMITTED_SNAPSHOT setting to ON so that it allows read access to information in the database while data is being written or modified.
To set the READ_COMMITTED_SNAPSHOT setting to ON, execute the following command at the database server prompt:
ALTER DATABASE database_name SET READ_COMMITTED_SNAPSHOT ON;
NOTE: You must adhere to the following guidelines to configure the database settings:
Before configuring the database settings, stop all the ZENworks Services on all the ZENworks Servers.
After configuring the settings, start all the ZENworks Services on all the ZENworks Servers.
For detailed information on how to stop and start the ZENworks Services, see .
System Requirements 23
1.5
LDAP Directory Requirements
ZENworks 11 can reference existing user sources (directories) for user-related tasks such as assigning content to users, creating ZENworks administrator accounts, and associating users with devices creating ZENworks administrator accounts and associating users with devices. LDAP (Lightweight Directory Access Protocol) is the protocol used by ZENworks with respect to interacting with users.
Table 1-7 LDAP Directory Requirements
1.6
Inventoried-Only Device Requirements
You can use ZENworks 11 to inventory workstations and servers by deploying the Inventory-Only module on these devices.
IMPORTANT: If there are ZENworks product issues that are caused by an issue with the platform, the following support standards apply:
Platforms that are generally supported by platform vendors are supported by Novell.
If the platform vendor provides support to your installations through a special agreement (such as extended support), Novell expects you to extend this support infrastructure to us to resolve the issue.
If the platform vendor does not support the platform at all, Novell offers no additional support.
Item Requirements
LDAP version LDAP v3
OPENLDAP is not supported. However, if you have eDirectory installed on a SUSE Linux server, you can use that as a user source. LDAP v3 can be used to access eDirectory on the Linux server using the alternate ports that you specified for eDirectory when installing it (because OPENLDAP might have been using the default ports).
Authoritative user source
Novell eDirectory 8.7.3 or 8.8 (on all supported platforms) If you use eDirectory as the user source, make sure that no two eDirectory users have the same username and password. Even if the usernames are same, make sure that the passwords are different.
Microsoft Active Directory (as shipped with Windows 2000 SP4 or later)
Domain Services for Windows (DSfW)
LDAP user access ZENworks requires only read access to the LDAP directory. For more information, see “Connecting to User Sources” in the ZENworks 11 SP2 Administration Quick Start.
LDAP Authentication Simple bind
Simple bind is in which an application provides a Distinguished Name (DN) and the clear text password for that DN. To use a simple bind, the client must supply the DN of an existing LDAP entry and a password which matches the
userPassword attribute for that entry. The Administrator can also enter the DN and the clear text password by using the Configuration page in the ZENworks Control Center.
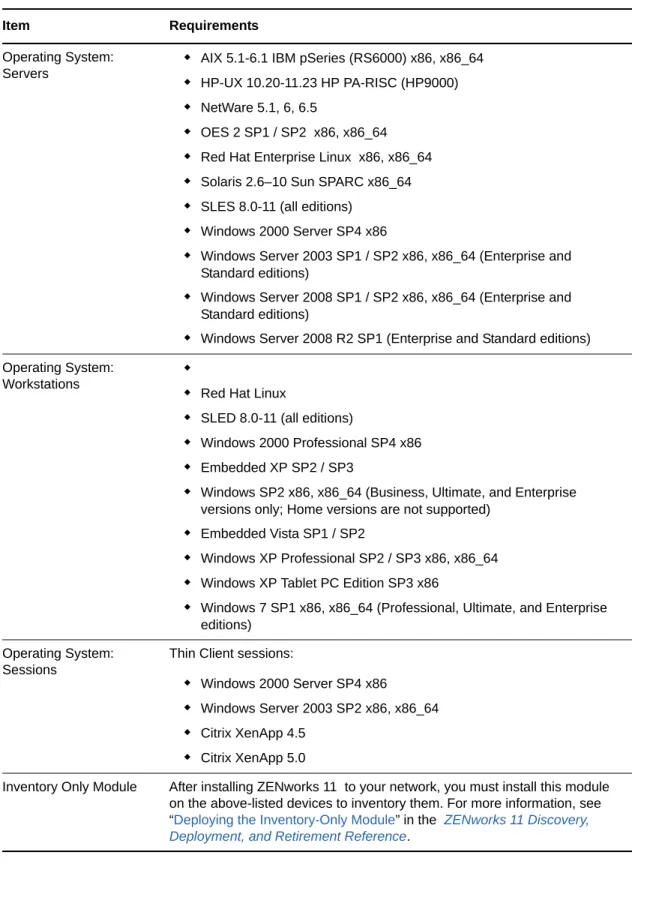
The inventoried-only devices must meet the following requirements: Table 1-8 Inventoried-Only Device Requirements
Item Requirements
Operating System: Servers
AIX 5.1-6.1 IBM pSeries (RS6000) x86, x86_64
HP-UX 10.20-11.23 HP PA-RISC (HP9000)
NetWare 5.1, 6, 6.5
OES 2 SP1 / SP2 x86, x86_64
Red Hat Enterprise Linux x86, x86_64
Solaris 2.6–10 Sun SPARC x86_64
SLES 8.0-11 (all editions)
Windows 2000 Server SP4 x86
Windows Server 2003 SP1 / SP2 x86, x86_64 (Enterprise and Standard editions)
Windows Server 2008 SP1 / SP2 x86, x86_64 (Enterprise and Standard editions)
Windows Server 2008 R2 SP1 (Enterprise and Standard editions) Operating System:
Workstations
Red Hat Linux
SLED 8.0-11 (all editions)
Windows 2000 Professional SP4 x86
Embedded XP SP2 / SP3
Windows SP2 x86, x86_64 (Business, Ultimate, and Enterprise versions only; Home versions are not supported)
Embedded Vista SP1 / SP2
Windows XP Professional SP2 / SP3 x86, x86_64
Windows XP Tablet PC Edition SP3 x86
Windows 7 SP1 x86, x86_64 (Professional, Ultimate, and Enterprise editions)
Operating System: Sessions
Thin Client sessions:
Windows 2000 Server SP4 x86
Windows Server 2003 SP2 x86, x86_64
Citrix XenApp 4.5
Citrix XenApp 5.0
Inventory Only Module After installing ZENworks 11 to your network, you must install this module on the above-listed devices to inventory them. For more information, see “Deploying the Inventory-Only Module” in the ZENworks 11 Discovery, Deployment, and Retirement Reference.
System Requirements 25
Hardware: Disk Space The Inventory-Only module requires the following minimum disk space:
AIX: 4 MB
Solaris: 4 MB
Linux: 900 KB
HP-UX: 900 KB
Windows: 15 MB
Mac OS: 8 MB
NetWare: 30 MB
System Libraries: AIX The following system libraries are required on AIX devices:
/unix
/usr/lib/libc.a (shr.o)
/usr/lib/libc.a (pse.o)
/usr/lib/libpthread.a (shr_xpg5.o)
/usr/lib/libpthread.a (shr_comm.o)
/usr/lib/libpthreads.a (shr_comm.o)
/usr/lib/libstdc++.a (libstdc++.so.6)
/usr/lib/libgcc_s.a (shr.o)
/usr/lib/libcurl.a (libcurl.so.3)
/usr/lib/libcrypt.a (shr.o)
System Libraries: HP-UX The following system libraries are required on HP-UX devices:
/usr/lib/libc.1
/usr/lib/libc.2
/usr/lib/libdld.1
/usr/lib/libdld.2
/usr/lib/libm.2
/usr/local/lib/libcrypto.sl
/opt/openssl/lib/libcrypto.sl.0
/opt/openssl/lib/libssl.sl.0
/usr/local/lib/libiconv.sl
/usr/local/lib/libintl.sl
/usr/local/lib/gcc-lib/hppa1.1-hp-hpux11.00/3.0.2/../../../libidn.sl
1.7
Administration Browser Requirements
Make sure the workstation or server where you run ZENworks Control Center to administer your system meets the following requirements:
Table 1-9 Administration Browser Requirements
1.8
Installation User Requirements
The user running the installation program must have administrator or root privileges on the device. For example:
Windows: Log in as a Windows administrator.
Linux: If you log in as a non-root user, use the su command to elevate your privileges to root, then run the installation program.
1.9
Supported Smart Cards and Smart Card Readers
For information on the supported Smart Cards and the Smart Card Readers, see Novell Enhanced Smart Card Method Installation and Administration Guide (http://www.novell.com/documentation/ iasclient30x/nescm_install/data/b7gwvo2.html).
Item Requirements
Web Browser The administration device must have one of the following Web browsers installed:
Internet Explorer 8 (32-bit only) on Windows Vista, Windows 7, Windows Server 2003, Windows XP, Windows Server 2008, and Windows Server 2008 R2
Firefox version 3.0.10 or the later patches of version 3.0 on Windows and Linux devices
Firefox version 3.5 or the later patches of version 3.5 on Windows and Linux devices
Firefox version 3.6 or the later patches of version 3.6 on Windows and Linux devices
TCP Ports In order to fulfill a user’s request for a remote session on a managed device, you must open port 5550 on the management console device in order to run Remote Management Listener.
2
Coexistence with Other ZENworks Products 27
2
Coexistence with Other ZENworks
Products
If your environment includes other ZENworks products, please refer to the following sections for coexistence information you should be aware of before installing ZENworks 11 :
Section 2.1, “ZENworks Desktop Management,” on page 27
Section 2.2, “ZENworks Asset Management,” on page 30
Section 2.3, “ZENworks Endpoint Security Management,” on page 31
Section 2.4, “ZENworks Patch Management,” on page 31
Section 2.5, “ZENworks Server Management,” on page 31
Section 2.6, “ZENworks Linux Management,” on page 31
Section 2.7, “ZENworks Handheld Management,” on page 32
2.1
ZENworks Desktop Management
The following information applies to ZENworks 11 coexistence with ZENworks 7.x Desktop
Management (ZDM 7). ZENworks 11 does not coexist with ZENworks for Desktops 4.x or ZENworks 6.5 Desktop Management.
2.1.1
Server Coexistence
The ZENworks 11 Server cannot coexist with the ZDM 7 Server or Agent. Do not install a ZENworks 11 Server on any network server that already has a ZDM 7 Server or Agent installed.
2.1.2
Agent Coexistence
The ZENworks 11 Adaptive Agent can coexist with the ZDM 7 Agent if Asset Management or Patch Management is the only ZENworks Adaptive Agent feature installed on the device.
The ZDM 7 Agent must be installed on a device before the ZENworks 11 Adaptive Agent. Installing the ZDM 7 Agent after the ZENworks 11 Adaptive Agent can have undesirable consequences, including being able to start Windows only in Safe mode until the agents are removed.
When you install the Adaptive Agent on a ZDM 7 registered device, the ZDM 7 GUID is used to register the device in the ZENworks 11 Management Zone. This provides a migration path for the device if you decide to move from ZDM 7 to ZENworks 11 .
The ZDM 7 Agent is automatically uninstalled when you install the Configuration Management features (Policy Management, Bundle Management, Remote Management, User Management, Imaging and Endpoint Security Management) because Configuration Management features overlap with ZDM 7 Agent functionality.
To summarize, you can use ZDM 7 and ZENworks 11 Asset Management or ZENworks 11 Patch Management on the same device, but you cannot use ZDM 7 and ZENworks 11 Configuration Management or ZENworks 11 Endpoint Security Management on the same device.
Review the following scenarios for instructions on how to achieve coexistence of ZDM 7 with Asset Management or Patch Management in the management zone.
“Scenario 1: Installing ZENworks 11 Asset Management or ZENworks 11 Patch Management” on page 28
“Scenario 2: Installing ZENworks 11 Configuration Management or ZENworks 11 Endpoint Security Management along with ZENworks 11 Asset Management or ZENworks 11 Patch Management” on page 28
Scenario 1: Installing ZENworks 11 Asset Management or ZENworks
11 Patch Management
When you install the ZENworks 11 , activate the product license for ZENworks 11 Asset Management or ZENworks 11 Patch Management. To activate the product license, do the following in the
ZENworks 11 Installation Wizard:
1 In the License Key Panel under Choose the products to be installed, select the Evaluate check box or specify the license key only for Asset Management and Patch Management.
For more information on how to install the server, see “Performing the Installation” on page 47. 2 Follow the prompts to complete the installation process.
Scenario 2: Installing ZENworks 11 Configuration Management or
ZENworks 11 Endpoint Security Management along with ZENworks
11 Asset Management or ZENworks 11 Patch Management
Use one of the following methods to install ZENworks 11 Configuration Management or ZENworks 11 Endpoint Security Management along with ZENworks 11 Asset Management or ZENworks 11 Patch Management:
Method 1:
If you have more devices managed exclusively by ZENworks 11 than devices managed by ZDM 7, you must perform the following tasks to achieve ZENworks 11 and ZDM 7 coexistence:
1 Activate all of the products by providing valid product license keys during the installation of ZENworks 11 .
For more information on how to activate a product license key, see “Performing the Installation” on page 47.
2 Before deploying the ZENworks 11 Adaptive Agent, you must configure the ZENworks 11 Configuration Management and ZENworks 11 Endpoint Security Management Agent features not to be installed:
2a In ZENworks Control Center, click Configuration.
2b In the Management Zone Settings panel, click Device Management, then click ZENworks Agent.
2c In the Agent Features panel, select the Installed and Enabled option next to the Patch Management and Asset Management Agent features
2d Deselect the Installed option next to the Configuration Management and Endpoint Security Management Agent features.
Coexistence with Other ZENworks Products 29 3 Deploy the ZENworks 11 Adaptive Agent on the ZDM 7 managed devices.
For more information on how to deploy the ZENworks Adaptive Agent, see “Deploying the ZENworks Adaptive Agent” in the ZENworks 11 Discovery, Deployment, and Retirement Reference.
In ZENworks Control Center, the devices appear in the \Servers folder or the \Workstation
folder on the Devices page.
4 Create a folder in the \Servers folder or the \Workstation folder on the Devices page.
For more information on how to create a folder, see “Creating a Folder” in the ZENworks 11 SP2 Administration Quick Start.
5 Move all the devices on which the ZENworks 11 Adaptive Agent is deployed to the folder you just created in the \Servers folder or the \Workstation folder.
6 Override the Management Zone setting at the folder level: 6a Click Devices.
6b Click the folder you created in Step 4, where you placed all of the devices. 6c Click Details next to the folder name to display the folder’s details.
6d Click Settings > Device Management > ZENworks Agent. 6e Click Override settings.
6f Click Apply.
7 Install the ZENworks 11 Configuration Management or ZENworks 11 Endpoint Security Management Agent features:
7a In ZENworks Control Center, click Configuration.
7b In the Management Zone Settings panel, click Device Management, then click ZENworks Agent.
7c In the Agent Features panel, select the Installed and Enabled option next to the Configuration Management or Endpoint Security Management Agent features. 7d Click Apply.
8 Deploy the ZENworks 11 Adaptive Agent on devices managed exclusively by ZENworks 11 . For more information on how to deploy the ZENworks Adaptive Agent, see “Deploying the ZENworks Adaptive Agent” in the ZENworks 11 Discovery, Deployment, and Retirement Reference.
In ZENworks Control Center, the devices appear in the \Servers folder or the \Workstation
folder on the Devices page.
Method 2
If you have fewer devices managed exclusively by ZENworks 11 than devices managed by ZDM 7, you must perform the following tasks to achieve ZENworks 11 and ZDM 7 coexistence:
1 Activate all of the products by providing valid product license keys during the installation of ZENworks 11 .
For more information on how to activate a product license key, see “Performing the Installation” on page 47.
2 Deploy the ZENworks 11 Adaptive Agent on devices.
For more information on how to deploy the ZENworks Adaptive Agent, see “Deploying the ZENworks Adaptive Agent” in the ZENworks 11 Discovery, Deployment, and Retirement Reference.
In ZENworks Control Center, the devices appear in the \Servers folder or the \Workstation
folder on the Devices page.
3 Create a folder in the \Servers folder or the \Workstation folder on the Devices page.
For more information on how to create a folder, see “Creating a Folder” in the ZENworks 11 SP2 Administration Quick Start.
4 Move all the devices on which the ZENworks 11 Adaptive Agent is deployed to the folder you just created in the \Servers folder or the \Workstation folder.
5 Override the Management Zone setting at the folder level: 5a Click Devices.
5b Click the folder you created in Step 3, where you placed all of the devices. 5c Click Details next to the folder name to display the folder’s details.
5d Click Settings > Device Management > ZENworks Agent. 5e Click Override settings.
5f In the Agent Features panel, select the Installed and Enabled option next to the Configuration Management or Endpoint Security Management Agent features. 5g Click Apply.
6 Before deploying the ZENworks 11 Adaptive Agent, you must configure the ZENworks 11 Configuration Management and ZENworks 11 Endpoint Security Management Agent features not to be installed:
6a In ZENworks Control Center, click Configuration.
6b In the Management Zone Settings panel, click Device Management, then click ZENworks Agent.
6c In the Agent Features panel, select the Installed and Enabled option next to the Patch Management and Asset Management Agent features
6d Deselect the Installed option next to the Configuration Management and Endpoint Security Management Agent features.
6e Click Apply.
7 Deploy the ZENworks 11 Adaptive Agent on ZDM 7 managed devices.
For more information on how to deploy the ZENworks Adaptive Agent, see “Deploying the ZENworks Adaptive Agent” in the ZENworks 11 Discovery, Deployment, and Retirement Reference
In ZENworks Control Center, the devices appear in the \Servers folder or the \Workstation
folder on the Devices page.
2.2
ZENworks Asset Management
The following information applies to ZENworks 11 coexistence with ZENworks 7.5 Asset Management (ZAM 7.5):
Server Coexistence: There are no known coexistence issues. For performance reasons, however, we recommend that you do not install a ZENworks 11 Server on the same network server as a ZAM 7.5 Server.
Agent Coexistence Beginning with ZAM 7.5 IR19, the ZENworks 11 Adaptive Agent (including the Inventory-Only Agent) and ZAM 7.5 client can coexist.
Coexistence with Other ZENworks Products 31
2.3
ZENworks Endpoint Security Management
The following information applies to ZENworks 11 coexistence with ZENworks Endpoint Security Management 4.1 (ZESM 4.1):
Server Coexistence: There are no known coexistence issues. For performance reasons, however, we recommend that you do not install a ZENworks 11 Server on the same network server as a ZESM 4.1 Server.
Agent Coexistence The ZENworks 11 Adaptive Agent and ZESM 4.1 Client can not coexist. You must uninstall the ZESM 4.1 Client before installing the ZENworks 11 Adaptive Agent.
2.4
ZENworks Patch Management
The following information applies to ZENworks 11 coexistence with ZENworks 7.x Patch Management (ZPM 7) and ZENworks Patch Management 6.4 (ZPM 6.4):
Server Coexistence: There are no known coexistence issues. For performance reasons, however, we recommend that you do not install a ZENworks 11 Server on the same network server as a ZPM 7/ZPM 6.4 Server.
Agent Coexistence: The ZENworks 11 Adaptive Agent and ZPM 7/ZPM 6.4 Agents can coexist. If you decide to use ZENworks 11 Patch Management instead of ZPM 7/ZPM 6.4, you can remove the ZPM 7/ZPM 6.4 Agent because ZENworks 11 Patch Management uses the ZENworks 11 Adaptive Agent.
2.5
ZENworks Server Management
The following information applies to ZENworks 11 coexistence with ZENworks 7.x Server Management (ZSM 7) and ZENwork for Servers 3.x (ZfS 3):
Server Coexistence: There are no known coexistence issues. For performance reasons, however, we recommend that you do not install a ZENworks 11 Server on the same network server as a ZSM 7/ZfS 3 Servers.
Agent Coexistence: ZSM 7 and ZfS 3 do not include an agent.
2.6
ZENworks Linux Management
The following information applies to ZENworks 11 coexistence with ZENworks 7.x Linux Management (ZLM 7):
Server Coexistence: There are two issues related to server coexistence:
Issue 1: The ZENworks 11 Server (Linux version) cannot coexist with the ZLM 7 Server. Do not install the ZENworks 11 Server on any Linux server that already has a ZLM 7 Server installed.
Issue 2: The ZENworks 11 Satellite (Linux version) cannot coexist with the ZLM 7 Server. Do not install the ZENworks 11 Satellite on any Linux server that already has a ZLM 7 Server installed.
Server/Agent Coexistence: The ZENworks 11 Server and Satellite (Linux versions) cannot coexist with the ZLM 7 Agent, meaning that the ZENworks 11 Server and Satellite cannot be a managed device in your ZLM 7 zone. Do not install the ZLM 7 Agent on the same Linux server as a ZENworks 11 Server or Satellite.
If your device has the ZENworks Linux Management Server installed, you must manually uninstall the ZENworks Linux Management Server before installing the ZENworks Configuration Management Server. However, if your device has the ZENworks Linux Management Agent installed, you need not manually uninstall the ZENworks Linux Management Agent because it is automatically uninstalled from the device while installing the ZENworks Configuration
Management Server.
Agent Coexistence: If your device has the ZENworks Linux Management Agent installed, you need not manually uninstall the ZENworks Linux Management Agent because it is automatically uninstalled from the device while installing the ZENworks Configuration Management Agent. You cannot uninstall ZENworks 7.3 Linux Management Agent on ZENworks 11 Inventoried-Only devices because ZENworks 7.3 Linux Management Agent removes the files which are used by ZENworks 11 Inventory-Only Agent.
2.7
ZENworks Handheld Management
The following information applies to ZENworks 11 coexistence with ZENworks 7.x Handheld Management, ZENworks for Handhelds 5.x, and ZENwork for Handhelds 3.x:
Server Coexistence: There are no known coexistence issues. For performance reasons, however, we recommend that you do not run the ZENworks 11 Server on the same network server as the traditional ZENworks Handheld Management Servers.
3
Preparation 33
3
Preparation
The following sections provide information to prepare you for the installation of ZENworks 11 :
Section 3.1, “Understanding What the ZENworks Installation Does,” on page 33
Section 3.2, “Gathering Installation Information,” on page 33
Section 3.3, “Preinstallation Tasks,” on page 34
3.1
Understanding What the ZENworks Installation
Does
The first time you install ZENworks 11 , you establish the Management Zone with a Primary Server, which is the first server you install to. Other Primary Servers can then be installed into that
Management Zone.
The ZENworks installation program does the following during installation of your first Primary Server:
Creates the Management Zone
Creates a password that you supply for the default ZENworks Administrator account
Establishes and populates the ZENworks database
The ZENworks installation does the following during installation of any Primary Server:
Installs the ZENworks Adaptive Agent so that it can be managed
Installs ZENworks Control Center (ZCC)
Installs the zman command line utility
Installs and starts the ZENworks services
The Adaptive Agent is installed on managed devices from files on the Primary Server. For more information, see“ZENworks Adaptive Agent Deployment” in the ZENworks 11 SP2 Administration Quick Start.
You have three installation methods:
To learn what you need to know before installing ZENworks, continue with Section 3.2, “Gathering Installation Information,” on page 33.
3.2
Gathering Installation Information
During installation of ZENworks 11 , you need to know the following information:
Installation method to use (GUI, command line, or unattended)
Graphical User Interface: A graphical user interface (GUI) installation program that works with both Windows and Linux servers is provided on the installation CD. For Linux servers, GUI capability must already be installed.
Command Line: A command line installation is available, but only for Linux servers. The Windows and Linux installation executables can both be run from a command line for purposes of using installation arguments, but for Windows it only starts the GUI installation program.
Unattended: You can use either installation method to create a response file for an unattended installation of ZENworks to other servers.
Installation path (for Windows only)
Management Zone (zone name, username, password, and port)
Database choice (embedded Sybase SQL, remote OEM Sybase SQL, external Sybase SQL, external Microsoft SQL, or Oracle database)
For more information, see Section 3.3, “Preinstallation Tasks,” on page 34.
Database information (server name, port, database name, username, password, named instance, domain, and whether you are using Windows or SQL Server authentication) For Oracle and MS SQL, ensure that the database username adheres to the following conventions:
The name must begin with an alphabetic character.
The following characters cannot be used: - (hyphen) or . (period). Additionally, @ cannot be used in username for Oracle.
Certificate Authority information (internal, or signed certificate, private key, and public certificate) in DER format
License keys (60-day trial options are available)
If you choose to deploy Primary Servers behind a L4 switch, ensure that all such Primary servers are running on the same HTTP and HTTPS ports.
For more information on these items, see Table 4-1, “Installation Information,” on page 49.
To start a ZENworks installation, continue with Section 3.3, “Preinstallation Tasks,” on page 34.
3.3
Preinstallation Tasks
Perform the following applicable tasks, then continue with Section 4.1, “Performing the Installation,” on page 47:
Section 3.3.1, “Verifying That the Minimum Requirements Have Been Met,” on page 34
Section 3.3.2, “Creating an Installation DVD from the ISO Download,” on page 35
Section 3.3.3, “Creating an External Certificate,” on page 35
Section 3.3.4, “Installing an External ZENworks Database,” on page 37
Section 3.3.5, “Installing Mono 2.0.1-1.17 on SLES 11,” on page 46
3.3.1
Verifying That the Minimum Requirements Have Been Met
Before you begin the ZENworks installation, ensure that the following requirements are met:
Ensure that the device where you want to install the Primary Server software fulfills the necessary requirements. For more information, see Chapter 1, “System Requirements,” on page 7.
(Conditional) If you plan to install the Primary Server software on 64-bit Windows Server 2003 or 64-bit Windows Server 2008, ensure that the device has Windows Installer 4.5 or later installed.
Preparation 35
3.3.2
Creating an Installation DVD from the ISO Download
If you obtained the ZENworks software as an ISO image download, do one of the following to create the installation DVD:
“Using Windows to Create a ZENworks Installation DVD from an ISO Image” on page 35
“Using Linux to Create a ZENworks Installation DVD from an ISO Image” on page 35
Using Windows to Create a ZENworks Installation DVD from an ISO
Image
1 Download the ZENworks 11 installation ISO image from the Novell Web site (http:// www.novell.com/) and copy it to a temporary location on your Windows device. 2 Burn the ISO image to a DVD.
Using Linux to Create a ZENworks Installation DVD from an ISO
Image
Optionally, you can simply run the installation program from the ISO mount point, instead of burning the DVD:
1 Download the ZENworks 11 installation ISO image from the Novell Web site (http:// www.novell.com/) and copy it to a temporary location on your Linux device.
2 Do one of the following:
Mount the ISO image by using the following command:
mount -o loop /tempfolderpath/isoimagename.iso mountpoint
Replace tempfolderpath with the path to the temporary folder, replace isoimagename with the ZENworks ISO filename, and replace mountpoint with the path to the file system location where you want to mount the image. The path specified by mountpoint must already exist.
For example:
mount -o loop /zcm11/ZCM11.iso /zcm11/install
Burn the ISO image to a DVD.
3.3.3
Creating an External Certificate
If you plan to use external certificates, install openssl and create individual server certificate with subject as the server’s Fully Qualified Domain Name (FQDN) for all the devices on which you plan to install ZENworks Primary Server or to use it as Satellites with the authentication role configured. Do the following to create an individual certificate file:
1 To generate a private key that is needed to create a certificate signing request (CSR), enter the following command:
openssl genrsa -out zcm.pem 2048
2 To create a CSR that can be signed by the external CA, enter the following command:
When you are asked for “YOUR name,” enter the full DNS name assigned to the server where you are installing ZENworks 11 .
3 To convert the private key from PEM format to DER format, enter the following command:
openssl pkcs8 -topk8 -nocrypt -in zcm.pem -inform PEM -out zcmkey.der -outform DER
The private key must be in the PKCS8 DER format, and the signed certificate must be in the X.509 DER format. You can use the OpenSSL command line tool to convert your keys to the proper format. This tool can be obtained as part of the Cygwin toolkit, or as part of your Linux distribution.
4 Use the CSR and generate a certificate by using Novell ConsoleOne, Novell iManager or a true external CA such as Verisign.
“Generating a Certificate by Using Novell ConsoleOne” on page 36
“Generating a Certificate by Using Novell iManager” on page 37
Generating a Certificate by Using Novell ConsoleOne
1 Ensure that eDirectory is configured as the CA. 2 Issue the certificate for the Primary Server.
2a Launch Novell ConsoleOne.
2b Log in to the eDirectory tree as an administrator with the appropriate rights. For more information about the appropriate rights, see the Entry Rights Needed to Perform Tasks section in the Certificate Server documentation at the Novell Documentation Web site (http:/ /www.novell.com/documentation).
2c From the Tools menu, click Issue Certificate. 2d Browse for and select the zcm.csr file. 2e Click Next.
2f Complete the wizard by accepting the default values. 2g Specify the certificate basic constraints, then click Next.
2h Specify the validity period, the effective and expiration dates then click Next. 2i Click Finish.
2j Choose to save the certificate in the DER-format, and specify a name for the certificate. 3 Export the Organizational CA's self-signed certificate.
3a Log in to eDirectory from ConsoleOne.
3b In the Security container, right-click the CA, then click Properties. 3c In the Certificates tab, select the self-signed certificate.
3d Click Export.
3e When prompted to export the private key, click No.
3f Export the certificate in DER format and choose the location in which you want to save the certificate.
3g Click Finish.