I.
l
• •
... .. ... ...
... .. . . .. . . .
.
.....
.. ...
.. ......... .. ... . . . . ... .. . .
. .
.
. . .. .. .. .. . . .. ...
.
. .. .. .. ...
...
.
...
.. .. .. .. .. .. .. .. ...
.
. . . . . . ... .. .. .. .. .. .. ..
.
.. .. .. .. .. .. ... . . .
.
. .
.. .. .. .. .. .. ...
.. .. .. .. .. .. .. .. .. .. ...
. . . . . . . . . . . . . .. .. .. .. .. .. .. .. .. .. .. .. .. .. .. ..
. . . . . . . . . ... .. .. ..
. .
.. .. .. .. .. ...
.. . .. .. .. .. .. .. .. .. .. ...
. . .:.:.:.:.:.:.:.:.:.:.:
..:
..:.
:
-:.:.:.:.:.:.:.:.:
.. :.:.:.:.:.:.: ..
.
~",-"~",,.
.. .. .. .. .. .. .. .. .. .. .. .. .. .. .. .. .. .. .. .. .. .. . ..
. . . ... ..
.
.. ......
.. ....
.. .....
.. .. .. .. .. .. .. .. ....
..... ..
. . . . . . . . .. .. .. .. .. .. .. .. .. .. .. .. .. .. .. .. ...
.. .. .. .. .. .. .. .. .. .. .. .. .. ...
.. . . . . . . . . . . .... .. .. .. .. .. .. .. .. .. .. .. .. .. .. .. .. .. .. .. .. .. .. ..
.
.
.. .. .. .. .. .. .. .. .. . . .. . . . . . . ... .. .. .. .. .. .. ..
. .
.
.. .. .. . .. . . ... .. .. .. .. .. .. .. .. .. ..
.
.. .. .. .. .. . .. . .3+0pen MS-DOS LAN Manager
User Guide
A member of the 3+0pen family of products.
Copyright © 3Com Corporation, 1989. All rights reserved. 3165 Kifer Road
Santa Clara, CA 95052-8145 Printed in the U.S.A.
described in this manual at any time.
Portions of this manual are reproduced in whole or in part with permission from Microsoft Corporation.
Trademarks
3Com and 3+ are registered trademarks of 3Com Corporation. 3+0pen is a trademark of 3Com Corporation.
Microsoft, Microsoft Word, Microsoft Project, MS, and MS-DOS are registered trademarks of Microsoft Corporation. Apple, LaserWriter, and Macintosh are registered trademarks of Apple Computer, Incorporated. Mac Draw is a registered trademark of Claris Corporation.
Recognition
Writer: Robert Shepherd. Editors: Ruth Hartman and Nancy Newlin. Production: Cate Lush and Christa Schmidt. Engineering information: Ray Marshall, Les Cheong, Dan Myers.
Welcome
Welcome ix
MS-DOS LAN Manager Basic x MS-DOS LAN Manager Enhanced xi
Hardware, Software, and Documentation You Will Need xii Conventions Used in This Guide xiv
Keys xiv
Key Combinations xiv Procedural Conventions xv Notational Conventions xv
Notational Convention Examples xvi Contents of This Guide xvii
Finding Further Information xviii
What Do Local and Remote Mean? 1'-9
What Security Options Are Available for Servers? 1-9
Introducing MacroCorp 1-10
Chapter 2: Using MS-DOS LAN Manager Basic
MS-DOS LAN Manager Basic Commands 2-3
Starting MS-DOS LAN Manager Basic 2-4
Getting Help 2-5
Linking to Shared Resources 2-6
Working with Shared Directories 2-9
Linking to a Shared Directory 2-9
Unlinking from a Shared Directory 2-10
Working with Shared Printers 2-11
Linking to a Shared Printer Queue 2-11
Printing Files 2-11
Checking Print Request Status 2-12
Unlinking from a Shared Printer Queue 2-13
Pausing and Restarting Network Services 2-14
Dispiaying Network Names 2-15
Using MS-DOS Commands 2-16
Getting Started with MS-DOS LAN Manager Enhanced 3-2 The MS-DOS LAN Manager Screen 3-3
Starting the MS-DOS LAN Manager Screen 3-3 Using the MS-DOS LAN Manager Screen 3-4 Menus 3-5
Dialog Boxes 3-8
Moving Within a Dialog Box 3-9 Accelerator Keys 3-10
Text Boxes 3-11 List Boxes 3-13 Check Boxes 3-16 Option Buttons 3-17 Command Buttons 3-19 Display Fields 3-20
Getting Help with Menus and Dialog Boxes 3-21 MS-DOS LAN Manager Screen Summary 3-21 MS-DOS LAN Manager Enhanced Commands 3-23
Chapter 4: MS-DOS LAN Manager Screen Tutorial
Before You Start 4-2
Lesson 1: Starting MS-DOS LAN Manager 4-3 Lesson 2: Selecting Servers 4-7
Lesson 3: Logging Off 4-12
Lesson 4: Exiting the MS-DOS LAN Manager Screen 4-13 Lesson 5: Using a Shared Directory with DOS Commands 4-14 Lesson 6: Listing Your Connections 4-16
Lesson 7: Disconnecting from a Shared Directory 4-19 Lesson 8: Connecting to a Shared Printer 4-20 Lesson 9: Printing a File on a Shared Printer 4-22 Lesson 10: Viewing a Printer Queue 4-23
Lesson 11: Removing Your Request from a Printer Queue 4-24 Lesson 12: Disconnecting from a Shared Printer 4-25
Logging Off from the Local Area Network 5-10 Changing a Password 5-12
Changing Your Password at Your Netstation 5-12 Changing Your Password at a Server 5-14 If You Forget Your Password 5-15
Chapter 6: Using Shared Directories
About Shared Directories 6-2
Connecting to Shared Directories with the MS-DOS LAN Manager screen 6-4 Connecting to 3+0pen Servers 6 - 4 '
Connecting to Directories Shared by 3+ Servers 6-8 Connecting to Shared Directories USing Commands 6-12 Automatic Connections to Shared Directories 6-14 Listing Your Connections to Shared Directories 6-15 Disconnecting from Shared Directories 6-18
Copying and Moving Files 6-19
Using the NET COpy Command 6-20
Copying Files Between Network Servers 6-20 Using the NET MOVE Command 6-22
Chapter 7: Using Shared Printers
Shared Printers and Printer Queues 7-3
Connecting to a Printer Queue USing the MS-DOS LAN Manager Screen 7-4
Connecting to 3+0pen Servers 7-4
Connecting to Printer Queues Shared by 3+ Servers 7-6 Using Commands to Connect to Shared Printers 7-8
Printing a File on a Shared Printer 7-10
Using Applications and Shared Printers 7 -10
Examining a Printer Queue 7 -13
Removing a Print Request from a Printer Queue 7-15 Holding a Print Request in a Printer Queue 7-17
Releasing a Held Request 7 -18
Pausing Your Connections to Printer Queues 7-20 Continuing Paused Connections 7-21
Disconnecting Your Netstation from a Printer Queue 7-22
Chapter 8: Sending and Receiving Messages
About Messages 8-2 The Messenger Service 8-3
Starting the Messenger Service 8-3 Sending Messages 8-4
Sending a Message with the MS-DOS LAN Manager Screen 8-5 Sending a Message with the NET SEND Command 8-7
Receiving Your Messages 8-8
Starting the Netpopup Service 8-9 Using Aliases 8-10
Deleting an Alias 8-13
Chapter 9: Using Profile Files
Profile Files 9-2
Using an Existing Profile File 9-3
Saving Your Current Configuration to a Profile File 9-5 Admin Index Template 9-1
List of Tables
Table Title
Table 2-1. MS-DOS LAN Manager Basic Commands 2-3 Table 3-1. MS-DOS LAN Manager Screen Menus 3-5 Table 3-2. MS-DOS LAN Manager Screen Keys 3-21
Table 3-3. MS-DOS LAN Manager Enhanced Commands 3-23
Table 3-4. MS-DOS LAN Manager Enhanced Network Administrator Commands 3-24
Welcome
Welcome to 3+0pen™ Microsoft® MS-DOS® LAN Manager, a local area network (LAN) for computers running MS-DOS or PC-DOS. A local area network combines computer software and hardware to let computer users share information and equipment. Each computer can work independently or in conjunction with the other computers on the local area network.
Two versions of MS-DOS LAN Manager are available, each with a different level of functionality. Both are covered in this guide. One version, called MS-DOS LAN Manager Basic, is used by typing commands at the MS-DOS prompt. MS-DOS LAN Manager Basic is easy to use and is described in Chapter 2 of this guide.
• Pause and restart links to local area network resources.
• Get on-line help.
• Read, revise, and create files on other computers.
• Keep your work group's data in a secure and centralized location.
• Use applications-such as Microsoft Word-with files on other computers.
MS-DOS LAN Manager Enhanced combines all of the functionality of the Basic program with some very powerful and useful additional features, including a full-screen interface. With the Enhanced software you can also:
• Work with menus and dialog boxes instead of typing commands at the MS-DOS prompt.
• Send messages to other users on the local area network.
• Use printers across the local area network.
• Put together a customized set of connections--called a profile file-so that you can connect to a number of frequently used refile-sources with one command.
• Use the Messenger and Netpopup services to send and receive messages.
80386-based computer with more memory is recommended.
• A local area network adapter properly configured and installed in your computer and physically connected to the local area network. See the documentation for your computer and for the adapter card if you need help installing it.
You will also need the following software installed on your computer:
• MS-DOS or PC-DOS operating system
• MS-DOS LAN Manager netstation software
See your network administrator if the MS-DOS LAN Manager software has not been installed on your netstation.
When the MS-DOS LAN Manager software has been installed on your computer, you will be ready to start going through this guide. This manual contains the fundamental concepts and information you need for using MS-DOS LAN Manager.
Manager User Reference to learn more about the capabilities of
MS-DOS LAN Manager. The User Reference provides specific details about MS-DOS LAN Manager commands and menus and contains descriptions of all of the command options.
This guide assumes that you have a working knowledge of MS-DOS and that you have experience working with files and directories. If you are not familiar with MS-DOS, you may want to consult the following manuals:
[Esc] Escape
[Alt] Alternate
[Ctrl] Control
[Backspace] Backspace
[Space bar] Space bar
[Fl]-[Fx] Function keys
.J or [Return] or
Fl through Fx
Return or
[Enter] Enter key
Key Combinations
'
If two or more keys are to be pressed simultaneously, they are linked
with· a + sign. For example, the following key combination resets a neisiaiion:
[Ctrl]+[Alt]+[Backspace]
Information you should enter is shown in blue. Tenns shown in italics should be replaced with specific infonnation. For example:
makedisk n:.J
means that you type the command MAKEDISK followed by a drive identifier (n::) and press [Return].
Notational Conventions
Throughout this manual, the following conventions are used to distinguish elements of text.
Text Element Indicates
ALL CAPITAL LETTERS Command names and filenames.
Bold New terms.
Bold Courier typeface Input you enter.
Regular Courier typeface Screen text.
[Brackets] Nonalyhabetic key names such as [Enter or command options.
Italics Variable command option names.
net copy pathnamel [pathname2]
This means that to copy files you must type the words net copy followed by the pathname of the file (or files) you want to copy
(pathnamel). If you want, you can also specify the path name to which you want the file or files copied (pathname2). Otherwise, they are
copied into your current directory, and need to be renamed.
When typing commands, be sure to include blank spaces as they appear on the syntax line. After you have typed a command and verified that your typing is correct, press [Enter]. MS-DOS LAN Manager will then perform the command.
The syntax of some commands may be too complex to be represented by a single syntax line. In such cases, the syntax line appears in generic form, and detailed infonnation about the options will follow:
net copy options
You may find that commands typed incorrectly can result in an error message. For example, if you try to copy files from the current directory and you don't specify pathname2, the following error message is displayed:
File cannot be copied onto itself
o
File(s) copiedIn this case, the NET COpy command is ended and must be retyped correctly.
This guide contains nine chapters, an appendix, and a glossary of terms. The appendix contains infonnation about MS-DOS LAN Manager's compatibility with other local area networks. The following table provides a quick overview of the chapters in this manual:
Chapter Contents
Chapter 1 Provides an overview of MS-DOS LAN Manager and introduces MacroCorp, Inc., a fictional fmancial services company used in many of the examples in this guide. Chapter 1 covers most of the conceptual information you will need to understand before you start using MS-DOS LAN Manager. Read Chapter 1 before reading the rest of this guide.
Chapter 2 Describes MS-DOS LAN Manager Basic and exrains how to share resources by typing commands at t e MS-DOS prompt. Chapter 2 covers the Basic version exclusively, but you should read it before reading the rest of this guide even if you plan to use the Enhanced version. MS-DOS LAN Manager Enhanced includes all of the features described in Chapter 2. (Chapters 3 through 9 are specific to MS-DOS LAN Manager Enhanced, and, as a result, users of the Basic version can disregard them.)
Chapter 3 Introduces MS-DOS LAN Manager Enhanced, which includes a full-screen interface for the MS-DOS LAN Manager software. Chapter 3 explains how to start MS-DOS LAN Manager Enhanced and defines all of the elements displayed on the screen.
Chapter 4 Contains a tutorial designed to teach users of 3+0pen MS-DOS LAN Manager Enhanced how to access and
use ~hared directories and printers, and how to send and
receIve messages.
Chapter 9
make it easy for you to automatically connect to frequently used resources.
Finding Further Information
One other manual is included with MS-DOS LAN Manager:
• 3 + Open MS-DOS LAN Manager User Reference, a detailed
reference that explains each command and dialog box available to the local area network user. This manual describes how to use MS-DOS LAN Manager with either MS-MS-DOS LAN Manager commands or the LAN Manager screen.
MS-DOS
LAN Manager
1
1-1
Chapter
1:
Understanding MS-DOS
LAN
Manager
This chapter covers the basic concepts and tenns used to describe local area networks in general and 3+Open MS-DOS LAN Manager in particular. After reading this chapter, you will know what MS-DOS LAN Manager is and see how it enables you to work more effectively and efficiently by giving you access to computer resources distributed throughout your office or company.
What is a Local Area Network?
A local area network consists of a group of individual computers that are connected so that they can communicate with each other and share resources, such as hard disks and printers.
A computer has different devices that perform different jobs: the hard disk stores files, the monitor displays information, and the printer prints data. The components that you can use over the local area network are referred to as resources. A local area network consists of:
• Computers located in the same group of offices or buildings.
• Cables connecting the computers.
• Software that runs on each of the computers and coordinates communication between the computers.
MS-DOS LAN Manager is the software that allows computers running MS-DOS to communicate over a local area network. When the
computers in your company or office are connected to each other across a local area network, you can work much more efficiently and save a lot of time.
Local area
networks allow
you to share
resources
MS-DOS
LAN Manager
1
1-3
Suppose another department in your organization has a laser printer. You would probably be more efficient in your work if you could use it sometimes. If nothing else, you could produce better looking reports. To print your report on this laser printer without MS-DOS LAN
Manager, you would have to copy it onto a floppy disk and take the disk to the computer that is connected to the laser printer.
But if the laser printer is shared with the local area network, you can send the report from your computer directly to the laser printer. The report would be printed exactly as though your computer were connected directly to the printer.
The resources that can be shared across the local area network include:
• Equipment, such as printers and hard drives.
• Software programs that many people want to use, such as Microsoft
Word for Networks.
• Shared information, such as inventory reports or spreadsheets.
What Are Servers?
Some of the computers on a local area network operate as servers. The primary role of a server is to with users at other computers. Servers get their name from their role of serving the needs of local area network users. Usually, servers are the most powerful computers on the local area network. They usually store a lot of information and share resources, such as printers.
Sharing is the most fundamental concept of MS-DOS LAN Manager, or of any local area network, for that matter. Before you can use a
You can name your computer after yourself
What Are Network Administrators?
Every local area network has a network administrator-someone responsible for keeping the local area network running smoothly. The network administrator controls and shares server resources and can help you learn how to use MS-DOS LAN Manager. Talk to your network administrator if you have any problems or questions you cannot resolve on your own.
What Is a Netstation?
When your computer is connected to the local area network, it becomes a netstation.
Very little about your computer changes when it becomes a netstation on the local area network. You continue using it as you always have. Now, however, you have access to more information from shared files and can print information more easily on shared printers.
With MS-DOS LAN Manager, servers share resources-such as
printers and hard disks-with netstations. For example, a netstation can connect to a server's hard disk and then use that hard disk as though it
were its own.
Local area networks usually contain many more netstations than servers. Netstations cannot share their resources. Netstations can only access and use the resources of servers, not other netstations.
What Are Computer Names?
Each server and netstation on the local area network has a unique name to distinguish it from other computers on the local area network. This name is referred to as its computer name. Computer names personalize your organization's computers with distinct names or purposes.
Logging on to
the local area
network
MS-DOS
LAN Manager
1
1-5
Your organization might also follow a theme for naming the servers you use. Organizations can use the names of literary characters,
entertainment figures, or anything else that strikes their fancy. One
company named its servers after the characters in the play A Streetcar
Named Desire. Another organization named its servers after the planets in our solar system.
What Are User Names and Passwords?
After you have turned on your computer, you need to log on to the local area network by typing your user name and password. Your user name is the name by which you are known on the local area network. It can be the same as your computer name and can be up to 20 characters long.
If your name is Floyd Smith, you can use floyds for both your
computer name and your user name.
The network administrator will authorize your user name and at the same time establish a password for you to use when you log on. Passwords can be up to 14 characters long. You will need to type the password whenever you access protected information.
What Are Shared Resources?
When working with MS-DOS LAN Manager, share and use are complementary terms: network administrators share resources (that is, make them available to users on the network), and users use the resources that have been shared by network administrators.
Before you can access a shared resource, you need to establish a connection between your netstation and the resource. You do this by telling MS-DOS LAN Manager the name of the shared resource you want to use. This is referred to as a link. Establishing a link is like calling someone on the phone-using the link is like the actual conversation you have with the person on the other end. By
establishing a link, you open a channel between your net station and a shared resource.
Once you have linked to a shared resource, working with that resource is just like using one of your own computer's resources-you use a shared directory exactly as you would one of your netstation's own directories.
For example, suppose your manager is the network administrator for your local area network and controls a server. All of the spreadsheets associated with your project are stored in a directory on this server. Before you can work with these spreadsheets, two things must happen:
• The network administrator must share the directory.
• You must iink your netstation to the shared directory that contains
About devices and device names About sharenames About network paths and pathnames MS-DOS
LAN Manager
1
1-7
What are Device Names, Sharenames, and
Pathnames?
A shared directory serves as a communal data storage area. To use a shared directory, you need to connect one of your netstation's device names to the shared directory. A device name is simply the name by which your computer identifies a device. Device names vary according to the type of component they identify-for example, disk device names are drive letters (A:, B:, C:, D:) and printer device names are the names of printer ports (LPTl:, LPT2:).
For example, your netstation's hard disk has the device name C:. MS-DOS provides device names D: through Z: for connections to shared directories. This concept should make it easier for you to think of shared directories as additional disk drives connected to your netstation.
Computers and users are identified by computer names and user names. Shared resources-such as directories and printers-are identified by
sharenames. Sharenames are designated by local area network network administrators. For example, a network administrator in charge of sharing a hard disk on a server might assign the disk a sharename of
baby.
When connecting to a shared resource, you need to type the sharename and the computer name to locate the resource. The combination of both names is known as the network path. Network paths consist of two backslashes (\\) followed by the computer name, another backslash, and the sharename. For example, the network path for the shared directory face on the server baby would be \\baby\{ace.
When a filename is added to the network path, it becomes a network pathname. Using the above example, the network pathname for the file
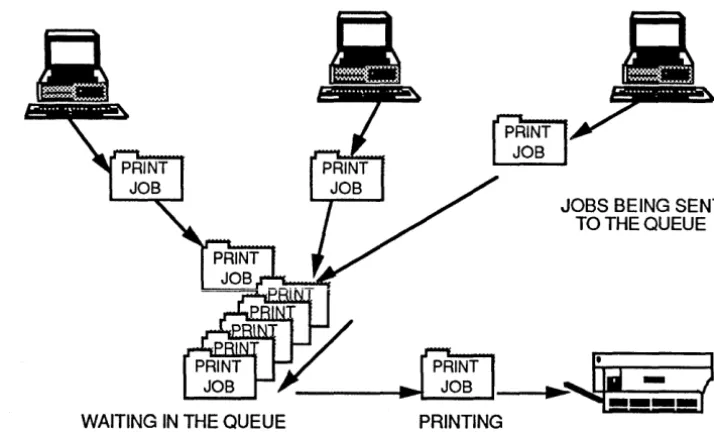
What Are Printer Queues?
Other users are working on the local area network at the same time that you are-that's what networking is all about. Conflicts can arise if both you and another user want to use the same shared resource at the same time. For example, you may both want to print files on the same printer simultaneously.
When a network administrator shares a hardware device that can handle only one request at a time, such as a printer, MS-DOS LAN Manager creates a queue for that printer.
A queue collects requests to use the device and then fulfills the requests in the same order that it received them. Queues eliminate competition for access to shared printers. Figure 1-1 illustrates how queues work.
JOBS BEING SENT TO THE QUEUE
G;J
.
n
)
- - - I . .
~...:J~O~B~---I
...~-:.-I
[image:27.545.110.467.325.541.2]WAITING IN THE QUEUE PRINTING
MS-DOS
LAN Manager
1
1-9
When you use MS-DOS LAN Manager to send a document to a printer, you are actually sending a request to a queue. MS-DOS LAN Manager prints your file when the documents sent before yours have been printed.
What Do Local and Remote Mean?
Local and remote are terms that are used to describe resources on the local area network. A local resource is a resource that is attached to, or part of, the computer in front of you. In other words, you do not need MS-DOS LAN Manager to use local resources. One example of a local resource is the hard drive on your personal computer.
Remote is the opposite of local. All resources on your local area network that are not part of or directly attached to your computer are remote resources. Computers on the local area network other than your own are remote computers. If you need MS-DOS LAN Manager to access a resource, then that resource is a remote resource. One example of a remote resource is a prin ter that is connected to a server on the local area network.
What SecuriW Options Are Available for Servers?
Your network administrator will work with you to decide which
resources you and other users need access to and which resources need to be protected. For example, if the people in your department want to share files in a server's directory, your network administrator can set up user accounts for each person and give each person permission to use the directory. People who do not have access permission-perhaps employees in another department-will not be able to work with your files. Another way to protect a resource is for a network administrator to assign a password to the resource itself. For example, your network administrator might share a printer and assign a password to that printer. Then, only the people who know the password can use the printer. See Chapter 6: Using Shared Directories for more information about
An example of working with the Iocalarea network
Introducing MacroCorp
Many of the examples in this manual are drawn from a fictional financial services company called MacroCorp, Inc. These examples suggest how you might use a local area network in your own environment.
MacroCorp provides investment and money-management services to a wide array of customers. The employees of MacroCorp just installed MS-DOS LAN Manager on their personal computers to help make them more efficient.
Jenny Tibbett, MacroCorp's Vice President for Investments, is starting a new series of reports on investments for the company. Since she will be working on these reports with other people-including accountants, other vice presidents, and secretaries-she is going to place the report files in a shared directory on a server called invest. This way, everyone
has access to them.
The first thing Jenny does is connect to a remote directory called reports
and then create her own subdirectory called monthly. Next, she copies
all of her reports to this subdirectory and contacts Mary Sullivan-the local area network network administrator for MacroCorp--to talk about the access rights that should be associated with this subdirectory. MacroCorp employees can (or cannot) access the reports in the monthly
subdirectory depending upon the access rights that are assigned at this point.
By establishing a connection to the hard disk on the invest
server-which has been shared by the network administrator-Jenny can use that hard disk as though it were another hard disk on her own computer. Other MacroCorp employees can also use the hard disk on the invest
server, allowing them-depending on their access rights-to share the files in the subdirectory \reports\monthly. Other MacroCorp employees
Server (invest)
Netstation
MS-DOS LAN Manager
Queue
~
~
hard disk
[image:30.545.132.487.69.573.2]\\fdrive
Figure 1-2. MacroCorp
1
1-11
Read this chapter even if
you plan to use Enhanced
Using MS-DOS
2
LAN Manager Basic2-1
Chapter 2: Using MS-DOS LAN
Manager Basic
This chapter describes the commands that are available with 3+0pen MS-DOS LAN Manager Basic and then explains how to use them to connect to and work with the local area network. Basic is a subset of MS-DOS LAN Manager Enhanced: all the Basic commands are available in Enhanced. Thus, if you will be using MS-DOS LAN Manager Enhanced, you should read this chapter before you move on to learn about Enhanced.
For more infonnation on any of the commands described here, including options that are available, see the 3 + Open MS-DOS LAN
Before you read this chapter, you should:
• Read Chapter 1: Understanding MS-DOS LAN Manager to familiarize yourself with the concept of sharing resources over a local area network.
• Have MS-DOS LAN Manager Basic installed on your netstation.
See your network administrator if MS-DOS LAN Manager is not already installed on your netstation.
Read this chapter before reading the rest of this guide even if you plan to use the Enhanced version of MS-DOS LAN Manager. It is important to understand the Basic commands that are discussed here-and that are available to users of Enhanced-before you move on to the information in the Enhanced chapters. The discussion of MS-DOS LAN Manager Enhanced begins in Chapter 3.
This chapter begins with general infonnation that describes how to:
• Use MS-DOS LAN Manager Basic commands.
• Start the network.
• Get on-line help with the MS-DOS LAN Manager Basic commands.
• Link and unlink shared resources, and display a list of your current links.
• Use passwords.
The chapter continues with infonnation about specific MS-DOS LAN Manager functions, such as how to:
• Link to, and unlink from, shared directories.
• Link to, and unlink from, shared printers.
• Check printer queues.
• Print files on shared printers.
Using MS-DOS
2
LAN Manager Basic2-3
MS-DOS LAN Manager Basic Commands
MS-DOS LAN Manager commands work much like MS-DOS
commands except that most of them start with the word net. Table 2-1
is a list of the MS-DOS LAN Manager Basic commands described in
this chapter. If you need more information on a particular command,
see the 3
+
Open MS-DOS LAN Manager User Reference.T bl 2 1 MS DOS LAN M a e
-
.
-
anager aSlc omman S B . C dCommand Function
LOGOFF Logs a user off the network.
LOGON Logs a user on to the network.
NET CONTINUE Reactivates a network resource that was paused
using the NET PAUSE command.
NET HELP Disp~ays information about the command you
specIfy.
NET NAME Displays the network name (referred to as the
computer name) of the local netstation.
NET PAUSE Temporarilthuspends links to shared
resources. e lInks to shared resources may
be reestablished with the NET CONTINUE command.
NET PRINT S~ows printer queue; sends files to a shared
pnnter.
NET START Starts a netstation on the network.
WORKSTATION
NET USE Lists network resources; links and unlinks
network resources.
Starting MS-DOS LAN Manager Basic
The 3+Open MS-DOS LAN Manager setup program installed the necessary commands to start MS-DOS LAN Manager in your computer's AUTOEXEC.BAT file. All commands in
AUTOEXEC.BAT, including the MS-DOS LAN Manager startup commands, are executed automatically each time you start or reboot your computer.
AUTOEXEC.BA T contains two commands to start MS-DOS LAN Manager. You may also type these commands at the MS-DOS prompt if they have been removed from your A UTOEXEC.BA T file.
The ftrst starts MS-DOS LAN Manager in general: NET START WORKSTATION. For example, if your computer name is floyds,
AUTOEXEC.BAT would contain the following command to start the Workstation service:
The second command in AUTOEXEC.BAT is LOGON. LOOON is very similar to Enhanced's NET LOGON command. LOGON (without the word NET in front of it) is a special program that logs you in to both 3+0pen and, if your network also contains 3+ servers, the 3+ network. LOGON is usually set up to include your password automatically; however, it can also be set up so that you see the following prompt when your netstation is started:
Enter your password:
Type your password at the prompt. Your password will not be displayed on your netstation's screen, thus keeping your password conftdential. Refer to Chapter 2: MS-DOS LAN Manager Commands in the 3+0pen MS-DOS LAN Manager User Reference for more
LAN Manager Basic
2
2-5
Your network administrator will have installed MS-DOS LAN Manager Basic and assigned a computer name for you. Contact your network administrator if you have trouble starting MS-DOS LAN Manager or if you have any other questions. Your network administrator can also change your password or your computer name.
Getting Help
You can display helpful information about any of the MS-DOS LAN Manager commands. To view the names of all of the commands for which help is available, type:
net help
There are two ways to get help for MS-DOS LAN Manager commands. One way is to type NET HELP followed by the command. (You do not need to type net twice with this method-see the example below.)
The second way to get help is to type the command followed by /help. For example, to get help for the command NET PRINT, you could type either of the following:
net help print
or
net print /help
The NET USE command
Network paths
Linking to Shared Resources
Before you can link to a shared resource, whether a directory or printer, you need to know the following:
• The server's computer name and the directory's or printer's sharename
• The password, if one is required
Contact your network administrator if you need the password, computer name, or sharename of the resource to which you want to connect.
There are two ways you can link to a shared resource. One way is to use the NET USE command to assign a local device name, such as Z: or LPTl:, to the shared directory or printer, and then connect that device name to the resource.
For example, to link device name Z: on your netstation to the shared directory face located on the server baby, type:
net use z: \\baby\face
Another way to link to a shared resource is to substitute a network path for a directory when using a local area network command.
For example, to copy a file powder from your computeris floppy drive to the shared directory face located on the server baby, type:
net copy a:powder \\baby\face
Using MS-DOS
2
LAN Manager Basic2-7
Using Passwords
You may need to use a password to link to a shared resource. Passwords are assigned by network administrators to limit access to certain resources. Resource passwords are usually different from the individual user password you supply when logging on to the network. Resource passwords apply to shared resources rather than to
individuals.
IT the resource you want to connect to is protected with a password-for example, a directory containing sensitive sales information-you will need to provide the password when you use the NET USE command before you can be connected to the directory.
There are two ways to enter passwords with the NET USE command. The fIrst way is to type the password on the same line as the command. For example, to link the device name G: to the shared directory \ \sales
on the server admsvc with the password bonds, type:
net use g: \\admsvc\sales bonds
Another way is to type an asterisk (*) after the NET USE command. MS-DOS LAN Manager will prompt you for the password. For example, to use the same device name and shared directory, type:
net use g: \\admsvc\sales
*
The following prompt--or one similar to this-will appear:
Password?
Type your password at the prompt. Your password will not be displayed on your netstation's screen, thus keeping your password confIdential. If you make an error and are refused access to the resource, retype the command and password. If you continue to have problems linking to a protected resource, see your network
Listing Links to Network Resources
You can use the NET USE command to list your current links to network resources. By listing your connections to shared directories, you can see the status of your link to each directory.
You may need a reminder about which printer queue you are connected to, or you may need to locate the name associated with a printer. Or you may be are just planning to delete any unneeded links.
To list your links to network resources, type the following command:
Information similar to the following appears:
Local Network
Status Device Name
D: \\SATURN2\SYS
E: \\sales\SUSANK
F: \\SATURN\APPS
LPTl \\SATURN\LASERJET
The command completed successfully.
This lists all of the resources that are currently linked to your netstation.
The items that have disk device names (for example, D: and E:) in the
Local Device column are shared directories. The items that are listed
LAN Manager Basic
2
2-9
Working with Shared Directories
MS-DOS LAN Manager lets you make use of files on directories shared by servers. Two forms of the NET USE command let you link to, and unlink from, shared directories.
Linking to a Shared Directory
To link to a shared directory, use the NET USE command followed by a device name and the network path of the directory. Type a password at the end of the command if one is required (if you do not include a required password, you will be prompted to supply it). Remember that a network path consists of two backslashes, the computer name of the server, another backslash, and the sharename.
For example, to link the device name G: to the directory money on the server sales, type:
net use g: \\sa1es\money
The following message appears when the connection is made:
The command completed successfully.
Now that you have linked the device name G: to the LAN path
\\sales\money, you can look at the contents of the money directory. To do so, type:
dir g:
Unlinking from a Shared Directory
Use the NET USE command appended with a slash and the letter d (/d) to unlink from a shared directory. The d option is an abbreviation for delete.
You should disconnect from shared directories as soon as you are done using them. To unlink from the shared directory that is linked to the device name G:, type:
LAN Manager Basic
2
2-11
Working with Shared Printers
MS-DOS LAN Manager lets you use printers shared by servers on ~he
network. The NET USE command links to and unlinks from shared printers. The NET PRINT command sends jobs to shared printers to be printed and gives you control over your jobs in print queues.
Linking to a Shared Printer Queue
To link to a shared printer queue, use the NET USE command followed by a device name and the network path of the queue. Include a
password at the end of the NET USE command, if one is required. For example, to link the device name LPTl: to the printer queue
laserjet
shared by the server
sales,
type:net use 1ptl: \\sa1es\1aserjet
You may now send files to the printer queue. See the next section, "Printing Files," for more information.
Printing Files
When you use the NET USE command to link to a shared printer, your applications can print to the redirected device name, and the output is printed on the linked printer. There are times when you may want to send a file directly to a shared printer; use the NET PRINT command to send files to a printer queue. Use the name of the file you want printed and the device name you linked to the shared printer's queue. For example, to send the file
report
to the printer queue linked to LPTl:, type:net print report Iptl:
Checking Print Request Status
You can examine a printer queue to check on the status of a particular print request. By locating your request in the list of requests, you get an idea of when your work will be printed. Also, by examining various printer queues before actually using a shared printer, you can choose the printer where you will have the shortest wait. To check a printer queue linked to LPTl:, type:
net print lptl:
Information similar to the following appears:
Posld Size Date Time Name Status
001014 4197 06-24-88 14:45 Ginny:SPD: Printing
002015 197 06-24-88 14:49 Doralee:SPD: Waiting
003016 5007 06-24-88 14:55 viki:SPD: Waiting
004017 6787 06-24-88 14:55 Mario:SPD: Waiting
Refer to Chapter 2: MS-DOS LAN Manager Command Reference in the 3
+
Open MS-DOS LAN Manager User Reference for a detailedUsing MS-DOS
2
LAN Manager Basic2-13
Unlinking from a Shared Printer Queue
Use the NET USE command appended with a slash and the letter d (ld) to unlink from a shared printer queue. The d is an abbreviation for delete. You should unlink from printer queues when you no longer need to use them. You can use a device name or the shared printer network path with the NET USE command.
To unlink from a printer queue linked to LPTl:, type:
net use lptl: /d
To unlink from the printer queue laserjet shared by the server sales,
type:
net use \\sales\laserjet /d
Pausing and Restarting Network Services
Occasionally, you may need to suspend your links to shared resources. You might want to do this so you can link your devices to your own disks, directories, or printers.
For example, if you have linked your device name LPTl: to a network printer, you cannot use that device name for your own printer. The NET PAUSE command allows you to temporarily suspend your links to shared resources.
Use the NET CONTINUE command when you are ready to reactivate your links to shared resources.
The NET PAUSE and NET CONTINUE commands have two options available:
Option Explanation
drdr Pauses (NET PAUSE) or restarts (NET CONTINUE) all links to shared directories.
prdr Pauses (NET PAUSE) or restarts (NET CONTINUE) all links to shared printers.
The following list shows different ways you can use the NET PAUSE command:
What
you
wantto
pause Whatyou type
Links to shared directories net pause drdr
Using MS-DOS
2
LAN Manager Basic2-15
The following list shows you how to use the NET CONTINUE command:
What you want to continue What you type
Links to shared directories net continue drdr
Links to shared printers net continue prdr
Displaying Network Names
The NET NAME command displays the computer name of the local netstation. To display your netstation's computer name, type the following command:
net name
A display similar to the following appears:
Name
Floyds
Using MS-DOS Commands
After you have used the NET USE command to connect to a network resource, you can use most MS-DOS commands with the files and directories to which you have access. You cannot use commands, however, that read and write directly to the disk. The following MS-DOS commands do not work with resources that you link to over the local area network:
CHKDSK DIS KCOPY FORMAT
JOIN RECOVER SYS
If you try use any of these commands with a network file, directory, or disk, the following message will appear:
Cannot [command] a Network drive
YOl:1 can use MS-DOS commands to list directories and to copy, look at, rename, and delete files. If you have linked a disk drive device name to the network, use that device name with the command.
For example, if you have linked device name D: to the shared directory
accounts, the following command will copy the network file
JUNE88.DOC from the accounts directory onto a floppy disk that you have placed in drive A:
copy d:\june88.doc a:
You can also use the COpy command to copy files from a local disk to a shared directory. The following command copies the file JOHN.MTG into the network directory that has been linked to device name D:
MS-DOS LAN Manager
Enhanced
3
3-1
Chapter 3: Introducing MS-DOS
LAN Manager Enhanced
This chapter explains how to use menus and commands to make 3+Open MS-DOS LAN Manager Enhanced work for you. Use this chapter to:
• Learn how to operate MS-DOS LAN Manager Enhanced's full-screen interface.
Getting Started with MS-DOS LAN Manager
Enhanced
Before you read this chapter, you should:
• Read Chapters 1 and 2 of this manual.
• Have MS-DOS LAN Manager Enhanced installed on your netstation.
See your network administrator if MS-DOS LAN Manager Enhanced is not already installedon your netstation.
MS-DOS LAN Manager
Enhanced
3
3-3
The MS-DOS LAN Manager Screen
MS-DOS LAN Manager provides a system of menus and dialog boxes that guide you through LAN Manager tasks.
MS-DOS LAN Manager also displays information about your current use of the local area network. This information includes:
• Your netstation's computer name.
• The number of files you currently have open on the network server.
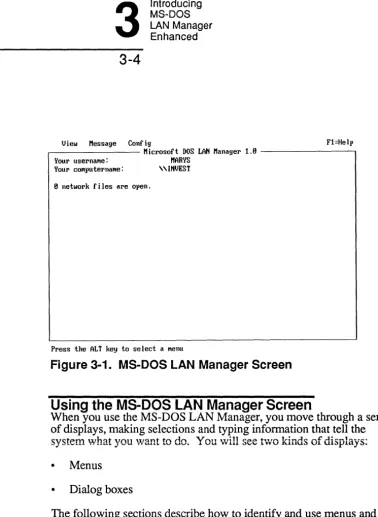
Starting the MS-DOS LAN Manager Screen
View Message Config Fl=Help , - - - Microsoft DOS LAN Manager 1.B - - - ,
Your usernaflle: MARYS Your COfllputernaflle: "INVEST
o network files are open.
[image:51.548.70.448.31.547.2]Press tJle ALT key to select a Menu
Figure 3-1. MS-DOS LAN Manager Screen
Using the MS-DOS LAN Manager Screen
When you use the MS-DOS LAN Manager, you move through a series of displays, making selections and typing information that tell the system what you \Vant to do. You will see two kinds of displays:
• Menus
• Dialog boxes
Using menus
MS-DOS LAN Manager
Enhanced
3
3-5
While working with the MS-DOS LAN Manager, you can press the [Esc] key at any time to cancel the current operation. To clear all of the menus and dialog boxes displayed, keep pressing [Esc] until you see the main MS-DOS LAN Manager screen. The main screen is the first one displayed when you start the program.
Menus
A menu is your starting point for any MS-DOS LAN Manager operation. The names of the menus appear at the top of the MS-DOS LAN Manager. The menus are used for the following purposes:
T bl 3 1 MS DOS LAN M a e
-
.
-
anager creen enus SM
Mew Purpose
View Displays the names of servers and shared resources across the local area network; lets you make connections to shared resources; lets
lOU
examine printer queues; lets you exit the MS-DOS L N Manager.Message Lets you send messages.
Config Saves or restores a prearranged set of connections; lets you change your password.
An example of a menu: the View menu
When you select a menu, you will see a list of available menu items. For instance, when you select the View menu the screen shown in Figure 3-2 appears.
I!Im!I Message Config Fl=Help
M' Icroso ft DOS LAN M anager 1 EI
Network servers ... I'IARYS
This workstation ... \\INVEST
Print queues ...
Exit F3
[image:53.546.102.439.201.423.2]View local-area network Servers
Figure 3-2. View Menu
Choosing a menu Hem using the keyboard
Choosing a menu item using a mouse
MS-DOS LAN Manager
Enhanced
3
3-7
To select a menu item and then choose an item from it, follow these steps:
1. Press [Alt].
The background of the View menu title changes colors, and one letter in each menu title changes color or becomes bold.
2. Use the Left and Right arrow keys to select a menu.
The background of each menu title changes as you move around with the arrow keys.
3. Press [Enter] or the Down arrow key to see the list of menu items.
4. Use the Up and Down arrow keys to move to a menu item.
5. Press [Enter].
The appropriate dialog box appears.
If you are working with a mouse, you can select an MS-DOS LAN Manager menu and then choose a menu item by following these steps:
1. Move the mouse pointer to the name of the menu you want to use.
2. Press and release the left mouse button.
The items for that menu appear under the name of the menu.
3. Move the mouse pointer to the menu item you want.
4. Press and release the left mouse button.
Using dialog boxes
For example, to see a list of the servers that are available to you, press [Alt] and then press the letter V to see the View menu. The ftrst menu item is Network Servers, and it is already selected. You will probably choose this menu item more frequently than any other. Press [Enter] to
choose Networ~ Servers. A dialog box appears on your screen,
displaying a list of the available servers.
Dialog Boxes
Dialog boxes show you information and ask you to make selections or supply additional information.
Select the desired information by pressing [Enter] when your choice is highlighted. IR some cases, you will need to enter information that is specific to what you want to do. You can use either uppercase or lowercase letters when you type something into a dialog box. When you are finished typing, press [Enter].
Dialog boxes often appear when you choose an item from a menu. They can contain up to six different types of areas:
• Text boxes
• List boxes
• Check boxes
• Option buttons
• Command buttons
Example
MS-DOS LAN Manager
Enhanced
3
3-9
If you select the Message menu and choose the Send menu item, the Send a Message dialog box appears. It contains text boxes, list boxes, option buttons, and command buttons. Figure 3-3 illustrates the Send a Message dialog box.
View 'i!4¥1WUi Conf ig Fl=Help
M' lcroso ft DOS LAN M anager 1 B
Vour usernaMe: MARVS
Vour cOMputernaMe: "INVEST
Send a Message 0 n
To: (0) NaMe [ ... . . . ]
( ) All LAN users
Send: (0) Message text (t!,lpe !,lour Message and press ENTED)
[ . . . ]
( ) Contents of file [*.* ... . . . . ]
Files in C:\LANMAN.DOS
Other drives/dirs
CHANGE. BAT
f
DOSURJH .MSP ..
f
DOSUR_02.I1SP !:i:
DRIVERS
;:;;
DOSUR_03.I1SP 1 NETPROG 1
I I
( 0)( ) (Cancel>
[image:56.549.133.440.234.459.2]Send a Message
Figure 3-3. Send a Message Dialog Box
Dialog boxes can also contain check boxes and display fields-they do not appear in this dialog box but are described later in this chapter.
Moving Within a Dialog Box
Using Accelerator Keys
Accelerator Keys
A quick way to move around in a dialog box is by using accelerator keys. Each area in a dialog box has an accelerator key associated with it. An accelerator key is a highlighted or underlined letter that appears in a legend in the dialog box. If you press that letter, you will move right to the area.
To use the accelerator keys, follow these steps:
1. Once you are in a dialog box, press [A1t].
A letter either is highlighted or changes color in each area of the dialog box. This is the accelerator key for that area. On monochrome monitors, the accelerator key is underlined.
2. To move to an area, press [AIt] and the accelerator key for the dialog box area to which you want to move.
Example
Editing a text box using the
keyboard
Text Boxes
MS-DOS LAN Manager
Enhanced
3
3-11
Text boxes let you identify objects such as files, computers, or resources to MS-DOS LAN Manager.
Text boxes are areas on the screen where you can enter or change information. Text boxes are surrounded by brackets, and they contain a series of dots. The letters you type replace the dots. For example:
Message text: [Do not forget dog food . . . ]
Sometimes text boxes appear with information already filled in. This is the default, or proposed response, for that text box. If you want to use the default information, you can leave the text box as it is.
If you want to enter information or change the existing contents of a text box, follow these steps:
1. Press [Tab] to move the cursor to the text box.
You can also use the [Shift] + [Tab ] and accelerator keys to move around in a dialog box.
2. Use [Del] or [Backspace] to erase any information already in a text box.
3. Type the information you want into the text box.
Text boxes can hold more characters than fit in the on-screen field. The text box will scroll horizontally as you type.
4. Press [Tab] if you need to move to another text box to add information.
Editing a text
box using a
mouse
The following edit keys may help you view or change the contents of the text box:
Key Movement
[Home] Moves the cursor to the left end of the text box.
[End] Moves the cursor to the right end of the text box.
To change the contents of a text box with a mouse:
1. Move the mouse pointer to the text box.
2. Press and release the left mouse button.
A text cursor will appear inside the text box.
3. Enter, change, or delete information in the text box.
4. Press [Enter] or press and release the left mouse button.
Example
John Q'Clare, an accountant at MacroCorp, wants to send a message to Jenny Tibbett. He selects the Message menu and chooses the Send menu item. John uses the accelerator keys to move the cursor to the Name text box, where he types jennyt and presses [Enter].
Using list boxes
List Boxes
MS-DOS LAN Manager
Enhanced
3
3-13
Like text boxes, list boxes let you identify objects such as files,
computers, or resources to MS-DOS LAN Manager. List boxes serve two purposes:
• They allow you to scroll through long lists that would not fit on the screen at one time.
• They present a list of items you can choose from, such as the names of servers or the print requests waiting at a shared printer.
Often list boxes are associated with text boxes: when you select an item from a list box, that item appears in the associated text box. A typical list box looks like this:
Files in C:\LANMAN.DOS CHANGE. BAT
INSTALL.HST LANMAN.INI I1SP2IMG.EXE
f
An item in a list box occupies one line. By default, MS-DOS LAN Manager selects the first item in a list box. In the above example, the list box contains filenames; the first filename will be highlighted when the list box opens. If you press [Enter], the highlighted file,
AUGUST.DOC, will be chosen for whatever action the dialog box is used for. For example, if it is being used to send a message, the
highlighted file will be sent to the recipient you designate. Column titles sometimes appear at the top of the list box. You cannot select a column title from a list box, only an item. When you select an item from a list box, all columns associated with the item are selected.
Selecting list
box Hems using
the keyboard
To select an item in a list box, follow these steps:
1. Use [Tab] to move the cursor into the list box.
You can also use the [Shift]+[Tab] and accelerator keys to move around in a dialog box.
2. Use the following keys to move around in the list box:
Key Movement
Up arrow Up one line
Down arrow Down one line
[Page Up] Up one page
[Page Down] Down one page
[Home] To the top of the list
[End] To the bottom of the list
The items in a list box are arranged alphabetically. Once you are in a list box, you can select items by pressing the frrst letter in the item name.
Selecting list
box Hems using
a mouse
Introducing
3
MS-DOS LAN Manager Enhanced
3-15
If you are using a mouse, you can view or select from the contents of a list box by following these steps:
1. Move the mouse pointer to the scroll bar of the list box.
The scroll bar is the vertical strip at the right side of the list box.
2. Place the mouse pointer over the rectangle in the scroll bar.
This rectangle is called the scroll box. The scroll box represents your current location in the list of entries in the list box.
3. Press the left mouse button and hold it down.
4. Move the mouse to slide the scroll box up or down in the scroll
bar.
When you move the scroll box to the top of the scroll bar, you will see the top of the list. When you move the scroll box to the
bottom of the scroll bar, you will see the bottom of the list.
5. Move the scroll box to a location in the scroll bar that roughly corresponds to the location in the list box that you want to bring into view.
6. Release the left mouse button.
The view in the list box now changes.
7. Move the mouse pointer to your selection in the list box. Press and release the left mouse button.
Using check boxes with the keyboard
Using check boxes with a
mouse
Example
The message John wants to send to Jenny is currently stored in a file. To send this file to Jenny, John first selects the Message menu and
chooses the Send menu item. In the Send a Message dialog box, there
is a text box for specifying the name of the file to be sent and an
associated list box showing the files in the current directory. Instead of
typing the filename of the file he wants to send, John moves the cursor to the list box and uses the arrow keys to locate and select the
appropriate filename. The filename he selects automatically appears in the Message filename text box.
Check Boxes
Check boxes specify options that can be either on or off. By marking an X in a check box, you activate an option. For example, the
following check box suspends message logging at your netstation:
[X] Pause logging messages
To use a check box, follow these steps:
1. Use [Tab] to move the cursor to the check box.
You can also use the [Shift]+[Tab] and accelerator keys to move around in a dialog box.
2. Press [Space bar] to place an X in the box Oi to iemove one.
If you are working with a mouse, you can use a check box by following these steps:
1. Move the mouse pointer to the check box.
\
Selecting option buttons
with the
keyboard
Example
MS-DOS LAN Manager
Enhanced
3
3-17
John wants to temporarily stop using shared printers from his netstation. First, he selects the View menu and chooses the This Workstation menu item. Then, in the Network Resources in Use at Your Workstation dialog box, John uses [Tab] to move the cursor to the Pause using printers check box and presses [ Space bar] to place a check in the check box. John thus temporarily suspends his use of any shared printersto which he is connected.
Option Buttons
Option buttons look like two or more sets of parentheses Use option buttons to select from a variety of choices. When you select an option button, a dot appears between the corresponding parentheses. Only one option button in a set can be selected at a time.
A typical set of option buttons looks like the following:
(*) Name
( ) All LAN users
To select an option button, follow these steps:
1. Press rrab] to move the cursor to the set of option buttons.
You can also use the [Shift]+[Tab] or accelerator keys to move around in a dialog box.
Selecting option buttons with a mouse
3. Press [Enter] to select a button.
When you select a button, a mark appears inside the parentheses. The contents of an associated text box may change when you select an option button.
If you are working with a mouse, you can select an option button by following these steps:
1. Place the mouse pointer between the parentheses of an option button.
2. Press and release the left mouse button.
The contents of an associated text box may change when you select an option button.
Example
Choosing
command
buttons using the keyboard
Choosing
command
buttons using a mouse
Command Buttons
MS-DOS LAN Manager
Enhanced
3
3-19
Command buttons appear at the bottom of a dialog box as angle brackets with words in them. A typical set of command buttons looks like the following:
<OK> <Cancel>
Command buttons perform an action, such as deleting a selected print request from a printer queue or taking you to another dialog box. When a dialog box appears on your screen, one command button is already highlighted. This is the default command button for the dialog box. Some buttons will appear colored-over or faded. These buttons represent actions that you cannot perform at the time.
To choose a command button, follow these steps:
1. Press [fab] to move the cursor to the command button.
The outline of the button is highlighted.
2. Press [Enter].
This activates the button, and the associated action takes place.
If you are working with a mouse, you can choose a command button by following these steps:
1. Move the mouse pointer to the command button.
2. Press and release the left mouse button.
Zoom, OK,
and Cancel command
buttons
Example
John is ready to send a file to Ben. First he selects the Message menu and chooses the Send menu item. Next, in the Send a Message dialog box, he specifies Ben as the recipient and designates the name of the file to send. He then uses [Tab] to move the cursor to the OK command button at the bottom of the dialog box. When he presses [Enter], the file is sent to Ben.
A few command buttons warrant special explanation. One is the Zoom button. You will find this button in many dialog boxes. The Zoom command button moves you to a new dialog box, zooming in on the item you have selected in the current dialog box. (Think of a zoom lens on a camera). When you select an item in a list box-a queue or a shared resource, for example-and then choose the Zoom button, you zoom in on that item to see more information about it.
Another special command button you should know about is the the OK command button. Choose OK to tell MS-DOS LAN Manager that you are ready to execute the actions or changes you have just specified in the dialog box. This button always appears with the Cancel command button. Use Cancel to exit a dialog box without saving any changes you have made or executing any actions you have indicated. The [Esc] key on your keyboard works the same way.
Display Fields
Display fields are areas that display information only. You cannot modify the contents of a display field. A typical display field might look like this:
Number of server sessions started: 8 Sessions unexpectedly disconnected: 12
Sessions successfully reconnected: 1
MS-DOS LAN Manager
Enhanced
3
3-21
Getting Help with Menus and Dialog Boxes
When working in the MS-DOS LAN Manager, you can get help at any time by pressing the [F 1] function key. The information you see will be keyed to the menu or dialog box on your screen when you ask for help. The help information for the MS-DOS LAN Manager also has an index that lets you locate and display information for specific topics.
MS-DOS LAN Manager Screen Summary
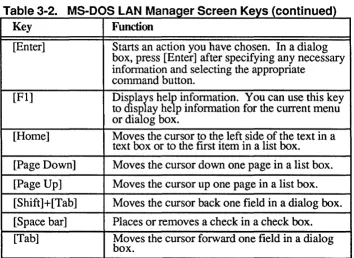
The keys and key sequences described in Table 3-2 let you navigate and work with the menus and dialog boxes of the MS-DOS LAN Manager.
T bl 3 2 MS DOS LAN M a e
-
.
-
anager creen eys SK
Key Function
[Alt] Activates accelerator keys by changing the appearance of one letter in each of the choices you can make within a menu or dialog box. By holding down [Alt] and pressing the
corresponding letter key on your keyboard, you can move directly to that choice.
[Delete] Deletes the character at the cursor in a text box.
Cursor Left and Right arrow keys let you move from one menu to another once you have pressed [Alt]. In text boxes, the Left and Right arrow keys move the cursor. In list boxes, the Up and Down arrow keys let you scroll through a list of items. [End] Moves the cursor to the right side of the text in a
Table 3-2. MS-DOS LAN Manager Screen Keys (continued)
Key Function
[Enter] Starts an action you have chosen. In a dialog box, press [Enter] after specifying any necessary infonnation and selecting the appropriate
command button.
[Fl] Di&lars hel~ infonnation. You can use this key
to sp ay he p infonnation for the current menu or dialog box.
[Home] Moves the cursor to the left side of the text in a text box or to the first item in a list box.
[Page Down] Moves the cursor down one page in a list box.
[Page Up] Moves the cursor up one page in a list box.
[Shift ]
+
[Tab] Moves the cursor back one field in a dialog box.[Space bar] Places or removes a check in a check box. [Tab] Moves the cursor forward one field in a dialog
MS-DOS LAN Manager
Enhanced
3
3-23
MS-DOS LAN Manager Enhanced Commands
The Enhanced version of MS-DOS LAN Manager provides thirteen commands in addition