December 12, 2007
Wireless Service Advisor (WSA)
Information in this manual is subject to change without notice. Companies, names and data used in examples within the manual are fictitious unless otherwise noted. No part of this manual may be reproduced or transmitted in any form or by any means, electronic or mechanical, for any purpose without the express written permission of Innovative Control Systems, Inc.
© 2007 Innovative Control Systems, Inc. All rights reserved.
Innovative Control Systems, Inc. 1349 Jacobsburg Road Wind Gap, PA 18091 (610) 881-8120
WSA Hand-held Portable Greeter System Standard Features LCD color screen
Full range keyboard
Built-in keypad
Built-in bar-code scanner
Microsoft Windows Mobile® operating system
Wireless thermal printer
Wireless network connectivity with a built-in antennae
Reprint lost tickets
Displays last 6 customer transactions
Employees can be clocked in and out
Hourly stats can be viewed
Options
Available as a point-of-sale device
Credit card reader
Management software license
Specifications
3" W × 6" L × 1 ½" D
Related Documents
Wireless Service Advisor Installation Guide
Table of Contents
1. SETTING UP THE HAND HELD IN TUNNEL MASTER® ... 11
Versioning Considerations ...11
Enabling User Access for Wireless Configuration Settings ...11
Creating the Hand Held Machine Key ...12
Adding a Printer to the Hand Held...13
Configuring Hand Held PLU Services ...14
2. USING HAND HELD INPUT DEVICE OPTIONS ... 18
Using the Scanner ...18
Linear Scanning... 18
Using the Magnetic Stripe Reader (MSR)...19
Attaching and Removing the MSR ... 19
Using the MSR... 20
Enabling the MSR ... 21
Using the Stylus...21
Using the On-Screen Keyboard ...21
Entering Text Using Block Recognizer ...22
Entering Text Using Letter Recognizer ...22
Using the QWERTY Keypad ...23
Using the Numeric Keypad ...24
Locating Other Hand Held Device Controls ...25
3. CONNECTIONS ... 25
Confirming the Wireless Connection ...25
4. GETTING STARTED WITH ICS HAND HELD CLIENT SOFTWARE ... 26
Starting the ICS Hand Held Client...26
Adding the ICS Hand Held Client to the Start Menu... 26
Starting the ICS Hand Held Client ... 26
Clocking In ... 26
Greeter Login Screen...27
Opening Bank ... 27
Mismatched Bank ... 27
Configurations Overview...28
About the Virtual Safe and Hand Held Devices...29
Establishing Correct Usage Processes for Hand Held Devices ...29
Hand Held As POS or POS with Bar-code Ticketing, Virtual Safe Available ... 29
Hand Held As POS or POS with Bar-code Ticketing, Virtual Safe Unavailable... 30
5. USING HAND HELD CASH MANAGEMENT ... 32
About the Hand Held Cash Management Screen ...32
About Adding and Removing ...34
Adding Money to the Hand Held...34
Removing Money from the Hand Held...35
6. PROCESSING CUSTOMER TRANSACTIONS ... 37
Viewing the Transactions Screen ...37
Viewing Plate Information... 38
Using the Barcode Scanner to View Plate Information... 39
About the Plate Information Screen ... 39
Viewing Customer History Data for Tracked Services ...40
Adding Default Customer Data at the Hand Held ...41
Adding Base, Extra and Misc. Services to the Transactions List ...41
Adding a Base Service to the Transactions List ... 42
Adding an Extra Service to the Transactions List... 43
Adding a Misc. Service to the Transactions List... 44
Removing a Service From the Transactions List ... 45
Clearing the Transactions List... 45
Finalizing a Transaction ... 46
About the Select Payment Screen ... 46
Finalizing Cash Payments ... 48
Finalizing Credit Card Payments ... 49
Finalizing Fleet Card Payments ... 51
Finalizing Gift Card Payments... 52
Finalizing Multiple Payment Types... 54
Changing a Transaction to a Presell Ticket ... 55
Printing Transaction Tickets at a Presell Hand Held ... 56
7. USING THE OPTIONS MENU COMMANDS... 56
About the Options Menu ... 57
Using the Refresh Services Command...57
Using the Deposit Command ...58
Availability of the Deposit Command ... 58
Using the Stacking Command ...60
Using the Time Clock Command...61
Clocking In ... 61
Clocking Out...62
Using the Greeter Login Screen or Change Greeter Command ...63
About the Close Shift Command, Virtual Safe Available ...64
Procedure for Close Shift Command, Virtual Safe Available ... 64
About the Close Shift Command, Virtual Safe Unavailable ...65
Procedure for Close Shift Command, Virtual Safe Unavailable... 65
8. REPORTS MENU... 66
Using the Sales Statistics Command ...67
Using the Hourly Statistics Command ...68
Using the Balance Inquiry Command ...70
Using the Cars on Stack Command...71
Using the Reprint Ticket Command ...72
9. PRINTER ... 72
About the Printer ... 73
MAC Address...73
Icons ...74
LCD Settings ... 74
Receipts ...75
Tickets... 76
Mobile Printer Troubleshooting ...77
Mobile Printer Preventive Maintenance ...77
10. FAQ ... 77
How Do I Restart the Hand Held After It Goes To Sleep?...77
How Do I Stop the Hand Held From Going To Sleep?...77
How Do I Get the Backlight to Turn On? ...78
How Do I Close the ICS Hand Held Client Application? ...78
How Do I Turn Off the Hand Held?...78
Can I Void, Credit or Refund a Transaction at the Hand Held? ...78
How Do I Change the Payment Method After a Transaction Has Been Posted?...78
Can I Change the Greeter for a Specific Transaction? ...78
Why Do I See the No Open Shifts Message In Tunnel Master? ...78
Can I Edit the Data for a Closed Shift? ...78
Why Do I See the Employee Not Clocked In Message? ...79
Can I Scan a Presell Ticket with the Hand Held? ...79
What Is the Difference Between Logging In As a Greeter and Clocking In? ...79
List of Figures
Figure 1. Wireless Configuration User Access Rights ... 12
Figure 2. Machine Key Dialog Box ... 13
Figure 3. Point of Sale Setup ... 14
Figure 4. Initial Hand Held Services Screen... 15
Figure 5. Hand Held Services with Assigned PLUs... 16
Figure 6. Base Services on the Hand Held... 17
Figure 7. Linear Scanning ... 19
Figure 8. Linear Scanning Aiming Pattern ... 19
Figure 9. Magnetic Stripe Reader (MSR) ... 20
Figure 10. MSR Card Swiping ... 20
Figure 11. On-screen Keypad... 22
Figure 12. QWERTY Keypad Details ... 23
Figure 13. Numeric Keypad Details... 24
Figure 14. Hand Held POS Device Details ... 25
Figure 15. Opening Bank ... 27
Figure 16. Mismatched Bank... 28
Figure 17. Usage Flow Diagram for Hand Held as POS with Virtual Safe Available ... 29
Figure 18. Usage Flow Diagram for Hand Held as POS with Virtual Safe Unavailable ... 30
Figure 19. Usage Flow Diagram for Hand Held as Presell ... 31
Figure 20. The Hand Held Cash Management Screen ... 33
Figure 21. Preparing a $100.00 Add in the Hand Held Cash Management Screen... 35
Figure 22. A Final $100.00 Adds Entry in the Hand Held Cash Management Journal ... 35
Figure 23. Preparing a $300.00 Remove in the Hand Held Cash Management Screen... 36
Figure 24. A Final $300.00 Removes Entry in the Hand Held Cash Management Journal ... 37
Figure 25. Transactions Screen ... 38
Figure 26. Plate Information Screen with No Customer Data ... 39
Figure 27. Plate Information Screen with Customer Data ... 39
Figure 28. Customer History... 41
Figure 29. Base Wash Selection Screen ... 42
Figure 30. Transaction Screen with Base Service ... 43
Figure 31. Extra Services Selection Screen ... 43
Figure 32. Misc. Services Profit Centers ... 44
Figure 33. Miscellaneous Service Selection Screen ... 45
Figure 34. Select Payment Screen... 46
Figure 36. Sale Complete Screen for a Cash Transaction ... 49
Figure 37. Sale Complete Screen Showing $10.00 Change Due ... 49
Figure 38. Credit Card Payment Screen ... 50
Figure 39. Sale Complete Screen for a Credit Card Transaction... 51
Figure 40. Fleet Card Payment Screen... 51
Figure 41. Sale Complete Screen for a Fleet Card Transaction... 52
Figure 42. Gift Card Payment Screen ... 53
Figure 43. Sale Complete Screen for a Gift Card Transaction ... 54
Figure 44. Select Payment Screen with Partial Amount Applied to Gift Card ... 55
Figure 45. Pre-Sell Message Box ... 56
Figure 46. Options Menu ... 57
Figure 47. Deposit Screen... 59
Figure 48. Deposited Funds Successfully Message... 59
Figure 49. Deposit Entry in Cash Management Journal... 60
Figure 50. Options Menu with Stacking ... 61
Figure 51. Options Menu without Stacking ... 61
Figure 52. Clock In Dialog Box ... 61
Figure 53. Clock Out Dialog Box ... 62
Figure 54. Greeter Login Dialog Box ... 63
Figure 55. Employee Not Clocked In Message ... 64
Figure 56. Ending Bank Dialog Box ... 66
Figure 57. Reports Menu ... 67
Figure 58. Sales Statistics... 68
Figure 59. Hourly Statistics ... 69
Figure 60. Gift Card Balance Inquiry Screen ... 71
Figure 61. Gift Card Balance ... 71
Figure 62. Cars on Stack Message... 72
Figure 63. Hand Held POS Printer Detail ... 73
Figure 64. Partial Status Report Showing MAC Address ... 74
Figure 65. Sample POS Receipt, No Bar Code ... 76
List of Tables
Table 1. PLU Configurations for Hand Held Devices ... 14
Table 2. Options Menu Functions ... 57
Table 3. Reports Menu Functions ... 67
Table 4. Hand Held POS Printer Icons... 74
Table 5. Mobile Printer Settings ... 75
1.
Setting Up the Hand Held in Tunnel Master®
This part explains how to configure Tunnel Master software for use with a WSA Hand-Held Portable Greeter System (referred to in this document as a Hand Held). It includes the following sections:
Versioning Considerations on page 11.
Enabling User Access for Wireless Configuration Settings on page 11.
Creating the Hand Held Machine Key on page 12.
Adding a Printer to the Hand Held on page 13.
Configuring Hand Held PLU Services on page 14.
Versioning Considerations
Release 1.0 of this document included content based on the following ICS software versions:
Hand Held Client software version 1.2.1.6.
Tunnel Master software version 5.0.0 build 7.
Web Services version 1.2.1.10.
Subsequent updates are summarized in Table 7. Document Change History, which can be found near the end of this user manual.
Enabling User Access for Wireless Configuration Settings
You must first set up user security access for the Hand Held in Tunnel Master. Follow these steps:
1 Select Security > Users, and then select a user.
2 Click Access. The User Access Screen appears for the user.
3 In the Menu area, scroll down to select Config.
4 In the Menu Name area, select Wireless Configuration.
5 In the Access area, select View. The user can now view and change settings for the Hand Held.
Figure 1. Wireless Configuration User Access Rights
6 Click Exit when you are finished. The setting is saved.
Creating the Hand Held Machine Key
In the Machine Setup screen, you can create a Hand Held machine key as a new device recognized by Tunnel Master.
Note: Before you begin, you need to know the corresponding Machine_ID value for the Hand Held device in the
CONFIG.DB file. Contact ICS support if you are not sure how
to access this information.
To create the Hand Held machine key, follow these steps:
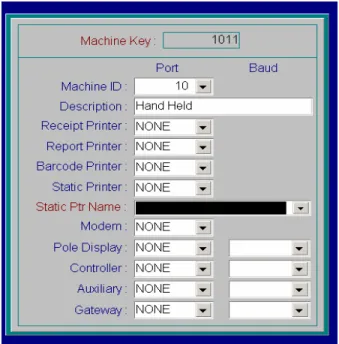
1 Select Config > Machine Setup. The Machine Setup screen appears.
2 Select File >Add. A new machine key number is created and the Machine Key
dialog box is available to edit.
3 Select the correct number in the Machine ID box. This is the number corresponding to the Machine_ID field in the CONFIG.DB file.
Figure 2. Machine Key Dialog Box
5 Click Save (you do not need to select any other options). The Machine ID for the Hand Held device is associated with the new Machine Key.
Adding a Printer to the Hand Held
You can add a wireless printer to the Hand Held device in the Point of Sale Setup
screen.
Note: You will need the name and IP address for the wireless printer
at your site. Default values are provided in the steps below. However, your actual settings may be different. Contact ICS support if you need assistance.
Follow these steps for basic configuration settings:
1 Select Config > Point of Sale Configuration > Point of Sale Setup. The Point of Sale Setup screen appears.
2 Select the Hand Held machine ID number in the Machine ID box.
3 Click Edit. The Point of Sale setup box is available to edit.
4 Select a wireless printer in the Receipt Printer box. Default is ZEBRA.
5 In the Receipt Copies box, type 1 to print a single receipt.
6 In the HH Printer IP box, type the printer IP address and a colon followed by the printer port number.
Default is 10.0.0.160:6101.
Default is 0.
8 In the Barcode Printer box, select a printer. Default is ZEBRA.
9 In the Number of Copies box, type 1 to print a single ticket.
10 In the Receipt Message area, type a receipt message.
Figure 3. Point of Sale Setup
11 Click Save when you are finished. The wireless printer is added to the Hand Held.
Configuring Hand Held PLU Services
You can add, remove and reorder which PLU services are available at the Hand Held. You can add PLUs to the following lists:
Base. For base wash services.
Extra. For extra services such as tire shine. Also useful for zero-dollar services such as wrap retract.
Misc. For all non-wash services such as lube center PLUs, impulse items and gift card adds.
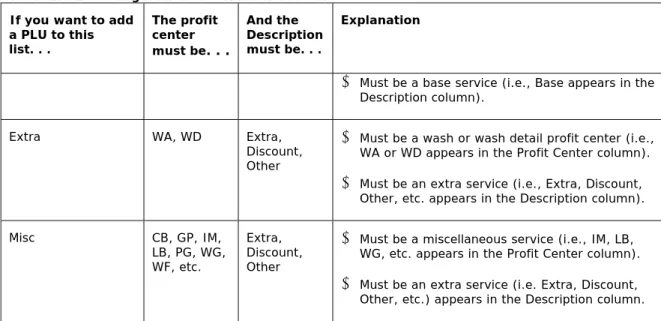
The following table describes which PLUs can be applied to each list.
Table 1. PLU Configurations for Hand Held Devices If you want to add
a PLU to this list. . .
The profit center must be. . .
And the Description must be. . .
Explanation
Base WA, WD Base Must be a wash or wash detail profit center (i.e.,
Table 1. PLU Configurations for Hand Held Devices If you want to add
a PLU to this list. . .
The profit center must be. . .
And the Description must be. . .
Explanation
Must be a base service (i.e., Base appears in the Description column).
Extra WA, WD Extra,
Discount, Other
Must be a wash or wash detail profit center (i.e., WA or WD appears in the Profit Center column).
Must be an extra service (i.e., Extra, Discount, Other, etc. appears in the Description column).
Misc CB, GP, IM,
LB, PG, WG, WF, etc.
Extra, Discount, Other
Must be a miscellaneous service (i.e., IM, LB, WG, etc. appears in the Profit Center column).
Must be an extra service (i.e. Extra, Discount, Other, etc.) appears in the Description column.
To assign PLUs to a Hand Held, follow these steps:
1 Select Config > Hand Held > Wireless Configuration. The Hand Held Services screen appears listing all available PLUs.
Figure 4. Initial Hand Held Services Screen
2 Add, remove and reorder services:
To Add a service to the Hand Held, select a service in the PLU area, and then click Add in the Base, Extra or Misc list.
Note: See Table 1. PLU Configurations for Hand Held Devices for an
To Remove a service from the Hand Held, select a service in a Base,
Extra or Misc list, and then click Remove.
To reorder services, click Up or Down in a Base, Extra or Misc list. Services are displayed on the Hand Held device in the order they appear in the list.
3 Continue assigning services, and then click Exit when you are finished. The services are saved and will appear on the Hand Held.
Tip: If the Hand Held is active, select Options > Refresh Services to update the PLU selections after you make changes in the Hand Held Services screen.
Figure 6. Base Services on the Hand Held
Note: All PLUs appearing in the Extra list are displayed on the Hand
Held, regardless of the base wash chosen by the customer. For example, suppose PLU 1 (Royal Flush Wash) includes PLU 11 (Wax). If the customer buys a Royal Flush Wash, then Wax will still appear as an option in the Extra services list. Therefore, employees must know what extra services are included with base washes so they do not mistakenly charge customers for extra services included with base washes.
2.
Using Hand Held Input Device Options
This part includes descriptions and step-by-step procedures on how you can use various input methods to interact with the Hand Held device. It includes the following main sections:
Using the Scanner on page 18.
Using the Magnetic Stripe Reader (MSR) on page 19.
Using the Stylus on page 21.
Using the On-Screen Keyboard on page 21.
Entering Text Using Block Recognizer on page 22.
Entering Text Using Letter Recognizer on page 22.
Using the QWERTY Keypad on page 23.
Using the Numeric Keypad on page 24.
Locating Other Hand Held Device Controls on page 25.
Note: More detailed descriptions on how to use Hand Held features
such as the stylus, status icons, and function buttons, along with a list of available accessories, and a troubleshooting guide, are included in the MC70 Enterprise Digital
Assistant User Guide, document number 72E-71769-02,
which you can download from the Symbol product manuals page:
Note: More detailed information on how to use software-based
features such as the on-screen keyboard, block recognizer and letter recognizer, along with other Microsoft Windows Mobile® operating system features, can be found on the Windows Mobile home page:
Using the Scanner
You can use the scanner to read customer club cards with barcodes. Card information, such as customer profile and license plate, will appear in the Hand Held transaction screen.
Before using the scanner, a greeter must log in. See Chapter 4, Getting Started with ICS Hand Held on page 26.
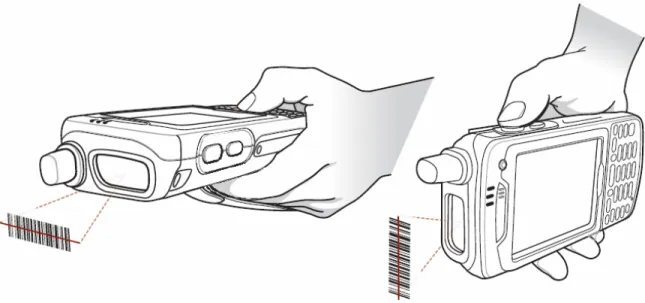
Linear Scanning
Figure 7. Linear Scanning
2 Press the scan button. Ensure the red scan beam covers the entire bar code. The Scan/Decode LED lights red to indicate that scanning is in process, then lights green and a beep sounds, by default, to indicate the bar code was decoded successfully.
Figure 8. Linear Scanning Aiming Pattern
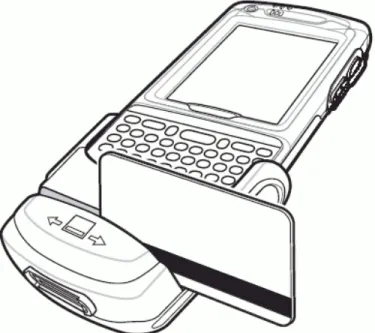
Using the Magnetic Stripe Reader (MSR)
When attached to the Hand Held, the MSR allows the Hand Held to capture data from magnetic stripe cards. You can use the MSR to finalize customer transactions for credit card, gift card and fleet card payment types.
Attaching and Removing the MSR
To attach, slide the MSR onto the bottom of the EDA and secure by snapping the arms into the EDA housing.
Figure 9. Magnetic Stripe Reader (MSR)
To remove the MSR open the arms and pull the MSR from the EDA.
Using the MSR
Swipe the magnetic stripe card through the MSR, with the magnetic stripe on the card facing down.
Swipe the card in either direction, from left to right or from right to left. For best results, gently press down on the card while swiping to ensure contact with the bottom of the reader.
Enabling the MSR
If the MSR becomes unresponsive, follow these steps:
1 To quit ICS Hand Held client software, do one of the following.
Tap Quit on the Greeter Login screen.
Tap Options > Change Greeter, and then tap Quit on the Greeter Login screen.
2 Reattach the MSR to the Hand Held unit.
3 Tap Start > ICS Hand Held Client to restart the software. The MSR is available. You can begin swiping cards.
Using the Stylus
Use the Hand Held stylus to select items and enter information. The stylus functions as a mouse.
Tap: Touch the screen once with the stylus to press option buttons and open menu items.
Tap and Hold: Tap and hold the stylus on an item to see a list of actions available for that item. On the pop-up menu that appears, tap the action to perform.
Drag: Hold the stylus on the screen and drag across the screen to select text and images. Drag in a list to select multiple items.
Note: Symbol recommends using the spring-loaded tip of the stylus
to write on the screen, and the back end of the stylus to tap the screen. Use your finger, not the stylus, to press the Power button and keypad buttons.
Note: To prevent damage to the screen, do not use any device other
than the Symbol-provided stylus.
Using the On-Screen Keyboard
Select the keyboard icon to display the on-screen keyboard. Using this option, the numbers/letters can be entered with the stylus.
Figure 11. On-screen Keypad
You can enter text by tapping keys on the keyboard that is displayed on the screen.
1 In a program, tap the Input Selector arrow, and then Keyboard.
2 Enter text by tapping keys on the on-screen keyboard.
Note: To make the keys larger, tap the Input Selector arrow, and
then Options. In the Input method list, select Keyboard, and then tap Large Keys.
Entering Text Using Block Recognizer
With Block Recognizer, you use a single stroke to write letters, numbers, symbols, and punctuation, which are then converted into typed text.
1 From a program, tap the Input Selector arrow and then Block Recognizer.
2 Write characters, numbers, and symbols in the designated writing area. Enter letters by writing in the abc (left) area of the box
Enter numbers by writing in the 123 (right) area of the box.
Enter symbols and punctuation by tapping in either area of the box and then writing the desired character.
Note: For help with writing characters with Block Recognizer, tap the
question mark near the writing area.
Entering Text Using Letter Recognizer
With Letter Recognizer, you can write individual letters, numbers, and punctuation and have them converted into typed text.
1 From a program, tap the Input Selector arrow, and then Letter Recognizer.
2 Write characters, numbers, and symbols in the designated writing area. Enter capital letters by writing in the ABC (left) area of the box. Enter lower case letters by writing in the abc (middle) area of the box. Enter numbers by writing in the 123 (right) area of the box.
Enter punctuation and symbols by tapping in either area of the box and then writing the desired character.
Note: For help with writing characters with Letter Recognizer, tap
the question mark near the writing area.
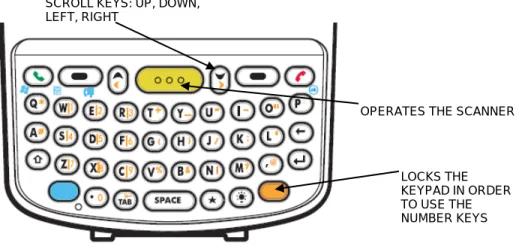
Using the QWERTY Keypad
The QWERTY keypad produces the 26-character alphabet (A-Z, both lowercase and uppercase), numbers (0-9), and assorted characters. The keypad is color-coded to indicate which modifier key to press to produce a particular character or action. The keypad default is alphabetic, producing lowercase letters.
Figure 12. QWERTY Keypad Details
Blue Key (left) Launches applications (shown on the keypad in blue).
Press the Blue key once to activate this mode temporarily, followed by another key. This displays the following icon at the bottom of the screen, until a second key is pressed:
Press the Blue key twice to lock this mode. This displays the following icon at the bottom of the screen:
Press the Blue key a third time to unlock.
Press and hold the Blue key while selecting a sequence of keys to activate this mode temporarily. This displays the following icon at the bottom of the screen as long as the key is pressed:
Orange Key (right) Accesses the secondary layer of characters and actions (shown on the keypad in orange).
Press the Orange key once to activate this mode temporarily, followed by another key. This displays the following icon at the bottom of the screen, until a second key is pressed:
Press the Orange key twice to lock this mode. This displays the following icon at the bottom of the screen:
LOCKS THE KEYPAD IN ORDER TO USE THE NUMBER KEYS SCROLL KEYS: UP, DOWN,
LEFT, RIGHT
Press the Orange key a third time to unlock.
Press and hold the Orange key while selecting a sequence of keys to activate this mode temporarily. This displays the following icon at the bottom of the screen as long as the key is pressed:
Using the Numeric Keypad
The numeric keypad contains application keys, scroll keys, and function keys. The keypad is color-coded to indicate the alternate function key (blue) values. Note that an application can change keypad functions so the Hand Held keypad may not function exactly as described.
Figure 13. Numeric Keypad Details
Use this key to launch applications or access items (shown on the keypad in blue). Press the Blue key once to activate this mode, followed by another key.
A single press displays the following icon at the bottom of the screen, until a second key is pressed:
A single press displays the following icon at the bottom of the screen:
Press the Orange key a second time to return to the normal state.
Press the Orange key, then the Shift key to add a temporary shift (that applies only to the next key pressed) to the orange lock state. This displays the following icon at the bottom of the screen:
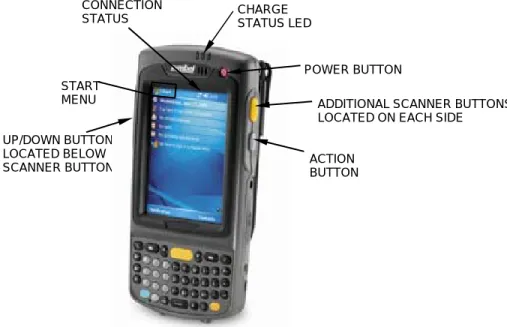
Locating Other Hand Held Device Controls
Figure 14. Hand Held POS Device Details
3.
Connections
The wireless connection icon should appear on the Hand Held start screen in the lower right hand corner.
If only the Bluetooth icon is displayed, the wireless connection will need to be restarted.
Note: Do not activate Bluetooth. This will cut off the wireless
network connection. If Bluetooth is activated, press and hold the red power button to reset the unit.
To start the wireless network, follow these steps:
1 Select Start > Programs > WirelessCompanion. The Wireless Companion screen appears.
2 Select Wireless Launch, and then select Enable Radio. This will start the wireless connection.
Confirming the Wireless Connection
1 Select the wireless connection icon, and then select Manage Profiles.
UP/DOWN BUTTON LOCATED BELOW SCANNER BUTTON
POWER BUTTON CHARGE
STATUS LED
ADDITIONAL SCANNER BUTTONS LOCATED ON EACH SIDE
ACTION BUTTON START
MENU
CONNECTION STATUS
2 Tap and hold on a Wireless Profile.
3 Select Connect.
4 A connected icon will appear on the start screen.
If the connection is unavailable, a no connection icon appears.
4.
Getting Started with ICS Hand Held Client Software
This part includes descriptions and step-by-step procedures for getting started with the ICS Hand Held Client software. It includes the following main sections:
Starting the ICS Hand Held Client on page 26
Clocking In on page 26
Greeter Login Screen on page 27
Opening Bank on page 27
Configurations Overview on page 28
About the Virtual Safe and Hand Held Devices on page 29
Establishing Correct Usage Processes for Hand Held Devices on page 29
Starting the ICS Hand Held Client
You can start the ICS Hand Held Client to begin processing customer purchases.
Adding the ICS Hand Held Client to the Start Menu
If it does not already appear on the Start Menu, follow these steps to add the Hand Held Client to the Start Menu:
1 Select Start > Settings > Menus.
2 Check the Hand Held Client box, and then select OK. The Hand Held client will appear in the Start menu.
Starting the ICS Hand Held Client
After you have added the Hand Held Client to the Start Menu, select Start > Hand Held Client to start the ICS Hand Held Client application.
Clocking In
Before you log in as a greeter, you should make sure you are clocked in. You can clock in at the Hand Held. Or you can clock in at another attended POS device.
See Using the Time Clock Command on page 61 for more information.
Greeter Login Screen
After you have clocked in, then you can log into the Hand Held as a greeter.
See Using the Greeter Login Screen or Change Greeter Command on page 63.
Opening Bank
If your Hand Held device is configured to work as a Point of Sale (POS) with the Virtual Safe unavailable, then you will need to enter an opening bank.
Figure 15. Opening Bank
Enter the opening bank amount (e.g., 100), and then tap Finalize. The Customer Data screen appears.
Note: The Hand Held shift is opened with the amount entered in the
Opening Bank screen. A new shift is created in Tunnel Master software.
Mismatched Bank
If the opening bank amount does not equal the previous ending bank amount, then the
Figure 16. Mismatched Bank
Tap Yes to continue. The difference between the previous Ending Bank and the current Beginning Bank is shown as a Beginning Bank Edit entry. To see the
Beginning Bank Edit entry, select either POS > Hand Held Cash Management
or POS > Cash Management. This amount also appears in the shift detail report for the Hand Held. It is informational only. It will not be included in the
calculations to determine whether the current shift’s ending bank is over, under or even.
Tap No to cancel. You can re-enter the Beginning Bank.
Configurations Overview
Your Hand-held Portable Greeter System can be configured three different ways depending upon your needs.
Note: Contact ICS support if you are unsure about your Hand Held
configuration.
POS. Use this option when greeters accept payment for customer transactions at the Hand Held. The device acts as a fully functioning attended point of sale (e.g., a cash register). You can open and close shifts, accept payments, print standard receipts, and post transactions to the database.
POS with bar-code ticketing option. Use this option if the greeter will accept payment for customer transactions at the Hand Held and print bar-coded tickets along with standard receipts. The device acts as a fully functioning POS (as described above).
Presell. Use this option if the greeter will not accept payment for customer transactions at the Hand Held. The device initiates customer transactions and prints bar-coded, presell tickets only. You cannot open and close shifts, accept payments or post transactions to the database.
About the Virtual Safe and Hand Held Devices
In addition to the three configurations outlined earlier (POS, POS with bar-code ticketing, and Presell), your Hand Held device will be configured with the Virtual Safe either available or unavailable. If you have other attended terminals at your site, then the Hand Held devices will function in the same way as those other attended terminals. For
example, if you have a POS cash register with the Virtual Safe available, then your Hand Held device(s) will also function with the Virtual Safe available.
Note: Contact ICS support if you are unsure about whether the
Virtual Safe is available or unavailable at your Hand Held device.
Establishing Correct Usage Processes for Hand Held Devices
You or your employees will follow different processes depending on how your Hand Held device is configured. The following diagrams illustrate each process.
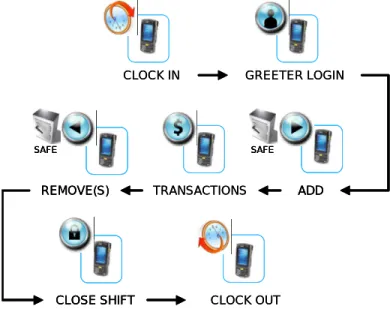
Hand Held As POS or POS with Bar-code Ticketing, Virtual Safe Available
TRANSACTIONS CLOSE SHIFT GREETER LOGIN CLOCK IN CLOCK OUT REMOVE(S) SAFE ADD SAFE TRANSACTIONS CLOSE SHIFT CLOSE SHIFT GREETER LOGIN CLOCK IN CLOCK OUT REMOVE(S) SAFE REMOVE(S) SAFE SAFE ADD SAFE ADD SAFE SAFE
Figure 17. Usage Flow Diagram for Hand Held as POS with Virtual Safe Available
When you use the Hand Held as a POS and the Virtual Safe is available, then you can follow the steps shown in Figure 17 to establish correct usage processes for the device.
1 Clock In. Clock in first. You can clock in at a separate attended terminal (e.g., cash register POS), or at the Hand Held device itself on the Greeter Login screen.
2 Greeter Login. You enter your employee ID number and manager ID number at the Hand Held device. This logs you in as a greeter. Only one greeter at a time can be logged into a Hand Held. This also opens the Hand Held shift. The shift is opened with a $0.00 Beginning Bank. You can see the Beginning Bank amount in Tunnel Master. Select either POS > Hand Held Cash Management or POS > Cash Management.
3 Add. Immediately after you log in, you should use the Add command in Tunnel Master to establish a cash balance for the device. For example, if you start your Hand Held shift with $100.00 in cash and coins, you should select POS > Hand Held Cash Management in Tunnel Master, and then click Add to add $100.00 to the Hand Held. This moves $100.00 from the Virtual Safe to the Hand Held.
4 Transactions. Process customer transactions during the shift.
5 Remove(s). You can use the Remove command in Tunnel Master software during the Hand Held shift. Select POS > Hand Held Cash Management, and then click Remove. You can use the remove command for two reasons:
Cash Drop. You might want to remove extra cash from the Hand Held (i.e., a cash drop). This will move cash from the Hand Held to the Virtual Safe. You can do this numerous times during the Hand Held shift.
Final Remove Before Closing the Shift. You should remove the total cash at the Hand Held before closing its shift. This will create a final remove entry. Cash is removed from the Hand Held to the Virtual Safe.
6 Close Shift. After you are finished ringing up sales—and after you have
performed the final Remove command in Tunnel Master—then you can close the Hand Held shift. Select Options > Close Shift on the Hand Held. The shift is closed with a $0.00 Ending Bank. You can see the Ending Bank amount in Tunnel Master. Select either POS > Hand Held Cash Management or POS > Cash Management.
7 Clock Out. You can clock out at a separate attended terminal (e.g., cash register POS), or at the Hand Held device itself.
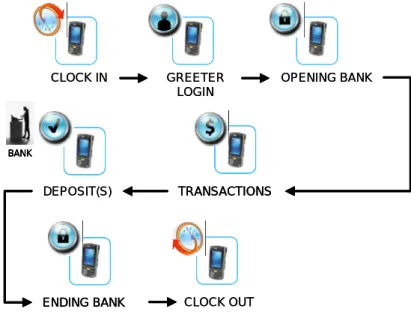
Hand Held As POS or POS with Bar-code Ticketing, Virtual Safe Unavailable
GREETER LOGIN OPENING BANK TRANSACTIONS CLOCK OUT ENDING BANK CLOCK IN DEPOSIT(S) BANK GREETER LOGIN OPENING BANK TRANSACTIONS TRANSACTIONS CLOCK OUT ENDING BANK ENDING BANK CLOCK IN DEPOSIT(S) BANK BANK BANK
When you use the Hand Held as a POS and the Virtual Safe is unavailable, then you can follow the steps shown in Figure 18 to establish correct usage processes for the device.
1 Clock In. Clock in first. You can clock in at a separate attended terminal (e.g., cash register POS), or at the Hand Held device itself on the Greeter Login screen.
2 Greeter Login. You enter your employee ID number and manager ID number at the Hand Held device. This logs you in as a greeter. Only one greeter at a time can be logged into a Hand Held.
3 Opening Bank. Enter the opening bank amount for the Hand Held shift. The shift is opened with the amount you type. A Beginning Bank entry is created in Tunnel Master software. You can see the Beginning Bank amount by selecting POS > Cash Management.
4 Transactions. Process customer transactions during the shift.
5 Deposit(s). You can use the Deposit command on the Hand Held to remove extra cash from the device (i.e., a cash drop). This will move cash from the Hand Held to the Bank. You can do this numerous times during the Hand Held shift.
6 Ending Bank. After you are finished ringing up sales, you can close the Hand Held shift by entering an Ending Bank amount. Select Options >Close Shift on the Hand Held, and then enter an Ending Bank amount. The shift is closed with the amount you type. An Ending Bank entry is created in Tunnel Master software. You can see the Ending Bank amount by selecting POS > Cash Management.
7 Clock Out. You can clock out at a separate attended terminal (e.g., cash register POS), or at the Hand Held device itself.
Hand Held As Presell
GREETER LOGIN
CLOCK OUT
TRANSACTIONS
CLOCK IN GREETER LOGINGREETER LOGIN
CLOCK OUT CLOCK OUT
TRANSACTIONS TRANSACTIONS CLOCK IN
CLOCK IN
When you use the Hand Held as a Presell device, it makes no difference whether the Virtual Safe is available or unavailable. You can follow the steps shown in Figure 19 to establish correct usage processes for the device.
1 Clock In. Clock in first. You can clock in at a separate attended terminal (e.g., cash register POS), or at the Hand Held device itself on the Greeter Login screen.
2 Greeter Login. You enter your employee ID number and manager ID number at the Hand Held device. This logs you in as a greeter. Only one greeter at a time can be logged into a Hand Held.
3 Transactions. Process customer transactions during the shift. You can use the device to initiate customer transactions and print bar-coded, presell tickets. You cannot accept payments or post transactions to the database.
4 Clock Out. You can clock out at a separate attended terminal (e.g., cash register POS), or at the Hand Held device itself.
5.
Using Hand Held Cash Management
This part includes descriptions and step-by-step procedures for using the Hand Held Cash Management functions in Tunnel Master software. It includes the following main
sections:
About the Hand Held Cash Management Screen on page 32.
About Adding and Removing on page 34.
Adding Money to the Hand Held on page 34.
Removing Money from the Hand Held on page 35.
Note: The Hand Held Cash Management procedures described in this
section are available only in configurations where the Virtual Safe is available at the Hand Held.
About the Hand Held Cash Management Screen
In Tunnel Master software, the POS > Hand Held Cash Management menu item is available for configurations with the Virtual Safe available at the Hand Held.
Figure 20. The Hand Held Cash Management Screen
1 Information area for the Hand Held device.
Shift. The unique shift number associated with the Hand Held.
Device. Device configuration details and machine ID number.
Description. Brief description identifying the machine.
Start Date. Day on which the shift was opened. You cannot see past dates.
Start Time. Time at which the shift was opened.
2 Hand Held cash management journal entries appear here. Possible entries include Beginning Bank, Ending Bank, Add and Remove. Transactions are not shown.
Date. Date of the journal entry.
Time. Time of the journal entry.
Function. Journal entry type: Beginning Bank, Ending Bank, Add or Remove.
Name. User name of whoever was logged into the system when the journal entry was created.
Amount. Amount of cash involved for the journal entry.
Verified. Whether the journal entry has been independently verified for accuracy.
AUTO means the entry is automatically verified upon being created. A blank space means the entry is not verified. A user name and date means someone has verified the entry.
3 Details area for a journal entry. If you select a journal entry in area 2 (above), then more information about that entry is displayed here.
From: Where the money came from. A Hand Held device ID and shift number appears here. The Virtual Safe and shift number might also appear here.
Denominations. Denomination boxes are available to edit as you create an Add
or Remove entry. The sum total of the cash amount appears in Drop Total.
About Adding and Removing
When the Hand Held is configured as a POS with the Virtual Safe available, you can select POS > Hand Held Cash Management in Tunnel Master to Add and Remove
cash to and from the Hand Held whenever you open or close a shift. For example, when you open a shift by logging in at the Greeter Login screen for the first time, you should also Add money to the Hand Held. Then, immediately before you close the shift by selecting Options > Close Shift at the Hand Held, you should Remove money. You can do both Adds and Removes in Tunnel Master software, not at the Hand Held itself.
Adding Money to the Hand Held
Add money immediately after you open a shift by logging in for the first time at the
Greeter Login screen. You can also add money anytime during the Hand Held shift to replenish the greeter's cash on hand for making change.
To add money from the Virtual Safe to the Hand Held, follow these steps:
1 If you have not already done so, start a shift at the Hand Held by logging in at the
Greeter Login screen.
2 In Tunnel Master, select POS > Hand Held Cash Management. The Hand Held Cash Management screen appears.
Note: See also, Why Do I See the No Open Shifts Message In Tunnel
Master? on page 78
3 If you are using more than one Hand Held, click Next Record and Previous Record to navigate through each open Hand Held shift until you have found the shift you want. If you have only one Hand Held, then that shift is the only available option.
4 Click Add. The journal entry details area is available to edit. Safe appears in the drop-down box. It is the only available option.
5 Type amounts in the denomination boxes. The total is shown in the Drop Total
Figure 21. Preparing a $100.00 Add in the Hand Held Cash Management Screen
6 Click Save when you are finished. An unverified Adds entry is created in the Hand Held Cash Management journal. The money is taken out of the Virtual Safe and put into the Hand Held.
Figure 22. A Final $100.00 Adds Entry in the Hand Held Cash Management Journal
Note: You or a supervisor should verify the Adds entry after the total cash amount is actually counted and confirmed by the greeter who is operating the Hand Held.
Removing Money from the Hand Held
Remove immediately before you close a Hand Held shift. You can also remove money anytime during the Hand Held shift to reduce the greeter's cash on hand to a
pre-determined level.
To remove money from the Hand Held to the Virtual Safe, follow these steps:
1 In Tunnel Master, select POS > Hand Held Cash Management. The Hand Held Cash Management screen appears.
Note: See also, Why Do I See the No Open Shifts Message In Tunnel
Master? on page 78
2 If you are using more than one Hand Held, click Next Record and Previous Record to navigate through each open Hand Held shift until you have found the shift you want. If you have only one Hand Held, then that shift is the only available option.
3 Click Remove. The journal entry details area is available to edit. Safe appears in the drop-down box. It is the only available option.
4 Type amounts in the denomination boxes. The total is shown in the Drop Total
box.
Figure 23. Preparing a $300.00 Remove in the Hand Held Cash Management Screen
5 Click Save when you are finished. An unverified Removes entry is created in the Hand Held Cash Management journal. The money is taken out of the Hand Held and put into the Virtual Safe.
Figure 24. A Final $300.00 Removes Entry in the Hand Held Cash Management Journal
Note: You or a supervisor should verify the Removes entry after the total cash amount is actually counted and confirmed.
6.
Processing Customer Transactions
This part includes descriptions and step-by-step procedures for processing customer transactions. It includes the following main sections:
Viewing the Transactions Screen on page 37.
Viewing Plate Information on page 38.
Viewing Customer History Data for Tracked Services on page 40.
Adding Default Customer Data at the Hand Held on page 41.
Adding Base, Extra and Misc. Services to the Transactions List on page 41.
Finalizing a Transaction on page 46.
Viewing the Transactions Screen
The top half of the transactions screen provides fields for the greeter to enter the customer plate and select a Base, Extra or Misc service. The Service Name and Price
area lists services currently selected for the customer.
Note: The default state (e.g., PA) will appear in the Plate box.
Figure 25. Transactions Screen
Selected services and their pre-tax prices appear in the Service Name and Price
areas.
The bottom menu bar provides the following selections:
Finalize (POS) or Print (Presell).
Options. Refresh Services, Deposit (if Virtual Safe unavailable), Stacking, Time Clock, Clock In, Clock Out, Change Greeter, Close Shift (POS only).
Reports. Sales Statistics, Hourly Statistics, Balance Inquiry, Cars On Stack, Reprint Ticket.
Edit List. Delete, Clear.
Viewing Plate Information
1 On the transactions screen, enter the state and plate number in the Plate boxes, and then tap Go. The Plate Information screen appears.
If Plate Not on File appears in the Name box, no information is available for that plate. You can add the information in Tunnel Master software. Or you can add a new default customer profile at the Hand Held by processing the transaction while the unknown plate number appears in the Plate box in the transactions screen.
Figure 26. Plate Information Screen with No Customer Data
If information about the customer is available, the data appears in the Plate
Information screen.
Figure 27. Plate Information Screen with Customer Data
Using the Barcode Scanner to View Plate Information
If the customer has a loyalty card or club card, you can use the barcode scanner to view the customer history and license plate data. When you scan card, the Plate Information
screen appears. Aim the scan window at the bar code, and then press the scan button.
Note: See Using the Scanner on page 18 for more information.
About the Plate Information Screen
The following information in the Plate Information screen on the Hand Held is derived from the Customers screen (Customer > Customer) in Tunnel Master.
Name & Address. This information appears as entered in the customer record in Tunnel Master.
First Visit & Last Visit. Date of the first and last time customer came in using a license number with known customer information.
Avg. Days & Avg. Sales. Average days between sales and average sales per car. Avg. Sales is the total dollars in sales divided by the number of total visits.
Bonus. Total number of bonus points customer has accumulated if promotion is active.
Birth Day. Birthday information. This is required if customer wishes to participate in the system Birthday Promotion program.
Book Count. Number of active and pending wash book coupon points remaining for customer.
Book Value. Redeem value of active wash book coupons. Book Exp. Expiration date of the wash book.
Club Value and Club Exp. is derived from the Cars screen (Customer > Cars) in Tunnel Master.
Club Value. Redeem value of the club PLU assigned to the license plate. Club Exp. Expiration date of the club PLU assigned to the license plate.
Viewing Customer History Data for Tracked Services
Before entering a transaction, you can view customer history data for tracked services. You can use this information to suggest new base washes the customer might like to try, or to offer upsell items.
Note: Tracked services are established in Tunnel Master by checking
the Track box in the Services screen. To view customer history data, follow these steps:
1 On the transactions screen, enter a state and license plate number in the Plate
boxes, and then tap Go. The plate information screen appears.
2 On the plate information screen, tap History. The customer transaction history screen appears.
Note: Turn the Hand Held device sideways to view customer
Figure 28. Customer History
# Days. The number of days since the tracked service was purchased. Date. Month and day. Does not include year.
Service. Name of tracked service.
3 After viewing the data, tap Ok in the upper-right corner of the screen to exit.
Adding Default Customer Data at the Hand Held
You can process a customer transaction with an unrecognized state or license plate in the
Plate box on the transactions screen (e.g., the plate is not on file). This will create a new default entry for that customer in the database after the transaction is finalized.
1 Enter new state and license plate number in the Plate boxes.
2 Process a transaction at the Hand Held.
3 Finalize the transaction. A new a car key and customer key is created in Tunnel Master. The default customer first name is UNKNOWN. You can update the customer and car data in Tunnel Master at a later time.
Adding Base, Extra and Misc. Services to the Transactions List
To sell or presell services, you can choose from among three main options: Base, Extra, and Misc. Available services for these main options are configured in Tunnel Master. Valid combinations of services are as follows:
One Base.
One or more Misc.
One Base plus one or more Extra and/or Misc.
You cannot select an Extra service by itself.
If you select an Extra service in combination with a Misc. service, then you must also select one Base service before finalizing the transaction.
Only one base service is allowed per transaction. You cannot select more than one base service.
Adding a Base Service to the Transactions List
To add a base service to the transactions list, follow these steps:
See Viewing Plate Information on page 38 for more information.
1 On the Transactions screen, tap Base. The service Selection screen appears. If more than one screen of services is available, tap <-- Prev. and --> Next to navigate through the lists.
Figure 29. Base Wash Selection Screen
2 On the service Selection screen, tap a service. The transaction screen appears and your selection is added to the list.
To change the base service, tap Base again, and then select a different service. Only one Base service is permitted per transaction.
Figure 30. Transaction Screen with Base Service
Adding an Extra Service to the Transactions List
One base service must appear in the transactions list before you can add an extra service.
See Viewing Plate Information on page 38 for more information.
To add an extra service to the transactions list, follow these steps:
1 On the Transactions screen, tap Extra. The Extra Services Selection screen appears. If more than one screen of services is available, tap <-- Prev. and -->
Next to navigate through the lists.
2 On the Extra Services Selection screen, tap an extra service. The transaction screen appears and your selection is added to the list.
Adding a Misc. Service to the Transactions List
You can add aMisc. service to the transactions list or sell a Misc. product/service by itself.
See Viewing Plate Information on page 38 for more information.
To add a Misc. service to the transactions list, follow these steps:
1 On the Transactions screen, tap Misc. The Profit Center Selection screen appears. If more than one screen of profit centers is available, tap <-- Prev. and
--> Next to navigate through the lists.
Figure 32. Misc. Services Profit Centers
2 Select a profit center. The Miscellaneous Services Selection screen appears for the profit center you selected.
Figure 33. Miscellaneous Service Selection Screen
Note: Some Misc. services appear with yellow-text formatting. These
are configured as open pricing PLUs. You can manually enter the price for these services. In Tunnel Master, select Config >
Service Configuration > Service Table to see which
services are offered as open pricing. Those with Department checked in the Operation area are configured for open pricing.
3 In the Miscellaneous Services Selection screen, tap a service. The Transactions
screen appears and the miscellaneous service is added to the list.
If you selected an open pricing service, either enter the price information.
Removing a Service From the Transactions List
To remove a service from the transactions list, follow these steps:
1 In the transactions list, tap the service you want to remove. The transaction is selected.
2 Tap Edit List, and then tap Delete. The transaction is removed from the list.
Clearing the Transactions List
To clear the transaction list, follow these steps:
On the Transactions screen, tap Edit List > Clear. The transaction list is cleared; all items are removed. Information appearing in the Plate boxes is also removed.
Finalizing a Transaction
After you have viewed customer history data and added services to the transactions list, you can finalize the transaction.
About the Select Payment Screen
You can select one or more payment types in the Select Payment screen
Figure 34. Select Payment Screen
The Total Owed line shows the amount owed including any taxes. You can accept four different payment types at the Hand Held:
Cash
Credit Card
Fleet Card
Gift Card
You can process combinations of payment types for each transaction. To split a
transaction between two payment types (e.g., gift card and cash), you can ring in one type with a partial amount, and then complete the transaction with the second payment type. Payment is accepted and the transaction is finalized when the combination of payment types sums to the total amount due.
Notes: You cannot void a transaction at the Hand Held. Customers
must take their receipts to an attended point of sale (e.g., cash register) with the Tunnel Master Point of Sale Entry screen available.
You can split payments if the customer wants to use more than one payment type. See Finalizing Multiple Payment Types on page 54.
If you are using a Hand Held configured as a POS, then you can tap Pre-Sell in the Select Payment screen. Tap Pre-Sell if you want to initiate the transaction and print a bar-coded, pre-sell ticket but not collect payment. See Changing a
Transaction to a Presell on page 55 for more information.
If you are using a Hand Held configured as a POS with pre-sell ticketing, the receipt will print along with a bar-coded pre-sell ticket, which you can provide to the customer. The customer may present the bar-coded ticket to another attendant, who can scan the ticket to program selected services at the wash tunnel.
To see a list of transactions completed at the Hand Held, you can select POS > View Register Transactions in Tunnel Master. The payment type appears, along with other details, such as the ticket number, amount tendered and time.
If you attempt to finalize a sale, but you are not clocked in, then the following error message appears:
Finalizing Cash Payments
To finalize a transaction as a cash payment, follow these steps:
1 Tap Finalize on the Transactions screen. The Select Payment screen appears.
2 Tap Cash as a payment type. The Cash screen appears.
Figure 35. Cash Payment Screen
3 To enter an amount in the Amount Tendered box, you can do any of the following:
Tap one of the pre-configured payment amounts, +20, +10, +5, or +1. The amount is added to the Amount Tendered box.
Tap Exact Change. The Amount Tendered box is filled with the Amount
Due.
Tap the Amount Tendered box, and then use a Hand Held input method such as the numeric keypad, block recognizer, or on-screen keyboard to enter an amount.
Note: Denominations are not recorded. The Amount Tendered box
is recorded as a single amount without associated denominations.
4 Tap Finalize after you have entered a final amount in the Amount Tendered box. The service is accepted. The Cars on Stack message appears (if Options >
Figure 36. Sale Complete Screen for a Cash Transaction
If change is due, the amount appears after the Change Due heading.
Figure 37. Sale Complete Screen Showing $10.00 Change Due
5 If necessary provide change back to the customer, and then tap Ok on the Sale Complete screen. The Transactions screen appears.
Finalizing Credit Card Payments
To finalize a transaction as a credit card payment, follow these steps:
1 Tap Finalize on the Transactions screen. The Select Payment screen appears.
2 Tap Credit Card as a payment type. The Credit Card screen appears. By default, the full Amount Due appears in the Amount Tendered box.
Figure 38. Credit Card Payment Screen
3 Do one of the following:
To use the optional Magnetic Stripe Reader (MSR):
Swipe the credit card through the MSR with the magnetic stripe on the card facing down. Swipe the card in either direction, from left to right or from right to left. For best results, gently press down on the card while swiping to ensure contact with the bottom of the reader. The credit card information appears in the boxes.
(Optional) Tap the Zip Code box, and then enter the customer zip code. (Optional) Tap the CVV2, and then enter a three-digit security code, found
on the back of the credit card.
To manually enter the credit card information:
Tap the Account Number box, and then enter the card number. Card
numbers are usually 16 digits. Spaces are optional (e.g., 1234 5678 9012 3456).
Tap the Expiration boxes, and then select a month and date.
(Optional) Tap the Zip Code box, and then enter the customer zip code. (Optional) Tap the CVV2 box, and then enter a three-digit security code,
found on the back of the credit card.
Tap the Card Type box, and then select a card type in the list.
Tap Finalize after you have entered all credit card information. The service is accepted.
4 The Cars on Stack message appears (if Options > Stacking is checked), and then the Sale Complete screen appears.
Figure 39. Sale Complete Screen for a Credit Card Transaction
5 Tap Ok on the Sale Complete screen. The Transactions screen appears.
Finalizing Fleet Card Payments
To finalize a transaction as a fleet card payment, follow these steps:
1 Tap Finalize on the Transactions screen. The Select Payment screen appears.
2 Tap Fleet Card as a payment type. The Fleet Card screen appears. By default, the full Amount Due appears in the Amount Tendered box.
Figure 40. Fleet Card Payment Screen
3 Do one of the following:
To use the optional Magnetic Stripe Reader (MSR):
Swipe the fleet card through the MSR with the magnetic stripe on the card facing down. Swipe the card in either direction, from left to right or from
right to left. For best results, gently press down on the card while swiping to ensure contact with the bottom of the reader. The fleet card information appears in the Account Number box.
To manually enter the fleet account number
Tap the Account Number box, and then enter the fleet card bar code number, which usually begins with a percent sign followed by five digits (e.g., %12345). Alternatively, you can enter the charge account number directly. If you enter the fleet card bar code number, it must be preceded with a percent sign. If instead you choose to enter the charge account number directly, do not enter a percent sign first.
4 Tap Finalize after you have entered the fleet bar code or charge account number. The account is charged. The Cars on Stack message appears (if Options > Stacking is checked), and then the Sale Complete screen appears.
Figure 41. Sale Complete Screen for a Fleet Card Transaction
5 Tap Ok on the Sale Complete screen. The Transactions screen appears.
Note: When a Fleet card is swiped, Tunnel Master software will verify
the unique card bar code number, which is associated with a valid fleet charge account. The fleet charge account can be configured with a tax exempt status, discounts, commissions, etc. After the account is proven to be valid, any possible configured items are also applied to calculate the sale amount owed. This information appears on the final receipt.
Finalizing Gift Card Payments
To finalize a transaction as a gift card payment, follow these steps:
1 Tap Finalize on the Transactions screen. The Select Payment screen appears.
2 Tap Gift Card as a payment type. The Gift Card screen appears. By default, the full Amount Due appears in the Amount Tendered box.
Figure 42. Gift Card Payment Screen
3 Do one of the following:
To use the optional Magnetic Stripe Reader (MSR):
Swipe the gift card through the MSR with the magnetic stripe on the card facing down. Swipe the card in either direction, from left to right or from right to left. For best results, gently press down on the card while swiping to ensure contact with the bottom of the reader. The gift card information appears in the Account Number box.
To manually enter the gift account number
Tap the Account Number box, and then enter the account number. Gift account numbers are usually 16 digits. Spaces are optional (e.g., 1234 5678 9012 3456).
You do not need to select an item in the Card Type list. The card type is preconfigured in Tunnel Master and cannot be changed. It appears here for informational purposes only.
4 Tap Finalize after you have entered the gift account number. The service is accepted. The Cars on Stack message appears (if Options > Stacking is checked), and then the Sale Complete screen appears, which also shows the remaining Gift Card Balance.
Figure 43. Sale Complete Screen for a Gift Card Transaction
5 Tap Ok on the Sale Complete screen. The Transactions screen appears.
Finalizing Multiple Payment Types
You can split a payment type among four different options: Cash, Credit Card, Fleet Card, and Gift Card. For example, the customer may need to pay a partial amount with a gift card, and then complete the payment with cash.
To finalize a transaction with multiple payment types, follow these steps:
1 Tap Finalize on the Transactions screen. The Select Payment screen appears.
2 Tap a payment type. For example, if you tap Gift Card, then the Gift Card
screen appears. By default, the full Amount Due appears in the Amount Tendered box.
3 Tap the Amount Tendered box, and then enter the partial amount to be applied to the payment type.
4 Enter any additional information (e.g., Account Number, etc.), and then tap
Finalize when you are finished. The select payment screen appears with partial amounts next to each payment type.
Figure 44. Select Payment Screen with Partial Amount Applied to Gift Card
Note: If you need to change an amount appearing next to one of the
four payment types (e.g., $10.00 next to Gift Card), tap
Back to start over.
5 Tap a different payment type. For example, if you tap Cash, then the Cash screen appears.
6 Repeat steps 3 through 5 until you have entered the final Amount Due in the
Amount Tendered box. Final payment will be accepted and the transaction finalized when you enter the remaining Amount Due in the Amount Tendered
box.
The Cars on Stack message appears (if Options > Stacking is checked), and then the Sale Posted Successfully message appears.
Changing a Transaction to a Presell Ticket
You can change the transaction to generate a presell ticket, even if the sale was begun as a paid transaction.
1 Tap Pre-Sell on the Select Payment screen if you want to initiate the transaction and print a bar-coded, pre-sell ticket but not collect payment. A message box appears.