© 2019, IRJET | Impact Factor value: 7.211 | ISO 9001:2008 Certified Journal
| Page 1679
Design and development of a Programmable High Current Laser Diode
Driver for Fiber Laser System
Shubhadeep Maity
1, Umang Dixit
2, Yashpal Gogia
31
Pursuing
MTech
. In Electronics Design & Technology, National Institute of Electronics & Information Technology,
Aurangabad, Maharashtra.
2Scientist ‘
F
’, LASTEC, DRDO, Delhi.
3
Scientist/Engineer ‘D’
, National Institute of Electronics & Information Technology, Aurangabad, Maharashtra.
--- *** ---Abstract-The Laser Diodes are essential part in design and development of Fiber Laser Systems. It requires fixed amount of
current as an input, so that it can provide desired optical output power. The Laser Diode Driver is an electronic circuit unit which feed a controllable constant current in to the laser diode so, that it can generate a significant amount of optical power as an output. We have designed and developed a programmable high current laser diode driver that can generate constant current into laser diode. The current can be set to any value between 0.5A to 12A by means of Arduino microcontroller or by potentiometer. The current will remain constant irrespective to the variation in input voltage and resistance of laser diode. This Programmable HighCurrent Laser Diode Driver can be used for any continuous wave (CW) fiber laser system within the permissible output power.
Keywords: Laser, Laser Diode, Laser Diode Driver, Fiber Optics, Arduino.
1.
INTRODUCTION
In a system using fiber laser source, the critical part is to design a constant current source which shall be linear, noiseless and accurate to deliver fixed current into the laser diode; to generate optical output. Laser diode driver helps us to drive laser diode by providing pre-set constant current. There are two advantages of laser diode drivers over voltage sources. First one is that the current delivered by laser diode driver shall remain constant irrespective to the type of laser diode used. In other words, the resistance offered by the laser diode shall not matter in case of a constant current source. Secondly, if fiber laser system is run on a battery, then during its operation battery discharges hence input voltage decreases. But the laser diode driver will generate a constant current into the laser diode for a particular input voltage range, thereby maintaining the output optical power at the same level.
The above advantages are not present if we drive the laser diode from a voltage source. If one connects a laser diode, directly to a voltage source, there is no way to control the current flowing into the laser diode, unless one knows the resistance of laser diode. Also, the output optical power from a laser diode varies non-linearly with respect to the voltage across the laser diode. Whereas, the output optical power varies linearly with respect to input drive current of laser diode above threshold current. Moreover, the laser diode driver feeds a controllable constant current to the laser diode. Each laser diode has its minimum and maximum current specifications. Minimum lasing current (also known as threshold current) is defined as the current below which laser diode can’t generate any power and maximum permissible current is a specified amount of current above which the laser diode will go through a permanent damage.
Generally, there are few classes or "types" of laser diode drivers. These are: Continuous Wave (CW), Pulsed Mode, low power and
high-power drivers. Continuous wave laser diode driver provides a continuous current to the laser diode to produce constant
output level over time, in theory forever if needed. Pulsed mode laser diode drivers generate a current with certain duty cycle. The duty cycle is the “on” time of the current source (output power will be high) to the total time of the pulse (on and off time). The low-power and high-power drivers are common in industries and they are named depending on the magnitude of the output power fed to the load.
© 2019, IRJET | Impact Factor value: 7.211 | ISO 9001:2008 Certified Journal
| Page 1680
2.
HARDWARE INTERFACE
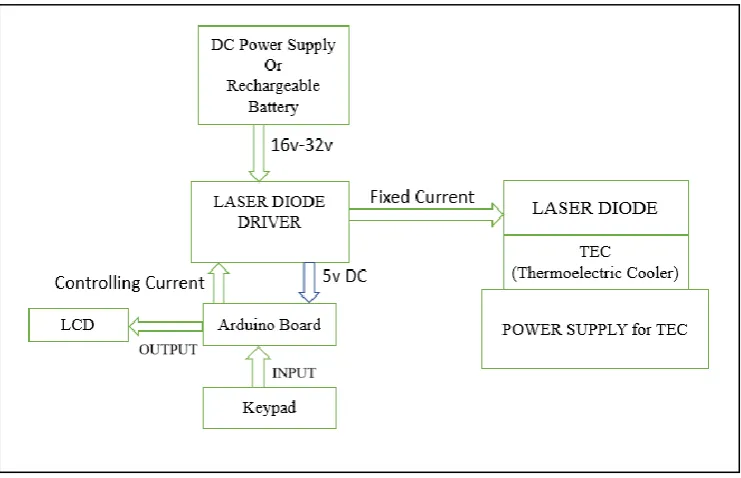
Fig 1
:
Block diagram of Laser diode driver experimental setup.The overall system for driving a laser diode by a Laser Diode Driver consists of following blocks, namely:
2.1 DC Power Supply or Rechargeable Battery:
A regulated DC power supply is used which acts a source to the driver circuit. We can also use a portable rechargeable battery to power the circuit.2.2 Power supply for TEC (Thermoelectric Cooler):
It is the power supply module, used to power the Thermoelectric Cooler. It also programs the set temperature of laser diode, i.e. the temperature at which the laser diode has operated.2.3 TEC:
Thermoelectric cooler operates on the Peltier effect [1]. It is constructed by two unique semiconductors, one n-type and one p-type.It has two sides, and when a DC current flows through the device, it transfers heat from one side to another side, so that one side gets cooler while the other side become hotter. The hot side is attached to a heat sink so that it carries away heat to the ambient. The cool side may go below the room temperature and attached to laser diode. Thus, it will maintain the temperature of laser diode within the permissible range.
[image:2.595.113.484.140.379.2]© 2019, IRJET | Impact Factor value: 7.211 | ISO 9001:2008 Certified Journal
| Page 1681
We have used a fiber coupled LASER DIODE made up of AlGaAs compound having a wavelength of 976nm,output optical power is 50.3W(typically), threshold current is 0.50A, maximum operating current is 9.95A, and maximum operating voltage is 10.13V, diameter of fiber core and clad is 105 µm and 125µm respectively (Multi Mode).It can give 50W continuous wave optical output power.
2.5 Arduino UNO Board with LCD Display & Keypad:
Arduino UNO is an open source microcontroller board based on the microchip ATmega328P microcontroller. It has 14 digital pins; 6 analog pins and it can be programmed with Arduino IDE (Integrated Development Environment) via a type B USB cable. Its operating voltage is 5V, among 14 digital pins 6 pins can generate PWM signal, DC current per I/O pin is 20 mA, DC current for 3.3V pin is 50 mA, it has SRAM of 2 KB, 1 KB of EEPROM, 32 KB of flash memory and 0.5 KB of this flash memory is used by bootloader, which helps us to upload a new code to the microcontroller without any external hardware programmer, and a clock speed of 16 MHz.A 2X16(2 lines and 16 characters) LCD display is interfaced with Arduino UNO by connecting 4 pins only and this can be done by using the I2C serial bus.
Connections: DATA: SDA pin – A4 pin of Arduino, CLOCK: SCL pin – A5 pin of Arduino, POWER: PWR- +5V of Arduino, and GROUND: GND- GND of Arduino.
A 4X4 (4 rows and 4 columns) keypad is interfaced with Arduino UNO by connecting 4 row pins with 6,7,8,9 digital pins of Arduino and 4 column pins with 2,3,4,5 digital pins of Arduino.
2.6 Laser Diode Driver:
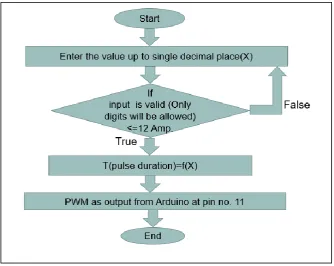
It is an electronic circuit which will supply a constant current to drive a laser diode. This circuit can operate with minimum of 16V to maximum of 32V and maximum 12A current. DC-DC convertors of 5V and 12V are used to provide the power supply to Arduino UNO and to the cooling fan of the external circuit respectively. A mode selection switch allows us to select the path for control voltage either from potentiometer or Arduino via low pass filter (LPF).In potentiometer mode, a voltage divider circuit is designed to provide desired amount of control voltage, similarly in case of Arduino mode, microcontroller is being programmed to generate pulse width modulation (PWM) as per the keypad input (shown in fig. 3). The PWM signal passes through a low pass filter to produce an average value, which is then supplied to the non-inverting terminal of the Op-amp through a laser on off switch. Transistor Q1 and Q2 act as Darlington pair to provide desired current gain [3]. A CMOS NAND buffer is connected with the laser on/off switch for controlling relay, which will bypass any surge current and protect the laser diode from permanent damage during over-current situations.
But during the over-current situation bipolar junction transistors may get damaged as current flows through transistor from relay. To protect the transistors, the over current sense circuit makes N-channel enhancement mode DMOS FET, ON thereby pulling down the control voltage to zero in over-current conditions. When the circuit is not powered or when the laser on/off switch is in off position then the normally on relay shorts the terminals of laser diode in parallel. Hence, laser diode is prevented from electrostatic discharge (ESD) events. Soft start of laser diode is achieved by a RC circuit connected before the non-inverting terminal of the Op-Amp that oppose sudden change in the input current of the laser diode and provide a smooth start depends on the RC time constant to improve the life of it. Transient spike protection is achieved by connecting a capacitor across the laser diode and the reverse polarity protection is achieved by connecting a diode in anti-parallel with laser diode.
© 2019, IRJET | Impact Factor value: 7.211 | ISO 9001:2008 Certified Journal
| Page 1682
[image:4.595.129.476.145.404.2]
Fig 2: Block diagram of laser diode driver.
[image:4.595.131.466.455.721.2]© 2019, IRJET | Impact Factor value: 7.211 | ISO 9001:2008 Certified Journal
| Page 1683
Table 1: Observation table for optical output power with differentinput voltages and fixed current in Arduino Mode.
Arduino Mode
Input Voltages (V) Current (A) Optical output Power (W)
16 6.1 32.1
18 6.1 32.3
20 6.0 32.5
22 6.2 32.6
25 6.2 32.7
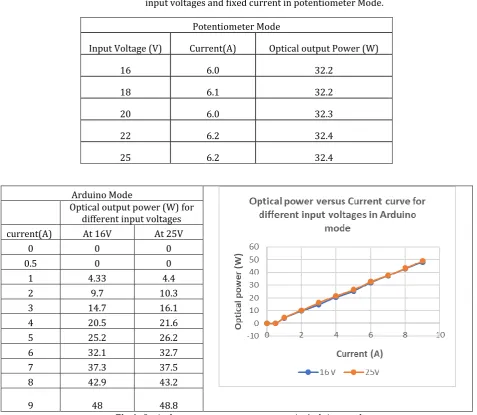
Table 2: Observation table for optical output power with different input voltages and fixed current in potentiometer Mode.
Potentiometer Mode
Input Voltage (V) Current(A) Optical output Power (W)
16 6.0 32.2
18 6.1 32.2
20 6.0 32.3
22 6.2 32.4
25 6.2 32.4
Arduino Mode
Optical output power (W) for different input voltages
current(A) At 16V At 25V
0 0 0
0.5 0 0
1 4.33 4.4
2 9.7 10.3
3 14.7 16.1
4 20.5 21.6
5 25.2 26.2
6 32.1 32.7
7 37.3 37.5
8 42.9 43.2
9 48 48.8
© 2019, IRJET | Impact Factor value: 7.211 | ISO 9001:2008 Certified Journal
| Page 1684
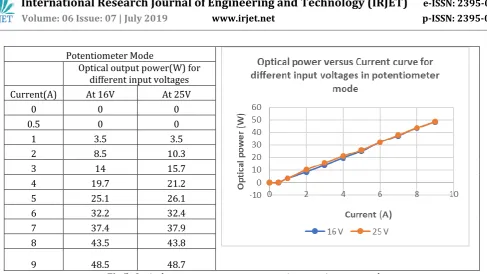
Optical output power(W) fordifferent input voltages
Current(A) At 16V At 25V
0 0 0
0.5 0 0
1 3.5 3.5
2 8.5 10.3
3 14 15.7
4 19.7 21.2
5 25.1 26.1
6 32.2 32.4
7 37.4 37.9
8 43.5 43.8
[image:6.595.50.538.53.327.2]9 48.5 48.7
Fig 5: Optical power versus current curve in potentiometer mode.
Our driver can generate up to 12A output current for input voltage ranges from 16V to 32V. But if we use single laser diode having a lower compliance voltage (say 10V), then there will be large voltage drop across output transistor (about 21V VCE
for input voltage of 32VDC) which may cause thermal breakdown of transistor. Hence, the maximum input voltage should be restricted to 15V above the compliance voltage of laser diode. If we use two laser diodes connected in series each having compliance voltage of 10V, then we can easily operate our driver for input voltage of 32VDC.
4.
CONCLUSIONS
This designed and developed programmable high current laser diode driver has current set accuracy of ± 0.8% of maximum output current. Whereas, commercially available laser diode drivers in the market has current set accuracy of ± 0.5% of maximum output current. It provides a steady current to laser diode irrespective of the change in input voltage. The output optical power levels were also stable for every value of the current fed to the laser diode.
5.
Future Possibilities
In near future we can work on this developed circuit to integrate it with LabVIEW to control the circuit from remote PC and to provide a better current set accuracy.
ACKNOWLEDGEMENT
We would like to express my deepest gratitude to Sh. Hari Babu Srivastava, Outstanding Scientist and Director LASTEC, DRDO for permitting us to carry out my training and publish this research work and also Dr. Sanjeev Kr. Gupta, Executive Director, NIELIT, Aurangabad.
© 2019, IRJET | Impact Factor value: 7.211 | ISO 9001:2008 Certified Journal
| Page 1685
REFERENCE
[1] Khaled Teffah et al., 2018, “Modelling and Experimentation of New Thermoelectric Cooler –Thermoelectric Generator Module,” Energies.
[2] Dimitar Georgiev Todorov and Asparuh Ivanov Grigorov, “High power laser diode driving techniques,” Electronics’ 2006, 20 – 22 September, Sozopol, BULGARIA.
[3] Jacob Millman, “Electronic Devices andCircuitspaperback-2015”.
BIOGRAPHY
Shubhadeep Maity
Pursuing MTech, E.D.T., NIELIT, Aurangabad
Dr. Babasaheb Ambedkar Marathwada University, Maharashtra BTech, E.C.E., T.I.S.L., Kolkata
Maulana Abul Kalam Azad University of Technology, West Bengal
Umang Dixit Scientist ‘F’
Laser Science and Technology Centre DRDO, Delhi
MTech, Microelectronics, IIT BHU, Varanasi B.E., Electronic and Communication Engineering MBM Engineering College, Jodhpur
Yashpal Gogia Scientist/Engineer ‘D’
National Institute of Electronics and Information Technology Aurangabad, Maharashtra