Smart Projectors using Remote Controlled Raspberry Pi
Dhaval Chheda
Computer Department, V.E.S. Institute of Technology,
Chembur, Mumbai – 400074
Divyesh Darde
Computer Department, V.E.S. Institute of Technology,
Chembur, Mumbai – 400074
Shraddha Chitalia
Computer Department, V.E.S. Institute of Technology,
Chembur, Mumbai – 400074
ABSTRACT
The paper puts forth an idea which focuses on cost reduction and enhancing the quality of service in the field of technology-aided teaching. It proposes the use of Raspberry Pi and its web interface, to store files that have been sent from remote sources and view these power point files or Portable Document Files (PDF) on the projector. The proposed system aims to substitute laptops with Raspberry Pi which will not only drastically reduce the cost involved, but also will help achieving quality of service as the system will consume a smaller amount of power, yet will provide the same functionality as any other similar system does. The proposed system will be controlled by using a smart phone based remote control, thus adding to the convenience.
General Terms
Cost-reduction, Quality of service
Keywords
Raspberry Pi, Projector, Net IO, Remote Access, Storage
1.
INTRODUCTION
In this paper, first the problem has been defined, and then a cost-effective solution to that problem using Raspberry Pi has been proposed. The technical details of Raspberry Pi and elucidation of how they will be used in the proposal has been mentioned. Further, every step of the proposal has been mentioned in detail including the OS installation and the Linux commands to be followed for configuration of the Raspberry Pi. Towards the end, the cost of this proposal, which is the most vital area of our concern, has been estimated.
1.1
Motivation
Technology has taken centre stage in schools and colleges, with students being taught using PowerPoint slides and Portable Document Files (PDF), giving better insights into the subject matter. For this, prerequisites include laptops that need to be connected to projectors and portable devices like pen drive. One notices the following inefficiencies in this practice: 1. Requirement of a laptop for each and every class, resulting in increased cost.
2. Mandatory to carry a portable device each time.
Thus, there arises a need to create a device which promises to reduce the overall cost as well as eliminates the need to carry a portable device every time to theclass.
1.2
Problem Scenario
To better understand the problem, consider the present scenario in any one department of an institution. If the department has five classes and professor in each of this class uses projector, this brings in the requirement of one laptop for each class. Now, if five classes at the same time require laptops, the amount to be invested by the department would
approximately account to Indian Rupees 2,00,000 (40K * 5 = 2 Lakh Rupees). This is a huge amount that the department invests. Today, any college or university has at least 5 departments. So the cost sums up to Rupees 10,00,000. Thus, college or university spends such huge amount of money which when compared to the intent behind it does not seem to be efficient. If this amount is reduced it would help save a large amount of money, which could be further used by the department for some research or any other beneficial task. This paper is an effort to address this problem. The system proposed here is referred to as “Smart projectors using Remote controlled Raspberry Pi”. It makes use of a Raspberry Pi – a credit card sized computer which would provide cost-effective and energy-efficient solution to the above stated problem. Cost-effective as Raspberry Pi costs only one tenth of a laptop (35-40 USD) [1] and energy-efficient as it consumes much less power ( 5V ) as compared to required by a laptop.
1.3 Overview of the Proposed System
Overall objective of this project is to use Raspberry Pi and its web interface to store files that have been sent from remote sources and view these files on the projector. Once Raspberry Pi has been set up and is ready to be used like a normal computer, applications can be installed thereby enabling to view all the Portable Document Files (PDF) and power-point presentations.
The next is to use a remote control to control these applications. Controlling of Raspberry Pi can be achieved using a smart phone which almost everyone carries today. Some readily available applications on the Google Play Store include NetIO and XBMC server allowing creation of customized remote control to control Raspberry Pi.
The Raspberry Pi has a HDMI port and an Ethernet slot along with IEEE 802.11g. This facilitates uploading files and presentations from local as well as remote destinations to the Raspberry Pi.
2.
DETAILS ABOUT RASPBERRY PI
2.1
Raspberry Pi - the device
Raspberry Pi is a credit card sized computer. It’s basically a small PC which provides all the basic functions that are provided by a desktop PC. For example, it provides functions like word processing, gaming and playing audio/video. It has become a widely used device for learning programming since last one year. [1]
2.2
Specifications
Raspberry Pi provides is the presence of two USB ports, where one can connect his pen drive or USB mouse/Keyboard. General Purpose Input/output (GPIO) are a set of generic pins on a Raspberry Pi whose behavior can be controlled as well as programmed through software. The Raspberry Pi also has an SD card slot, which can act as an internal storage and can also store an image of Operating System. [2]
2.2.1
Model of Raspberry Pi
[image:2.595.315.539.81.367.2]Raspberry Pi model B is to be used for this purpose. It comprises of a 512 MB RAM model with two USB ports and a 10/100 Ethernet controller. The figure below shows the model.
Figure 1 : Features offered in Raspberry Pi Model B
The Raspberry Pi model B consists of a 512 MB RAM. It exhibits the Broad com BCM2835 ARM11 700Mhz ‘System on Chip’ Processor. One can play Full 1080p High Definition Blu-Ray Quality Videos on Raspberry Pi due to the presence of Integrated Video core 4 Graphics Processing Unit (GPU). One can program as well as learn programming conveniently due to the presence of the free, versatile, and highly developer friendly Debian GNU/Linux Operating System. It consists of 2 USB ports, 1 HDMI Video output, RCA Video output, 3.5mm Audio Jack output. Raspberry Pi Model B is powered by a 5V Micro USB Power Input Jack. It is pretty energy-efficient as it requires only about 700mA current to operate. It also consists of an SD, MMC, SDIO Flash Memory Card SlotSD, MMC, SDIO Flash Memory Card Slot as well as a 26-pin 2.54mm Header Expansion Slot.[3]
[image:2.595.54.281.230.398.2]2.3
Raspberry Pi: A Cost-effective Solution
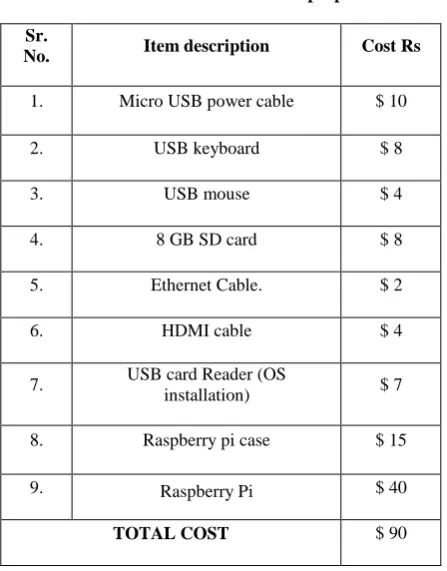
The problem which is addressed by the proposed system involves cost reduction. This will be achieved when we consider the cost of all the hardware and software components comprised in this system.Table 1. Cost involved for the proposal
Sr.
No. Item description Cost Rs
1. Micro USB power cable $ 10
2. USB keyboard $ 8
3. USB mouse $ 4
4. 8 GB SD card $ 8
5. Ethernet Cable. $ 2
6. HDMI cable $ 4
7. USB card Reader (OS
installation) $ 7
8. Raspberry pi case $ 15
9. Raspberry Pi $ 40
TOTAL COST $ 90
As per the feasibility study conducted, the total cost involved would account to a maximum of $100 which is equal to about Indian Rupees 6000 to 7000. Now, if we consider the same scenario for a department as stated above , the total cost incurred would be Rs. 35,000 (5 x max (6000, 7000)). This implies that the present cost will be cut by 80%, which would indeed prove to be a successful attempt to save huge amount of money for any institute. Thus, taking cost into consideration the proposed system proves to be relevant. Additionally, it provides the same services as the current system does. Thus, the working model of the proposed system would reduce the overall cost involved without compromising on the services it offers.
3.
ARCHITECTURE OF THE
PROPOSED SYSTEM
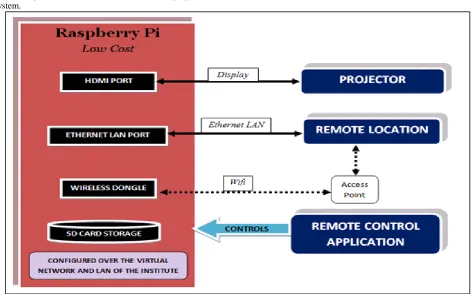
The System architecture mainly comprises of three blocks: 1. Raspberry Pi:
The HDMI port on Raspberry Pi will allow connecting a projector to the palm top. This also helps eliminating the need an LCD screen, thus reducing the cost involved. The next component is the SD card storage, which will store all the files which are transferred to the Pi from local/remote locations.
2. Network Access layer:
The network access layer includes the use of wireless dongle or Ethernet to connect to the network. Wifi can be enabled on the Pi by following the procedure specified below. This layer allows transmission of files to the Pi.
3. Remote control application
Figure 2 represents the system architecture of the proposed system.
Figure 2 : Architecture of the proposed system
3.1 Steps involved in system creation:
3.1.1 Creating a Palm Top using Raspberry Pi
[image:3.595.57.273.497.712.2]This can be achieved by integrating micro USB power cable, USB keyboard, USB mouse, 8GB SD card, Ethernet cable and HDMI cable with the Raspberry Pi. The LCD screen can be used for testing purposes. It can be eliminated later to reduce cost thereby meeting the goal of cost-effective system. [4]
Figure 3 : Figure of a Palm top implemented using Raspberry Pi
The Pi supports three different video outputs: composite video, HDMI video and DSI video. While composite and HDMI video are readily accessible to the user, DSI video requires specialized hardware. [5]
Composite Video: It is available via the yellow-and-silver port on the Pi, and is designed for older display devices. So, when no other display devices with HDMI support are available, you can use this port for display. But, the quality is not that clear and of limited resolution.
HDMI Video: The High Definition Multimedia Interface (HDMI) connector will provide better quality picture. The RCA Connector for composite video provides analogue connection, while this provides high speed digital connections. Significant quality levels are achieved in this type of display
DSI Video: This can be found above the SD Card slot on the top of the Raspberry Pi, a small ribbon connector protected by a layer of plastic. This is for a video standard - Display Serial Interface (DSI) which is used in flat-panel displays of tablets and smart phones.
3.1.2 Setting up the Raspberry Pi for the first time
To use Raspberry Pi, an Operating System (OS) needs to be installed onto an SD card. These instructions to be followed include:
1. Insert an SD card that is 4GB or greater in size in the computer.
Windows
Download the SD Association's Formatting Tool1.
Install and run the Formatting Tool on the machine.
Set "FORMAT SIZE ADJUSTMENT" option to "ON" in the "Options" menu
Check that the SD card inserted matches the one selected by the Tool
Click the “Format” button
3. Download the New Out Of Box Software (NOOBS). NOOBS makes setting up a Raspberry Pi for the first time much easier. Advantages are that one will not need network access, and won’t need to download any special imaging software. NOOBS gives a list of Operating Systems to select from when booting for the first time. [6]
4. Unzip the downloaded file. Right click on the file and choose “Extract all” in Windows.
5. Copy the extracted files onto the SD card that was just formatted.
6. Insert the SD card into Pi and connect the power supply.
Pi will now boot into NOOBS and should display a list of operating systems that one can choose to install. If the display remains blank, one should select the correct output mode for the display by pressing one of the following number keys on the keyboard:
HDMI mode: this is the default display mode.
HDMI safe mode: select this mode if you are using the HDMI connector and cannot see anything on screen when the Pi has booted.
Composite PAL mode: select either this mode or composite NTSC mode if you are using the composite RCA video connector
3.1.3 Connecting Raspberry Pi to the Ethernet
LAN
First of all, it is required that the Raspberry Pi should be connected to the LAN via Ethernet cables. Following steps will configure the Raspberry Pi over the Ethernet LAN: [7]
1. On the LXTerminal, check the current network settings using ‘ifconfig’
2. Modify the current network settings. To edit the network setting you must edit the interfaces file. The network can use a dynamic (DHCP) IP address or a static (set) IP address.
3. DHCP (Dynamic Host Configuration Protocol) is used to dynamically configure a host connected to a network so that it can use that network. For us, the Raspberry Pi will be new to the network of the institute and will have to be configured over there. The DHCP basically assigns the host IP address, a subnet mask, a default gateway, and so on. [8] 4. When the Raspberry Pi will be new to the network,
it will send DHCP discovery packet to the network. After encountering the packet, the DHCP server will respond by sending a DHCP offer to the Raspberry Pi. This offer will include an IP address and a subnet mask and a few more things. So using DHCP, one can temporarily lease an IP address to the client.
5. Since remote login will be required for the Raspberry Pi, a static IP is advised.
6. Look for the eth0 line which corresponds to the
Raspberry pi Ethernet (RJ45) port. Edit the file to look similar to this example: iface eth0 inet static
address 192.100.1.102 netmask 255.255.255.0 gateway 192.100.1.1
7. Set the address to the IP address you want the Raspberry Pi to occupy.
8. Restart the Raspberry Pi and check the new connection by pinging the device.
3.1.4 Remote access to your Raspberry Pi through
the Ethernet LAN
Now that the Raspberry Pi will be connected over the Ethernet LAN of the institute, one can access its contents from just any other machine in your institute, without requiring a mouse, monitor or a keyboard.
Remote desktop protocol (RDP) basically provides user a graphical interface to access the server over the network. It allows a client to communicate with a Windows server. One can run applications on a server from a remote client. To prevent traffic from intrusion, RDP uses authentication and encryption. XRDP is present on the Raspberry Pi, and facilitates controlling the Raspberry Pi remotely from a Windows PC. [9]
Now, RDP should be installed on your PC, whereas, XRDP should be installed on your Raspberry Pi.
The following command will install XRDP on your Raspberry Pi:
sudo apt-get install xrdp
3.1.5 Setting up Wifi in Raspberry Pi
The Raspbian OS offers Wifi configuration utility. A shortcut exists for Wifi Configuration on the desktop of RPi. After clicking on the shortcut, one will have to follow the following simple steps:
1. Scan for the wifi access points in the vicinity. A new window will open giving details about the access points.
2. Find the wireless access point in the list, and then double click it.
3. A new window will open wherein one will have to enter the password. After adding the access point, one can check the Wifi connectivity in the very first window. IP address on Raspberry Pi is displayed too. Now the Raspberry Pi is connected to the wireless access point.
3.1.6 Assigning static IP address to Raspberry Pi
The above method will assign RPi a dynamic IP address using DHCP. This automatically assigned IP address is absolutely fine if the connection is not used often. But since the RPi will be accessed more often, it is better to configure a static IP for the RPi. The steps to be followed for this are: [10]
2. Using the command ifconfig, get the following information about the router/access point:
inet addr – 192.168.1.81 (Pi's Current IP Address) Bcast – 192.168.1.255 (The Broadcast IP Range) Mask – 255.255.255.0 (Subnet Mask Address) 3. Using the netstat command collect information
about the Gateway & Destination IP Addresses 4. Open the file sudo nano /etc/network/interfaces in a
text editor and simply change
iface eth0 inet dhcp to
iface eth0 inet static
5. Then directly enter: (this is an illustration)
address 192.168.1.81 (Give higher IP Address in comparison with the old one)
netmask 255.255.255.0 network 192.168.1.0 broadcast 192.168.1.255 gateway 192.168.1.254
6. Further, check if your IP address is allotted properly by pinging the device
ping 192.168.1.254
3.1.7 Setting up the Server
Now that configuring the Raspberry Pi over the Ethernet as well as WIFI is done, making remote access possible, a web user interface for the client PCs for convenient access to Raspberry Pi remotely is to be designed. [11]
1. The Raspberry Pi has a “memory_split” option that divides the memory between the CPU and GPU (Graphics). Since this for a web server, that much GPU memory is not needed, so change it to 16M.
2. One may want to also enable the SSH server if that’s how he will be accessing the device.
3. Update the Raspberry Pi software and then reboot the device.
4. Now install the following software required:
Install Apache and PHP:
sudo apt-get install apache2 php5 libapache2-mod-php5
Install MySQL:
sudo apt-get install mysql-server mysql-client php5-mysql
Then make any changes needed for the Apache configuration and restart:
sudo service apache2 restart
If one wants to take a look at the PHP configuration, create the following file:
sudo nano /var/www/phpinfo.php
Inside that file put the following code: <?php phpinfo(); ?>
Save it, and load it up on the browser.
Now that all the required software exists at the Raspberry Pi, one will have to design a web interface using HTML-CSS-PHP technologies on your Raspberry Pi. Thus, now a web interface has been created for managing the contents in the Raspberry Pi remotely.
3.1.8 Configuring the Remote Control
The remote control for the Raspberry Pi will be
implemented using the application ‘Net IO’. NetIO is a multi platform smart phone application, a remote control for many electronic devices. One can easily communicate with a PC, a laptop or a Raspberry Pi.
Net IO is available on the Google play store, once one buys it, he will have to make certain phone side as well as Raspberry Pi side configurations for the making the user interface ready for the remote control.
One has to simple follow the following setup to get started with this application:[12]
1. Design: Create configurations on a normal screen on the browser.
2. Synchronize: Connect the application with the UI-designer account and synchronize configurations.
3. Control: Control the hardware connected to the network.
4.
CONCLUSION AND FUTURE SCOPE
4.1
Conclusions
The present education system depends a lot on technology-aided teaching. Hence there is a requirement of many laptops. But one realizes that most of the functionality of these laptops is under-utilized as the sole purpose of these laptops is storing and projecting slides. Laptops consume a lot of power, as well as are very costly. Thus, this paper proposes replacement of laptops with a low-cost as well as low-power consuming storage device, which can be designed using Raspberry Pi. A user interface can be designed for this device for remote access, thus adding to professors’ convenience. Moreover, this device can also be controlled by using smart phone applications for easy navigation. This device can be used for presentations used in seminars, or for educational purposes in schools or colleges, or for entertainment purposes. Also, this device can be used to for storing data which has been sent from remote locations. All in all, this device offers all the features that a laptop offers, but at a price which is less than half the price we pay for laptops.
4.2
Future Scope
1. For now, this paper proposes replacing laptops with the new storage device for a department. This can be extended over a large scale too, say for all the departments of the college and then also over many institutes all over the country. This product indeed has tremendous potential of replacing laptops, especially for the particular application of storage and projecting.
2. Another future scope is powering the Raspberry Pi using a battery. For now, the Raspberry Pi needs to be connected to the power supply via the USB power port. But in case the power goes off, it would turn off the Pi abruptly. So, it would be better if the Raspberry Pi is connected to a backup battery power supply.
5.
REFERENCES
[1] About Raspberry Pi: www.raspberrypi.org: This is the official website of the Raspberry Pi project.
[2] Membrey, Peter, and David Hows. Learn Raspberry Pi with Linux. Apress, 2012
Guide. John Wiley & Sons, 2012
[4] Portable Pi: blog.parts-people.com/2012/12/20/mobile- raspberry-pi-computer-build-your-own-portable-rpi-to-go: Technology Blog of 'Parts-People', a company which began in May 2002 as a part time home based business with a small inventory of liquidation parts for PC's and Laptops.
[5] Upton, Eben, and Gareth Halfacree. Meet the Raspberry Pi. Wiley. com, 2012.
[6] Information on the New Out Of the Box Software (NOOBS): www.raspberrypi.org/archives/4100: This is the official website of the Raspberry Pi project.
[7] Configuring Raspberry Pi over the Ethernet LAN: www.instructables.com/id/Configuring-the-Raspberry-Pi-ethernet-port-for-rem : Instructables is a place that lets you explore, document, and share your creations. It originated at the MIT Media Lab as the future founders of Squid Labs built places to share their projects, connect with others, and make an impact on the world.
[8] Membrey, Peter, Tim Verhoeven, and Ralph Angenendt. "Setting Up DHCP." The Definitive Guide to CentOS
(2009): 181-197.
[9] Longzheng, Cai, Yu Shengsheng, and Zhou Jing-li. "Research and implementation of remote desktop protocol service over SSL VPN." Services Computing, 2004. (SCC 2004). Proceedings. 2004 IEEE International Conference on. IEEE, 2004.
[10] Giving Raspberry Pi a static IP address : www.modmypi.com/blog/tutorial-how-to-give-your-raspberry-pi-a-static-ip-address : A tutorial on the official website of ModMyPi LTD. ModMyPi LTD was founded in February 2012 following the public release of the ground breaking Raspberry Pi Model B. ModMyPi LTD specialise in the 3D design and manufacture of unique, professional and high-quality Raspberry Pi Cases. [11] Setting up Raspberry Pi Server:
www.jeremymorgan.com/tutorials/raspberry-pi/how-to-raspberry-pi-web-server : Blog of Jeremy Morgan, who is a Silicon Forest Hacker / Developer writing about Tech, Programming, SEO and Marketing.