http://www.3com.com/
Part Number: 900-0095-01 Published: July 2002
NBX
®Telephone Guide
Telephones
■ NBX 1102 Business Telephone
■ NBX 2102 Business Telephone
■ NBX 2102-IR Business Telephone
■ NBX 2101 Basic Telephone
Attendant Consoles
■ NBX 1105 Attendant Console
Copyright © 2002, 3Com Corporation. All rights reserved. No part of this documentation may be reproduced in any form or by any means or used to make any derivative work (such as translation, transformation, or adaptation) without written permission from 3Com Corporation.
3Com Corporation reserves the right to revise this documentation and to make changes in content from time to time without obligation on the part of 3Com Corporation to provide notification of such revision or change. 3Com Corporation provides this documentation without warranty, term, or condition of any kind, either implied or expressed, including, but not limited to, the implied warranties, terms, or conditions of merchantability, satisfactory quality, and fitness for a particular purpose. 3Com may make improvements or changes in the product(s) and/or the program(s) described in this documentation at any time.
If there is any software on removable media described in this documentation, it is furnished under a license agreement included with the product as a separate document, in the hardcopy documentation, or on the removable media in a directory file named LICENSE.TXT or !LICENSE.TXT. If you are unable to locate a copy, please contact 3Com and a copy will be provided to you.
UNITED STATES GOVERNMENT LEGEND
If you are a United States government agency, then this documentation and the software described herein are provided to you subject to the following:
All technical data and computer software are commercial in nature and developed solely at private expense. Software is delivered as “Commercial Computer Software” as defined in DFARS 252.227-7014 (June 1995) or as a “commercial item” as defined in FAR 2.101(a) and as such is provided with only such rights as are provided in 3Com’s standard commercial license for the Software. Technical data is provided with limited rights only as provided in DFAR 252.227-7015 (Nov 1995) or FAR 52.227-14 (June 1987), whichever is applicable. You agree not to remove or deface any portion of any legend provided on any licensed program or documentation contained in, or delivered to you in conjunction with, this guide.
Unless otherwise indicated, 3Com registered trademarks are registered in the United States and may or may not be registered in other countries.
3Com, NBX, the 3Com logo, and SuperStack are registered trademarks of 3Com Corporation. NBX NetSet and pcXset are trademarks of 3Com Corporation.
5ESS is a registered trademark and 4ESS is a trademark of Lucent Technologies.
Adobe is a trademark and Adobe Acrobat is a registered trademark of Adobe Systems Incorporated. Microsoft, Windows, Windows 2000, and Windows NT are registered trademarks of Microsoft Corporation.
C
ONTENTS
A
BOUTT
HISG
UIDE How to Use This Guide 7 Conventions 8Documentation 9
Comments on the Documentation 9
1
G
ETTINGS
TARTEDSetting Up Your Password and Voice Mail for the First Time 11 NBX NetSet Utility 13
Starting the NBX NetSet Utility 13
Navigation and Shortcut Icons in the NBX NetSet Utility 14 Quick Reference Sheets 14
2
NBX B
USINESST
ELEPHONESBusiness Telephone Buttons and Controls 16
Programmable Access Buttons on the Business Telephone 19 Default Settings 19
Status Lights for System Appearance Buttons on the Business Telephone 20
3
NBX B
ASICT
ELEPHONEBasic Telephone Buttons and Controls 22
Programmable Access Buttons on the Basic Telephone 23 Status Icons on the Basic Telephone 24
4
NBX V
OICEM
ESSAGING NBX Messaging Components 25Changing Your Password 26 Security Tips 27
Changing Your Name Announcement and Personal Greeting 27 Listening to NBX Messages 28
From Your Computer 29 From Your NBX Telephone 29 From Any Internal NBX Telephone 29 From a Remote Location 29
Information About Your Messages 30 Replying to a Message 31
Forwarding a Message 31
Creating and Sending a Message 33 Creating Personal Voice Mail Group Lists 34
Modifying or Deleting Groups 35 Marking a Message as Private or Urgent 36
Forwarding Incoming Calls to Your Call Coverage Point 36 Other Ways to Manage Your Voice Mail Messages 37 Other Kinds of Mailboxes 37
Greeting-Only Mailbox 37 Phantom Mailbox 38 Group Mailbox 38
5
S
TANDARDF
EATURES Answering a Call 40Answering a Second Call 40
Using the NBX Telephone Display Panel 41 Tips on Using the Lists 42
More Ways to Dial a Call 42 An Internal Call 42 An External Call 43 Redialing a Call 43
Setting Your Call Coverage Point 43 Putting a Call on Hold 44
Transferring a Call 45
Direct Mail Transfer 46
Establishing a Conference Call 46 More About Conference Calls 47
Disconnecting the Last Person That You Called 48 Setting the Volume 48
6
P
ERSONALIZINGY
OURT
ELEPHONEGuidelines About Features on NBX Telephones 50 Ringer Tones 50
Speed Dials 51
Personal Speed Dials 51 System-wide Speed Dials 52
Special Case: One-Touch Speed Dials 53 Printing Speed Dial Lists 54
Printing Labels for NBX Telephones 54 Off-Site Notification 55
Do Not Disturb 58
Preventing Unauthorized Use of Your Telephone 59 Telephone Locking 59
Call Permissions 60 Class of Service Override 60 Palm Integration 61
Using a Headset 61
Ending Calls When Using a Headset 62
Returning to the Headset After a Long Delay 62
7
G
ETTINGM
ORE FROMY
OURT
ELEPHONES
YSTEM Listening to Your Messages in Your E-mail or Browser 64 Account (Billing) Codes 64Caller ID 65
Internal and External Caller ID 65 Calling Line Identity Restriction (CLIR) 65 Call Pickup 66
Hunt Groups and Calling Groups 68 Hunt Groups 68
Calling Groups 71 Group Membership 71 Call Park 72
Paging 73
Dialing a Call to a Remote Office 74 Using Unique Extensions 74 Using Site Codes 74 Bridged Extensions 75 Delayed Ringing 76 Pulse Dialing 76
Using a Feature Code 77 Using a Mapped Button 77 Using a Personal Speed Dial 77 Additional Applications 77
8
A
TTENDANTC
ONSOLES NBX 1105 Attendant Console 80Attendant Console Labels 82 Complement Attendant Software 83
Managing Calls 84
A
T
ELEPHONEI
NSTALLATION, M
AINTENANCE,
ANDT
ROUBLESHOOTINGConnecting the Telephone 85
Attaching and Adjusting the Support Bracket 86 Low-Profile and High-Profile Positions 86 Wall-Mount Position 87
Security Wall-Mount Bracket 87 Moving Your Telephone 88
Swapping Telephones 88 Cleaning Your Telephone 88 Troubleshooting Problems 89
A
BOUT
T
HIS
G
UIDE
This guide is intended for anyone using NBX® Telephones, the NBX 1105 Attendant Console, or the NBX Complement Attendant Software. It includes information about using the NBX Voice Mail system and the NBX NetSet™ administration utility for personal telephone settings.
If the information in the release notes (readme.pdf) on the Resource Pack CD differs from the information in this guide, follow the instructions in the release notes.
Analog telephones connected to the NBX system through the Analog Terminal Card or the single-port Analog Terminal Adapter can use most of the features described in this book. For a list of features and Feature Codes, see the NBX Feature Codes Guide in the NBX NetSet utility.
How to Use
This Guide
Table 1 shows where to look for specific information in this guide.
Table 1 Where to Find Information
If you are looking for information about Turn to
How to get started Chapter 1
The NBX Business Telephones, their buttons, and controls Chapter 2
The NBX Basic Telephone, its buttons, and controls Chapter 3
NBX Voice Messaging features Chapter 4
Using standard telephone features Chapter 5
Personalizing your telephone Chapter 6
Enhanced system features Chapter 7
The Attendant Console and Complement Attendant Software Chapter 8
Telephone maintenance and troubleshooting information Appendix A
8 ABOUT THIS GUIDE
Conventions
Table 2 defines some commonly used words and phrases in this guide.Table 3 lists conventions that are used throughout this guide. Table 2 Common Terms
Term Definition
Auto Attendant The set of voice prompts that answers incoming calls and describes actions that a caller can take to access individual services.
Administrator The person who is responsible for maintaining your 3Com Networked Telephony Solution.
Receptionist The person who answers the majority of incoming telephone calls. In some business environments, this person may be a switchboard operator.
User A person who has a single NBX Business Telephone, an NBX Basic Telephone, or an analog telephone connected to the NBX system through an ATC card or the
single-port ATA device.
NBX 25 NBX 25 Communications System NBX 100 NBX 100 Communications System
SuperStack 3 NBX 3Com SuperStack 3 NBX Networked Telephony Solution
Table 3 Icons
Icon Type Description
Information note Information that describes important features or instructions.
Caution Information that alerts you to potential loss of data or potential damage to an application, system, device, or network.
Documentation 9
Documentation
The documentation set for 3Com NBX Networked Telephony Solutions is designed to help NBX telephone users, installers, and administrators maximize the full potential of the system.The NBX Resource Pack CD contains many guides to the NBX products and their related 3Com applications.
To order a set of paper copies of the NBX Administrator’s Guide, NBX Installation Guide, and NBX Telephone Guide, as well as the NBX Resource Pack CD, contact your authorized 3Com NBX reseller.
When you log in to the NBX NetSet™ utility as a user or administrator, you can view the PDF versions of the NBX Telephone Guide and NBX Feature Codes Guide by clicking the icons at the bottom of the screen.
When you log in as an administrator, you can also see the
NBX Administrator’s Guide.
Comments on the Documentation
Your suggestions are important to us. They help us to make the NBX documentation more useful to you.
Please send your e-mail comments about this guide or any of the 3Com NBX documentation and Help systems to:
Include the following information with your comments:
■ Document title
■ Document part number (found on the front or back page)
■ Page number
Example:
NBX Telephone Guide
Part Number 900-0095-01
Page 25
1
G
ETTING
S
TARTED
As soon as you are given a telephone and extension number, you need to set up a password and record your name announcement and personal greeting.
This chapter covers these topics:
■ Setting Up Your Password and Voice Mail for the First Time
■ NBX NetSet Utility
■ Quick Reference Sheets
For how to access NBX features from an analog telephone, set your password as described next and then see the NBX Feature Codes Guide in the NBX NetSet utility.
Setting Up Your
Password and
Voice Mail
for the First Time
The procedure by which you set up your password and voice mailbox for the first time depends on:
■ The kind of telephone that you have
■ The kind of voice messaging system on your NBX system. Ask your administrator what kind of voice messaging is active on your system.
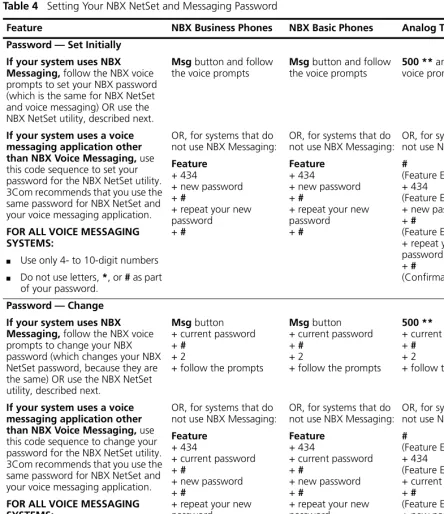
Table 4 describes how to set up your first password.
12 CHAPTER 1: GETTING STARTED
Table 4 Setting Your NBX NetSet and Messaging Password
Feature NBX Business Phones NBX Basic Phones Analog Telephones
Password — Set Initially
If your system uses NBX Messaging, follow the NBX voice prompts to set your NBX password (which is the same for NBX NetSet and voice messaging) OR use the NBX NetSet utility, described next.
If your system uses a voice messaging application other than NBX Voice Messaging, use this code sequence to set your password for the NBX NetSet utility. 3Com recommends that you use the same password for NBX NetSet and your voice messaging application.
FOR ALL VOICE MESSAGING SYSTEMS:
■ Use only 4- to 10-digit numbers ■ Do not use letters, *, or # as part
of your password.
Msg button and follow the voice prompts
OR, for systems that do not use NBX Messaging:
Feature
+ 434
+ new password + #
+ repeat your new password
+ #
Msg button and follow the voice prompts
OR, for systems that do not use NBX Messaging:
Feature
+ 434
+ new password + #
+ repeat your new password
+ #
500 ** and follow the voice prompts
OR, for systems that do not use NBX Messaging:
#
(Feature Entry Tone) + 434
(Feature Entry Tone) + new password + #
(Feature Entry Tone) + repeat your new password
+ #
(Confirmation Tone)
Password — Change
If your system uses NBX Messaging, follow the NBX voice prompts to change your NBX password (which changes your NBX NetSet password, because they are the same) OR use the NBX NetSet utility, described next.
If your system uses a voice messaging application other than NBX Voice Messaging, use this code sequence to change your password for the NBX NetSet utility. 3Com recommends that you use the same password for NBX NetSet and your voice messaging application.
FOR ALL VOICE MESSAGING SYSTEMS:
■ If you forget your password, the
administrator can reset it to your extension. Then use this code (for applications other than NBX Voice Messaging) or the NBX voice prompts to change it.
Msg button + current password + #
+ 2
+ follow the prompts
OR, for systems that do not use NBX Messaging:
Feature
+ 434
+ current password + #
+ new password + #
+ repeat your new password
Msg button + current password + #
+ 2
+ follow the prompts
OR, for systems that do not use NBX Messaging:
Feature
+ 434
+ current password + #
+ new password + #
+ repeat your new password
500 **
+ current password + #
+ 2
+ follow the prompts
OR, for systems that do not use NBX Messaging:
#
(Feature Entry Tone) + 434
(Feature Entry Tone) + current password + #
(Feature Entry Tone) + new password + #
(Feature Entry Tone) + repeat your new password
+ #
NBX NetSet Utility 13
NBX NetSet Utility
The NBX NetSet administration utility has two interfaces:■ Administrator — Your administrator logs on with a special password and uses the NBX NetSet utility to manage and configure system-wide telephone settings and many of the settings for your telephone.
■ User — As a telephone user, you log in to the NBX NetSet utility with your own system ID (your extension) and password to:
■ View and change your telephone’s personal settings, such as speed dials, ringer tone, and specify where you want your calls to go when you cannot answer them (your call coverage point)
■ Listen to and delete your voice messages from your computer as an alternative to managing calls on your telephone.
■ View your call permissions, current feature settings, and the internal user directory to call other users on your system, and log in to and log out of one or all hunt groups and calling groups of which your telephone is a member.
See Chapter 5, Chapter 6, and Chapter 7 for discussions about the standard and enhanced features that you can monitor and change in the NBX NetSet utility. See Chapter 4 for voice messaging features.
If your NBX system uses 3Com NBX Unified Communications or a third-party messaging application, off-site notification and other voice messaging features are available through your messaging application. See the application’s documentation rather than using this Guide.
Starting the NBX NetSet Utility
To use the NBX NetSet utility, you need a computer that is connected to your local area network (LAN) and that has a web browser. (You do not need Internet access.) To start the NBX NetSet utility:
1 Ask your administrator for the IP (web) address for your NBX system.
2 In the web browser on your computer, enter the IP address in the Address field. The NBX NetSet login screen appears.
Microsoft Internet Explorer version 5.5 or later is optimal.
3 Click User to log in as a user. The password dialog box appears.
4 Type your NBX NetSet user identification (always your 3-digit or 4-digit telephone extension) and your NBX NetSet password, and then click OK.
14 CHAPTER 1: GETTING STARTED
Navigation and Shortcut Icons in the NBX NetSet Utility
The icons at the lower right of any Personal Settings window allow you or your administrator to navigate to the following features:
The icons below the window are shortcuts to these features:
Quick Reference
Sheets
To open and print a copy of the Quick Reference Sheet for the most frequently used features on your telephone:
1 Log in to the NBX NetSet utility. See “Starting the NBX NetSet Utility”
earlier in this chapter.
2 Click Telephone Quick Reference. The quick reference sheet that pertains to your telephone model (Business, Basic, or analog) appears.
Adobe Acrobat Reader 4.0 or 5.0 is required to view the file. Reader 5.0 is available free on the NBX Resource Pack CD or from the Adobe Web site: www.adobe.com
Table 5 Navigation Icons
Icon Action Where You Go
Back ■ User — The main NBX NetSet login dialog box
■ Administrator — The NBX NetSet main menu
window.
Help Help for the fields and procedures related to the screen
One-Touch Speed Dials
Off-Site Notification
Telephone Guide (this guide)
2
NBX B
USINESS
T
ELEPHONES
This chapter describes the buttons, controls, and features on the following NBX telephone models:
■ NBX 1102 Business Telephone
■ NBX 2102 Business Telephone
■ NBX 2102-IR Business Telephone
The chapter covers these topics:
■ Business Telephone Buttons and Controls
■ Programmable Access Buttons on the Business Telephone
■ Status Lights for System Appearance Buttons on the Business
Telephone
Unless otherwise noted, the features discussed in this chapter apply to all NBX Business Telephones and to the SuperStack 3 NBX, NBX 100, and NBX 25 Networked Telephony Solutions.
For how these features work on an analog telephone connected to the NBX system, see the NBX Feature Codes Guide below any screen in the NBX NetSet utility.
16 CHAPTER 2: NBX BUSINESS TELEPHONES
Business Telephone
Buttons and
Controls
Figure 1 shows the buttons and controls on the NBX Business Telephone.
Figure 1 NBX Business Telephone (Model 2102-IR Shown)
The NBX Business Telephones have these features:
1 Handset
2 MSG (Message) button — Accesses your voice mail messages through the NBX Messaging system. See “Listening to NBX Messages” in
Chapter 4.
3 Display panel — Provides telephone status messages, Caller ID information (if enabled), and the number of messages that you have in your voice mail mailbox. You can also use it to view the directory of people’s names in your company, logs of incoming and outgoing calls, personal speed dial numbers, and system speed dial numbers.
4 FWD MAIL (Forward to Voice Mail) button — Directs all incoming calls to your voice mail (or to wherever you have specified in NetSet > Personal Settings > Call Forward) after one ring. See “Forwarding Incoming Calls to Your Call Coverage Point”in Chapter 4.
11 12
3 5
2 6 7 8
13 14 15 16
17
1 4 9
18 19
10 a–f
Business Telephone Buttons and Controls 17
5 Soft buttons — Allow you to select names from the internal user directory, select and dial a personal speed dial or system-wide speed dial, and select and redial a recent call to or from your telephone. See “Using the NBX Telephone Display Panel” in Chapter 5. The buttons, left to right:
■ Slct (Select)
■ Back (returns you to the next higher level in the menu)
■ Exit
6 Telephone key pad
7 Scroll buttons — Allow you to scroll through user names in the internal user directory, view your personal speed dials and system-wide speed dials, and view recent calls to and from your telephone. See “Using the NBX Telephone Display Panel” in Chapter 5.
8 Program button — Reserved for future use.
9 Programmable Access buttons with indicator lights — See
“Programmable Access Buttons on the Business Telephone” and “Status Lights for System Appearance Buttons on the Business Telephone” later in this chapter.
10 Programmable Access buttons without indicator lights — See
“Programmable Access Buttons on the Business Telephone” later in this chapter.
11 Hold button — Places a caller on hold. See “Putting a Call on Hold” in
Chapter 5.
12 Microphone (located on the underside of the telephone) — Activated when the telephone is in speaker phone mode, that is, after you press the Speaker button or the Hands Free button. For best results, keep the area around the microphone free of obstructions.
13 Transfer button — Sends an incoming call to another telephone. See
“Transferring a Call” in Chapter 5.
18 CHAPTER 2: NBX BUSINESS TELEPHONES
15 Redial button — Redials the last telephone number or extension that you called. See “Redialing a Call” in Chapter 5.
16 Speaker button — Enables you to use the speaker phone feature. Press the Speaker button before you dial the call, when your telephone is ringing, or while a call is in progress. To turn the speaker phone off and resume the conversation, pick up the handset.
17 Volume control buttons — Adjust the volume of the ringer, the speaker, and the handset. See “Setting the Volume” in Chapter 5.
18 Infrared Port (NBX 2102-IR Telephone only) — Receives infrared signals from a hand-held device running the Palm Operating System. See
“Palm Integration” in Chapter 6.
19 Mute button — Enables you to prevent callers from hearing what you are saying during a telephone call. Press the Mute button to turn off the telephone’s microphone when you are using the handset or when your telephone is in speaker phone mode. To turn off the Mute feature, press the Mute button again.
20 Hands Free button — Allows you to answer internal (intercom) calls without picking up the handset. To activate this feature, press the Hands Free button before calls come in to your telephone. The indicator lights when the feature is enabled. When you receive an internal call, your telephone sounds a tone and activates the speaker phone.
Programmable Access Buttons on the Business Telephone 19
Programmable
Access Buttons on
the Business
Telephone
Figure 2 displays the 18 programmable Access buttons. The One-Touch Speed Dials screen in the NBX NetSet utility shows your telephone’s current button mappings.
Figure 2 Access Buttons
Default Settings Access buttons have these default settings, which your administrator can change:
1 Feature button — Allows you to access features that are not directly assigned to an Access button on your telephone. See the NBX Feature Codes Guide in the NBX NetSet utility for a list of features and codes.
2 Direct Mail Transfer button — Sends a call directly to another user’s voice mailbox. See “Direct Mail Transfer” in Chapter 7.
3 Call Park button — Allows you to place a call in a “holding pattern” so that it can be retrieved from any other telephone on the system. See
“Call Park”in Chapter 7.
4 Flashbutton (analog line only) — Toggles the current call to another call if the line has the Call Waiting service from your local telephone company, or enables call transfer if the line has the Call Transfer service.
5 Unassigned — This button has no default assigned function.
6 Releasebutton — Disconnects calls. This feature is commonly used when you use a telephone headset. See “Using a Headset” in Chapter 6.
7 Typically, you can use these nine buttons for personal speed dial settings, although the administrator can map them to other features. See “Speed Dials” in Chapter 6.
8 In most circumstances, your administrator designates these three system appearance buttons as lines for incoming and outgoing calls.
1 2 3 4 5 6
7
20 CHAPTER 2: NBX BUSINESS TELEPHONES
Status Lights for
System Appearance
Buttons on the
Business Telephone
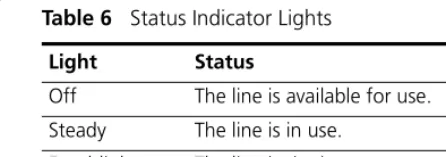
The light for each Access button that is set up as an incoming line (system appearance) indicates the status of the button. Table 6 shows the light pattern that is associated with the status of each line status.
The display panel on an NBX Telephone shows the name and extension of an internal caller. If your organization purchases Caller ID service from your telephone company and if the external caller allows Caller ID information to be broadcast, the display panel shows the external caller’s name and telephone number.
You can answer the call while the line’s status light is still flashing. Put the first call on hold and press the Access button for the new incoming call. For more information, see “Putting a Call on Hold” in Chapter 5. Table 6 Status Indicator Lights
Light Status
Off The line is available for use. Steady The line is in use.
3
NBX B
ASIC
T
ELEPHONE
This chapter describes the buttons, controls, and features that are specific to the NBX 2101 Basic Telephone. It covers these topics:
■ Basic Telephone Buttons and Controls
■ Programmable Access Buttons on the Basic Telephone
■ Programmable Access Buttons on the Basic Telephone
Unless otherwise noted, the features discussed in this chapter apply to the SuperStack 3 NBX, NBX 100, and NBX 25 Networked Telephony Solutions.
For a description of the features on the NBX Business Telephone, see
22 CHAPTER 3: NBX BASIC TELEPHONE
Basic Telephone
Buttons and
Controls
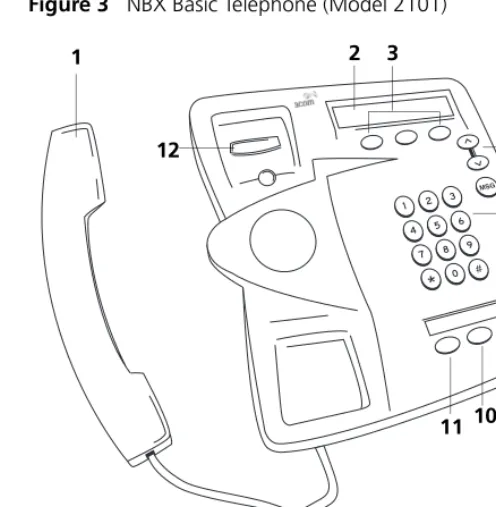
Figure 3 shows the buttons and controls on the NBX Basic Telephone.
Figure 3 NBX Basic Telephone (Model 2101)
The NBX Basic Telephone has these features:
1 Handset
2 Display panel — Provides telephone status messages (see Table 7), Caller ID, Locked Telephone, and other feature information (if enabled), and the number of messages in your voice mail mailbox. You can also use it to view and dial from the call logs of your most recent calls , the internal user directory, your personal speed dial list or the system-wide speed dial list.
3 Soft buttons — Allow you to select and dial names from Call Logs (your recent Missed, Answered, and Dialed calls), the internal user directory, or the personal and system-wide speed dial lists. See “More Ways to Dial a Call” in Chapter 5. The buttons, from left to right, are:
■ Slct (Select)
■ Back (returns you to the next higher level in the menu)
■ Exit
2 3
4 5 6 7 8
9 10 11 12
Programmable Access Buttons on the Basic Telephone 23
4 Scroll buttons — Allow you to scroll through user names in the internal user directory, view your personal speed dials and system-wide speed dials, and view recent calls to and from your telephone. See “Using the NBX Telephone Display Panel” in Chapter 5.
5 MSG (Message) button — Accesses your voice mail messages through the NBX Messaging system. See “Listening to NBX Messages” in
Chapter 4.
6 Telephone key pad
7 Volume control buttons — Adjust the volume of the ringer and the handset. See “Setting the Volume” in Chapter 5.
8 Hold button — Places a caller on hold. See “Putting a Call on Hold”in
Chapter 5.
9 Transfer button — (factory default setting) See “Programmable Access Buttons on the Basic Telephone” later in this chapter.
10 Call Toggle button — (factory default setting) See “Programmable Access Buttons on the Basic Telephone” later in this chapter.
11 Feature button — (factory default setting) See “Programmable Access Buttons on the Basic Telephone” later in this chapter.
12 Switch hook (under the handset) — Pressing and releasing the switch hook gives you a dial tone. This feature is used with Call Park. See “Call Park” in Chapter 7.
Programmable
Access Buttons on
the Basic Telephone
The NBX Basic Telephone has three programmable Access buttons. The factory-default settings for these buttons are (from left to right):
■ Feature — Press this button before you dial a feature code. See the
NBX Feature Codes Guide below any screen in the NBX NetSet utility.
■ Call Toggle — The Call Toggle button is available only on the NBX Basic Telephone. Using this button, you can manage two telephone calls at the same time. See “Answering a Call” in Chapter 5.
■ Transfer — Press this button to transfer the current call to another extension or telephone number. See “Transferring a Call” in
Chapter 5.
24 CHAPTER 3: NBX BASIC TELEPHONE
Status Icons on the
Basic Telephone
Your NBX Basic Telephone allows you to use two telephone lines at the same time.
On the display panel, the behavior of the telephone icon next to the number 1 (for Line 1) on the first row, or 2 (for Line 2) on the second row, indicates the status of the lines. See Table 7..
If a call comes in on one line while you are on a call on the other line, you can answer the second call. See “Answering a Call” in Chapter 5.
Table 7 Status Indicator Behavior for the Telephone Icon in the Display Panel Telephone
Icon Status
4
NBX V
OICE
M
ESSAGING
This chapter covers these topics:
■ NBX Messaging Components
■ Changing Your Password
■ Changing Your Name Announcement and Personal Greeting
■ Listening to NBX Messages
■ Replying to a Message
■ Forwarding a Message
■ Creating and Sending a Message
■ Creating Personal Voice Mail Group Lists
■ Marking a Message as Private or Urgent
■ Forwarding Incoming Calls to Your Call Coverage Point
■ Other Ways to Manage Your Voice Mail Messages
■ Other Kinds of Mailboxes
NBX Messaging
Components
A key component of the NBX Networked Telephony Solutions is the NBX Messaging system, which includes voice mail, off-site notification, and several administrative features. Voice mail allows callers to leave voice messages in your voice mailbox when you are not able to answer your telephone. You can listen to, save, and forward those messages from any touch-tone telephone.
If your system uses a messaging application other than NBX Messaging, such as 3Com® NBX® Unified Communications or a third-party
messaging application, use the documentation for your messaging application instead of the instructions in this chapter.
26 CHAPTER 4: NBX VOICE MESSAGING
Important Considerations
■ The steps are the same for initially setting up the name
announcement, personal greetings, and passwords for personal, greeting-only, and phantom voice mailboxes. See “Setting Up Your Password and Voice Mail for the First Time” in Chapter 1 for details. (Your administrator creates group mailboxes and their passwords.)
■ For changes to passwords and greetings, see “Changing Your
Password” and “Changing Your Name Announcement and Personal
Greeting” later in this chapter.
■ The default setting for the maximum length of each voice mail message on the system is 5 minutes. Your administrator can configure your organization’s NBX messaging system to receive and store voice mail messages that are up to 10 minutes long.
■ Use the Off-Site Notification feature if you want the NBX system to notify you when callers leave voice mail messages in your voice mailbox. See “Off-Site Notification” in Chapter 6.
For information on accessing NBX features from an analog telephone, see the NBX Feature Codes Guide in the NBX NetSet™ utility. For how to set
up your NBX NetSet password the first time, see Chapter 1.
Changing Your
Password
You use the same 4-digit to 10-digit password to log in to the NBX NetSet utility and to access your NBX voice mail. You can change this password with your telephone (using the NBX voice prompts or a feature code) or through the NBX NetSet utility. See Table 8.
See Chapter 1 for how to set up your password for the first time.
If you forget your password, the administrator can set it to be your extension number. Then follow the instructions in Table 8 to change it to a more secure password. See “Security Tips” next.
If your NBX system uses 3Com NBX Unified Communications or a third-party messaging system:
■ Use the feature code method in Table 8 to set and change the NBX
NetSet password.
■ 3Com recommends that you use the same password for your voice
Changing Your Name Announcement and Personal Greeting 27
Security Tips ■ Change your password often.
■ Do not use passwords that can easily identify you, such as your phone extension or birth date.
■ Avoid simple passwords such as 1234 or 0000.
■ Use numbers only; do not use * or # as part of your password.
■ Longer passwords are more secure.
■ Never tell your password to anyone.
Changing Your
Name
Announcement and
Personal Greeting
Change your personal greeting often, to let callers know, for instance, that you are on vacation, available at another number, or unavailable for a specified amount of time.
You may also want to change the greeting to say that your extension is a “greeting-only mailbox,” so that callers do not attempt to leave
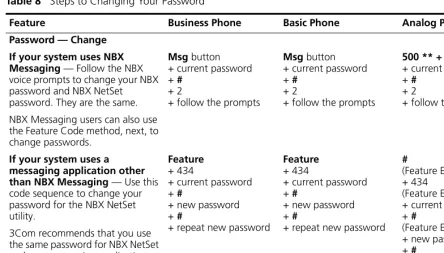
messages. See “Greeting-Only Mailbox” later in this chapter. Table 8 Steps to Changing Your Password
Feature Business Phone Basic Phone Analog Phone
Password — Change
If your system uses NBX Messaging — Follow the NBX voice prompts to change your NBX password and NBX NetSet password. They are the same. NBX Messaging users can also use the Feature Code method, next, to change passwords.
If your system uses a messaging application other than NBX Messaging — Use this code sequence to change your password for the NBX NetSet utility.
3Com recommends that you use the same password for NBX NetSet and your messaging application.
Msg button + current password + #
+ 2
+ follow the prompts
Feature
+ 434
+ current password + #
+ new password + #
+ repeat new password
Msg button + current password + #
+ 2
+ follow the prompts
Feature
+ 434
+ current password + #
+ new password + #
+ repeat new password
500 ** + extension
+ current password + #
+ 2
+ follow the prompts
#
(Feature Entry Tone) + 434
(Feature Entry Tone) + current password + #
(Feature Entry Tone) + new password + #
(Feature Entry Tone) + repeat new password + #
28 CHAPTER 4: NBX VOICE MESSAGING
To change your name announcement or personal greeting:
1 Log in to your mailbox at your telephone or remotely.
2 Press 9 for Mailbox Options and then press 1.
3 To review or change your name announcement, press 1 and follow the prompts.
4 To review or change your personal greeting, press 2 and follow the prompts.
If you forget your password, the administrator can set it to be your extension number. Then follow the instructions in Table 8 to change it to a more secure password. See “Security Tips” earlier in this chapter.
Listening to NBX
Messages
You can listen to your NBX voice mail messages from your NBX
telephone, from any touch-tone telephone, or by logging in to the NBX NetSet utility. After you listen to messages, you can save or delete them to clear them from the New Messages queue. For how to set up your NBX NetSet password the first time, see Chapter 1.
If your system uses a messaging application other than NBX Messaging (such as 3Com NBX Unified Communications or a third-party messaging application), use the documentation for your messaging application instead of these instructions.
Message Indicators When you have messages in your mailbox:
■ On an NBX Business Telephone — The indicator next to the MSG button lights up, and the display panel shows the total number of messages. Example: 3 Msgs 2 New.
■ On an NBX Basic Telephone — The display panel shows the total number of messages. Example: 3 Msgs 2 New.
■ On an analog telephone — Pick up the handset. If you hear the New Messages Tone (alternating solid tone and rapid stutter tone), you have new messages (or messages that you have listened to but did not save or delete). For information on accessing NBX features from an analog telephone, see the NBX Feature Codes Guide in the NBX NetSet utility.
Listening to NBX Messages 29
From Your Computer To listen to your messages from your computer, you must have a sound card and a third-party application such as Windows Media Player:
1 Log on to the NBX NetSet utility with your extension and password.
2 Select a message in the Voice Mail Messages area, Personal Settings tab.
3 Click Listen.
4 The third-party application downloads and plays the voice message.
5 To delete the message, select the message and then click Delete.
From Your NBX Telephone
To listen to your messages from your own NBX Business or Basic Telephone:
1 Pick up the handset and press the MSG button to access the mailbox.
2 At the prompt, type your password and press #.
3 See Table 9 for the buttons that you use to manage your messages.
From Any Internal NBX Telephone
To listen to your messages from any NBX telephone other than your own within your NBX system:
1 Pick up the handset and press the MSG button.
2 Press * and dial your extension. You hear your name announcement.
3 Dial your password and press #.
4 See Table 9 for the buttons that you use to manage your messages.
From a Remote Location
To listen to your messages from an external telephone:
■ If you can dial your telephone extension directly — Press * during your greeting. At the prompts, enter your extension and password, and press #.
■ If you call the main telephone number of your organization and:
■ The Automated Attendant answers — Press * * during the greeting. At the prompts, enter your extension and password, and press #.
■ The receptionist answers — Ask to be transferred to your voice mail. Press * during the greeting. At the prompts, enter your extension and password and press #.
30 CHAPTER 4: NBX VOICE MESSAGING
Information About Your Messages
To listen to date, time, and sender information for a message in your mailbox, press 6 during or after the message, and then press one of these buttons:
Table 9 Managing Your NBX Voice Messages
Play or repeat a message.
Save the message.
Delete the message from your mailbox. You cannot retrieve a message after you delete it.
Reply to the message. See “Replying to a Message”
later in this chapter.
Forward the message. See “Forwarding a Message”
later in this chapter.
Listen to date, time, and sender information about the message. See “Information About Your Messages” next.
Back up 5 seconds in the current message.
Pause the current message for up to 20 seconds.
Move ahead 5 seconds in the current message.
Move to the next message.
Return to the main menu.
Date and time information.
Sender information.
Replying to a Message 31
Replying to a
Message
You can send a reply to the originator of a voice mail message.
If you receive a message that is marked Private, you can send a reply only to the originator.
To reply to a message after you listen to it:
1 Press 4.
2 After the tone, record your reply.
3 Hang up, or press # for more options.
4 If you press #, press one of these buttons:
Forwarding a
Message
You can forward most messages, either with or without adding introductory comments.
If the message that you received is marked Private, you cannot forward it.
To forward a message:
1 Log in to your voice mailbox at your telephone or remotely.
2 Listen to a message that you want to forward, and press 5.
3 After the tone, record an introductory message and then press #.
OR
If you choose not to record a comment, press # when you hear the tone.
Send your reply.
Re-record your reply.
Listen to your reply.
32 CHAPTER 4: NBX VOICE MESSAGING
4 Optionally, press one of these buttons, OR proceed to step 5.
5 When you are ready to forward the message, press 1.
6 Dial one of these destination numbers plus #:
■ The internal extension or mailbox number of the recipient
■ A One-Touch (on the NBX Business Telephone), personal, or system-wide speed dial number. See “Speed Dials” in Chapter 6.
■ A personal voice mail group list number. (See “Creating Personal Voice
Mail Group Lists” later in this chapter.)
■ A site code plus extension (to send to a user on another NBX system in your organization). Example: neee or neeee (where n = one or more site code digits and e = the extension digits on the other system)
For details on valid site codes, see your administrator.
7 To forward the message to several recipients, dial each mailbox number followed by #.
8 After the last destination number and its #, press #. Your message is sent.
Stay on the line and follow the prompts to delete or save the message.
Re-record your introductory comment.
Listen to your introductory comment.
Creating and Sending a Message 33
Creating and
Sending a Message
To create and send a message directly without actually making a call:
1 Log in to your mailbox at your telephone or remotely.
2 Dial 2 to select Create and Send a Message.
3 At the tone, record a message that is at least 2 seconds long, and press # to end the recording.
4 Optionally, press one of these buttons, OR proceed to step 5.
5 When you are ready to send the message, press 1.
6 Dial one of these destination numbers plus #:
■ The internal extension or mailbox number of the recipient
■ A One-Touch (NBX Business Telephone only), personal, or system-wide speed dial number. See “Speed Dials” in Chapter 6.
■ A personal voice mail group list number. (See “Creating Personal Voice
Mail Group Lists” later in this chapter.)
■ A site code plus extension (to send to a user on another NBX system in your organization). Example: neee or neeee (where n = one or more site code digits and e = the extension digits on the other system)
For details on valid site codes, see your administrator.
7 To send the message to several recipients, dial each mailbox number followed by #.
8 After the last destination number and its #, press #. Your message is sent.
Re-record the message.
Review the message.
34 CHAPTER 4: NBX VOICE MESSAGING
Creating Personal
Voice Mail Group
Lists
A Personal Voice Mail List, also called a mail group, is a collection of extensions to which you assign a special “group number.” Use it to send a message to everyone on the list at the same time.
A Personal Voice Mail List is not the same as a Hunt Group or Calling Group. See “Hunt Groups and Calling Groups” in Chapter 7.
To create a personal voice mail list (mail group):
1 Log in to your mailbox at your telephone or remotely.
2 Dial 9 for Mailbox Options.
3 Dial 3 for Group Lists, and then 2 for Create Group.
4 Dial any 2-digit number, which becomes the Group Number.
5 After the tone, record a name for the group, and press #. Record the group number and name.
6 Dial one of these numbers:
■ 1 to save the group name and proceed to step 7
■ 2 to change the group name and return to step 5
■ * to exit without saving
7 After you press 1, dial one of these destination numbers plus #:
■ The internal extension or mailbox number of the recipient.
■ A One-Touch (NBX Business Telephone only), personal, or system-wide speed dial number. See “Speed Dials” in Chapter 6.
■ A site code plus extension (to send to a user on another NBX system in your organization). Example: neee or neeee (where n = one or more site code digits and e = the extension digits on the other system)
For details on valid site codes, see your administrator.
8 When you have added all of the destination numbers, press:
■ 1 to save the group list
■ 2 to cancel creating the group
■ ** to return to the previous menu
Creating Personal Voice Mail Group Lists 35
Modifying or Deleting Groups
You can review your voice mail groups, add members, or delete a group.
To modify a voice mail group:
1 Log in to your mailbox at your telephone or remotely.
2 Dial 9 forMailbox Options.
3 Dial 3 to select Group Lists.
4 Press 1, 3, or 4:
5 If you press 4, dial one of these destination numbers plus # to add a destination address to the group:
■ The internal extension or mailbox number of the recipient.
■ A One-Touch (NBX Business Telephone only), personal, or system-wide speed dial number. See “Speed Dials” in Chapter 6.
■ A site code plus extension (to send to a user on another NBX system in your organization). Example: neee or neeee (where n = one or more site code digits and e = the extension digits on the other system)
For details on valid site codes for your system, see your administrator.
6 When you have added all of the destination numbers, press:
■ 1 to save the modified group list
■ 2 to cancel this modification to the group
■ ** to return to the previous menu
OR hang up.
Review your list of groups.
Create a group.
Delete a group.
Add to the members in a group. See step 5.
36 CHAPTER 4: NBX VOICE MESSAGING
Marking a Message
as Private or Urgent
When you leave a message in another user’s mailbox, you can mark it as
Private or Urgent. If you do not select a delivery option, your message is sent as a Normal message.
■ Private Messages —The recipient cannot forward the message to others.
■ Urgent Messages — Places the message at the beginning of the recipient’s message queue so that Urgent messages are heard first.
1 Follow the steps in “Replying to a Message”, “Forwarding a Message”, or “Creating and Sending a Message” earlier in this chapter.
2 In step 4, press 9.
3 To mark the message Urgent, press 1. To mark the message Private, press 2.
4 To send the marked message, press 1, or listen to the prompts for other choices.
Forwarding
Incoming Calls to
Your Call Coverage
Point
You can configure your NBX telephone so that all incoming calls go directly into your call coverage point, which may be your voice mailbox, the Auto Attendant or receptionist, or a different telephone number. When a call comes in, the telephone rings once (giving you the chance to answer the call) and then sends the call to your call coverage point.
On an NBX Business Telephone:
1 Press the FWD MAIL (Forward to Mail) button. The indicator light turns on.
2 To turn off Forward to Mail, press the button again. The light turns off.
On an NBX Basic Telephone:
1 Pick up the handset.
2 Press the Feature button and 440. FWD appears in the display panel.
3 To turn off Forward to Mail, pick up the handset and press the Feature button and 440 again. FWD disappears from the display panel.
To prevent the telephone from ringing even once, use the Do Not Disturb feature. See “Do Not Disturb” in Chapter 6.
Other Ways to Manage Your Voice Mail Messages 37
Other Ways to
Manage Your Voice
Mail Messages
You can listen to and, in some configurations, delete your voice messages from within an e-mail application or a messaging application using your Internet browser. For details, see “Listening to Your Messages in Your E-mail or Browser” in Chapter 7.
Other Kinds of
Mailboxes
The NBX system allows you (for the greeting-only mailbox) or the administrator (for phantom or group mailboxes) to set up mailboxes for special situations, as described in this section.
Greeting-Only Mailbox
When you designate that your mailbox is a greeting-only mailbox, callers hear your personal greeting but they cannot leave a voice mail message.
Examples:
■ If you are a teacher in a school, you can create a personal greeting message every day that explains homework assignments. Students call in to the greeting-only mailbox to get the homework information but cannot leave a message for you on this mailbox.
■ When you take an extended leave of absence, you can create a personal greeting with the scheduled date of return and whom to call during your absence. Callers can be transferred to other extensions but are unable to leave voice mail messages for you.
■ If you are the administrator, you can create a greeting-only mailbox and use the personal greeting to post information for employees, such as a notice that the offices are closed because of bad weather.
To change your voice mailbox to a greeting-only mailbox,
in NBX NetSet > NBX Messaging, select Greeting Only Mailbox.
When you create the personal greeting, remember to tell callers that they cannot leave messages in this voice mailbox. For instructions on changing the personal greeting, see “Changing Your Name Announcement and Personal Greeting” earlier in this chapter.
In addition to preventing a caller from leaving a message, a greeting-only mailbox does not allow anyone to:
■ Forward or create and send a message to it
■ Reply to a message that was sent from its extension
38 CHAPTER 4: NBX VOICE MESSAGING
Phantom Mailbox A phantom mailbox does not have an actual telephone associated with it. The administrator sets up a phantom mailbox.
Examples:
■ If you are a sales representative who travels constantly for your organization and never comes into the office, you still need a way to receive telephone messages. Using your phantom mailbox, you can retrieve, forward, and save messages in the same way that any other employee can but without a physical telephone connected to your NBX system.
■ If you are an employee who lives a long distance from your office and work from home, customers and others can leave messages in the your phantom mailbox and you can call in to the NBX system to retrieve them.
You retrieve messages from a phantom mailbox in the same way that you retrieve messages from a personal mailbox. See “Listening to NBX Messages” earlier in this chapter.
Group Mailbox A group mailboxis a voice mailbox from which a group of users can retrieve messages. Your administrator creates group mailboxes and can explain how to retrieve messages that are left in the group mailbox.
Example:
■ During nonbusiness hours, the system can send incoming telephone calls for your sales department to a group mailbox. Your administrator assigns to the appropriate sales people the ability to listen to, forward, or otherwise handle all messages that are directed to the group mailbox.
5
S
TANDARD
F
EATURES
This chapter describes standard features of the NBX Business and Basic Telephones. It covers these topics:
■ Answering a Call
■ Using the NBX Telephone Display Panel
■ More Ways to Dial a Call
■ Setting Your Call Coverage Point
■ Putting a Call on Hold
■ Transferring a Call
■ Establishing a Conference Call
■ Setting the Volume
Unless otherwise noted, the features described in this chapter are available on the SuperStack 3 NBX, NBX 100, and NBX 25 systems.
For help on accessing NBX features from an analog telephone, see the
NBX Feature Codes Guide in the NBX NetSet utility. For how to set up your NBX NetSet password the first time, see Chapter 1.
If your system uses a messaging application other than NBX Messaging, such as 3Com NBX Unified Communications or a third-party messaging application, use the documentation for your messaging application instead of the instructions in this chapter.
40 CHAPTER 5: STANDARD FEATURES
Answering a Call
To answer an incoming call, pick up the handset or, if you are using an NBX Business Telephone, press the Speaker button.The display panel on an NBX Telephone shows the name and extension of an internal caller. If your organization purchases Caller ID service from your telephone company and if the external caller allows Caller ID information to be broadcast, the display panel shows the external caller’s name and telephone number.
An unanswered call on any telephone on the NBX system is forwarded to the point that you specify in NBX NetSet > User Information > Call Forward. To specify the number of times that your telephone rings before the call is forwarded or to specify where you want the call to go, see “Setting Your Call Coverage Point” later in this chapter.
Answering a Second Call
On the NBX Business Telephone, when a new call arrives while you are on a call:
1 Press Hold to put the current call on hold.
2 Press the Access button for the line on which the new call is arriving.
3 To return to the earlier call, hang up the new call, or put it on hold or transfer it, and then press the Access button for the original call.
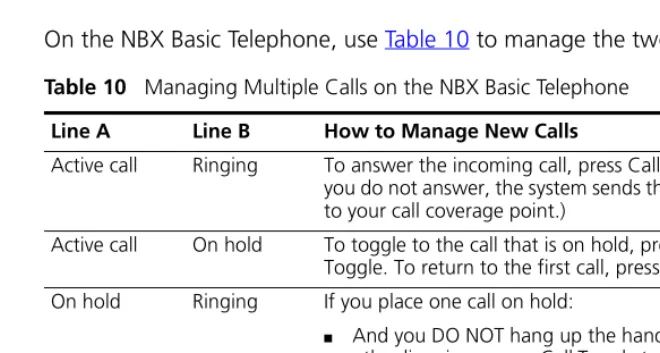
On the NBX Basic Telephone, use Table 10 to manage the two lines.
Table 10 Managing Multiple Calls on the NBX Basic Telephone Line A Line B How to Manage New Calls
Active call Ringing To answer the incoming call, press Call Toggle. (If you do not answer, the system sends the second call to your call coverage point.)
Active call On hold To toggle to the call that is on hold, press Call Toggle. To return to the first call, press Call Toggle. On hold Ringing If you place one call on hold:
■ And you DO NOT hang up the handse, and the
other line rings, press Call Toggle to return to the call on hold. Then press Call Toggle to answer the incoming call.
■ And you DO hang up the handset and the other
Using the NBX Telephone Display Panel 41
See also “Status Icons on the Basic Telephone” in Chapter 3 for the indicators in the NBX Basic telephone display panel during these calls.
Using the NBX
Telephone
Display Panel
Use the telephone display panel of the NBX Telephone to dial a number:
■ Call Logs — Logs of the most recent calls to and from your telephone (Missed Calls, Answered Calls, Dialed Calls).
■ Directory — A list of the users and their extensions on your system
■ Personal SpeedDials — A list of personal speed dial numbers that you have set in NBX NetSet > Speed Dials or System Speed Dials, the list of the system-wide speed dial numbers
To access the display panel lists:
1 Pick up the handset. Press one of the scroll keys to the right of the display.
On an NBX Business Telephone, press a scroll key without picking up the handset. The Speaker comes on, and you hear the dial tone briefly.
2 Use the scroll keys to move through the lists. When you see the list that you want to use, press the button under Slct (Select).
3 Use the scroll keys to move to the name or number that you want to call. Verify that the cursor is at that entry, and press the button under Slct.
4 To move back to the previous menu, press the button under Back.
5 To leave the lists entirely, press the button under Exit, or press an Access button that is programmed for Release, or hang up.
On hold On hold If you have placed two calls on hold:
■ And you DO NOT hang up the handset, press
Call Toggle to return to the call you most recently placed on hold. Then press Call Toggle again to return to the line you first placed on hold.
■ And you DO hang up the handset, pick up the
handset to return to the call you most recently placed on hold. Then press Call Toggle to be connected to the line you first placed on hold. Active or on
hold
On hold If a third call comes in while you have one active call and one on hold, or two calls on hold, the system forwards the third caller directly to your call coverage point. See “Setting Your Call Coverage Point” in Chapter 5 for call forwarding details.
42 CHAPTER 5: STANDARD FEATURES
Tips on Using the Lists
■ After you press a scroll key, if you do not select an item immediately, the display alternates between the list:
and the menu choices:
■ In the user directory, names appear in alphabetical order. The system updates the directory when your administrator adds or removes users.
■ In the user directory, to move quickly to the first name that begins with a particular letter, use the key pad. For example: press 3 twice to move to the first name that begins with E; press 3 three times to move to the first name that begins with F. Then scroll to the name you want.
More Ways to Dial
a Call
This section describes other standard dialing features. For information on dialing from an analog telephone, see the NBX Feature Codes Guide in the NBX NetSet utility.
An Internal Call To dial an internal call:
1 Pick up the handset or, on an NBX Business Telephone, press the Speaker button. You hear the dial tone. For an internal call, if your telephone defaults to an external line or if you inadvertently choose an external line, select an internal line.
2 Use the display panel to find and dial the last name in the user directory, find and dial one of the numbers in a speed dial directory, or dial the person’s 3-digit or 4-digit extension.
Call Logs Directory
Select an entry Slct | Back | Exit
Setting Your Call Coverage Point 43
3 When you are finished, hang up the handset, or if you are using the Speaker, press the Speaker button again to end the call.
For details about placing calls to remote or branch offices, see “Dialing a Call to a Remote Office” in Chapter 7.
An External Call To dial an external call:
1 Pick up the handset or, if you are using an NBX Business Telephone, press the Speaker button. You hear the Dial Tone. If your telephone defaults to an internal line, dial 9,8 or whatever you need to access an external line. If you are using an NBX Business Telephone and one of the buttons is configured to access an external line directly, press the Access button.
2 Dial the number, OR use the display panel on an NBX Telephone to scroll to a recent missed, answered, or dialed number, or a personal or
system-wide speed dial number. If you have programmed one of the One-Touch buttons on the NBX Business Telephone, press that button.
3 When you finish speaking, hang up the handset, or if you are using the Speaker, press the Speaker button to terminate the call.
Redialing a Call On an NBX Business Telephone:
■ Pick up the handset and press Redial to dial the most recent number that you called OR use the Call Logs to redial a recently missed, answered, or dialed call.
On an NBX Basic Telephone:
■ Pick up the handset on your telephone and then press the Feature button + 401 to dial the most recent number that you dialed,OR use the Call Logs on the display panel to redial a recently missed,
answered, or dialed call.
Setting Your Call
Coverage Point
Use this feature to specify:
■ How many times you want your telephone to ring before the system forwards unanswered calls
■ Where you want your calls to go when you do not answer
To change the number of rings or the call coverage point:
1 Log in to NBX NetSet > User Information > Call Forward.
44 CHAPTER 5: STANDARD FEATURES
3 Select a call coverage point:
■ If you select Forward Call to Phone Number, type that number in the Phone Number field. Do not use parentheses, hyphens, or spaces. For external calls, start by entering a 9 or 8 or whatever required to access an outside line. Example: 912815551212 dials (281) 555-1212.
The number that you choose may be limited by your call permissions. To view your permissions, see NBX NetSet > User Info > Call Permissions.
■ If you select Disconnect (no coverage), the system disconnects an incoming call if it is not answered after the specified number of rings.
4 Click Apply, and then click OK.
■ Calls that come in directly to your extension go to the call coverage
point that you specify in the NBX NetSet utility.
■ Calls that come to your telephone through hunt groups and calling
groups follow the call coverage path that your administrator sets up for the group. See “Hunt Groups and Calling Groups” in Chapter 7.
Putting a Call
on Hold
On an NBX Business Telephone, press Hold. To return to the call, press the Access button on which the call arrived.
On an NBX Basic Telephone:
1 Press the Hold button.
2 To return to the call, press the Call Toggle button.
To put an NBX Basic Telephone call on hold to dial a second number:
1 Press the Call Toggle button to put the call on hold and then dial the second telephone number.
2 To return to the original call, press the Call Toggle button again.
On the NBX Basic Telephone, if you have placed two calls on hold, how you return to the calls depends on whether you have hung up since you put the call on hold.
If you place two calls on hold:
■ And you DID NOT hang up the handset, press Call Toggle to return to the call that you most recently put on hold. Then press Call Toggle again to return to the second call.
Transferring a Call 45
Transferring a Call
When you answer an incoming telephone call, the Transfer feature allows you to send that call from your telephone to any other internal line or, if your call permissions allow, to an outside line. (To view your permissions, log in to NBX NetSet > User Information > Call Permissions. The administrator can change your call permissions.)Announced (Screened) Transfer
Before you complete a transfer, you can announce to the recipient that you are transferring a call. The recipient can then decide whether to take the call. To announce a transfer:
1 While on a call, press the Transfer button. The system places the caller on hold and selects a new line.
2 Dial the extension number to which you want to transfer the call.
3 When the recipient answers, announce the call.
■ If the recipient wants to take the call, press Transfer again to complete the transfer, and hang up the handset.
■ If you are on an NBX Business Telephone and the recipient does not want to take the call, retrieve it by pressing the Access button on which the call originated.
■ If you are on an NBX Basic Telephone, and the recipient does not want to take the call, press and release the hook switch to disconnect the attempted transfer, and then retrieve the original call by pressing Call Toggle.
Blind Transfer In a blind transfer, you transfer the call without notifying the recipient:
1 While on a call, press the Transfer button. The system places the caller on hold and selects a new line.
2 Dial the number to which you want to transfer the call.
3 As soon as you hear a full ring, press the Transfer button and hang up. (If you press the Transfer button too soon after you dial the number, the transfer may not occur.)
46 CHAPTER 5: STANDARD FEATURES
Direct Mail Transfer
You can transfer a call directly into another user’s voice mailbox. The call does not ring on that user’s telephone.Calls transferred to a user’s mailbox by means of Direct Mail Transfer are always directed into that user’s voice mailbox, even if the recipient has specified a different call coverage point.
On an NBX Business Telephone:
1 While you are on a call, press the Access button assigned to Direct Mail Transfer.
2 Dial the extension of the person to whose voice mailbox you want to transfer the call.
3 Hang up the handset.
On an NBX Basic Telephone:
1 While you are on a call, press the Feature button and 441.
2 Dial the voice mail extension of the person to whose voice mailbox you want to transfer the call.
3 Hang up the handset.
Establishing a
Conference Call
You can establish a Conference Call with up to four parties, including yourself. You must be using a telephone on the NBX system. The other three parties can be any combination of internal and external calls.
From an NBX Telephone, follow these steps:
On the NBX Basic Telephone, you must use the Feature code instructions in parentheses. For the NBX Business Telephone, use the Conference button OR the Feature Code instructions.
1 Dial a call, or receive a call from someone else. Two parties are now on the call.
2 While on the call, press the Conference button (or press Feature+ 430). The system selects a new line and places the first party on hold.
3 Dial a call to an internal or external third party.
Establishing a Conference Call 47
■ Until you press the Conference button (or Feature+ 430) the second time, the second party rem