MultiMode™ MOTOR CONTROLLER © 2011 CURTIS INSTRUMENTS, INC.
1243GEN2 Manual, p/n 37044 Rev. E: February 2011
CURTIS INSTRUMENTS, INC. 200 Kisco Avenue
Mt. Kisco, New York 10549 USA Tel. 914.666.2971 Fax 914.666.2188 www.curtisinstruments.com M O D E L
1243
Generation 2
CONTENTS
1. OVERVIEW ...1
2. INSTALLATION AND WIRING ...4
Mounting the Controller ...4
Connections: Low Current ...6
Connections: High Current ...6
Wiring: Controller ...7
Wiring: Throttle ...9
5kΩ–0, 2-wire potentiometer throttle (“Type 1”) ...10
Single-ended 0–5V, current source, 3-wire pot, and electronic throttles (“Type 2”) ...11
0–5kΩ, 2-wire potentiometer throttle (“Type 3”) ...13
Wigwag 0–5V and 3-wire pot throttles ...14
Wiring: Fault Outputs ...14
Wiring: Spyglass Display ...15
Wiring: Emergency Reverse ...16
Wiring: Emergency Reverse Check ...16
Wiring: Auxiliary Driver ...16
Contactor, Switches, and Other Hardware ...17
3. PROGRAMMABLE PARAMETERS ...19
Battery Parameter ...21
Battery Voltage ...21
Acceleration Parameters ...21
Drive Current Limit, M1–M4 ...21
Acceleration Rate, M1–M4 ...21
Quick Start ...21
Current Ratio ...22
Braking Parameters ...23
Braking Current Limit, M1–M4 ...23
Deceleration Rate, M1–M4 ...23
Throttle Deceleration Rate ...23
Restraint, M1–M4 ...23
Braking Rate, M1–M4 ...24
Taper Rate ...25
Variable Braking ...25
Interlock Braking Parameters ...26
Interlock Braking Rate ...26
Max. Forward Regen ...26
Max. Reverse Regen ...26
Min. Forward Regen ...27
Min. Reverse Regen ...27
Max. Load Volts ...27
Min. Load Volts ...27
Electromagnetic Brake Parameters ...28
Aux Type ...28
EM Brake PWM ...28
Aux Delay ...28
Interlock Brake Delay ...28
Speed Parameters ...31
Max. Forward Speed, M1–M4 ...31
Max. Reverse Speed, M1–M4 ...31
Creep Speed ...31 Load Compensation ...31 Throttle Parameters ...32 Throttle Type ...32 Throttle Deadband ...32 Throttle Max ...34 Throttle Map ...36
Pot Low Fault ...38
Field Parameters ...38
Min. Field Current Limit ...38
Max. Field Current Limit ...38
Field Map Start ...38
Field Map ...39
Field Check ...40
Main Contactor Parameters ...40
Main Contactor Interlock ...40
Main Contactor Open Delay ...40
Main Contactor Diagnostics ...40
Sequencing Fault Parameters ...41
Anti-Tiedown ...41
High Pedal Disable (HPD) ...41
Static Return to Off (SRO) ...42
Sequencing Delay ...42
Emergency Reverse Parameters ...43
Emergency Reverse Current Limit ...43
Emergency Reverse Check ...43
Emergency Reverse Direction Interlock ...43
Motor Protection Parameters ...44
Warm Speed ...44 CONTENTS
Hourmeter Parameters ...45
Adjust Hours High ...45
Adjust Hours Middle ...45
Adjust Hours Low ...45
Set Total Hours ...45
Set Traction Hours ...46
Total Service Hours ...46
Traction Service Hours ...46
Total Disable Hours ...46
Traction Disable Hours ...46
Traction Fault Speed ...47
Service Total ...47
Service Traction ...47
Hourmeter Type ...48
Pump Meter ...48
Battery Discharge Indicator (BDI) Parameters ...49
Full Voltage ...49
Empty Voltage ...49
Reset Voltage ...49
Battery Adjust ...50
BDI Disable ...50
BDI Limit Speed ...50
Fault Code Parameters ...51
Fault Code ...51
BDI Lockout ...52
4. INSTALLATION CHECKOUT ...53
5. VEHICLE PERFORMANCE ADJUSTMENT ...55
Major Tuning ...55
Tuning the active throttle range ...55
Tuning the controller to the motor ...58
Setting the unloaded vehicle top speed ...60
Equalizing loaded and unloaded vehicle speed ...61
Fine Tuning ...62
Response to reduced throttle ...62
Response to increased throttle ...63
Smoothness of direction transitions ...63
Ramp climbing ...64
6. PROGRAMMER MENUS ...65
1243GEN2 Parameters Menu ...65
1243GEN2 Monitor Menu ...69
1243GEN2 Faults/Diagnostics Menu ...70
7. DIAGNOSTICS AND TROUBLESHOOTING ...71
Programmer Diagnostics ...71
Spyglass Diagnostics ...71
Status LED Diagnostics ...74
Fault Output LED Diagnostics ...75
8. CONTROLLER MAINTENANCE ...76
Cleaning ...76
Fault History ...76
APPENDIXA Vehicle Design Considerations APPENDIXB Curtis WEEE / RoHS
APPENDIXC Programming Devices
APPENDIXD Programmable Parameters Index APPENDIXE Specifications, 1243GEN2 Controller CONTENTS
FIGURES
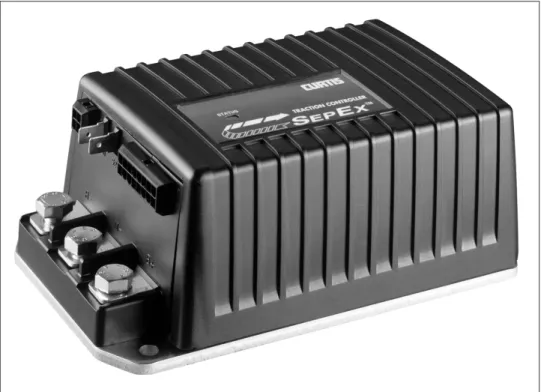
FIG. 1: Curtis 1243GEN2 electronic motor controller ... 1
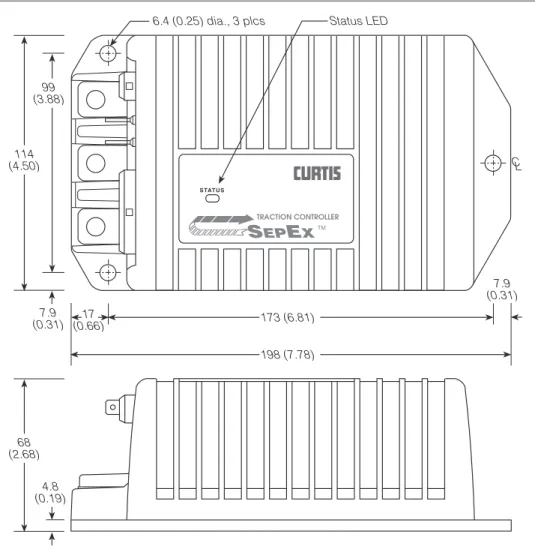
FIG. 2: Mounting dimensions, Curtis 1243GEN2 controller ... 4
FIG. 3: Basic wiring configuration, Curtis 1243GEN2 controller ... 7
FIG. 4: Wiring for 5kΩ–0 throttle (“Type 1”) ... 10
FIG. 5: Wiring for 20kΩ potentiometer used as a wigwag-style throttle (“Type 1”) ... 10
FIG. 6: Wiring for 0–5V throttles (“Type 2”) ... 11
FIG. 7: Wiring for current source throttle (“Type 2”) ... 12
FIG. 8: Wiring for 3-wire potentiometer throttle (“Type 2”) ... 12
FIG. 9: Wiring for Curtis ET-XXX electronic throttle (“Type 2”) ... 13
FIG. 10: Wiring for 0–5kΩ throttle (“Type 3”) ... 14
FIG. 11: Wiring for fault outputs ... 15
FIG. 12: Wiring for Curtis Spyglass display ... 15
FIG. 13: Ramp restraint maps for controller with the minimum field set at 3 amps, maximum field at 18 amps, and braking current limit at 300 amps ... 24
FIG. 14: Electromagnetic brake parameters, in the context of the four delay parameters ... 29
FIG. 15: Effect of adjusting the throttle deadband parameter ... 33
FIG. 16: Effect of adjusting the throttle max parameter ... 34, 35 FIG. 17: Throttle maps for controller with maximum speed set at 100% and creep speed set at 0 ... 36
FIG. 18: Throttle maps for controller with maximum speed set at 100% and creep speed set at 10% ... 37
TABLES
FIG. 19: Throttle maps for controller
with maximum speed set at 90%
and creep speed set at 10% ... 37
FIG. 20: Field current relative to armature current, with field map parameter set at 50% and 20% ... 39
FIG. 21: Curtis 840 Spyglass, 3-LED and 6-LED models ... 73
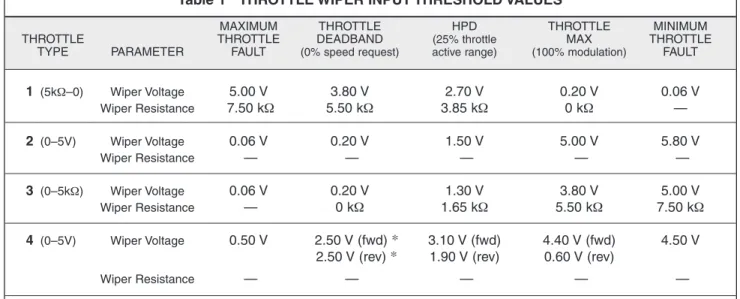
TABLES TABLE 1: Throttle wiper input (Pin 6) threshold values ... 9
TABLE 2: Mode selection ... 18
TABLE 3: Configuration options: auxiliary driver ... 30
TABLE 4: Programmable throttle types ... 32
TABLE 5: Standard battery voltages ... 49
TABLE 6: Fault categories ... 50
TABLE 7: Troubleshooting chart ... 72
TABLE 8: Status LED fault codes ... 74
TABLE 9: Fault category codes ... 75
1 — OVERVIEW
OVERVIEW
Curtis 1243 Generation 2 MultiMode™ controllers are separately excited motor speed controllers designed for use in a variety of small industrial vehicles and in material handling equipment. These programmable controllers are simple to install, efficient, and cost effective, while offering more features than the original 1243.
1
Fig. 1 Curtis 1243GEN2
MultiMode™ electronic motor controller.
The 1243GEN2 MultiMode™ controller provides smooth precise control of motor speed and torque. A full-bridge field control stage is combined with a half-bridge armature power stage to provide solid state motor reversing and full regenerative braking without additional relays or contactors.
The controller’s rugged IP53 housing and packaging are built to withstand shock and vibration. State-of-the-art surface mount logic board fabrication makes the 1243GEN2 controller even more reliable than the original 1243.
The 1243GEN2 is fully programmable through the Curtis 13XX handheld programmer. In addition to configuration flexibility, the programmer provides diagnostic and test capability.
1 — OVERVIEW
Like all Curtis motor controllers, the 1243GEN2 offers superior operator control of the vehicle’s motor drive speed. Features include:
✓ Interlock braking with load sensor to meet required braking distance without unnecessary harsh braking at light loads
✓ Maintenance monitor responds to preset vehicle operating hours and
drive hours as programmed by the OEM
✓ Two hourmeters—total KSI-on hours and traction hours—and the
associated maintenance timers are built into the controller
✓ BDI calculations performed within controller
✓ Estimates motor temperature based on field resistance and cuts back
maximum speed if the motor is overheated
✓ Diagnostic checks for field open and field shorted faults
✓ Supports PWM electromagnetic brake with maximum continuous
current of 2 amps
✓ Supports Type 4 throttle
✓ Active precharge of controller capacitor bank extends life of main
contactor
✓ Compatibility with Curtis 1307/1311 handheld programmers for quick and easy testing, diagnostics, and parameter adjustment
✓ MultiMode™ allows four user-selectable vehicle operating modes
✓ Continuous armature current control, reducing arcing and brush wear ✓ Complete diagnostics through the handheld programmer, the built-in
Status LED, and the optional 840 Spyglass display
✓ Two fault outputs provide diagnostics to remotely mounted displays
✓ Regenerative braking allows shorter stopping distances, increases battery charge, and reduces motor heating
✓ Automatic braking when throttle is reduced provides a compression braking feel and enhances safety
✓ Brake/Drive Interlock meets ISO stopping distance requirements ✓ Ramp restraint feature provides automatic electronic braking
that restricts vehicle movement while in neutral
✓ Linear cutback of regenerative braking current during overvoltage
✓ High pedal disable (HPD) and static return to off (SRO) interlocks prevent vehicle runaway at startup
✓ Internal and external watchdog circuits ensure proper software operation
✓ Fully protected inputs and short-circuit protected output drivers.
Curtis Model 840 Spyglass Display [optional]
✓ 3-wire serial interface
✓ Sequences between hourmeter, BDI, and error displays
✓ Single alphanumeric, non-backlit, 8 character, 5 mm LCD display for hourmeter, BDI, and fault messages
✓ Display updated by dedicated unidirectional serial port
✓ Available in 52 mm round case, DIN case, and as a bare board, each
with an 8-pin Molex connector; cases feature front seal to IP65 and rear seal to IP40; shock and vibration protection to SAE J1378
✓ Operating temperature range -10°C to 70°C; models with lower temperature ratings available for freezer applications
Familiarity with your Curtis controller will help you install and operate it prop-erly. We encourage you to read this manual carefully. If you have questions, please contact the Curtis office nearest you.
INSTALLATION AND WIRING
MOUNTING THE CONTROLLER
The controller can be oriented in any position, but the location should be carefully chosen to keep the controller as clean and dry as possible. If a clean, dry mounting location cannot be found, a cover must be used to shield the controller from water and contaminants. When selecting the mounting position, be sure to also take into consideration (1) that access is needed at the front of the controller to plug the programmer into its connec-tor, and (2) that the built-in Status LED is visible only through the view port in the label on top of the controller.
The outline and mounting hole dimensions for the 1243GEN2 control-ler are shown in Figure 2. To ensure full rated power, the controlcontrol-ler should be fastened to a clean, flat metal surface with three 6 mm (1/4") diameter screws, using the holes provided.
2
2 — INSTALLATION & WIRING: Controller
Fig. 2 Mounting dimensions, Curtis 1243GEN2 controller. CL SEPEX 198 (7.78) 6.4 (0.25) dia., 3 plcs 68 (2.68) 114 (4.50) 173 (6.81) 17 (0.66) 7.9 (0.31) 99 (3.88) 4.8 (0.19) 7.9 (0.31) STATUS Status LED TRACTION CONTROLLER TM
2 — INSTALLATION & WIRING: Controller
The mounting surface must be at least a 300×300×3 mm (12"×12"×1/8")
aluminum plate, or its equivalent, and subjected to a minimum 3 mph airflow to meet the specified time/current ratings. Although not usually necessary, a thermal joint compound can be used to improve heat conduction from the controller heatsink to the mounting surface.
You will need to take steps during the design and development of your end product to ensure that its EMC performance complies with applicable regulations; suggestions are presented in Appendix A.
The 1243GEN2 controller contains ESD-sensitive components. Use ap-propriate precautions in connecting, disconnecting, and handling the controller. See installation suggestions in Appendix A for protecting the controller from ESD damage.
Working on electric vehicles is potentially dangerous. You should protect yourself against runaways, high current arcs, and outgassing from lead acid batteries:
RUNAWAYS — Some conditions could cause the vehicle to run out of control. Disconnect the motor or jack up the vehicle and get the drive wheels off the ground before attempting any work on the motor control circuitry.
HIGH CURRENT ARCS — Electric vehicle batteries can supply very high power, and arcs can occur if they are short circuited. Always open the battery circuit before working on the motor control circuitry. Wear safety glasses, and use properly insulated tools to prevent shorts.
LEAD ACID BATTERIES — Charging or discharging generates hydrogen gas, which can build up in and around the batteries. Follow the battery manufacturer’s safety recommendations. Wear safety glasses.
☞
CONNECTIONS
Low Current Connections
A 16-pin Molex low current connector in the controller provides the low cur-rent logic control connections:
2 — INSTALLATION & WIRING: Controller
The mating connector is a 16-pin Molex Mini-Fit Jr. connector p/n 39-01-2165 using type 5556 terminals.
A 4-pin low power connector is provided for the handheld programmer. A complete 1311 programmer kit, including the appropriate connecting cable, can be ordered from Curtis.
The 4-pin connector can also be used for the Spyglass display. The display is unplugged when the programmer is used.
High Current Connections
Pin 1 load sensor input [optional] Pin 2 Fault 1 output / pump input Pin 3 Fault 2 output
Pin 4 main contactor driver output Pin 5 throttle: 3-wire pot high Pin 6 throttle: 0–5V; pot wiper Pin 7 throttle: pot low
Pin 8 auxiliary driver output (typically used for an electromagnetic brake)
Pin 9 Mode Select 2 input
Pin 10 emerg. reverse check output [optional] Pin 11 reverse input
Pin 12 forward input
Pin 13 emergency reverse input Pin 14 Mode Select 1 input Pin 15 interlock input Pin 16 keyswitch input (KSI)
8 7 6 5 4 3 2 1
16 15 14 13 12 11 10 9
Pin 1receive data (+5V)
Pin 2ground (B-)
Pin 3transmit data (+5V)
Pin 4+15V supply (100mA) 3 4
1 2
2 — INSTALLATION & WIRING: Controller
nuts required for the M8 bolts. The maximum bolt insertion depth below the surface of the bus bar is 1.3 cm (1/2"). Bolt shafts exceeding this length may damage the controller. The torque applied to the bolts should not exceed 16.3 N·m (12 ft-lbs).
Two 1/4" quick connect terminals (S1 and S2) are provided for the con-nections to the motor field winding.
WIRING: Standard Configuration
Figure 3 shows the typical wiring configuration for most applications. For walkie applications the interlock switch is typically activated by the tiller, and an emergency reverse switch on the tiller handle provides the emergency reverse signal.
For rider applications the interlock switch is typically a seat switch or a foot switch, and there is no emergency reverse.
Fig. 3 Standard wiring configuration, Curtis 1243GEN2 controller.
S1 S2 B- M- B+ INTERLOCK 5 kΩ POT THROTTLE (TYPICAL) EMERGENCY REVERSE
emergency reverse wiring check (optional) FORWARD MAIN CONTACTOR COIL POLARITY PROTECTION DIODE REVERSE MODE SELECT 1 MODE SELECT 2 ELECTRO-MAGNETIC BRAKE KEY SWITCH POWER FUSE A MAIN CONTACTOR B+ B-A2 A1 S2 S1 CONTROL FUSE 1 9 8 16
2 — INSTALLATION & WIRING: Controller
Standard Power Wiring
Motor armature wiring is straightforward, with the armature’s A1 connection going to the controller’s B+ bus bar and the armature’s A2 connection going to the controller’s M- bus bar.
The motor’s field connections (S1 and S2) are less obvious. The direction of vehicle travel with the forward direction selected will depend on how the motor’s S1 and S2 connections are made to the controller’s two field terminals (S1 and S2) and how the motor shaft is connected to the drive wheels through the vehicle’s drive train. CAUTION: The polarity of the S1 and S2 connections will affect the operation of the emergency reverse feature. The forward and reverse switches and the S1 and S2 connections must be configured so that the vehicle drives away from the operator when the emergency reverse button is pressed.
Standard Control Wiring
Wiring for the input switches and contactors is shown in Figure 3; the pins are identified on page 6. In the standard wiring configuration, the auxiliary driver at Pin 8 is used to drive an electromagnetic brake.
The main contactor coil must be wired directly to the controller as shown in Figure 3. The controller checks for welded or missing contactor faults and uses the main contactor coil driver output to disconnect the battery from the controller and motor when specific faults are present. If the main contactor coil is not wired to Pin 4, the controller will not be able to open the main contactor in serious fault conditions and the system will therefore not meet EEC safety requirements.
☞
2 — INSTALLATION & WIRING: Throttle
WIRING: Throttle
Wiring for various throttles is described below. They are categorized as Type 1, 2, 3, and 4 throttles in the program menu of the handheld programmer. Note: In the text, throttles are identified by their nominal range and not by their actual active range.
Appropriate throttles for use with the 1243GEN2 controller include two-wire 5kΩ–0 throttles (“Type 1”); 0–5V throttles, current source throttles, three-wire potentiometer throttles, and electronic throttles wired for single-ended operation (all “Type 2”); two-wire 0–5kΩ throttles (“Type 3”), and 0–5V and three-wire potentiometer throttles wired for wigwag operation (“Type 4”). The operating specifications for these throttle types are summarized in Table 1. Refer to Section 3: Programmable Parameters, for information on the effects of the Throttle Deadband and Throttle Max parameters on the minimum and maximum throttle thresholds.
If the throttle you are planning to use is not covered, contact the Curtis office nearest you.
Table 1 THROTTLE WIPER INPUT THRESHOLD VALUES
MAXIMUM THROTTLE HPD THROTTLE MINIMUM
THROTTLE THROTTLE DEADBAND (25% throttle MAX THROTTLE
TYPE PARAMETER FAULT (0% speed request) active range) (100% modulation) FAULT
1 (5kΩ–0) Wiper Voltage 5.00 V 3.80 V 2.70 V 0.20 V 0.06 V Wiper Resistance 7.50 kΩ 5.50 kΩ 3.85 kΩ 0 kΩ — 2 (0–5V) Wiper Voltage 0.06 V 0.20 V 1.50 V 5.00 V 5.80 V Wiper Resistance — — — — — 3 (0–5kΩ) Wiper Voltage 0.06 V 0.20 V 1.30 V 3.80 V 5.00 V Wiper Resistance — 0 kΩ 1.65 kΩ 5.50 kΩ 7.50 kΩ 4 (0–5V) Wiper Voltage 0.50 V 2.50 V (fwd) * 3.10 V (fwd) 4.40 V (fwd) 4.50 V
2.50 V (rev) * 1.90 V (rev) 0.60 V (rev)
Wiper Resistance — — — — —
Notes: The Throttle Deadband and Throttle Max thresholds are valid for nominal 5kΩ potentiometers or 5V sources with the default Throttle Deadband and Throttle Max parameter settings of 0% and 100% respectively. These threshold values will change with variations in the Throttle Deadband and Throttle Max parameter settings.
The HPD thresholds are 25% of the active throttle range and therefore depen-dent on the programmed Throttle Deadband and Throttle Max settings (which define the active range).
The wiper voltage is measured with respect to B-.
The wiper resistance is measured from pot low to pot wiper. The potentiometer must be disconnected from the controller when making this measurement.
* With a 0% Throttle Deadband setting, there is no neutral point on a Type 4 throttle. A Throttle Deadband setting of at least 8% is recommended for Type 4 throttles.
2 — INSTALLATION & WIRING: Throttle
5kΩ–0 Throttle (“Type 1”)
The 5kΩ–0 throttle (called a “Type 1” throttle in the programming menu of the 13XX programmer) is a 2-wire resistive throttle that connects between the Pot Wiper and Pot Low pins (Pins 6 and 7), as shown in Figure 4. It doesn’t matter which wire goes on which pin. For Type 1 throttles, zero speed corresponds to 5 kΩ measured between the two pins and full speed corresponds to 0 Ω. (Note: This wiring is also shown in the standard wiring diagram, Figure 3.)
Fig. 4 Wiring for 5kΩ–0 throttle (“Type 1”).
In addition to accommodating the basic 5kΩ–0 throttle, the Type 1 throttle is the easiest with which to implement a wigwag-style throttle. Using a 20kΩ potentiometer wired as shown in Figure 5, the pot wiper can be set such that the controller has 5 kΩ between Pins 6 and 7 when the throttle is in the neutral position. The throttle mechanism can then be designed such that rotating it either forward or back decreases the resistance between Pins 6 and 7, which increases the controller output. The throttle mechanism must provide signals to the controller’s forward and reverse inputs independent of the throttle pot resistance. The controller will not sense direction from the pot resistance.
Fig. 5 Wiring for 20kΩ
potentiometer used as a wigwag-style throttle (“Type 1”). 20 kΩ FASTER FASTER
Pot Wiper input (Pin 6) Pot Low input (Pin 7)
Broken wire protection is provided by the controller sensing the current flow from the wiper input through the potentiometer and into the Pot Low pin. If the Pot Low input current falls below 0.65 mA or its voltage below 0.06 V, a throttle fault is generated and the controller is disabled. Note: The Pot Low pin (Pin 7) must not be tied to ground (B-).
5kΩ–0
Pot Low input (Pin 7) Pot Wiper input (Pin 6)
2 — INSTALLATION & WIRING: Throttle
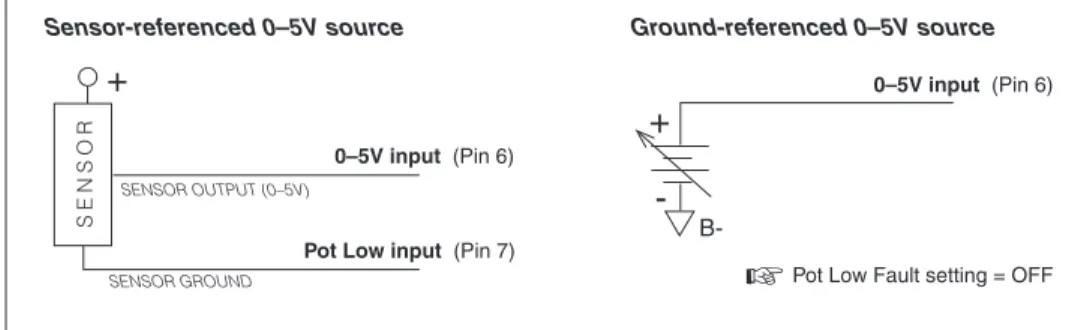
0–5V, Current Source, 3-Wire Potentiometer, and Electronic Throttles (“Type 2”)
With these throttles (“Type 2” in the programming menu) the controller looks for a voltage signal at the wiper input (Pin 6). Zero speed will correspond to 0 V and full speed to 5 V (measurements made relative to B-). A voltage source, current source, 3-wire potentiometer, or electronic throttle can be used with this throttle type. The wiring for each is slightly different and each has varying levels of throttle fault detection associated with it.
0–5V Throttle
Two ways of wiring the 0–5V throttle are shown in Figure 6. The active range for this throttle is from 0.2 V (at 0% Throttle Deadband) to 5.0 V (at 100% Throttle Max), measured relative to B-.
Fig. 6 Wiring for 0–5V throttles (“Type 2”).
Sensor-referenced 0–5V throttles must provide a Pot Low current greater than 0.65 mA to prevent shutdown due to pot faults. It is recommended that the maximum Pot Low current be limited to 55 mA to prevent damage to the Pot Low circuitry.
Ground-referenced 0–5V throttles require setting the Pot Low Fault pa-rameter (see Section 3, page 38) to Off; otherwise the controller will register a throttle fault and will shut down. For ground-referenced 0–5V throttles, the controller will detect open breaks in the wiper input but cannot provide full throttle fault protection. Also, the controller recognizes the voltage between the wiper input and B- as the applied throttle voltage and not the voltage from the voltage source relative to the Pot Low input.
For either throttle input, if the 0–5V throttle input (Pin 6) exceeds 5.5 V relative to B-, the controller will register a fault and shut down.
+ - B-+ SENSOR GROUND SENSOR OUTPUT (0–5V) S E N S O R
Pot Low input (Pin 7)
0–5V input (Pin 6)
0–5V input (Pin 6)
Pot Low Fault setting = OFF
☞
2 — INSTALLATION & WIRING: Throttle
Current Sources As Throttles
A current source can also be used as a throttle input, wired as shown in Figure 7. A resistor, Rthrottle, must be used to convert the current source value to a
volt-age. The resistor should be sized to provide a 0–5V signal variation over the full current range.
The Pot Low Fault parameter (see Section 3, page 38) must be set to Off; otherwise the controller will register a throttle fault and will shut down. It is the responsibility of the vehicle manufacturer to provide appropriate throttle fault detection in applications using a current source as a throttle.
Fig. 8 Wiring for 3-wire potentiometer throttle (“Type 2”). 1k Ω –10k Ω
Pot Wiper input (Pin 6)
Pot Low input (Pin 7) Pot High output (Pin 5)
FASTER
Fig. 7 Wiring for current source throttle (“Type 2”).
3-Wire Potentiometer (1kΩ–10k1Ω) Throttle
A 3-wire pot with a total resistance value anywhere between 1 kΩ and 10 kΩ can be used, wired as shown in Figure 8. The pot is used in its voltage divider mode, with the voltage source and return being provided by the 1243GEN2 controller. Pot High (Pin 5) provides a current limited 5V source to the pot, and Pot Low (Pin 7) provides the return path. If a 3-wire pot is used and the Pot Low Fault parameter (see Section 3, page 38) is set to On, the controller will provide full throttle fault protection in accordance with EEC requirements. Note: the Pot Low pin (Pin 7) must not be tied to ground (B-).
R throttle
B-0–5V input (Pin 6)
Pot Low Fault setting = OFF
2 — INSTALLATION & WIRING: Throttle
Curtis ET-XXX Electronic Throttle
The Curtis ET-XXX provides a 0–5V throttle and forward/reverse inputs for the 1243GEN2 controller. Wiring for the ET-XXX is shown in Figure 9. When an electronic throttle is used, the Pot Low Fault parameter (see Section 3, page 38) must be set to Off; otherwise the controller will register a throttle fault and will shut down.
There is no fault detection built into the ET-XXX, and the controller will detect only open wiper faults. It is the responsibility of the vehicle manufacturer to provide any additional throttle fault detection necessary.
The ET-XXX can be integrated into a control head to provide wigwag-style throttle control. Alternatively, a complete control head assembly is avail-able from Curtis. This control head assembly—the CH series—combines the ET-XXX throttle with a variety of standard control head switch functions for use in walkie and lift truck applications.
0–5kΩ Throttle (“Type 3”)
The 0–5kΩ throttle (“Type 3” in the programming menu) is a 2-wire resistive throttle that connects between the Pot Wiper and Pot Low pins (Pins 6 and 7) as shown in Figure 10. Zero speed corresponds to 0 Ω measured between the two pins and full speed corresponds to 5 kΩ. This throttle type is not ap-propriate for use in wigwag-style applications.
Broken wire protection is provided by the controller sensing the current flow from the wiper input through the potentiometer and into the Pot Low pin. If the Pot Low input current falls below 0.65 mA or its voltage below 0.06 V,
Fig. 9 Wiring for Curtis ET-XXX electronic throttle (“Type 2”). GREEN ORANGE BLACK BLACK/WHITE WHITE WHT/BRN B+ KEYSWITCH connector WHT/GRN
Reverse input (Pin 11) KSI (Pin 16)
0–5V input (Pin 6) Forward input (Pin 12)
Pot Low Fault setting = OFF
☞
B-2 — INSTALLATION & WIRING: Throttle
Fig. 10 Wiring for 0–5kΩ throttle (“Type 3”).
a throttle fault is generated and the controller is disabled. Note: The Pot Low pin (Pin 7) must not be tied to ground (B-).
Wigwag-Style 0–5V Voltage Source and 3-Wire Pot Throttle (“Type 4”)
These throttles (“Type 4” in the programming menu) operate in true wigwag style. No signals to the controller’s forward and reverse inputs are required; the action is determined by the wiper input value. The interface to the controller for Type 4 devices is similar to that for Type 2 devices. The neutral point will be with the wiper at 2.5 V, measured between Pin 6 and B-.
The controller will provide increasing forward speed as its wiper input value (Pin 6) is increased, with maximum forward speed reached at 4.5 V. The controller will provide increasing reverse speed as the wiper input value is decreased, with maximum reverse speed reached at 0.5 V. The minimum and maximum wiper voltage must not exceed the 0.5V and 4.5V fault limits.
When a 3-wire pot is used and the Pot Low Fault parameter (see Section 3, page 36) is set to On, the controller provides full fault protection for Type 4 traction throttles. Any potentiometer value between 1 kΩ and 10 kΩ is sup-ported. When a voltage throttle is used, it is the responsibility of the OEM to provide appropriate throttle fault detection.
Note: If your Type 4 throttle has an internal neutral switch, this internal neutral switch should be wired to the forward switch input (Pin 12). The con-troller will behave as though no throttle is requested when the neutral switch is high, and will use the throttle value when the neutral switch is low.
WIRING: Fault Outputs
The 1243GEN2 has two fault signal outputs (Pins 2 and 3), which can be used to provide diagnostic information to a display panel. These current-sinking outputs can drive LEDs or other loads requiring less than 10 mA. Since these outputs are intended to drive LEDs, each contains a dropping resistor; as a result, these outputs will not pull down to B-. Wiring is shown in Figure 11.
The Fault 1 and Fault 2 outputs can be programmed to display fault information in either of two formats: Fault Code format or Fault Category format (see Section 3, page 51).
0–5kΩ
Pot Low input (Pin 7) Pot Wiper input (Pin 6)
2 — INSTALLATION & WIRING: Spyglass Display
Fig. 11 Wiring for fault outputs, when used to drive LEDs. Alternatively, Pin 2 can be used for a pump me-ter input, and Pin 3 can be used to interface an external
enable circuit.
B-+
-Fault 1 output (Pin 2)
Fault 2 output (Pin 3)
WIRING: Spyglass Display
The Curtis 840 Spyglass features an 8-character LCD display that sequences between hourmeter, BDI %, and fault messages. Depending on the model, either three or six indicator LEDs are also located on the face of the gauge. See Section 7 (Diagnostics and Troubleshooting) for more information on the Spyglass displays.
The mating 8-pin connector is Molex 39-01-2085, with 39-00-0039 (18–24 AWG) pins.
Fig. 12 Wiring guide and mounting dimensions for Curtis Spyglass (6-LED model shown; dimensions and wiring are identical for the 3-LED model).
SPYGLASS 1243·GEN·2 CONTROLLER
PIN # FUNCTION PIN #
1–4 N.C. – 5 +12V, +15V 4 6 receive data 3 7 N.C. – 8 ground (B+) 2 58 (2.25) 44 (1.75) 8 58 (2.25) 52 (2.0)
“U” clamp for up to 6 (0.25) panel thickness 5 4 1 WIRING GUIDE 3 4 1 2 0 1
2 — INSTALLATION & WIRING: Emerg. Reverse and Aux Driver
☞
C A U T I O N
WIRING: Emergency Reverse
To implement the emergency reverse feature, Pin 13 (the emergency reverse input) must be connected to battery voltage as shown in the standard wiring diagram, Figure 3.
The controller provides maximum braking torque as soon as the emer-gency reverse switch is closed. The vehicle will then be automatically driven in the reverse direction at the programmed emergency reverse current limit until the emergency reverse switch is released.
CAUTION: The polarity of the S1 and S2 connections will affect the op-eration of the emergency reverse feature. The forward and reverse switches and the S1 and S2 connections must be configured so that the vehicle drives away from the operator when the emergency reverse button is pressed.
WIRING: Emergency Reverse Check
An optional wire connected directly to the emergency reverse switch provides for broken wire detection when that feature is programmed On (see Section 3, page 43). The emergency reverse check output wire periodically pulses the emergency reverse circuit to check for continuity in the wiring. If there is no con-tinuity, the controller output is inhibited until the wiring fault is corrected.
The emergency reverse check wire is connected to Pin 10 as shown by the dotted line in the standard wiring diagram, Figure 3. If the option is selected and the check wire is not connected, the vehicle will not operate. If the op-tion is not selected and the check wire is connected, no harm will occur—but continuity will not be checked.
WIRING: Auxiliary Driver
The 1243GEN2 provides an auxiliary driver at Pin 8. This low side driver is designed to energize an electromagnetic brake coil, as shown in the standard wiring diagram (Figure 3). The output is rated at 2 amps and is overcurrent protected. A coil suppression diode is provided internally to protect the driver from inductive spikes generated at turn-off. The recommended wiring is shown in the standard wiring diagram, Figure 3. The contactor coil or driver load should not be connected directly to B+, which would cause the controller to be always biased On via a path through the coil suppression diode to the KSI input.
Although it is typically used to drive an EM brake, the auxiliary driver can be used to drive a pump contactor or hydraulic steering assist in applica-tions not requiring an EM brake.
Note: Because the auxiliary driver is typically used for an EM brake, the programmable parameters related to this driver are described in the electro-magnetic brake parameter group; see page 28.
CONTACTOR, SWITCHES, and OTHER HARDWARE Main Contactor
A main contactor should be used with any 1243GEN2 controller; otherwise the controller’s fault detects will not be able to fully protect the controller and mo-tor drive system from damage in a fault condition. The main contacmo-tor allows the controller and motor to be disconnected from the battery. This provides a significant safety feature in that the battery power can be removed from the drive system if a controller or wiring fault results in full battery power being applied to the motor. If the Contactor Diagnostics parameter (see Section 3, page 40) is On, the controller will conduct a missing contactor check and a welded contactor check each time the main contactor is requested to close and will not proceed with the request if a fault is found.
A single-pole, single-throw (SPST) contactor with silver-alloy contacts, such as an Albright SW80 or SW180—available from Curtis—is recommended for use as the main contactor. The contactor coils should be specified with a continuous rating at the nominal battery pack voltage.
The main contactor coil driver output (Pin 4) is rated at 2 amps, is over-current protected, and is checked for open coil faults. A built-in coil suppres-sion diode is connected between the main contactor coil driver output and the keyswitch input. This protects the main contactor coil driver from failure due to inductive voltage kickback spikes when the contactor is turned off.
Keyswitch and Interlock Switch
The vehicle should have a master on/off switch to turn the system off when not in use. The keyswitch input provides logic power for the controller.
The interlock switch—which is typically implemented as a tiller switch, deadman footswitch, or seatswitch—provides a safety interlock for the system. The keyswitch and interlock switch provide current to drive the main contactor coil and all other output driver loads as well as the controller’s internal logic circuitry and must be rated to carry these currents.
Forward, Reverse, Mode Select, and Emergency Reverse Switches
These input switches can be any type of single-pole, single-throw (SPST) switch capable of switching the battery voltage at 10 mA. Typically the emergency reverse switch is a momentary switch, active only while it is being pressed.
Reverse Polarity Protection Diode
For reverse polarity protection, a diode should be added in series between the battery and KSI. This diode will prohibit main contactor operation and cur-rent flow if the battery pack is accidentally wired with the B+ and B- terminals exchanged. It should be sized appropriately for the maximum contactor coil and fault diode currents required from the control circuit. The reverse polarity protection diode should be wired as shown in the standard wiring diagram, Figure 3 (page 7).
Circuitry Protection Devices
To protect the control circuitry from accidental shorts, a low current fuse (appropriate for the maximum current draw) should be connected in series between the battery and KSI. Additionally, a high current fuse should be wired in series with the main contactor to protect the motor, controller, and batter-ies from accidental shorts in the power system. The appropriate fuse for each application should be selected with the help of a reputable fuse manufacturer or dealer. The standard wiring diagram, Figure 3, shows the recommended location for each fuse.
Mode Select Switch Operation
The two mode select switches (Mode Select 1 and Mode Select 2) together define the four operating modes. The switch combinations are shown in Table 2.
Table 2 MODE SELECTION
MODE MODE
OPERATING MODE SELECT SELECT
SWITCH 1 SWITCH 2
MultiMode™ 1 OPEN OPEN
MultiMode™ 2 CLOSED OPEN
MultiMode™ 3 OPEN CLOSED
MultiMode™ 4 CLOSED CLOSED
Load Sensor [optional]
The 1243GEN2 provides a load sensor input at Pin 1. The controller can be programmed to vary the strength of regen braking depending on the load sensor input. The load sensor, if one is used, should be sized to handle your application’s maximum expected load without exceeding 5 V.
3 — PROGRAMMABLE PARAMETERS
PROGRAMMABLE PARAMETERS
The 1243GEN2 controller has a number of parameters that can be programmed using a Curtis programming device. These programmable parameters allow the vehicle’s performance characteristics to be customized to fit the needs of individual vehicles or vehicle applications.
The OEM can specify the default value for each parameter and can also designate whether a parameter will have User or OEM access rights. Accordingly, programmers are available in User and OEM versions. The User programmer can adjust only those parameters with User access rights, whereas the OEM programmer can adjust all the parameters. For information about Curtis pro-gramming devices, see Appendix C.
The MultiMode™ feature of the 1243GEN2 controller allows operation in four distinct modes. These modes can be programmed to provide four different sets of operating characteristics, which can be useful for operating in different conditions, such as slow precise indoor maneuvering in Mode 1; faster, long distance, outdoor travel in Mode 4; and application-specific special conditions in Modes 2 and 3. Eight parameters can be configured independently in each of the four modes:
— acceleration rate (M1–M4) — braking current limit (M1–M4) — braking rate (M1–M4) — deceleration rate (M1–M4) — drive current limit (M1–M4) — maximum forward speed (M1–M4) — maximum reverse speed (M1–M4) — restraint (M1–M4).
To better describe their interrelationships, the individual parameters are grouped into categories as follows:
Battery Parameters Acceleration Parameters Braking Parameters
Interlock Braking Parameters Electromagnetic Brake Parameters Speed Parameters
Throttle Parameters Field Parameters Contactor Parameters Sequencing Fault Parameters Emergency Reverse Parameters Motor Protection Parameters Hourmeter Parameters BDI Parameters Fault Code Parameters
3 — PROGRAMMABLE PARAMETERS
Battery Parameter ...p.21
Battery Voltage
Acceleration Parameters ...p.21
Drive Current Limit, M1–M4 Acceleration Rate, M1–M4 Quick Start
Current Ratio
Braking Parameters ...p.23
Braking Current Limit, M1–M4 Deceleration Rate, M1–M4 Throttle Deceleration Rate Restraint, M1–M4 Braking Rate, M1–M4 Taper Rate Variable Braking Interlock Braking Parameters ...p.26
Interlock Braking Rate Max. Forward Regen Max. Reverse Regen Min. Forward Regen Min. Reverse Regen Max. Load Volts Min. Load Volts
Electromagnetic Brake
Parameters ...p.28
Auxiliary Driver Type Electromagnetic Brake PWM Auxiliary Driver Delay Interlock Brake Delay
Speed Parameters ...p.31
Max. Forward Speed, M1–M4 Max. Reverse Speed, M1–M4 Creep Speed Load Compensation Throttle Parameters ...p.32 Throttle Type Throttle Deadband Throttle Max Throttle Map Pot Low Fault
Field Parameters ...p.38
Min. Field Current Limit Max. Field Current Limit Field Map Start
Field Map Field Check
Main Contactor Parameters ....p.40
Main Contactor Interlock Main Contactor Open Delay Main Contactor Diagnostics
Sequencing Fault Parameters ..p.41
Anti-Tiedown
High Pedal Disable (HPD) Static Return to Off (SRO) Sequencing Delay
Emergency Reverse
Parameters ...p.43
Emerg. Reverse Current Limit Emerg. Reverse Check
Emerg. Reverse Direction Interlock
Motor Protection Parameters ..p.44
Warm Speed
Motor Warm Resistance Motor Hot Resistance
Motor Resistance Compensation
Hourmeter
Parameters ...p.45
Adjust Hours High Adjust Hours Middle Adjust Hours Low Set Total Hours Set Traction Hours Total Service Hours Traction Service Hours Total Disable Hours Traction Disable Hours Traction Fault Speed Service Total Service Traction Hourmeter Type Pump Meter BDI Parameters ...p.49 Full Voltage Empty Voltage Reset Voltage Battery Adjust BDI Disable BDI Limit Speed
Fault Code
Parameters ...p.51
Fault Code BDI Lockout
Individual parameters are described in the following text in the order they are listed on this page. They are listed by the abbreviated names that are displayed by the program-ming device. Not all of these parameters are displayed on all controllers; the list for any given controller depends on its specifications.
The programmer displays the parameters in a different order. For a list of the individual parameters in the order in which they are displayed, see Section 6: Programmer Menus.
3 — PROGRAMMABLE PARAMETERS: Battery & Acceleration Parameters
VOLTAGE
The battery voltage parameter sets the overvoltage and undervoltage protec-tion thresholds for the controller and battery. Overvoltage protecprotec-tion cuts back regenerative braking to prevent damage to batteries and other electrical system components due to overvoltage; undervoltage protection prevents systems from operating at voltages below their design thresholds. The battery voltage parameter can be set at 2 or 3, and should always be set to the system’s nominal battery pack voltage:
NOMINAL SETTING BATTERYPACKVOLTAGE
2 24V
3 36V
M1–M4, DRIVE C/L
The drive current limit parameter allows adjustment of the maximum current the controller will supply to the motor during drive operation. This parameter can be limited to reduce the maximum torque applied to the drive system by the motor in any reduced performance mode. The drive current limit is adjustable from 50 amps up to the controller’s full rated armature current. (The full rated current depends on the controller model; see specifications in Table D-1.)
The drive current limit is tuned as part of the vehicle performance adjust-ment process (Section 5).
M1–M4, ACCEL RATE
The acceleration rate defines the time it takes the controller to accelerate from 0% drive output to 100% drive output. A larger value represents a longer acceleration time and a gentler start. Fast starts can be achieved by reducing the acceleration time, i.e., by adjusting the accel rate to a smaller value. The acceleration rate is adjustable from 0.1 to 3.0 seconds.
The acceleration rate is tuned as part of the vehicle performance adjust-ment process (Section 5).
QUICK START
Upon receiving a sudden high throttle demand from neutral, the quick start
function causes the controller to momentarily exceed its normal acceleration rate, in order to overcome vehicle inertia. The quick start algorithm is ap-plied each time the throttle passes through neutral and the controller is not in
Battery Parameter
3 — PROGRAMMABLE PARAMETERS: Braking Parameters
braking mode. If the controller is in braking mode, the quick start function is disabled, allowing normal braking to occur. Quick start is adjustable from 0 to 10. Increasing the value will “liven” the vehicle’s acceleration response to fast throttle movements.
The quick start parameter is tuned as part of the vehicle performance adjustment process (Section 5).
NOTE: Quick start is not a MultiMode™ parameter, and its value will therefore affect all four operating modes.
CURRENT RATIO
The current ratio parameter defines how much of the programmed drive cur-rent will be available to the motor at reduced throttle requests. The curcur-rent ratio parameter can be set to 1, 2, 3, or 4. These settings correspond to the following ratios: SETTING RATIO 1 1 : 1 2 2 : 1 3 4 : 1 4 8 : 1
For example, with the current ratio set at 1 with 20% throttle requested, 20% of the battery voltage and 20% of the drive current will be allowed to flow in the motor (assuming a 50% throttle map setting). If the current ratio is set at 2 under these same conditions, 40% of the current will be available; if it is set at 3, 80%. The controller will not allow more than the programmed drive current to flow in the motor. If the current ratio is set at 4 with 20% throttle requested, the controller will allow only 100% of the drive current and not 160%.
High current ratio values will allow quicker startup response and improved ramp climbing with partial throttle, but may cause too much jumpiness.
The current ratio parameter is tuned as part of the vehicle performance adjustment process (Section 5).
3 — PROGRAMMABLE PARAMETERS: Braking Parameters
The seven Braking parameters affect the regenerative braking that is initiated when the throttle is reduced or when the direction is reversed while the vehicle is being driven. During regen braking, armature current flows toward the battery.
M1–M4, BRAKE C/L
The braking current limit parameter adjusts the maximum current the control-ler will supply to the motor during regen braking. The braking current limit is adjustable from 50 amps up to the controller’s full rated braking current. (The full rated current depends on the controller model; see specifications in Table D-1.) The braking current limit is tuned as part of the vehicle performance adjustment process (Section 5).
M1–M4, DECEL RATE
The deceleration rate defines the time it takes the controller to reduce its output to the new throttle request when the throttle is reduced or released. A lower value represents a faster deceleration and thus a shorter stopping distance. The decel rate defines the vehicle’s braking characteristic for any reduction in throttle, including to neutral, that does not include a request for the opposite direction. The decel rate is adjustable from 0.1 to 10.0 seconds. The decel rate is tuned as part of the vehicle performance adjustment process (Section 5). THROTTLE DECEL
The throttle deceleration rate parameter adjusts the rate at which the vehicle transitions to braking when throttle is first reduced. If the throttle decel rate is set low, deceleration is initiated abruptly. The transition is smoother if the throttle decel rate is higher; however, setting the throttle decel parameter too high can cause the vehicle to feel uncontrollable when the throttle is released, as it will continue to drive for a short period. The throttle decel rate is adjustable from 0.1 to 1.0 second, with a value of 0.3 or 0.4 working well for most vehicles.
When the armature current goes negative (i.e., at the point when positive torque transitions to negative torque), the normal decel rate goes into effect. M1–M4, RESTRAINT
Because the 1243GEN2 controller is configured to provide regenerative braking, overspeed causes the controller to create a braking current and thus limit or “restrain” the overspeed condition. The restraint parameter determines how strongly the controller tries to limit the vehicle speed to the existing throttle setting. It is applicable when throttle is reduced or when the vehicle begins to travel downhill.
Fig. 13 Ramp restraint maps for controller with Field Min set at 3 amps, Field Max at 18 amps, and braking current limit at 300 amps.
BRAKING CURRENT (amperes)
F IE LD C U R R E N T (am peres) 300 250 200 150 100 50 0 25 20 15 10 5 0 Field Max = 18 A Field Min = 3 A Brake C/L = 300 A Restraint = 25 A Restraint = 15 A Restraint = 10 A Restraint = 3 A Restraint = 35 A
At zero throttle, the restraint function tries to keep the motor at zero speed, which helps hold the vehicle from running away down ramps. The higher the restraint parameter value, the stronger the braking force applied to the motor and the slower the vehicle will creep down ramps. This creeping speed depends on the restraint setting, the steepness of the ramp, and the vehicle load weight. The restraint feature can never hold a vehicle perfectly stationary on a ramp and is not intended to replace a mechanical or electromagnetic brake for this purpose.
The restraint parameter establishes a linear mapping of field current to braking current, and is adjustable from the programmed minimum field (Field Min) up to the controller’s full rated field current. As shown in Figure 13, it is limited by the programmed maximum field (Field Max). Setting the restraint parameter to a high value will cause strong braking, in an effort to bring the vehicle speed down to the requested speed. Extremely high values may cause the vehicle speed to oscillate (“hunt”) while in ramp restraint.
The restraint parameter is tuned as part of the vehicle performance ad-justment process (Section 5).
M1–M4, BRAKE RATE
The braking rate defines the time it takes the controller to increase from 0% braking output to 100% braking output (as defined by the corresponding mode-specific brake current limit) when a new direction is selected. A larger value represents a longer time and consequently gentler braking. Faster braking is achieved by adjusting the braking rate to a smaller value. The braking rate is adjustable from 0.1 second to 3.0 seconds.
TAPER RATE
The taper rate affects direction-reversal at the very end of braking, just before the vehicle stops moving in the original direction. Low taper rate values result in faster, more abrupt direction transitions. Higher taper rate values result in slower and smoother direction transitions. The taper rate is adjustable from 1 to 20. The taper rate is tuned as part of the vehicle performance adjustment process (Section 5).
VARIABLE BRAKE
The variable braking parameter defines how the controller will apply brak-ing force when direction-reversal brakbrak-ing is requested. If the variable brakbrak-ing parameter is programmed On, the amount of braking current applied by the controller will be a function of the throttle’s position when braking is requested. With variable braking, the operator can use the throttle to control the amount of braking force applied to a moving vehicle. Increasing throttle in the direction opposite to the vehicle’s motion will apply increasing amounts of regen braking current to the motor, slowing the vehicle more quickly.
If a fixed amount of braking force is preferred, the variable braking pa-rameter should be programmed Off. With variable braking Off, the controller applies the full braking current specified as soon as braking is requested.
If the interlock switch opens while the vehicle is being driven, the controller uses the motor to apply regenerative braking as soon as the programmed Sequencing Delay (see page 42) expires. This braking—which is called interlock braking—greatly reduces wear on the electromagnetic brake and also enables the vehicle to meet more stringent stopping distance requirements.
As soon as interlock braking brings the motor speed to approximately zero, the electromagnetic brake is applied. Note that for safety, the EM brake will engage after the programmed Interlock Brake Delay (see page 28) even if interlock braking does not bring the motor speed close to zero.
The seven Interlock Braking parameters affect the regen braking that results when the interlock switch is opened while the vehicle is being driven.
INT BRAKE RATE
The interlock braking rate defines the time it takes the controller to increase from 0% to 100% braking output (as determined by the max regen current setpoints) when interlock braking is initiated. The interlock braking rate is adjustable from 0.1 to 3.0 seconds.
MAX FWD REGEN
The maximum forward regen parameter defines the maximum regenerative current at maximum load while traveling in the forward direction. The max forward regen current is adjustable from 100 amps up to the controller’s full rated current.
If a load sensor is not used, this will be the single maximum regen current in the forward direction.
MAX REV REGEN
The maximum reverse regen parameter defines the maximum regenerative current at maximum load while traveling in the reverse direction. The max reverse regen current is adjustable from 100 amps up to the controller’s full rated current.
If a load sensor is not used, this will be the single maximum regen cur-rent in the reverse direction.
3 — PROGRAMMABLE PARAMETERS: Interlock Braking Parameters
If your application will have widely varying loads, we recommend that you include a load sensor (at Pin 1). The use of a load sensor can prevent unnecessarily harsh braking at light loads, which may lock up the wheels.
MIN FWD REGEN [applicable only with optional load sensor]
The minimum forward regen parameter defines the maximum regenerative current at minimum load while traveling in the forward direction. The Min Fwd Regen current is adjustable from 25 amps up to the controller’s full rated current. The forward regen current increases linearly from Min Fwd Regen to Max Fwd Regen as the load sensor input varies from Min Load Volts to Max Load Volts.
Note: If the load sensor’s voltage is out of range (less than 0.2 V or greater than 4.8 V) during interlock braking while the vehicle is driving forward, the regen current will default to the programmed Max Fwd Regen value.
MIN REV REGEN [applicable only with optional load sensor]
The minimum reverse regen parameter defines the maximum regenerative current at minimum load while traveling in the reverse direction. The Min Rev Regen current is adjustable from 25 amps up to the controller’s full rated current. The reverse regen current increases linearly from Min Rev Regen to Max Rev Regen as the load sensor input varies from Min Load Volts to Max Load Volts.
Note: If the load sensor’s voltage is out of range (less than 0.2 V or greater than 4.8 V) during interlock braking while the vehicle is driving in reverse, the regen current will default to the programmed Max Rev Regen value.
MAX LOAD VOLTS [applicable only with optional load sensor]
The maximum load volts parameter defines the load sensor input voltage at the maximum load. It is adjustable from 0.2 V to 4.8 V.
MIN LOAD VOLTS [applicable only with optional load sensor]
The minimum load volts parameter defines the load sensor input voltage at the minimum load. It is adjustable from 0.2 V up to the programmed Max Load Volts.
The four Electromagnetic Brake parameters—along with the sequencing delay—af-fect the behavior of the auxiliary driver at Pin 8. This driver is typically used for an electromagnetic brake, as shown in the basic wiring diagram (Figure 3, page 7). See Figure 14 for an illustration of the relationship between interlock braking, the EM brake, and the sequencing, auxiliary, and interlock braking delays.
AUX TYPE
The auxiliary driver type parameter configures the low side driver at Pin 8. The auxiliary driver can be programmed to operate in any of the configurations (i.e., Types 1 through 5) described in Table 3. Types 1 through 4 are various ways of configuring the driver for an electromagnetic brake; Type 5 is a non-EM-brake option. If no auxiliary device will be connected to Pin 8, the auxiliary driver should be programmed to Type 0.
EM BRAKE PWM
The auxiliary driver output (at Pin 8) can be modulated if you are using an EM brake (or other auxiliary device) whose coil voltage rating is lower than the battery voltage. If the electromagnetic brake PWM parameter is programmed On, the brake will pull in at 100% PWM (full current up to 3 amps) for 500 ms and then pull back to 62.5% PWM (≈2 amps max) at a frequency of about 250 Hz and continue at this level until released. If programmed Off, the aux-iliary driver output will remain steadily at 100% PWM.
AUX DELAY
The auxiliary driver delay parameter allows a delay before the electromagnetic brake is engaged (Pin 8 driver opened) after the vehicle reaches the neutral state (throttle in neutral, both direction switches open, motor speed approximately zero). The Aux Delay is adjustable from 0 to 30 seconds. When set to zero, there is no delay and the brake is engaged as soon as the vehicle reaches the neutral state. This parameter does not apply to Aux Type 1 (see Table 3).
For Aux Type 5, the device connected to Pin 8 will be off when the Pin 8 driver is open, and on when the driver is closed. The aux delay could be used to allow the auxiliary device to keep running for a short while after the vehicle reaches the neutral state.
INT BRAKE DLY
The interlock brake delay parameter allows a delay before the electromagnetic
Electromagnetic Brake Parameters
Fig. 14 The electromagnetic brake parameters, in the context of the 1243GEN2
controller’s four delay param-eters (sequencing, interlock brake, main contactor open, and aux delays). This figure assumes the standard wiring configuration, which includes an EM brake.
For descriptions of the sequencing delay and main contactor open delay, see
pages 42 and 40. Interlock Brake Delay
(0.0 – 8.0 s) The EM brake engages unless it already engagedat the completion of interlock braking. Interlock braking from motor
(applied until motor speed approx. zero) The EM brake engages unless it already engagedat the expiration of Intk Brake Delay.
* The neutral state is reached when, during normal operation, the throttle is in neutral, both direction switches are open, and the motor speed is approximately zero.
Aux Delay
(0.0 – 30.0 s) EM brake engages,for Aux Types 2, 3, and 4.
INTERLOCK SWITCH OPENS VEHICLE REACHES NEUTRAL STATE* Sequencing Delay (0.0 – 3.0 s) HPD fault (HPD Type 1) SRO fault
Main Open Delay (0.0 – 40.0 s)
Main contactor opens
3 — PROGRAMMABLE PARAMETERS: Electromagnetic Brake Parameters
expired or when the motor speed approaches zero, whichever occurs first. The Interlock Brake Delay is adjustable from 0.0 to 8.0 seconds. When set to zero, there is no delay and the brake is engaged as soon as the interlock switch opens. Interlock braking will still occur until the motor speed hits zero.
3 — PROGRAMMABLE PARAMETERS: Electromagnetic Brake Parameters
Table 3 CONFIGURATION OPTIONS: AUXILIARY DRIVER (Pin 8)
TYPE DESCRIPTION OF OPERATION
0 Aux driver disabled.
1 Electromagnetic brake used like a parking brake.
• The brake is released when the interlock switch closes. • The brake is engaged as follows:
Interlock The aux driver engages the brake when the interlock switch opens and (a) the programmed Sequencing Delay and Interlock Brake Delay expire or (b) the motor speed nears zero, whichever happens first.
Neutral State * The aux driver does not respond to neutral state; there is no therefore no Aux Delay.
Emerg. Rev. The aux driver does not respond to emergency reverse. 2 Electromagnetic brake used to prevent rolling when stopping on a hill.
• The brake is released when the interlock switch closes
and either a direction switch or the emergency reverse switch closes. • The brake is engaged as follows:
Interlock Same as Type 1.
Neutral State * When the vehicle reaches the neutral state, the aux driver engages the brake as soon as the programmed Aux Delay expires.
Emerg. Rev. After the emergency reverse switch has been applied and released, the aux driver engages the brake as soon as the programmed Aux Delay has expired. The Aux Delay timer starts when motor speed nears zero.
3 Electromagnetic brake functions as in Type 2 except during Emerg. Rev.
Emerg. Rev. (a) If both direction switches are open when the emergency reverse switch is released, same as Type 2. (b) If a direction switch is closed when the emergency reverse switch is released, the Aux Delay timer starts when the emergency reverse switch is released.
4 Electromagnetic brake functions as in Type 1 except during Emerg. Rev.
Emerg. Rev. Same as Type 3, except in situation (a), where the aux driver does not respond, and the brake therefore remains released.
5 Auxiliary device other than an electromagnetic brake.
This option is appropriate if the aux driver will be used for a brush or pump motor contactor, for example, or for hydraulic steering assist. The aux driver will be energized when the interlock switch and either a direction switch or the emergency reverse switch are closed. The aux driver will turn off when the programmed Aux Delay has expired after the interlock switch opens, or both direction switches are opened while the vehicle is driving, or the emer-gency reverse switch is released. The Aux Delay timer starts when motor
M1–M4, MAX FWD SPD
The maximum forward speed parameter defines the maximum controller voltage output at full throttle, in the forward direction. The maximum forward speed parameter is adjustable from the programmed creep speed up to 100%. It is tuned as part of the vehicle performance adjustment process (Section 5). M1–M4, MAX REV SPD
The maximum reverse speed parameter defines the maximum controller volt-age output at full throttle, in the reverse direction. The maximum reverse speed parameter is adjustable from 0% to 100%. It is tuned as part of the vehicle performance adjustment process (Section 5).
CREEP SPEED
The creep speed parameter defines the initial controller output generated when a direction is first selected. No applied throttle is necessary for the vehicle to enter the creep mode, only a direction signal. The controller maintains creep speed until the throttle is rotated out of the throttle deadband (typically 10% of throttle).
Creep speed is adjustable from 0% to 25% of the controller output; it cannot be set higher than the lowest programmed M1–M4 maximum forward speed. The specified creep speed is not displayed as the throttle percent in the programmer’s Test Menu when a direction is selected and zero throttle is ap-plied; only the 0% throttle command is displayed.
LOAD COMP
The load compensation parameter actively adjusts the applied motor volt-age as a function of motor load current. This results in more constant vehicle speeds over variations in driving surface (ramps, rough terrain, etc.) without the vehicle operator constantly adjusting the throttle position; it also helps equal-ize loaded and unloaded vehicle speeds. The load compensation parameter is adjustable from 0% to 25% of the controller’s PWM output. High values will cause the controller to be more aggressive in attempting to maintain vehicle speed. However, too much load compensation can result in jerky vehicle starts and speed oscillation (“hunting”) when the vehicle is unloaded.
The load compensation parameter is tuned as part of the vehicle perfor-mance adjustment process (Section 5).
Speed Parameters
3 — PROGRAMMABLE PARAMETERS: Throttle Parameters
Throttle Parameters
THROTTLE TYPE
The 1243GEN2 controller accepts a variety of throttle inputs. Instructions are provided in Section 2 for wiring the most commonly used throttles: 5kΩ–0 and 0–5kΩ 2-wire potentiometers, 3-wire potentiometers, 0–5V throttles, current sources, and the Curtis ET-XXX electronic throttle.
The throttle type parameter can be programmed to 1, 2, 3, or 4. The standard throttle input signal type options are listed in Table 4.
Table 4 PROGRAMMABLE THROTTLE TYPES THROTTLE
TYPE DESCRIPTION
1 2-wire 5kΩ–0 potentiometer
2 single-ended 3-wire potentiometer with 1kΩ to 10kΩ range; 0–5V voltage source;
current source driving external resistor; or Curtis ET-XXX electronic throttle 3 2-wire 0–5kΩ potentiometer
4 wigwag 3-wire potentiometer with 1kΩ to 10kΩ range; 0–5V voltage source;
or current source driving external resistor
THROTTLE DB
The throttle deadband parameter defines the throttle pot wiper voltage range that the controller interprets as neutral. Increasing the throttle deadband set-ting increases the neutral range. This parameter is especially useful with throttle assemblies that do not reliably return to a well-defined neutral point, because it allows the deadband to be defined wide enough to ensure that the controller goes into neutral when the throttle mechanism is released.
Examples of deadband settings (0%, 10%, 40%) are shown in Figure 15 for the four throttle types (see Table 4). In all the examples in Figure 15, the throttle max parameter is set at 100%.
The throttle deadband parameter is adjustable from 0% to 40% of the nominal throttle wiper range; the default setting is 10%. The nominal throttle wiper voltage range depends on the throttle type selected. See Table 1 (page 9) for the characteristics of your selected throttle type.
The throttle deadband is tuned as part of the vehicle performance adjust-ment process (Section 5).