Corporate Headquarters Cisco Systems, Inc.
170 West Tasman Drive
Catalyst 6500 Series Switch Content
Switching Module Command Reference
Software Release 3.2(1) September, 2003
THE SPECIFICATIONS AND INFORMATION REGARDING THE PRODUCTS IN THIS MANUAL ARE SUBJECT TO CHANGE WITHOUT NOTICE. ALL STATEMENTS, INFORMATION, AND RECOMMENDATIONS IN THIS MANUAL ARE BELIEVED TO BE ACCURATE BUT ARE PRESENTED WITHOUT WARRANTY OF ANY KIND, EXPRESS OR IMPLIED. USERS MUST TAKE FULL RESPONSIBILITY FOR THEIR APPLICATION OF ANY PRODUCTS.
THE SOFTWARE LICENSE AND LIMITED WARRANTY FOR THE ACCOMPANYING PRODUCT ARE SET FORTH IN THE INFORMATION PACKET THAT SHIPPED WITH THE PRODUCT AND ARE INCORPORATED HEREIN BY THIS REFERENCE. IF YOU ARE UNABLE TO LOCATE THE SOFTWARE LICENSE OR LIMITED WARRANTY, CONTACT YOUR CISCO REPRESENTATIVE FOR A COPY.
The following information is for FCC compliance of Class A devices: This equipment has been tested and found to comply with the limits for a Class A digital device, pursuant to part 15 of the FCC rules. These limits are designed to provide reasonable protection against harmful interference when the equipment is operated in a commercial environment. This equipment generates, uses, and can radiate radio-frequency energy and, if not installed and used in accordance with the instruction manual, may cause harmful interference to radio communications. Operation of this equipment in a residential area is likely to cause harmful interference, in which case users will be required to correct the interference at their own expense.
The following information is for FCC compliance of Class B devices: The equipment described in this manual generates and may radiate radio-frequency energy. If it is not installed in accordance with Cisco’s installation instructions, it may cause interference with radio and television reception. This equipment has been tested and found to comply with the limits for a Class B digital device in accordance with the specifications in part 15 of the FCC rules. These specifications are designed to provide reasonable protection against such interference in a residential installation. However, there is no guarantee that interference will not occur in a particular installation.
Modifying the equipment without Cisco’s written authorization may result in the equipment no longer complying with FCC requirements for Class A or Class B digital devices. In that event, your right to use the equipment may be limited by FCC regulations, and you may be required to correct any interference to radio or television communications at your own expense.
You can determine whether your equipment is causing interference by turning it off. If the interference stops, it was probably caused by the Cisco equipment or one of its peripheral devices. If the equipment causes interference to radio or television reception, try to correct the interference by using one or more of the following measures:
• Turn the television or radio antenna until the interference stops.
• Move the equipment to one side or the other of the television or radio.
• Move the equipment farther away from the television or radio.
• Plug the equipment into an outlet that is on a different circuit from the television or radio. (That is, make certain the equipment and the television or radio are on circuits controlled by different circuit breakers or fuses.)
Modifications to this product not authorized by Cisco Systems, Inc. could void the FCC approval and negate your authority to operate the product.
The Cisco implementation of TCP header compression is an adaptation of a program developed by the University of California, Berkeley (UCB) as part of UCB’s public domain version of the UNIX operating system. All rights reserved. Copyright © 1981, Regents of the University of California.
NOTWITHSTANDING ANY OTHER WARRANTY HEREIN, ALL DOCUMENT FILES AND SOFTWARE OF THESE SUPPLIERS ARE PROVIDED “AS IS” WITH ALL FAULTS. CISCO AND THE ABOVE-NAMED SUPPLIERS DISCLAIM ALL WARRANTIES, EXPRESSED OR IMPLIED, INCLUDING, WITHOUT
LIMITATION, THOSE OF MERCHANTABILITY, FITNESS FOR A PARTICULAR PURPOSE AND NONINFRINGEMENT OR ARISING FROM A COURSE OF DEALING, USAGE, OR TRADE PRACTICE.
IN NO EVENT SHALL CISCO OR ITS SUPPLIERS BE LIABLE FOR ANY INDIRECT, SPECIAL, CONSEQUENTIAL, OR INCIDENTAL DAMAGES, INCLUDING, WITHOUT LIMITATION, LOST PROFITS OR LOSS OR DAMAGE TO DATA ARISING OUT OF THE USE OR INABILITY TO USE THIS MANUAL, EVEN IF CISCO OR ITS SUPPLIERS HAVE BEEN ADVISED OF THE POSSIBILITY OF SUCH DAMAGES.
CCSP, CCVP, the Cisco Square Bridge logo, Follow Me Browsing, and StackWise are trademarks of Cisco Systems, Inc.; Changing the Way We Work, Live, Play, and Learn, and iQuick Study are service marks of Cisco Systems, Inc.; and Access Registrar, Aironet, BPX, Catalyst, CCDA, CCDP, CCIE, CCIP, CCNA, CCNP, Cisco, the Cisco Certified Internetwork Expert logo, Cisco IOS, Cisco Press, Cisco Systems, Cisco Systems Capital, the Cisco Systems logo, Cisco Unity, Enterprise/Solver, EtherChannel, EtherFast, EtherSwitch, Fast Step, FormShare, GigaDrive, GigaStack, HomeLink, Internet Quotient, IOS, IP/TV, iQ Expertise, the iQ logo, iQ Net Readiness Scorecard, LightStream, Linksys, MeetingPlace, MGX, the Networkers logo, Networking Academy, Network Registrar, Packet, PIX, Post-Routing, Pre-Routing, ProConnect, RateMUX, ScriptShare, SlideCast, SMARTnet, The Fastest Way to Increase Your Internet Quotient, and TransPath are registered trademarks of Cisco Systems, Inc. and/or its affiliates in the United States and certain other countries.
C O N T E N T S
Preface
ixAudience
ixOrganization
ixConventions
xRelated Documentation
xiObtaining Documentation
xiCisco.com
xiDocumentation CD-ROM
xiOrdering Documentation
xiDocumentation Feedback
xiiObtaining Technical Assistance
xiiCisco TAC Website
xiiOpening a TAC Case
xiiTAC Case Priority Definitions
xiiiObtaining Additional Publications and Information
xiiiC H A P T E R 1
Using Content Switching Module Commands
1-1Using the CSM Commands
1-1Command Modes
1-2Regular Expressions
1-3C H A P T E R 2
Content Switching Module Commands
2-1arp
2-2capp udp
2-3options (CAPP UDP submode)
2-4port (CAPP UDP submode)
2-5Contents
failover (fault tolerant submode)
2-14heartbeat-time (fault tolerant submode)
2-15preempt (fault tolerant submode)
2-16priority (fault tolerant submode)
2-17ip slb mode
2-18map cookie
2-20match protocol http cookie (cookie map submode)
2-21map dns
2-22match protocol dns domain (DNS map submode)
2-23map header
2-24match protocol http header (header map submode)
2-25map retcode
2-26match protocol http retcode (return code map submode)
2-27map url
2-28match protocol http url (URL map submode)
2-29module csm
2-30natpool (module submode)
2-31owner
2-32billing-info (owner submode)
2-33contact-info (owner submode)
2-34maxconns (owner submode)
2-35policy
2-36client-group (policy submode)
2-37cookie-map (policy submode)
2-38header-map (policy submode)
2-39serverfarm (policy submode)
2-40set ip dscp (policy submode)
2-41sticky-group (policy submode)
2-42url-map (policy submode)
2-43probe
2-44address (probe submode)
2-46Contents
interval (probe submode)
2-52name (probe submode)
2-53open (probe submode)
2-54port (probe submode)
2-55receive (probe submode)
2-56request (probe submode)
2-57retries (probe submode)
2-58script (probe submode)
2-59real
2-60backup real (real server submode)
2-61health probe (real server submode)
2-62inservice (real server submode)
2-63maxconns (real server submode)
2-65minconns (real server submode)
2-66redirect-vserver (real server submode)
2-67weight (real server submode)
2-68redirect-vserver
2-69advertise (redirect virtual server submode)
2-70client (redirect virtual server submode)
2-71idle (redirect virtual server submode)
2-72inservice (redirect virtual server submode)
2-73replicate csrp (redirect virtual server submode)
2-74ssl (redirect virtual server submode)
2-75virtual (redirect virtual server submode)
2-76vlan (redirect virtual server submode)
2-77webhost backup (redirect virtual server submode)
2-78webhost relocation (redirect virtual server submode)
2-79reverse-sticky
2-80script file
2-81Contents
nat server (serverfarm submode)
2-89predictor (serverfarm submode)
2-90probe (serverfarm submode)
2-92retcode-map (serverfarm submode)
2-93show module csm
2-94show module csm arp
2-95show module csm capp
2-96show module csm conns
2-98show module csm dfp
2-100show module csm ft
2-102show module csm map
2-103show module csm memory
2-105show module csm natpool
2-106show module csm owner
2-107show module csm policy
2-108show module csm probe
2-109show module csm probe script
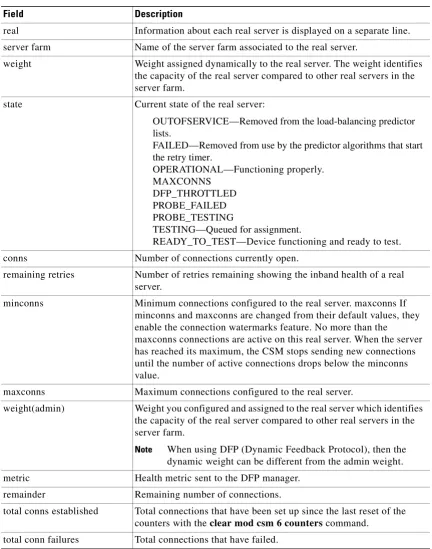
2-110show module csm real
2-111show module csm real retcode
2-113show module csm script
2-114show module csm script task
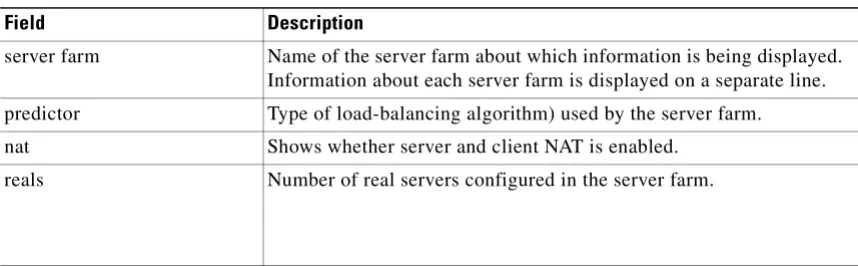
2-115show module csm serverfarm
2-116show module csm static
2-118show module csm static server
2-119show module csm stats
2-120show module csm status
2-122show module csm sticky
2-123show module csm tech-script
2-124show module csm tech-support
2-125show module csm vlan
2-128show module csm vserver redirect
2-129Contents
sticky
2-135static (sticky submode)
2-137vserver
2-138advertise (virtual server submode)
2-139client (virtual server submode)
2-140domain (virtual server submode)
2-141idle (virtual server submode)
2-142inservice (virtual server submode)
2-143owner (virtual server submode)
2-144parse-length (virtual server submode)
2-145pending (virtual server submode)
2-146persistent rebalance (virtual server submode)
2-147replicate csrp (virtual server submode)
2-148reverse-sticky (virtual server submode)
2-149serverfarm (virtual server submode)
2-150slb-policy (virtual server submode)
2-152ssl-sticky (virtual server submode)
2-153sticky (virtual server submode)
2-154url-hash (virtual server submode)
2-156virtual (virtual server submode)
2-157unidirectional (virtual server submode)
2-159vlan (virtual server submode)
2-160vlan
2-161alias (VLAN submode)
2-162gateway (VLAN submode)
2-164ip address (VLAN submode)
2-165route (VLAN submode)
2-166xml-config
2-167client-group (XML submode)
2-168Preface
This preface describes the audience, organization, and conventions of this publication, and provides information on how to obtain related documentation.
Audience
This publication is for experienced network administrators who are responsible for configuring and maintaining Catalyst 6500 series switches and network managers who perform any of the following tasks:
• Managing network security
• Configuring firewalls
• Managing default and static routes, and TCP and UDP services
This guide contains the commands available for use with the Cisco Content Switching Module (CSM). Use this guide with the Catalyst 6500 and Cisco 7600 Series Content Switching Module Hardware Installation Guide and the Catalyst 6500 and Cisco 7600 Series Firewall Services Module Configuration Guide.
Organization
This publication is organized as follows:
Chapter Title Description
Chapter 1 Using Content Switching Module Commands
Introduces you to the CSM commands, access modes, and common port and protocol numbers.
Chapter 2 Content Switching Module Commands
Preface Conventions
Conventions
This document uses the following conventions:
Notes use the following conventions:
Note Means reader take note. Notes contain helpful suggestions or references to material not covered in the publication.
Cautions use the following conventions:
Caution Means reader be careful. In this situation, you might do something that could result in equipment
Convention Description
boldface font Commands, command options, and keywords are in
boldface.
italic font Arguments for which you supply values are in italics.
[ ] Elements in square brackets are optional. Default responses to system prompts are in square brackets.
{ x | y | z } Alternative keywords are grouped in braces and separated by vertical bars. Braces can also be used to group keywords and/or aguments; for example, {interfaceinterfacetype}. [ x | y | z ] Optional alternative keywords are grouped in brackets and
separated by vertical bars.
string A nonquoted set of characters. Do not use quotation marks around the string or the string will include the quotation marks.
screen font Terminal sessions and information the system displays are in
screen font.
boldface screen
font
Information you must enter is in boldface screen font.
italic screen font Arguments in the screen display for which you supply values are in italic screen font.
^ The symbol ^ represents the key labeled Control—for example, the key combination ^D in a screen display means hold down the Control key while you press the D key.
< > Nonprinting characters, such as passwords are in angle brackets.
Preface
Related Documentation
Related Documentation
Use this document in conjunction with the CSM documentation available online at the following site:
http://www.cisco.com/univercd/cc/td/doc/product/lan/cat6000/cfgnotes/csm_3_2 /index.htm
Cisco provides CSM technical tips at the following site:
http://www.cisco.com/en/US/products/hw/modules/ps2706/ps780/index.html
Obtaining Documentation
Cisco provides several ways to obtain documentation, technical assistance, and other technical resources. These sections explain how to obtain technical information from Cisco Systems.
Cisco.com
You can access the most current Cisco documentation on the World Wide Web at this URL:
http://www.cisco.com/univercd/home/home.htm
You can access the Cisco website at this URL:
http://www.cisco.com
International Cisco websites can be accessed from this URL:
http://www.cisco.com/public/countries_languages.shtml
Documentation CD-ROM
Cisco documentation and additional literature are available in a Cisco Documentation CD-ROM package, which may have shipped with your product. The Documentation CD-ROM is updated regularly and may be more current than printed documentation. The CD-ROM package is available as a single unit or through an annual or quarterly subscription.
Registered Cisco.com users can order a single Documentation CD-ROM (product number DOC-CONDOCCD=) through the Cisco Ordering tool:
http://www.cisco.com/en/US/partner/ordering/ordering_place_order_ordering_tool_launch.html
All users can order annual or quarterly subscriptions through the online Subscription Store:
http://www.cisco.com/go/subscription
Preface Obtaining Technical Assistance
• Nonregistered Cisco.com users can order documentation through a local account representative by calling Cisco Systems Corporate Headquarters (California, USA.) at 408 526-7208 or, elsewhere in North America, by calling 800 553-NETS (6387).
Documentation Feedback
You can submit comments electronically on Cisco.com. On the Cisco Documentation home page, click
Feedback at the top of the page.
You can send your comments in e-mail to [email protected].
You can submit comments by using the response card (if present) behind the front cover of your document or by writing to the following address:
Cisco Systems
Attn: Customer Document Ordering 170 West Tasman Drive
San Jose, CA 95134-9883
We appreciate your comments.
Obtaining Technical Assistance
For all customers, partners, resellers, and distributors who hold valid Cisco service contracts, the Cisco Technical Assistance Center (TAC) provides 24-hour, award-winning technical support services, online and over the phone. Cisco.com features the Cisco TAC website as an online starting point for technical assistance.
Cisco TAC Website
The Cisco TAC website (http://www.cisco.com/tac) provides online documents and tools for
troubleshooting and resolving technical issues with Cisco products and technologies. The Cisco TAC website is available 24 hours a day, 365 days a year.
Accessing all the tools on the Cisco TAC website requires a Cisco.com user ID and password. If you have a valid service contract but do not have a login ID or password, register at this URL:
http://tools.cisco.com/RPF/register/register.do
Opening a TAC Case
Preface
Obtaining Additional Publications and Information
To open a case by telephone, use one of the following numbers:
Asia-Pacific: +61 2 8446 7411 (Australia: 1 800 805 227) EMEA: +32 2 704 55 55
USA: 1 800 553-2447
For a complete listing of Cisco TAC contacts, go to this URL:
http://www.cisco.com/warp/public/687/Directory/DirTAC.shtml
TAC Case Priority Definitions
To ensure that all cases are reported in a standard format, Cisco has established case priority definitions.
Priority 1 (P1)—Your network is “down” or there is a critical impact to your business operations. You and Cisco will commit all necessary resources around the clock to resolve the situation.
Priority 2 (P2)—Operation of an existing network is severely degraded, or significant aspects of your business operation are negatively affected by inadequate performance of Cisco products. You and Cisco will commit full-time resources during normal business hours to resolve the situation.
Priority 3 (P3)—Operational performance of your network is impaired, but most business operations remain functional. You and Cisco will commit resources during normal business hours to restore service to satisfactory levels.
Priority 4 (P4)—You require information or assistance with Cisco product capabilities, installation, or configuration. There is little or no effect on your business operations.
Obtaining Additional Publications and Information
Information about Cisco products, technologies, and network solutions is available from various online and printed sources.
• The Cisco Product Catalog describes the networking products offered by Cisco Systems, as well as ordering and customer support services. Access the Cisco Product Catalog at this URL:
http://www.cisco.com/en/US/products/products_catalog_links_launch.html
• Cisco Press publishes a wide range of networking publications. Cisco suggests these titles for new and experienced users: Internetworking Terms and Acronyms Dictionary, Internetworking
Technology Handbook, Internetworking Troubleshooting Guide, and the Internetworking Design Guide. For current Cisco Press titles and other information, go to Cisco Press online at this URL:
http://www.ciscopress.com
Preface Obtaining Additional Publications and Information
• Internet Protocol Journal is a quarterly journal published by Cisco Systems for engineering professionals involved in designing, developing, and operating public and private internets and intranets. You can access the Internet Protocol Journal at this URL:
http://www.cisco.com/en/US/about/ac123/ac147/about_cisco_the_internet_protocol_journal.html
• Training—Cisco offers world-class networking training. Current offerings in network training are listed at this URL:
C H A P T E R
1
Using Content Switching Module Commands
This chapter describes how to use the CSM commands and contains the following sections:
• Using the CSM Commands, page 1-1
• Command Modes, page 1-2
Using the CSM Commands
This section provides a brief introduction to using CSM commands and where to go for more information on configuring and using your CSM.
You will use these CSM commands for basic tasks:
With the CSM command-line interface (CLI), you can do the following tasks:
• Check the syntax before entering a command.
Enter a command and press the ? key to view a quick summary, or precede a command with the help command,(help aaa, for example).
• Abbreviate commands.
You can use the config t command to start configuration mode, the write t command statementto list the configuration, and write m to write to Flash memory. In most commands, the show command
Command Task
write memory Saving the configuration
write terminal Viewing the configuration
logging buffered debugging Accumulating system log (syslog) messages
show logging Viewing system log (syslog) messages
Chapter 1 Using Content Switching Module Commands Command Modes
• Create your configuration in a text editor, and then cut and paste it into the configuration.
You can paste in a line at a time or the whole configuration. Always check your configuration after pasting large blocks of text to be sure that all of the text was copied.
For information about how to build your CSM configuration, refer to the Catalyst 6500 Series Content Switching Module Installation and Configuration Note.
CSM technical documentation is located online at the following website:
http://www.cisco.com/univercd/cc/td/doc/product/lan/cat6000/mod_icn/csm
Command Modes
The CSM contains a command set based on Cisco IOS technologies and provides configurable command privilege modes based on the following command modes:
Note When using the CSM on a switch running the Catalyst operating system and Cisco IOS, you must session to the Mutilayer Switch Feature Card (MSFC) for the router prompt.
• Unprivileged mode
The unprivileged mode allows you to view CSM settings. The unprivileged mode prompt appears as follows when you first access the CSM:
Router>
• Privileged mode
Any unprivileged mode command will work in privileged mode. Use the enable command to start the privileged mode from the unprivileged mode as follows:
Router> enable Password: Router
The # prompt is displayed.
Use the exit or end commands to exit privileged mode and return to unprivileged mode as follows:
Router# exit
Logoff
Type help or '?' for a list of available commands. Router>
Use the disable command to exit privileged mode and return to unprivileged mode as follows:
Router# disable
Router>
• Configuration mode
Chapter 1 Using Content Switching Module Commands
Regular Expressions
Use the exit or end commands to exit configuration mode and return to privileged mode as follows:
Router(config)# end
Router#
Use the disable command to exit configuration mode and return to unprivileged mode as follows:
Router(config)# disable
Router>
• Submodes
When you are in a submode, the prompt changes to:
Router(config-submode_name)#
Regular Expressions
Regular expressions used in CSM commands are based on the UNIX filename specification. You will use regular expressions in these commands:
• match protocol http cookie (cookie map submode), page -21
• match protocol http header (header map submode), page -25
• match protocol http url (URL map submode), page -29
Expression Meaning
“*” Zero or more characters
“?” Exactly one character—the [Ctrl + V] key combination must be entered
“\” Escaped character
“|” Or
Bracketed range (for example, [0–9]) Matching any single character from the range
Leading ^ in a range Do not match any in the range
“.\a” Alert (ASCII 7)
“.\b” Backspace (ASCII 80
“.\f” Form-feed (ASCII 12)
“.\n” Newline (ASCII 10)
“.\r” Carriage return (ASCII 13)
“.\t” Tab (ASCII 9)
“.\v” Vertical tab (ASCII 11)
C H A P T E R
2
Content Switching Module Commands
Chapter 2 Commands for the Content Switching Module arp
arp
To configure a static ARP entry, use the arp command. To remove the static ARP entry from the configuration, use the no form of this command.
arp ip_addressmac-address vlan id
no arp ip_address
Syntax Description
Defaults This command has no default settings,
Command Modes CSM configuration submode
Command History
Examples This example shows how to configure a static ARP entry:
Router(config-module-csm)# arp 1.1.1.1 0123.4567.89ab vlan 3
ip_address IP address that you want associate with the ARP entry. mac-address MAC address of the host.
vlan id Identifies the VLAN.
Release Modification
Chapter 2 Commands for the Content Switching Module
capp udp
capp udp
To enter the Content Application Peering Protocol (CAPP) User Datagram Protocol (UDP) configuration submode, and then enable the CAPP, use the capp udp command. To remove the CAPP UDP
configuration, use the no form of this command.
capp udp no capp udp
Syntax Description This command has no arguments or keywords.
Defaults This command has no default settings,
Command Modes CSM configuration submode
Command History
Usage Guidelines The CSM implements only the agent side of the CAPP, not the content router functionality. This feature provides Global Server Load Balancing (GSLB) when you use the CSM with a Content Services Switch (CSS), which provides the content router function.
When you enter the CAPP UDP submode, the following commands are available:
• default—Sets a command to its default.
• exit—Saves changes and exits from the subcommand mode; see the “agent (DFP submode)” command section.
• no—Negates a command or sets the specified command to its defaults.
• options—Sets optional parameters for a specified IP address. see the “options (CAPP UDP submode)” command section.
• port—Configures the CAPP port. Range is from 1 to 65535. Default is 5002, see the “port (CAPP UDP submode)” command section.
• secure—Enables encryption, see the “secure (CAPP UDP submode)” command section.
Release Modification
Chapter 2 Commands for the Content Switching Module options (CAPP UDP submode)
options (CAPP UDP submode)
To assign session options to an IP address, use the options command in the CAPP UDP submode. To remove the options for the specified address from the configuration, use the no form of this command.
options ip_address encryption MD5 secret
no options ip_address
Syntax Description
Defaults This command has no default settings.
Command Modes CSM CAPP UDP submode
Command History
Usage Guidelines The CSM applies encryption to packets sent to this destination address or when the CSM receives datagrams with a matching source IP address.
You can set the IP address to 0.0.0.0 to apply encryption to all incoming and outbound datagrams that are not specifically configured. The 0.0.0.0 IP address allows you to set a global security configuration that can be applied to an arbitrary number of peers.
Examples This example shows the application of a specific option set to 10.6.3.21 and a global option set to all other IP addresses. The CSM encrypts datagrams received from 10.6.3.21 and transmitted to 10.6.3.21 with encryption code mySecret. All other datagrams, received or transmitted, are assigned to the default encryption secret anotherSecret.
Cat6k-2(config-slb-capp-udp)# options 10.6.3.21 encryption MD5 mySecret
Cat6k-2(config-slb-capp-udp)# options 0.0.0.0 encryption MD5 anotherSecret
Related Commands capp udp
ip_address IP address that you want associate with this group of options.
encryption MD5 Specifies MD5 authentication.
secret The string used in encryption and decryption of the MD5 hashing method. Enter an unquoted text string with a maximum of 31 characters.
Release Modification
Chapter 2 Commands for the Content Switching Module
port (CAPP UDP submode)
port (CAPP UDP submode)
To set the port number for CAPP UDP connections, use the port command in the CAPP UDP submode. To remove the port from the configuration, use the no form of this command.
port port_num
no port
Syntax Description
Defaults The no form of this command sets the port to 5002.
Command Modes CSM CAPP UDP submode
Command History
Examples This example shows how to set the port for CAPP connections:
Cat6k-2(config-slb-capp-udp)# 50
Related Commands capp udp
port_num Specifies the UDP port number. Enter a value of 1 to 65535.
Release Modification
Chapter 2 Commands for the Content Switching Module secure (CAPP UDP submode)
secure (CAPP UDP submode)
To enable or disable the encryption requirement for inbound CAPP datagrams, use the secure command in the CAPP UDP submode. This command prevents unauthorized messages from entering the CSM. To remove the encryption requirement from the configuration, use the no form of this command.
secure no secure
Syntax Description This command has no arguments or keywords.
Defaults This command has no default settings.
Command Modes CSM CAPP UDP submode
Command History
Usage Guidelines Use the capp udp secure command with the capp udp options command to specify which secure messages are accepted. If you use this command without the capp udp options command, the CSM drops all incoming data.
Examples This example shows how to allow only incoming traffic from 10.6.3.21 encrypted with the encryption code mySecret:
Cat6k-2(config-slb-capp-udp)# secure
Cat6k-2(config-slb-capp-udp)# options 10.6.3.21 encryption md5 mySecret
Related Commands capp udp
Release Modification
Chapter 2 Commands for the Content Switching Module
clear module csm
clear module csm
To force the active CSM to become the standby module, use the clear module csm command.
clear module csm [slot | all] arp-cache ip-address connections [real | vserver] counters ft active linecard-configuration sticky [1-255 | all]
Syntax Description
Defaults This command has no default settings.
Command Modes Privileged
Command History
Usage Guidelines When a connection is closed, a reset (RST) is sent to both the client and the server. Counters reset all the CSM statistics information, except for the show mod csm X tech-support counters, which are reset any time that you run the show command. The linecard-configuration command forces a soft-reset of the CSM, which erases all existing connections and run-time information. The CSM then reloads its configuration from Cisco IOS. This process takes about 3 seconds.
slot (Optional) Specifies the CSM location in the switch. Range is from 1 to 9.
all (Optional) Applies to all online CSM modules.
arp-cache ip-address Clears the SLB ARP cache.
connections Specifies connections.
real (Optional) Clears SLB connections for the real servers.
vserver (Optional) Clears SLB connections for a virtual server.
counters Clears SLB statistics.
ft active Clears the CSM fault tolerance state to force a failover.
linecard-configuration Clears the configuration database stored in the SLB linecard
sticky Specifies sticky.
1-255 (Optional) Clears the designated sticky group; range is from 1 to 255.
all (Optional) Clears all sticky entries from the sticky database.
Release Modification
Chapter 2 Commands for the Content Switching Module dfp
dfp
To enter the Dynamic Feedback Protocol (DFP) submode, and then configure DFP, use the dfp
command. To remove the DFP configuration, use the no form of this command.
dfp [password password[timeout]]
no dfp [password password]
Syntax Description
Defaults Timeout value is 180 seconds.
Command Modes Module CSM configuration submode
Command History
Usage Guidelines The timeout option allows you to change the password without stopping messages between the DFP agent and its manager.
During a timeout, the agent sends packets with the old password (or null, if there is no old password), and receives packets with either the old or new password. After a timeout expires, the agent sends and receives packets with only the new password; received packets that use the old password are discarded.
If you are changing the password for an entire load-balanced environment, set a longer timeout. The extended timeout allows enough time for you to update the password on all agents and servers before the timeout expires. The embedded timeout also prevents mismatches between agents and servers that have the new password and agents and servers that have the old password.
Examples This example shows how to initiate DFP agent configuration mode, configure DFP, set the password to flounder, and configure a 60-second timeout:
password (Optional) Specifies a password for MD5 authentication.
password (Optional) Password value for MD5 authentication. This password must be the same on all DFP manager devices. The password can contain 1–64 characters. Valid characters are: a–z, A–Z, 0–9, @, #, $. timeout (Optional) Delay period, in seconds, during which both the old
password and the new password are accepted; the range is from 0 to 65535.
Release Modification
Chapter 2 Commands for the Content Switching Module
agent (DFP submode)
agent (DFP submode)
To configure the DFP agent to which the CSM is going to communicate, use the agent command in the SLB DFP submode. To remove the agent configuration, use the no form of this command.
agent ip-address port [keepalive-timeout[retry-count[retry-interval]]]
no agent ip-address port
Syntax Description
Defaults Keepalive timeout is 0 (no keepalive message).
Retry count is 0 seconds (0 seconds allows infinite retries).
Retry intervalis 180 seconds.
Command Modes SLB DFP configuration submode
Command History
Examples This example shows how to initiate the DFP agent, configure a 350-second timeout, and configure the number of retries to 270:
Cat6k-2(config-slb-dfp)# agent 111.101.90.10 2 350 270
Related Commands dfp
manager (DFP submode) show module csm dfp
ip-address IP address of the DFP agent. port Port number of the DFP agent.
keepalive-timeout (Optional) Time period in seconds between keepalive messages; the range is from 1 to 65535.
retry-count (Optional) Number of consecutive connection attempts or invalid DFP reports received before tearing down the connections and marking the agent as failed; the range is from 0 to 65535. retry-interval (Optional) Interval between retries; the range is from 1 to 65535.
Release Modification
Chapter 2 Commands for the Content Switching Module manager (DFP submode)
manager (DFP submode)
To set the port where an external DFP can connect to the CSM, use the manager command in SLB DFP submode. To remove the manager configuration, use the no form of this command.
manager port
no manager
Syntax Description
Defaults This command has no default settings.
Command Modes SLB DFP configuration submode
Command History
Usage Guidelines This command enables the CSM to listen to DFP connections from an external DFP manager.
Examples This example shows how to set the DFP manager port:
Cat6k-2(config-slb-dfp)# manager 4
Related Commands agent (DFP submode) dfp
show module csm dfp
port Port number.
Release Modification
Chapter 2 Commands for the Content Switching Module
exit
exit
To log out of the system or to leave a subcommand mode, use the exit command.
exit
Syntax Description This command has no arguments or keywords.
Defaults This command has no default settings.
Command Modes Command mode
Usage Guidelines To leave a subcommand mode, use the exit command. The exit command saves any changes before leaving the submode.
Examples This example shows how to log out of the CSM:
Cat6k-2(config-module-csm)# exit
Chapter 2 Commands for the Content Switching Module ft group
ft group
To enter the fault tolerant submode, and then configure fault tolerance on the CSM, use the ft group
command. To remove the fault-tolerant configuration, use the no form of this command.
ft group group-id vlan vlan number
no ft group
Syntax Description
Defaults This command has no default settings.
Command Modes Module CSM configuration submode
Command History
Usage Guidelines A fault-tolerant group is comprised of two Catalyst 6500 series switches each containing a CSM configured for fault-tolerant operation. Each fault-tolerant group appears to network devices as a single device. A network may have more than one fault-tolerant group.
When you enter the fault tolerance group submode, the following commands are available:
• default—Sets a command to its default.
• exit—Saves changes and exits from the subcommand mode; see the “agent (DFP submode)” command section.
• failover—Saves changes and exits from the subcommand mode; see the “failover (fault tolerant submode)” command section.
• heartbeat-time—Saves changes and exits from the subcommand mode; see the “heartbeat-time (fault tolerant submode)” command section.
• no—Negates a command or sets the specified command to its defaults.
• preempt—Sets optional parameters for a specified IP address. See the “preempt (fault tolerant submode)” command section.
group-id ID of the fault-tolerant group. Both CSMs must have the same group ID. Range is from 1 to 254.
vlan vlan number Specifies the VLAN over which heartbeat messages are sent by VLAN number. Both CSMs must have the same VLAN ID. The range is from 2 to 4095.
Release Modification
Chapter 2 Commands for the Content Switching Module
ft group
Examples This example shows how to configure a fault-tolerant group named 123 on VLAN 5 and set the failover time to 3 seconds:
Cat6k-2(config-module-csm)# ft group 123 vlan 5
Cat6k-2(config-slb-ft)# failover 3
Chapter 2 Commands for the Content Switching Module failover (fault tolerant submode)
failover (fault tolerant submode)
To set the time for a standby CSM to wait before becoming an active CSM, use the failover command in the SLB fault-tolerant configuration submode. To remove the failover configuration, use the no form of this command.
failover failover-time
no failover
Syntax Description
Defaults Failover time is 3 seconds.
Command Modes SLB fault-tolerant configuration submode
Command History
Examples This example shows how to set a failover period of 6 seconds:
Cat6k-2(config-slb-ft)# failover 6
Related Commands ft group
show module csm ft
failover-time Amount of time the CSM must wait after the last heartbeat message is received before assuming the other CSM is not operating; the range is from 1 to 65535.
Release Modification
Chapter 2 Commands for the Content Switching Module
heartbeat-time (fault tolerant submode)
heartbeat-time (fault tolerant submode)
To set the time interval between heartbeat messages that are transmitted by the CSM, use the
heartbeat-time command in the SLB fault-tolerant configuration submode. To restore the default heartbeat interval, use the no form of this command.
heartbeat-time heartbeat-time
no heartbeat-time
Syntax Description
Defaults Heartbeat-time is 1 second.
Command Modes SLB fault-tolerant configuration submode
Command History
Examples This example shows how to set the heartbeat time to 2 seconds:
Cat6k-2(config-slb-ft)# heartbeat-time 2
Related Commands ft group
show module csm ft
heartbeat-time Time interval between heartbeat transmissions in seconds; the range is from 1 to 65535.
Release Modification
Chapter 2 Commands for the Content Switching Module preempt (fault tolerant submode)
preempt (fault tolerant submode)
To allow a higher priority CSM to take control of a fault-tolerant group when it comes online, use the
preempt command in the SLB fault-tolerant configuration submode. To restore the preempt default value, use the no form of this command.
preempt no preempt
Syntax Description This command has no arguments or keywords.
Defaults The default value is that preempt is disabled.
Command Modes Privileged
Command History
Usage Guidelines When you enable preempt, the higher priority CSM preempts the other CSM in the fault-tolerant group when the higher priority CSM comes online. When you enable no preempt, the current primary CSM remains the primary CSM when the next CSM comes online.
Note You must set both members of the fault-tolerant CSM pair to preempt for this feature to work.
Examples This example shows how to set the fault-tolerance mode to preempt:
Cat6k-2(config-slb-ft)# preempt
Related Commands ft group
priority (fault tolerant submode) show module csm ft
Release Modification
Chapter 2 Commands for the Content Switching Module
priority (fault tolerant submode)
priority (fault tolerant submode)
To set the priority of the CSM, use the prioritycommand in the SLB fault-tolerant configuration submode. To restore the priority default value, use the no form of this command.
priority value
no priority
Syntax Description
Defaults Value is 10.
Command Modes SLB fault-tolerant configuration submode
Command History
Usage Guidelines The CSM with the largest priority value is the primary CSM in the fault-tolerant pair when the modules are both operating.
Examples This example shows how to set the priority value to 12:
Cat6k-2(config-slb-ft)# priority 12
Related Commands ft group
preempt (fault tolerant submode) show module csm ft
value Priority of a CSM; the range is from 1 to 254.
Release Modification
Chapter 2 Commands for the Content Switching Module ip slb mode
ip slb mode
To operate as a CSM load-balancing device instead of a Cisco IOS server load balancing (SLB) device, use the ip slb mode command to configure the switch. To remove the mode configuration, use the no
form of this command.
ip slb mode {csm | rp}
no ip slb mode
Syntax Description
Defaults Route processor mode
Command Modes Global configuration
Command History
Usage Guidelines We recommend that you use the rp mode for all configuration. The rp mode allows you to configure both the switch and the CSM or other modules without changing modes.
Note You need to reboot the switch to change the mode.
This command allows you to change from the Cisco IOS SLB mode to the CSM load-balancing mode.
Note Specifying the no ip slb mode command is the same as specifying the rp mode.
Note In csm mode, all ip slb commands apply to a CSM module; Cisco IOS SLB is not available. In rp mode (the default), ip slb commands apply to Cisco IOS SLB. The modulecsm commands are available to configure multiple CSMs.
csm Keyword to select the CSM load-balancing mode that allows you to configure a single CSM only and prohibits the use of Cisco IOS SLB on the Catalyst 6500 series switch.
rp Keyword to select the route processor Cisco IOS SLB mode and enable module CSM commands for configuring multiple CSMs.
Release Modification
1.1(1) This command was introduced.
Chapter 2 Commands for the Content Switching Module
ip slb mode
Examples This example shows how to configure the CSM load-balancing mode:
Cat6k-2(config)# ip slb mode csm
Related Commands module csm
Chapter 2 Commands for the Content Switching Module map cookie
map cookie
To create a cookie map, and then enter the cookie map configuration submode for specifying cookie match rules, use the map cookie command. To remove the cookie maps from the configuration, use the
no form of this command.
map cookie-map-name cookie no map cookie-map-name
Syntax Description
Defaults This command has no default settings.
Command Modes Module CSM configuration submode
Command History
Examples This example shows how to create a cookie map:
Cat6k-2(config-module-csm)# map upnready cookie
Related Commands cookie-map (policy submode)
match protocol http cookie (cookie map submode)
show module csm map
cookie-map-name Cookie map instance; the character string is limited to 15 characters.
cookie Enters the cookie map submode.
Release Modification
Chapter 2 Commands for the Content Switching Module
match protocol http cookie (cookie map submode)
2 2
match protocol http cookie (cookie map submode)
To add cookies to a cookie map, use the match protocol http cookie command in SLB cookie map configuration submode. Multiple match rules can be added to a cookie map. To remove the cookie map name from the cookie map, use the no form of this command.
match protocol http cookie cookie-name cookie-value cookie-value-expression
no match protocol http cookie cookie-name cookie-value cookie-value-expression
Syntax Description
Defaults This command has no default settings.
Command Modes SLB cookie map configuration submode
Usage Guidelines Cookie regular expressions (see “Regular Expressions” section on page 2-3) are based on the UNIX filename specification. URL expressions are stored in a cookie map in the form cookie-name = cookie-value-expression. Cookie expressions allow spaces if they are escaped or quoted. You must match all cookies in the cookie map.
Command History
Examples This example shows how to add cookies to a cookie map:
Cat6k-2(config-slb-map-cookie)# match protocol http cookie albert cookie-value 4*
Related Commands cookie-map (policy submode) map cookie
show module csm map
cookie-name Cookie name; the range is from 1 to 63 characters.
cookie-value
cookie-value-expression
Specifies a cookie value expression; the range is from 1 to 255 characters.
Release Modification
Chapter 2 Commands for the Content Switching Module map dns
map dns
To enter the SLB DNS map mode and configure a DNS map, use the map dns command. To remove the DNS map from the configuration, use the no form of this command.
map dns-map-name dns no map dns-map-name dns
Syntax Description
Defaults This command has no default settings.
Command Modes SLB DNS map configuration submode
Command History
Usage Guidelines Any match of a DNS regular expression in the DNS map results in a successful match. A maximum of 1023 DNS domains can be configured to a map.
Examples This example shows how to group DNS domains:
Cat6k-2(config-module-csm)# map m1 dns
Cat6k-2(config-slb-map-dns)# exit
Cat6k-2(config)
Related Commands match protocol dns domain (DNS map submode) show module csm map
dns-map-name Name of an SLB DNS map; the character string range is from 1 to 15 characters.
Release Modification
Chapter 2 Commands for the Content Switching Module
match protocol dns domain (DNS map submode)
match protocol dns domain (DNS map submode)
To add a DNS domain to a DNS map, use the match protocol dns domain command in the SLB DNS map configuration submode. To remove the DNS domain from the URL map, use the no form of this command.
match protocol dns domain name
no match protocol dns domain name
Syntax Description
Defaults This command has no default settings.
Command Modes SLB DNS map configuration submode
Command History
Examples This example shows how to add domains to a DNS map:
Cat6k-2(config-slb-map-dns)# match protocol dns domain cisco.com
Related Commands map dns
show module csm map
name Names the DNS domain being mapped.
Release Modification
1.1(1) This command was introduced.
Chapter 2 Commands for the Content Switching Module map header
map header
To create a map group for specifying HTTP headers, and then enter the header map configuration submode, use the map header command. To remove the HTTP header group from the configuration, use the no form of this command.
map name header no map name
Syntax Description
Defaults This command has no default settings.
Command Modes Module CSM configuration submode
Command History
Examples This example shows how to group HTTP headers and associate them with a content switching policy:
Cat6k-2(config-module-csm)# map upnready header
Cat6k-2(config-slb-map-header)# match protocol http header Accept header-value *jpeg*
Cat6k-2(config-slb-map-header)# match protocol http header User-Agent header-value *NT*
Cat6k-2(config-slb-map-header)# match protocol http header Host header-value
www.myhome.com
Cat6k-2(config-slb-map-header)# exit
Related Commands header-map (policy submode)
match protocol http header (header map submode) show module csm map
name Map instance; the character string is from 1 to 15 characters.
Release Modification
Chapter 2 Commands for the Content Switching Module
match protocol http header (header map submode)
match protocol http header (header map submode)
To specify header fields and values for the CSM to search for when receiving a request, use the match protocol http header command in SLB header map configuration submode. Multiple match rules can be added to a header map. To remove the header match rule from the header map, use the no form of this command.
match protocol http header field header-value expression
no match protocol http header field
Syntax Description
Defaults This command has no default settings.
Command Modes SLB header map configuration submode
Usage Guidelines There are predefined fields, for example, Accept-Language, User-Agent, or Host.
Header regular expressions(see “Regular Expressions” section on page 2-3) are based on the UNIX filename specification. URL expressions are stored in a header map in the form header-name = expression. Header expressions allow spaces provided that they are escaped or quoted. All headers in the header map must be matched
Command History
Examples This example shows how to specify header fields and values to search upon a request:
Cat6k-2(config-slb-map-header)# match protocol http header Host header-value XYZ
Related Commands header-map (policy submode) map header
field Literal name of the generic field in the HTTP header. The range is from 1 to 63 characters.
header-value expression Specifies the header value expression string to compare against the value in the specified field; the range is from 1 to 127 characters.
Release Modification
Chapter 2 Commands for the Content Switching Module map retcode
map retcode
To enable return code checking, and then enter the return code map submode, use the map retcode
command. To remove the return code checking from the configuration, use the no form of this command.
map name retcode no map name
Syntax Description
Defaults This command has no default settings.
Command Modes CSM module submode
Command History
Examples This example shows how to enable return error code checking:
Cat6k-2(config-module-csm)# map upnready retcode
Related Commands cookie-map (policy submode)
match protocol http cookie (cookie map submode) show module csm map
name Return error code map instance; the character string is limited to 15 characters.
retcode Keyword to enter the return error code map submode.
Release Modification
Chapter 2 Commands for the Content Switching Module
match protocol http retcode (return code map submode)
match protocol http retcode (return code map submode)
To specify return code thresholds, count and log return codes, and send syslog messages for return code events received from the servers, use the match protocol http retcode command in SLB return code map configuration submode. To remove the return code thresholds, use the no form of this command.
match protocol http retcode min max action {count | log | remove} threshold [reset seconds]
no match protocol http retcode minmax
Syntax Description
Defaults This command has no default settings.
Command Modes SLB return code map configuration submode
Usage Guidelines The threshold and reset values are not configurable for the count action. These commands only are available for the log and remove actions.
Command History
Examples This example shows how to specify return codes values to search for in an HTTP request:
min max Minimum and maximum range of return codes used to perform a count, log, or remove action.
action count Increments the statistics of the number of occurrences of return codes received.
action log Specifies where syslog messages are sent when a threshold is reached.
action remove Specifies where the syslog messages are sent when a threshold is reached and the server is removed from service.
threshold The number of return occurrences before the log or remove action is taken.
reset seconds (Optional) Number of seconds to wait before the processing can resume.
Release Modification
Chapter 2 Commands for the Content Switching Module map url
map url
To enter the SLB URL map mode and configure a URL map, use the map url command. To remove the URL map from the configuration, use the no form of this command.
map url-map-name url no map url-map-name
Syntax Description
Defaults This command has no default settings.
Command Modes SLB URL map configuration submode
Command History
Usage Guidelines Any match of a URL regular expression in the URL map results in a successful match. A maximum of 1023 URLs can be configured to a map.
Examples This example shows how to group URLs and associate them with a content switching policy:
Cat6k-2(config-module-csm)# map m1 url
Cat6k-2(config-slb-map-url)# match protocol http url /index.html
Cat6k-2(config-slb-map-url)# match protocol http url /stocks/csco/
Cat6k-2(config-slb-map-url)# match protocol http url *gif
Cat6k-2(config-slb-map-url)# match protocol http url /st*
Cat6k-2(config-slb-map-url)# exit
Cat6k-2(config)
Related Commands match protocol http url (URL map submode) show module csm map
url-map (policy submode)
url-map-name Name of an SLB URL map; the character string range is from 1 to 15 characters.
Release Modification
Chapter 2 Commands for the Content Switching Module
match protocol http url (URL map submode)
match protocol http url (URL map submode)
To add a URL regular expression to a URL map, use the match protocol http url command in the SLB URL map configuration submode. Multiple match rules can be added to a URL map. To remove the URL regular expression from the URL map, use the no form of this command.
match protocol http [method method-expression] url url-expression
no match protocol http url [method method-expression] url url-expressionn
Syntax Description
Defaults This command has no default settings.
Command Modes SLB URL map configuration submode
Usage Guidelines URL regular expressions (see “Regular Expressions” section on page 2-3) are based on the UNIX filename specification. URL expressions are stored in a cookie map in the form urln. URL expressions do not allow spaces and only one of the URLs in the map must be matched
The method expression can either be one of the standard HTTP 1.1 method names (OPTIONS, GET, HEAD, POST, PUT, DELETE, TRACE, or CONNECT) or a string you specify that must be matched exactly (PROTOPLASM).
Command History
Examples This example shows how to add URL expressions to a URL map:
Cat6k-2(config-slb-map-url)# match protocol http url html
Related Commands map url
method method-expression (Optional) Specifies the method to match.
url url-expression Specifies the regular expression range; the range is from 1 to 255 characters.
Release Modification
1.1(1) This command was introduced.
Chapter 2 Commands for the Content Switching Module module csm
module csm
To allow the association of load-balancing commands to a specific CSM module, and then enter the CSM module configuration submode for the specified slot, use the module csm command. To remove the
module csm configuration, use the no form of this command.
Note The module ContentSwitching Moduleslot command is the full syntax; the module csmslot command is a valid shortcut.
module csm slot-number
no module csm slot-number
Syntax Description
Defaults This command has no default settings.
Command Modes Global configuration submode
Command History
Usage Guidelines If you want to use the multiple module configuration, you must change the ip slb mode command to rp. An existing CSM configuration is migrated to the new configuration when you change the mode from
csm to rp. The default mode is rp, which allows multiple CSM support and allows the Catalyst operating system and Cisco IOS software to run on the same switch.
Migrating from a multiple module configuration to a single module configuration is supported. Migrating the Cisco IOS SLB configuration to the CSM configuration is not supported.
To remove connections to a real server, use the clear module csmX connnection command.
The CSM had its own ARP cache, which was populated with ARP entries through ARP learning. The addition of the arp option allows you to statically configure ARP entries.
Examples This example shows how to configure a CSM:
Cat6k-2(config)# module csm 5
Cat6k-2(config-module-csm)# vserver VS1
slot-number Slot number where the CSM resides.
Release Modification
Chapter 2 Commands for the Content Switching Module
natpool (module submode)
natpool (module submode)
To configure source NAT and create a client address pool, use the natpool command in module CSM configuration submode. To remove a natpool configuration, use the no form of this command.
natpool pool-name start-ip end-ip {netmask netmask | prefix-length leading_1_bits}
no natpool pool-name
Syntax Description
Defaults This command has no default settings.
Command Modes Module CSM configuration submode
Command History
Usage Guidelines If you want to use client NAT, you must create at least one client address pool. A maximum of 255 NAT pool addresses are available for any CSM.
Examples This example shows how to configure a pool of addresses with the name web-clients, an IP address range from 128.3.0.1 through 128.3.0.254, and a subnet mask of 255.255.0.0:
Cat6k-2(config-module-csm)# natpool web-clients 128.3.0.1 128.3.0.254 netmask 255.255.0.0
Related Commands nat client (serverfarm submode) show module csm natpool
pool-name Name of a client address pool; the character string is from 1 to 15 characters.
start-ip end-ip Specifies the starting and ending IP address that define the range of addresses in the address pool.
netmasknetmask (Optional) Mask for the associated IP subnet.
prefix-lengthleading_1_bits (Optional) Mask for the associated IP subnet.
Release Modification
Chapter 2 Commands for the Content Switching Module owner
owner
To configure an owner object, use the owner command in module CSM configuration submode. To remove an owner configuration, use the no form of this command.
owner name
no owner
Syntax Description
Defaults This command has no default settings.
Command Modes Module CSM configuration submode
Command History
Usage Guidelines You can define more than one virtual server to the same owner, associate multiple servers to an owner, and apply a connection watermark. After the sum of the number of open connections to all virtual servers in a particular owner reaches the VIP connection watermark level for that owner, new connections to any of these virtual servers are rejected by the CSM.
Examples This example shows how to configure an owner object:
Cat6k-2(config-module-csm)# owner sequel
Related Commands billing-info (owner submode) contact-info (owner submode) maxconns (owner submode)
name Name of the object owner.
Release Modification
Chapter 2 Commands for the Content Switching Module
billing-info (owner submode)
billing-info (owner submode)
To configure billing information for an owner object, use the billing-info command in the owner configuration submode. To remove billing information from the configuration, use the no form of this command.
billing-info billing-address-information
no billing-info
Syntax Description
Defaults This command has no default settings.
Command Modes Module CSM configuration submode
Command History
Examples This example shows how to configure an owner object:
Cat6k-2(config-owner)# billing-info 300 cordera avenue
Related Commands owner
contact-info (owner submode)
billing-address-information Specifies the owner’s billing address.
Release Modification
Chapter 2 Commands for the Content Switching Module contact-info (owner submode)
contact-info (owner submode)
To configure an e-mail address for an owner object, use the contact-info command in owner configuration submode. To remove the contact information from the owner configuration, use the no form of this command.
contact-info string
no contact-info
Syntax Description
Defaults This command has no default settings.
Command Modes Module CSM configuration submode
Command History
Examples This example shows how to configure an owner object:
Cat6k-2(config-owner)# contact-info [email protected]
Related Commands billing-info (owner submode) owner
string The owner’s information.
Release Modification
Chapter 2 Commands for the Content Switching Module
maxconns (owner submode)
maxconns (owner submode)
To configure the maximum number of concurrent connections allowed for an owner object, use the
maxconns command in owner configuration submod