PHP Programming with PEAR
XML, Data, Dates, Web Services, and Web APIs
Maximize your PHP development productivity by
mastering the PEAR packages for accessing and
displaying data, handling dates, working with XML and
Web Services, and accessing Web APIs
Stephan Schmidt
Carsten Lucke
Stoyan Stefanov
Aaron Wormus
PHP Programming with PEAR
XML, Data, Dates, Web Services, and Web APIs
Copyright © 2006 Packt Publishing
All rights reserved. No part of this book may be reproduced, stored in a retrieval system, or transmitted in any form or by any means, without the prior written permission of the publisher, except in the case of brief quotations embedded in critical articles or reviews.
Every effort has been made in the preparation of this book to ensure the accuracy of the information presented. However, the information contained in this book is sold without warranty, either express or implied. Neither the author, Packt Publishing, nor its dealers or distributors will be held liable for any damages caused or alleged to be caused directly or indirectly by this book.
Packt Publishing has endeavored to provide trademark information about all the companies and products mentioned in this book by the appropriate use of capitals. However, Packt Publishing cannot guarantee the accuracy of this information.
First published: September 2006
Production Reference: 1160906
Published by Packt Publishing Ltd. 32 Lincoln Road
Olton
Birmingham, B27 6PA, UK. ISBN 1-904811-79-5
www.packtpub.com
Credits
Authors
Stephan Schmidt Carsten Lucke Stoyan Stefanov Aaron Wormus
Reviewers
Lukas Smith Shu-Wai Chow Arnaud Limbourg
Development Editor
Douglas Paterson
Assistant Development Editor
Nikhil Bangera
Technical Editor
Ashutosh Pande
Editorial Manager
Dipali Chittar
Indexer
Mithil Kulkarni
Proofreader
Chris Smith
Layouts and Illustrations
Shantanu Zagade
Cover Designer
About the Authors
Stephan Schmidt is working for 1&1 Internet, the world’s largest web hosting
provider in Karlsruhe. He is leading a team of PHP and Java programmers and focusses on the development of the websites and online ordering systems of 1&1. He has been an active contributor to the PHP open source scene since 2001, when he founded the PHP Application Tools website (http://www.php-tools.net) together with some friends, which today is one of the oldest PHP OSS projects. He has also been working on more than 15 PEAR packages (with a focus on XML and web services), as well as the id3 extension. Recently he started the XJConf project (http://www.xjconf.net) and also contributes to the Java community.He is the author of the (German language) PHP Design Patterns (O'Reilly Verlag, ISBN 3-89721-442-3) as well as a co-author of several other books on PHP and has been writing articles for several magazines. He has also spoken at various open-source conferences around the globe.
He devotes his spare time to American super-hero comics and the golden 50s.
Carsten Lucke studied computer science at the University of Applied Sciences
in Brandenburg, Germany. He is currently working as a software engineer for the software design and management AG (sd&m AG) in Munich, Germany.In his spare time he writes articles for various magazines and contributes to the open-source community (especially PHP). He is the developer of a handful of PEAR/ PECL packages, founder of the 3rdPEARty pear channel-server project (3rdpearty. net) and the tool-garage.de open-source and freeware project.
Stoyan Stefanov
is a web developer from Montreal, Canada, Zend Certified Engineer, book author, and contributor to the international PHP community. His personal blog is at http://www.phpied.com.Aaron Wormus is a freelance consultant working out of Frankfurt Germany.
With a background in client/server development and intranet infrastructure, Aaron uses the power of PHP and Open Source tools to implement customized back-end solutions for his clients.As a writer, Aaron contributes regular articles for PHPMagazine, PHPArchitect and
About the Reviewers
Lukas Kahwe Smith has been developing PHP since 2000 and joined the PEAR
repository in 2001. Since then he has developed and maintained several PEAR packages, most notably MDB2 and LiveUser and has influenced the organization of the project itself as a founding member of the PEAR Group steering committee and QA core team. Aside from several magazine publications he is a well known speaker at various international PHP conferences.Shu-Wai Chow has worked in the field of computer programming and information technology for the past eight years. He started his career in Sacramento, California, spending four years as the webmaster for Educaid, a First Union company and another four years at Vision Service Plan as an application developer. Through the years, he has become proficient in Java, JSP, PHP, ColdFusion, ASP, LDAP, XSLT, and XSL-FO. Shu has also been the volunteer webmaster and a feline adoption counselor for several animal welfare organizations in Sacramento.
He is currently a software engineer at Antenna Software in Jersey City, New Jersey. Born in the British Crown Colony of Hong Kong, Shu did most of his alleged growing up in Palo Alto, California. He studied Anthropology and Economics at California State University, Sacramento. He lives along the New Jersey coast with seven very demanding cats, three birds that are too smart for their own good, a cherished Fender Stratocaster, and a beloved, saint-like girlfriend.
Table of Contents
Preface
1
Chapter 1: MDB2
5
A Brief History of MDB2 5
Abstraction Layers 6
Database Interface Abstraction 6
SQL Abstraction 6
Datatype Abstraction 7
Speed Considerations 7
MDB2 Package Design 7
Getting Started with MDB2 8
Installing MDB2 8
Connecting to the Database 9
DSN Array 9
DSN String 9
Instantiating an MDB2 object 10
Options 10
Option "persistent" 11 Option "portability" 11
Setting Fetch Mode 12
Disconnecting 12
Using MDB2 12
A Quick Example 13
Executing Queries 14
Fetching Data 14
Shortcuts for Retrieving Data 15
query*() Shortcuts 15
get*() Shortcuts 16
Data Types 18
Setting Data Types 18
Setting Data Types when Fetching Results 19 Setting Data Types for get*() and query*() 20
Quoting Values and Identifiers 20
Iterators 21
Debugging 22
MDB2 SQL Abstraction 23
Sequences 23
Setting Limits 24
Replace Queries 24
Sub-Select Support 25
Prepared Statements 26
Named Parameters 27
Binding Data 27
Execute Multiple 28
Auto Prepare 28
Auto Execute 29
Transactions 30
MDB2 Modules 31
Manager Module 32
Function Module 35
Reverse Module 36
Extending MDB2 37
Custom Debug Handler 38
Custom Fetch Classes 40
Custom Result Classes 41
Custom Iterators 44
Custom Modules 44
Mymodule2 45
MDB2_Schema 46
Installation and Instantiation 46
Dump a Database 46
Switching your RDBMS 49
Summary 50
Chapter 2: Displaying Data
51
HTML Tables 51
Table Format 52
Using HTML_Table to Create a Simple Calendar 53
Setting Individual Cells 54
Extended HTML_Table with HTML_Table_Matrix 56
Excel Spreadsheets 58
Our First Spreadsheet 59
About Cells 60
Setting Up a Page for Printing 60
Adding some Formatting 61
About Colors 62
Pattern Fill 63
Number Formatting 64
Adding Formulas 66
Multiple Worksheets, Borders, and Images 67
Other ways to create Spreadsheets 69
CSV 69
The Content-Type Trick 69 Generating Excel 2003 Files 69 Creating Spreadsheets using PEAR_OpenDocument 70
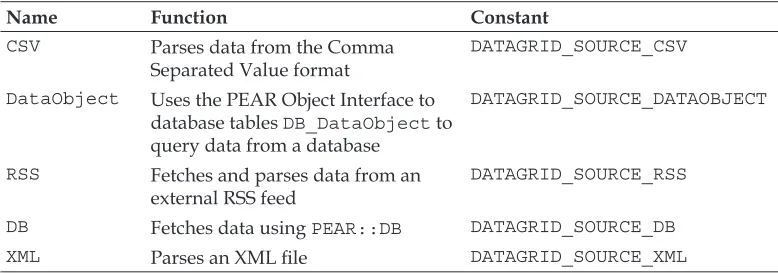
DataGrids 70
DataSources 71
Renderers 71
A Simple DataGrid 72
Paging the Results 73
Using a DataSource 73
Using a Renderer 74
Making it Pretty 75
Extending DataGrid 76
Adding Columns 77
Generating PDF Files 78
Colors 82
Fonts 82
Cells 83
Creating Headers and Footers 83
Summary 84
Chapter 3: Working with XML
85
PEAR Packages for Working with XML 86
Creating XML Documents 86
Creating a Record Label from Objects 88
Creating XML Documents with XML_Util 92
Additional Features 96
Creating XML Documents with XML_FastCreate 97
Interlude: Overloading in PHP5 98
Back to XML 99
Creating XML Documents with XML_Serializer 105
XML_Serializer Options 107
Adding Attributes 109
Treating Indexed Arrays 110 Creating the XML Document from the Object Tree 113 Putting Objects to Sleep 116
What's your Type? 118
Creating Mozilla Applications with XML_XUL 120
XUL Documents 120
Creating XUL Documents with XML_XUL 123
Creating a Tab Box 127
Processing XML Documents 129
Parsing XML with XML_Parser 131
Enter XML_Parser 132
Implementing the Callbacks 133 Adding Logic to the Callbacks 136
Accessing the Configuration Options 139
Avoiding Inheritance 140
Additional XML_Parser Features 142
Processing XML with XML_Unserializer 143
Parsing Attributes 145
Mapping XML to Objects 148 Unserializing the Record Labels 154
Additional Features 156
XML_Parser vs. XML_Unserializer 156
Parsing RSS with XML_RSS 157
Summary 161
Chapter 4: Web Services
163
Consuming Web Services 164
Consuming XML-RPC-Based Web Services 164
Accessing the Google API 170
Consuming REST-Based Web Services 173
Searching Blog Entries with Services_Technorati 173 Accessing the Amazon Web Service 179
Consuming Custom REST Web Services 188
Offering a Web Service 196
Offering XML-RPC-Based Web Services 197
Error Management 202
Offering SOAP-Based Web Services 205
Error Management 210
Offering REST-Based Services using XML_Serializer 212
Our Own REST Service 214
Chapter 5: Working with Dates
223
Working with the Date Package 223
Date 224
Creating a Date Object 224
Querying Information 225
Manipulating Date Objects 226
Comparing Dates 227
Formatted Output 228
Creating a Date_Span Object 229 Manipulating Date_Span Objects 230
Timespan Conversions 231
Comparisons 231
Formatted Output 232
Date Objects and Timespans 232
Dealing with Timezones using Date_Timezone 233
Creating a Date_Timezone object 234 Querying Information about a Timezone 234 Comparing Timezone Objects 235 Date Objects and Timezones 235
Conclusion on the PEAR::Date Package 237
Date_Holidays 237
Instantiating a Driver 238
Identifying Holidays 239
The Date_Holidays_Holiday Class 240
Calculating Holidays 240
Getting Holiday Information 241
Filtering Results 242
Combining Holiday Drivers 244
Is Today a Holiday? 244
Multi-Lingual Translations 246
Adding a Language File 247 Getting Localized Output 248
Conclusion on Date_Holidays 250
Working with the Calendar Package 250
Introduction to Basic Classes and Concepts 252
Object Creation 255
Querying Information 255
Building and Fetching 257
Make a Selection 258
Validating Calendar Date Objects 259
Validation Versus Adjustment 260 Dealing with Validation Errors 260
Adjusting the Standard Classes' Behavior 261
What are Decorators? 262
The Common Decorator Base Class 262
Generating Graphical Output 263
Navigable Tabular Calendars 265
Summary 270
Preface
PEAR is the PHP Extension and Application Repository, and is a framework and distribution system for reusable, high-quality PHP components, available in the form of "packages". The home of PEAR is pear.php.net, from where you can download and browse this extensive range of powerful packages. For most things that you would want to use in your day-to-day development work, you will likely find a PEAR class or package that meets your needs. In addition to the functionality offered by the packages, PEAR code follows strict coding guidelines, bringing a consistency to your PEAR development experience.In this book, you will learn how to use a number of the most powerful PEAR
packages to boost your PHP development productivity. By focusing on the packages for key development activities, this book gives you an in-depth guide to getting the most from these powerful coding resources.
What This Book Covers
Chapter 1 provides an introduction to the MDB2 database abstraction layer. You will see how to connect to the database, instantiate MDB2 objects, execute queries and fetch data. There are a number of features and SQL syntax that are implemented differently in the database systems that MDB2 supports. MDB2 does its best to wrap the differences and provide a single interface for accessing those features, so that the developer doesn't need to worry about the implementation in the underlying database system. You will see how to use this SQL abstraction feature to provide auto-increment fields, perform "replace" queries that will update the records that already exist or do an insert otherwise, and make use of prepared statements, a convenient and security-conscious method of writing to the database. You will also learn about MDB2 modules and how to extend MDB2 to provide custom fetch and result classes, iterators, and modules.
Chapter 2 covers a range of PEAR packages commonly used for presenting data in different formats. You will see how to use HTML_Table and HTML_Table_Matrix to create and format tables, generate and format an Excel spreadsheet with the Excel_ Spreadsheet_Writer package, create a flexible, pageable "datagrid" with Structures_ Datagrid, and generate PDF documents on the fly with File_PDF.
XML is another favorite format for working with data, and PEAR does not let you down with its XML support.
In Chapter 3 we take an in-depth look at working with XML in PEAR. The chapter covers creating XML documents using the XML_Util, XML_FastCreate, XML_Serializer, and XML_XUL packages. The chapter also covers reading XML documents using a SAX-based parser and transforming PHP objects into XML (and back again!) with XML_Serializer and XML_Unserialize.
Chapter 4 introduces you to PEAR's support for web services and Web APIs. You will learn about consuming SOAP and XML-RPC web services, access the Google API, search blog entries with Services_Technorati, access the Amazon web service, access the Yahoo API, and learn how to offer web services, either XML-RPC or SOAP based. You will also get a taste of offering a REST-based service with XML_Serializer.
Chapter 5 covers PEAR's date and time functions using PEAR::Calendar and PEAR:: Date. You will learn about the benefits these packages offer over the standard PHP date and time functions, and then see how to create, manipulate, and compare Date objects, work with Date_Span arithmetic, handle timezones, keep track of public holidays with Date_Holiday, and use the Calendar class to display an HTML calendar.
Conventions
In this book, you will find a number of styles of text that distinguish between different kinds of information. Here are some examples of these styles, and an explanation of their meaning.
There are three styles for code. Code words in text are shown as follows: "This class also provides a setId() method, which is called by the Label object when the artist is added to the list of signed artists."
A block of code will be set as follows: function getDGInstance($type) {
{
$datagrid =& new $type; return $datagrid; } else
{
return false; }
}
When we wish to draw your attention to a particular part of a code block, the relevant lines or items will be made bold:
$driver = Date_Holidays::factory($driverId, $year); $internalNames = $driver->getInternalHolidayNames();
Any command-line input and output is written as follows: $ pear-dh-compile-translationfile --help
New terms and important words are introduced in a bold-type font. Words that you see on the screen, in menus or dialog boxes for example, appear in our text like this: "clicking the Next button moves you to the next screen".
Warnings or important notes appear in a box like this.
Tips and tricks appear like this.
Reader Feedback
Feedback from our readers is always welcome. Let us know what you think about this book, what you liked or may have disliked. Reader feedback is important for us to develop titles that you really get the most out of.
To send us general feedback, simply drop an email to [email protected], making sure to mention the book title in the subject of your message.
If there is a book that you need and would like to see us publish, please send us a note in the SUGGEST A TITLE form on www.packtpub.com or
If there is a topic that you have expertise in and you are interested in either writing or contributing to a book, see our author guide on www.packtpub.com/authors.
Customer Support
Now that you are the proud owner of a Packt book, we have a number of things to help you to get the most from your purchase.
Downloading the Example Code for the Book
Visit http://www.packtpub.com/support, and select this book from the list of titlesto download any example code or extra resources for this book. The files available for download will then be displayed.
The downloadable files contain instructions on how to use them.
Errata
Although we have taken every care to ensure the accuracy of our contents, mistakes do happen. If you find a mistake in one of our books—maybe a mistake in text or code—we would be grateful if you would report this to us. By doing this you can save other readers from frustration, and help to improve subsequent versions of this book. If you find any errata, report them by visiting http://www.packtpub.com/ support, selecting your book, clicking on the Submit Errata link, and entering the
details of your errata. Once your errata have been verified, your submission will be accepted and the errata added to the list of existing errata. The existing errata can be viewed by selecting your title from http://www.packtpub.com/support.
Questions
MDB2
The Web has matured and grown over the last decade and with it the need for more complex and dynamic sites. While storing information in a text file or simple database may have been suitable in the past, these days any serious application developer requires a firm knowledge of how to wield the relational database. From the earliest versions of PHP, programmers have always been able to count on strong database support. However until the recent release of PDO there had been no standard way of interfacing with the multiple database drivers bundled with PHP. The lack of unified API has spawned several efforts to create database abstraction layers (DBAL). The primary goal of these efforts is to enable developers to write code that is not specific to the database back end being used, thereby enabling clients/ users to deploy the application on whichever database platform they prefer. The three most prominent full-featured database abstraction layers over the years have been AdoDB, PEAR::DB, and Metabase. In the last few years we have seen another very strong contender in the arena of database abstraction layers, and that is PEAR::MDB. This chapter is about MDB's second iteration—MDB2.A Brief History of MDB2
It all started when Lukas Smith, a PEAR developer, submitted a few patches to the existing DBAL, Metabase. At some point he and the Metabase author started discussing bringing Metabase into PEAR as a new package. The goal of the new package was to merge the functionality of Metabase with the API of the existing and popular PEAR::DB into a feature-rich and well-performing database abstraction library, leveraging the PEAR infrastructure. Thus began the life of MDB2's
predecessor PEAR::MDB.
had reached a stable state in PEAR, it was not possible to fix these API issues without breaking backwards compatibility, which was not an option. The solution was to take the lessons learned during the development of Metabase and MDB and apply them to a new package that would contain a well-designed and modern API. The new package became MDB2.
Abstraction Layers
Before we get into the details of how MDB2 handles database abstraction, we should take a look at database abstraction theory and find out exactly what it means. There are several different facets to database abstraction, and we will go over them and specify what their requirements are.
Database Interface Abstraction
Database interface abstraction is the most important of all; it allows a programmer to access every database using the same method calls. This means that instantiating a database connection, sending a query, and retrieving the data will be identical, regardless of which database you are interfacing with.
SQL Abstraction
Most modern databases support a standard subset of SQL, so most SQL that you write will work regardless of which database back end you are using. However, many databases have introduced database-specific SQL lingo and functions, so it is possible that the SQL that you write for one database will not work on another. As an RDBMS (Relational DataBase Management System) matures, sometimes it implements features that are not compatible with older versions of the same database. So if an application developer wants to write SQL compliant with all versions of a specific database (or which can be used on multiple database back ends), one option is to stick to SQL they know is supported on all platforms. The better option though, is to use an abstraction layer that emulates the functionality when it's not available on the specific platform.
Datatype Abstraction
The third type of abstraction is the datatype abstraction. The need for this type of abstraction stems from the fact that different databases handle data types differently.
Speed Considerations
Now that you are salivating over all these great features that are bundled in MDB2, you should think about speed and performance issues. When using a database abstraction layer you need to understand that in many cases you will need to sacrifice performance speed for the wealth of functionality that the package offers. This is not specific to MDB2 or even database abstraction layers, but to abstraction layers or software virtualization systems in general.
Thankfully, unlike VMWare or Microsoft Virtual PC, which abstract each system call made, MDB2 only provides abstraction when a feature is not available in a specific back end. This means that performance will depend on the platform on which you are using MDB2. If you are very concerned about performance, you should run an opcode cache, or turn on a database-specific query caching mechanism in your particular database. Taking these steps in PHP itself or your database back end will make the overhead, which is inevitable in your database abstraction layer, much smaller.
MDB2 Package Design
The API design of MDB2 was created to ensure maximum flexibility. A modular approach was taken when handling both database back ends and specific advanced functionality. Each database -specific driver is packaged and maintained as an independent PEAR module. These driver packages have a life of their own, which means individual release cycles and stability levels. This system allows the maintainers of the database drivers to release their packages as often as they need to, without having to wait for a release of the main MDB2 package. This also allows the MDB2 package to advance in stability regardless of the state of the driver packages, the effect being that while the state of MDB2 is stable, some of its drivers may only be beta. Also, when a new database driver is released, it is tagged as alpha and the release process progresses according to PEAR standards.
The second type of modularity built into MDB2 is used for adding extended
as possible, and also makes it possible for the user to define and include their own classes into MDB2. You'll see the details of how to extend MDB2 later in this chapter.
Getting Started with MDB2
Let's discuss the necessary steps to install MDB2, to create an MDB2 object, and then set up some options to set the data fetch mode and finally disconnect from the database.
Installing MDB2
When installing MDB2, keep in mind that the MDB2 package does not include any database drivers, so these will need to be installed separately. MDB2 is stable, but as explained earlier, since the packages have different release cycles, the status of the package you plan to use may be beta, alpha, or still in development. This will need to be taken into consideration when installing a driver package.
The easiest way to install MDB2 is by using the PEAR installer: > pear install MDB2
This command will install the core MDB2 classes, but none of the database drivers. To install the driver for the database you'll be using, type:
> pear install MDB2_Driver_mysql
This will install the driver for MySQL. If you wish to install the driver for SQLite, type: > pear install MDB2_Driver_sqlite
The full list of currently available drivers is as follows:
fbsql: FrontBase ibase: InterBase mssql: MS SQL Server mysql: MySQL
mysqli: MySQL using the mysqli PHP extension; for more details, visit http://php.net/mysqli
oci8: Oracle pgsql: PostgreSQL querysim: Querysim sqlite: SQLite •
• • • •
Connecting to the Database
To connect to your database after a successful installation, you need to set up the DSN (Data Source Name) first. The DSN can be a string or an array and it defines the parameters for your connection, such as the name of the database, the type of the RDBMS, the username and password to access the database, and so on.
DSN Array
If the DSN is defined as an array, it will look something like this:
$dsn = array ( 'phptype' => 'mysql',
'hostspec' => 'localhost:3306', 'username' => 'user',
'password' => 'pass', 'database' => 'mdb2test' );
Here's a list of keys available to use in the DSN array:
phptype: The name of the driver to be used, in other words, it defines the type of the RDBMS
hostspec: (host specification) can look like hostname:port or it can be only
the hostname while the port can be defined separately in a port array key database: The name of the actual database to connect to
dbsyntax: If different than the phptype protocol: The protocol, for example TCP socket: Mentioned if connecting via a socket
mode: Used for defining the mode when opening the database file
DSN String
A quicker and friendlier way (once you get used to it) to define the DSN is to use a string that looks similar to a URL. The basic syntax is:
phptype://username:password@hostspec/database
The example above becomes:
$dsn = 'mysql://user:pass@localhost:3306/mdb2test';
More details on the DSN and more DSN string examples are available in the PEAR manual at http://pear.php.net/manual/en/package.database.mdb2.intro-dsn.php.
•
•
Instantiating an MDB2 object
There are three methods to create an MDB2 object:$mdb2 =& MDB2::connect($dsn); $mdb2 =& MDB2::factory($dsn); $mdb2 =& MDB2::singleton($dsn);
connect() will create an object and will connect to the database. factory() will create an object, but will not establish a connection until it's needed. singleton() is like factory() but it makes sure that only one MDB2 object exists with the same DSN. If the requested object exists, it's returned; otherwise a new one is created. One scenario exists where you can "break" the singleton functionality by using setDatabase() to set the current database to a database different from the one
specified in the DSN.
$dsn = 'mysql://root@localhost/mdb2test'; $mdb2_first =& MDB2::singleton($dsn); $mdb2_first->setDatabase('another_db');
$mdb2_second =& MDB2::singleton($dsn);
In this case you'll have two different MDB2 instances.
All three methods will create an object of the database driver class. For example, when using the MySQL driver, the variable $mdb2 defined above will be an instance of the MDB2_Driver_mysql class.
Options
MDB2 accepts quite a few options that can be set with the call to connect(),
factory(), or singleton(), or they can be set later using the setOption() method (to set one option a time) or the setOptions() method (to set several options at once). For example:
$options = array ( 'persistent' => true, 'ssl' => true,
);
$mdb2 =& $MDB2::factory($dsn, $options);
or
$mdb2->setOption('portability', MDB2_PORTABILITY_NONE);
Option "persistent"
This Boolean option defines whether or not a persistent connection should be established.
There is an informative article on mysql.com about the pros and cons of using persistent connections in MySQL; it's located at http://www.mysql.com/ news-and-events/newsletter/2002-11/ a0000000086.html.
The default value is false. If you want to override the default, you can set it when the object is created:
$options = array ( 'persistent' => true );
$mdb2 =& MDB2::factory($dsn, $options);
Using setOption() you can define options after the object has been created: $mdb2->setOption('persistent', true);
Option "portability"
MDB2 tries to address some inconsistencies in the way different DBMS implement certain features. You can define to which extent the database layer should worry about the portability of your scripts by setting the portability option.
The different portability options are defined as constants prefixed with
MDB2_PORTABILITY_* and the default value is MDB2_PORTABILITY_ALL, meaning "do everything possible to ensure portability". The full list of portability constants and their meaning can be found at http://pear.php.net/manual/en/package. database.mdb2.intro-portability.php.
You can include several portability options or include all with some exceptions by using bitwise operations, exactly as you would do when setting error reporting in PHP. The following example will set the portability to all but lowercasing:
MDB2_PORTABILITY_ALL ^ MDB2_PORTABILITY_LOWERCASE
If you don't want use the full portability features of MDB2 but only trim white space in results and convert empty values to null strings:
Probably the best thing to do is to leave the default MDB2_PORTABILITY_ALL; this way if you run into some problems with your application, you can double-check the database access part to ensure that the application is as portable as possible.
Setting Fetch Mode
One more setting you'd probably want to define upfront is the fetch mode, or the way results will be returned to you. You can have them as an enumerated list (default option), associative arrays, or objects. Here are examples of setting the fetch mode:
$mdb2->setFetchMode(MDB2_FETCHMODE_ORDERED); $mdb2->setFetchMode(MDB2_FETCHMODE_ASSOC); $mdb2->setFetchMode(MDB2_FETCHMODE_OBJECT);
Probably the friendliest and the most common fetch mode is the associative array, because it gives you the results as arrays where the keys are the names of the table columns. To illustrate the differences, consider the different ways of accessing the data in your result sets:
echo $result[0]; // ordered/enumerated array, default in MDB2 echo $result['name']; // associative array
echo $result->name; // object
There is one more fetch mode type, which is MDB2_FETCHMODE_FLIPPED. It's a bit exotic and its behavior is explained in the MDB2 API documentation as:
"For multi-dimensional results, normally the first level of arrays is the row number, and the second level indexed by column number or name. MDB2_FETCHMODE_ FLIPPED switches this order, so the first level of arrays is the column name, and the second level the row number."
Disconnecting
If you want to explicitly disconnect from the database, you can call: $mdb2->disconnect();
Even if you do not disconnect explicitly, MDB2 will do that for you in its destructor.
Using MDB2
id name family birth_date 1 Eddie Vedder 1964-12-23 2 Mike McCready 1966-04-05 3 Stone Gossard 1966-07-20
A Quick Example
Here's a quick example, just to get a feeling of how MDB2 can be used. You'll learn the details in a bit, but take a moment to look at the code and see if you can figure it out yourself.
<?php
require_once 'MDB2.php'; // setup
$dsn = 'mysql://root:secret@localhost/mdb2test'; $options = array ('persistent' => true);
$mdb2 =& MDB2::factory($dsn, $options); $mdb2->setFetchMode(MDB2_FETCHMODE_ASSOC);
// execute a query
$sql = 'SELECT * FROM people'; $result = $mdb2->query($sql);
// display first names
while ($row = $result->fetchRow()) {
echo $row['name'], '<br />'; }
// release resources $result->free();
// disable queries
$mdb2->setOption('disable_query', true);
// delete the third record $id = 3;
$sql = 'DELETE FROM people WHERE id=%d';
$sql = sprintf($sql, $mdb2->quote($id, 'integer')); echo '<hr />Affected rows: ';
echo $mdb2->exec($sql);
Executing Queries
To execute any query, you can use the query() or exec() methods. The query() method returns an MBD2_Result object on success, while exec() returns the number of rows affected by the query, if any. So exec() is more suitable for queries that modify data.
While you can basically perform any database operation with query(), there are
other methods, discussed later, that are better suited for more specific common tasks.
Fetching Data
In the example above we had:$sql = 'SELECT * FROM people'; $result = $mdb2->query($sql);
The variable $result will be an MDB2_Result object, or more specifically, it will be a database driver-dependent class that extends MDB2_Result, for example MDB2_ Result_mysql. To navigate through the result set you can use the fetchRow() method in a loop.
while ($row = $result->fetchRow()) {
echo $row['name'], '<br />'; }
Every time you call fetchRow(), it will move to the next record and will give you a reference to the data contained in it. Apart from fetchRow(), there are also other methods of the fetch*() family:
fetchAll() will give you an array of all records at once.
fetchOne() will return the value from first field of the current row if called
without any parameters, or it can return any single field of any row. For example, fetchOne(1,1) will return Mike, the second column of the second row.
fetchCol($colnum) will return all the rows in the column with number $colnum, or the first column if the $colnum parameter is not set.
Note that fetchRow() and fetchOne() will move the internal pointer to the current record, while fetchAll() and fetchCol() will move it to the end of the result set. So in the example above if you call fetchOne(1) twice, you'll get Eddie then Mike. You can also use $result->nextResult() to move the pointer to the next record in the result set or $result->seek($rownum) to move the pointer to any row specified
• •
by $rownum. If in doubt, $result->rowCount() will tell you where in the result set your pointer currently is.
You also have access to the number of rows and the number of columns in a result set: $sql = 'SELECT * FROM people';
$result = $mdb2->query($sql);
echo $result->numCols(); // prints 4 echo $result->numRows(); // prints 3
Shortcuts for Retrieving Data
Often it is much more convenient to directly get the data as associative arrays (or your preferred fetch mode) and not worry about navigating the result set. MDB2 provides two sets of shortcut methods – query*() methods and get*() methods. They take just one method call to do the following:
1. Execute a query
2. Fetch the data returned
3. Free the resources taken by the result
query*() Shortcuts
You have at your disposal the methods queryAll(), queryRow(), queryOne(), and queryCol(), which correspond to the four fetch*() methods explained above. Here's an example to illustrate the difference between the query*() and the fetch*() methods:
// the SQL statement
$sql = 'SELECT * FROM people'; // one way of getting all the data $result = $mdb2->query($sql); $data = $result->fetchAll();
$result->free(); // not required, but a good habit // the shortcut way
$data = $mdb2->queryAll($sql);
In both cases if you print_r() the contents in $data and use the associative array fetch mode, you'll get:
Array ( [0] => Array ( [id] => 1 [name] => Eddie [family] => Vedder
)
[1] => Array ( [id] => 2 [name] => Mike [family] => McCready [birth_date] => 1966-04-05 )
... )
get*() Shortcuts
In addition to the query*() shortcuts, you have the get*() shortcuts, which behave in the same way, but also allow you to use parameters in your queries. Consider the following example:
$sql = 'SELECT * FROM people WHERE id=?'; $mdb2->loadModule('Extended');
$data = $mdb2->getRow($sql, null, array(1));
In this example the question mark in the statement is a placeholder that will be replaced by the value in the third parameter of getRow().
You can also use named parameters, like this:
$sql = 'SELECT * FROM people WHERE id=:the_id'; $mdb2->loadModule('Extended');
$data = $mdb2->getRow( $sql, null,
array('the_id' => 1) );
Note that the get*() methods are in the Extended MDB2 module, which means that they are not available until you load that module using $mdb2->loadModule('Extended').
Loading modules benefits from object overloading, which was not available before PHP5, so to get access to the methods of the Extended module in PHP4, you need to call them using:
$mdb2->extended->getAll($sql);
as opposed to:
getAssoc()
Another useful get*() method that doesn't have a directly corresponding fetch*() or query*() is getAssoc(). It returns results just like getAll(), but the keys in the result
array are the values of the first column. In addition, if there are only two columns in the result set, since one of them is already used as an array index, the other one is returned as a string (аs opposed to an array with just one element). A few examples to illustrate the differences between getAll() and getAssoc():
$sql = 'SELECT id, name FROM people'; $mdb2->loadModule('Extended');
$data = $mdb2->getAll($sql);
getAll() will return an enumerated array and each element of the array is an
associative array containing all the fields.
Array ( [0] => Array ( [id] => 1 [name] => Eddie )
[1] => Array ( [id] => 2 [name] => Mike )
... )
If the same query is executed with getAssoc(), like $data= $mdb2->getAssoc($sql); the result is:
Array ( [1] => Eddie [2] => Mike [3] => Stone )
If your query returns more than two rows, each row will be an array, not a scalar. The code follows:
$sql = 'SELECT id, name, family FROM people'; $mdb2->loadModule('Extended');
$data = $mdb2->getAssoc($sql);
And the result:
Array ( [1] => Array ( [name] => Eddie [family] => Vedder )
Data Types
To address the issue of different database systems supporting different field types, MDB2 comes with its own portable set of data types. You can use MDB2's data types and have the package ensure portability across different RDBMS by mapping those types to ones that the underlying database understands.
The MDB2 data types and their default values are as follows: $valid_types = array ( 'text' => '',
'boolean' => true, 'integer' => 0, 'decimal' => 0.0, 'float' => 0.0,
'timestamp' => '1970-01-01 00:00:00', 'time' => '00:00:00',
'date' => '1970-01-01', 'clob' => '',
'blob' => '', )
More detailed information on the data types is available in the datatypes.html
document you can find in the docs folder of your PEAR installation. You can also
find this document on the Web, in the PEAR CVS repository:
http://cvs.php.net/viewcvs.cgi/pear/MDB2/docs/datatypes.html?view=co
Setting Data Types
In all the data retrieval methods that you just saw (query*(), fetch*(), get*()) you can specify the type of the results you expect and MDB2 will convert the values to the expected data type. For example the query() method accepts an array of field data types as a second parameter.
$sql = 'SELECT * FROM people';
$types = array();
$result = $mdb2->query($sql, $types); $row = $result->fetchRow();
var_dump($row);
Here the $types array was blank, so you'll get the default behavior (no data type conversion) and all the results will be strings. The output of this example is:
array(2) {
... }
But you can specify that the first field in each record is of type integer and the second is text by setting the $types array like this:
$types = array('integer', 'text');
In this case you'll get: array(2) {
["id"]=> int(1)
["name"]=> string(5) "Eddie" ...
}
When setting the types, you can also use an associative array where the keys are the table fields. You can even skip some fields if you don't need to set the type for them. Some valid examples:
$types = array( 'id' => 'integer', 'name' => 'text' );
$types = array('name'=>'text'); $types = array('integer');
Setting Data Types when Fetching Results
If you didn't set the data types during a query() call, it's still not too late. Before you start fetching, you can set the types by calling the setResultTypes() method.
// execute query
$sql = 'SELECT * FROM people'; $result = $mdb2->query($sql);
// fetch first row without type conversion $row = $result->fetchRow();
var_dump($row['id']); // output is: string(1) "1"
// specify types
$types = array('integer');
$result->setResultTypes($types);
$row = $result->fetchRow(); var_dump($row['id']); // output is: int(2)
Setting Data Types for get*() and query*()
All the get*() and query*() methods that you saw earlier in this chapter accept data types as a second parameter, just like query() does.
You can set the data types parameter not only as an array $types=
array('integer'), but also as a string $types='integer'. This is convenient when you work with methods that return one column only, such as getOne(), queryOne(), getCol(), and queryCol(), but you should be careful when using it for *All() and *Row() methods because the string type parameter will set the type
for all the fields in the record set.
Quoting Values and Identifiers
The different RDBMS use different quoting styles (for example single quotes ' as opposed to double quotes ") and also quote different data types inconsistently. For example, in MySQL you may (or may not) wrap integer values in quotes, but for other databases you may not be allowed to quote them at all. It's a good idea to leave the quoting job to the database abstraction layer, because it "knows" the different databases.
MDB2 provides the method quote() for quoting data and quoteIdentifier() to
quote database, table, and field names. All the quotes MDB2 inserts will be the ones appropriate for the underlying RDBMS. An example:
$sql = 'UPDATE %s SET %s=%s WHERE id=%d'; $sql = sprintf( $sql,
$mdb2->quoteIdentifier('people'), $mdb2->quoteIdentifier('name'),
$mdb2->quote('Eddie'), // implicit data type $mdb2->quote(1, 'integer') // explicit type );
If you echo$sql in MySQL you'll get:
UPDATE `people` SET `name`='Eddie' WHERE id=1
In Oracle or SQLite the same code will return:
As you can see in the example above, quote() accepts an optional second parameter that sets the type of data (MDB2 type) to be quoted. If you omit the second
parameter, MDB2 will try to make a best guess for the data type.
Iterators
MDB2 benefits from the Standard PHP Library (http://php.net/spl), and
implements the Iterator interface, allowing you to navigate through query results in a simpler manner:
foreach ($result as $row) {
var_dump($row); }
For every iteration, $row will contain the next record as an array. This is equivalent to calling fetchRow() in a loop, like this:
while ($row = $result->fetchRow()) {
var_dump($row); }
In order to benefit from the Iterator implementation, you need to include the file Iterator.php from MDB2's directory by using the loadFile() method:
MDB2::loadFile('Iterator');
Then when you call query(), you pass the name of the Iterator class as a fourth parameter, like this:
$query = 'SELECT * FROM people';
$result = $mdb2->query($query, null, true, 'MDB2_BufferedIterator');
MDB2 comes with two Iterator classes:
MDB2_Iterator: This implements SPL's Iterator and is suitable to work with unbuffered results.
MDB2_BufferedIterator: This extends MDB2_Iterator and implements the SeekableIterator interface. When you work with buffered results (which is the default in MDB2), it's better to use MDB2_BufferedIterator, because it provides some more methods, like count() and rewind().
•
Debugging
MDB2 allows you to keep a list of all queries executed in an instance, this way helping you debug your application. To enable the debugging, you need to set the debug option to a positive integer.
$mdb2->setOption('debug', 1);
Then you can get the collected debugging data at any point using: $mdb2->getDebugOutput();
You can also set the option log_line_break, which specifies how the separate entries in the debug output will be delimited. The default delimiter is a line break \n. Take a look at the following example that sets the debug option and the line separator, executes a few queries, and then draws an unordered list with the debug output.
$mdb2->setOption('debug', 1);
$mdb2->setOption('log_line_break', "\n\t");
$sql = 'SELECT * FROM people'; $result = $mdb2->query($sql);
$sql = 'SELECT * FROM people WHERE id = 1'; $result = $mdb2->query($sql);
$sql = 'SELECT name FROM people'; $result = $mdb2->query($sql);
$debug_array = explode("\n\t", trim($mdb2->getDebugOutput()));
echo '<ul><li>';
echo implode('</li><li>', $debug_array); echo '</li></ul>';
This example will produce:
query(1): SELECT * FROM people
query(1): SELECT * FROM people WHERE id = 1 query(1): SELECT name FROM people
It's a good idea to reset the debug level to 0 when your application is in production, so that you don't have the overhead of storing all executed queries in the debug log.
MDB2 SQL Abstraction
There are a number of features and items of SQL syntax that are implemented differently in the various database systems that MDB2 supports. MDB2 does its best to wrap the differences and provide a single interface for accessing those features, so that the developer doesn't need to worry about the implementation in the underlying database system.
Sequences
Auto-increment fields are a convenient way to define and update IDs as primary keys to your tables. The problem is that not all RDBMS support auto increments. To address this inconsistency, the concept of sequence tables is used in MDB2. The idea is that MDB2 will create and maintain a new table (without you having to worry about it) and will store and increment the last ID, which you can use later when inserting into in the main table.
Let's assume that the table people, which was used in this chapter's examples, is empty. Before you insert into this table, you need the next consecutive ID. For this purpose you call the method nextId() to give you the new ID, like this:
$my_new_id = $mdb2->nextId('people');
Now $my_new_id has the value 1, and behind the scenes MDB2 will create a new table called people_seq with one field only, called sequence, and one row only, containing the value 1. The next time you call $mdb2->nextId('people'), MDB2 will increment the value in people_seq and return 2 to you.
sequence 1
You're free to pass any identifier as a parameter when callingnextId(). MDB2 will append _seq to your identifier and create a new table with that name, if one doesn't already exist. Unless you have special needs, it helps code readability if you use an identifier that is the name of the main table you're inserting into.
While sequence is the default name of the field in the sequence table, it can be overwritten by setting the seqcol_name option, like this:
$mdb2->setOption('seqcol_name', 'id');
Additionally, the name of the sequence table can be customized by setting the seqname_format option. Its default value is %s_seq, where %s is replaced by the
Setting Limits
In MySQL you can limit the number of records returned by a query by using LIMIT.
For example, the following query will give you only the first two records:
SELECT * FROM people LIMIT 0, 2;
LIMIT is MySQL-specific, so it may be missing from other database systems or implemented differently. To wrap all the differences and provide a common interface for limiting results, MDB2 offers the setLimit() method. An example:
$sql = 'SELECT * FROM people'; $mdb2->setLimit(2);
$result = $mdb2->query($sql);
If you want to define an offset (where to start when setting the limit), you specify the offset value as a second parameter:
$mdb2->setLimit(2, 1);
Note that setLimit() will affect only the next query; any query after that will behave as usual.
Another way to limit the results is by using the limitQuery() method from the
Extended module. Instead of first setting the limit and then executing the query, you do it with one method call. To get two records starting from offset 1, write:
$mdb2->loadModule('Extended'); $sql = 'SELECT * FROM people';
$result = $mdb2->limitQuery($sql, null, 2, 1);
Using limitQuery() doesn't affect the queries executed after that and it returns an MDB2_Result object, just like query().
Replace Queries
MySQL supports the REPLACE statement in addition to UPDATE and INSERT. REPLACE will update the records that already exist or perform an insert otherwise. Using REPLACE directly will create portability issues in your application, which is why MDB2 wraps this functionality in the replace() method. You call replace() by providing the name of the table and an array of data about the records.
$fields=array ( 'id' => array ( 'value' => 6, 'key' => true ),
'birth_date' => array ('value' => '1975-06-20') );
$mdb2->replace('people', $fields);
As you can see, the data to be written to the table was set using the value keys. It
was also specified that the id is a key, so that (if using REPLACE directly is not an option) MDB2 can check if a record with this ID already exists. If you have a key that consists of several fields, set the 'key'=>true index for all of them. Other array elements you can use are:
type: to specify the MDB2 data type
null: (true or false) to specify whether the null value should be used, ignoring the content in the value key
The replace() method will return the number of affected rows, just like exec() does. Technically, the replace operation is an insert if the record doesn't exist or otherwise a delete and then an insert. Therefore the replace() method will return 1 if the record didn't exist previously or 2 if an existing record was updated.
Sub-Select Support
You can pass an SQL query string to the subSelect() method. In this case, if the database system supports sub-selects, the result will be the same query unchanged. If sub-selects are not supported though, the method will execute the query and return a comma-delimited list of the result values. It is important that the query you pass to subSelect() returns only one column of results. Example:
// sub-select query string
$sql_ss = 'SELECT id FROM people WHERE id = 1 OR id = 2'; // the main query
$sql = 'SELECT * FROM people WHERE id IN (%s)'; // call subSelect()
$subselect = $mdb2->subSelect($sql_ss); // update and print the main query echo $sql = sprintf($sql, $subselect); // execute
$data = $mdb2->queryAll($sql);
If sub-selects are supported, the echo statement above will output: SELECT * FROM people WHERE id IN
(SELECT id FROM people WHERE id = 1 OR id = 2)
Otherwise you'll get:
SELECT * FROM people WHERE id IN (1, 2)
Note that subSelect() is not a full sub-query replacement, it just emulates the so-called non-correlated sub-queries. This means that your sub-selects and your main query should be executable as stand-alone queries, so in your sub-query you cannot refer to results returned by the main query, and vice-versa.
Prepared Statements
Prepared statements are a convenient and security-conscious method of writing to the database. Again, not all database systems support prepared statements, so MDB2 emulates this functionality when it's not provided natively by the RDBMS. The idea is to have the following:
A generic query with placeholders instead of real data that is passed to the prepare() method
Some data about the records to be inserted, updated, or deleted A call to execute() the prepared statement
The generic query may use unnamed or named placeholders, for example: $sql = 'INSERT INTO people VALUES (?, ?, ?, ?)';
or
$sql = 'INSERT INTO people VALUES
(:id, :first_name, :last_name, :bdate)';
Then you call the prepare() method, which gives you an instance of the MDB2_ Statement_* class corresponding to the current database driver you're using:
$statement = $mdb2->prepare($sql);
If you use unnamed parameters (the question marks), you need to have your data as an ordered array, like:
$data = array(
$mdb2->nextId('people'), 'Matt', 'Cameron', '1962-11-28' );
And then you pass the data to the execute() method of the MDB2_Statement class: $statement->execute($data);
Finally you release the resources taken: $statement->free();
•
Named Parameters
If you use named parameters in your generic query, you have the convenience of using associative arrays when supplying data and not worrying about the order of the parameters as you would in the case of unnamed parameters. The following is a valid way to set data for a query with named parameters:
$data = array( 'first_name' => 'Jeff', 'last_name' => 'Ament',
'id' => $mdb2->nextId('people'), 'bdate' => '1963-03-10'
);
Binding Data
Another option for setting the data for a prepared statement is to use the bindParam() method. Here's an example:
// prepare the statement
$sql = 'INSERT INTO people VALUES
(:id, :first_name, :last_name, :bdate)'; $statement = $mdb2->prepare($sql);
// figure out the data
$id = $mdb2->nextId('people'); $first_name = 'Kirk';
$last_name = 'Hammett'; $bdate = '1962-11-18';
// bind the data
$statement->bindParam('id', $id);
$statement->bindParam('first_name', $first_name); $statement->bindParam('last_name', $last_name); $statement->bindParam('bdate', $bdate);
// execute and free $statement->execute(); $statement->free();
One thing to note about bindParam() is that it takes a reference to the variable containing the data. If you're inserting several new records, therefore calling
Another way to supply data before executing a prepared statement is to use the bindParamArray() method, which allows you to bind all parameters at once. In the code from the previous example you can replace the four calls to bindParam() with one call to bindParamArray():
$array_to_bind = array('id' => $id,
'first_name' => $first_name, 'last_name' => $last_name, 'bdate' => $bdate
);
$statement->bindParamArray($array_to_bind);
Execute Multiple
Once you have prepared a statement, you can insert multiple rows in one shot by using executeMultiple(). This method is also in the Extended MDB2 module, so
you need to load it first. The data you specify must be in a multidimensional array where each element at the top level of the array is one record.
$sql = 'INSERT INTO people VALUES (?, ?, ?, ?)'; $statement = $mdb2->prepare($sql);
$data = array(
array($mdb2->nextId('people'), 'James', 'Hetfield', '1969-06-06'), array($mdb2->nextId('people'), 'Lars', 'Ulrich', '1968-02-02') );
$mdb2->loadModule('Extended');
$mdb2->executeMultiple($statement, $data); $statement->free();
Auto Prepare
Instead of writing a generic query and then preparing a statement, you can have the autoPrepare() method do it for you. You supply only the name of the table,
an array of field names, and the type of the query—insert, update, or delete. If you do an update or delete, you can also give the WHERE condition as a string or an array containing different conditions, which MDB2 will concatenate with AND for you. An insert example would be:
$mdb2->loadModule('Extended'); $table = 'people';
$fields = array('id', 'name', 'family', 'birth_date'); $statement = $mdb2->autoPrepare($table, $fields,
This way you'll get an MDB2_Statement object created from a generic query that looks like this:
INSERT INTO people (id, name, family, birth_date) VALUES (?, ?, ?, ?)
If you want an update statement, you can do something like this: $mdb2->loadModule('Extended');
$table = 'people';
$fields = array('name', 'family', 'birth_date'); $where = 'id = ?';
$statement = $mdb2->autoPrepare($table, $fields,
MDB2_AUTOQUERY_UPDATE, $where);
The code above will prepare this type of generic query:
UPDATE people SET name = ?, family = ?, birth_date = ? WHERE id = ?
Internally, autoPrepare() uses the buildManipSQL() method, which basically does all the work of creating the generic query, but doesn't call prepare() once the query
is built. You might find this method useful in cases when you just need a query and do not intend to use prepared statements. Here's how you can delete all the records in the table with last names starting with S and s:
$mdb2->loadModule('Extended'); $sql = $mdb2->buildManipSQL( 'people',
false,
MDB2_AUTOQUERY_DELETE, 'family like "s%"'); echo $mdb2->exec($sql);
Auto Execute
The autoExecute() method is similar to autoPrepare() but it also executes the prepared statement. The difference in the parameters passed is that the array of fields should be an associative array containing bothe the field names and the data to be inserted or updated.
$mdb2->loadModule('Extended'); $table = 'people';
$fields = array ( 'id' => $mdb2->nextId('people'), 'name' => 'Cliff',
'family' => 'Burton', 'birth_date' => '1962-02-10' );
Transactions
If transactions are supported by your RDBMS, using them is very good practice to keep your data in a consistent state, should an error occur in the middle of the process of writing several pieces of data to one or more tables.
You begin by checking whether transactions are supported by your RDBMS and then you initiate a new transaction with a call to beginTransaction(). Then you start executing the different queries that comprise your transaction. After every query you can check the result and if you find it's a PEAR_Error, you can roll back (undo) the transaction and all previously executed queries within it. Otherwise you commit (finalize) the transaction. Before the calls to rollback() or commit(), you need to check if you really are in transaction, using the inTransaction() method.
if ($mdb2->supports('transactions')) {
$mdb2->beginTransaction(); }
$result = $mdb2->exec('DELETE FROM people WHERE id = 33'); if (PEAR::isError($result))
{
if ($mdb2->inTransaction()) {
$mdb2->rollback(); }
}
$result = $mdb2->exec('DELETE FROM people WHERE id = invalid something'); if (PEAR::isError($result))
{
if ($mdb2->inTransaction()) {
$mdb2->rollback(); }
}
elseif ($mdb2->inTransaction()) {
$mdb2->commit(); }
MDB2 Modules
When looking at some of the examples earlier in this chapter, you've already seen how the idea of modularity is built into MDB2. The main purpose is to keep the base functionality lightweight and then include more functionality on demand, using the loadModule() method.
Earlier in the chapter, the Extended module was loaded like this: $mdb2->loadModule('Extended');
After this call you have access to all the methods that the Extended module provides, such as all the get*() methods. The methods are accessible through the extended property of the $mdb2 instance:
$mdb2->extended->getAssoc($sql);
In addition to that, in PHP5, due to the object overloading functionality, you can access the methods directly as methods of the $mdb2 instance:
$mdb2->getAssoc($sql);
In this chapter PHP5 was assumed, so all the calls to the module methods benefit from object overloading and are called using this short notation.
Yet another way to access the module's methods is by prefixing them with the short name of the module ex (for "Extended"). This is also PHP5-only.
$mdb2->exGetAssoc($sql);
And finally, you can specify a custom property name to load the module into (works in both PHP 4 and 5):
$mdb2->loadModule('Extended', 'mine'); $mdb2->mine->getAssoc($sql);
The full list of currently available MDB2 modules is as follows (short access names given in brackets):
Extended (ex): You already have an idea of some of the methods available in the Extended module. This module is the only one unrelated to the different database drivers and its definition file (Extended.php) lies in the root MDB2 directory, not in the Drivers directory. This module is defined in the MDB2_ Extended class, which inherits the MDB2_Module_Common class.
Datatype (dt): Contains methods for manipulating and converting MDB2 data types and mapping them to types that are native to the underlying database.
•
Manager (mg): Contains methods for managing the database structure (schema), like creating, listing, or dropping databases, tables, indices, etc. Reverse (rv): Methods for reverse engineering a database structure. Native (na): Any methods that are native to the underlying database are placed here.
Function (fc): Contains wrappers for useful functions that are implemented differently in the different databases.
Let's see a few examples that use some of the modules.
Manager Module
Using the Manager module you have access to methods for managing your database schema. Let's see some of its methods in action.
Create a Database
Here's an example that will create a new blank database: $mdb2->loadModule('Manager');
$mdb2->createDatabase('test_db');
Create a Table
You can use the Manager module to recreate the table people that was used in the
earlier examples in this chapter. This table had four fields:
id: An unsigned integer primary key that cannot be null name: A text field, like VARCHAR(255) in MySQL
family: Same type as name birth_date: A date field
To create this table you use the createTable() method, to which you pass the table
name and an array containing the table definition.
$definition = array ( 'id' => array ( 'type' => 'integer', 'unsigned' => 1, 'notnull' => 1, 'default' => 0, ),
'name' => array ( 'type' => 'text', 'length' => 255 ),
'family' => array ( 'type' => 'text',
•
• •
•
'length' => 255 ),
'birth_date' => array ( 'type' => 'date' )
);
$mdb2->createTable('people', $definition);
Alter Table
Let's say that after the table was created, you decide that 255 characters are too much for one name. In this case you'll need to set up a new definition array and call
alterTable(). The new definition array used for modifications is broken down into the following keys:
name: New name for the table add: New fields to be added remove: Fields to be dropped rename: Fields to rename change: Fields to modify
Here's how to modify the name field to store only a hundred characters: $definition = array(
'change' => array( 'name' => array(
'definition' => array( 'length' => 100, 'type' => 'text', ) ),
) );
$mdb2->alterTable('people', $definition, false);
If you set the third parameter of alterTable() to true, MDB2 will not execute the changes, but will only check if they are supported by your DBMS.
Constraints
The id field was meant to be the primary key, but so far it isn't. For this purpose you can use the createConstraint() method, which accepts the table name, the name
we chose for the constraint, and the array containing the constraint definition.
$definition = array ( 'primary' => true,
'fields' => array ( 'id' => array())
);
$mdb2->createConstraint('people', 'myprimekey', $definition);
Note that MySQL will ignore the myprimekey name of the constraint, because it requires the primary key to always be named PRIMARY.
Now we can specify that the name plus the family name should be unique: $definition = array('unique' => true,
'fields' => array('name' => array(), 'family' => array(), )
);
$mdb2->createConstraint('people', 'unique_people', $definition);
On second thoughts, different people sometimes have the same names, so let's drop this constraint:
$mdb2->dropConstraint('people', 'unique_people');
Indices
If there will be a lot of SELECTs on the birth_date field, you can speed them up by
creating index on this field.
$definition = array('fields' => array('birth_date' => array(),) ); $mdb2->createIndex('people', 'dates', $definition);
Note that by default MDB2 will add a _idx suffix to all your indices and constraints. If you want to modify this behavior, set the idxname_format option:
$mdb2->setOption('idxname_format', '%s'); // no suffix
Listings
Function Module
The Function module contains some methods to access common database functions, such as referring to the current timestamp, and concatenating or getting partial strings. If you want to access the current timestamp in your statements, you can use the now() method and it will return you the means to get the timestamp in a way that is native for the currently underlying database system.
$mdb2->loadModule('Function'); echo $mdb2->now();
This will output CURRENT_TIMESTAMP when using MySQL and datetime('now') when using SQLite.
now() accepts a string parameter (with values date, time, and timestamp) that
specifies if you want the current date, time, or both.
If you wish to concatenate strings in your statements in a database-agnostic way, you can use the concat() method and pass an unlimited number of string parameters to it. For extracting substrings, you have the substring() method. Here's an example that uses both methods:
$mdb2->loadModule('Function'); $sql = 'SELECT %s FROM people';
$first_initial = $mdb2->substring('name', 1, 1); $dot = $mdb2->quote('.');
$all = $mdb2->concat($first_initial, $dot, 'family'); $sql = sprintf($sql, $all);
$data = $mdb2->queryCol($sql);
echo $sql; print_r($data);
The print_r() from this code will produce: Array (
[0] => E.Vedder [1] => M.McCready [2] => S.Gossard ...
)
The echo$sql; line will print a different result, depending on the database driver you use. For MySQL it would be:
Using the Oracle (oci8) driver, you'll get:
SELECT (SUBSTR(name, 1, 1) || '.' || family) FROM people
In this example only the first character from the value in the name field was extracted. Then it was concatenated with the dot symbol and the full value of the family field. Note that it was necessary to quote the dot in order for it to be treated as a string and not a field name.
Reverse Module
If you want to get information about the table people that was used in the examples in this chapter, you can call the tableInfo() method:
$mdb2->loadModule('Reverse'); $data = $mdb2->tableInfo('people');
If you print_r() the result, you'll get something like: Array( [0] => Array ( [table] => people [name] => id