for MERLIN LEGEND™ Communications System
Copyright© 1991 AT&T
AT&T 585-214-010
All Rights Reserved
Issue 1
Printed in U.S.A.
October 1991
Notice
Every effort was made to ensure that the information in this book was complete and accurate at the time of printing. However, information is subject to change.
Federal Communications Commission (FCC) Interference Notice
This equipment has been tested and found to comply with the limits of a Class A digital device, pursuant to Part 15 of FCC rules. These limits are designed to provide reasonable protection against harmful interference when the equipment is operated in a commercial environment. This equipment generates, uses, and can radiate radio frequency energy and, if not installed and used in accordance with the instruction manual, may cause harmful interference, in which case the user will have to correct the interference at his or her own expense. For additional FCC interference, registration, and repair information, see the information located at the back of this book.
Trademarks
MERLIN LEGEND and MLX-20L are trademarks of AT&T.
Magic On Hold, MERLIN, AUDIX and SPIRIT are registered trademarks of AT&T. MS-DOS is a registered trademark of Microsoft Corporation.
Warranty
AT&T provides a limited warranty to this product. Refer to the “Limited Use Software License Agreement” card provided with this package.
Ordering Information
The order number for this book is 585-214-010. To order additional books, call 1 800 432-6600 in the U.S. and 1 800 255-1242 in Canada. For more information on how to order this and other system reference materials, see “About This Guide.”
Support Telephone Numbers
AT&T provides a toll-free customer helpline 24 hours a day. In the U.S. call the AT&T Helpline at 1 800 628-2888 if you need assistance when installing, programming, or using your system. In Canada, call one of the following Technical Assistance Centers for service or technical assistance:
Eastern Canada and Ottawa: 1 800 363-1882
Ontario: 1 800 387-4268
About This Guide
xi■ Documentation Conventions xi
■ Related Documents xiii
How to Order Documentation xiii
■ Basic Terms and Key Concepts xiv
1
Programming the MERLIN LEGEND System
for CMS
1-1■ Before You Begin
A Word About Programming System Programming Telephone Programming Backups
■ Setting Basic System Operating Conditions
System Mode
System Renumbering Block Renumbering Single Renumbering Transfer Return Time Transfer Audible Extension Status
■ Setting Up Lines, Trunks, and Pools for CMS
Remove CMS Trunks, External Alerts, and Loop-Backs from PooIs (PBX Only)
Remove CMS Lines, External Alerts, and Loop-Backs from Telephones
Program T1 Lines
C o n t e n t s
Program Loop-Start Lines
Program Ground-Start and ISDN PRI Lines
■ Setting Up the Operator Positions
Identify CMS Operator Positions
Assign CMS Lines, External Alerts, and Loop-Backs to CMS Supervisor
Copy Line Assignments to CMS PC Ports Set CMS Supervisor to No Ring
Assign Feature Button
■ Setting Up Agent Telephones
Remove Non-CMS Lines from Agent Telephones (Key Only—Optional)
Set Line Ringing Options
Assign Available and ACW Buttons
■ Setting Up the Fallback Plan
Assign the Group Coverage Sender Assign CMS Agents to a Calling Group Set the Calling Group to Auto Logout Assign Coverage Group
Assign Coverage Off Button Set Group Coverage Delay
■ Setting Up Optional Equipment and Features
Headsets
Analog Headsets MLX Headsets Agent Assist Button Paging Groups
CMS Supervisor Features Barge-In
Group Page
Agent Status Control
Transfer-to-Split
Adding a Ghost Module
Assigning Primary Coverage Buttons Transfer-to-Queue
All-Ring Operation
1-38 1-38 1-39 1-40 1-41
2
Installing the Hardware
■ Hardware RequirementsMERLIN LEGEND Hardware CMS Hardware—Required CMS Hardware—Optional
■ Installation Procedures
Installing the External Alert
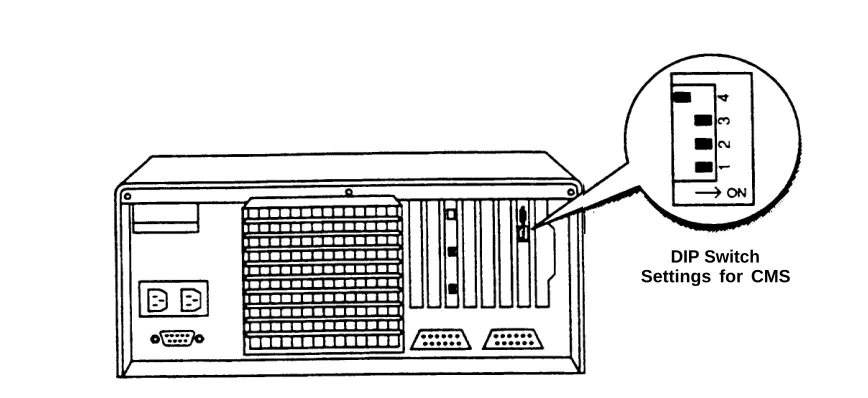
Changing the VDC 600 Board DIP Switch Setting Connecting CU1 and CU2 to the MERLIN LEGEND
System
Connecting the Voice Announcement Unit 570 and 571 Printer Option Changes
Installing a View-Only Monitor installing Loop-Backs
2-1 2-1 2-2 2-2 2-4 2-6 2-9 2-11
2-12 2-14 2-15 2-15 2-16
3
Installing the CMS Software
3-1■ Installing MS-DOS 3-2
■ Installing the CMS Software 3-3
C o n t e n t s
4
CMS Programming Basics
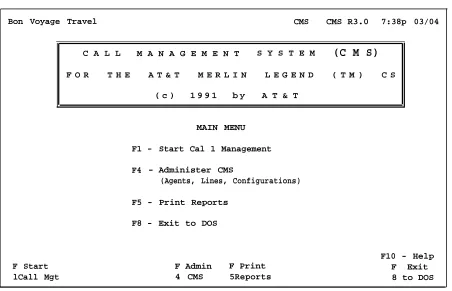
■ Starting CMS
When You Need Help
■ Moving Between CMS Screens ■ Entering and Editing Data
Editing Prompt and Function Keys Guidelines for Entering Data
Alternate Editing Keys Simple Editing Procedures
■ Leaving CMS
4-1 4-1 4-3 4-3 4-5 4-6 4-7 4-8 4-8 4-9
5
Identifying Agents and Lines
5-1■ Getting Started 5-2
■ Creating an Agent Directory 5-3
■ Programming CMS Lines 5-6
Adding Lines 5-7
Identifying Priority Lines 5-8
Assigning Line Group IDs (Optional) 5-8
6
Building a Shift Configuration
6-1■ Getting Started 6-2
■ Selecting a Configuration 6-3
■ Assigning Splits 6-4
■ Programming Call Flow
Assigning Main and Secondary Splits Turning Intraflow On/Off (Optional)
Setting the Intraflow Threshold (Optional) Setting All-Ring Operation
■ Naming and Saving the Shift Configuration
Naming a Split Configuration Saving a Split Configuration
■ Choosing a Start-Up Configuration
6-9 6-10 6-11 6-12 6-12 6-13 6-13 6-14 6-15
7
Testing CMS
7-1■ Startup Test 7-2
■ Line Status Test 7-3
■ Agent Status Test 7-5
■ Voice Announcement Unit Test 7-6
■ Intraflow Test 7-7
8
Customizing CMS
8-1■ Getting Started 8-2
■ Setting CMS Options 8-3
Service Level Limit 8-3
Abandoned Call Threshold 8-3
Alarm On/Off 8-4
Delay Message Length 8-4
Business Name 8-5
C o n t e n t s
9
Troubleshooting
9-1■ Error Messages 9-2
■ Warning Messages 9-7
■ System Errors 9-14
What They Mean What to Do
■ Other Messages ■ Other Problems
If CMS is Managing Calls Correctly If CMS has Stopped Managing Calls
Call Management Problems Agent Problems
External Alert Problems
■ Fallback Plan
9-14 9-14 9-14 9-15 9-16 9-18 9-18 9-21 9-25 9-27
A
Guide to CMS Screens
A-1B
Upgrade Information
B-1C
MERLIN LEGEND CMS Factory Settings
C-1GL Glossary
GL-1I N I n d e x
IN-1About
This Guide
This guide explains how to install, program, and test the Call Management System (CMS) on the MERLIN LEGEND™ Communications System. When you complete the activities in this guide, CMS is ready to manage calls with a primary shift configuration. Additional programming, customization, and fine-tuning are described in the CMS Supervisor’s Guide.
When using this guide, refer to the completed MERLIN LEGEND and CMS planning forms. These forms contain information for setting up the system according to the customer’s requirements. The forms should be located in the back cover pocket of the CMS Supervisor’s Guide. If they are not,
contact the Account Manager or CMS supervisor. For the MERLIN LEGEND forms, contact the MERLIN LEGEND system manager.
In addition to the planning forms, the instructions in this guide assume that you have the following:
■ A properly installed MERLIN LEGEND Communications System. ■ An AT&T PC dedicated exclusively to CMS; the CMS PC cannot be
used for MERLIN LEGEND system programming or any other applications.
■ The documents that came with the PC.
NOTE:
If this installation is an upgrade, refer to Appendix B, “Upgrade Information,” first.
Documentation Conventions
Several special symbols and typefaces appear in this guide. For example, keys that appear on your keyboard are shown like this:
[F1] (function key F1) [ ] (up arrow)
[ ] (down arrow) [ ] (left arrow) [ ] (right arrow) [ ] (tab key)
[
↵
↵
] (enter key)When two keys must be pressed simultaneously, they appear like this:
[ ] + [ ] (press the up arrow and tab key simultaneously).
On the CMS screens, different typefaces are used throughout this guide:
This typeface represents information the system displays,
such as prompts.
This bold typeface represents information you enter.
Also on CMS screens, a field in which you enter data is blank. To indicate that blank field in this guide, a blank line is used. For example, the following input line includes blank lines to show that you must enter text:
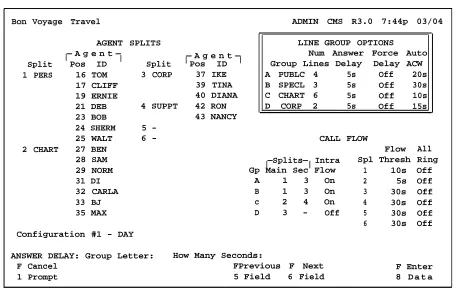
ANSWER DELAY: Group Letter: _ How Many Seconds:
On the screen, these two fields appear as blanks.
About This Guide
Related Documents
Other documents are available to help you setup, use, and maintain CMS with the MERLIN LEGEND system. These documents are:
■ CMS Planning Guide and Forms
■ CMS Supervisor’s Guide ■ CMS User’s Quick Reference
■ MERLIN LEGEND Communications System PBX System Planning
■ MERLIN LEGEND Communications System Key System Planning
■ MERLIN LEGEND Communications System Programming Guide
■ MERLIN LEGEND Communications System lnstallation, Programming, and Maintenance
■ MERLIN LEGEND Communications System Reference
How to Order Documentation
The CMS documents listed above come with the system. You can order additional copies of those documents or the related MERLIN LEGEND system documentation from the AT&T Customer Information Center. To order, find the order number in the table on the following page and call the telephone numbers on the inside front cover.
Document
CMS
Planning Guide and Forms Supervisor’s Guide
User’s Quick Reference (packages of 15)
MERLIN LEGEND Communications System
PBX System Planning Key System Planning
System Programming Guide
Installation, Programming, and Maintenance System Reference
Order Number
585-214-050 585-214-071 585-214-070 555-610-113 555-610-112 555-610-111 555-610-140 555-610-110
Basic Terms and Key Concepts
Before you begin setting up CMS for the MERLIN LEGEND Communications System, you should be familiar with some basic CMS terms and key CMS concepts. This section gives brief descriptions of the most important terms and concepts; additional CMS terms are included in the glossary.
Automatic Call Distributor
CMS is the automatic call distributor (ACD) for the MERLIN LEGEND system. CMS distributes calls that come in on the MERLIN LEGEND system telephone lines assigned to CMS.
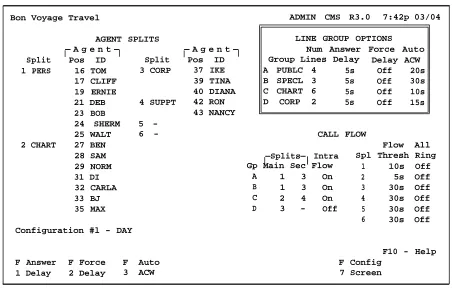
Lines and Line Groups
The MERLIN LEGEND system telephone lines assigned to CMS are organized into line groups. Usually the incoming calls for a line group are of the same type. For example, the lines for incoming sales calls are in one line group and the lines for service calls in another. CMS accommodates up to a total of 28 lines assigned to up to four line groups.
About This Guide
Agents and Agent Splits
Incoming calls are answered by agents who are assigned to agent splits. A split is a team of agents who handle the same type of incoming calls. Each split is assigned to answer calls for one or more line groups. There can be up to six splits, with a maximum of 28 agents in a split. However, no more than 28 agents can be active in CMS at any one time.
Shift Configuration
A shift configuration is an arrangement of line groups and agent splits for managing calls. You can create up to six different configurations to handle different calling patterns in your business. However, only one shift
configuration can be active at a time, and no more than 28 agents can be in that configuration.
Main Splits and Secondary Splits
In a configuration, some splits are main splits and others are
secondary splits. A main split has primary responsibility for answering calls for a line group. A secondary split answers calls for a line group only if the main split for that group is overloaded.
Intraflow and Intraflow Threshold
The sending of calls to agents in a secondary split is called intraflow.
Intraflow can be turned on and off. The number of seconds that the call waits in the main split before it is sent to the secondary split is called the intraflow
threshold.
Logged Out State and Available State
When call management begins for a shift, the agents in the shift configuration are in the logged out state. CMS keeps statistics on other calls made by agents who are logged out, but doesn’t send calls to them, so the agents have to signal CMS that they are ready to receive calls (in available state). They do so by pressing the programmed button labeled Available on their telephones (MERLIN LEGEND system telephones).
After-Call-Work (ACW) State
When agents need time to complete work on their most recent CMS call (such as processing an order or updating a record), they can leave the avail-able state and enter the after-call-work (ACW) state by pressing the pro-grammed button labeled ACW on their telephones. CMS does not send calls to agents who are in this after-call-work state, but it does keep statistics on them. To return to the available state from the after-call-work state, agents simply press Available.
Automatic After-Call-Work (Auto ACW) State
The automatic after-call-work (Auto ACW) feature automatically places agents into the after-call-work state when they complete an ACD call. Auto ACW lasts for a specified length of time, as programmed at installation or by the CMS supervisor. During that time, agents receive no calls. When the time elapses, agents are automatically made available. Agents can make them-selves available before the specified time elapses by pressing Available.
Supervisory Login/Logout
The CMS supervisor can change an agent’s work state from the CMS PC or the supervisor’s telephone. From the Split Status Information screen, the supervisor simply enters the agent’s ID at the appropriate prompt and enters the new status (Logged out/Available/ACW). From the telephone, the super-visor presses the agent’s Inside Auto Dial (DSS) button then the button pro-grammed for the desired work state ( Make Available, Make ACW, and Make Log Out ).
Call Management
Call management is the automatic distribution of calls within a shift
configuration. When a call comes into CMS, the system goes through the fol-lowing steps:
1. CMS looks for an available agent in the main split assigned to the line group for the incoming call.
2. If an agent is available, CMS answers the call and transfers it to the agent who has been available the longest.
About This Guide
3. If no agent is available, CMS waits a certain number of seconds, then answers the call and connects it to a delay message. The length of time CMS waits before answering the call is known as the answer delay. If an agent becomes available at any time during the answer delay interval or during the delay message, the call is transferred to the agent. 4. If no agent has become available and the delay message is finished,
CMS puts the call on hold.
5. As soon as an agent is available, CMS transfers the oldest waiting call to the agent.
6. If the call has waited a certain amount of time (the intraflow threshold), it may be sent (intraflowed) to an available agent in the secondary split (if intraflow is on).
Answer Delay, Force Delay, and Priority Lines
The CMS answer delay, force delay, and priority lines options modify the basic call management sequence. When no agent is available to answer the call, the answer delay setting determines how long a call rings before CMS answers and connects it to the delay message. With force delay active, all calls are connected to the delay message whether or not there are available agents, and callers hear the entire message before being connected to an agent. Calls coming in on lines that have been designated priority are answered before any other waiting calls.
For CMS to work correctly, you must program certain MERLIN LEGEND system settings, features, and options correctly. This chapter includes detailed instructions for completing that programming. How you use this chapter depends on whether you are installing CMS on a new MERLIN LEGEND system or adding CMS to an existing system.
If CMS is part of the initial MERLIN LEGEND installation, obtain all the MERLIN LEGEND planning forms. For CMS-specific items, follow the procedures included in this chapter. However, since CMS programming is only a part of MERLIN LEGEND system programming, we recommend that you proceed through the programming sequence outlined in Chapter 3 of MERLIN LEGEND Communications System Programming, making sure you complete all necessary CMS programming.
If you are adding CMS to an existing system, you may have to modify some system settings according to the MERLIN LEGEND system planning forms. All the instructions for doing so are included in this chapter. We recommend that you use this chapter as your primary reference and refer to MERLiN LEGEND Communications System Programming only as necessary for additional information.
Programming the MERLIN LEGEND System for CMS
Before You Begin
The MERLIN LEGEND system planning forms include all the items required for CMS, as recorded during CMS planning. The MERLIN LEGEND forms used for CMS are listed below. Have them available before you start.
■ Form 1, System Planning
■ Form 2a, System Numbering—Station Jacks ■ Form 2c, System Numbering—Trunk Jacks
■ Form 4a, Analog Multiline Telephone ■ Form 4b, Digital/ISDN (MLX) Telephone ■ Form 5a, Direct Line Console (DLC)—Analog ■ Form 6c, Group Page
■ Form 6d, Group Coverage ■ Form 6e, Group Calling ■ Form 6f, System Features
A Word About Programming
MERLIN LEGEND programming includes both system programming and tele-phone programming. This guide assumes that you are familiar with program-ming the MERLIN LEGEND system using either an MLX-20L™ display tele-phone or a PC. For more detailed information about system programming, see MERLIN LEGEND Communications System Programming.
System Programming
You can perform system programming from the MERLIN LEGEND system programming console or PC. To enter system programming mode and display the system programming menu, complete the following procedure (note that each item listed in the MLX-20L column refers to a menu item on the system programming console):
Step
MLX-20L
PC
1. Display system program- Menu Type SPMming menu Sysprog [ [
↵
↵
]] Exit [ [↵
↵
]][F1] [F5]
In the system programming instructions that follow, we assume that you have entered programming mode and are starting from the system programming menu. Refer to the above procedure if necessary.
NOTE:
Certain programming selections cause the system to restart automatically. To continue programming after a system restart, enter the programming mode as described above.
Some of the items to be programmed may already have the correct settings. On the PC or MLX-20L display, the current setting is highlighted with reverse video. If an item is set correctly, you do not need to reset it. Simply exit that programming selection and continue with another one. For a list of the fac-tory settings, see Appendix C.
Telephone Programming
You can complete telephone programming either at an individual phone or from the system programming console or PC using centralized telephone gramming. For most telephone programming, we recommend that you pro-gram the telephone directly to ensure proper button assignment and to test the programming immediately.
Backups
If you are adding CMS to an existing system, backup the MERLIN LEGEND files using SPM before you start. If an error occurs during programming, you
Programming the MERLIN LEGEND Sytem for CMS
can restore the original settings from the backup. After completing MERLIN LEGEND programming, backup the MERLIN LEGEND files again. If you are not familiar with the MERLIN LEGEND backup procedure, contact the MER-LIN LEGEND system manager or see Chapter 2 of MERMER-LIN LEGEND Com-munications System Programming.
Setting Basic System
Operating Conditions
Using CMS with the MERLIN LEGEND system requires certain operating con-ditions. This section gives instructions for setting the system mode, extension numbering scheme, call transfer options, and extension status for CMS.
Sytem Mode
Set the system to key mode or hybrid/PBX mode. Do not set it to behind switch mode. Refer to the back of MERLIN LEGEND Form 1, System Plan-ning. The factory setting is key mode.
IMPORTANT:
DO NOT change the system mode if you are adding CMS to an existing system, unless you plan to reprogram the entire system. Changing the system mode deletes all current line and telephone programming and resets them to the factory setting for that mode. You will have to reas-sign all lines and reprogram all telephones after making this change.
Step
MLX-20L
PC
1. Display Mode screen System [F1]
Mode [F3]
2. Specify key mode Key [F1]
or or or
hybrid/PBX mode and save entry
Hybrid/PBX [F2]
Enter [F10]
The system will restart
System Renumbering
System Renumbering includes selecting the type of numbering scheme (2-digit, 3-(2-digit, or 4-digit set-up extension numbers) and changing extension numbers from their factory-set values. Selecting a numbering scheme is required; renumbering extensions is optional. Refer to the front of Form 2a, System Numbering—Station Jacks. The factory setting is 2-digit extension numbering and the factory set extensions numbers are listed on the form.
Step
MLX-20L
PC
1. Display Default Number- Sys Renumber [F2]
ing screen Default Numbering [F1]
2. Specify System Number-ing Plan
— For 2-digit 2-Digit [F1]
— For 3-digit 3-Digit [F2]
— For 4-digit Set Up Space [F3]
3. Exit to System Program- Exit [F5]
ming
To exit from Set Up Space, press
Exit or [F5] twice more
Programming the MERLIN LEGEND System for CMS
NOTE:
If Form 2a does not show that any extensions are to be renumbered, skip the remainder of this section and continue with “Transfer Return Time.” Refer to the “Renumber To” column of the form to determine if extensions are to be renumbered.
Block Renumbering
If Form 2a shows the CMS extensions to be renumbered as a consecutive range, or block, renumber the whole block at once by completing the steps below. Refer to Form 2a for the new extension numbers.
IMPORTANT
In steps 2–4 below, enter 2-digit, 3-digit, or 4-digit extension numbers depending on the numbering scheme selected in the previous pro-cedure. For example, use 4-digit extensions if you selected Set Up Space.
Step
MLX-20L
PC
1. Display Block Renumber SysRenumber [F2]
Extensions Entry screen Block [F3]
Extensions [F2]
2. Enter the 2-digit, 3-digit, Dial extension Type extension or 4-digit extension Enter [F10]
number for the first extension in the block.
3. Enter the 2-digit, 3-digit, Dial extension Type extension or 4-digit extension Enter [F10]
number for the last extension in the block.
4. Enter the new 2-digit, 3- Dial extension Type extension digit, or 4-digit extension Enter [F10]
number for the first extension in the block.
This number cannot overlap any of the pre-assigned line, extension, or adjunct numbers.
5. Exit to System Programming Exit [F5]
Exit [F5]
Single Renumbering
Follow the steps below to renumber a single extension. Refer to Form 2a for the new extension numbers.
IMPORTANT
In steps 3 and 4 below, enter 2-digit, 3-digit, or 4-digit extension
numbers depending on the numbering scheme selected in the previous procedure. For example, use 4-digit extensions if you selected Set Up Space.
Step
MLX-20L
PC
1. Display Single Renumber SysRenumber [F2]
screen Single [F2]
2. Select Extensions Extensions [F2]
3. Enter the 2-digit, 3-digit, Dial extension Type extension or 4-digit extension Enter [F10]
number for the exten-sion.
Programming the MERLIN LEGEND . System for CMS
4. Enter the new 2-digit, 3-digit, or 4-digit extension number.
Repeat steps 2-4 for each extension.
Dial extension.
Enter
Type extension.
[F10]
5. Exit to System Programming Exit [F5]
Exit [F5]
Transfer Return Time
The Transfer Return Time controls the number of rings that occur before a call is considered “refused” by an agent. For CMS, set the Return Time to as few as three rings or as many as five rings. Refer to the “Transfer Options” sec-tion of Form 6f, System Features. The factory setting is four rings.
Step
MLX-20L
PC
1. Display Transfer Return Options [F7]
screen Transfer [F1]
Return Time [F1]
2. Erase current setting, Drop [Alt] +
❑
Pspecify the number of rings, Dial number of Type number of
and save entry rings rings
Enter [F10]
3. Exit to System Programming Exit [F5]
Exit [F5]
Transfer Audible
The Transfer Audible feature defines what a caller hears when his or her call is transferred. For CMS, set this feature to Ringback. Refer to the “Transfer Options” section of Form 6f, System Features. The factory setting is Music-on-Hold.
Step
MLX-20L
PC
1. Display Transfer Audible Options [F7]
screen Transfer [F1]
Audible [F3]
2. Select Ringback and save Ringback [F2]
entry Enter [F10]
3. Exit to System Programming Exit [F5]
Exit [F5]
Extension Status
The Extension Status feature allows the CMS supervisor to determine the status of CMS agent telephones through the lights next to the DSS buttons assigned to agent extensions on the supervisor’s telephone. For CMS, set this feature to Group Calling/CMS. Refer to the “Extension Status” section of Form 6f, System Features. The factory setting is Group Calling/CMS.
Step
MLX-20L
PC
1. Display Extension Status Options [F7]
Button Type screen Ext Status [F7]
2. Specify Group Call/CMS GrpCall/CMS [F2]
and save entry Enter [F10]
3. Exit Exit [F5]
Programming the MERLIN LEGEND System for CMS
Setting Up Lines,
Trunks, and Pools for CMS
For CMS to function properly, all CMS lines or trunks must be assigned only to the CMS PC and the CMS supervisor telephone. In addition, you must pro-gram CMS channels in T1 lines for ground-start emulation. ISDN Primary Rate Interface (PRI) lines require no special programming for CMS. The fol-lowing sections give instructions for completing these tasks.
Remove CMS Trunks, External Alerts,
and Loop-Backs from Pools (PBX Only)
For a MERLIN LEGEND system operating in hybrid/PBX mode, make sure that no CMS trunks are in the default pools. When a system is first set up, all loop-start lines default to the Main Pool (extension number 70) while all
ground-start lines default to the pool with extension number 890. The follow-ing procedure removes all CMS loop-start and ground-start trunks, external alerts, and loop-back trunks that have defaulted to these pools. Refer to the “Trunk Type” column on Form 2c, System Numbering—Trunk Jacks to iden-tify loop-start and ground-start trunks.
Step
MLX-20L
PC
1. Display Pools screen LinesTrunks [F4]
Pools [F9]
2. Identify the pool and Dial pool dial- Type pool
dial-save entry out code out code
Enter [F10]
3. Select specific CMS trunks
— For logical IDs 1-20 Lines 01-20 [F1]
— For logical IDs 21-40 Lines 21-40 [F2]
— For logical IDs 41-60 Lines 41-60 [F3]
— For logical IDs 61-80 Lines 61-80 [F4]
4. Remove each CMS Press line but- Press function trunk, external alert, and ton for each key for each loop-back from the pool trunk until red trunk until letter
LED is off “R” is erased 5. Exit to System Program- Exit [F5]
ming Exit [F5]
Remove CMS Lines, External
Alerts, and Loop-Backs from Telephones
A MERLIN LEGEND system operating in key mode automatically assigns up to 32 lines on telephone line buttons, depending on the type of telephone. In hybrid/PBX mode, the system automatically assigns trunks to operator tele-phones. If any of these lines or trunks are CMS lines or are used for CMS external alerts or loop-backs, remove them from all telephones in a key sys-tem and from all operator telephones in a hybrid/PBX syssys-tem. (Make sure the CMS lines are first removed from the default pools. See the previous pro-cedure.)
In steps 1-5 below, you first remove CMS lines, external alerts, and loop-backs from one agent phone (in a key system) or from one operator phone (in a hybrid/PBX system). In steps 6-9, you copy the assignments from that phone to other agent or operator phones. You cannot copy line assignments between operator and non-operator phones in a hybrid/PBX system.
To identify CMS lines, external alerts, and loop-backs, refer to Form 2c, Sys-tem Numbering—Trunk Jacks.
NOTE:
For any CMS lines or trunks connected to MERLIN LEGEND jacks above logi-cal ID 32, you may skip this procedure. No lines or trunks above logilogi-cal ID 32 default to telephones.
Programming the MERLIN LEGEND System for CMS
Step
MLX-20L
PC
1. Display Assign Extensions [F6]
Lines/Trunks screen LinesTrunks [F1]
Identify the first exten- Dial number Type number sion number and save Enter [F10]
entry
3. Select CMS lines (1 to 32)
— For logical IDs 1-20 Lines 01-20 [F1]
— For logical IDs 21-32 Lines 21-40 [F2]
4. Remove lines from tele- Press line but- Press function phone ton for each line key for each
until green LED line until letter is off “G” is erased 5. Exit to System Program- Exit [F5]
ming Exit [F5]
6. Display copy from Extensions [F6]
screen Line Copy [F2]
Single [F1]
7. Enter same extension as Dial number Type number in step 2 and save entry Enter [F10]
8. Enter the extension Dial number Type number number to copy to and Enter [F10]
save entry
Repeat for each exten-sion
9 . Exit to System Program- Exit [F5]
ming Exit [F5]
Exit [F5]
Program T1 Lines
If the MERLIN LEGEND system has 100D (DS1) modules with T1 lines to be used by CMS, you must specify the emulation for each T1 channel. Channels used for CMS must be programmed for ground-start emulation. To identify DS1/T1 lines, refer to the “Jack Type” column on Form 2c, System
Numbering—Trunk Jacks.
NOTE:
Other channels in a T1 line not assigned to CMS may have other emulations.
Step
MLX-20L
PC
1. Identify the slot number LinesTrunks [F4]
with the 100D module GS/LS/DSl [F1]
and save entry Dial slot number Type slot number
Enter [F10]
2. Specify T1 for the line Type [F1]
type and save entry T1 [F1]
Enter [F10]
3. Specify ground-start emulation
— To select all channels All Ground [F6]
Enter [F10]
Go to step 5 Go to step 5 — To select some chan- GroundStart [F1]
nels Enter [F10]
4 . Identify channel(s) and Dial channel Type channel
assign type number number
Enter [F10]
Programming the MERLIN LEGEND System for CMS
Repeat for each channel
5. Exit to System Program- Exit [F5]
ming Exit [F5]
Program Loop-Start Lines
If the Central Office of the local telephone company sends a reliable discon-nect signal for loop-start lines, program the system to recognize the signal. Refer to the top of Form 2c, System Numbering—Trunk Jacks.
Step
MLX-20L
PC
1. Display Loop Start Lines Trunks [F4]
Disconnect screen TT/LS Disc [F3] LS Disconnect [F2]
2. Specify the LS Discon- Yes
nect as reliable and save Enter
entry
[F1] [F10]
3. Exit to System Program- Exit [F5]
ming Exit [F5]
Program Ground-Start
and ISDN PRI Lines
CMS requires no special MERLIN LEGEND programming for using these types of lines.
Setting Up the Operator Positions
CMS requires three operator positions—two for the CMS PC (ports CU1 and CU2) and one for the CMS supervisor. All CMS lines or trunks, external alerts, and loop-backs are assigned to these positions. The following sections give instructions for setting up these three positions.
Identify CMS Operator Positions
Identify three analog DLC operator positions. The two CMS PC positions (CU1 and CU2) must be on the same analog module. Note that, none of these positions should be extension 10, the MERLIN LEGEND primary opera-tor position. To locate the operaopera-tor positions, refer to Form 5a, Direct Line Console (DLC)—Analog.
Step
MLX-20L
PC
1. Display Direct Line Operator [F3]
Operators entry screen Positions [F1] Direct Line [F1]
2. Identify and assign DLC Dial extension, Type extension, operator positions slot and port, or slot and port, or
logical ID logical ID
Enter [F10]
Repeat for each position
3. Save all entries StoreAll [F3]
The system will restart
Programming the MERLIN LEGEND System for CMS
Assign CMS Lines, External Alerts,
and Loop-Backs to CMS Supervisor
Before assigning all CMS outside lines or trunks—including those used for CMS external alerts and loop-backs—to line buttons on the CMS supervisor’s telephone, remove any non-CMS lines or trunks that have defaulted to the extension. The following procedure gives instructions for completing these two tasks. To identify CMS lines or trunks, refer to Form 2c, System
Numbering—Trunk Jacks. To identify CMS line buttons, refer to Form 5a, Direct Line Console (DLC)—Analog.
IMPORTANT
The order in which you add lines to the telephone determines the line button assignments on the phone. For example, the first line you add is assigned to line button 3, the second line is assigned to line button 4, and so on. For this ordering to work, you must first remove all lines from the phone (step 4).
Step
MLX-20L
PC
1. Display Assign Extensions [F6]
Lines/Trunks screen LinesTrunks [F1]
2. Identify the CMS Dial number Type number supervisor’s extension Enter [F10]
and save entry
3. Select lines or trunks
— For logical IDs 1-20 Lines 01-20 [F1]
— For logical IDs 21-40 Lines 21-40 [F2]
— For logical IDs 41-60 Lines 41-60 [F3]
— For logical IDs 61-80 Lines 61-80 [F4]
4. Remove non-CMS Press line but- Press function lines/trunks from line but- ton for each key for each tons line/trunk until line/trunk until
green LED is off letter “G” is erased
5. Assign CMS lines/trunks Press line but- Press function to line buttons in the ton for each key for each order they appear on line/trunk until line/trunk until Form 5a green LED is on letter “G”
appears 6. Exit to System Program- Exit [F5]
ming Exit [F5]
Copy Line
Assignments to CMS PC Ports
The two CMS PC ports (CU1 and CU2) must have the same line assignments as the CMS supervisor’s telephone, including the CMS external alert lines and loop-backs. To save time and ensure that the line assignments are identical, copy the CMS supervisor assignments to the extensions for CU1 and CU2. For those extension numbers, refer to Form 5a, Direct Line Console (DLC)— Analog.
Step
MLX-20L
PC
1. Display copy from Extensions [F6]
screen Line Copy [F2]
Single [F1]
2. Enter the CMS supervisor Dial number Type number extension and save entry Enter [F10]
Programming the MERLIN LEGEND System for CMS
3. Enter the CU1 extension Dial number Type number
and save entry Enter [F10]
4. Enter the CU2 extension Dial number Type number
and save entry Enter [F10]
5. Exit to System Program- Exit [F5]
ming Exit [F5]
Exit [F5]
Set CMS Supervisor to No Ring
Although the CMS supervisor should have access to all CMS lines or trunks, they should not ring at the telephone. To prevent the lines from ringing, set the supervisor’s console to No Ring. This programming affects all lines/ trunks—even non-CMS lines—assigned to line buttons on the telephone.
Step
MLX-20L
PC
1. Display Station Program- More [PgUp]
ming screen Cntrl Prog [F4]
2. Enter CMS supervisor Dial number Type number extension number Enter [F10]
Start [F10]
3. Select a CMS line button Press line but- Press a line
and enter No Ring ton button
feature code
❑
*❑
3❑
4❑
5❑
*❑
3❑
4❑
54. Exit [ Top Sys Prog ] [Alt] +
❑
CNOTE:
When the fallback plan is started, the lines on the CMS supervisor telephone must be set to Immediate Ring. The fallback plan will not work if the lines are set to No Ring. The code for Immediate Ring is
❑ ❑ ❑ ❑
*
3 4 7 .Assign Feature Button
The Feature button lets the CMS supervisor use MERLIN LEGEND features
by pressing Feature and dialing a code. To program a Feature button, com-plete the following steps through centralized telephone programming. (If desired, you can program this button directly at the phone.) Note that the
Feature button must be assigned to button 34.
Step
MLX-20L
PC
1. Display Centralized Pro- More [PgUp]
gramming screen Cntr-Prg [F4]
2. Select the CMS Dial extension Type extension supervisor’s extension number number
Enter [F10]
Start [F10]
3. Select the line button Page 2 [F7]
range for button 34
4. Select and assign button Press button 34 Press [Shift] +
34 Enter the function key
❑ ❑ ❑
*
2 0 for button 34[F10]
❑ ❑ ❑
*
2 06. Exit to System Program- [ Top Sys Prog ] [Alt] +
❑
C mingProgramming the MERLIN LEGEND System for CMS
Setting Up Agent Telephones
The next step in programming the MERLIN LEGEND system for CMS is to prepare each CMS agent’s telephone. CMS requires certain operating condi-tions and button assignments on agent telephones, as described in this sec-tion. To program additional telephone features not required by CMS, see MERLIN LEGEND Communications System Programming.
NOTE:
Unless otherwise stated, the instructions for programming buttons and features on agent telephones are given for programming the telephone directly, not centrally.
Remove Non-CMS Lines from
Agent Telephones (Key Only—Optional)
A MERLIN LEGEND system operating in key mode automatically assigns up to 32 lines onto telephone line buttons, depending on the number of line but-tons on the telephone. You already removed CMS lines from all phones in the system. You must now remove any non-CMS lines that remain on CMS agent telephones. If there are no non-CMS lines in the system, skip this section.
NOTE:
If lines are to remain on a telephone as personal lines, set them to No Ring, as described in the next section.
The following procedure uses system programming to remove lines from one phone first and then to copy the assignments on that phone to all other agent phones. To identify non-CMS lines, refer to MERLIN LEGEND Form 2c, Sys-tem Numbering—Trunk Jacks. For personal line assignments, refer to Form 4a, Analog Multiline Telephone and Form 4b, Digital/ISDN (MLX) Telephone.
IMPORTANT
You cannot copy line assignments between operator and non-operator phones. (See step 6.)
Step
MLX-20L
PC
1. Display Assign Extensions [F6]
Lines/Trunks screen LinesTrunks [F1]
2. Identify the first agent’s Dial number Type number extension number and Enter [F10]
save entry 3. Select lines
— For logical IDs 1-20 — For logical IDs 21-40 — For logical IDs 41-60
Lines 01-20 [F1]
Lines 21-40
Lines 41-60
[F2]
[F3]
— For logical IDs 61-80 Lines 61-80 [F4]
4. Remove lines from tele- Press line but- Press function phone ton for each line key for each
until green LED line until letter is off “G” is erased 5. Exit to System Program- Exit [F5]
ming Exit [F5]
6. Display copy from screen Extensions [F6]
Line Copy [F2]
Single [F1]
7. Enter same extension as Dial number Type number in step 2 and save entry Enter [F10]
Programming the MERLIN LEGEND System for CMS
8. Enter the next agent Dial number Type number extension number and Enter [F10]
save entry
Repeat for each extension
9. Exit to System Program- Exit [F5]
ming Exit [F5]
Exit [F5]
Set Line Ringing Options
All CMS calls come to agents over the extension/system access (SA) button. To ensure that these calls ring immediately, set the extension button (for key mode) or system access button (for hybrid/PBX mode) on each agent phone to Immediate Ring. Also, if a CMS agent’s telephone has personal line or pool buttons, set them to No Ring to prevent calls on those lines from disturb-ing the agent while on CMS calls.
The following instructions are for programming the telephone directly. Note that the steps differ for analog and MLX (digital) telephones. For line assign-ments, refer to Form 4a, Analog Multiline Telephone and Form 4b,
Digital/lSDN (MLX) Telephone.
Step
Analog
MLX
1. Enter programming Slide the T/P 0 0
mode switch to the P
(program) posi-tion
[Feature] ❑ ❑
2. Select extension/system Press Press
access button and enter extension/SA extension/SA Immediate Ring feature button button
code
❑ ❑ ❑
*
3 7❑ ❑ ❑
*
3 73. If applicable, select a Press line/pool Press line/pool personal line/pool button button button
and enter No Ring
❑ ❑ ❑
*
3 5❑ ❑ ❑
*
3 5feature code
4. Exit Slide T/P switch [Feature]
❑ ❑
*
0to center posi-
❑
tion0
Assign Available and ACW Buttons
Assign each agent’s telephone an Available and an ACW button to report the agent’s status to the system. For the button assignments, refer to Form 4a, Analog Multiline Telephone and Form 4b, Digital/lSDN (MLX) Telephone.
Step
Analog
MLX
1. Enter programming Slide the T/P [Feature]
❑ ❑
mode switch to the P
(program) posi-tion
0 0
2. Select and assign the Press Available Press Available
Available button button button
❑ ❑ ❑
*
4 4❑ ❑ ❑
*
4 43. Select and assign ACW Press ACW but- Press ACW
but-button ton ton
❑ ❑ ❑
*
4 5❑ ❑ ❑
*
4 54. Exit Slide T/P switch [Feature]
❑ ❑
*
to center posi-
❑
0tion
0
2 Programming the MERLIN LEGEND System for CMS
Setting Up the Fallback Plan
IMPORTANT
The fallback plan supports up to 20 agents at a time. If more than 20 agents must be included in fallback operation at one time, there must be a second CMS supervisor to act as the Group Call Coverage sender. Setting up the fallback plan for two supervisors requires additional plan-ning. Contact the AT&T Account Manager or AT&T Authorized Dealer if necessary.
During normal operation, the CMS PC distributes all CMS calls to CMS agents. However, if the CMS PC malfunctions, the CMS fallback plan pro-vides the capability to distribute these calls correctly but not to maintain
his-torical records or reports.
The fallback plan uses the MERLIN LEGEND Group Call Coverage and Group Calling features. The CMS supervisor telephone acts as a sender for all CMS calls, directing them to CMS agent phones. CMS agents continue to work as normal, answering calls that ring at their phones and using their agent status buttons.
You activate the fallback pIan by a Coverage Off button programmed on the CMS supervisor phone. During normal CMS operation, Coverage Off is on, disabling the distribution of calls by the MERLIN LEGEND system and allow-ing the CMS PC to distribute calls. However, when the CMS PC is not work-ing, turning Coverage Off off enables the system to distribute calls through the CMS supervisor’s console. To ensure that both the CMS PC and MERLIN LEGEND system are not distributing calls, Coverage Off requires a button with lights to show its status (green light for on; no light for off).
NOTE:
When the fallback plan is active, CMS lines on the CMS supervisor’s phone must be set to Immediate Ring. However, this setting is not required until fall-back starts. Instructions for programming Immediate Ring are included in Chapter 9, “Troubleshooting.”
This section gives instructions for setting up the fallback plan. Have available MERLIN LEGEND Form 6d, Group Coverage, Form 6e: Group Calling, and Form 5a, Direct Line Console (DLC)—Analog.
Assign the Group Coverage Sender
Program the CMS supervisor telephone to be a Group Coverage sender. The receiver, or target, for this sender is the calling group made up of CMS agent telephones. Refer to Form 6d, Group Coverage for the group number.
Step
MLX-20L
PC
1. Display Group Cover Extensions [F6]
screen More [PgUp]
Group Cover [F3]
2. Identify the call coverage Dial group Type group group and save entry number number
Enter [F10]
3. Assign the CMS supervi- Dial CMS Type CMS sor as the sender for this supervisor supervisor call coverage group extension extension
Enter [F10]1
4. Exit to System Program- Exit [F5]
ming Exit [F5]
Assign CMS Agents to a Calling Group
Assign up to 20 agents to the calling group that will be the receiver for the CMS fallback plan. If there are more than 20 agents, create a second group to be assigned to a different sender. Refer to Form 6e, Group Calling for the group number and member extensions.
Programming the MERLIN LEGEND System for CMS
NOTE:
The Group Calling Line/Pool Assignments must be empty for the fallback cal-ling group. If they are not, fallback cannot be disabled.
Step
MLX-20L
PC
1. Display Group Calling Extensions [F6]
screen More [PgUp]
Grp Calling [F4]
Members [F9]
2. Identify the calling group Dial group Type group and save entry extension extension
number number
Enter [F10]
3. Assign CMS agent exten- Dial extension, Type extension, sions to the group slot and port, or slot and port, or
logical ID logical ID
Enter
Repeat for each exten-sion.
[F10]
5. Exit to System Program- Exit [F5]
ming Exit [F5]
Exit [F5]
Set the Calling Group to Auto Logout
Program the fallback calling group for Auto Logout (the factory setting). Refer to the back of Form 6e, Group Calling for the setting.
Step
MLX-20L
PC
1. Display Group Calling Group Type screen
-Extensions More
[F6] [PgUp] Grp Calling [F4]
More [PgUp]
Group Type [F1]
2. Identify the group and Dial group Type group save entry extension extension
number number
Enter [F10]
3. Select Auto Logout Auto Logout [F2]
Enter [F10]
4. Exit to System Program- Exit [F5]
ming Exit [F5]
Exit [F5]
Assign Coverage Group
Assign the CMS supervisor to be the Group Coverage sender for the calling group of CMS agents. For the calling group extension and coverage group number, refer to Form 6d, Group Coverage.
Programming the MERLIN LEGEND System for CMS
Step
MLX-20L
PC
1. Display Group Calling screen
Extensions [F6]
More [PgUp]
Grp Calling [F4] Grp Coverage [F3]
2. Identify the calling group Dial group Type group and save entry extension extension
number number
Enter [F10]
3. Identify the Group Cover- Dial call cover- Type call cover-age sender and save age group age group
entry number number
Enter [F10]
4. Exit to System Program- Exit [F5]
ming Exit [F5]
Assign Coverage Off Button
Assign button 33 on the CMS supervisor telephone as the Coverage Off but-ton (butbut-ton 33 has a light). Refer to Form 5a, Direct Line Console (DLC)— Analog for the location of button 33. The following instructions are for pro-gramming at the CMS supervisor telephone.
Step
CMS Supervisor Telephone
1. Enter programming Slide the T/P switch to the P
mode (program) position
2. Select and assign the Press button 33
Coverage Off button
❑ ❑ ❑
*
4 93. Exit Slide T/P switch to center posi-tion
Set Group Coverage Delay
The Group Coverage Delay feature controls how soon calls are sent from Group Coverage senders to receivers. The factory setting is three rings. Refer to the top of Form 6d, Group Coverage, for the new setting.
NOTE:
Changing the Coverage Delay setting affects all coverage groups on the MERLIN LEGEND system.
Step MLX-20L PC
1. Display Coverage Delay Options [F7]
screen More [PgUp]
Cover Delay [F6]
2. Erase the current setting Drop [Alt]
+
❑
P3. Enter number of rings Dial the number Type the number
and save entry. Enter [F10]
4. Exit to System Program- Exit [F5]
ming Exit [F5]
Exit [F5]
Programming the MERLIN LEGEND System for CMS.
Setting Up Optional
Equipment and Features
The MERLIN LEGEND programming up to this point was required for CMS. This section describes programming that is optional, depending on how CMS is to be used. These optional items are recorded on the planning forms.
Headsets
Headsets allow the CMS supervisor and agents to receive and make calls without using a handset. The type of headset used depends on whether it is connected to an analog phone or an MLX phone. The headset for an analog phone also requires a 502C headset adapter. The telephone programming required for headset usage also differs from MLX to analog phone, as
described below.
NOTE:
If you program the phones centrally from the system console, place the Sys-tem Programming Console Template on the console before beginning. Refer to the button numbers on the template for selecting a button on the phone.
Analog Headsets
Analog headsets do not require any programming. The Headset Off and
Headset Mute buttons are on the 502C headset adapter. However, you
should program an Auto-Answer All button to answer calls automatically with the headset. To assign this button, complete the following steps at each analog telephone with a headset. (If desired, you can program the button centrally. ) Refer to Form 4a, Analog Multiline Telephone and to Form 5a, Direct Line Console (DLC)—Analog for the button assignments.
Step
Analog Telephone
1. Enter programming Slide the T/P switch to the Pmode (program) position
2. Select and assign a but- Press the button
ton
❑ ❑ ❑ ❑
*
7 5 43. Exit Slide T/P switch to center posi-tion
MLX Headsets
To use a headset on an MLX telephone, you must assign a Headset Hangup
and a Headset Status button. In addition, you can assign a Headset
Auto-Answer and a Headset/Handset Mute button. To assign the headset
but-tons, complete the following centralized programming for each MLX tele-phone with a headset. (If desired, you can program all of these buttons except the Headset Hangup button directly at the telephone. ) Refer to Form 4b, Digital/lSDN (MLX) Telephone for the button assignments.
Step
MLX-20L
PC
1. Display Centralized Pro- More [PgUp]
gramming Screen Cntr-Prg [F4]
2. Select the extension Dial extension Type extension number to program number number
Enter [F10]
Start [F10]
3. Select the line button range
— For buttons 1-20 — For buttons 21-34
Page 1
Page 2
[F6]
[F7]
Programming the MERLIN LEGEND System for CMS
4. Select and assign a Press the but- Press [Shift] +
Headset Hangup button ton the function key
Enter for the button
❑ ❑ ❑ ❑
*
7 8 1 [F10]❑ ❑ ❑ ❑
*
7 8 15. Select and assign a Repeat Step 3, Repeat Step 3,
Headset Status button then press a then press
button [Shift] + the
Enter function key for
❑ ❑ ❑ ❑
*
7 8 2 a button[F10]
❑ ❑ ❑ ❑
*
7 8 26. Select and assign a Repeat Step 3, Repeat Step 3,
Headset Auto-Answer then press a then press
button (optional) button [Shift] + the
Enter function key for
❑ ❑ ❑ ❑
*
7 8 0 a button[F10]
❑ ❑ ❑ ❑
*
7 8 07. Select and assign a Repeat Step 3, Repeat Step 3,
Headset/Handset Mute then press a then press
button (optional) button [Shift] + the
Enter function key for
❑ ❑ ❑ ❑
*
7 8 3 a button[F10]
❑ ❑ ❑ ❑
*
7 8 38. Exit to System Program- [ Top Sys Prog ] [Alt] +
❑
ming
C
Agent Assist Button
If requested, assign an Agent Assist button to agent telephones. The Agent
Assist button uses the MERLIN LEGEND Manual Signaling feature to enable
an agent to signal the CMS supervisor directly for assistance. For the button assignment, refer to Form 4a, Analog Multiline Telephone and Form 4b, Digital/lSDN (MLX) Telephone.
Step
Analog
MLX
1. Enter programming Slide the T/P [Feature]
❑ ❑
mode switch to the P
(program) posi-tion
2. Select and assign the Press Agent Press Agent
Agent Assist button Assist button Assist button
❑ ❑ ❑
*
2 3 +❑ ❑ ❑
*
2 3 +0 0
CMS Supervisor CMS Supervisor extension extension
3. Exit Slide T/P switch [Feature]
❑ ❑
to center posi-❑
0tion
*
0Paging Groups
Paging Groups provide a quick way for the CMS supervisor to page all agents in a group at the same time. To create a paging group, identify an extension number for the group and enter all member extensions. Complete the following programming at the system programming console or PC. Refer to Form 6c, Group Page for the paging group assignments.
Programming the MERLIN LEGEND System for CMS
Step
MLX-20L
PC
1. Display Group Page Extensions [F6]
screen More [PgUp]
Group Page [F2]
2. Identify the paging group Dial extension Type extension and save entry number or logi- number or
logi-cal ID cal ID
Enter [F10]
3. Assign extensions to Dial extension, Type extension, paging group slot and port, or slot and port, or
logical ID logical ID
Enter [F10]
Repeat for each exten-sion in the group
4. Exit to System Program- Exit [F5]
ming Exit [F5]
CMS Supervisor Features
The MERLIN LEGEND system has many features that are useful to the CMS supervisor. Several of these features can be assigned to buttons, giving the supervisor one-touch use of the feature. This section gives instructions for assigning several buttons through centralized telephone programming. Refer to Form 5a, Direct Line Console (DLC)—Analog for the button assignments.
NOTE:
When you program the phone centrally from the system console, place the System Programming Console Template on the console before beginning. Refer to the button numbers on the template for selecting a button on the phone.
Barge-In
The Barge-In feature lets the CMS supervisor join a call to assist CMS agents. To program a Barge-in button, you must complete the following steps
through centralized telephone programming.
Step
MLX-20L
PC
1. Display Centralized Pro- More [PgUp]
gramming Screen Cntr-Prg [F4]
2. Select the CMS Dial extension Type extension supervisor’s extension number number
Enter [F10]
Start [F10]
3. Select the line button range
— For buttons 1-20 Page 1 [F6]
— For buttons 21-34 Page 2 [F7]
4. Select and assign a but- Press the but- Press [Shift] +
ton ton the function key
Enter for the button
❑ ❑ ❑
*
5 8 [F10]❑ ❑ ❑
* 5 86. Exit to System Program- [ Top Sys Prog ] [Alt] +
❑
ming
C
Group Page
The Group Page feature lets the CMS supervisor make voice announcements to all members of a paging group by calling the group with one touch. To program a Group Page button, complete the following steps centrally. (If desired, you can program this feature directly at the phone instead.) Refer to Form 5a, Direct-Line Console (DLC)—Analog for the button assignment and Form 6c, Group Page for the paging group extension number.
Programming the MERLIN LEGEND System for CMS
Step
MLX-20L
PC
1. Display Centralized Pro- More [PgUp]
gramming screen Cntr-Prg [F4]
2. Select the CMS Dial extension Type extension supervisor’s extension number number
Enter [F10]
Start [F10]
3. Select the line button range
— For buttons 1-20 Page 1 [F6]
— For buttons 21-34 Page 2 [F7]
4. Select and program a Press the but- press [Shift] + button with the group ton the function key
number Enter for the button
❑ ❑ ❑
*
2 0 [F10]Dial the group
❑ ❑ ❑
*
2 0page extension Type the group number page extension
number 6. Exit to System Program- [ Top Sys Prog ]
ming
[Alt] +
❑
CAgent Status Control
The Agent Status Control feature uses three buttons on the CMS supervisor’s telephone to let the CMS supervisor change the status of CMS agent tele-phones. The three buttons are Make Available (Operator ESS2), Make ACW
(After-Call Work, Operator ESS1), and Make Log Out (Operator ESS Off). To program these buttons, complete the following steps centrally. (If desired, you can program them directly at the phone. ) Refer to Form 5a, Direct-Line Console (DLC)—Analog for the button assignments.
Step
MLX-20L
PC
1. Display Centralized Pro- More [PgUp]gramming screen Cntr-Prg [F4]
2. Select the CMS Dial extension Type extension supervisor’s extension number number
Enter [F10]
Start [F10]
3. Select the line button range
— For buttons 1-20 — For buttons 21-34
Page 1
Page 2
[F6] [F7]
4. Select and program a Press the but- Press [Shift] +
Make Avaliable (Opera- ton the function key tor ESS2) button Enter for the button
❑ ❑ ❑ ❑
*
7 6 2 [F10]❑ ❑ ❑ ❑
*
7 6 25. Select and program a Press the
but-Make ACW (Operator ton
ESS1) button Enter
Press [Shift] + the function key
❑ ❑ ❑ ❑
*
7 6 1for the button
[F10]
❑ ❑ ❑ ❑
*
7 6 16. Select and program a Press the but- Press [Shift] +
Make Log Out (Operator ton the function key ESS Off) button Enter for the button
❑ ❑ ❑ ❑
*
7 6 0 [F10]❑ ❑ ❑ ❑
*
7 6 07. Exit to System Program- [ Top Sys Prog ] [Alt] +
❑
ming
C
NOTE:
To use the Agent Status Control Features, the supervisor telephone must be in Supervisor mode ( [Function] + [32] + [Hold] ).
Programming the MERLIN LEGEND System for CMS
Transfer-to-Split
The Transfer-to-Split feature allows agents to transfer calls from one split to another using various MERLIN LEGEND features. CMS does not keep histori-cal records of histori-calls transferred using Transfer-to-Split. An alternate transfer method is Transfer-to-Queue, which requires additional hardware and does maintain historical records (see page 1-40).
Programming the Transfer-to-Split feature includes adding a ghost module to the system and assigning a Primary Coverage button for the ghost extension on all agent telephones requiring the feature. Have available MERLIN
LEGEND Form 1, System Planning, Form 2a, System Numbering—Station Jacks, Form 4a, Analog Multiline Telephone, and Form 4b, Digital/lSDN (MIX) Telephone.
Adding a Ghost Module
IMPORTANT:
You can program a ghost module only through a PC running SPM, not through the system console.
To determine the ghost module, refer to the back of Form 1 for the next logi-cal module in the system after the last actual module. Complete the following steps at a PC running SPM.
Step
PC
1. Enter programming mode and display SPM
Boards Menu [ [
↵
↵
]][ [
↵
↵
]][F3]
2. Select one of the following module types:
— 408LS [F1]
— 008ATL [F7]
— 008NT2 [F8]
3. Enter and save the slot number. Use the Type the slot slot number displayed, which is the first number
available slot. [F10]
[F5]
The system will restart
Assigning Primary Coverage Buttons
To assign a Primary Coverage button at each agent telephone with the Transfer-to-Split feature, refer to Form 2a for the ghost extension number and Forms 4a and 4b for the location of the button. Complete the following steps at each telephone.
Step
Analog
MLX
1. Enter programming mode
Slide the T/P [Feature]
❑ ❑
switch to the P(program)
posi-0 0
tion
2. Select and assign the Press button Press button
Primary Coverage but-
❑ ❑ ❑
*
4 0 +❑ ❑ ❑
*
4 0 +ton and ghost telephone ghost extension ghost extension
extension number number
3. Exit Slide T/P switch [Feature]
❑ ❑
*
0 to center posi-❑
0tion
Programming the MERLIN LEGEND System for CMS
Transfer-to-Queue
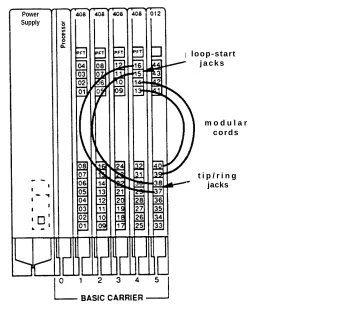
The Transfer-to-Queue feature allows agents to transfer calls from one split to another. This feature uses a hardware loop-back arrangement that allows CMS to maintain complete historical records on the new call. MERLIN LEGEND programming includes setting up a calling group of tip/ring exten-sions and assigning Auto Login for the calling group. Refer to Form 6e, Group Calling for the group number and tip/ring jack IDs.
S t e p
MLX-20L
PC