Beginning Python
Peter Norton, Alex Samuel, David Aitel, Eric Foster-Johnson,
Leonard Richardson, Jason Diamond,
About the Authors
Peter Norton (NY, NY)has been working with Unix and Linux for over a decade at companies large and small solving problems with Linux. An officer of the NY Linux Users Group, he can be found on the nylug-talk mailing list. Peter coauthored Professional RHEL3. He works for a very large financial com-pany in NYC, plying his Python and open-source skills.
Alex Samuel (San Diego, CA)has developed software for biology researchers and now studies high-energy physics at Caltech. Alex has worked on many GNU/Linux development tools, including GCC, and co-founded CodeSourcery LLC, a consulting firm specializing in GNU/Linux development tools.
David Aitel (NY, NY)is the CEO of Immunity and a coauthor of Shellcoder’s Handbook.
Eric Foster-Johnson (Minneapolis, MN)uses Python extensively with Java, and is a veteran author, most recently completing Beginning Shell Scripting.
Leonard Richardson (San Francisco, CA) writes useful Python packages with silly names.
Jason Diamond (CA) Jason Diamond is a software development instructor for DevelopMentor and a consultant specializing in C++, .NET, Python, and XML. He spends most of his spare time contributing to open-source projects using his favorite language, Python.
Aleathea Parker (San Francisco CA) is a programmer working as a publication engineer for a major software company, coding primarily in Python and XSLT. She has a background in web applications and content management.
Michael Roberts (Puerto Rico)has been programming professionally in C, Perl, and Python for long enough that Python didn’t actually exist when he started. He is the chief perpetrator of the wftk
open-source workflow toolkit, and he swears that it will someday be finished, for certain values of
“finished”.
Credits
Acquisitions Editor
Debra Williams Cauley
Development Editor
Kelly D. Henthorne
Production Editor
William A. Barton
Copy Editor
Luann Rouff
Production Manager
Tim Tate
Editorial Manager
Mary Beth Wakefield
Vice President & Executive Group Publisher
Richard Swadley
Vice President and Publisher
Joseph B. Wikert
Project Coordinator
Kristie Rees
Graphics and Production Specialists
Sean Decker Carrie Foster Lauren Goddard Denny Hager Jennifer Heleine Amanda Spagnuolo
Quality Control Technicians
Leann Harney Joe Niesen
Carl William Pierce
Media Development Specialists
Angela Denny Kit Malone Travis Silvers
Proofreading and Indexing
TECHBOOKS Production Services
To my Claudia, for keeping me thinking straight through a crazy time. To my mom, Eunice, for bringing me food and asking if I was okay throughout. To Debra, for roping me into this. And to all of the authors,
I want to thank you for making it to the finish line.
Whoa! I didn’t know what I was getting you all into! —P. N.
To my dad, Clarence A. Johnson, 1922–2005. —E. F-J.
For my mother. —L. R.
For Jilly: 1 = 2. —J. D.
To Aaron, for putting up with me. —A. P.
To my wife, Agnes, in revenge for her doctoral thesis. —M. R.
Contents
Acknowledgments xxix
Introduction xxxi
Chapter 1: Programming Basics and Strings
1
How Programming Is Different from Using a Computer
1
Programming Is Consistency
2
Programming Is Control
2
Programming Copes with Change
2
What All That Means Together
3
The First Steps
3
Starting codeEditor
3
Using codeEditor’s Python Shell
4
Try It Out: Starting the Python Shell 4
Beginning to Use Python — Strings
5
What Is a String?
5
Why the Quotes?
6
Try It Out: Entering Strings with Different Quotes 6
Understanding Different Quotes
6
Putting Two Strings Together
8
Try It Out: Using + to Combine Strings 8
Putting Strings Together in Different Ways
9
Try It Out: Using a Format Specifier to Populate a String 9
Try It Out: More String Formatting 9
Displaying Strings with Print
10
Try It Out: Printing Text with Print 10
Summary
10
Exercises
11
Chapter 2: Numbers and Operators
13
Different Kinds of Numbers
13
Numbers in Python
14
Try It Out: Using Type with Different Numbers 14 Try It Out: Creating an Imaginary Number 15
xii
Contents
Program Files
15
Try It Out: Using the Shell with the Editor 16
Using the Different Types
17
Try It Out Including Different Numbers in Strings 18 Try It Out: Escaping the % Sign in Strings 18
Basic Math
19
Try It Out Doing Basic Math 19
Try It Out: Using the Modulus Operation 20
Some Surprises
20
Try It Out: Printing the Results 21
Using Numbers
21
Order of Evaluation
21
Try It Out: Using Math Operations 21
Number Formats
22
Try It Out: Using Number Formats 22
Mistakes Will Happen
23
Try It Out: Making Mistakes 23
Some Unusual Cases
24
Try It Out: Formatting Numbers as Octal and Hexadecimal 24
Summary
24
Exercises
25
Chapter 3: Variables — Names for Values
27
Referring to Data – Using Names for Data
27
Try It Out: Assigning Values to Names 28
Changing Data Through Names
28
Try It Out: Altering Named Values 29
Copying Data
29
Names You Can’t Use and Some Rules
29
Using More Built-in Types
30
Tuples — Unchanging Sequences of Data
30
Try It Out: Creating and Using a Tuple 30 Try It Out: Accessing a Tuple Through Another Tuple 31
Lists — Changeable Sequences of Data
33
Try It Out Viewing the Elements of a List 33
Dictionaries — Groupings of Data Indexed by Name
34
Try It Out: Making a Dictionary 34
Try It Out: Getting the Keys from a Dictionary 35
Treating a String Like a List
36
Special Types
38
Contents
Other Common Sequence Properties
38
Referencing the Last Elements
38
Ranges of Sequences
39
Try It Out: Slicing Sequences 39
Growing Lists by Appending Sequences
40
Using Lists to Temporarily Store Data
40
Try It Out: Popping Elements from a List 40
Summary
41
Exercises
42
Chapter 4: Making Decisions
43
Comparing Values — Are They the Same?
43
Try It Out: Comparing Values for Sameness 43
Doing the Opposite — Not Equal
45
Try It Out: Comparing Values for Difference 45
Comparing Values — Which One Is More?
45
Try It Out: Comparing Greater Than and Less Than 45
More Than or Equal, Less Than or Equal
47
Reversing True and False
47
Try It Out: Reversing the Outcome of a Test 47
Looking for the Results of More Than One Comparison
48
How to Get Decisions Made
48
Try It Out: Placing Tests within Tests 49
Repetition 51
How to Do Something — Again and Again
51
Try It Out: Using a while Loop 51
Stopping the Repetition
52
Try It Out: Using else While Repeating 54 Try It Out: Using continue to Keep Repeating 54
Handling Errors
55
Trying Things Out
55
Try It Out: Creating an Exception with Its Explanation 56
Summary
57
Exercises
58
Chapter 5: Functions
59
Putting Your Program into Its Own File
59
Try It Out: Run a Program with Python -i 61
xiv
Contents
Functions: Grouping Code under a Name
61
Try It Out: Defining a Function 61
Choosing a Name
62
Describing a Function in the Function
63
Try It Out: Displaying __doc__ 63
The Same Name in Two Different Places
64
Making Notes to Yourself
65
Try It Out: Experimenting with Comments 65
Asking a Function to Use a Value You Provide
66
Try It Out Invoking a Function with Parameters 67
Checking Your Parameters
68
Try It Out: Determining More Types with the type Function 69 Try It Out: Using Strings to Compare Types 69
Setting a Default Value for a Parameter — Just in Case
70
Try It Out: Setting a Default Parameter 70
Calling Functions from within Other Functions
71
Try It Out: Invoking the Completed Function 72
Functions Inside of Functions
72
Flagging an Error on Your Own Terms
73
Layers of Functions
74
How to Read Deeper Errors
74
Summary
75
Exercises
76
Chapter 6: Classes and Objects
79
Thinking About Programming
79
Objects You Already Know
79
Looking Ahead: How You Want to Use Objects
81
Defining a Class
81
How Code Can Be Made into an Object
81
Try It Out: Defining a Class 82
Try It Out: Creating an Object from Your Class 82 Try It Out: Writing an Internal Method 84 Try It Out: Writing Interface Methods 85
Try It Out: Using More Methods 87
Objects and Their Scope
89
Try It Out: Creating Another Class 89
Summary
92
Exercises
93
Contents
Chapter 7: Organizing Programs
95
Modules
96
Importing a Module So That You Can Use It
96
Making a Module from Pre-existing Code
97
Try It Out: Creating a Module 97
Try It Out: Exploring Your New Module 98
Using Modules — Starting With the Command Line
99
Try It Out: Printing sys.argv 100
Changing How Import Works — Bringing in More
101
Packages 101
Try It Out: Making the Files in the Kitchen Class 102
Modules and Packages
103
Bringing Everything into the Current Scope
103
Try It Out: Exporting Modules from a Package 104
Re-importing Modules and Packages
104
Try It Out: Examining sys.modules 105
Basics of Testing Your Modules and Packages
106
Summary 106
Exercises 107
Chapter 8: Files and Directories
109
File Objects
109
Writing Text Files
110
Reading Text Files
111
Try It Out: Printing the Lengths of Lines in the Sample File 112
File Exceptions
113
Paths and Directories
113
Paths
114
Directory Contents
116
Try It Out: Getting the Contents of a Directory 116 Try It Out: Listing the Contents of Your Desktop or Home Directory 118
Obtaining Information about Files
118
Recursive Directory Listings 118
Renaming, Moving, Copying, and Removing Files
119
Example: Rotating Files
120
Creating and Removing Directories
121
Globbing
122
xvi
Contents
Pickles
123
Try It Out: Creating a Pickle File 123
Pickling Tips
124
Efficient Pickling
125
Summary 125
Exercises 125
Chapter 9: Other Features of the Language
127
Lambda and Filter: Short Anonymous Functions
127
Reduce
128
Try It Out: Working with Reduce 128
Map: Short-Circuiting Loops
129
Try It Out: Use Map 129
Decisions within Lists — List Comprehension
130
Generating Lists for Loops
131
Try It Out: Examining an xrange Object 132
Special String Substitution Using Dictionaries
133
Try It Out: String Formatting with Dictionaries 133
Featured Modules
134
Getopt — Getting Options from the Command Line
134
Using More Than One Process
137
Threads — Doing Many Things in the Same Process
139
Storing Passwords
140
Summary 141
Exercises 142
Chapter 10: Building a Module
143
Exploring Modules
143
Importing Modules
145
Finding Modules
145
Digging through Modules
146
Creating Modules and Packages
150
Try It Out: Creating a Module with Functions 150
Working with Classes
151
Defining Object-Oriented Programming
151
Creating Classes
151
Try It Out: Creating a Meal Class 152
Extending Existing Classes
153
Contents
Finishing Your Modules
154
Defining Module-Specific Errors
154
Choosing What to Export
155
Documenting Your Modules
156
Try It Out: Viewing Module Documentation 157
Testing Your Module
162
Running a Module as a Program
164
Try It Out: Running a Module 164
Creating a Whole Module
165
Try It Out: Finishing a Module 165
Try It Out: Smashing Imports 169
Installing Your Modules
170
Try It Out: Creating an Installable Package 171
Summary 174
Exercises 174
Chapter 11: Text Processing
175
Why Text Processing Is So Useful
175
Searching for Files
176
Clipping Logs
177
Sifting through Mail
178
Navigating the File System with the os Module
178
Try It Out: Listing Files and Playing with Paths 180 Try It Out: Searching for Files of a Particular Type 181
Try It Out: Refining a Search 183
Working with Regular Expressions and the re Module
184
Try It Out: Fun with Regular Expressions 186
Try It Out: Adding Tests 187
Summary 189
Exercises 189
Chapter 12: Testing
191
Assertions 191
Try It Out: Using Assert 192
Test Cases and Test Suites
193
Try It Out: Testing Addition 194
Try It Out: Testing Faulty Addition 195
Test Fixtures
196
Try It Out: Working with Test Fixtures 197
xviii
Contents
Putting It All Together with Extreme Programming
199
Implementing a Search Utility in Python
200
Try It Out: Writing a Test Suite First 201 Try It Out: A General-Purpose Search Framework 203
A More Powerful Python Search
205
Try It Out: Extending the Search Framework 206
Formal Testing in the Software Life Cycle
207
Summary 208
Chapter 13: Writing a GUI with Python
209
GUI Programming Toolkits for Python
209
PyGTK Introduction
210
pyGTK Resources
211
Creating GUI Widgets with pyGTK
213
Try It Out: Writing a Simple pyGTK Program 213
GUI Signals
214
GUI Helper Threads and the GUI Event Queue
216
Try It Out: Writing a Multithreaded pyGTK App 219
Widget Packing
222
Glade: a GUI Builder for pyGTK
223
GUI Builders for Other GUI Frameworks
224
Using libGlade with Python
225
A Glade Walkthrough
225
Starting Glade
226
Creating a Project
227
Using the Palette to Create a Window
227
Putting Widgets into the Window
228
Glade Creates an XML Representation of the GUI
230
Try It Out: Building a GUI from a Glade File 231
Creating a Real Glade Application
231
Advanced Widgets
238
Further Enhancing PyRAP
241
Summary 248
Exercises 248
Chapter 14: Accessing Databases
249
Working with DBM Persistent Dictionaries
250
Choosing a DBM Module
250
Creating Persistent Dictionaries
251
Try It Out: Creating a Persistent Dictionary 251
Contents
Accessing Persistent Dictionaries
252
Try It Out: Accessing Persistent Dictionaries 253
Deciding When to Use DBM and When to Use a Relational Database
255
Working with Relational Databases
255
Writing SQL Statements
257
Defining Tables
259
Setting Up a Database
260
Try It Out: Creating a Gadfly Database 261
Using the Python Database APIs
262
Downloading Modules
263
Creating Connections
263
Working with Cursors
264
Try It Out: Inserting Records 264
Try It Out: Writing a Simple Query 266
Try It Out: Writing a Complex Join 267
Try It Out: Updating an Employee’s Manager 269
Try It Out: Removing Employees 270
Working with Transactions and Committing the Results
271
Examining Module Capabilities and Metadata
272
Handling Errors
272
Summary 273
Exercises 274
Chapter 15: Using Python for XML
275
What Is XML?
275
A Hierarchical Markup Language
275
A Family of Standards
277
What Is a Schema/DTD?
278
What Are Document Models For?
278
Do You Need One?
278
Document Type Definitions
278
An Example DTD
278
DTDs Aren’t Exactly XML
280
Limitations of DTDs
280
Schemas 280
An Example Schema
280
Schemas Are Pure XML
281
Schemas Are Hierarchical
281
Other Advantages of Schemas
281
Schemas Are Less Widely Supported
281
xx
Contents
XPath
282
HTML as a Subset of XML
282
The HTML DTDs
283
HTMLParser
283
Try It Out: Using HTMLParser 283
htmllib
284
Try It Out: Using htmllib 284
XML Libraries Available for Python
285
Validating XML Using Python
285
What Is Validation?
286
Well-Formedness versus Validation
286
Available Tools
286
Try It Out: Validation Using xmlproc 286
What Is SAX?
287
Stream-based
288
Event-driven
288
What Is DOM?
288
In-memory Access
288
Why Use SAX or DOM
289
Capability Trade-Offs
289
Memory Considerations
289
Speed Considerations
289
SAX and DOM Parsers Available for Python
289
PyXML
290
xml.sax
290
xml.dom.minidom 290
Try It Out: Working with XML Using DOM 290 Try It Out: Working with XML Using SAX 292
Intro to XSLT
293
XSLT Is XML
293
Transformation and Formatting Language
293
Functional, Template-Driven 293
Using Python to Transform XML Using XSLT
294
Try It Out: Transforming XML with XSLT 294
Putting It All Together: Working with RSS
296
RSS Overview and Vocabulary
296
Making Sense of It All 296 RSS Vocabulary 297
An RSS DTD
297
Contents
A Real-World Problem
297
Try It Out: Creating an RSS Feed 298
Creating the Document 300 Checking It Against the DTD 301
Another Real-World Problem
301
Try It Out: Creating An Aggregator 301
Summary 303
Exercises 303
Chapter 16: Network Programming
305
Try It Out: Sending Some E-mail 305
Understanding Protocols
307
Comparing Protocols and Programming Languages
307
The Internet Protocol Stack
308
A Little Bit About the Internet Protocol
309
Internet Addresses 309 Internet Ports 310
Sending Internet E-mail
311
The E-mail File Format
311
MIME Messages
313
MIME Encodings: Quoted-printable and Base64 313 MIME Content Types 314
Try It Out: Creating a MIME Message with an Attachment 315
MIME Multipart Messages 316
Try It Out: Building E-mail Messages with SmartMessage 320
Sending Mail with SMTP and smtplib
321
Try It Out: Sending Mail with MailServer 323
Retrieving Internet E-mail
323
Parsing a Local Mail Spool with mailbox
323
Try It Out: Printing a Summary of Your Mailbox 324
Fetching Mail from a POP3 Server with poplib
325
Try It Out: Printing a Summary of Your POP3 Mailbox 327
Fetching Mail from an IMAP Server with imaplib
327
Try It Out: Printing a Summary of Your IMAP Mailbox 329
IMAP’s Unique Message IDs 330
Try It Out: Fetching a Message by Unique ID 330
Secure POP3 and IMAP
331
Webmail Applications Are Not E-mail Applications
331
Socket Programming
331
Introduction to Sockets
332
Try It Out: Connecting to the SuperSimpleSocketServer with Telnet 333
xxii
Contents
Binding to an External Hostname
334
The Mirror Server
335
Try It Out: Mirroring Text with the MirrorServer 336
The Mirror Client
336
SocketServer
337
Multithreaded Servers
339
The Python Chat Server
340
Design of the Python Chat Server
340
The Python Chat Server Protocol
341
Our Hypothetical Protocol in Action 341 Initial Connection 342
Chat Text 342
Server Commands 342 General Guidelines 343
The Python Chat Client
346
Single-Threaded Multitasking with select
348
Other Topics
350
Miscellaneous Considerations for Protocol Design
350
Trusted Servers 350 Terse Protocols 350
The Twisted Framework
351
Deferred Objects 351
The Peer-to-Peer Architecture
354
Summary 354
Exercises 354
Chapter 17: Extension Programming with C
355
Extension Module Outline
356
Building and Installing Extension Modules
358
Passing Parameters from Python to C
360
Returning Values from C to Python
363
The LAME Project
364
The LAME Extension Module
368
Using Python Objects from C Code
380
Summary 383
Exercises 383
Chapter 18: Writing Shareware and Commercial Programs
385
A Case Study: Background
385
How Much Python Should You Use?
386
Contents
Pure Python Licensing
387
Web Services Are Your Friend
388
Pricing Strategies
389
Watermarking
390
Other Models
394
Selling as a Platform, Rather Than a Product
395
Your Development Environment
395
Finding Python Programmers
396
Training non-Python Programmers
397
Python Employment Resources
397
Python Problems
397
Porting to Other Versions of Python
397
Porting to Other Operating Systems
398
Debugging Threads
399
Common Gotchas
399
Portable Distribution
400
Essential Libraries
401
Timeoutsocket
401
PyGTK
402
GEOip
402
Summary 403
Chapter 19: Numerical Programming
405
Numbers in Python
405
Integers
406
Long Integers
406
Floating-point Numbers
407
Formatting Numbers
408
Characters as Numbers
410
Mathematics 412
Arithmetic
412
Built-in Math Functions
414
The math Module
415
Complex Numbers
416
Arrays
418
The array Module
420
The numarray Package
422
Using Arrays 422 Computing the Standard Deviation 423
xxiv
Contents
Chapter 20: Python in the Enterprise
427
Enterprise Applications
428
Document Management
428
The Evolution of Document Management Systems 429 What You Want in a Document Management System 430
People in Directories
431
Taking Action with Workflow
432
Auditing, Sarbanes-Oxley, and What You Need to Know
433
Auditing and Document Management
434
Working with Actual Enterprise Systems
435
Introducing the wftk Workflow Toolkit
435
Try It Out: Very Simple Record Retrieval 436 Try It Out: Very Simple Record Storage 438
Try It Out: Data Storage in MySQL 439
Try It Out: Storing and Retrieving Documents 441 Try It Out: A Document Retention Framework 446
The python-ldap Module
448
Try It Out: Using Basic OpenLDAP Tools 449
Try It Out: Simple LDAP Search 451
More LDAP
453
Back to the wftk
453
Try It Out: Simple Workflow Trigger 454
Try It Out: Action Queue Handler 456
Summary 458
Exercises
458
Chapter 21: Web Applications and Web Services
459
REST: The Architecture of the Web
460
Characteristics of REST
460
A Distributed Network of Interlinked Documents 461 A Client-Server Architecture 461 Servers Are Stateless 461
Resources 461
Representations 462
REST Operations
462
HTTP: Real-World REST
463
Try It Out: Python’s Three-Line Web Server 463
The Visible Web Server
464
Try It Out: Seeing an HTTP Request and Response 465
The HTTP Request
466
The HTTP Response
467
Contents
CGI: Turning Scripts into Web Applications
468
Try It Out: Running a CGI Script 469
The Web Server Makes a Deal with the CGI Script
470
CGI’s Special Environment Variables
471
Accepting User Input through HTML Forms
473
The cgi Module: Parsing HTML Forms
474
Try It Out: Printing Any HTML Form Submission 478
Building a Wiki
480
The BittyWiki Core Library
481
Back-end Storage 481
WikiWords 481
Writing the BittyWiki Core 481
Try It Out: Creating Wiki Pages from an Interactive Python Session 483
The BittyWiki Web Interface
484
Resources 484
Request Structure 484 But Wait — There’s More (Resources) 485
Wiki Markup 486
Web Services
493
How Web Services Work
494
REST Web Services
494
REST Quick Start: Finding Bargains on Amazon.com
495
Try It Out: Peeking at an Amazon Web Services Response 496
Introducing WishListBargainFinder
497
Giving BittyWiki a REST API
500
Wiki Search-and-Replace Using the REST Web Service
503
Try It Out: Wiki Searching and Replacing 507
XML-RPC 508
XML-RPC Quick Start: Get Tech News from Meerkat
509
The XML-RPC Request
511
Representation of Data in XML-RPC 512
The XML-RPC Response
513
If Something Goes Wrong
513
Exposing the BittyWiki API through XML-RPC
514
Try It Out: Manipulating BittyWiki through XML-RPC 517
Wiki Search-and-Replace Using the XML-RPC Web Service
518
SOAP
520
SOAP Quick Start: Surfing the Google API
520
The SOAP Request
522
The SOAP Response
524
If Something Goes Wrong
524
xxvi
Contents
Exposing a SOAP Interface to BittyWiki
525
Try It Out: Manipulating BittyWiki through SOAP 526
Wiki Search-and-Replace Using the SOAP Web Service
527
Documenting Your Web Service API
529
Human-Readable API Documentation
529
The BittyWiki REST API Document 529 The BittyWiki XML-RPC API Document 529 The BittyWiki SOAP API Document 530
The XML-RPC Introspection API
530
Try It Out: Using the XML-RPC Introspection API 530
WSDL
531
Try It Out: Manipulating BittyWiki through a WSDL Proxy 533
Choosing a Web Service Standard
534
Web Service Etiquette
535
For Consumers of Web Services
535
For Producers of Web Services
535
Using Web Applications as Web Services
536
A Sampling of Publicly Available
Web Services
536
Summary 538
Exercises 538
Chapter 22: Integrating Java with Python
539
Scripting within Java Applications
540
Comparing Python Implementations
541
Installing Jython
541
Running Jython
542
Running Jython Interactively
542
Try It Out: Running the Jython Interpreter 542
Running Jython Scripts
543
Try It Out Running a Python Script 543
Controlling the jython Script
544
Making Executable Commands
545
Try It Out: Making an Executable Script 546
Running Jython on Your Own
546
Packaging Jython-Based Applications
547
Integrating Java and Jython
547
Using Java Classes in Jython
548
Try It Out: Calling on Java Classes 548
Try It Out: Creating a User Interface from Jython 550
Accessing Databases from Jython
552
Working with the Python DB API 553
Contents
Setting Up a Database 554
Try It Out: Create Tables 555
Writing J2EE Servlets in Jython
558
Setting Up an Application Server 559 Adding the PyServlet to an Application Server 560 Extending HttpServlet 561
Try It Out: Writing a Python Servlet 562
Choosing Tools for Jython
564
Testing from Jython
565
Try It Out: Exploring Your Environment with Jython 565
Embedding the Jython Interpreter
566
Calling Jython Scripts from Java
566
Try It Out: Embedding Jython 567
Compiling Python Code to Java
568
Handling Differences between C Python and Jython
569
Summary 570
Exercises 571
Appendix A: Answers to Exercises
573
Appendix B: Online Resources
605
Appendix C: What’s New in Python 2.4
609
Glossary 613
Index
623
1
Programming Basics
and Strings
This chapter is a gentle introduction to the practice of programming in Python. Python is a very rich language with many features, so it is important to learn to walk before you learn to run. Chapters 1 through 3 provide a basic introduction to common programming ideas, explained in easily digestible paragraphs with simple examples.
If you are already an experienced programmer interested in Python, you may want to read this chapter quickly and take note of the examples, but until Chapter 3 you will be reading material with which you’ve probably already gained some familiarity in another language.
If you are a novice programmer, by the end of this chapter you will have learned some guiding principles for programming, as well as directions for your first interactions with a programming language — Python. The exercises at the end of the chapter provide hands-on experience with the basic information that you’ll have learned.
How Programming Is Different
from Using a Computer
The first thing you need to understand about computers when you’re programming is that you control the computer. Sometimes the computer doesn’t do what you expect, but even when it doesn’t do what you want the first time, it should do the same thing the second and third time — until you take charge and change the program.
The trend in personal computers has been away from reliability and toward software being built on top of other, unreliable, software. The results that you live with might have you believing that computers are malicious and arbitrary beasts, existing to taunt you with unbearable amounts of extra work and various harassments while you’re already trying to accomplish something. If you do feel this way, you already know that you’re not alone. However, after you’ve learned how to program, you gain an understanding of how this situation has come to pass, and perhaps you’ll find that you can do better than some of the programmers whose software you’ve used.
Note that programming in a language like Python, an interpreted language, means that you are not going to need to know a whole lot about computer hardware, memory, or long sequences of 0s and 1s. You are going to write in text form like you are used to reading and writing but in a different and sim-pler language. Python is the language, and like English or any other language(s) you speak, it makes sense to other people who already speak the language. Learning a programming language can be even easier, however, because programming languages aren’t intended for discussions, debates, phone calls, plays, movies, or any kind of casual interaction. They’re intended for giving instructions and ensuring that those instructions are followed. Computers have been fashioned into incredibly flexible tools that have found a use in almost every business and task that people have found themselves doing, but they are still built from fundamentally understandable and controllable pieces.
Programming Is Consistency
In spite of the complexity involved in covering all of the disciplines into which computers have crept, the basic computer is still relatively simple in principle. The internal mechanisms that define how a com-puter works haven’t changed a lot since the 1950s when transistors were first used in comcom-puters.
In all that time, this core simplicity has meant that computers can, and should, be held to a high stan-dard of consistency. What this means to you, as the programmer, is that anytime you tell a computer to metaphorically jump, you must tell it how high and where to land, and it will perform that jump — over and over again for as long as you specify. The program should not arbitrarily stop working or change how it works without you facilitating the change.
Programming Is Control
Programming a computer is very different from creating a program, as the word applies to people in real life. In real life, we ask people to do things, and sometimes we have to struggle mightily to ensure that our wishes are carried out — for example, if we plan a party for 30 people and assign two of them to bring the chips and dip and two of them to bring the drinks.
With computers that problem doesn’t exist. The computer does exactly what you tell it to do. As you can imagine, this means that you must pay some attention to detail to ensure that the computer does just what you want it to do.
One of the goals of Python is to program in blocks that enable you to think about larger and larger jects by building each project as pieces that behave in well-understood ways. This is a key goal of a pro-gramming style known as object-oriented propro-gramming. The guiding principle of this style is that you can create reliable pieces that still work when you piece them together, that are understandable, and that are useful. This gives you, the programmer, control over how the parts of your programs run, while enabling you to extend your program as the problems you’re solving evolve.
Programming Copes with Change
Programs are run on computers that handle real-world problems; and in the real world, plans and cir-cumstances frequently change. Because of these shifting circir-cumstances, programmers rarely get the opportunity to create perfectly crafted, useful, and flexible programs. Usually, you can achieve only two of these goals. The changes that you will have to deal with should give you some perspective and lead you to program cautiously. With sufficient caution, you can create programs that know when they’re
Chapter 1
being asked to exceed their capabilities, and they can fail gracefully by notifying their users that they’ve stopped. In the best cases, you can create programs that explain what failed and why. Python offers especially useful features that enable you to describe what conditions may have occurred that prevented your program from working.
What All That Means Together
Taken together, these beginning principles mean that you’re going to be introduced to programming as a way of telling a computer what tasks you want it to do, in an environment where you are in control. You will be aware that sometimes accidents can happen and that these mistakes can be accommodated through mechanisms that offer you some discretion regarding how these conditions will be handled, including recovering from problems and continuing to work.
The F irst Steps
First, you should go online to the web site for the book, following the procedure in the Introduction, and follow the instructions there for downloading PythonCard. PythonCard is a set of utilities that provides an environment for programming in Python. PythonCard is a product that’s free to use and distribute and is tailor-made for writing in Python. It contains an editor, called codeEditor, that you will be using for the first part of this book. It has a lot in common with the editor that comes with Python, called idle, but in the opinion of the authors, codeEditor works better as a teaching tool because it was written with a focus on users who may be working on simpler projects. In addition, codeEditor is a program written in Python.
Just as authors and editors have specialized tools for writing for magazines, books, or online publica-tions, programmers also need specialized tools. As a starting Python programmer, the right tool for the job is codeEditor.
Starting codeEditor
Depending on your operating system, you will start codeEditor in different ways.
Once it is installed on your system with PythonCard, on Linux or Unix-based systems, you can just type
codeEditorin a terminal or shell window and it will start.
On Windows, codeEditor should be in your Start menu under Programs➪PythonCard. Simply
launch-ing the program will get you started.
When you start codeEditor for the first time, it doesn’t display an open file to work with, so it gives you the simplest possible starting point, a window with very little in it. Along the left side, you’ll see line numbers. Programmers are often given information by their programs about where there was a problem,
Programs are written in a form called source code. Source code contains the instruc-tions that the language follows, and when the source code is read and processed, the instructions that you’ve put in there become the actions that the computer takes.
or where something happened, based on the line number in the file. This is one of the features of a good programming editor, and it makes it much easier to work with programs.
Using codeEditor’s Python Shell
Before starting to write programs, you’re going to learn how to experiment with the Python shell. For now, you can think of the Python shell as a way to peer within running Python code. It places you inside of a running instance of Python, into which you can feed programming code; at the same time, Python will do what you have asked it to do and will show you a little bit about how it responds to its environ-ment. Because running programs often have a context — things that you as the programmer have tai-lored to your needs — it is an advantage to have the shell because it lets you experiment with the context you have created. Sometimes the context that you’re operating in is called your environment.
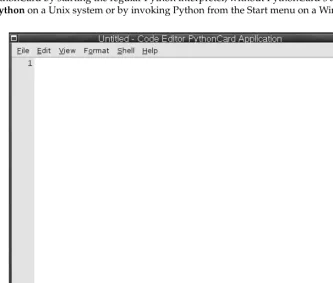
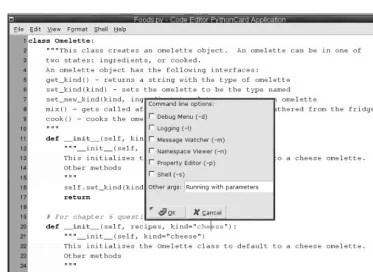
Try It Out
Starting the Python Shell
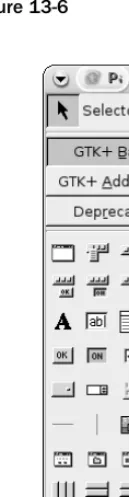
To start the Python shell from codeEditor, pull down the Shell menu in the codeEditor’s menu bar and select Shell window. This will open a window with the Python shell in it (no surprises here) that just has simple text, with line numbers along the left side (see Figure 1-1). You can get a similar interface without using PythonCard by starting the regular Python interpreter, without PythonCard’s additions, by just typing python on a Unix system or by invoking Python from the Start menu on a Windows system.
Figure 1-1
Chapter 1
After you’ve started the shell, you’ll be presented with some information that you don’t have to be con-cerned about now (from, import, pcapp, and so on), followed by the sign that the interpreter is ready and waiting for you to work with it: >>>.
>>> import wx
>>> from PythonCard import dialog, util >>> bg = pcapp.getCurrentBackground() >>> self = bg
>>> comp = bg.components >>>
How It Works
The codeEditor is a program written in Python, and the Python shell within it is actually a special pro-gramming environment that is enhanced with features that you will use later in the book to help you explore Python. The import, from, and other statements are covered in Chapter 7 in depth, but for now they’re not important.
Beginning to Use Python — Strings
At this point, you should feel free to experiment with using the shell’s basic behavior. Type some text, in quotes; for starters, you could type the following:
>>> “This text really won’t do anything” “This text really won’t do anything” >>>
You should notice one thing immediately: After you entered a quote (“), codeEditor’s Python shell changed the color of everything up to the quote that completed the sentence. Of course, the preceding text is abso-lutely true. It did nothing: It didn’t change your Python environment; it was merely evaluated by the run-ning Python instance, in case it did determine that in fact you’d told it to do something. In this case, you’ve asked it only to read the text you wrote, but doing this doesn’t constitute a change to the environment.
However, you can see that Python indicated that it saw what you entered. It showed you the text you entered, and it displayed it in the manner it will always display a string — in quotes. As you learn about other data types, you’ll find that Python has a way of displaying each one differently.
What Is a String?
The string is the first data type that you’re being introduced to within Python. Computers in general, and programming languages specifically, segregate everything they deal with into types. Types are cate-gories for things within a program with which the program will work. After a thing has a type, the pro-gram (and the propro-grammer) knows what to do with that thing. This is a fundamental aspect of how computers work, because without a named type for the abstract ideas that they work with, the computer won’t know how to do basic things like combine two different values. However, if you have two things, and they’re of the same type, you can define easy rules for combining them. Therefore, when the type of a thing has been confirmed, Python knows what its options are, and you as the programmer know more about what to do with it.
Why the Quotes?
Now, back to strings in particular. Strings are the basic unit of text in Python. Unlike some other pro-gramming languages, a single letter is represented as a one-letter string. Instead of trying to explain strings in terms of other concepts in a vacuum, let’s create some examples of strings using the Python shell and build from there.
Try It Out
Entering Strings with Different Quotes
Enter the following strings, keeping in mind the type of quotes (single or double) and the ends of lines (use the Enter key when you see that the end of a line has been reached):
>>> “This is another string” ‘This is another string’ >>> ‘This is also a string’ ‘This is also a string’
>>> “””This is a third string that is some ... how different”””
‘This is a third string that is some\n how different’
How It Works
If you use different quotes, they may look different to you; to the Python interpreter; however all of them can be used in the same situations and are very similar. For more information, read on.
These examples raise a few questions. In your first text example, you saw that the text was enclosed in double quotes, and when python saw two quotes it repeated those double quotes on the next line. However, in the preceding example, double quotes are used for “This is another string”, but below it single quotes are used. Then, in the third example, three double quotes in a row are used, and after the word “some” we used the Enter key, which caused a new line to appear. The following section explains these seemingly arbitrary conventions.
Understanding Different Quotes
Three different types of quotes are used in Python. First, there are the single and double quotes, which you can look at in two ways. In one way, they are identical. They work the same way and they do the same things. Why have both? Well, there are a couple of reasons. First, strings play a huge part in almost any program that you’re going to write, and quotes define strings. One challenge when you first use them is that quotes aren’t special characters that appear only in computer programs. They are a part of any normal English text to indicate that someone has spoken. In addition, they are used for emphasis or to indicate that something is literally what was seen or experienced.
The dilemma for a programming language is that when you’re programming, you can only use charac-ters that are already on a keyboard. However, the keys on a keyboard can be entered by the average user, so obviously people normally use those keys for tasks other than programming! Therefore, how do you make it a special character? How do you indicate to the language that you, the programmer, mean some-thing different when you type a set of quotes to pass a string to your program, versus when you, as the programmer, enter quotes to explain something to the person using your program?
One solution to this dilemma is a technique that’s called escaping. In most programming languages, at least one character, called an escape character, is designated; and it has the power to remove the special
Chapter 1
significance from other special characters, such as quotes. This character in Python is the backslash ( \). Therefore, if you have to quote some text within a string and it uses the same style of quote in which you enclosed the entire string, you need to escape the quote that encloses the string to prevent Python from thinking that it has prematurely reached the end of a string. If that sounds confusing, it looks like this:
>>> ‘And he said \’this string has escaped quotes\’’ “And he said ‘this string has escaped quotes’”
Returning to those three examples, normally a running Python shell will show you a string that it has evaluated in single quotes. However, if you use a single quote within a string that begins and ends with double quotes, Python will display that string with double quotes around it to make it obvious to you where the string starts and where it ends:
>>> ‘Ben said “How\’re we supposed to know that?”’ ‘Ben said “How\’re we supposed to know that?”’ >>>
This shows you that there is no difference between single and double quoted strings. The only thing to be aware of is that when you start a string with a double quote, it can’t be ended by a single quote, and vice versa. Therefore, if you have a string that contains single quotes, you can make your life easier by enclosing the string in double quotes, and vice versa if you’ve got strings with quotes that have been enclosed in single quotes. SQL, the language that is used to obtain data from databases, will often have single quoted strings inside of them that have nothing to do with Python. You can learn more about this when you reach Chapter 14. One more important rule to know is that by themselves, quotes will not let you create a newline in a string. The newline is the character that Python uses internally to mark the end of a line. It’s how computers know that it’s time to start a new line.
Python has one more special way of constructing strings, one that will almost always avoid the entire issue of requiring an escape character and will let you put in new lines as well: the triple quote. If you ever use a string enclosed in three quotes in a row — either single or double quotes, but all three have to be the same kind — then you do not have to worry about escaping any single instance of a single or dou-ble quote. Until Python sees three of the same quotes in a row, it won’t consider the string ended, and it can save you the need to use escape characters in some situations:
>>> “””This is kind of a special string, because it violates some ... rules that we haven’t talked about yet”””
“This is kind of a special string, because it violates some\n rules that we haven’t talked about yet”
Within strings, Python has a way of representing special characters that you normally don’t see — in fact, that may indicate an action, such as a newline, by using sequences of characters starting with a backslash (\). (Remember that it’s already special because it’s the escape character and now it’s even more special.) The newline is \n, and it is likely the most common special character you will encounter.
Until you see how to print your strings, you’ll still see the escaped characters look-ing as you entered them, as \n,instead of, say, an actual line ending, with any more tests starting on the next line.
As you can see here, Python enables you to do what you want in triple-quoted strings. However, it does raise one more question: What’s that \ndoing there? In the text, you created a new line by pressing the Enter key, so why didn’t it just print the rest of the sentence on another line? Well, Python will provide an interpretation to you in the interest of accuracy. The reason why \nmay be more accurate than showing you the next character on a new line is twofold: First, that’s one way for you to tell Python that you’re interested in printing a new line, so it’s not a one-way street. Second, when displaying this kind of data, it can be confusing to actually be presented with a new line. Without the \n, you may not know whether something is on a new line because you’ve got a newline character or because there are spaces that lead up to the end of the line, and the display you’re using has wrapped around past the end of the current line and is continued on the next line. By printing \n, Python shows you exactly what is happening.
Putting Two Strings Together
Something that you are probably going to encounter more than a few times in your programming adventures is multiple strings that you want to print at once. A simple example is when you have sepa-rate records of a person’s first name and last name, or their address, and you want to put them together. In Python, each one of these items can be treated separately, as shown here:
>>> “John” ‘John’ >>> “Q.” ‘Q.’
>>> “Public” ‘Public’ >>>
Try It Out
Using + to Combine Strings
To put each of these distinct strings together, you have a couple of options. One, you can use Python’s own idea of how strings act when they’re added together:
>>> “John” + “Q.” + “Public” ‘JohnQ.Public’
How It Works
This does put your strings together, but notice how this doesn’t insert spaces the way you would expect to read a person’s name; it’s not readable, because using the plus sign doesn’t take into account any con-cepts of how you want your string to be presented.
You can easily insert spaces between them, however. Like newlines, spaces are characters that are treated just like any other character, such as A, s, d, or 5. Spaces are not removed from strings, even though they can’t be seen:
>>> “John” + “ “ + “Q.” + “ “ + “Public” ‘John Q. Public’
After you determine how flexible you need to be, you have a lot of control and can make decisions about the format of your strings.
Chapter 1
Putting Strings Together in Different Ways
Another way to specify strings is to use a format specifier. It works by putting in a special sequence of characters that Python will interpret as a placeholder for a value that will be provided by you. This may initially seem like it’s too complex to be useful, but format specifiers also enable you to control what the displayed information looks like, as well as a number of other useful tricks.
Try It Out
Using a Format Specifier to Populate a String
In the simplest case, you can do the same thing with your friend, John Q.:
>>> “John Q. %s” % (“Public”) ‘John Q. Public’
How It Works
That %sis the format specifier for a string. Several other specifiers will be described as their respective types are introduced. Each specifier acts as a placeholder for that type in the string; and after the string, the %sign outside of the string indicates that after it, all of the values to be inserted into the format speci-fier will be presented there to be used in the string.
You may be wondering why the parentheses are there. The parentheses indicate to the string that it should expect to see a sequence that contains the values to be used by the string to populate its format specifiers.
Sequences are a very important part of programming in Python, and they are covered in some detail later. For now, we are just going to use them. What is important to know at this point is that every for-mat specification in a string has to have an element that for-matches it in the sequence that’s provided to it. The items we are putting in the sequence are strings that are separated by commas (if there is more than one). If there is only one, as in the preceding example, the sequence isn’t needed, but it can be used.
The reason why this special escape sequence is called a format specifier is because you can do some other special things with it — that is, rather than just insert values, you can provide some specifications about how the values will be presented, how they’ll look.
Try It Out
More String Formatting
You can do a couple of useful things when formatting a simple string:
>>> “%s %s %10s” % (“John”, “Q.”, “Public”) ‘John Q. Public’
>>> “%-10s %s %10s” % (“John”, “Q.”, “Public”) ‘John Q. Public’
How It Works
In the first string, the reason why Publicis so alone along the right side is because the third format specifier in the main string, on the left side, has been told to make room for something that has 10 char-acters. That’s what the %10smeans. However, because the word Publiconly has 6 characters, Python padded the string with space for the remaining four characters that it had reserved.
In the second string, the Q.is stranded in the middle, with Johnand Publicfar to either side. The behavior on its right-hand side has just been explained. The behavior on its left happens for very sim-ilar reasons. An area with 10 spaces has been created in the string, but this string was specified with a
%-10s. The -in that specifier means that the item should be pushed to the left, instead of to the right, as it would normally.
Displaying Strings with Print
Up until now, you have seen how Python represents the strings you type, but only how it represents them internally. However, you haven’t actually done anything that your program would show to a user. The point of the vast majority of programs is to present users with information — programs produce everything from sports statistics to train schedules to web pages to automated telephone voice response units. The key point is that they all have to make sense to a person eventually.
Try It Out
Printing Text with Print
For displaying text, a special feature is built into useful languages, one that helps the programmer dis-play information to users. The basic way to do this in Python is by using the printfunction:
>>> print “%s %s %10s” % (“John”, “Q.”, “Public”) John Q. Public
>>>
You’ll notice that there are no longer any quotes surrounding the first, middle, and last name. In this case, it’s significant — this is the first thing that you’ve done that would actually be seen by someone using a program that you’ve written!
How It Works
printis a function — a special name that you can put in your programs that will perform one or more tasks behind the scenes. Normally, you don’t have to worry about how it happens. (When you start writ-ing your own functions in Chapter 5, you’ll naturally start to think more about how this works.)
In this case, the printfunction is an example of a built-in function, which is a function included as a part of Python, as opposed to a function that you or another programmer has written. The print func-tion performs output — that is, it presents something to the user using a mechanism that they can see, such as a terminal, a window, a printer, or perhaps another device (such as a scrolling LED display). Related routines perform input, such as getting information from the user, from a file, from the network, and so on. Python considers these input/output (I/O) routines. I/O commonly refers to anything in a program that prints, saves, goes to or from a disk, or connects to a network. You will learn more about I/O in Chapter 8.
Summar y
In this chapter, you’ve begun to learn how to use the programming editor codeEditor, which is a pro-gram written in Python for the purpose of editing Python propro-grams. In addition to editing files,
Chapter 1
codeEditor can run a Python shell, where you can experiment with simple Python programming lan-guage statements.
Within the shell, you have learned the basics of how to handle strings, including adding strings together to create longer strings as well as using format specifiers to insert one or more strings into another string that has format specifiers. The format specifier %sis used for strings, and it can be combined with num-bers, such as %8s, to specify that you want space for eight characters — no more and no less. In later chapters, you will learn about other format specifiers that work with other types.
You also learned how to print strings that you have created. Printing is a type of input/output operation (input/output is covered in more detail in Chapter 8). Using the printfunction, you can present users of your program with strings that you have created.
In the next chapter, you will learn about dealing with simple numbers and the operations that you can perform on them, as well as how to combine numbers and strings so that printcan render numbers dis-playable. This technique of using format specifiers will enable you to display other types of data as well.
Exercises
1.
In the Python shell, type the string, "Rock a by baby,\n\ton the tree top,\t\twhen the wind blows\n\t\t\t the cradle will drop." Experiment with the number and placement of the \tand\nescape sequences and see how this affects what you see. What do you think will happen?
2.
In the Python shell, use the same string indicated in the prior exercise, but display the string using the printfunction. Again, play with the number and location of the \nand \tescape sequences. What do you think will happen?2
Number s and Operator s
When you think of numbers, you can probably invoke pleasant memories like Sesame Street and its counting routine or more serious memories like math lessons. Either way, you are familiar with numbers. Indeed, numbers are such a familiar concept that you probably don’t notice the many different ways in which you use them depending on their context.
In this chapter, you will be re-introduced to numbers and some of the ways in which Python works with them, including basic arithmetic and special string format specifiers for its different types of numbers. When you have finished the chapter, you will be familiar with the different basic categories of numbers that Python uses and with the methods for using them, including displaying and mixing the various number types.
Different Kinds of Numbers
If you have ever used a spreadsheet, you’ve noticed that the spreadsheet doesn’t just look at num-bers as numnum-bers but as different kinds of numnum-bers. Depending on how you’ve formatted a cell, the spreadsheet will have different ways of displaying the numbers. For instance, when you deal with money, your spreadsheet will show one dollar as 1.00. However, if you’re keeping track of the
miles you’ve traveled in your car, you’d probably only record the miles you’ve traveled in tenths of a mile, such as 10.2. When you name a price you’re willing to pay for a new house, you proba-bly only think to the nearest thousand dollars. At the large end of numbers, your electricity bills are sent to you with meter readings that come in at kilowatt hours, which are each one thousand watts per hour.
What this means in terms of Python is that, when you want to use numbers, you sometimes need to be aware that not all numbers relate to each other (as you’ll see with imaginary numbers in this chapter), and sometimes you’ll have to be careful about what kind of number you have and what you’re trying to do with it. However, in general, you will use numbers in two ways: The first way will be to tell Python to repeat a certain action, while the second way will be to represent things that exist in the real world (that is, in your program, which is trying to model something in the real world). You will rarely have to think of numbers as anything besides simple numbers when you are counting things inside of Python. However, when you move on to trying to solve problems
that exist in the real world — things that deal with money, science, cars, electricity, or anything else, you’ll find yourself more aware about how you use numbers.
Numbers in Python
Python offers four different kinds of numbers with which you can work: integers, long numbers (or longs), floating-point numbers (or floats), and imaginary numbers.
Integers and longs are very closely related and can be mixed freely. Each one is a whole number, positive or negative, but plain integers only run between –2,147,483,648 and +2,147,483,647. That’s pretty big — big enough for a lot of tasks. However, if you find that you need more than that, Python will notice this and automatically promote your number from a plain integer to a long number.
To determine the type of a number, you can use a special function that is built into Python, called type. When you use type, Python will tell you what kind of data you’re looking at. Let’s try this with a few examples.
Try It Out
Using Type with Different Numbers
In the codeEditor’s Python shell, you can enter different numbers and see what typetells you about how Python sees them:
>>> type(1) <type ‘int’> >>> type(2000) <type ‘int’>
>>> type(999999999999) <type ‘long’>
>>> type(1.0) <type ‘float’>
How It Works
Although in everyday life 1.0 is the same number as 1, Python will automatically perceive 1.0as being a
float; without the .0, the number 1 would be dealt with as the integer number one (which you probably learned as a whole number in grade school), which is a different kind of number.
In essence, the special distinction between a float and an integer or a long integer is that a float has a component that is a fraction of 1. Numbers such as 1.01, 2.34, 0.02324, and any other number that con-tains a fractional component is treated as a floating-point number (except for imaginary numbers, which have rules of their own). This is the type that you would want to use for dealing with money or with things dealt with in partial quantities, like gasoline or pairs of socks. (There’s always a stray single sock in the drawers, right?)
The last type of number that Python offers is oriented toward engineers and mathematicians. It’s the
imaginary number,and you may remember it from school; it’s defined as the square root of –1. Despite being named imaginary, it does have a lot of practical uses in modeling real-world engineering situa-tions, as well as in other disciplines like physics and pure math. The imaginary number is built into Python so that it’s easily usable by user communities who frequently need to solve their problems with computers. Having this built-in type enables Python to help them do that. If you happen to be one of those people, you will be happy to learn that you’re not alone, and Python is there for you.
Chapter 2
Try It Out
Creating an Imaginary Number
The imaginary number behaves very much like a float, except that it cannot be mixed with a float. When you see an imaginary number, it will have the letter j trailing it:
>>> 12j 12j
How It Works
When you use the letter jnext to a number and outside the context of a string (that is, not enclosed in quotes), Python knows that you’ve asked it to treat the number you’ve just entered as an imaginary number. When any letter appears outside of a string, it has to have a special meaning, such as this modi-fier, which specifies the type of number, or a named variables (which you’ll see in Chapter 3), or another special name. Otherwise, the appearance of a letter by itself will cause an error!
You can combine imaginary and nonimaginary numbers to create complex numbers:
>>> 12j + 1 (1+12j) >>> 12j + 1.01 (1.01+12j)
>>> type (12j + 1) <type ‘complex’>
You can see that when you try to mix imaginary numbers and other numbers, they are not added (or subtracted, multiplied, or divided); they’re kept separate, in a way that creates a complex number. Complex numbers have a real part and an imaginary part, but an explanation of how they are used is beyond the scope of this chapter, although if you’re someone who needs to use them, the complex number module (that word again!) is something that you can explore once you’ve gotten through Chapter 6. The module’s name is cmath, for complex math. Complex numbers are discussed further in Chapter 19.
Program F iles
At this point, it’s worth looking at the codeEditor environment again. You have already used the codeEditor’s Python shell to enter examples, and you have looked at the examples and questions in
15
Numbers and Operators
A word to the wise: Numbers can be tricky
Experts in engineering, financial, and other fields who deal with very large and very small numbers (small with a lot of decimal places) need even more accuracy and con-sistency than what built-in types like floats offer. If you’re going to explore these disci-plines within programming, you should use the available modules, a concept
introduced in Chapter 7, which are written to handle the types of issues pertinent to the field in which you’re interested. Or at least using modules that are written to han-dle high-p
![Crystal structures and Hirshfeld surface analyses of 2 [(4,6 diaminopyrimidin 2 yl)sulfanyl] N (pyridin 2 yl)acetamide and 2 [(4,6 diaminopyrimidin 2 yl)sulfanyl] N (pyrazin 2 yl)acetamide](data:image/gif;base64,R0lGODlhAQABAIAAAP///wAAACH5BAEAAAAALAAAAAABAAEAAAICRAEAOw==)