Drupal’s Building
Blocks
Drupal’s Building
Blocks
Upper Saddle River, NJ • Boston • Indianapolis • San Francisco New York • Toronto • Montreal • London • Munich • Paris • Madrid
Capetown • Sydney • Tokyo • Singapore • Mexico City
Quickly Building Web Sites
with CCK, Views, and Panels
Earl Miles
Lynette Miles
with Emma Jane Hogbin and Karen Stevenson
lisher was aware of a trademark claim, the designations have been printed with initial capi-tal letters or in all capicapi-tals.
The authors and publisher have taken care in the preparation of this book, but make no expressed or implied warranty of any kind and assume no responsibility for errors or omis-sions. No liability is assumed for incidental or consequential damages in connection with or arising out of the use of the information or programs contained herein.
The publisher offers excellent discounts on this book when ordered in quantity for bulk pur-chases or special sales, which may include electronic versions and/or custom covers and content particular to your business, training goals, marketing focus, and branding interests. For more information, please contact:
U.S. Corporate and Government Sales (800) 382-3419
For sales outside the United States, please contact: International Sales
[email protected] Visit us on the Web: informit.com/aw
Library of Congress Cataloging-in-Publication Data
Drupal’s building blocks : quickly building web sites with cck, views, and panels / Earl Miles ... [et al.].
p. cm.
Includes bibliographical references and index. ISBN 978-0-321-59131-9 (pbk. : alk. paper)
1. Drupal (Computer file) 2. Web sites—Authoring programs. 3. Web site development. I. Miles, Earl.
TK5105.8885.D78D77 2010 006.7'8—dc22
2010043527 Copyright © 2011 Pearson Education, Inc.
All rights reserved. Printed in the United States of America. This publication is protected by copyright, and permission must be obtained from the publisher prior to any prohibited repro-duction, storage in a retrieval system, or transmission in any form or by any means, elec-tronic, mechanical, photocopying, recording, or likewise. For information regarding permissions, write to:
Pearson Education, Inc.
Rights and Contracts Department 501 Boylston Street, Suite 900 Boston, MA 02116
Fax: (617) 671-3447 ISBN-13: 978-0-321-59131-9 ISBN-10: 0-321-59131-3
Text printed in the United States on recycled paper at RR Donnelley in Crawfordsville, Indiana.
First printing, December 2010
Mark L. Taub Executive Editor Debra Williams Cauley Development Editor Michael Thurston Managing Editor John Fuller Full-Service Production Manager Julie B. Nahil Project Management LaurelTech Copy Editor Jill E. Hobbs Indexer Jack Lewis Proofreader Charles Roumeliotis Technical Reviewers Jen Lindner Andy Wilson Chris Hanson Clay Robeson Publishing Coordinator Kim Boedigheimer
Interior and Cover Designer
Gary Adair
Compositor
❖
To “Sprout” and “Bud” ❖
Contents at a Glance
Contents ixForeword xvii Preface xix
Acknowledgments xxiii About the Authors xxiv
I: Content Construction Kit
1 Introducing CCK and Nodes 3 2 Field Concepts 17
3 Deeper into Fields 39 4 Themes and CCK 59 5 CCK API 75
II: Views
6 Relational Databases 101 7 Creating Views 109
8 Arguments, Exposed Filters, and Relationships 137 9 Theming Views 153 10 Query Optimization 177 11 Views API 185 III: Panels 12 Introducing Panels 217 13 Creating Panels 225
14 Context, Relationships, and Arguments in Panels 257 15 Panels Theming 275
16 Site Deployment 291
IV: Appendices
A Other Useful Modules 303 B Reporting Issues 309
C Views API Handlers and Plugins 315
Contents
Foreword xvii Preface xixAcknowledgments xxiii About the Authors xxiv
I: Content Construction Kit
1 Introducing CCK and Nodes 3
The Node System 3
Why Nodes Are Important 4 Default Content Types 4 Parts of a Node 5
Why Add Fields to Nodes? 7
Quest for the Grail: How CCK Was Born 8 Getting Started with CCK 10
Creating a New Content Type 11 Summary 15
2 Field Concepts 17
What You Should Know Before Creating Fields and Content Types 17
The Content Type Pages 17 Identification 18
Submission Form Settings 19 Workflow Settings 21 Comment Settings 22 Fields, Export, and Import 22 Creating New Fields for Content 24
Adding Fields 24 Data Types 26 Widgets 29
Putting the Parts Together 30 Changing the Field Display 33 Sharing Fields 36
Summary 38
3 Deeper into Fields 39 Choosing Field Types 39
Using Text 40
Using Numeric Types 40 Using Node Reference 41 User Reference 42
Constraining Data with Widgets 43 Date Module 48
Computed Fields 51 Link and Email Fields 54 Highly Visual Media 55
FileField 55 ImageField 56
ImageAPI, ImageCache, and ImageCache UI 56 Summary 57 4 Themes and CCK 59 Theme Basics 59 CCK Specific Theming 62 Formatters 62 Field Templates 62 Node Templates 65 Excluding Fields 68 Node Reference 68 Helper Modules 69 Theme Developer 70 Contemplate 71 Summary 73 5 CCK API 75
Using the CCK API 75 The Field Model 76
Creating New Field Types, Widget Types, and Formatters 76
Creating Custom Field Types, Widget Types, or Formatters 77
Widget Type Modules 85 Formatter Modules 87
Creating Field Instances Using Content Copy 91 Creating Field Instances with the CRUD API 91 Creating Data for CCK Fields 95
Miscellaneous Helper Functions 97 Summary 98
II: Views
6 Relational Databases 101
Drupal, SQL, and the Emergence of Views 101 Pronouncing SQL 101
The Drupal “Learning Cliff” 102 The Basics of Relational Databases 102
Rows and Fields 103 Keys 103
Filtering and Sorting 105 Filtering 105
Sorting 106 Joins 106
From SQL to Views to Human Language 107 Summary 108 7 Creating Views 109 Views UI 109 List 110 Add 112 Import 125 Tools 125
Showing Your Views to the World: Creating Displays 131 Blocks 132 Pages 133 Attachments 135 Feed 135 Summary 136 xi Contents www.it-ebooks.info
8 Arguments, Exposed Filters, and Relationships 137 Arguments 137
Arguments as Filters 138 Configuring an Argument 139
Using Arguments as Part of a View 142 Exposed Filters 145 Relationships 148 Summary 151 9 Theming Views 153 An Overview 153 Classes in Views 153 Template Files 156
The Display Templates 159 View Styles 160
The Row Templates 161 Other Templates 162 Working with Templates 164
Rescan the Template Files 165 Debugging 167
Printing Default Messages for Empty Fields 167 Grouping in a Template 169
Summary 175
10 Query Optimization 177
Balancing Development Time Against CPU Time 177 Sticking with What Views Gives You 177
When You Need More Than Views 178 Determining Query Performance 178 Embedding Queries 179
EXPLAIN 180
Indexing Versus Caching 182 Experimenting with Your Site 183 Summary 183
xiii
Contents
11 Views API 185 Data Architecture 185
Object-Oriented Programming 186 Base Tables and Relationships 191 The Objects Involved in a View 192 The Views API 199
The Life Cycle of a View 201 View Execution Cycle 201 Executing a Views Display 203 Execution-Related Hooks 204
The Database Schema and Data Hook 206 Relating Tables to Each Other 206 Declaring Tables in hook_views_data() 207 Declaring Fields on Tables 209
Handlers Versus Plugins 210 Handlers 210 Plugins 212 Summary 213 III: Panels 12 Introducing Panels 217 Introduction to Panels 217
A Brief History of Panels 217
Push and Pull: How Panels Is Different 218 Point-and-Click Layout 219
Context 221
Pluggable Architecture 221 Modules 222
Panels Package 222 Chaos Tool Suite 223 Summary 224
13 Creating Panels 225 Your First Panel 225
The Panels Dashboard 226 Panel Pages 227
Panel Nodes 233 Mini-Panels 236
Adding Content to Panels 237 Adding Content Panes 238 Caching 242
Configuring Existing Content Panes 243 Access Rules 244
Overriding Core Display Pages 246 Node View 248
Taxonomy 251 User View 252
Overriding Core Node Editing Pages 253 Summary 255
14 Contexts, Relationships, and Arguments in Panels 257 Contexts 257
Contexts in Panel Pages 258 Taxonomy 262
Arguments in Panes 264
The Add Content Modal for Views 266 View Pane Displays 268
Relationships 271
Using Relationships 271
User Reference and Node Reference 272 Summary 274 15 Panels Theming 275 Layout 275 Flexible Layout 275 Changing Layouts 279 Stylizer 280
Working with Styles 282 CSS in the Panels UI 284 CSS in Source Code 285
Identifying a Particular Pane 286 Other Stylistic Changes 289 Summary 290
xv
Contents
16 Site Deployment 291
Configuring Your Development Environment 291 Content Versus Structure 291
Source Control 292 Moving to Production 293
Keeping Development Separate from Production 293 Testing Your Changes 293
Documenting Your Work 294 Exporting Your Structures 294
Exporting CCK 295 Exporting Views 296 Exporting Panels 298 Helper Modules 299 Deploy 299 Features 299 Drush 299 Summary 300 IV: Appendices
A Other Useful Modules 303
Extending the Use of Your Modules 303 General Modules 303 Pathauto 303 Views 304 Views_or 304 Nodequeue 304 Flag 305 Views Slideshow 305 Views Bonus Pack 305 Views Attach 306 Views Import 306 ApacheSolr Views 306 SimpleViews 307
Views Bulk Operations 307 Views Datasource 307
Sheetnode 307 CCK 307
Calendar 308 Panels 308
Advanced Profile Kit 308
Total Control Admin Dashboard 308 B Reporting Issues 309
Submit a Complete Report 309 Read the Documentation 310 Check Other Sources 311
Know the Difference between a Bug and a Support Request 312
Stay on Topic 312
Understand the Life Cycle of a Bug 312 Be Patient 313
Remember That You’re Asking for Someone Else’s Time 314
Contribute Back 314
C Views API Handlers and Plugins 315 Views Handlers 315
Field Handlers 315 Sort Handlers 316 Filter Handlers 316
Handlers for Arguments 316 Relationship Handlers 317 Views Plugins 317 Display Plugins 317 Style Plugins 317 Row Plugins 318 Views Classes 318 Index 327
Foreword
There was a time, in the 1950s, when to be a computer programmer you had to be something of an electrical engineer. You had to be handy with wire cutters and strippers and be willing to get your hands dirty—literally. That all changed over the decades, and programming a computer became a simple feat by contrast. Still, it remained the domain of only a few people with the proper education and technological sense. It was the advent of microcomputers and the Internet that made the world of technology more accessible, or at least began the process of attracting more people.
It was that time and those elements—that first major wave of public inclusion—that called for easier methods and for better tools for programming, for making use of computers, and for communicating information throughout the world.
It seems that each decade—perhaps not exactly in 10-year increments—brings with it a new wave of technology that makes the use and manipulation of technology accessible to more people. Each period begins with only people of certain technology prowess being able to participate fully. But in time the demand becomes so great, and the desires of the greater community so intense, that new innovations are achieved and new ways are determined in which more people can be part of the creation process and not just be on the receiving end.
It was just 15 years ago or so that Web design required an in-depth understanding of HTML, skills in network configuration, and the ability to program using less-than-intuitive programming languages to be able to do more than create a few flat Web pages. To be able to create forms, allow users to enter information themselves on a site, and provide many of the features that are commonplace today required the advanced and diverse programming skills of a Web developer—not to mention a sense of design, an understanding of
marketing, and good writing abilities. So, many sites were either poorly constructed or else were the result of a heavily orchestrated organization that employed many people from diverse backgrounds. Web design was simply inaccessible for most people and
organizations.
That has all changed as well and is continuing to change. We’re in the middle of a new period of accessible technology, it seems. Drupal is changing the way Web sites are built. While Drupal can be used as a Web programming framework, it doesn’t have to be. Unlike many other Web design tools, you don’t have to be a programmer to build a Web site with Drupal.
In the Drupal world, many people build Web sites very easily. You just decide what you want on your Web site—text, photographs, a blog, places for visitors to comment, a feed from your Twitter account, and many, many other things—and then download the modules you need based on your wish list (you can have all that you wish for now), install each module, do a bit of configuring through your Web browser (mostly pointing and clicking, with the occasional typing of content), and you’re done. Zero programming is required. It’s that easy.
The Drupal community has created thousands of modules, all freely available from the drupal.org Web site. It’s a credit to the collective efforts of thousands of smart people working together for years, not only for their own interests, but even more so for the benefit of others. Each module alters and extends Drupal’s core capabilities and adds new functionality to a Drupal site. Owing to the vast amount of modules available from the Drupal community, the number of distinctly different sites that can be built using Drupal is unlimited, and the number that have already been built using Drupal is extensive. The speed at which sites can be assembled using Drupal and Drupal modules is surprising and unmatched. Not a single proprietary content management system has the depth and breadth of Drupal—not to mention that it’s free.
Nevertheless, two contributed modules stand out from the rest: Content Construction Kit (CCK) and Views. Not only are they the most popular modules, but they are also two of the most flexible modules. I have repeatedly been surprised by how Web
developers use Drupal, and what they build using CCK and Views. More than once, I’ve been shown “new tricks” of what can be done with CCK and Views without a single line of programming. The world of CCK and Views is an interesting one. The true depth and richness of these two modules have been mastered by only a few people, because ultimately the limits of what you can do with these modules has more to do with the data provided to them than it has to do with the capabilities of the site builder. The Panels module, while not standing out quite as strongly as Views and CCK, allows site builders the opportunity to tune their sites more carefully to look and feel the way they want. It gives them large amounts of control and organization, again without needing to write a single line of code. It, too, has allowed surprising systems with only a few tricks. Behind the code that makes these modules work is a strong community of committed volunteers. One of these people is Earl Miles, a coauthor of this book. As an active member of the Drupal community for many years now, he has contributed a great deal to the direction of Drupal. More specifically to the topic of this book, he is a key
contributor to CCK and the principal author of Views and Panels. I cannot think of a better person to write about these particular modules. Coauthor Lynette Miles, in contrast, is not a developer at all, and yet these modules have allowed her to contribute to the Drupal project by providing support for the usage of these modules both on
drupal.org and in IRC. Her knowledge of the questions people ask when learning to use these modules is instrumental in understanding how to explain these sometimes difficult concepts to users.
Even if you’re already a seasoned user of CCK, Views, or Panels, I have no doubt that this book will provide you with several new techniques and methods for getting the most out of these extremely essential modules. It certainly has for me.
Dries Buytaert Founder and project lead of Drupal, CTO of Acquia October 2010
Preface
Drupal is an open source software package that is offered for free to download, modify, and use. It has been implemented by thousands of people around the world and is used by millions of people daily as the basis for discussion Web sites, community portals, corporate intranets, e-commerce Web sites, vanity Web sites, resource directories, image galleries, podcasts, and more. By choosing to use Drupal, you are accessing not only an award-winning Web platform, but also its vibrant community.
Often referred to as “The Big Three,” the Content Construction Kit (CCK), Views, and Panels modules have fundamentally changed the way developers, site builders, and designers create Drupal Web sites—and yet they are all contributed modules. In this book, the core contributors to these three suites of modules teach you how to build better Web sites. The modules described are widely considered essential modules that will be installed on almost every site. They allow for a level of customization that is
unparalleled in the market, and are a key reason that Drupal is being chosen over its competition.
The book assumes you are familiar with how to install Drupal and enable modules. Web developers and administrators of Drupal Web sites are the target audience, although the book is written so that devoted Drupal enthusiasts can fully customize their sites using the information provided here.
Part I—Content Construction Kit
Content Construction Kit is a module that allows you to define the data that makes up your site’s content types. It lets you add new fields chosen from a variety of field types, such as text, numbers, dates, and even references to other content. It handles input forms and provides a variety of output styles for each field. Throughout the first part of this book, you will learn how to use CCK to customize your data objects to conform to your needs, rather than making your needs conform to the core content types.
Chapter 1
In Chapter 1, we explain the basic concepts needed to understand the powerful but complicated creature known as CCK, including how it came to be, how the basic Drupal structure is defined, and why the level of flexibility and customization offered by the node system is important.
Chapter 2
Expanding on the general usage of content types and fields, Chapter 2 delves into how CCK works its magic, both from an administrative user interface (UI) point of view and within the Drupal database itself. To do so, we explore two potential Web sites: a homebrewer’s journal and a T-shirt sales site.
Chapter 3
There are an extensive number of ways you can use content fields to create your Web site. Understanding and using fields and helpers for those fields creates possibilities for any kind of data. In Chapter 3, we dig more into field types and consider why you might want to use one type of field over another in your content type. We also look at some field types that you might want to add, but that are not part of the core CCK package.
Chapter 4
Now that your content is created, it’s time to make it look professional and easy to read. CCK does a great job of allowing you to add plenty of customized content. What it doesn’t do as well is display the data in a fashion that is clean and nicely readable for users. In Chapter 4, we take a look at the theme system and how CCK interacts with it.
Chapter 5
CCK includes methods that PHP developers can use to create fields outside of the user interface. This creates even more flexibility, but requires a definite knowledge of the PHP language as well as familiarity with Drupal’s development style. In this chapter, we delve into integrating CCK with other modules.
Part II—Views
The Views module is a powerful query builder designed to simplify the task of building custom query displays. It accomplishes this feat by providing lists of all table and field information that it knows of and letting the user assemble items from these lists together. After a complete rewrite for Drupal 6, Views has a new interface with more options than ever before. With the addition of a live preview and query display, site builders can nail down their displays in a way that was previously impossible to do without making changes that can affect all users.
Chapter 6
Drupal relies on an SQL database to store information, and it currently supports MySQL and PostgreSQL. Properly using Views requires an understanding of how the database stores data, how it is related across various tables, and how Drupal works with the database to retrieve data. This chapter is directed toward newer users and programmers.
Chapter 7
In Chapter 7, we focus on the Views UI, including how each function works. We look at how each piece creates part of a query, and how the results of those queries fit into pages and blocks. We also discuss the most important filters you may need as well as how to create relationships between node content that does not otherwise share information.
Preface xxi
RSS, styles and fields, and the Views Bonus Pack are other important topics when determining what you want out of your view; they are also covered in this chapter.
Chapter 8
Supplying arguments to Views is one of the ways the Views module becomes even more powerful and flexible. Relationships bring data together in new ways, and expand the information available to the rest of Views. Chapter 8 describes how to customize your views even more through the power of relationships, arguments, and filters.
Chapter 9
Views can be themed just like anything else in Drupal. The Views module provides an entirely new level of classes, theming templates, and strategies over its predecessor. In Chapter 9, we discuss the template files and their contents, change some CSS, and look at how we can approach rendering data by multiple methods.
Chapter 10
One of the biggest questions facing the developers of any software installation of any kind is, “How much time will each part of this application take?” Entire software packages exist to measure this kind of information. For some people, optimization is the key to a well-run and well-maintained site. For others, this issue represents a giant hassle. In Chapter 10, we provide a few suggestions as to when and why it might be
appropriate to do some customization to your Views-generated queries.
Chapter 11
In Chapter 11, we explore the nuts and bolts of how Views is put together—at the code level. You will learn about the data architecture of Views, the life cycle of a view, and its database schema. We also introduce the plugins and handlers needed to control custom queries and formatted output.
Part III—Panels
Now it’s time to really customize how you want your site to look. The Panels module supplies a group of standard layout templates. In this part of the book, you learn how to create panels that override default page layouts, explore how to theme these layouts, and get an introduction to the Panels API.
Chapter 12
The core functionality of the Panels module is layout; designing the layout is when things start to look polished. With an understanding of Panels, administrators can create a style that is easily applied to every page of a site, or a different style for every page. Chapter 12 provides an introduction to how Panels works.
Chapter 13
In Chapter 13, we investigate the Panels UI, including how each part fits together to create a wide range of panels. You learn how to create your very first panel, add content to a range of panel types, and override the core display pages for each of your site’s content types.
Chapter 14
Panels incorporates a few major features that can take you from the basics of Web site development to real complexity. Using arguments, relationships, and contexts, you can build connections between pieces of content in your panel layouts.
Chapter 15
We’ve come to the final steps of designing a Web site with Panels—theming. This development phase puts the last touches on a Web site and brings everything together. Chapter 15 covers styling that can be done from within the Panels UI. You also learn how to apply custom CSS selectors that you can hook into from your own CSS files. Prepare yourself to be amazed at the level of control Panels gives you for theming your site.
Chapter 16
Once a site is built, it must be deployed and made available for use. In Chapter 16, we touch on some of the challenges and changes that come with moving a site from testing to production. Views, Panels, and CCK all have the ability to export their structures, giving you the most leverage over site control; in this chapter, you find out how.
Part IV—Appendices
The appendices cover a range of topics you’ll need to truly succeed with this suite of modules. Appendix A covers other, relevant modules you’ll want to check out when building a site with CCK, Views, and Panels. Appendix B teaches you the “best practices” for reporting an issue. Appendix C gives you an overview of the plugin classes that are available to programmers in the Views API.
Acknowledgments
Earl and Lynette would like to thank more people than they can possibly remember for their help and support during the writing and production of this book. First, our editor, Debra Williams Cauley, had much more patience than we could have asked for or deserved. Emma Jane Hogbin was instrumental in the final push to complete this book— not to mention being generally sympathetic and otherwise all-around awesome. Karen Stevenson also deserves mention for her significant contribution of the Content Construc -tion Kit API chapter. Our friends as well as cohorts in the Drupal community—Clay, Chris, Andy, and Yves—provided lots of valuable feedback about where things were good, bad, and “What in the world were you trying to say here?” We would also like to thank the technical and copy editors at Pearson who made sure we were up to standard and cleaned up after us; any errors are most definitely ours, not theirs. Finally, we would like to thank our family and friends, with a special “thank you” to famous writer C. E. Murphy, for being encouraging and offering lots of helpful advice on how to keep making progress.
Earl Miles is a permanent member and founder of the Drupal Association. In 2005, Earl found Drupal and thought it was exactly what he needed to build a Web site in his spare time. When he found that Drupal lacked some key features, Earl ignored work for three weeks and created the Views module, which has been instrumental in Drupal’s continued growth. Earl has been active in the community, providing support, as well as posting tips and tricks when the mood strikes him.
Happily married, Earl’s first child was born May 2007. He is an amateur writer (sci-fi fantasy) and a gamer. A lifelong programmer, he is currently employed by iO1, a company that actively participates in the development and consumption of open source software.
Earl’s Drupal blog is Angry Donuts (www.angrydonuts.com).
Lynette Miles has worked for 15 years in professional software technical support, mainly for Alcatel-Lucent. During that time, she has done everything from respond to customer issues via phone, email, and ticketing systems to writing and editing documentation for corporate software. She has also spent entirely too much time building and maintaining technical support knowledge bases for customers and support team members.
She became involved with Drupal after attending DrupalCon Brussels and DrupalCon Barcelona with her husband and becoming tired of listening to him talk about how active his issue queue was. Since then, she has spent most of her contributing time working with the Drupal Documentation Team and triaging the Views and Panels queues. She actively maintains that she is not a coder, stating, “I have people for that.”
Lynette is a gamer, a spinner, and a knitter. She has cheerfully created her own Drupal hats based on Emma Jane Hogbin’s pattern, complete with glow-in-the-dark faces. Most of her time is spent ensuring that she and Earl’s daughter (also a DrupalCon fixture) learn the proper way to work with Drupal, “Don’t hack core!”
I
Content
Construction Kit
Content Construction Kit, commonly known as CCK, is a module that allows you to define the data that makes up your site’s content types. It lets you add new fields chosen from a variety of field types, such as text, numbers, dates, and even references to other content. It handles input forms and provides a variety of output styles for each field. With CCK, you can customize your data objects to conform to your needs, rather than changing your needs so that they conform to the content types available.
1
Introducing CCK
and Nodes
The atom is the fundamental building block of all matter in the universe; the node is the fundamental building block of all Drupal sites on the Internet.
I
n this chapter, we explain the basic concepts needed to understand the powerful but complicated creature known as Content Construction Kit, including how it came to be, how the basic Drupal structure is defined, and why the level of flexibility and customiza-tion offered by the node system is important. We start off with an explanacustomiza-tion of how Drupal’s core node system works and then look at how CCK provides new, enhanced functionality to your Web site.The Node System
Simply put, a node is a piece of user-created information that is stored within a Drupal Web site’s database, with a goal of having a consistent API for access, expansion, storage, and output. Okay, perhaps that wasn’t quite so simple. More simply put, a node is a post. It can be a blog post, a forum post, or a news article. Of course, it can also be much more than that. It could be a recipe in a searchable database. Or perhaps it might repre-sent a track on a CD, even containing the audio file that lets the user play that track.
Likewise, a node can also be the CD that the track appears on, as well as the artist who recorded that track. Depending on the needs of the Web site, the label that distrib-uted the CD might be a node. Press releases related to that CD might also be stored as a node. Fans might post their reviews of the CD—also as nodes—and the artist might upload photographs of a recent concert tour promoting the CD.
Long story made short, nodes are the main unit of information available for display in a Drupal Web site. Deciding what will be a node depends on which information you think may deserve a page of its own, and which logical item makes the most sense to display or make lists of for your users to view or search on.
Why Nodes Are Important
One of the reasons nodes are important is that they have a flexible API that allows mod-ules to act upon them, and that enables a designer to use a theme to control how they are presented. Many of these tools are available right in the core Drupal installation. For example, the Upload module can add file attachments to a node. The Path module, which supports general URL aliasing, provides a specific method of creating paths to nodes. The Menu module lets you put your nodes right into the navigation system.
External modules can do even more. Various voting modules, such as Fivestar, can be used to allow your users to place a rating on any kind of node. The Inline module cre-ates an easy method for attaching images and displaying them within the body text of a module. This list goes on and on, but the important point is that this common API means that even simple node types can have very powerful features when you enable the right module.
Drupal comes with a basic set of content types already enabled. Other modules create more exotic content types. If you are just starting out with Drupal and trying to figure out exactly what you want to or can do with your site, exploring the content types in the Drupal administration pages is a good starting place.
It is valuable to know what the base content types are, as well as their internal and external fields, to decide whether you should use an existing type as is, modify a current type, or create a new one altogether.
Default Content Types
Navigate to Administer >> Content management >> Content types to see which content types are currently available for your installation. If you have not added many modules, you will have only a few content types to start with, but many of the modules available might well have added more types. You’ll have to check your module’s
documentation to see what these types are or do. The default Drupal content types are Page and Story:
n Page: The page is one of the content types created for you during the installation
process. It exists primarily for historical reasons. Back in the days when Drupal couldn’t easily have arbitrary content types, the page node type was used to create static pages as a way to provide basic structure for the site. The most common example of a page node might be the classic “About this site” page, which doesn’t change very often.
n Story: Story is the other content type that is automatically created as part of the
installation process. It’s meant to be an example to guide new users into Drupal, but it’s actually an exercise in confusion because new users have no idea what the Story content type is for. The simple answer is that the Story content type is for whatever you want it to be. In the classic sense, a Web site posts “stories,” which are often thought of as articles that are placed on the front page to be read as news. Story could easily be called News or Article, but it could also be called Post
The Node System 5
and be just as meaningful. The important point is that the story node type can be used for whatever you want—or, if you prefer, nothing at all.
The following content types are also available in Drupal core but are not turned on by default:
n Blog entry: One of the most common forms of Web communication, a blog entry
allows you to write a journal or diary type of page for your own purposes. This type is provided by the Blog module. Interestingly enough, the Blog module is actually meant for a single site with multiple bloggers. If you are creating a site with just one blogger, you are (counterintuitively) best off not enabling the Blog module and instead creating your own blog content type.
n Book page: Book pages are intended to be used as part of a group of nodes. In
Drupal-ese, a book is a series of posts that are arranged in a hierarchical structure to provide a consistent experience for reading. Manuals and presentations are excellent examples of a book. This content type is provided by the Book module.
n Forum topic: Forums are the classic Web-based message board. They create
con-tainers for posts, and those posts can have comments. As of Drupal 6, forums can have more than just forum topics posted in them. This content type is provided by the Forum module.
n Poll: A poll is a question with multiple possible answers where users can choose a
response and see how many other users have chosen each topic. As an example, you might create a breakfast poll with choices such as scrambled eggs, pancakes, peanut butter on toast, or nothing. This content type is provided by the Poll module.
When the administrator creates a new content type, it starts off looking very much like the Story type. There are no special fields, no new screens, and no places to enter data that are different than you would expect. Node types are often created by other modules, and will come with a full form to fill out for each new piece of content.
Parts of a Node
As mentioned previously, a node is, generically, “a piece of content.” Let’s explore what exactly makes up that piece of content. To start with, every node has a number called the node ID or nid, which is used to uniquely identify it. The nid is assigned automatically when the node is created.
One important thing nodes have is a path or a URL. After all, Drupal is about building for the Web, and if your node can’t be found on the Web, it’s not very interest-ing. Given its nid, a node can always be found at the URL “node/nid.” For example, http://www.drupal.org/node/162242 is the “Getting Started” page for CCK. Using the node/node ID structure should always take you to the page, even if an alias for that page is in place. An alias allows you to use other methods to refer to a given node.
There are two primary ways that a node can be viewed, plus a few other ways that we’ll talk more about in the Views section. The first way is the full node view, which is normally only seen when visiting the URL for that node—node/node ID in our previ-ous example. In this view, you normally see the node’s title, the node’s body, and any other data that has been added to the node, such as file attachments and voting widgets. The full node view also shows the node’s links, which will include such commands as those for adding new content plus whatever other actions modules add. Some examples of these actions might be to bookmark the node, set the node’s published or sticky flag, and share the node with a social networking site such as Digg. In addition, the node will have local tasks (more commonly known as tabs) that provide commands to edit the node, view the node’s revisions, and perform many other actions (usually administrator specific).
The other way a node can be viewed is within a list. Drupal’s front page is a prime example of a list of content, as well as the blog page and the taxonomy list pages. These pages are referred to as river of news listings, because they tend to always place the newest content on the top, and the node view is called the teaser view. The teaser view typically consists of the node title, a shortened version of the body, and links to get to the full node body and/or comment on the node. This view is designed to provide just enough of the content to let the user decide if he or she wants to read the content, but does not neces-sarily show all the content. With proper theming (see Chapter 4), you can actually create multiple teaser views, which can be used situationally. Some may be more compact because they reside in smaller areas, such as on complicated front pages with a lot of dif-ferent content; others may be much larger because they are used in a river of news.
The list below contains the attributes that Drupal automatically assigns to nodes, although only Title and Body will be listed in the “Manage field” section when you go to manage the content. Title and Body are input; in general, the rest of the attributes are handled by yes/no flags or by the database, as discussed in greater detail in Chapter 2.
Following are the required parts of a node:
n Author: The user who created or owns the content. n Post date: The date when the node was first created. n Updated date: The last time this information was updated.
n Title: The title of the content. It is surprising that this information is required, but
to administer content, nodes are most easily identified by the title. There are ways to deal with this requirement, however.
n Published: Is this content published? Published content is available to all visitors
who have permission to access content; unpublished content is available only to users who can administer nodes.
n Promoted to front page: Content that is promoted to the front page will appear in
Drupal’s default front page. If you change the default front page, you get to use this flag for whatever you like!
n Sticky: Sticky content should appear at the top of most lists containing such
The Node System 7
Nodes have other data that is not required but is nonetheless important and useful:
n Teaser: This is a short version of the full information in the node. In a news story,
it could be the first paragraph(s) of an article.
n Body: The body is the entire (long) version of the node content.
n Input format: This controls how the teaser and the body are interpreted. It
pro-vides restrictions to HTML help provide security for the Web site, as well as options to make the text look cleaner. Those options include the line break filter and other optional filters such as bbcode and markdown.
Together, node and node_revisions are the tables upon which all Drupal content is built. Consider your content: you may not need to have revisions on at all. Most user content won’t need it. Revisions are a type of source control. If you have the revisions feature turned on, it will keep track of which changes were made, and which user made them. This promotes accountability and provides a relatively quick and painless way to reverse a mistake or deletion of information. It is especially useful for documentation: revisions can be added to and updated as new information becomes available, while keeping a record of previous versions.
Why Add Fields to Nodes?
For some users, the starting list of fields will satisfy their needs perfectly. This is true of users whose needs consist mainly of free-form text areas in which they can enter what-ever content they like without consideration for calculating values, showing images, or any other operation that needs specific data. Other users—likely the majority—will have a need to enter exact, discrete data using a standard format.
The body field of a node is an example of an unstructured or free-form text area. You can enter any text you want here, and it will be stored and returned when the node is displayed. This capability can be useful for taking notes, writing recipes, or any number of other tasks. The body can be broken into two parts within the field itself, so as to create the teaser. It has the bonus of being clear and very easy to use. The downside is that the body field is not easily styled, can easily become cluttered, and is not structured. Users who are adding new nodes using just the body can put data wherever they want, and none of the parts can be called out specifically for special attention.
Using CCK to add fields eliminates the downsides of using an unstructured text area by creating input areas that meet the exact needs of your site. By enforcing rules for each text area on allowable input, this module helps create a consistent look and feel for the site, as well as consistent data. Using a structured field like the ones CCK creates will ensure that your prices, dates, and products all look and behave in the desired fashion. Along with promoting data integrity, CCK fields can be themed separately from each other and from the rest of the node. That enables you to change the look of every piece of information on your site with relative ease.
Quest for the Grail: How CCK Was Born
Ever since the early days of Drupal, flexible, administrator-controlled content design management has been one of the many Holy Grails of the Drupal community. But what does this mean, exactly? Content management is the ability to control (sort, moderate, categorize, delete, or otherwise do whatever you like) existing, dynamic content in the system. Content design management, then, is the ability to control the form this content takes within your system.
For example, a blog post basically consists of a title, the post, perhaps a category, and a few tags, as well as a few other administrative fields. This data is no big deal; Drupal already has all of it. A recipe, by comparison, is a title, a description, a collection of ingre-dients, and maybe some other interesting callouts, such as the preparation time, a rating, the nutritional value, and any number of other items. These items may even be specific to the site that is storing the recipe—a site specializing in healthy foods might want a breakdown of calories, fats, carbohydrates, or maybe even some clever calculation to assign some sort of health or point value to the recipe. As these two examples suggest, there is a real need for a better way to store both types of content—some way that would suit most uses and allow for standard ways to maintain and update the data. When Drupal was first developed, the problem was, of course, that none of these decisions could be controlled by the administrator. They could be controlled only by the developer. Every new type of content required a new module, and each module had to create the database tables, work out the database schema, provide the input form for the node, handle all of the reading and writing to the database, and tell the Drupal core about the plan. For a developer, doing all this isn’t difficult work, but it is tedious, especially if you have a lot of content. Also, custom code requires extra maintenance, especially because of the way Drupal system upgrades work. Unfortunately, the upgrade process is not exactly one of Drupal’s greatest strengths. Administrators want a standard way of handling things like recipes, and they want to know that for every item that is created, all of the standard Drupal hooks and menu items and image storage capabilities will be there. A consistent application programming interface (API) was sorely needed.
In Drupal 4.4, along came a module named Flexinode. Flexinode gave Drupal Web site builders who were not code writers the promise of newfound freedom: freedom to create new content types and add fields to them. And this newcomer was pluggable! New types of content could be added to the system, leading to a vast—indeed, bewildering—array of individual types of content that could be bolted onto a node and turned into whatever you might desire.
However, there were some major limitations in the Flexinode module. First, new fields were specific to their content type and could not be used for more than one set of data. As a consequence, you could not easily query for all of the results that matched between two content types. For example, if you had a field for phone numbers, a con-tent type for employees, and a concon-tent type for customers, you couldn’t query for phone number and get both employees and customers in the same query. While both types have
Quest for the Grail: How CCK Was Born 9
a phone number, as far as the database is concerned these fields are no more equivalent to each other than the title is to the author.
Another problem was the method of database storage. Due to the manner in which Flexinode stored information, very large queries with multiple joins would have to be created to retrieve all of the information for a particular node. While this requirement didn’t appear to be a problem with smaller node types with only a few thousand nodes in the system, sites with dozens of fields per node could quickly bog down badly on the server side. The reality of database mechanics caused this method to fail to scale for very large content types—something no company that relies on its Web site for revenue gen-eration could afford.
These real problems were fundamental to the design of Flexinode. Through several versions of Drupal, the module continued to suffer from these problems created early on in its development. These flaws could not be fixed, at least not without a significant amount of recoding. Ultimately, these limitations spelled the death of Flexinode, despite the efforts of some within the community to save it, and Flexinode work finally stopped with the advent of Drupal 4.7.
Well before Drupal 4.7 was released, however, Jonathan Chaffer (known as JonBob on drupal.org) reached out to the community. At the very first DrupalCon, a group of 30 or so devoted Drupal developers got together in Antwerp, Belgium, to hash out the design and milestones to create a replacement for Flexinode.
CCK Historical Context
You can find a forum post that was used by JonBob to keep the community apprised of the status of CCK at http://drupal.org/cck-status
This replacement was called Content Construction Kit. And while Flexinode was largely just the work of Chaffer, the scope of CCK was significantly larger than that of Flexinode. To handle this burden, Chaffer organized a community effort. He did the core work needed to create the system, while others in the community helped out.
CCK finally became a reality—albeit a rather immature reality—in Drupal 4.7. While the base was workable, there was still a good deal of functionality that needed to be added.
CCK has many advantages over Flexinode, not the least of which is the redesign and streamlining of the code, but most of these differences aren’t apparent to a Web site’s visi-tors. The most important difference is to the person who is creating or administering content types: CCK provides greater control over the storage mechanism, which creates a consistent database schema that is more easily used by other modules (such as the more recent Views module), thereby allowing for a richer integration. This approach also allows CCK to utilize more caching and other performance enhancements so that it can scale to large content types with large amounts of data. Although CCK still has flaws, many of these problems are related to the design of Drupal itself, and each successive release of Drupal is addressing them.
Drupal and Version Numbers
Drupal went quickly from version 1 to version 4, but the major version remained at 4 for several years, leading to some confusion about Drupal version numbers. Right around Drupal 4.3, which was quite close to Drupal 4.0, the developers started creating point releases to fix bugs, calling them 4.3.1, 4.3.2, and so on, but continuing to do major fea-ture and API rewrites inside the 4.x line. By the time Drupal 4.7 (the last of the 4.x line) was released in 2007, the codebase barely resembled what was found in version 4.0. A lengthy discussion ensued—within a community that barely resembled the community that had existed for Drupal 4.0 in 2002—and it was realized that Drupal had been misusing the so-called minor version releases. It was decided the next version would be Drupal 5, to be followed by Drupal 6, and that point releases would not include new features or API upgrades.
The real problem, of course, was user confusion. When people installing Drupal mod-ules and maintaining Drupal Web sites saw Drupal 4.6 and 4.7, they assumed that the two versions were relatively close together in terms of features and, more importantly, module compatibility. Unfortunately, this was not the case. Over time, the community did recognize the problem created by the numbering scheme and it was corrected. If for some reason you come across an older site that needs to be upgraded, you may want to keep this point in mind.
For example, Drupal 5 added the ability to create arbitrary content types right in the core system, whereas previous versions of Drupal required modules to do this. As a result, CCK was able to completely remove that part of its codebase, let core Drupal do the work, and became a field manager instead of a node manager.
Getting Started with CCK
If you haven’t got an installation of Drupal running, now is the time to do so. You’ll need a base install with the CCK, Views, and Panels modules. There are many options for Drupal out there. You need PHP, a supported database, Drupal, a Web server, and the modules discussed in this book: Views, Panels, and CCK.
One of the most popular ways to get Drupal up and running quickly is to use one of the various XAMPP stacks; these include WAMP, LAMP, MAMP, and so on. These stacks include PHP, Apache, and the MySQL database, installable on Microsoft Windows, Linux, and Macintosh, respectively. With this base, installing Drupal is almost a piece of cake! One of the best places to find information on how to install Drupal is the Drupal install guide, located at http://drupal.org/getting-started/install.
The primary modules we’ll be using through the book are located at these pages:
n Content Construction Kit: http://drupal.org/project/cck n Views: http://drupal.org/project/views
n Chaos Tool Suite: http://drupal.org/project/ctools n Panels: http://drupal.org/project/panels
You will need to download these modules. Pick the most recent recommended version, which will be in green and say “recommended for 6.x” on its project page. Once the download is complete, you will need to unzip the .tar.gz files in a fashion appropriate for your particular installation. The Drupal.org installation page in the Getting Started handbook has several recommendations to help you with this task.
Modules should be installed into drupal_directory/sites/all/modules; this directory holds modules that are not part of Drupal core. Best practices for Drupal indicate that you never install or modify anything inside the core, including the core directories. Placing these new directories under sites/all/modules keeps your additional modules and themes in one place. This consideration becomes critically important when you are upgrading; upgrades involve removing the entire core directory. If your add-on modules are there, it’s much, much harder to back them up before performing an upgrade.
Once the modules are installed, log into your site through a Web browser, navigate to Administer >> Site building >> Modules, and enable the appropriate modules. For now, you need to enable only the CCK modules. Enable them all; we’ll talk about them and use most of them in various examples.
If you’re not completely comfortable with the process of installing all the modules yourself, you might consider something like the Acquia Drupal stack available at http://acquia.com/downloads. It will install everything you need to run Drupal, as well as some of the most popular modules (such as CCK and Views). You’ll still have to get Panels and CTools on your own, though.
Creating a New Content Type
CCK is a small group of modules that assist in the creation of new fields for content types. Drupal core allows you to create a content type, and CCK adds the fields you want to have in that content type to make it suit your needs. This allows for the ultimate in flexibility and customization.
Figure 1-1 shows the list of available content types for your Web site. To reach it, nav-igate to Administer >> Content management >> Content types.
11
Creating a New Content Type
Figure 1-1 The Content types page
The Content types page employs a group of links for the creation, editing, and deletion of your content types. When you create your own content types later in this chapter, they will appear on this page. To create your own content type, you need to think about exactly which kind of data you need to provide for your Web site visitors. For example, suppose I want to create a Web site about homebrewing. I have friends who are interested in alcohol as well, so I want to share my knowledge and recipes with them. At the very least, I’ll need a Blog or Story content type and a Recipe content type. Drupal already comes with Blog and Story, but does not provide a Recipe type by default (more about the base node types later). I’ll have to make one myself. I brew beer and mead—but what if I want to try making wine someday, or cider? Do I want to have a generic “ingredients” label or do I want to make specific groups of types of ingredients? All of these beverages use yeast. What else might they share? Do I even need to worry about that issue yet?
As another example, suppose that I have a client who wants to sell shirts. He’ll eventu-ally want to be able to show the shirts, the sizes that are available, and the different styles. He might want to have specials on a given shirt. Which content types does he need?
Let’s take a look at the first step of creating your own fully customized data by creat-ing a content type. Figure 1-2 and the followcreat-ing exercise show you the Content type
page and walk you through the steps needed to complete it. In later chapters, we’ll take this content type and discuss the technical implication of each field.
Exercise 1-1
Creating a New Content Type: Beer Recipe
You’ve got a Web site where you’d like to keep track of your homebrew recipes. You need to create a content type to contain recipe information.
1. Click the Add content type link.
2. Give the new content type a Name, Type, and Description.
13
Creating a New Content Type
Field Value
Name Beer recipe Type beer_recipe
Description Homebrew recipes—relax, don’t worry!
3. Save the content type.
4. Open the submission guidelines fieldset and enter “About this recipe” in the submission guidelines.
5. Open the Workflow settings fieldset and check the boxes labeled “Published” and “Promoted to front page” as well as the radio button under the heading
“Attachments” labeled “Enabled.” 6. Save the content type.
When you go back to the Content Type List page, your new content type will be added to the listing of available nodes to create. Clicking the Edit links will take you back to the content type creation page with the values you entered previously. You can also add a new homebrew recipe for your Web site from this page.
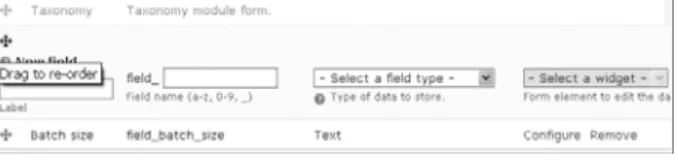
CCK’s purpose is to help you do one real task: add fields to your content types. It does so primarily by adding an engine and user interface (UI) that assists you by asking for some information and using that data to create and update tables with spaces for new fields. Fields are primarily defined by the type of data they will contain—numeric, text, image, and so on. With CCK and the addition of some helper modules, you can create a storage place for nearly any kind of data you want.
CCK is a project that contains several modules, which are listed later in this section. These are not the only modules available for CCK, of course; they’re just the ones that are installed when you download CCK and add it to your Drupal installation. Two gen-eral types of modules exist: field modules and helpers. Field modules help you create new fields, and helper modules perform data or display manipulation.
Here are all of the CCK modules and their purposes:
n Content: The basic required module.
Helpers
n Content Copy: Used for importing and exporting fields. It is useful for migrating
field definitions between multiple installations.
n Content Permissions: Allows the administrator to add and update permissions on a
per-field basis.
n Fieldgroup: Creates groups for fields. It allows fields to be grouped together
visu-ally on input forms and content display. A fieldgroup might be used for a mailing address, for example, to group each street address, ZIP code, and state into a single area on the Web page.
Fields
n Nodereference: Adds a field that allows the administrator to create relationships
between nodes. It is especially useful when a node contains another node. An author node may contain a “published works” node that holds images from a book, for example.
n Text: Adds field types to enter short (single-line input boxes) or long (text area)
amounts of text.
n Userreference: Allows the administrator to establish a relationship between a node
and a user.
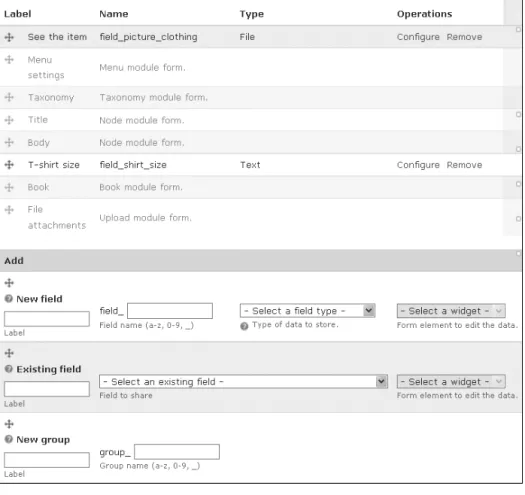
Many modules can be added to CCK to accomplish a variety of tasks. These add-ons have been contributed to the community for everyone’s use. We recommend visiting the project’s modules page (http://drupal.org/project/Modules/category/88) to see the full list of available add-on modules. Be warned: There are many, many add-ons and the list can be overwhelming! The majority of these modules are classified as either field or helper modules.
Some examples of CCK field modules are Number and Date, both of which were created to meet very common user needs. For example, Date helps you to customize how your system stores and displays dates so that you can personalize the system based on the needs of your audience, wherever they might be located. Add-on helper modules include CCK Blocks, CCK Formatters, and Range, all of which modify how data from CCK-based fields is displayed.
CCK is only as powerful as the designer using it. When creating a Web site, as with any development work, thinking ahead about design is at the very least a good strategic move, if not a crucial one for facilitating later work. Take some time to plan out what content you will need. From product descriptions to images to prices, there is a hefty amount of potential content. If you take the time to do some planning, you’ll know what information you have, which content types that information is in, and what has
been intentionally shared from the beginning. This will go a long way toward helping you understand where your data is when you try to create a list for display.
CCK may give you the nails, but without a plan in place, you’re going to hammer those nails into the wrong boards and your construction will fall apart. Knowing how nodes are put together gives you the basic structure to start putting new information into your site.
Summary
CCK enables a user to easily draw down a node creation form, placing all of the node’s fields in one clear and easily accessible place. Each form contains clearly marked slots to hold easily identifiable information. Users can be given as much or as little help as nec-essary with the use of additional text to ease the creation of nodes. The downside is that the administrators need to set that form up in a fashion that is easy to use and makes sense to the user.
The power of CCK strengthens the core of Drupal Web sites, allowing site creators to take the next step by adding fields and bringing the site to life. And once you’ve used CCK to set up your fields, your users’ experience is both enriched and significantly easier.
15
Summary
2
Field Concepts
F
ields are the protons, neutrons, and electrons of the Drupal atom. You can’t build a node without fields, and every content type is made up of fields.This chapter expands on the general usage of content types and fields. We’ll talk about how they’re created and about what happens in the database. To do that, we’ll explore two potential Web sites: a homebrewer’s journal and a T-shirt sales site.
What You Should Know Before Creating Fields
and Content Types
Basic field and content type creation is one of the more common tasks to accomplish once you’ve made a plan for what you wish to create. The real work begins when you try to figure out how to actually create what you want.
Drupal has a number of overlapping names for different functions and concepts. One overlap that we should cover before going on is the difference between fields, field types, and field instance settings. Fields are any area on the page where you can add information—an identified slot of information that is often referred to as a form field. A field type is the type of data that the field can store, such as a date, a number, or text. Field instance settings are options that can be set for a particular field in a node type. We’ll talk in more depth about specifics later. For now, just recognize that fields are what make up a content type, and their structure depends on the choices you make in creating them.
The Content Type Pages
Creating multiple new content types requires a fuller understanding of the content types pages. We created one content type in Chapter 1, so the landing page is not completely unfamiliar. In addition to the List page that lists your types there is also an Add Content Type page where you can add new types.
On the content types List page, you’ll find a list of all of the currently available content types for your site. The name, the type, the description of the content type, and the operations you may perform on that content type are all detailed on this page. The edit, delete, and manage field operations are available as well. When CCK is not installed, this page looks a little different, and the manage field operation is not available.
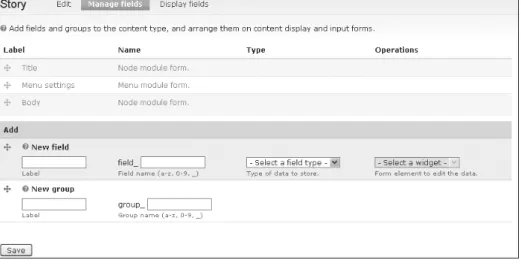
The following operations are available on the List page when CCK is installed:
n Edit: Allows you to change the basic settings for a content type. n Delete: Removes a content type entirely.
n Manage fields: Goes directly to the Manage fields tab inside that content type. This
page may also be reached by choosing the “edit” option next to a content type, and then selecting the Manage fields tab.
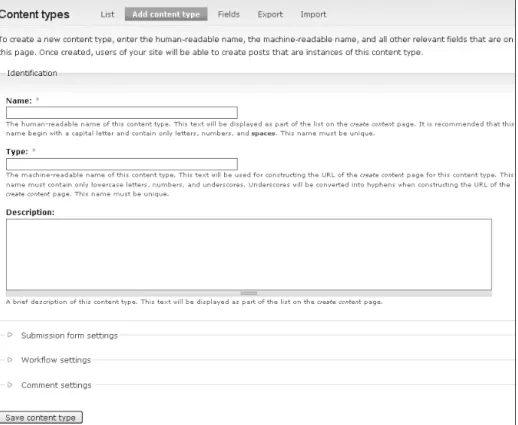
The second tab is Add Content Type. This page is a little more complex, but it’s useful to understand what everything here does. This tab is where you define the foundation of new content. You could create a recipe, a weekly specials node type for a storefront, or any number of other things. This page is divided into four sections you need to understand before you can create a new content type: Identification, Submission form settings, Workflow settings, and Comment settings.
To explain how this process works, we’ll create a new recipe content type. Because I’m a brewer and I want to keep track of my recipes, I’ll create a new Beer recipe content type.
Identification
Identification is broken up into three form fields, two of which are mandatory. First is the Name field, which is the user-friendly name that will show up on the user interface (UI) when the content creator wants to add new information to the site. When creating a new content type, you’ll want to choose something simple and reasonably obvious as the name. For our example, we’ll use two words: Beer recipe.
The Type field gives the base of the actual name of the database table you are going to create. The Type also will become part of the URL construction when you edit the content type later. It’s a very good idea to make this machine name short and descriptive and probably similar to the Name. Because I want to keep my Type consistent with the Name and be descriptive, I’ll use beer_recipe.
Last is the Description field, which is optional. Description is where you can add some text explaining to your users what the purpose of this content type is. This infor-mation will appear on the content type List page, so it should be short but explicit. For our example, I’ll explain to my users that these recipes are for tasty homebrewed beer— relax, don’t worry.
Figure 2-1 Content type identification
Special Characters
The Name and Type fields are limited in the characters that can be used to define them. The Name should include only alphanumeric characters and spaces. The Type should include only lowercase letters, numbers, and underscores (any Unicode character of type a–z, 0–9, or _). The Name and Type field names must both be unique, and are required.
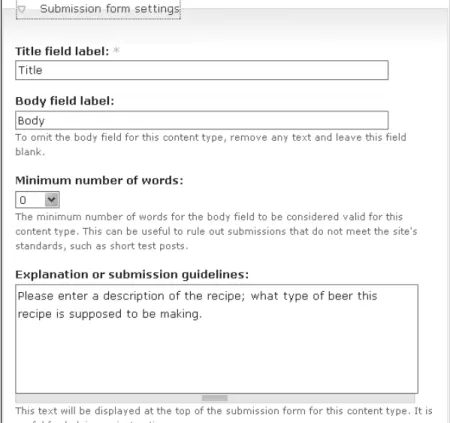
Submission Form Settings
Submission form settings specifies the defaults and requirements for the new node to be submitted. The Title field label is a required field; the information provided here will appear as the title of the submitted content. In many cases, the Title field should be left untouched. For our recipe example, I’ll leave the Title field alone; I almost certainly am going to want to have a different name for each recipe, and the title should be an obvious marker. At best, I could change the label to “Recipe name” to make it more in character with the actual working of the node.
19
The Content Type Pages
The Body field label is not required, but removing the default text will remove the Body field from the content type entirely. For my new content type, I have to think about the Body field label. The new content type is a recipe: Does it need a Body? A question often asked by CCK users is, “Should I use a Body field or a CCK field?” On the one hand, it’s easiest to use the Body field. It is already there and is used in the same fashion in many other content types. On the other hand, a CCK field can be defined to do many things and is very flexible. For now, I’ll stick with the default body field; I don’t have a good reason not to do so, and I don’t need to use anything other than a plain text box for my description—and that’s what Body already provides.
For our example, each recipe should have a description of what it is, so that other brewers know what to expect if they try this recipe themselves. I’ll change the label to “About this beer:” to clarify this point.
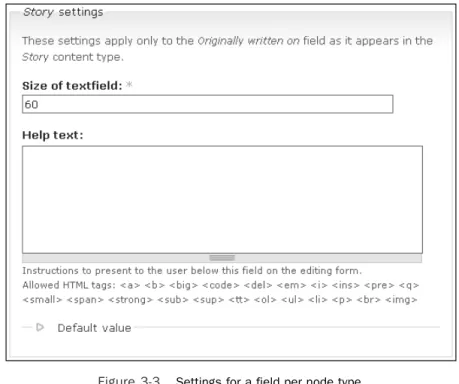
The Minimum number of words field adds a requirement for the amount of text that must be provided before the new content can be added to the site. Explanation or sub-missions guidelines is a text box where the administrator can place help text that will guide node authors later when they are adding content. Right now, I don’t want to
specify a minimum number of words to submit the new content, so I’ll leave the drop-down menu at 0 and make a note in the Explanation guidelines indicating that this field should tell other brewers what the recipe is intended to create.
Figure 2-2 shows what the section looks like when filled out as indicated.
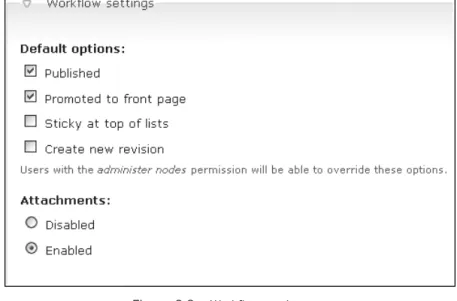
Workflow Settings
The Workflow settings section, shown in Figure 2-3, specifies two things for new con-tent: default options and attachments. These can be set up by node type. Default options include “Published,” “Promoted to front page,” “Sticky at top of lists,” and “Create new revision.”
For example, the Story type is published and promoted to the front page by default. For my recipe example, I plan to leave “Published” and “Promoted to front page” checked. Chances are that when I’m submitting a new recipe, it’s because I’ve just brewed a novel beverage and I want people to see what I’ve done most recently.
The “Sticky at top of lists” option sets the sticky bit in the database and forces content with this flag set to remain at the top of its content area. For my recipe, setting the sticky bit probably isn’t too useful. If I were writing an example recipe for other users to follow, however, setting the sticky bit would make it very easy for a new user to find it.
The “Create new revision” option turns on revision controls for this content type. This allows you to save a record of each change that is made to that specific node. For example, I typically want to duplicate a beer recipe as it is written. But what happens if I have a recipe that I want to reuse, but I can’t get one of the ingredients I used before? I’ll have to revise the recipe. I’ll go ahead and check the “Create new revision” box so
21
The Content Type Pages
Figure 2-3 Workflow settings
that I can easily make a revision while preserving a copy of the original recipe. It is appropriate to leave “Create new revision” turned off for most content types; however, if you know you’ll want to refer back to older versions of nodes on your Web site, you should enable this option.
Comment Settings
The Comment settings section, shown in Figure 2-4, covers the myriad options available for commenting on nodes. The default comment setting is the basis for the rest of the choices. If comments are disabled, none of the other settings is necessary. The rest of the options determine how comments on a node are displayed, in what order, and so on. Comments are part of a node, and you may occasionally see them listed with node types, but they are not nodes in and of themselves. Comments are not critical to the creation of a node, and CCK is not concerned with comments as a rule. That leaves comments out of the general scope of our discussion here. They might be useful for the recipe, but I’ll leave comments alone, and call it do