San Jose State University
SJSU ScholarWorks
Master's Projects Master's Theses and Graduate Research
Spring 2018
PE Header Analysis for Malware Detection
Samuel Kim
San Jose State University
Follow this and additional works at:https://scholarworks.sjsu.edu/etd_projects Part of theComputer Sciences Commons
This Master's Project is brought to you for free and open access by the Master's Theses and Graduate Research at SJSU ScholarWorks. It has been Recommended Citation
Kim, Samuel, "PE Header Analysis for Malware Detection" (2018).Master's Projects. 624. DOI: https://doi.org/10.31979/etd.q3dd-gp9u
PE Header Analysis for Malware Detection
A Project Presented to
The Faculty of the Department of Computer Science San José State University
In Partial Fulfillment
of the Requirements for the Degree Master of Science
by Samuel Kim
© 2018 Samuel Kim
The Designated Project Committee Approves the Project Titled PE Header Analysis for Malware Detection
by Samuel Kim
APPROVED FOR THE DEPARTMENT OF COMPUTER SCIENCE SAN JOSÉ STATE UNIVERSITY
May 2018
Dr. Mark Stamp Department of Computer Science Dr. Melody Moh Department of Computer Science
ABSTRACT
PE Header Analysis for Malware Detection by Samuel Kim
Recent research indicates that effective malware detection can be implemented based on analyzing portable executable (PE) file headers. Such research typically relies on prior knowledge of the header to extract relevant features. However, it is also possible to consider the entire header as a whole, and use this directly to determine whether the file is malware. In this research, we collect a large and diverse malware data set. We then analyze the effectiveness of various machine learning techniques based on PE headers to classify the malware samples. We compare the accuracy and efficiency of each technique considered.
ACKNOWLEDGMENTS
I would like to thank, my project adviser, Dr. Mark Stamp, with his guidance and patience. I also would like to thank my committee members, Dr. Melody Moh and Mr. Fabio Di Troia for their assistance and help in this project. Finally I would like to thank my parents for their support and encouragement.
TABLE OF CONTENTS CHAPTER 1 Introduction . . . 1 2 Background . . . 4 2.1 PE File Format . . . 4 2.2 Prior Work . . . 6
2.2.1 PE Header for Malware Detection . . . 6
2.2.2 Detection Utilizing Support Vector Machine . . . 6
2.2.3 Machine Learning . . . 7
2.2.4 PE Header with Minimal Domain Knowledge . . . 7
2.3 Feature Definition . . . 9
2.3.1 Feature Full . . . 9
2.3.2 Feature Free . . . 9
2.4 Machine Learning Algorithms . . . 9
2.4.1 Random Forest . . . 10
2.4.2 K-Nearest Neighbors . . . 10
2.4.3 Support Vector Machine . . . 12
2.4.4 OVO and OVA . . . 13
2.4.5 Neural Network . . . 15
3 Implementation. . . 18
3.0.1 Data . . . 18
3.0.3 Software and Hardware . . . 22
4 Experiment and Results . . . 23
4.1 Design of the Experiment . . . 23
4.2 Random Forest Experiment . . . 24
4.3 K-NN Experiment . . . 25
4.4 SVM Experiment . . . 25
4.5 Neural Network Experiment . . . 26
5 Future Work and Conclusion . . . 27
LIST OF REFERENCES . . . 29
APPENDIX A Features . . . 32
LIST OF TABLES
1 Group A - VirusShare, Group B - Industry Partner . . . 8
2 Results from 102 family classification . . . 26
3 Results from binary classification (malware vs benign) . . . 26
A.4 Features used for feature free experiments, extracted using pefile library . . . 32
A.5 101 family used for classification . . . 33
B.6 Feature full family, feature importance . . . 36
B.7 Feature full binary, feature importance . . . 39
B.8 Feature free family, top 15 feature importance . . . 40
LIST OF FIGURES
1 Hex view of the first part of the PE file . . . 5
2 K-NN classification example [1] . . . 11
3 SVM classification example [2] . . . 13
4 Kernel trick [3] . . . 13
5 Kernel trick transformation [3] . . . 14
6 OVO and OVA example [3] . . . 14
7 Neural Network . . . 16
8 Illustration of single node . . . 17
9 Linux command to list PE file . . . 19
10 Code snippets to explain the relevant PowerShell commands . . . 20
11 Snippet of the log file that was exported . . . 20
12 Setting the encoding flag to open the file . . . 21
13 Linux find command to list all files on the mounted hard drive . . 21
14 Windows Defender naming convention [4] . . . 22
15 Sampling example . . . 23
CHAPTER 1 Introduction
One of the managers came to our office requesting help to access his files. He could not open any of the files on his laptop. He was a victim of ransomware inadvertently downloaded onto his computer when opening an email attachment from work. The anti virus software on the mail servers and his laptop computer failed to detect the malware instance. This software not only encrypted the files on his laptop, but also encrypted his external backup drive. In order to get his files back, this particular malware required payment to be made through cryptocurrency. Unfortunately, it was company policy to not pay the ransom. In the end he lost years worth of work on multiple projects. This is a true story, and stories like this have become increasingly common.
Although the number of unique malware types have decreased, the total number of malware instance have increased significantly [5]. Malware developers have become more focused on certain types of malware, such as ransomware, and have developed methods to obfuscate the purpose of the code making them difficult to detect. Some ways of obfuscation is by polymorphic or metamorphic self replication, where each new replicated malware instance is undetectable by current signatures. The number of active malware instances encountered has continued to grow exponentially, driven both by replication of existing malware designs and new malware development. To combat this growth, different detection methods have been developed.
The most common detection method which is still in use today is signature detection. When a malware instance is identified a signature is extracted. The signature is a unique contiguous set of bytes which identifies the malware [6]. Normally the signature is extracted from the payload, which executes the actual malicious act [7].
files as often occurs with viruses, or even stealing personal information as commonly happens in web and email-based malware. Once the signature has been identified, it is placed in a database and utilized to identify the malware instance. The key weakness to this technique is that the malware must first be identified and a unique payload extracted, after which an analysis can be utilized for detection.
The heuristic method is a process by which the activities of a malware instance is analyzed either in realtime, where the maware is executed in a virtual environment, or by decompiling and analyzing the code. When running in a virtual environment, malicious activities of the program are observed. The anti virus software attempts to detect whether acts such as file replication, overwriting, or obfuscation are attempted. When the code is decompiled, a comparison is made with known malware code to determine if the program is malicious [8]. The primary weakness of this method is its inability to detect viruses which utilize new methods to implement the malicious activity.
In a generic detection method, the virus is detected by identifying generically threatening techniques. Examples of generic detection might include contacting a known ip address, renaming files or modifying a specific file [9]. Unlike heuristic approach, the program is not thoroughly analyzed for detection, but rather generically detected. The weakness in this method is that it is unable to find unknown malware. To improve on some of these shortcomings, machine learning technique have been developed to detect malware. Features are extracted using either a dynamic analysis or static analysis of the potential malware instance [10]. In dynamic analysis, features are extracted by running or emulating the code. In contrast, static analysis looks at the sequence of bytes or opcode values and extracts features from that information. Most of these studies require analysis or execution of the entire program. There are only a few studies which focus only on the PE headers.
Most studies have fairly small data sets (in the thousands). The few studies which utilize large data sets are unable to share them due to various restrictions on use of the data. It is fairly easy to get large data sets of computer viruses, but these sets are unorganized and not cleaned for machine learning. Furthermore, getting large data sets that are labeled and classified in multiple groups (such as families of malware) are also difficult to collect or unavailable.
In this paper we will be using a large data set of over 500,000 labeled malware instance. We will go over how this data set was collected and labeled. Analysis of each PE file will focus on the header; we will explore the feasibility of this technique to identify and classify malware. Both feature free and feature full approach will be used in the machine learning algorithms.
In Chapter 2, we will go over some background information. We will review some of the previous work which has been done that specifically focuses on the PE header. The PE file structure will also be reviewed in this chapter. Furthermore, there will be an overview of the features and machine learning algorithms that will be used in this project. In Chapter 3, we will discuss how the malware was labeled using Windows Defender, and what these labels mean. This chapter will also talk about the tools and libraries used to parse the header and run the experiments. Chapter 4 will discuss the experiments and results. Finally, Chapter 5 will provide a conclusion and a direction for future work.
CHAPTER 2 Background
Section 2.1 of this chapter will introduce the PE file structure. In Section 2.2, prior malware detection work utilizing the PE header will be discussed. PE features will be covered in Section 2.3. Section 2.4 will go over the machine learning algorithms which will be used in the experiments.
2.1 PE File Format
Windows program files are in a specific format called Portable Executable (PE). They were first introduced back in Windows NT 3.1 [11]. Since its introduction, extensions have been made for additional binary formats including .NET and 64 bit support (PE+32). This is the standard binary format for EXE and DLL files under Windows.
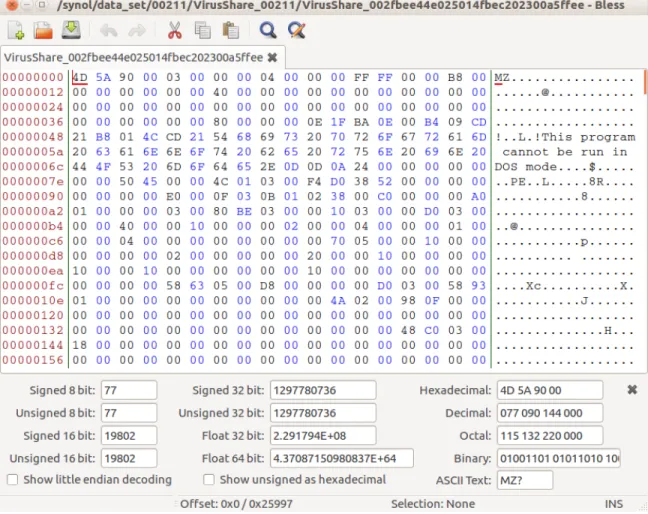
The PE file starts with the MS-DOS header, the bytes being the ascii value of MZ as shown in Figure 1. This identifies the first part of the file as a MS-DOS header section. The next section is the stub program, a full fledged MS-DOS program. The purpose of this program is to give a descriptive error message to the user if the program is executed in MS-DOS, or any version of Windows prior to Windows NT 3.1. The hex view in Figure 1 shows a message "This program cannot be run in DOS mode". Note that the programmer can insert any stub program that they like.
The hexadecimal address at 0x3c contains the offset to the PE signature [12]. The PE signature follows the MS-DOS stub and consists of 4 bytes which identify the image format; a PE format image file will have a signature consisting of the letters P, E, and two null bytes: i.e., "PE\0\0" [13]. After the signature is the PE header.
Included in the PE header is the COFF file header. This includes the Machine field, in our case this will be an INTEL 386 or compatible processor, the NumberOfSections, the SizeOfOptionalHeader, the NumberOfSymbols and PointerToSymbolTable. After
Figure 1: Hex view of the first part of the PE file
the COFF file header is the Optional header. This header is divided in two parts: the Window specific fields, and the data directories. The Window specific fields is used by the operating system to load and execute the file. The data directories contain the location (RVA) and size of the different tables which are required by the OS, These are loaded into memory at run time.
After the Optional header is the section tables. These are basically the Section header for each data section. Matt Pietrek calls it the "phone book containing information about each section in the image" [11]. It contains size and location information.
Sections are where the code or data is located. For instance, the .text section is where your code goes, the .data section is where your static and global variables are stored, and the .bss section is the location of the uninitialized variables.
2.2 Prior Work
From this brief overview of the PE file format we can see that the PE header is quite complex, with many variables and fields. It is common for malware developers to manipulate the PE header to hide the malware instance from anti virus software. In this section we will review some of the studies that focuses on the PE header. 2.2.1 PE Header for Malware Detection
This small project, [14], demonstrated malware detection by extracting the header fields and making a comparison of these features against benign files. The "pefile" Python library was used to extract the File, Optional, and Section headers. No machine learning was used, however all the features from the extracted headers were compared. The top 5 feature which differed significantly from a benign header were used for binary classification. A 99.5% true positive rate was achieved using this detection method.
The benign data set was downloaded from download.com and softpedia.com. A program was developed, called Web-Spider, which uses the BeautifulSoup and Appscript libraries to download these files. The malware was provided by the professor, Dr. Perdisci. A total of 5,598 malware samples and 1,237 benign samples were used in the project.
2.2.2 Detection Utilizing Support Vector Machine
This study, [15], used Support Vector Machine algorithm to detect and classify malware. The Microsoft application Dumpbin was used to extract the header infor-mation. They classified the malware into 5 different classes: benign, virus, email
worm, trojan and backdoor. Feature selection was done and an accuracy of 98% was achieved for detecting virus. No classification accuracy was given, however accuracy of above 80-90% was achieved for each of the malicious classes against benign files.
This project had 1,908 benign programs and 7,863 malicious files. The virus binaries are from VX Heaven and was identified by the Kaspersky anti virus software. The benign files were extracted from Windows 2000 and XP operating system, and a website called PChome.
2.2.3 Machine Learning
This project, [16], compared and used multiple machine learning algorithms to classify malware. The following algorithms were used in this research: Naive Bayes, Decision Tree, SVM, Random Forest and IB5. All the algorithms had an area under the ROC curve (AUC) above 0.85 for both multi-class and binary classification. Random Forest had the best AUC result of 0.991 for multi-class and 0.998 for binary classifications.
The data set was collected from various sources, some of them pre-labeled. All viruses were cleaned using 3 different anti virus applications. 8,265 benign files and 15,641 infected files with 7 different classes were in the data set. Headers and Import tables were extracted using the objdump program. A total of 1,867 features were extracted.
2.2.4 PE Header with Minimal Domain Knowledge
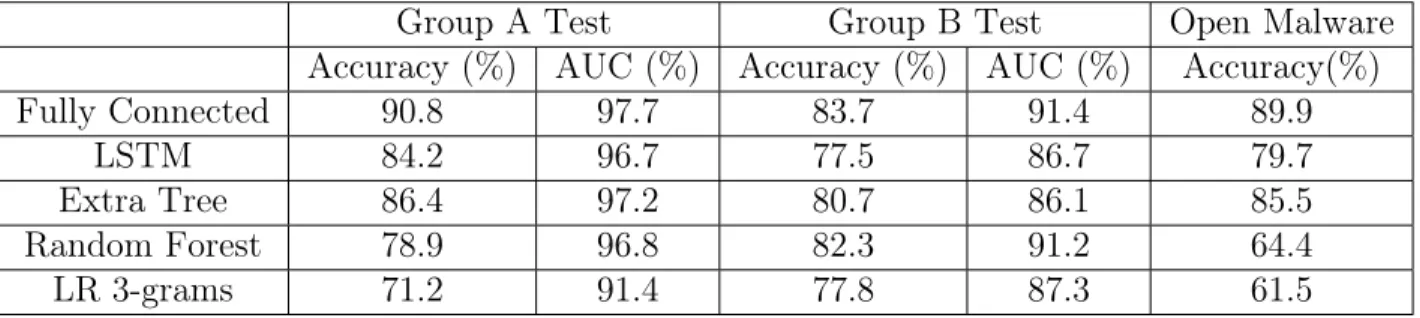
Lastly, this paper [17], which our project is based on, obtained their malware data sets from three different sources: VirusShare, Open Malware, and an "Industry Partner". These data sets were grouped by their sources. The total number of malware were 541,575 where 240,000 of them were from the "Industry Partner", these were unavailable due to a non disclosure agreement.
Five machine learning models were utilized in this approach. Two kinds of features were extracted from the PE header, minimal domain knowledge and domain knowledge. The minimal domain knowledge approach uses the byte value of the header, where as the domain knowledge approach uses the extracted header information based on the PE specification from Microsoft (both approaches are detailed in Section 2.3). The first 3 header sections from the PE file was used, Import tables were not utilized. The baseline approach was using a domain knowledge feature onto two tree based learning algorithms, Random Forest and Extra Trees. These algorithms were applied to each of the groups. The result of the tree based model gave an accuracy of 99% for both VirusShare and Open Malware data sets, and 69.9% for the "Industry Partner" set. No other machine learning model results based on domain knowledge features were published in this paper.
The minimal domain knowledge feature for the five machine learning model results are shown in Table 1.
Group A Test Group B Test Open Malware
Accuracy (%) AUC (%) Accuracy (%) AUC (%) Accuracy(%)
Fully Connected 90.8 97.7 83.7 91.4 89.9
LSTM 84.2 96.7 77.5 86.7 79.7
Extra Tree 86.4 97.2 80.7 86.1 85.5
Random Forest 78.9 96.8 82.3 91.2 64.4
LR 3-grams 71.2 91.4 77.8 87.3 61.5
Table 1: Group A - VirusShare, Group B - Industry Partner
As we can see, the accuracy was above 70% for all 3 groups while the Neural Network (Fully Connected) had an accuracy above 80%. Binary classification was applied to all experiments.
2.3 Feature Definition
In this section we will clearly define the features that were used in this project. We will cover feature full and feature free, note that these were referred to as "domain knowledge" and "minimum domain knowledge" in [17].
2.3.1 Feature Full
Feature full is produced by extracting the feature utilizing knowledge of the Microsoft PE specification. For example, in the PE specification the value for NumberOfSection is located in the Image file header, 2 bytes after the signature. The value extracted would be used as a feature. There are a number of programs and libraries that parse the PE file in this manner, such as PortEx, pefile, and objdump. We used the pefile library on the first 3 header sections, resulting in 87 features. The list of exact features used is in Appendix A.
2.3.2 Feature Free
Feature free is simply reading the first 64 bytes from the MS-DOS header and adding the PE header which starts at the offset defined at 0x3c. 264 contiguous bytes are read, starting from the offset. Each byte is considered a feature, giving us 328 features. The header file may not end at byte 328, however it gives us a general overview of the header without parsing out each specific feature. This is in contrast to the feature full approach. The feature free calculation was utilized in the previous project, [17].
2.4 Machine Learning Algorithms
This section will give a brief overview of the machine learning model which was used in this project.
2.4.1 Random Forest
The Random Forest approach consists of multiple decision trees created from a dataset. Random sets of features are picked at the split of each node. The average probability from each decision tree will be used to determine the classification.
Here is the basic algorithm for training a Random Forest classification [18]. 1. For each decision tree that is going to be grown:
(a) Choose a random subset from the data set, this will be used to build each decision tree.
(b) Grow each tree, apply following steps on each node until the minimum depth is reached.
i. Randomly select a set of features.
ii. Pick the best split point based on the randomly selected features. iii. Split the node into 2 child nodes.
2. Output the forest (all of the trees).
For example, consider a 5 tree Random Forest. Each tree would be created using one of the 5 subsets that was created in part (a) of the algorithm. Individual trees would be created by selecting a random fixed set of features at each node, then picking the best split point based on those features that will create two child nodes. This will be repeated until the minimum chosen depth is reached. Once the forest is created, the average probability on all 5 trees for each leaf classification can be computed to determine the classification [19].
2.4.2 K-Nearest Neighbors
K-NN is a clustering machine learning algorithm that uses the training set to determine the classification. The K in K-NN simply means that you are choosing the
K number of the nearest neighbors based on feature using a distance formula. The Euclidean distance is a commonly used formula for this model [20].
Figure 2: K-NN classification example [1]
The sample in Figure 2 shows a plot of two classes, ‘‘a’’ and ‘‘o’’, based on two features. The ‘‘a’’ and ‘‘o’’ points are from the training set, therefore there are 8 class ‘‘a’’ training points and 7 class ‘‘o’’ training points, for a total of 15 elements in the training set. The vector ‘‘c’’ is the input which we are trying to classify. If 𝐾 = 3, then the 3 nearest neighbors to ‘‘c’’ would be 2 ‘‘o’’s and 1 ‘‘a’’, by majority rules this would make ‘‘c’’ a class ‘‘o’’.
Since the classification is based on the number of nearest neighbors, it is possible for a tie to exist, particularly if the K is even or is a multiple of the number of classes. There are different ways of handling this, you can either choose a K which is not even and not a multiple of the number of classes, or randomly pick a class [18, 21].
The weakness in this model is the cost in calculating the distance to all the training points. Additionally with larger feature spaces the complexity of the equation makes it difficult to compute [21].
2.4.3 Support Vector Machine
Support Vector Machine (SVM) is a supervised learning classifier which was originally intended for binary classification, however it can be extended to more than two by using one-versus-one or one-versus-all classifications. We will first give a brief description on how SVM works for binary classification. Then we will touch on one-versus-one and one-versus-all classification and how they apply to SVM.
SVM implements classification by producing the best line or hyper-plane between the two classes. This hyper-plane is generated by determining the widest margin which separate the two groups without having any of the points inside that margin. In Figure 3, we can see that the larger margin is 𝑧2. The one # and two points would
be the support vectors. Finding the best line is a constrained optimization problem where the support vectors would be considered the constraints and the optimization is finding the best line by maximizing the margin. This problem can be solved using techniques from Lagrange multipliers. [22] provides more information on how the Lagrange multiplier is used in SVM.
The Figure 3 example has two features, therefore it has two dimensions. The same solution and technique can be applied to larger dimensions with more than two features. The classes in this case would be separated by a hyper-plane.
Another way to change the dimension is to use the kernel trick. This transforms the training points into a different space by adding another factor [23].
Figure 4 shows a plot that cannot be linearly separated in its current state. By applying the kernel trick to the training points, this will essentially project the points into a different dimension as shown in Figure 5. As a result, a third dimension 𝑍 is
added which makes the classes linearly separable.
There are a variety of transformation that can be used in the kernel trick. These include Linear, Radial Basis Function, Polynomial, and Sigmoid [20].
Figure 3: SVM classification example [2]
Figure 4: Kernel trick [3] 2.4.4 OVO and OVA
Although SVM is intended for use with binary classification, classification with more than two classes can be accomplished utilizing the one-vs-one and one-vs-all techniques. These techniques can be used generically with any binary classifiers [24].
Figure 5: Kernel trick transformation [3]
Figure 6: OVO and OVA example [3] 2.4.4.1 OVO
The one-vs-one (OVO) method compares each of the classes against each other to define the classification [24]. Figure 6 shows a plot of 3 classes, ×, △, and . In
the OVO method you would train the machine learning algorithm 3 times creating 3 binary models with the following classification, × vs △, × vs and, △vs . Now
when a new vector𝑧 is classified, it is input into each of the models. The classification
will be based on which of the classes have the most votes, also known as majority rules. For example, if two of the models output × and the third model outputs a△
one vote. This method allows a balanced comparison when there is an equal number of classes with all the training data. However, as more classes are added more models need to be trained for each of the comparisons.
2.4.4.2 OVA
The one-vs-all (OVA), also known as one-vs-rest, method compares each class against all of the available data [24]. Again looking at Figure 6, 3 binary classifiers
will be created: × vs △ and , △ vs× and , and vs △ and ×. To determine
what class a 𝑧 vector is in, the 𝑧 vector will be input into each of the models and the
highest probability will be chosen. This method requires fewer classification models to be trained than OVO. However, training is imbalanced, since one class is being trained against the rest of the classes.
2.4.5 Neural Network
Finally, the last machine learning algorithm that we will use in this project is the Neural Network. The first part of this section will describe the components of the Neural Network and how a given input is classified. The second part will go over the training and learning process.
2.4.5.1 Structure of Neural Network
The Neural Network is consists of nodes known as Perceptrons [25]. These Perceptrons are organized in layers where the first layer is the input layer and the last layer is the output layer. All layers in between the input and output are called hidden layers. This model is fully connected because each node in one layer is connected to all the node in the next layer. We can see in Figure 7 that there is an input layer, a hidden layer, and an output layer.
Each node has an activation function that takes a given input and outputs a value between 0 and 1. Some common activation functions include sigmoid, ReLu
Figure 7: Neural Network
and tanh [24]. The edges which connect these nodes are represented as weights. The product of the weights and an activation value is sent to the next layer as input. The weights are the variables that are tweaked to learn the correct output. Although not shown in Figure 7, the bias value is another variable which is also adjusted. It is a way to control the inactivity of the weighted sum. There is a unique bias for each of the hidden and output layers which is added to each node of those layers.
In Figure 8 we can see that there are four inputs, the product of all the𝑥𝑖 and𝑤𝑖.
These values are summed up with the bias 𝑏 and input into the activation function.
The 𝑥𝑖 are the activation values and the 𝑤𝑖 are the weights. The output of the
activation function is the new 𝑥 for the next layer. This process continues until the
output layer of the Neural Network. The output is in decimal form and the largest value from those output nodes is the result. For example, in Figure 7 the two outputs represent benign or malicious. If the top output node (benign) is 0.53 and the bottom
Figure 8: Illustration of single node
output node (malicious) is 0.47 then the prediction result is benign. The total of all the output nodes will equal one, 0.53 + 0.47 = 1.
2.4.5.2 Training Neural Network
When training the Neural Network, the end goal is to minimize the cost function. The cost function is the predicted output minus actual output squared and averaged among all the training data. To minimize the cost, the gradient descent is applied to cost function. This will give directions on how to change the weights and biases to decrease the cost. Back-propagation is the algorithm used to compute the gradient descent, [25] provides more information on propagation. The details of back-propagation is outside the scope of this paper.
CHAPTER 3 Implementation
In this section we will describe the data set and the process we took to label each PE file. Code snippets will be shown to demonstrate the key commands that were used in this project. These are not full programs but simple demonstrations of how they are used. The libraries and hardware will also be covered here.
3.0.1 Data
The larger labeled data set from the various papers which we found were un-available due to NDAs and license agreement. We attempted to use VirusTotal to label the malwares, however there were limitations to the student account that was provided to us. The rest API queries were limited to 10,000 per day and the request per minute were also throttled. This subsection will describe the process we utilize to verify and label the data set using Microsoft Windows Defender.
List of software that was used to process and label the data. • Linux (Ubuntu 16.04 LTS was used in this project.)
• Ktorrent (BitTorent client to download the data set) • Windows 10
• Windows Defender
• Cygwin with rsync.exe enabled • PowerShell ISE
The data set used came from VirusShare [26] and was distributed using BitTorrent. It was broken down into multiple zip files with one zip file per torrent. At the time of this writing there are over 300 torrents where the first 148 torrents, contain 131,072 samples each. The remaining torrents contains 65,536 samples each. Each zip file contains a mixed bag of samples for different platforms, this includes PE files, Android APK files, ELF files, etc...
$ / usr / bin / f i l e < f i l e _ n a m e > | g r e p P E 3 2 | sed ‘ s /:.*// ’ > > P E l i s t . txt
Figure 9: Linux command to list PE file
Since each zip file contains a variety of different file types, the Linux file command was used to filter out all the non PE files. The Linux command in Figure 9 uses the combination of file, grep, and sed to check if the file is of type PE. Looping through each file name with this line provide a list of all the PE files. Each PE file name was added to PElist.txt file. The PElist.txt was used to transfer each PE file onto a Windows 10 machine.
Before transferring using the PElist.txt file, the following Windows Defender setting were configured. Real time protection was turned on, cloud-based protection was turned off, and automatic sample submission was also turned off. The rsync.exe file and the Cygwin bin folder was also added to the Windows Defender exclusion list. This prevented Windows Defender from deleting or putting the rsync.exe file into quarantine.
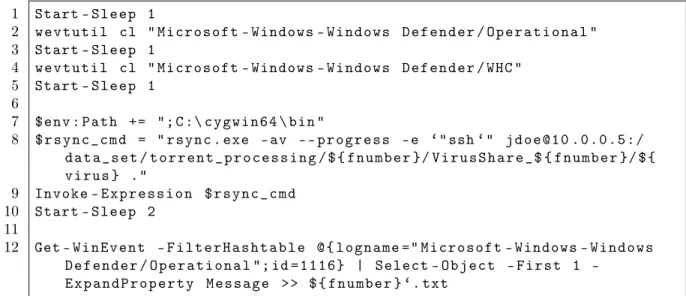
After setting the Windows Defender options, the generated PElist.txt was copied over to a Windows 10 machine. Using the PElist.txt file, each file was transferred over using the rsync command from a Cygwin install. A PowerShell script was used to transfer each file.
Figure 10 contains a portion of the PowerShell script which was used to transfer the file and extract the labels from the event logger. Windows 10 has a lot of automation built into the system so the logs can have information which we do not need. The wevtutil on line 2 and 4 will clear the logs for Windows Defender. Lines 7 through 9 utilize rsync from Cygwin to transfer the file. On line 7, $env:Path, the environment path needs to be set as a precondition in order for the script to find and
1 Start - S l e e p 1 2 w e v t u t i l cl " M i c r o s o f t - Windows - W i n d o w s D e f e n d e r / O p e r a t i o n a l " 3 Start - S l e e p 1 4 w e v t u t i l cl " M i c r o s o f t - Windows - W i n d o w s D e f e n d e r / WHC " 5 Start - S l e e p 1 6 7 $ e n v : P a t h += "; C :\ c y g w i n 6 4 \ bin " 8 $ r s y n c _ c m d = " r s y n c . exe - av - - p r o g r e s s - e ‘" ssh ‘" j d o e @ 1 0 . 0 . 0 . 5 : / d a t a _ s e t / t o r r e n t _ p r o c e s s i n g / $ { f n u m b e r }/ V i r u s S h a r e _ $ { f n u m b e r }/ $ { v i r u s } ." 9 Invoke - E x p r e s s i o n $ r s y n c _ c m d 10 Start - S l e e p 2 11 12 Get - W i n E v e n t - F i l t e r H a s h t a b l e @ { l o g n a m e =" M i c r o s o f t - Windows - W i n d o w s D e f e n d e r / O p e r a t i o n a l "; id = 1 1 1 6 } | Select O b j e c t F i r s t 1 -E x p a n d P r o p e r t y M e s s a g e > > $ { f n u m b e r } ‘. txt
Figure 10: Code snippets to explain the relevant PowerShell commands execute the rsync command. The Invoke-Expression on line 9 implements the actual execution of rsync. When the rsync command is invoked, Windows Defender will automatically detect and delete the malware that is being transferred in real time. All of these events, with information about the malware, will be logged. Finally, in line 12, the Windows Defender logs are extracted and appended to a text file. The ${fnumber} is a variable containing a string representing the zip file which the script is processing. . . . . . . . . N a m e : V i r T o o l : W i n 3 2 / V B I n j e c t ID : 2 1 4 7 6 0 0 1 2 5 S e v e r i t y : S e v e r e C a t e g o r y : T o o l . . . . . . . .
Figure 11: Snippet of the log file that was exported
The PowerShell script will generate a UTF-16 unicode text file with output similar to Figure 11. This unicode text file was moved to a Linux machine and parsed with
Python to extract the relevant labels into csv files. Because of the UTF-16 encoding, the encoding flag had to be set in the Python code as shown in Figure 12.
w i t h o p e n ( e v e n t _ v i e w e r , e n c o d i n g = ’ utf -16 - le ’) as f : h e a d e r = f . r e a d (1)
t e x t = f . r e a d l i n e s ()
Figure 12: Setting the encoding flag to open the file
The benign set was extracted from two malware free Windows 7 and 10 installation that had a variety of uninfected programs installed. The hard drive was removed from each of the machines and mounted onto a Linux operating system using an external hard drive disk dock. Using the find command, Figure 13, all paths to the files were listed. Using that list with the file command, Figure 9, all the PE files were copied over to a designated folder. To prevent duplicate files, they were renamed to their md5sum equivalent hash.
$ f i n d / mnt - t yp e f > F i l e F o l d e r L i s t . txt
Figure 13: Linux find command to list all files on the mounted hard drive 3.0.2 Malware Naming
Windows Defender uses the Computer Antivirus Research Organization (CARO) naming scheme. Figure 14 shows 5 parts of the name. The type is a broad general-ization of what the malware does. The platform entry indicates for which operating system this malware is intended. These can include Android, Linux, Windows, or others. The family entry is based on the malwares purpose and evidence that it came from the same author. Variant indicates that it is another version of the same mal-ware, normally created through replication. Finally, the last part provides additional information on the malware using a series of suffixes which can be looked up [4].
Figure 14: Windows Defender naming convention [4] 3.0.3 Software and Hardware
All experiments were done on a Centos 7 operating system. The workstation used has a 10 core Xeon E5-2630V4 processor with 64 gigabytes of memory. The Neural Network experiments were executed on a Nvidia GTX 1080 TI video card using Cuda cores. The Anaconda Python distribution was used for all experiments. This distribution contained most of the necessary libraries including Pandas, SciPy and scikit-learn. Keras and Tensorflow libraries were added to the Anaconda distribution for use with the Neural Network experiments.
CHAPTER 4 Experiment and Results
Here we will discuss the experiment and the results. The four machine learning algorithms used in the experiments are Random Forest, K-NN, SVM, and Neural Networks. The design and setup for each algorithm’s experiment will be described here.
4.1 Design of the Experiment
These experiments compared feature full vs feature free approaches for family and binary classification (benign vs malware). The data set for the binary classification was balanced with 85,042 benign files and 85,042 malware instances, sampled from the larger set. The data set for the family classification experiment was done on 102 families, where each family had a sample size of 1,000 members. 1,000 benign files was also included in this experiment, giving a total of 102,000 specimens. To make the comparison, four experiments were utilized for each of the machine learning algorithms.
d a t a f r a m e _ s a m p l e = m a l w a r e _ d a t a f r a m e . s a m p l e ( n = 8 5 0 4 2 )
Figure 15: Sampling example
The Panda sample function was used to sample the data. In Figure 15, the
malware_dataframe is a Panda dataframe containing the entire data set. The parameter n=85042 will randomly choose 85,042 specimen, without replacement (no duplicate, all
specimens are unique) returned as a dataframe. For invocation of the experiment, a new sample was chosen. Therefore all the experiments utilized a different sample from the same larger data set. This was implemented for both the family and binary
X_train , X_test , y_train , y _ t e s t = t r a i n _ t e s t _ s p l i t ( X , y , t e s t _ s i z e = 0 . 2 )
Figure 16: Splitting the data set
After sampling, data sets for all the experiments were shuffled and split into train and test sets. 80% of the data was used for training and 20% of the data was used for testing. In Figure 16, the train_test_splitfunction from the sklearn library does
exactly that.
The sklearn library function StandardScalerwas used to normalize the features on
all the experiments. This simply re-scales the data points where the mean is zero and the standard deviation is one [27]. In other words, after StandardScalerhas completed,
the values will be transformed and ‘‘squished’’ so that all values center around zero and the values are not as spread out (standard deviation is reduced to one).
Standardscalar function utilize the 𝑍-score formula below: 𝑧 = (𝑥−𝜇)
𝜎
The 𝑥is the current value, 𝜇is the mean (average) of the current feature column that
the 𝑥 is in, 𝜎 is the standard deviation (the spread) of that column, and the𝑧 is the
new normalized value. There are other normalization techniques, butStandardScaler()
is considered the most common [27].
After building and training the model, the accuracy and the AUC was computed from the test set. Also, a 5-fold cross-validation was done on the entire set to verify the accuracy of the value which was produced from the test set.
4.2 Random Forest Experiment
For the Random Forest experiment, the default parameters were used for all
min_sample_leaf. By default, the max_feature parameter was set to auto, which is
the square root of the total number of features. The n_estimators parameter is the
number of trees that will be created, the default is 10. The min_sample_leafparameter
represents the leaves of the tree, the default is set to one. This means that a decision branch is created until no other decisions exist, that end node is the leaf node.
For family classifications, both feature full and feature free approaches gave an 85% accuracy and an AUC of 97% and 99%, respectively. The binary classification produced a 99% value for AUC as well as a 99% accuracy for feature free and feature full approaches.
4.3 K-NN Experiment
The sklearn.neighbors.KneighborsClassifier function was used to do the K-NN.
The K parameter is represented by n_neighborsvalue and was set to 5. The Euclidean
distance formula was used to determine the 5 nearest neighbors for the test set. The AUC and accuracy was 96% and 76%, respectively, for feature full family classification. Feature free for family classification had slightly lower results, with an AUC of 93% and an accuracy of 74%. Again, the binary classification gave a 99% across all scores.
4.4 SVM Experiment
For the SVM experiment, the kernel type was set to ’RBF’ for all experiments. For family classification, the gamma was set to 0.0115 and the cost was set to 2048. For binary classification, the gamma was set to 0.01 and the cost was set to 1.
Feature free approach performed better at 80% accuracy than feature full at 57% accuracy. The binary classification also performed slightly better with feature free at 99% accuracy vs feature full at 96% accuracy.
4.5 Neural Network Experiment
Keras was used to build the Neural Network. Keras is a high level Python API that is capable of running on top of different deep learning frameworks [28]. This project uses Keras on top of Tensorflow, which utilizes the Cuda cores on the Nvidia graphics card.
The Neural Network had 2 hidden layers with 400 nodes per layer. Each node was using the ReLu activation function. Dropout of 0.2 was implemented at each of the hidden and output layers. When fitting the model, the batch_size was set to 64
and theepochs value was set to 35.
The results for family classification of this model gave a 98% AUC for both feature full and feature free approaches. The accuracy for feature full was 75%, while the feature free was 79%. For binary classification, we again obtained 99% accuracy for all four scores.
Table 2: Results from 102 family classification
Family Classification Feature Full Feature Free Algorithm AUC Accuracy AUC Accuracy
Random Forest 0.97201 0.8522 0.9914 0.8479
K-NN 0.9655 0.7689 0.9382 0.7421
SVM 0.9384 0.5765 0.9960 0.8003
Neural Netowrk 0.9846 0.7516 0.9839 0.7949
Table 3: Results from binary classification (malware vs benign) Binary Classification Feature Full Feature Free
Algorithm AUC Accuracy AUC Accuracy
Random Forest 0.9996 0.9967 0.9994 0.9969
K-NN 0.9978 0.9926 0.9977 0.9928
SVM 0.9950 0.9686 0.9991 0.9924
CHAPTER 5
Future Work and Conclusion
The ROC AUC are normally generated for binary classifications. This ROC AUC, in Table 2 and 3, was generated by the correctness of each prediction in the test set. In other words, it is a two class classification where the two classes represent whether the specimen was correctly categorized. This kind of measurement is known as micro-averaging. It is normally utilized to measure the effectiveness of large classes in imbalanced test sets [29]. Since we have balanced all the experiments, we can assume that this shows a general effective measurement of the model.
From Table 2, we can see the ROC AUC scores on all of the family classifications are higher than the accuracy. This is because accuracy is based on a single threshold, implicitly set to 0.50. It is a ratio of how many predictions were correct. The ROC AUC is a summary of all the thresholds, and is a way to show how well different models perform based on their thresholds. Accuracy and ROC AUC are simply two different measurement with different meaning.
Based on the accuracy and the ROC AUC, with the exception of SVM, using feature free versus feature full did not seem to matter for either binary and family classification. SVM feature free, for family classification, may have contained more information since bytes may go beyond the three header sections, giving it a better family score. For all other approaches, similar results were obtained for each algorithm. This shows that the header information, using either feature free or feature full approaches, gives enough information to detect and classify the malware instance.
There is also the question of how these particular malware were detected and labeled by the anti virus company. The fact that binary classification gives a 99% accuracy shows that there is a strong possibility that header information is an important
manipulation of the header is common practice among malware developers. Relabeling all the VirusShare repositories using different anti virus software may give some insight into their approaches.
Another possible future experiment would be to include the Import tables and use the type labels for classification. The Windows Defender type is a more general classification then family. Type describes what the malware does. A few examples of type would be backdoor, spyware, and ransomware. We did some basic experiments using the features described in Section 2.3 and the type as the label, however the results were poor (below 50% accuracy). Adding the Import tables may improve the results since they contain information on functions and libraries that the malware may use.
The labeling technique described in Section 3.0.1 made it possible to collect enough information to do classification greater than two. Furthermore, we were able to experiment on data sets which were larger than many of the past projects. With this large labeled data set, experiments can be verified and extended to include multi-class classification.
LIST OF REFERENCES
[1] T. S. Körting, ‘‘How kNN algorithm works,’’ https://www.youtube.com/watch? v=UqYde-LULfs, 2014, (Accessed on 04/03/2018).
[2] T. S. Körting, ‘‘How SVM (Support Vector Machine) algorithm works,’’ https://www.youtube.com/watch?v=1NxnPkZM9bc&t=151s, 2014, (Accessed on 04/02/2018).
[3] M. Cavaioni, ‘‘Machine Learning - Support Vector Machines,’’
https://medium.com/machine-learning-bites/machine-learning-support-vector-machines-5bc28a7f5bcb, 2017, (Accessed on 04/02/2018).
[4] ‘‘Naming malware,’’ https://www.microsoft.com/en-us/wdsi/help/malware-naming, 2018, (Accessed on 05/02/2018).
[5] ‘‘2018 SonicWall Cyber Threat Report,’’ http://sonicwall.com, 2018, (Accessed on 04/04/2018).
[6] J. Aycock, Computer Viruses and Malware. Springer Science & Business Media, 2006.
[7] E. Skoudis and L. Zeltser, Malware Fighting Malicious Code. Prentice Hall
Professional, 2004.
[8] W. Wong and M. Stamp, ‘‘Hunting for metamorphic engines,’’Journal in
Com-puter Virology, vol. 2, pp. 211--229, 2006.
[9] L. Seltzer, ‘‘Heuristic vs. Generic Detection,’’ https://securitywatch.pcmag. com/security-software/284189-heuristic-vs-generic-detection, 2010, (Accessed on 10/20/2017).
[10] S. Deshmukh, F. D. Troia, and M. Stamp, ‘‘Vigenère scores for malware detection,’’ Journal of Computer Virology and Hacking Techniques, vol. 14, no. 2, pp. 157--165, 2018.
[11] M. Pietrek, ‘‘Peering inside the PE: A Tour of the Win32 Portable Executable File Format,’’ Microsoft Systems, pp. 15--38, 1994.
[12] M. Sikorski and A. Honig, Practical Malware Analysis: The Hands-On Guide to
Dissecting Malicious Software. No Starch Press, 2012.
[14] Y. Liao, ‘‘PE-Header-Based Malware Study and Detection,’’ http://www.cs.uga. edu/~liao/PE_Final_Report.pdf, 2012, (Accessed on 04/06/2018).
[15] T.-Y. Wang, C.-H. Wu, and C.-C. Hsieh, ‘‘Detecting Unknown Malicious Executa-bles Using Portable Executable Headers,’’ Fifth International Joint Conference
on INC, IMS and IDC, 2009. NCM’09., pp. 278--284, 2009.
[16] A. Walenstein, D. J. Hefner, and J. Wichers, ‘‘Header Information in Malware Families and Impact on Automated Classifiers,’’ 2010 5th International
Confer-ence on Malicious and Unwanted Software, pp. 15--22, 2010.
[17] E. Raff, J. Sylvester, and C. Nicholas, ‘‘Learning the PE Header, Malware
Detection with Minimal Domain Knowledge,’’ Proceedings of the 10th ACM
Workshop on Artificial Intelligence and Security, pp. 121--132, 2017.
[18] J. Friedman, T. Hastie, and R. Tibshirani, The Elements of Statistical Learning. Springer series in statistics New York, 2001.
[19] M. Denil, D. Matheson, and N. De Freitas, ‘‘Narrowing the Gap: Random Forests
In Theory and In Practice,’’ International Conference on Machine Learning
(ICML), 2014.
[20] F. Pedregosa, G. Varoquaux, A. Gramfort, V. Michel, B. Thirion, O. Grisel, M. Blondel, P. Prettenhofer, R. Weiss, V. Dubourg, J. Vanderplas, A. Passos, D. Cournapeau, M. Brucher, M. Perrot, and E. Duchesnay, ‘‘Scikit-learn: Machine Learning in Python,’’ Journal of Machine Learning Research, vol. 12, pp. 2825--2830, 2011.
[21] S. Theodoridis and K. Koutroumbas, Pattern Recognition. Academic Press,
2003.
[22] M. Stamp, Introduction to Machine Learning with Applications in Information
Security. CRC Press, 2017.
[23] P. Dangeti, Statistics for Machine Learning. Packt Publishing, 2017.
[24] A. Géron, Hands-on Machine Learning with Scikit-Learn and TensorFlow:
Con-cepts, Tools, and Techniques to Build Intelligent Systems. O’Reilly Media, Inc., 2017.
[25] M. Nielsen, ‘‘Neural Networks and Deep Learning,’’ http://
neuralnetworksanddeeplearning.com, 2015, (Accessed on 05/20/2017).
[26] J.-M. Roberts, ‘‘VirusShare.com - Because Sharing is Caring,’’ https://virusshare. com, 2011.
[27] S. Ozdemir and D. Susarla, Feature Engineering Made Easy. Packt Publishing, 2018.
[28] F. Chollet et al., ‘‘Keras,’’ https://keras.io, 2015, (Accessed on 05/20/2017).
[29] H. Schütze, C. D. Manning, and P. Raghavan, Introduction to Information
APPENDIX A Features
e_magic e_cblp e_cp
e_crlc e_cparhdr e_minalloc
e_maxalloc e_ss e_sp
e_csum e_ip e_cs
e_lfarlc e_ovno e_res
e_oemid e_oeminfo e_res2_1
e_res2_2 e_res2_3 e_res2_4
e_res2_5 e_res2_6 e_res2_7
e_res2_8 e_res2_9 e_res2_10
e_res2_11 e_res2_12 e_res2_13
e_res2_14 e_res2_15 e_res2_16
e_res2_17 e_res2_18 e_res2_19
e_res2_20 e_lfanew signature
Machine NumberOfSections TimeDateStamp
PointerToSymbolTable NumberOfSymbols SizeOfOptionalHeader
Characteristics Magic MajorLinkerVersion
MinorLinkerVersion SizeOfCode SizeOfInitializedData
SizeOfUninitializedData AddressOfEntryPoint BaseOfCode
ImageBase SectionAlignment FileAlignment
MajorOperatingSystemVersion MinorOperatingSystemVersion MajorImageVersion
MinorImageVersion MajorSubsystemVersion MinorSubsystemVersion
Reserved1 SizeOfImage SizeOfHeaders
CheckSum Subsystem DllCharacteristics
SizeOfStackReserve SizeOfStackCommit SizeOfHeapReserve
SizeOfHeapCommit LoaderFlags NumberOfRvaAndSizes
Name Misc Misc_PhysicalAddress
Misc_VirtualSize VirtualAddress SizeOfRawData
PointerToRawData PointerToRelocations PointerToLinenumbers
NumberOfRelocations NumberOfLinenumbers Characteristics
Adload Dorkbot Lethic Swizzor
Agent Dorv Lmir Systex
Aksula Drstwex Lolyda Taterf
Allaple Enterak Multsarch Tibs
Alureon Expiro Nagram Tiop
Autorun EyeStye Obfuscator Toga
BHO FakeRean Ogimant Unruy
Bagsu FakeSysdef OnLineGames VB
Bamital Fareit PcClient VBInject
Bancos Farfli Plingky Vbinder
Banker Fosniw Poison Viking
Banload Frethog QQpass Virut
Beebone Fynloski Ramnit Vobfus
Bibei Gamarue Rbot Vundo
Bifrose Hiloti Rebhip Waledac
Bulta Hotbar Renos Webprefix
C2Lop Hupigon Rimecud Wintrim
CeeInject Injector Rimod Winwebsec
ClickPotato Jadtre Sality Xpaj
Cutwail Karagany Sefnit Xtrat
Cycbot Kelihos Simda Zbot
Delf Killav Sinowal Zegost
DelfInject Koutodoor Sirefef Zlob
Diplugem Lamechi Small Zonsterarch
Zwangi Table A.5: 101 family used for classification
APPENDIX B
Random Forest Feature Importance
The feature importance value was generated using the Random Forest Classifier from scikit-learn. Due to space, only the top 15 features for feature free are shown in Tables B.8 and B.9. The Byte is the byte offset from the beginning of the PE file for the first 64 bytes, after 64 bytes the value in 0x3C is read and we continue from that read offset. For example, the first entry in Table B.8 shows the Byte value 76, we subtract 76−64 = 12, starting from the value read at 0x3C we go to the 12th byte. The Cygwin ls.exe command was used to determine the Potential Header for all of the Tables. PE headers are not strictly enforced and offsets may be different due to variations in the header, therefore the Potential Header value may not be identical for other PE files.
Feature Name Importance
1. TimeDateStamp 0.084791 2. SizeOfImage 0.073026 3. AddressOfEntryPoint 0.069002 4. SizeOfInitializedData 0.066414 5. Misc_PhysicalAddress 0.057584 6. Misc_VirtualSize 0.057184 7. SizeOfCode 0.056384 8. Misc 0.056301 9. SizeOfRawData 0.044140 10. e_lfanew 0.041902 11. CheckSum 0.035907 12. Characteristics 0.033730 13. NumberOfSections 0.030746 14. MajorLinkerVersion 0.026311 15. MajorImageVersion 0.020167 16. Characteristics 0.019226 17. SizeOfUninitializedData 0.018736 18. BaseOfCode 0.018319 19. DllCharacteristics 0.017721 20. MinorLinkerVersion 0.017668 21. PointerToRawData 0.012411
22. SizeOfHeaders 0.012027 23. MajorOperatingSystemVersion 0.010630 24. SizeOfStackReserve 0.010575 25. Name 0.010204 26. FileAlignment 0.010016 27. MinorImageVersion 0.009256 28. MajorSubsystemVersion 0.007577 29. SizeOfStackCommit 0.006865 30. MinorOperatingSystemVersion 0.005309 31. SizeOfHeapReserve 0.004879 32. VirtualAddress 0.004434 33. SectionAlignment 0.004380 34. Subsystem 0.003742 35. PointerToLinenumbers 0.003550 36. MinorSubsystemVersion 0.003265 37. e_cblp 0.002870 38. e_minalloc 0.002642 39. PointerToRelocations 0.002413 40. e_cp 0.002197 41. e_res 0.002123 42. e_ovno 0.001747 43. SizeOfHeapCommit 0.001328 44. e_sp 0.001049 45. e_cparhdr 0.001045 46. e_res2_9 0.000951 47. e_res2_10 0.000921 48. e_res2_2 0.000903 49. e_res2_13 0.000892 50. e_ip 0.000750 51. e_lfarlc 0.000698 52. e_res2_14 0.000696 53. NumberOfSymbols 0.000658 54. e_res2_11 0.000656 55. e_res2_15 0.000645 56. SizeOfOptionalHeader 0.000613 57. e_res2_3 0.000588 58. e_crlc 0.000559 59. LoaderFlags 0.000546 60. e_res2_18 0.000536 61. e_oemid 0.000529 62. NumberOfRvaAndSizes 0.000522
64. e_cs 0.000445 65. e_oeminfo 0.000430 66. e_csum 0.000415 67. Magic 0.000404 68. e_res2_17 0.000394 69. e_res2_1 0.000375 70. e_res2_8 0.000359 71. PointerToSymbolTable 0.000331 72. e_res2_7 0.000327 73. e_res2_20 0.000324 74. e_res2_12 0.000316 75. e_res2_4 0.000293 76. e_res2_6 0.000287 77. e_res2_16 0.000286 78. NumberOfLinenumbers 0.000232 79. e_res2_19 0.000210 80. Machine 0.000209 81. e_res2_5 0.000200 82. e_ss 0.000142 83. Reserved1 0.000044 84. NumberOfRelocations 0.000041 85. ImageBase 0.000006 86. signature 0.000000 87. e_magic 0.000000
Feature Name Importance 1. Subsystem 0.134816 2. DllCharacteristics 0.130153 3. MajorLinkerVersion 0.107264 4. MajorSubsystemVersion 0.099652 5. Machine 0.054559 6. CheckSum 0.050982 7. SizeOfHeaders 0.043853 8. TimeDateStamp 0.038626 9. Characteristics 0.035392 10. MajorOperatingSystemVersion 0.029959 11. SizeOfStackReserve 0.029872 12. AddressOfEntryPoint 0.029187 13. MajorImageVersion 0.028772 14. SizeOfOptionalHeader 0.028155 15. MinorOperatingSystemVersion 0.026572 16. PointerToRawData 0.019837 17. Name 0.016201 18. SizeOfUninitializedData 0.014611 19. e_lfanew 0.014396 20. Characteristics 0.007346 21. Magic 0.006299 22. NumberOfSections 0.006201 23. MinorSubsystemVersion 0.004621 24. SizeOfImage 0.004171 25. SizeOfInitializedData 0.003958 26. Misc_VirtualSize 0.003535 27. VirtualAddress 0.003514 28. SizeOfRawData 0.003358 29. Misc_PhysicalAddress 0.003276 30. Misc 0.003253 31. SizeOfHeapReserve 0.002818 32. SizeOfCode 0.002660 33. BaseOfCode 0.002630 34. e_ovno 0.001996 35. MinorLinkerVersion 0.001515 36. MinorImageVersion 0.001106 37. SectionAlignment 0.000875 38. SizeOfStackCommit 0.000621 39. PointerToRelocations 0.000502
40. e_cblp 0.000329 41. FileAlignment 0.000305 42. e_cparhdr 0.000287 43. SizeOfHeapCommit 0.000265 44. PointerToSymbolTable 0.000249 45. e_cp 0.000239 46. NumberOfSymbols 0.000205 47. e_sp 0.000159 48. Reserved1 0.000104 49. e_oeminfo 0.000082 50. e_cs 0.000061 51. e_res2_11 0.000052 52. LoaderFlags 0.000050 53. PointerToLinenumbers 0.000048 54. e_res2_17 0.000043 55. NumberOfLinenumbers 0.000042 56. e_res2_9 0.000038 57. e_res 0.000038 58. e_res2_3 0.000036 59. e_minalloc 0.000036 60. e_res2_6 0.000030 61. e_ip 0.000024 62. ImageBase 0.000021 63. e_res2_10 0.000017 64. e_res2_13 0.000017 65. e_res2_12 0.000016 66. e_res2_1 0.000014 67. e_res2_4 0.000012 68. e_res2_5 0.000010 69. e_res2_20 0.000010 70. e_maxalloc 0.000008 71. NumberOfRvaAndSizes 0.000007 72. e_oemid 0.000007 73. e_res2_14 0.000006 74. e_res2_2 0.000005 75. e_res2_15 0.000004 76. e_res2_18 0.000003 77. e_lfarlc 0.000003 78. e_res2_7 0.000002 79. e_crlc 0.000000 80. e_res2_19 0.000000 81. e_res2_16 0.000000
82. e_res2_8 0.000000 83. NumberOfRelocations 0.000000 84. signature 0.000000 85. e_csum 0.000000 86. e_ss 0.000000 87. e_magic 0.000000
Byte Importance Potential Header
1. 76 0.031758 PointerToSymbolTable
2. 147 0.024748 SizeOfImage
3. 106 0.024021 AddressOfEntryPoint
4. 206 0.023649 Size of Image Directory
5. 94 0.022319 SizeOfCode
6. 322 0.020937 Misc_VirtualSize
7. 98 0.020424 SizeOfInitializedData
8. 205 0.020409 Size of Image Directory
9. 203 0.019574 VirtualAddress of Image Directory
10. 61 0.019143 e_lfanew
11. 202 0.018807 TimeDateStamp
12. 197 0.018723 Size of Image Directory
13. 114 0.018066 BaseOfData
14. 194 0.017560 VirtualAddress of Image Directory
15. 321 0.017180 Misc_PhysicalAddress
Table B.8: Feature free family, top 15 feature importance
Byte Importance Potential Header
1. 160 0.152031 SizeOfStackReserve
2. 91 0.130916 MinorLinkerVersion
3. 137 0.115016 MajorSubsystemVersion
4. 129 0.051571 MajorOperatingSystemVersion
5. 197 0.050210 Size of Image Directory
6. 153 0.041540 CheckSum 7. 120 0.032546 SectionAlignment 8. 114 0.029533 BaseOfData 9. 157 0.027153 Subsystem 10. 119 0.020858 ImageBase 11. 315 0.020580 Name of Section 12. 88 0.018150 Magic
13. 301 0.017794 Size of Image Directory
14. 76 0.017590 PointerToSymbolTable
15. 222 0.016897 Size of Image Directory
![Figure 2: K-NN classification example [1]](https://thumb-us.123doks.com/thumbv2/123dok_us/1073223.2642819/21.918.321.650.218.472/figure-k-nn-classification-example.webp)
![Figure 4: Kernel trick [3]](https://thumb-us.123doks.com/thumbv2/123dok_us/1073223.2642819/23.918.337.645.483.779/figure-kernel-trick.webp)
![Figure 5: Kernel trick transformation [3]](https://thumb-us.123doks.com/thumbv2/123dok_us/1073223.2642819/24.918.340.634.140.320/figure-kernel-trick-transformation.webp)


![Figure 14: Windows Defender naming convention [4]](https://thumb-us.123doks.com/thumbv2/123dok_us/1073223.2642819/32.918.257.720.139.287/figure-windows-defender-naming-convention.webp)