TURB
DEBU
ER
Turbo
Debugge~
Version 2.0
User's Guide
Copyright © 1988, 1990 by Borland International. All rights reserved. All Borland products are trademarks or registered trademarks of Borland International, Inc. Other brand and product names are trademarks or registered trademarks of their respective holders.
c
o
N
T
E
N
T
s
Introduction 1 Local menus ... 22
Hardware and software requirements .... 1 His tory lessons . . . 23
A note on terminology ... 2 Automatic name completion ... 24
Wha t's in the manual ... 3 Incremental matching ... 25
How to contact Borland ... 5 Making macros ... ~ ... 25
Chapter 1 Getting started 7 Window shopping ... 25 Windows from the View menu ... 26
The distribution disks ... 8 Module window ... 26
The README file ... 8 Watches window ... 26
The HELPME!.DOC file ... 8
Turbo Debugger utilities ... 9 Breakpoints window ... 26 Stack window ... 27
Installing Turbo Debugger ... 10
Unzipping example files ... 10 Log window ... 27 Variables window ... 27
LCD and B /W monitors ... 11 File window ... 27
Hardware debugging ... 11 CPU window ... 28
Where to now? ... 11
Programmers learning a Turbo language ... 12
Dump window ... 28
Registers window ... 28
Numeric Processor window ... 29
Programmers already using a Turbo language ... 12 Execution History window ... 29 Hierarchy window ... 29
Chapter 2 Debugging and Turbo Debugger 13 What is debugging? ... 13
Is there a bug? ... 14
Where is it? ... 14
Duplicate windows ... 30
User screen ... 30
Inspector windows ... 30
The active window ... 31
What's in a window ... 31
What is it? ... 14 Working with windows ... 33
Fixing it ... 14
What Turbo Debugger can do for you ... 15
What Turbo Debugger won't do ... 16
How Turbo Debugger does it ... 17
The Turbo Debugger advantage ... 17
Menus and dialog boxes ... 18
Using the menus ... 18
Dialog boxes ... 20
Knowing where you're at ... 21
Window hopping ... 33
Moving and resizing windows ... 34
Closing and recovering windows . 35 Saving your window layout ... 36
Getting help ... 36
Online help ... 37
The status line ... 38
In a window ... 38
Chapter 3 A quick example 41
The demo programs ... 41
Using Turbo Debugger ... 43
The menus ... 43
The status line ... 43
The windows ... 44
Using the C demo program ... 45
Setting breakpoints ... 47
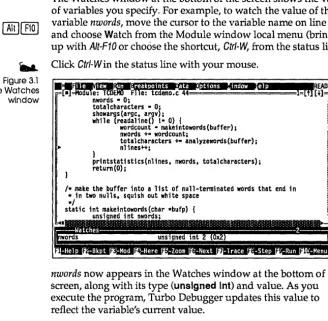
Using watches ... 48
Examining simple C data objects ... 48
Examining compound C data objects .. 50
Changing C data values ... 50
Using the Pascal sample program ... 52
Setting breakpoints ... 53
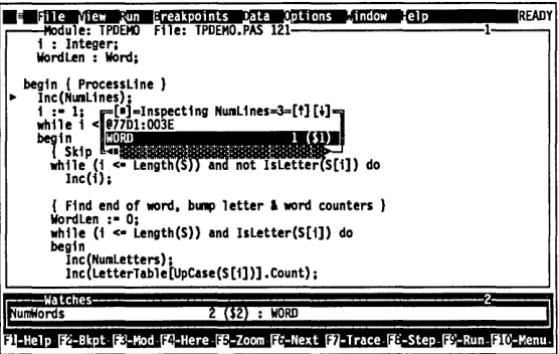
Using watches ... 54
Examining simple Pascal data objects .. 55
Examining compound Pascal data objects ... 57
Changing Pascal data values ... 57
Chapter 4 Starting Turbo Debugger 61 Preparing programs for debugging ... 61
Preparing Turbo C programs ... 62
Preparing Turbo Pascal programs ... 62
Preparing Turbo Assembler programs . 63 Preparing Microsoft programs ... 63
Running Turbo Debugger ... 63
Command-line options ... 64
Loading the configura tion file (-c) ... 64
Display updating (-d) ... 65
Getting help (-hand -?) ... 65
Process ID switching (-i) ... 65
Keystroke recording (-k) ... 65
Assembler-mode startup (-1) ... 66
Setting heap size (-m) ... 66
Mouse support (-p) ... 66
Remote debugging (-r) ... 67
Source code handling (-s) ... 67
Video hardware (-v) ... 68
Overlay pool size (-y) ... 68
Configuration files ... 69
The Options menu ... 69
The Language command ... 69
The Macros menu ... 70
Create ... 70
Stop Recording ... 70
Remove ... 70
Delete All ... 70
Display Options command ... 70
Display Swapping ... 71
Integer Format ... 72
Screen Lines ... 72
Tab Size ... 72
Pa th for Source command ... 72
Save Options command ... 72
Restore Options command ... 73
Running DOS in Turbo Debugger ... 73
Returning to DOS ... 74
Chapter 5 Controlling program execution 75 Examining the current program state .... 76
The Variables window ... 76
The Global pane local menu ... 77
Inspect ... 77
Change ... 78
The Static pane local menu ... 78
Inspect ... 78
Change ... 78
The Stack window ... 79
The Stack window local menu ... 79
Inspect ... 79
Locals ... 79
The Origin local menu command ... 80
The Get Info command ... 80
The Run menu ... 82
Run ... 83
Go to Cursor ... 83
Trace In to ... 83
Step Over ... 83
Execute To ... 84
Until Return ... 84
Animate ... 85
Back Trace ... 85
Instruction Trace ... 85
Arguments... . ... 85
The Execution History window ... 86 Pascal data Inspector windows ... 106
The Instructions pane ... 86 Scalars ... 106
The Instructions pane local menu ... 87 Pointers ... 106
Inspect ... 87 Arrays ... 107
Reverse Execute ... 87 Records ... 107
Full History ... 88 Procedures and functions ... 108
The Keystroke Recording pane ... 88 Assembler data Inspector windows .. 108
The Keystroke Recording pane local Scalars ... 108
menu ... 88 Pointers ... 109
Inspect ... 88 Arrays ... 109
Keystroke Restore ... 89 Structures and unions ... 110
Interrupting program execution ... 89 The Inspector window local menu ... 111
Ctrl-Break ... 89 Range ... 111
Program termination ... 90 Change ... 111
Restarting a debugging session ... 90 Inspect ... 111
Reloading your program ... 90 Descend . . . 112
Keystroke macro recording and New Expression ... 112
playback ... 91 Type Cast. ... 112
Opening a new program to debug ... 92
Changing the program argumen ts ... 93 Chapter 7 Breakpoints 115 The Breakpoints menu ... 116
Chapter 6 Examining and modifying Toggle ... 117
data 95 At ... 117
The Data menu ... 96 Changed Memory Global. ... 117
Inspect ... 96 Expression True Global... . . . 117
Evaluate/Modify... . ... 96 Hardware Breakpoint ... 117
Add Watch... . ... 99 Delete All ... 117
Function Return ... 99 Scope of breakpoint expressions ... 118
Pointing at data objects in source files ... 99 The Breakpoints window ... 118
The Watches window ... 100 The Breakpoints window local menu . 118 The Watches window local menu .... 101 Set Options.. . ... 119
Watch ... 101 Hardware Options ... 121
Edit ... 101 Add ... 121
Remove ... l01 Remove ... 122
Delete All ... 101 Delete All ... 122
Inspect ... 101 Inspect ... 122
Change ... 101 The Log window ... 122
Inspector windows ... 102 The Log window local menu ... 123
C data Inspector windows ... 103 Open Log File ... 123
Scalars ... 103 Close Log File ... 123
Pointers ... 103 Logging ... 123
Arrays ... l04 Add Comment ... 124
Conditional breakpoints and pass
counts ... 124
Global breakpoints ... 125
Breaking for changed data objects ... 126
Logging variable values ... 127
Executing expressions ... 127
Chapter 8 Examining and modifying files 129 Examining program source files ... 129
The Module window ... 130
The Module window local menu ... 131
Inspect ... 131
Watch ... 132
Module ... 132
File ... 132
Previous ... 132
Line ... 132
Search ... 132
Next ... 133
Origin ... 133
Goto ... 133
Edit ... 133
Examining other disk files ... 134
The File window ... 134
The File window local menu ... 134
Goto ... 135
Search ... 135
Next ... 136
Display As ... 136
File ... 136
Edit ... 136
Chapter 9 Expressions 137 Choosing the language for expression evaluation ... 138
Code addresses, data addresses, and line numbers ... 139
Accessing symbols outside the current scope ... 139
Scope override syntax ... 140
Implied scope for expression evalua tion ... . . . 142
Byte lists ... 143
C expressions ... 143
C symbols ... 143
C register pseudovariables ... 144
C constants and number formats .... 145
Esca pe sequences ... 145
C opera tors precedence . . . 146
Executing C functions in your pro-gram ... 147
C expressions with side effects ... 148
C reserved words and type conversion ... 148
Pascal expressions ... 149
Pascal symbols ... 149
Pascal constants and number formats. 149 Pascal strings ... 150
Pascal opera tors and opera tor precedence ... 150
Calling Pascal functions and procedures ... 151
Assembler expressions ... 151
Assembler symbols ... 151
Assembler constants ... 152
Assembler operators ... 152
Format control ... 153
Chapter 10 C++ and object-oriented Pascal debugging 155 The Hierarchy window ... 155
The Object Type List pane ... 156
The Object Type/Class List pane local menu ... 156
Inspect ... 156
Tree ... 157
The Hierarchy Tree pane ... 157
The Hierarchy Tree pane local menu(s) ... 157
The Parent Tree pane local menu .. 158
Object type / class Inspector windows .. 158
The object type/class Inspector window local menus ... 159
Inspect ... ~ . . . .. 159
Hierarchy ... 159
Show Inherited ... 159
Hierarchy ... 160 The Flags pane local menu ... 174
Show Inherited ... 160 Toggle ... 174
Object instance Inspector windows ... 160 The Data pane ... 174
The object/ class instance Inspector The Data pane local menu ... 175
window local menus ... 161 Goto ... 175
Range ... 161 Search ... 175
Change ... 161 Next ... 176
Methocls ... 161 Change ... 176
Show Inherited ... 162 Follow ... 176
Inspect ... 162 Near Code ... 176
Descend ... 162 Far Code ... 176
New Expression... . ... 162 Offset to Data ... 176
Type Cast... . ... 162 Segrnent:Offset to Data ... 177
Hierarchy ... 162 Base Segrnent:O to Data ... 177
The middle and bottom panes ... 162 Previous ... 177
Chapter 11 Assembler-level debugging 165 When source debugging isn't enough .. 165
The CPU window ... 166
The Code pane ... 168
The disassembler ... 168
The Code pane local menu ... 169
Goto ... 169
Origin ... 169
Follow ... 169
Caller ... 170
Previous . . . 170
Search ... 170
Mixed ... 171
New CS:IP ... 171
Assemble ... 171
I/O ... 172
In Byte ... 172
Out Byte ... 172
Read Word ... 172
Write Word ... 172
The Register and Flags panes ... 173
The Register pane local menu ... 173
Increment ... 173
Decrement ... 173
Zero ... 173
Change ... 173
Display As . . . 177
Byte ... 177
Word ... 177
Long ... 177
Comp ... 178
Float ... 178
Real ... 178
Double ... 178
Extended ... 178
Block ... 178
Clear ... 178
Move ... 179
Set ... 179
Read ... 179
Write ... 179
The Stack pane . . . 179
The Stack pane local menu ... 179
Goto ... 180
Origin ... 180
Follow ... 180
Previous ... 180
Change ... 180
The assembler ... 180
Operand address size overrides ... 181
Memory and immediate operands .181 Operand data size overrides ... 182
String instructions ... 182
Turbo C code generation ... 183 Module window ... 200
Chapter 12 The 80x87 coprocessor chip and emulator 185 The 80x87 chip vs. the emulator ... 185
The Numeric Processor window ... 186
The Register pane ... 186
The 80-bit floating-point registers .. 186
The Register pane local menu ... 187
Zero ... 187
Empty ... 187
Change ... 187
The Control pane ... 187
The control bits ... 187
The Control pane local menu ... 187
Numeric Processor window ... 201
Register pane ... 201
Status pane ... 201
Control pane ... 201
Hierarchy window ... 202
Object Type/Class List pane ... 202
Hierarchy Tree pane ... 202
Parent Tree pane ... 202
Registers window menu ... 202
Stack window ... 202
Variables window ... 202
GlobalSymbolpane ... 203
LocaISymbolpane ... 203
Watches window ... 203
Toggle ... 188
The Status pane ... 188
The status bits ... 188
Inspector window ... 204
Object Type/Class Inspector window ... 204
The Status pane local menu ... 188
Toggle ... 188 Object/ class instance Inspector window ... 204
Chapter 13 Command reference 191 Hot keys ... 191
Commands from the menu bar ... 194
Text panes ... 205
List panes ... 206
Commands in input and history list The == (System) menu ... 194
The File menu ... : 194
boxes ... 206
Window movement commands ... 207
The View menu ... 194 Wildcard search templates ... 208
The Run menu ... 195 Complete menu tree ... 208
The Breakpoints menu ... 195
The Data menu ... 195
The Options menu ... 196
The Window menu ... 196
The Help Menu ... 196
The local menu commands ... 197
Breakpoints window ... 197
The CPU window menus ... 197
Code pane ... 198
Chapter 14 How to debug a program 211 When things don't work ... 211
Debugging style ... 212
Run the whole thing ... 213
Incremental testing ... 213
Types of bugs ... 213
General bugs ... 214
Hidden effects ... 214
Data pane ... 198
Flags pane . . . 199
Register pane ... 199
Stack pane . . . 199
Dump window ... 200
File window ... 200
Log window menu ... 200
Assuming initialized data ... 214
Not cleaning up ... 214
Fencepost errors ... 215
C-specific bugs ... 215
Using uninitialized auto variables .. 215
Confusing
=
and== ...
216Bad pointer arithmetic ... 216
Unexpected sign extension ... 217
Unexpected truncation ... 217
Misplaced semicolons ... 217
Macros with side effects ... 218
Repeated auto variable names ... 218
Misuse of auto variables ... 218
Undefined function return value ... 218
Misuse of break keyword ... 219
Code has no effect ... 219
Pascal-specific bugs ... 219
Uninitialized variables ... 220
Dangling pointers ... 220
Scope confusion ... 221
Superfluous semicolons ... 222
Undefined function return value ... 223
Decrementing Word or Byte variables ... 224
Ignoring boundary or special cases . 224 Range errors ... 225
Assembler-specific bugs ... 226
Forgetting to return to DOS ... 226
Forgetting a RET instruction ... 226
Generating the wrong type of return ... 227
Reversing operands ... 227
Forgetting the stack or reserving a too-small stack ... 227
Calling a subroutine that wipes out registers ... 227
Using the wrong sense for a conditional jump ... 228
Forgetting about REP string overrun ... 228
Relying on a zero CX to cover a whole segment ... 228
U sing incorrect direction flag settings . . . 228
U sing the wrong sense for a repea ted string comparison ... 229
Forgetting about string segment defaults ... 229
Converting incorrectly from byte to word operations ... 229
Using multiple prefixes ... 229
Relying on the operand(s) to a string instruction . . . 229
Wiping out a register with multiplication ... 229
Forgetting that string instructions alter several registers ... 230
Expecting certain instructions to alter the carry flag ... 230
Waiting too long to use flags ... 230
Confusing memory and immediate operands ... 230
Causing segment wraparound .... 230
Failing to preserve everything in an interrupt handler ... 230
Forgetting group overrides in operands and data tables ... 231
Accuracy testing ... 231
Testing boundary conditions ... 231
Invalid data input ... 231
Empty data input ... 232
Debugging as part of program design .. 232
The sample debugging session ... 232
C debugging session ... 233
Looking for errors ... 233
Deciding your plan of attack ... 234
Starting Turbo Debugger ... 234
Inspecting ... 235
Breakpoin ts ... 235
The Watches window ... 236
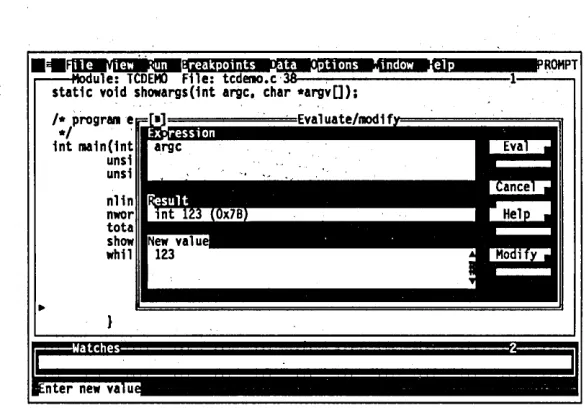
The Evaluate/Modify dialog box .... 236
Eureka! ... 236
Pascal debugging session ... 238
Looking for errors ... 238
Deciding your plan of attack ... 239
Starting Turbo Debugger ... 240
Moving through the program ... 240
The Evaluate/Modify dialog box .... 241
Inspecting ... 242
Wa tches ... 243
Chapter 15 Virtual debugging on the
80386 processor
247Equipment required for virtual
debugging ... 248
Installing the virtual debugger device driver ... 248
Starting the virtual debugger ... 248
Differences between normal and virtual debugging ... 250
TD386 error messages ... 251
TDH386.SYS error messages ... 252
Chapter 16 Protected-mode debugging
with TD286
253 Equipment required for the protected-mode debugger ... 253Installing the protected-mode debugger ... 254
Starting the protected-mode debugger .. 254
Differences between Turbo Debugger and protected-mode ... 254
Running TD286 on different machines .. 255
Chapter 17 Debugging TSRs and
device drivers
257 What's a TSR? ... 257Debugging a TSR ... 258
Wha t's a device driver? ... 261
Debugging a device driver ... 263
Terminating the debugging session .... 265
Appendix A Summary of
command-line options
267Appendix B Technical notes
269 Changed load address and free memory ... 269Crashing the system ... 270
Tracing through DOS and process ID switching ... 270
Using the 8087/80287 math coprocessor and emulator ... 270
Interrupts used by Turbo Debugger .... 271
Debugging using !NT 3 and !NT 1 ... 271
Display-saving and mode-switching ... 272
Memory consumption ... 272
EMS support ... 272
Interrupt vector saving and restoring ... 273
Appendix C InUne assembler
keywords
275Appendix D Customizing Turbo
De bugger
279 Running TDINST ... 280Setting the screen colors ... 280
Customizing screen colors ... 280
Windows ... 280
Dialog boxes ... 281
Menus ... 282
Screen ... 282
The default colors ... 282
Setting Turbo Debugger display parameters ... 283
Display Swapping ... 283
Integer Format ... 284
Beginning Display ... 284
Screen Lines ... 284
Tab Size ... 284
Maximum Tiled Watch ... 284
Fast Screen Update ... 285
Permit 43/50 Lines ... 285
Full Graphics Saving ... 285
User Screen Updating ... 285
Log List Length ... 286
Turbo Debugger options ... 286
Directories ... 286
Input and Prompting ... 287
History List Length ... 287
Interrupt Key ... 287
Set Key ... 287
Mouse Enabled ... 287
Beep on Error ... 287
Keystroke Recording ... 288
Control Key Shortcuts ... 288
Source Debugging ... 288
Language ... 288
Ignore Symbol Case ... 289
NMI Intercept ... 289
Use Expanded Memory ... 289
Change Process ID ... 289
DOS Shell Swap Size ... 290
Spare Symbol Memory ... 290
Remote Debugging ... 290
Remote Link Port ... 290
Link Speed ... 290
Setting the mode for display ... 290
Default ... 290
Color ... 290
Black and White ... 291
Monochrome ... 291
LCD ... 291
Command-line options and installation equivalents ... 291
When you're through... . ... 293
Saving changes ... 293
Save Configuration File ... 293
Modify TD.EXE ... 293
Exiting TDINST ... 294
Appendix E Remote debugging
295 Setting up a remote debugging system . 296 Remote software installation ... 296Starting the remote link ... 297
Starting Turbo Debugger on the remote link ... 297
About loading the program to the remote system ... 298
TDREMOTE command-line options .. 298
Remote debugging sessions ... 299
TDREMOTE messages ... 300
Getting it all to work ... 302
Appendix F Dialog boxes and error
messages
303 Dialog boxes ... 303Error messages ... 310
Fatal errors ... 310
Other error messages ... 311
Information messages ... 328
Appendix G Using Turbo Debugger
with different
languages
329 Turbo C tips ... 329Compiler code optimizing ... 329
Accessing pointer data ... 330
Stepping through complex expressions ... 330
Turbo Assembler tips ... 331
Looking at raw hex data ... 331
Source-level debugging ... 331
Examining and changing registers ... 331
Turbo Pascal tips ... 332
Stepping through initialization code .332 Stepping through exit procedures .... 332
Constants ... 332
String and set temporaries on the stack ... 333
Clever typecasting ... 333
CPU window tips for Pascal ... 334
Glossary
335T
A
B
L
E
s
2.1: What goes in a dialog box ... 20 C.2: 80386 instruction mnemonics ... 276
13.1: The function key and hot key C.3: 80486 instruction mnemonics ... 277
commands ... 192 C.4: 80386 registers ... 277
13.2: Text pane key commands ... 206 C.S: CPU registers ... 277
13.3: List pane key commands ... 206 C.6: Special keywords ... 277
13.4: Dialog box key commands ... 207 C.7: 8087/80287 numeric coprocessor 13.5: Window movement key instruction mnemonics ... 278
commands ... 208 C.8: 80387 instruction mnemonics ... 278
A.1: Turbo Debugger command-line D.1: Turbo Debugger command-line options ... 268 options ... 291
F
G
u
2.1: Global vs.local menus ... 22
2.2: A history list in an input box ... 24
2.3: Can you spot the active window? ... 31
2.4: A typical window ... 32
2.5: The normal status line ... 38
2.6: The status line with Altpressed ... 38
2.7: The status line with elr/pressed ... 39
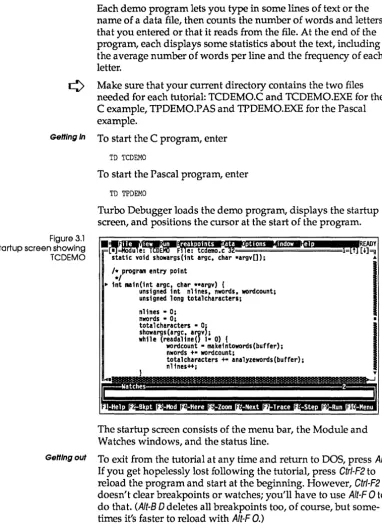
3.1: The startup screen showing TCDEMO ... 42
3.2: The menu bar ... 43
3.3: The status line ... 43
3.4: The Module and Watches windows, tiled ... 44
3.5: Program stops on return from function showargs ... 46
3.6: A breakpoint at line 44 ... 47
3.7: A C variable in the Watches window .48 3.8: An Inspector window ... 49
3.9: Inspecting a structure ... 50
3.10: The Change dialog box ... 51
3.11: The Evaluate/Modify dialog box ... 52
3.12: The program stops after returning from a procedure ... 53
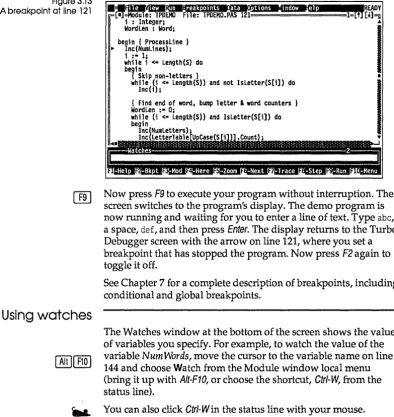
3.13: A breakpoint at line 121 ... 54
3.14: A Pascal variable in the Watches window ... 55
3.15: An Inspector window ... 56
3.16: Inspecting a record ... 57
3.17: The Change dialog box ... 58
3.18: The Evaluate/Modify dialog box ... 59
4.1: The Display Options dialog box ... 71
4.2: The Save Options dialog box ... 73
5.1: The Variables window ... 76
5.2: The Stack window ... 79
5.3: The Get Info text box ... 81
R
E
s
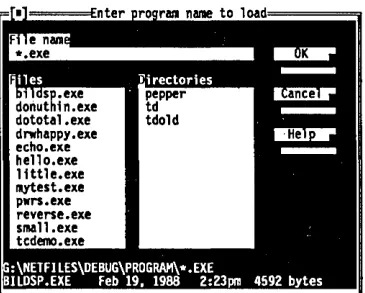
5.5: The Load Program dialog box ... 926.1: The Evaluate/Modify dialog box .... 97
6.2: The Watches window ... 100
6.3: A C scalar Inspector window ... 103
6.4: A C pointer Inspector window ... 104
6.5: A C array Inspector window ... 105
6.6: A C structure or union Inspector window ... l05 6.7: A C function Inspector window .... 106
6.8: A Pascal scalar Inspector window .. 106
6.9: A Pascal pointer Inspector window . 107 6.10: A Pascal array Inspector window .. 107
6.11: A Pascal record Inspector window. 108 6.12: A Pascal procedure Inspector window ... 108
6.13: An assembler scalar Inspector window ... l08 6.14: An assembler pointer Inspector window ... l09 6.15: An assembler array Inspector window ... ll0 6.16: An assembler structure Inspector window ... ll0 7.1: The Breakpoints window ... 118
7.2: The Breakpoint Options dialog box . 119 7.3: The Log window ... 122
8.1: The Module window ... 130
8.2: The File window ... 134
8.3: The File window showing hex data. 134 10.1: The Hierarchy window ... 156
10.2: An object type/ class Inspector window ... 158
10.3: An object/ class instance Inspector window ... 160
11.3: The Registers window ... 183 12.1: The Numeric Processor window ... 186 13.1: The Turbo Debugger menu tree ... 209 D.1: Customizing colors for windows ... 281 D.2: Customizing colors for dialog
boxes ... 282
D.3: The Display Options dialog box ... 283 D.4: The User Input and Prompting dialog
box ... 287 D.5: The Source Debugging dialog box . 288 D.6: The Miscellaneous Options dialog
N T
R
o
D
u
c
To
Turbo Debugger is a state-of-the-art, source-level debugger designed for Borland Turbo language programmers and pro-grammers using other' compilers who want a more powerful debugging environment.
N
Multiple, overlapping windows, a combination of pull-down and pqp-uP menus, and mouse support provide a fast, interactive environment. An online context-sensitive help system provides you with help during all phases of operation.
Here are just some of Turbo Debugger's features:
• uses the expanded Illemory specification (EMS) for debugging large programs
• full C, Pascal, and assembler expression evalua tion • reconfigurable screen layout
• assembler /CPU access when needed
• po~erful breakpoint and logging facility
• keystroke recording (macros)
• back tracing
• remote system for debugging large programs
• s~pport for 80386 and other vendors' debugging hardware
• full support for object-oriented programming in Turbo Pascal
·5.5 .
• full support for C++ in Turbo C++ • TSR and device driver debugging
Hardware and software requirements
compatibles. DOS 2.0 or higher is required and at least 384K of RAM. It runs on any 80-column monitor, either color or mono-chrome. We recommend a hard disk. If you want to run Turbo Debugger on a two-floppy system, you must use high-density disks. You can also use 3.5-inch, 720K disks; INSTALL won't install Turbo Debugger on these, so you will have to copy the files over yourself.
¢
Turbo Debugger does not require an 8087 math coprocessor chip.¢
To use Turbo Debugger with Borland products, you must have Turbo Pascal 5.0 or later, Turbo C 2.0, Turbo C++, or Turbo Assembler 1.0 or later. You must already have compiled your source code into an executable (.EXE file) with full debugging information turned on.-=:>
When you run Turbo Debugger, you'll need both the .EXE file andthe original source files. Turbo Debugger searches for source files first in the directory where the compiler found them when it compiled, second in the directory specified in the Options/Path for Source command, third in the current directory, and fourth in the directory the .EXE file is in.
A note on terminology
For convenience and brevity, we use a couple of terms in this manual in slightly more generic ways than usual. These terms are
module, function, and argument.
Module Refers to what is usually called a module in C and in assembler, but also to what is called a unit in Pascal.
Function Refers to both a C function and to what is known in Pascal as a subprogram (or routine), which encompasses functions, procedures,
and object methods. In C, a function can return a value (like a Pascal function) or not (like a Pascal procedure). (When a C function doesn't return a value, it's called a void function.) In the interest of brevity, we often use function in a generic way to stand for both C functions and Pascal functions and procedures-except, of course, in the language-specific areas of the manual.
What's in the manual
Here is a brief synopsis of the chapters and appendixes in this manual:
Chapter 1: Getting started describes the contents of the distri-bution disk and tells you how to load Turbo Debugger files into your system. It also gives you advice on which chapter to go to next, depending on your level of expertise.
Chapter 2: Debugging and Turbo Debugger explains the Turbo Debugger environment, menus, and windows, and shows you how to respond to prompts and error messages.
Chapter 3: A quick example leads you through a sample session--using either a Pascal or C program-that demonstrates many of the powerful capabilities of Turbo Debugger.
Chapter 4: Starting Turbo Debugger shows how to run the debugger from the DOS prompt, when to use command-line options, and how to record commonly used settings in configuration files.
Chapter 5: Controlling program execution demonstrates the various ways of starting and stopping your program, as well as how to restart a session or replay the last session.
Chapter 6: Examining and modifying data explains the unique capabilities Turbo Debugger has for examining and changing data inside your program.
Chapter 7: Breakpoints introduces the concept of actions, and how they encompass the behavior of what are sometimes referred to as breakpoints, watchpoints, and tracepoints. Both conditional and unconditional actions are explained, as well as the various things that can happen when an action is triggered.
Chapter 8: Examining and modifying files describes how to examine and change program source files, as well as how to examine and modify arbitrary disk files, either as text or binary data.
Chapter 10: C++ and object-oriented Pascal debugging explains the debugger's special features that let you examine objects in Turbo Pascal 5.5 programs and classes in Turbo C++ programs.
Chapter 11: Assembler-level debugging explains how to view and change memory as raw hex data, how to use the built-in assembler and disassembler, and how to examine or modify the CPU registers and flags.
Chapter 12: The 80x87 coprocessor chip and emulator discusses how to examine and modify the contents of the floating-point hardware or emulator.
Chapter 13: Command reference is a complete listing of all main menu commands and all local menu commands for each window type.
Chapter 14: How to debug a program is an introduction to strategies for effective debugging of your programs.
Chapter 15: Virtual debugging on the 80386 processor describes how you can take ad vantage of the extended memory and power of an 80386 computer by letting the program you're debugging use the full address space below 640K, as if no debugger were loaded.
Chapter 16: Protected-mode debugging with TD286 tells you how to use TD286 to run Turbo Debugger in protected mode, freeing up memory for debugging large programs.
Chapter 17: Debugging TSRs and device drivers explains how to debug terminate and stay resident programs and programs that become resident at startup time with Turbo Debugger, and how to load a symbol table manually.
Appendix A: Summary of command-line options is a summary of all the command-line options that are completely described in Chapter 4.
Appendix B: Technical notes is for experienced programmers. It
describes implementation details of Turbo Debugger that explain how it interacts with both your program and with DOS.
Appendix 0: Customizing Turbo Debugger explains how to use the installation program (TDINST) to customize screen colors and change default options.
Appendix E: Remote debugging explains how to use the TDREMOTE utility so that you can run Turbo Debugger on one system and the program you are debugging on another.
Appendix F: Dialog boxes and error messages lists all the prompts and error messages that can occur, with suggestions on how to respond to them.
Appendix G: Using Turbo Debugger with different languages
provides several tips when you're debugging programs written in C, assembler, or Pascal.
Glossary is an alphabetical list of commonly used terms in this manual, with short definitions.
How to contact Borland'
The best way to contact Borland is to log on to Borland's Forum on CompuServe: Type GO BOR from the main CompuServe menu
and choose "Borland Programming Forum B (Turbo Prolog, Turbo Assembler, Turbo Debugger, & Turbo C)" from the Borland main menu. Leave your questions or comments there for the support staff to process.
If you prefer, write a letter with your comments and send it to Borland International
Technical Support Department - Turbo Debugger 1800 Green Hills Road
P.O. Box 660001
Scotts Valley, CA 95066-0001, USA
408-438-5300 You can also telephone our Technical Support department. Please
have the following information handy before you call:
1. Product name and serial number on your original distribution disk. Please have your serial number ready, or we won't be able to process your call.
3. Computer brand, model, and the brands and model numbers of any additional hardware.
4. Operating system and version number. (The version number can be determined by typing VER at the MS-DOS prompt.) 5. Contents of your AUTOEXEC.BAT file.
6. Contents of your CONFIG.SYS file.
Recommended reading
Many leading publishers support Borland products with a wide range of excellent books, serving everyone from beginning programmers to advanced users. Here are a few titles that offer additional information on Turbo Debugger and Tools:
Ackerman, Charles. Turbo Debugger and Tools: A Self-Teaching Guide, John Wiley and Sons (New York: 1990).
Swan, Tom. Mastering Turbo Assembler, Howard W. Sams and Co. (Carmel, IN: 1989).
Swan, Tom. Mastering Turbo Debugger and Tools, Howard W. Sams and Co. (Carmel, IN: 1990).
c
H A p T E R1
Getting started
Your Turbo Debugger package consists of a set of distribution disks and the
Turbo Debugger User's Guide
(this manual). The distribution disks contain all the programs, files, and utilities needed to debug programs written in Turbo C, Turbo Assembler, Turbo Pascal, and any program written with a Microsoft compiler. In the README and the HELPME!.DOC files, the TurboDebugger package also contains documentation on subjects not covered in this manual.
The
Turbo Debugger User's Guide
provides a subject-by-subject introduction of Turbo Debugger's capabilities and a complete command reference.Before you get started using Turbo Debugger, you should make a complete working copy of the distribution disks, then store the original disks in a safe place. Use the original distribution disks as your backup only, and run Turbo Debugger off of the copy you've just made-the distribution disks are your only backup in case anything happens to your working files.
The distribution disks
When you install Turbo Debugger on your system, files from the distribution disks are copied to your working floppies or to your hard disk. Just run INSTALL.EXE, the easy-to-use installation program on your distribution disks. The distribution disks are formatted for double-sided, double-density disk drives and can be read by IBM PCs and close compatibles.
For a list of the files on your distribution disks, see the README file on the Installation disk.
The
README
file
¢
It is very important that you take the time to look at the README file on the Installation disk before you do anything else with Turbo Debugger. This file contains last-minute information that may not be in the manual. It also lists every file on the distri-bution disks, with a brief description of each.To access the README file, insert the Installation disk in drive A, switch to drive A by typing A: and pressing Enter, then type README
and press Enter again. Once you are in README, use the
i
and J, keys to scroll through the file. Press Esc to exit.The HELPMELDOC file
Your Installation disk also contains a file called HELPME!.DOC, which contains answers to problems that users commonly run into. Consult it if you find yourself having difficulties. Among other things, the HELPME!.DOC file deals with:
• Screen output for graphics and text-based programs • Executing other programs while you are still using the
EI Breaking out of a program
a The syntactic and parsing differences between Turbo Debugger and the Turbo languages
D Debugging multi-language programs with Turbo Debugger
[J Tandy lOOOA, IBM PC Convertible, or NEC MultiSpeed, and
other computers that use the NMI (nonmaskable interrupt)
Turbo Debugger utilities
Your Turbo Debugger package comes with several utility pro-grams. Detailed information on these utilities is available on your distribution disks. See the README file for how to access this disk-based documentation.
Here is a brief description of each of the Turbo Debugger utilities:
IJ The CodeView to Turbo Debugger utility, TDCONVRT.EXE,
lets you debug C and assembler programs developed with Microsoft compilers.
IJ The remote file transfer utility, TDRF.EXE, works in conjunction
with remote debugging and lets you issue basic file-main tenance commands to a remote system.
r:I The symbol table stripping utility, TDSTRIP.EXE, lets you strip
the debugging information (the "symbol table") from your pro-grams without relinking.
IJ TDP ACK.EXE lets you pack the debugging information. IJ TDMAP.EXE appends debugging information to a .MAP file.
D Finally, TDUMP.EXE is a generic object module and .EXE file
disassembler program.
IJ Additionally, we give you a small TSR program, TDNMI.COM
that resets the breakout-switch latch if you are using a Periscope I board.
¢
For a list of all the command-line options available for TDCONVRT.EXE, TDRF.EXE, TDSTRIP.EXE, TDPACK.EXE, TDMAP.EXE, or TDUMP.EXE, just type the program name and press Enter. For example, to see the command-line options for TDMAP.EXE, you would enterInstalling Turbo Debugger
The Installation disks contain a program called INST ALL.EXE that will assist you with the installation of Turbo Debugger 2.0.
To start the installation, change your current drive to the one that has the INSTALL program on it and enter INSTALL. You are given
instructions in a box at the bottom of the screen for each prompt.
INSTALL copies all Turbo Debugger files onto your hard disk and puts them into subdirectories. The default subdirectories are
Turbo Debugger directory: C: \ TD Example subdirectory: C: \ TD
By default, all files from the distribution disks are placed in the Turbo Debugger directory. !fyou would rather separate the demo programs into their own subdirectory as well, edit the default example files path before selecting START INSTALLATION.
You should read the README file to get further information about Turbo Debugger after you install Turbo Debugger.
¢
For a list of all the command-line options available for INSTALL.EXE, enter the program name followed by -h:INSTALL -h
Unzipping
example files
The Turbo Debugger distribution disks contain a file with a .ZIPfile name extension: TDEXAMPL.ZIP.
These files contain several other files that have been compressed and placed inside an archive. You can de-archive them yourself by using the UNZIP .EXE utility.
For example, entering
UNZIP TDEXAMPL
unpacks all the files stored in the TDEXAMPL.ZIP archive into the current directory.
LCD and B/W
monitors
If you have difficulty reading the text displayed by the INSTALLutility, it accepts an optional 18 command-line parameter that forces it to use black-and-white (BW80) mode:
A:INSTALL /B
Specifying the 18 parameter may be necessary if you are using an LCD screen or a system that has a color graphics adapter and a monochrome or composite monitor.
Hardware debugging
If you're using an 80386 system, you can install the TDH386.SYS device driver supplied with Turbo Debugger. This device driver will vastly speed up breakpoints that watch for changed memory areas and I/O port accesses.
Copy this file to the directory where you keep your device drivers and put a line in your CONFIG.SYS file that loads the driver, such as
DEVICE = \SYS\TDH386.SYS
The next time you boot up your system, Turbo Debugger will be able to find and use this device driver.
See the disk-based documentation on the hardware debugger interface for complete information on this device driver interface.
¢
If you have a hardware debugging board (such as Atron,Periscope, Purart Trapper, and so on), you may be able to use the board with Turbo Debugger. Check with the vendor of your board for its compatibility with Turbo Debugger.
Where to now?
Programmers
learning a Turbo
language
Programmers
already using a
Turbo language
If you are just starting to learn one of the languages in the Turbo family, you will want to be able to create small programs using it before you learn about the debugger. What better way to learn how to use the debugger than to have a real live problem of your own to debug! After you have gained a working knowledge of the language, work your way through Chapter 3, "A quick example," for a speedy tour of the major functions of Turbo Debugger. There you'll learn enough about the features you need to debug your first program; you'll find out about the debugger's more sophisticated capabilities in later chapters.
c
H A p T E R2
Debugging and Turbo Debugger
The simple truth is that no one's perfect; we all make mistakes. Whether it's with simple things like walking or complicated things like programming, we all stumble sometimes.
If you're a programmer, stumbling is a way of life. You hardly ever write an error-free program the first time out the gate. That's nothing to be ashamed of. Stumbling also implies picking yourself up off the floor and trying again, and again, and maybe again. In programming parlance, that's debugging.
What is debugging?
Is there a bug?
Where is it?
What is it?
Fixing it
The debugging process can be broadly divided into four steps:
1. Realizing you have an error 2. Finding where the error is 3. Finding the cause of the error 4. Fixing the error
The first step can be really obvious. The computer freezes up (or
hangs)
whenever you run it. Or perhaps it crashes in a shower of meaningless characters. Sometimes, however, the presence of a bug is not so obvious. The program might work fine until you enter a certain number (like 0 or a negative number) or until you examine the output closely. Only then do you notice that the result is off by a factor of .2 or that the middle initials in a list of names are wrong.The second step is sometimes the hardest: isolating where the error occurs. Let's face it, you simply can't keep the entire pro-gram in your head at one time (unless it's a very small propro-gram indeed). Your best approach is to divide and conquer-break up the program into parts and debug them separately. Structured programming is perfect for this type of debugging.
The third step, finding the cause of the error, is probably the second-hardest part of debugging. Once you've discovered where the bug is, it's usually somewhat easier to find out why the pro-gram is misbehaving. For example, if you've determined the error is in a procedure called
PrintNames,
you have only to examine the lines of that procedure instead of the entire program. Even so, the error can be elusive and you might need to experiment a bit before you succeed in tracking down.See Chapter 14 for a more detailed discussion of the debugging process.
squash the bug. Now you run the program again, wait for the next error to show up, and start the debugging process again.
Many times this four-step process is accomplished when you are writing the program itself. Syntax errors, for example, prevent your programs from compiling until they're corrected. The Borland language products have built-in syntax checkers that inform you of these errors and let you fix them on the spot.
But other errors are more insidious and subtle. They lie in wait until you enter a negative number, or they're so elusive you're stymied. That's where Turbo Debugger comes in.
What Turbo Debugger can do for you
Adding a full-feature debugger to the compiler itself would make it too big.
You must use a conversion utility that we supply before you debug a program written In a Microsoft language.
With the standalone Turbo Debugger, you have access to a much more powerful debugger than exists in your language compiler.
You can use Turbo Debugger with any program written in C, Pascal, or assembly language, either the Borland Turbo languages or those from other manufacturers if the compiler generates CodeView information. You can also debug any program created with another manufacturer's language product, but you'll be restricted to debugging on the assembly level-unless CodeView information is present. Then you must use the TDCONVRT utility described in the documentation on Turbo Debugger utilities on your distribution disks.
Turbo Debugger helps with the two hardest parts of the debug-ging process: finding where the error is and finding the cause of the error. It does this by slowing down program execution so you can examine the state of the program at any given spot. You can even test new values in variables to see how they affect your pro-gram. With Turbo Debugger, you can perform
tracing, stepping,
viewing, inspecting, changing,
andwatching.
Tracing You can execute your program one line at a time.
Back tracing You can step backward through your executed code, reversing the execution as you go.
Stepping You can execute your program one line at a time but step over any procedure or function calls. If
What Turbo
Debugger won't
do
Viewing
Inspecting
Changing
Watching
error-free, stepping over them speeds up debugging.
You can have Turbo Debugger open a special window to show you the state of your program from various perspectives: variables, their values, breakpoints, the contents of the stack, a log, a data file, a source file, CPU code, memory, regis-ters, numeric coprocessor information, object or class hierarchies, execution history, or program output.
You can have Turbo Debugger delve deeper into the workings of your program and show you the contents of complicated data structures like arrays.
You can replace the current value of a variable, either globally or locally, with a value you specify.
You can isolate program variables and keep track of their changing values as the program runs.
You can use these powerful tools to dissect your program into discrete chunks, confirming that one chunk works before moving to the next. In this way, you can burrow through the program, no matter how large or complicated, until you find where that bug is hiding. Maybe you'll find there's a function that inadvertently reassigns a value to a variable, or maybe the program gets stuck in an endless loop, or maybe it gets pulled into an unfortunate recursion. Whatever the problem, Turbo Debugger helps you find where it is and what's at fault.
Turbo Debugger 2.0 has even been enhanced to let you debug C++ and object-oriented Pascal programs. It is smart about objects and classes, and it correctly handles late binding of virtual
methods or member functions so that it always executes and displays the correct code.
How Turbo
• Turbo Debugger does not have a built-in editor to change your source code. Most programmers have their favorite editor and are comfortable with it. You can, however, easily transfer con-trol to your text editor by choosing the local Edit command from a File window (more on local commands in a minute). Turbo Debugger uses the editor you specified with the TDINST installation program. Better still, if you have Turbo C++, you can use the new Transfer feature to run Turbo Debugger from inside the Turbo language's integrated environment.
• Turbo Debugger cannot recompile your program for you. You need the original program compiler (like Turbo Pascal or Turbo C) to do that.
• Turbo Debugger does not take the place of thinking. When you're debugging a program, your greatest asset is simple thought. Turbo Debugger is a powerful tool, but if you use it mindlessly, it's unlikely to save you time or effort.
Debugger does it
Here's the really good news: Turbo Debugger gives you all this power and sophistication, and at the same time it's easy-dare we say intuitive-to use.Turbo Debugger accomplishes this artful blend of power and ease by offering an exciting environment. The next section examines the advantages of Turbo Debugger's revolutionary environment.
The Turbo Debugger advantage
Once you start using Turbo Debugger, we think you'll be totally addicted to it. Turbo Debugger has been especially designed to be as easy and convenient as possible. To this end, Turbo Debugger offers you these powerful features:
.. Convenient and logical global menus.
• Context-sensitive local menus throughout the product, which practically do away with memorizing and typing commands.
• Dialog boxes in which you can choose, set, and toggle options and type in information.
Menus and
dialog boxes
ri
• Full macro control to speed up series of commands and keystrokes.
• Convenient, complete window management.
• Mouse support.
• Access to several types of online help. • Session recording and reverse execution.
The rest of this chapter discusses these six features of the Turbo Debugger environment.
As with many Borland products, Turbo Debugger has a convenient global menu system accessible from a menu bar running along the top of the screen. This menu system is always available, no matter which of the debugger windows is active (that is, has a cursor in it).
A pull-down menu is available for each item on the menu bar. Through the pull-down menus, you can
• execute a command.
II open a pop-up menu. Pop-up menus appear when you choose a
menu item that is followed by a menu icon (~).
• open a dialog box. Dialog boxes appear when you choose a menu item that is followed by a dialog box icon ( ... ).
USing the menus There are four ways you can open the menus on the menu bar:
Gefflng In • Press F10, use ~ or ~ to go to the desired menu, and press
Enter.
m Press F10, then press the first letter of the menu name (Spacebar, F, V, R,
a,
0, 0, W, H).II Press Alt plus the first letter of any menu bar command
(Spacebar, F, V, R,
a,
0, 0, W, H). For example, wherever you are in the system, Aft-F takes you to the File menu. The == (System) menu opens with Aft-Spacebar.. . . • Click the menu bar command with the mouse.
Getting around II Use ~ and ~ to move from one pull-down menu to another.
(For example, when you are in the File menu, pressing ~ takes you to the View menu.)
El Use
i
and J, to scroll through the commands in a specific menu. g Use Home and End to go to the first and last menu items,respectively.
tl Highlight a menu command and press Enter to move to a
lower-level (pop-up) menu or dialog box.
III Click the mouse on a command to move to a lower-level
(pop-up) menu or dialog box.
This is how you get out of a menu or the menu system:
Getting out D Press Esc to exit a lower-level menu and return to the previous
menu.
IJ Press Esc in a pull-down menu to leave the menu system and
return to the active window.
D Press F10 at any menu level (but not in a dialog box) to leave the
menu system and return to the active window.
~ III Click the active window with the mouse to leave the menu·
system and return to the active window.
Some menu commands have a shortcut hot key that you press to execute them. The hot key appears in the menu to the right of these commands.
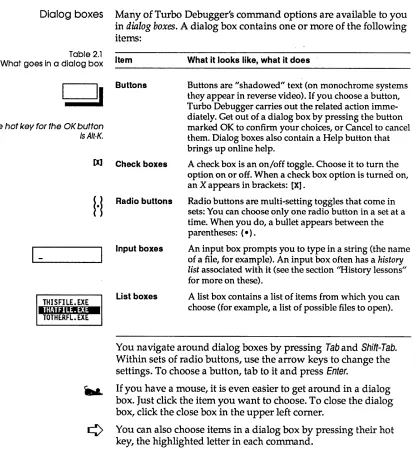
Dialog boxes Many of Turbo Debugger's command options are available to you in dialog boxes. A dialog box contains one or more of the following
[image:35.504.49.465.57.533.2]items:
Table 2.1 What goes In a dialog box
The hot key for the OK button Is Alt-K.
[X]
1-THISFILE.EXE
ImJl"·!I!a-TOTHERFL.EXE
Item
Buttons
Check boxes
Radio buttons
Input boxes
List boxes
What it looks like, what it does
Buttons are "shadowed" text (on monochrome systems
they appear in reverse video). If you choose a button,
Turbo Debugger carries out the related action imme-diately. Get out of a dialog box by pressing the button marked OK to confirm your choices, or Cancel to cancel them. Dialog boxes also contain a Help button that brings up online help.
A check box is an on/off toggle. Choose it to turn the option on or off. When a check box option is turnea on,
an X appears in brackets: [X].
Radio buttons are multi-setting toggles that come in sets: You can choose only one radio button in a set at a time. When you do, a bullet appears between the parentheses: (.).
An input box prompts you to type in a string (the name
of a file, for example). An input box often has a history
list associated with it (see the section "History lessons"
for more on these).
A list box contains a list of items from which you can choose (for example, a list of possible files to open).
You navigate around dialog boxes by pressing Tab and Shift-Tab.
Within sets of radio buttons, use the arrow keys to change the settings. To choose a button, tab to it and press Enter.
w..
If you have a mouse, it is even easier to get around in a dialog box. Just click the item you want to choose. To close the dialog box, click the close box in the upper left comer.-=:>
You can also choose items in a dialog box by pressing their hotKnowing where
you're at
In addition to the convenient system of Borland pull-down menus, the Turbo Debugger advantage consists of a powerful feature that lessens confusion by actually reducing the number of menus.To understand this feature, you must realize that first and fore-most, Turbo Debugger is context-sensitive. That means it keeps tabs on exactly which window you have open, what text is selected, and which subdivision, or pane, of the window your cursor is in. In other words, it knows precisely what you're look-ing at and where the cursor is when you choose a command. And it uses this information when it responds. Let's take an example to illustrate.
Suppose your Pascal program has a line like this:
MyCounter[TheGrade] := MyCounter[TheGrade] + 1;
As you'll discover when you work with Turbo Debugger, getting information on data structures is easy; all you do is press etrl-I, the hot key that opens an Inspector window, to
inspect
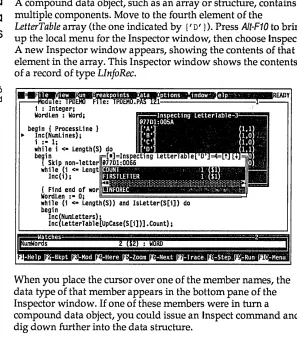
it. When the cursor is at MyCounter, Turbo Debugger shows you information on the contents of the entire array variable. But if you were to select (that is, highlight) the whole array name and the index and then press etrl-I, Turbo Debugger knows that you want to inspect one member and shows you only that member.You can tunnel down to finer and finer program detail in this way. Pressing etrl-I while you're already inspecting an array gives you a look a t a particular member.
This sort of context-sensitivity makes Turbo Debugger extremely easy to use. It saves you the trouble of memorizing and typing complicated strings of menu commands or arcane command-line switches. You simply move to the item you want to examine (or select it using the Ins key or drag over it with the mouse), and then invoke the command (etrl-/ for Inspect, for example). Turbo Debugger always does its best on delivering the goods for the particular item.
single
result; instead,the outcome of a command depends on where
your cursor
isor what text
isselected.
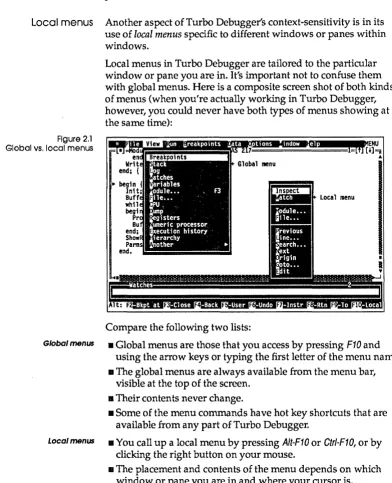
[image:37.505.57.449.88.571.2]Local menus Another aspect of Turbo Debugger's context-sensitivity is in its use of
local menus
specific to different windows or panes within windows.Figure 2.1 Global VS. local menus
Local menus in Turbo Debugger are tailored to the particular window or pane you are in. It's important not to confuse them with global menus. Here is a composite screen shot of both kinds of menus (when you're actually working in Turbo Debugger, however, you could never have both types of menus showing at the same time):
Compare the following two lists:
Global menus • Global menus are those that you access by pressing F10 and using the arrow keys or typing the first letter of the menu name. • The global menus are always available from the menu bar,
visible at the top of the screen. • Their contents never change.
• Some of the menu commands have hot key shortcuts that are available from any part of Turbo Debugger.
Local menus • You call up a local menu by pressing AIt-F10 or Ctrl-F10, or by clicking the right button on your mouse.
History lessons
II Contents can vary from one local menu to another. (Even so,
many of the local commands appear in almost all of the local menus, so that there's a predictable core of commands from one to another.) The results of like-named commands can be
different, however, depending on the context.
iii Every command on a local menu has a hot key shortcut
consisting of Gtrl plus the highlighted letter in the command. Because of this arrangement, a hot key, say Glrl-S, might mean one thing in one context but quite another in a different context. (A core of commands, however, is still consistent across the local menus. For example, the Goto command and the Search command always do the same thing, even when they are invoked from different panes.)
From a user's standpoint, local menus are a great convenience. All possible command choices relevant to the moment are laid out at a glance. This prevents you from trying to choose inappropriate commands and keeps the menus small and uncluttered.
Menus and context-sensitivity comprise just two aspects of the convenient environment of Turbo Debugger. Another habit-forming feature is the history list.
Conforming to the philosophy that the user shouldn't have to type more than absolutely necessary, Turbo Debugger remembers whatever you enter into input boxes and displays that text when-ever you call up the box again.
Figure 2.2
A history list In an Input box
The first Item In a search list Is always the word the cursor Is
on In the Module window.
Automatic name completion
Warning!
The search input box might look like this:
begin { progran } Init;
Buffer :- GetL1ne; whll e Buffer <> I I do
begin
ProcessL1 ne (Buffer) ;
Buffer:-~.ii.iii
•••
iiiiij~ end; IIIShowResul ts; PamsOnHeap; end.
ROMPT
You can use this history list as a shortcut to typing by using the arrow keys to select any previous entry then pressing Enter to start the search. If you have a mouse, you can also use the scroll bar to scroll to the entry you want. If you use an unaltered entry from the history list, that entry is copied to the top of the list.
You can also edit entries (use the arrow keys to insert the cursor in the highlighted text, then edit as usual, using Del or Backspace).
For example, you can select
MyPercentage
and change it toHisPercentage,
instead of typing in the entire text. If you start to type a new item when an entry is highlighted, you will overwrite the highligh ted item.A history list lists the last five responses unless you tell it other-wise. (You can change its size using the TDINST program.)
Turbo Debugger keeps a separate history list for most input boxes. That way, the text you enter to do a search does not clutter up the box for, say, going to a particular label or line number.
Whenever you are prompted for text entry in an input box, you can type in just part of a symbol name in your program, then press Ctrl-N.
When the word READY ••• appears in the upper right comer of the
Incremental
matching
Making macros
Whenever you find yourself repeating a series of steps, say to yourself, ·Shouldn't I be using a macro for this?·
Create Alt= Stop recording
Alt-Remove
Delete all
Window shopping
[] If you have typed enough of a name to uniquely identify it, Turbo Debugger simply fills in the rest of it.
[] If the name you have typed so far is not the beginning of any known symbol name, nothing happens.
[] If what you have typed matches the beginning of more than one symbol name, a list of matching names is presented for you to pick the one you want.
Turbo Debugger also lets you use incremental matching to find entries in a dialog box list of file and directory names. Start typing the name of the file or directory; if the file is available from the list box, the highlight bar moves to the name as soon as you have typed enough characters to identify it uniquely. Then all you have to do is choose the OK button.
Macros are simply hot keys that you define.
You can assign any series of Turbo Debugger commands and keystrokes to a single key, for playback whenever you want.
To create a macro, choose Options I Macros. At this point, you have a choice of four commands: Create, Stop Recording,
Remove, and Delete All. Choose Create; Turbo Debugger prompts you for a key to save the upcoming macro to. Press a little-used or easily remembered key or key combination (for example, Shift-F1
for rerunning a program). Now go through all the steps and com-mands you want to save to that key.
To end the macro recording session, do one of these things:
[] Choose Options I Macros I Stop Recording.
[] Press the newly defined macro key (Shift-F1 in this example). [] Press Alt -(hold down Alt and press the hyphen or minus sign).
Windows from the View menu Breakpoints Stack Log Watches Variables
Module... F3
File •••
CPU Dump Registers Numeric processor Execution history Hierarchy
Another ~
Chapter 8 details the Module window and its commands.
See Chapter 6 for more about the Watches window.
See Chapter 7 for a
complete description of this type of window and how breakpoints work.
types of windows; a window's type depends on what sort of information it holds. You open and close all windows using menu commands (or hot key shortcuts for those commands). Most of Turbo Debugger's windows come from the View menu, which lists fourteen types of windows. Another class of window, called the Inspector window, is opened by choosing either Data I Inspect or Inspect from a local menu.
Here is a list of the thirteen types of windows that you can open from the View menu:
Once you have opened one or more of these windows, you can move, resize, close, and otherwise manage them with commands from the Window and == (System) menus, which are discussed in the section "Working with windows."
Module window
Displays the program code that you're debugging. You can move around inside the module and examine data and code by posi-tioning the cursor on program variable names and issuing the appropriate local menu command.
You will probably spend more time in Module windows than in any other type, so take the time to learn about all the various local menu commands for this type of window.
You can also press F3 to open a Module window.
Watches window
Displays variables and their changing values. You can add a variable to the window by pressing Cfrl-Wwhen the cursor is on the variable in the Module window.
Breakpoints window
Displays the breakpoints you have set. A breakpoint defines a location in your program where execution stops so you can examine the program's status. The left pane lists the position of every breakpoint (or indicates that it is global), and the right pane indicates the conditions under which the currently highlighted breakpoint executes.
Chapter 5 provides more Information on the Stack window.
Stack window
Displays the current state of the stack, with the function called first on the bottom (in C programs, this is function main) and all subsequently called functions on top, in the order they were called.
You can bring up and examine the source code of any function in the stack by highlighting it and pressing Ctr/-I.
By highlighting a function name in the stack and pressing Ctrl-L,
you open a Variables window displaying variables global to the program, variables local to the function, and the arguments with which the function was called.
Log window
Chapter 7 tells you more Displays the contents of the message log. The log contains a
about the Log window. scrolling list of messages and information generated as you work
Chapter 5 describes the Variables window in more detail.
You can learn more about the File window in Chapter 8.
in Turbo Debugger. It tells you such things as why your program stopped, the results of breakpoints, and the contents of windows you saved in the log.
This window lets you look back into the past and see what led up to the current state of affairs.
Variables window
Displays all the variables accessible from a given spot in your pro-gram. The upper pane has global variables; the lower pane shows variables local to the current function or module, if any.
This window is helpful when you want to find a function or variable that you know begins with, say, "abc," and you can't remember its exact name. You can look in the global Symbol pane and quickly find what you want.
File window
Displays the contents of a disk file. You can view the file either as raw hex bytes or as ASCII text. You can search for specific text or byte sequences, as well as directly patching any part of the file on disk.
Chapter 11 discusses the CPU window and
assembler-level debugging.
See Chapter 11, which discusses assembler debugging, for more on this
window.
Chapter 11, which discusses assembler debugging, has more Information on this window.
contents of one of its files. You can also correct a mistake in the contents of a file, or examine a file produced by a program to make sure the contents are correct.
CPU window
Displays the current state of the central processing unit (CPU). This window has five panes: one that contains disassembled machine instructions, one that shows hex data bytes, one that displays a raw stack of hex words, one that lists the contents of the CPU registers, and one that indicates the state of the CPU flags.
The CPU window is useful when you want to watch the exact sequence of instructions that make up a line of source code or the bytes that comprise a data structure. If you know assembler code, this can help locate subtle bugs. You do not need to use this window to debug the majority of programs.
Turbo Debugger sometimes opens a CPU window automatically,
if your program stops on an instruction in the middle of a line of source code.
Dump window
Displays a raw displa