Corporate Headquarters Cisco Systems, Inc.
170 West Tasman Drive San Jose, CA 95134-1706
Catalyst 6500 Series Switch Content
Switching Module with SSL Command
Reference
THE SPECIFICATIONS AND INFORMATION REGARDING THE PRODUCTS IN THIS MANUAL ARE SUBJECT TO CHANGE WITHOUT NOTICE. ALL STATEMENTS, INFORMATION, AND RECOMMENDATIONS IN THIS MANUAL ARE BELIEVED TO BE ACCURATE BUT ARE PRESENTED WITHOUT WARRANTY OF ANY KIND, EXPRESS OR IMPLIED. USERS MUST TAKE FULL RESPONSIBILITY FOR THEIR APPLICATION OF ANY PRODUCTS.
THE SOFTWARE LICENSE AND LIMITED WARRANTY FOR THE ACCOMPANYING PRODUCT ARE SET FORTH IN THE INFORMATION PACKET THAT SHIPPED WITH THE PRODUCT AND ARE INCORPORATED HEREIN BY THIS REFERENCE. IF YOU ARE UNABLE TO LOCATE THE SOFTWARE LICENSE OR LIMITED WARRANTY, CONTACT YOUR CISCO REPRESENTATIVE FOR A COPY.
The Cisco implementation of TCP header compression is an adaptation of a program developed by the University of California, Berkeley (UCB) as part of UCB’s public domain version of the UNIX operating system. All rights reserved. Copyright © 1981, Regents of the University of California.
NOTWITHSTANDING ANY OTHER WARRANTY HEREIN, ALL DOCUMENT FILES AND SOFTWARE OF THESE SUPPLIERS ARE PROVIDED “AS IS” WITH ALL FAULTS. CISCO AND THE ABOVE-NAMED SUPPLIERS DISCLAIM ALL WARRANTIES, EXPRESSED OR IMPLIED, INCLUDING, WITHOUT
LIMITATION, THOSE OF MERCHANTABILITY, FITNESS FOR A PARTICULAR PURPOSE AND NONINFRINGEMENT OR ARISING FROM A COURSE OF DEALING, USAGE, OR TRADE PRACTICE.
IN NO EVENT SHALL CISCO OR ITS SUPPLIERS BE LIABLE FOR ANY INDIRECT, SPECIAL, CONSEQUENTIAL, OR INCIDENTAL DAMAGES, INCLUDING, WITHOUT LIMITATION, LOST PROFITS OR LOSS OR DAMAGE TO DATA ARISING OUT OF THE USE OR INABILITY TO USE THIS MANUAL, EVEN IF CISCO OR ITS SUPPLIERS HAVE BEEN ADVISED OF THE POSSIBILITY OF SUCH DAMAGES.
C O N T E N T S
Preface
xiAudience
xiOrganization
xiConventions
xiiRelated Documentation
xiiiObtaining Documentation
xiiiCisco.com
xiiiDocumentation DVD
xiiiOrdering Documentation
xivDocumentation Feedback
xivCisco Product Security Overview
xivReporting Security Problems in Cisco Products
xvObtaining Technical Assistance
xvCisco Technical Support Website
xvSubmitting a Service Request
xviDefinitions of Service Request Severity
xviObtaining Additional Publications and Information
xviiC H A P T E R 1
Using Content Switching Module Commands
1-1Using the CSM and CSM-S Commands
1-1Command Modes
1-2Regular Expressions
1-3C H A P T E R 2
Content Switching Module with SSL Commands
2-1arp
2-2capp udp
2-3options (CAPP UDP submode)
2-5Contents
manager (DFP submode)
2-12exit
2-13ft group
2-14failover (fault tolerant submode)
2-16heartbeat-time (fault tolerant submode)
2-17preempt (fault tolerant submode)
2-18priority (fault tolerant submode)
2-19track (fault tolerant submode)
2-20hw-module csm standby config-sync
2-21ip slb mode
2-22map cookie
2-24match protocol http cookie (cookie map submode)
2-25map dns
2-26match protocol dns domain (DNS map submode)
2-27map header
2-28insert protocol http header (header map submode)
2-29match protocol http header (header map submode)
2-30map retcode
2-31match protocol http retcode (return code map submode)
2-32map url
2-33match protocol http url (URL map submode)
2-34module csm
2-35natpool (module CSM submode)
2-36variable (module CSM submode)
2-37owner
2-40billing-info (owner submode)
2-41contact-info (owner submode)
2-42maxconns (owner submode)
2-43policy
2-44client-group (policy submode)
2-45cookie-map (policy submode)
2-46header-map (policy submode)
2-47nat client (policy submode)
2-48Contents
sticky-group (policy submode)
2-52url-map (policy submode)
2-53probe
2-54address (probe submode)
2-56credentials (probe submode)
2-57description (serverfarm submode)
2-58expect status (probe submode)
2-59failed (probe submode)
2-61header (probe submode)
2-62interval (probe submode)
2-63name (probe submode)
2-64open (probe submode)
2-65port (probe submode)
2-66receive (probe submode)
2-67recover (probe submode)
2-68request (probe submode)
2-69retries (probe submode)
2-70script (probe submode)
2-71real
2-72backup real (real server submode)
2-74health probe (real server submode)
2-75inservice (real server submode)
2-76maxconns (real server submode)
2-77minconns (real server submode)
2-78redirect-vserver (real server submode)
2-79weight (real server submode)
2-80redirect-vserver
2-81advertise (redirect virtual server submode)
2-82client (redirect virtual server submode)
2-83idle (redirect virtual server submode)
2-84Contents
webhost backup (redirect virtual server submode)
2-90webhost relocation (redirect virtual server submode)
2-91reverse-sticky
2-92script file
2-93script task
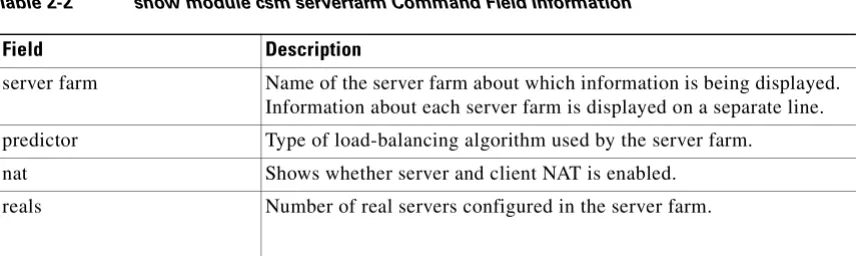
2-95serverfarm
2-96bindid (serverfarm submode)
2-97description (serverfarm submode)
2-98failaction (serverfarm submode)
2-99health (serverfarm submode)
2-100nat client (serverfarm submode)
2-101nat server (serverfarm submode)
2-102predictor (serverfarm submode)
2-103probe (serverfarm submode)
2-106retcode-map (serverfarm submode)
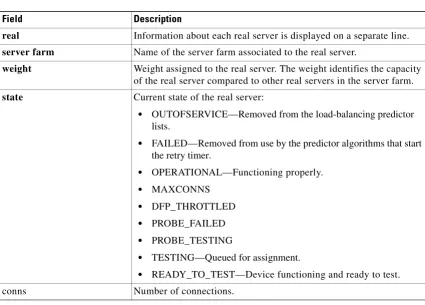
2-107show module csm
2-108show module csm arp
2-109show module csm capp
2-110show module csm conns
2-112show module csm dfp
2-114show module csm ft
2-116show module csm map
2-117show module csm memory
2-119show module csm natpool
2-120show module csm owner
2-121show module csm policy
2-122show module csm probe
2-123show module csm probe script
2-125show module csm pvlan
2-126show module csm real
2-127show module csm real retcode
2-129show module csm script
2-130show module csm script task
2-131Contents
show module csm static server
2-135show module csm stats
2-137show module csm status
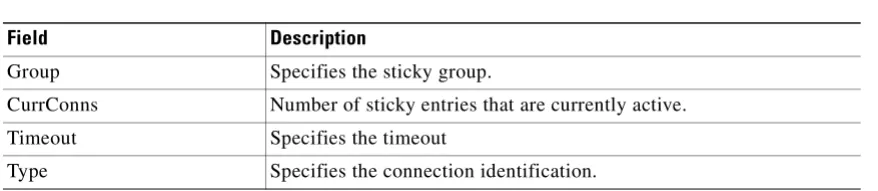
2-139show module csm sticky
2-140show module csm tech-script
2-142show module csm tech-support
2-143show module
csm
variable
2-146show module csm vlan
2-148show module csm vserver redirect
2-150show module csm xml stats
2-152snmp enable traps slb ft
2-153static
2-154real (static NAT submode)
2-155sticky
2-156cookie offset (sticky submode)
2-158cookie secondary (sticky submode)
2-159header (sticky submode)
2-160static (sticky submode)
2-161vserver
2-162advertise (virtual server submode)
2-163client (virtual server submode)
2-164description (virtual server submode)
2-165domain (virtual server submode)
2-166idle (virtual server submode)
2-167inservice (virtual server submode)
2-168owner (virtual server submode)
2-169parse-length (virtual server submode)
2-170pending (virtual server submode)
2-171persistent rebalance (virtual server submode)
2-172replicate csrp (virtual server submode)
2-173Contents
sticky (virtual server submode)
2-180unidirectional (virtual server submode)
2-182url-hash (virtual server submode)
2-183virtual (virtual server submode)
2-184vlan (virtual server submode)
2-187vlan
2-188alias (VLAN submode)
2-189description (VLAN submode)
2-191gateway (VLAN submode)
2-192ip address (VLAN submode)
2-193route (VLAN submode)
2-194xml-config
2-195client-group (XML submode)
2-196credentials (XML submode)
2-197inservice (XML submode)
2-198port (XML submode)
2-199vlan (XML submode)
2-200C H A P T E R 3
Commands Specific to the Content Switching Module with SSL
3-1clear ssl-proxy conn
3-5clear ssl-proxy session
3-6clear ssl-proxy stats
3-7crypto ca export pem
3-8crypto ca import pem
3-10crypto ca export pkcs12
3-12crypto ca import pkcs12
3-14crypto key export rsa pem
3-16crypto key import rsa pem
3-18debug ssl-proxy
3-20do
3-23show ssl-proxy admin-info
3-24show ssl-proxy buffers
3-25show ssl-proxy certificate-history
3-26Contents
show ssl-proxy natpool
3-35show ssl-proxy policy
3-36show ssl-proxy service
3-38show ssl-proxy stats
3-40show ssl-proxy status
3-43show ssl-proxy version
3-45show ssl-proxy vlan
3-46show ssl-proxy vts
3-47snmp-server enable
3-48ssl-proxy crypto selftest
3-49ssl-proxy mac address
3-50ssl-proxy natpool
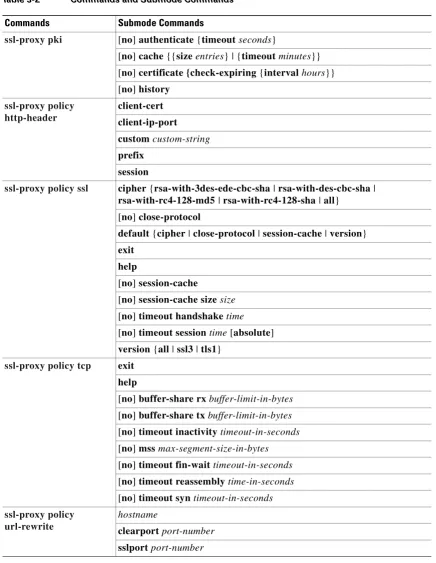
3-51ssl-proxy pki
3-52ssl-proxy policy http-header
3-54ssl-proxy policy ssl
3-56ssl-proxy policy tcp
3-60ssl-proxy policy url-rewrite
3-63ssl-proxy pool ca
3-65ssl-proxy service
3-66ssl-proxy service client
3-70ssl-proxy ssl ratelimit
3-73ssl-proxy vlan
3-74standby authentication
3-78standby delay minimum reload
3-79standby ip
3-81standby mac-address
3-83standby mac-refresh
3-85standby name
3-86standby preempt
3-87standby priority
3-89Contents
A P P E N D I X A
Acronyms
A-1Preface
This preface describes the audience, organization, and conventions of this publication, and provides information on how to obtain related documentation.
This guide contains the commands available for use with the Cisco Content Switching Module with SSL (CSM-S). Use this guide with the Catalyst 6500 Series Switch Content Switching Module with SSL Installation Note and the Catalyst 6500 Series Switch Content Switching Module with SSL Installation and Configuration Note.
Audience
This publication is for experienced network administrators who are responsible for configuring and maintaining Catalyst 6500 series switches and network managers who perform any of the following tasks:
• Managing network security
• Configuring firewalls
• Managing default and static routes and TCP and UDP services
Organization
This publication is organized as follows:
Chapter Title Description
Chapter 1 Using Content Switching Module Commands
Introduces you to the CSM commands, access modes, and common port and protocol numbers.
Chapter 2 Content Switching Module with SSL Commands
Preface Conventions
Conventions
This document uses the following conventions:
Notes use the following conventions:
Note Means reader take note. Notes contain helpful suggestions or references to material not covered in the publication.
Cautions use the following conventions:
Caution Means reader be careful. In this situation, you might do something that could result in equipment damage or loss of data.
Convention Description
boldface font Commands, command options, and keywords are in
boldface.
italic font Arguments for which you supply values are in italics. [ ] Elements in square brackets are optional. Default responses
to system prompts are in square brackets.
{ x | y | z } Alternative keywords are grouped in braces and separated by vertical bars. Braces can also be used to group keywords and/or aguments; for example, {interfaceinterfacetype}. [ x | y | z ] Optional alternative keywords are grouped in brackets and
separated by vertical bars.
string A nonquoted set of characters. Do not use quotation marks around the string or the string will include the quotation marks.
screen font Terminal sessions and information the system displays are in
screen font.
boldface screen
font
Information you must enter is in boldface screen font.
italic screen font Arguments in the screen display for which you supply values
are in italic screen font.
^ The symbol ^ represents the key labeled Control—for example, the key combination ^D in a screen display means hold down the Control key while you press the D key.
< > Nonprinting characters, such as passwords are in angle brackets.
Preface
Related Documentation
Related Documentation
For more detailed installation and configuration information for the Content Switching Module with SSL, refer to the following publications:
• Release Notes for the Catalyst 6500 Series Switch Content Switching Module with SSL
• Catalyst 6500 Series Switch Content Switching Module with SSL Installation Note
• Catalyst 6500 Series Switch Content Switching Module with SSL Command Reference
• Regulatory Compliance and Safety Information for the Catalyst 6500 Series Switches
For more detailed installation and configuration information for SSL services, refer to the following publications:
• Release Notes for Catalyst 6500 Series SSL Services Module Software Release 2.x
• Catalyst 6500 Series Switch SSL Services Module Installation and Verification Note
• Catalyst 6500 Series Switch SSL Services Module Command Reference
• Catalyst 6500 Series Switch SSL Services Module System Messages
Use this document in conjunction with the CSM documentation available online at the following site:
http://www.cisco.com/univercd/cc/td/doc/product/lan/cat6000/cfgnotes/csm_3_3 /index.htm
Cisco provides CSM technical tips at the following site:
http://www.cisco.com/en/US/products/hw/modules/ps2706/ps780/index.html
Obtaining Documentation
Cisco documentation and additional literature are available on Cisco.com. Cisco also provides several ways to obtain technical assistance and other technical resources. These sections explain how to obtain technical information from Cisco Systems.
Cisco.com
You can access the most current Cisco documentation at this URL:
http://www.cisco.com/univercd/home/home.htm
You can access the Cisco website at this URL:
http://www.cisco.com
You can access international Cisco websites at this URL:
http://www.cisco.com/public/countries_languages.shtml
Preface Documentation Feedback
Registered Cisco.com users (Cisco direct customers) can order a Cisco Documentation DVD (product number DOC-DOCDVD=) from the Ordering tool or Cisco Marketplace.
Cisco Ordering tool:
http://www.cisco.com/en/US/partner/ordering/
Cisco Marketplace:
http://www.cisco.com/go/marketplace/
Ordering Documentation
You can find instructions for ordering documentation at this URL:
http://www.cisco.com/univercd/cc/td/doc/es_inpck/pdi.htm
You can order Cisco documentation in these ways:
• Registered Cisco.com users (Cisco direct customers) can order Cisco product documentation from the Ordering tool:
http://www.cisco.com/en/US/partner/ordering/
• Nonregistered Cisco.com users can order documentation through a local account representative by calling Cisco Systems Corporate Headquarters (California, USA) at 408 526-7208 or, elsewhere in North America, by calling 1 800 553-NETS (6387).
Documentation Feedback
You can send comments about technical documentation to [email protected].
You can submit comments by using the response card (if present) behind the front cover of your document or by writing to the following address:
Cisco Systems
Attn: Customer Document Ordering 170 West Tasman Drive
San Jose, CA 95134-9883
We appreciate your comments.
Cisco Product Security Overview
Cisco provides a free online Security Vulnerability Policy portal at this URL:
http://www.cisco.com/en/US/products/products_security_vulnerability_policy.html
From this site, you can perform these tasks:
• Report security vulnerabilities in Cisco products.
• Obtain assistance with security incidents that involve Cisco products.
• Register to receive security information from Cisco.
A current list of security advisories and notices for Cisco products is available at this URL:
Preface
Obtaining Technical Assistance
If you prefer to see advisories and notices as they are updated in real time, you can access a Product Security Incident Response Team Really Simple Syndication (PSIRT RSS) feed from this URL:
http://www.cisco.com/en/US/products/products_psirt_rss_feed.html
Reporting Security Problems in Cisco Products
Cisco is committed to delivering secure products. We test our products internally before we release them, and we strive to correct all vulnerabilities quickly. If you think that you might have identified a vulnerability in a Cisco product, contact PSIRT:
• Emergencies —[email protected]
• Nonemergencies —[email protected]
Tip We encourage you to use Pretty Good Privacy (PGP) or a compatible product to encrypt any sensitive information that you send to Cisco. PSIRT can work from encrypted information that is compatible with PGP versions 2.x through 8.x.
Never use a revoked or an expired encryption key. The correct public key to use in your correspondence with PSIRT is the one that has the most recent creation date in this public key server list:
http://pgp.mit.edu:11371/pks/lookup?search=psirt%40cisco.com&op=index&exact=on
In an emergency, you can also reach PSIRT by telephone:
• 1 877 228-7302
• 1 408 525-6532
Obtaining Technical Assistance
For all customers, partners, resellers, and distributors who hold valid Cisco service contracts, Cisco Technical Support provides 24-hour-a-day, award-winning technical assistance. The Cisco Technical Support Website on Cisco.com features extensive online support resources. In addition, Cisco Technical Assistance Center (TAC) engineers provide telephone support. If you do not hold a valid Cisco service contract, contact your reseller.
Cisco Technical Support Website
The Cisco Technical Support Website provides online documents and tools for troubleshooting and resolving technical issues with Cisco products and technologies. The website is available 24 hours a day, 365 days a year, at this URL:
Preface Obtaining Technical Assistance
Note Use the Cisco Product Identification (CPI) tool to locate your product serial number before submitting a web or phone request for service. You can access the CPI tool from the Cisco Technical Support Website by clicking the Tools & Resources link under Documentation & Tools.Choose Cisco Product Identification Tool from the Alphabetical Index drop-down list, or click the Cisco Product
Identification Tool link under Alerts & RMAs. The CPI tool offers three search options: by product ID or model name; by tree view; or for certain products, by copying and pasting show command output. Search results show an illustration of your product with the serial number label location highlighted. Locate the serial number label on your product and record the information before placing a service call.
Submitting a Service Request
Using the online TAC Service Request Tool is the fastest way to open S3 and S4 service requests. (S3 and S4 service requests are those in which your network is minimally impaired or for which you require product information.) After you describe your situation, the TAC Service Request Tool provides recommended solutions. If your issue is not resolved using the recommended resources, your service request is assigned to a Cisco TAC engineer. The TAC Service Request Tool is located at this URL:
http://www.cisco.com/techsupport/servicerequest
For S1 or S2 service requests or if you do not have Internet access, contact the Cisco TAC by telephone. (S1 or S2 service requests are those in which your production network is down or severely degraded.) Cisco TAC engineers are assigned immediately to S1 and S2 service requests to help keep your business operations running smoothly.
To open a service request by telephone, use one of the following numbers:
Asia-Pacific: +61 2 8446 7411 (Australia: 1 800 805 227) EMEA: +32 2 704 55 55
USA: 1 800 553-2447
For a complete list of Cisco TAC contacts, go to this URL:
http://www.cisco.com/techsupport/contacts
Definitions of Service Request Severity
To ensure that all service requests are reported in a standard format, Cisco has established severity definitions.
Severity 1 (S1)—Your network is “down,” or there is a critical impact to your business operations. You and Cisco will commit all necessary resources around the clock to resolve the situation.
Severity 2 (S2)—Operation of an existing network is severely degraded, or significant aspects of your business operation are negatively affected by inadequate performance of Cisco products. You and Cisco will commit full-time resources during normal business hours to resolve the situation.
Severity 3 (S3)—Operational performance of your network is impaired, but most business operations remain functional. You and Cisco will commit resources during normal business hours to restore service to satisfactory levels.
Preface
Obtaining Additional Publications and Information
Obtaining Additional Publications and Information
Information about Cisco products, technologies, and network solutions is available from various online and printed sources.
• Cisco Marketplace provides a variety of Cisco books, reference guides, and logo merchandise. Visit Cisco Marketplace, the company store, at this URL:
http://www.cisco.com/go/marketplace/
• Cisco Press publishes a wide range of general networking, training and certification titles. Both new and experienced users will benefit from these publications. For current Cisco Press titles and other information, go to Cisco Press at this URL:
http://www.ciscopress.com
• Packet magazine is the Cisco Systems technical user magazine for maximizing Internet and networking investments. Each quarter, Packet delivers coverage of the latest industry trends, technology breakthroughs, and Cisco products and solutions, as well as network deployment and troubleshooting tips, configuration examples, customer case studies, certification and training information, and links to scores of in-depth online resources. You can access Packet magazine at this URL:
http://www.cisco.com/packet
• iQ Magazine is the quarterly publication from Cisco Systems designed to help growing companies learn how they can use technology to increase revenue, streamline their business, and expand services. The publication identifies the challenges facing these companies and the technologies to help solve them, using real-world case studies and business strategies to help readers make sound technology investment decisions. You can access iQ Magazine at this URL:
http://www.cisco.com/go/iqmagazine
• Internet Protocol Journal is a quarterly journal published by Cisco Systems for engineering professionals involved in designing, developing, and operating public and private internets and intranets. You can access the Internet Protocol Journal at this URL:
http://www.cisco.com/ipj
• World-class networking training is available from Cisco. You can view current offerings at this URL:
C H A P T E R
1
Using Content Switching Module Commands
This chapter describes how to use the CSM and CSM-S commands and contains the following sections:
• Using the CSM and CSM-S Commands, page 1-1
• Command Modes, page 1-2
Note Except where specifically differentiated, the term “Content Switching Module” and its acronym “CSM” includes both the Content Switching Module and the Content Switching Module with SSL.
The term “Content Switching Module with SSL” and its acronym “CSM-S” are used only where the information presented is specific to the CSMS.
The term SSL daughter card an SSL termination dauthter card for the CSM that accelerates Secure Socket Layer (SSL) transactions.
Using the CSM and CSM-S Commands
This section provides a brief introduction to using commands and where to go for more information on configuring and using your CSM or CSM-S.
You will use these commands for basic tasks:
Command Task
write memory Saving the configuration
write terminal Viewing the configuration
logging buffered debugging Accumulating system log (syslog) messages
show logging Viewing system log (syslog) messages
Chapter 1 Using Content Switching Module Commands Command Modes
With the command-line interface (CLI), you can do the following tasks:
• Check the syntax before entering a command.
Enter a command and press the ? key to view a quick summary, or precede a command with the help
command (help aaa, for example).
• Abbreviate commands.
You can use the config t command to start configuration mode, the write t command statementto list the configuration, and the write m commmand to write to Flash memory. In most commands, the show command can be abbreviated as sh. This feature is called command completion.
• Review possible port and protocol numbers at the following Internet Assigned Numbers Authority (IANA) websites:
http://www.iana.org/assignments/port-numbers http://www.iana.org/assignments/protocol-numbers
• Create your configuration in a text editor, and then cut and paste it into the configuration.
You can paste in a line at a time or the whole configuration. Always check your configuration after pasting large blocks of text to be sure that all of the text was copied.
For information about how to build your CSM and CSM-S configuration, refer to the Catalyst 6500 Series Content Switching Module Installation and Configuration Note and Catalyst 6500 Series Switch Content Switching Module with SSL Installation and Configuration Note.
CSM and CSM-S technical documentation is located online at the following websites:
http://www.cisco.com/univercd/cc/td/doc/product/lan/cat6000/mod_icn/csm
http://www.cisco.com/univercd/cc/td/doc/product/lan/cat6000/mod_icn/csm/csms
Command Modes
The CSM and CSM-S contain a command set based on Cisco IOS technologies and provides configurable command privilege modes based on the following command modes:
Note When using these modules on a switch running the Catalyst operating system and Cisco IOS, you must session to the Mutilayer Switch Feature Card (MSFC) for the router prompt.
• Unprivileged mode
The unprivileged mode allows you to view CSM settings. The unprivileged mode prompt appears as follows when you first access the CSM:
Router>
• Privileged mode
Any unprivileged mode command will work in privileged mode. Use the enable command to start the privileged mode from the unprivileged mode as follows:
Router> enable Password: Router
Chapter 1 Using Content Switching Module Commands
Regular Expressions
Use the exit or end commands to exit privileged mode and return to unprivileged mode as follows:
Router# exit
Logoff
Type help or '?' for a list of available commands.
Router>
Use the disable command to exit privileged mode and return to unprivileged mode as follows:
Router# disable
Router>
• Configuration mode
The configuration mode allows you to change the configuration. All privileged, unprivileged, and configuration commands are available in this mode. Use the configure terminal command to start the configuration mode as follows:
Router# configure terminal
Router(config)#
Use the exit or end commands to exit configuration mode and return to privileged mode as follows:
Router(config)# end
Router#
Use the disable command to exit configuration mode and return to unprivileged mode as follows:
Router(config)# disable
Router>
• Submodes
When you are in a submode, the prompt changes to:
Router(config-submode_name)#
Regular Expressions
Regular expressions used in commands are based on the UNIX filename specification. You will use regular expressions in these commands:
• match protocol http cookie (cookie map submode), page -25
• match protocol http header (header map submode), page -30
• match protocol http url (URL map submode), page -34
Expression Meaning
Chapter 1 Using Content Switching Module Commands Regular Expressions
“.\a” Alert (ASCII 7)
“.\b” Backspace (ASCII 80
“.\f” Form-feed (ASCII 12)
“.\n” Newline (ASCII 10)
“.\r” Carriage return (ASCII 13)
“.\t” Tab (ASCII 9)
“.\v” Vertical tab (ASCII 11)
“.\0” Null (ASCII 0)
“.\\” Backslash
“.\x##” Any ASCII character as specified in two-digit hexadecimal notation
C H A P T E R
2
Content Switching Module with SSL Commands
Chapter 2 Content Switching Module with SSL Commands arp
arp
To configure a static ARP entry, use the arp command. To remove the static ARP entry from the configuration, use the no form of this command.
arp ip_addressmac-address vlan id
no arp ip_address
Syntax Description
Defaults This command has no default settings.
Command Modes CSM configuration submode
Command History
Examples This example shows how to configure a static ARP entry:
Router(config-module-csm)# arp 1.1.1.1 0123.4567.89ab vlan 3
ip_address IP address that you want associate with the ARP entry.
mac-address MAC address of the host.
vlan id Identifies the VLAN.
Release Modification
Chapter 2 Content Switching Module with SSL Commands
capp udp
capp udp
To enter the Content Application Peering Protocol (CAPP) User Datagram Protocol (UDP)
configuration submode, and then enable the CAPP, use the capp udp command. To remove the CAPP UDP configuration, use the no form of this command.
capp udp
no capp udp
Syntax Description This command has no arguments or keywords.
Defaults This command has no default settings.
Command Modes CSM configuration submode
Command History
Usage Guidelines The CSM implements only the agent side of the CAPP, not the content router functionality. This feature provides Global Server Load Balancing (GSLB) when you use the CSM with a Content Services Switch (CSS), which provides the content router function.
When you enter the CAPP UDP submode, the following commands are available:
• default—Sets a command to its default.
• exit—Saves changes and exits from the subcommand mode; see the “agent (DFP submode)” command section.
• no—Negates a command or sets the specified command to its defaults.
• options—Sets optional parameters for a specified IP address. see the “options (CAPP UDP submode)” command section.
• port—Configures the CAPP port. Range is from 1 to 65535. Default is 5002, see the “port (CAPP UDP submode)” command section.
• secure—Enables encryption, see the “secure (CAPP UDP submode)” command section.
Release Modification
Chapter 2 Content Switching Module with SSL Commands capp udp
Chapter 2 Content Switching Module with SSL Commands
options (CAPP UDP submode)
options (CAPP UDP submode)
To assign session options to an IP address, use the options command in the CAPP UDP submode. To remove the options for the specified address from the configuration, use the no form of this command.
options ip_address encryption MD5 secret
no options ip_address
Syntax Description
Defaults This command has no default settings.
Command Modes CSM CAPP UDP submode
Command History
Usage Guidelines The CSM applies encryption to packets sent to this destination address or when the CSM receives datagrams with a matching source IP address.
You can set the IP address to 0.0.0.0 to apply encryption to all incoming and outbound datagrams that are not specifically configured. The 0.0.0.0 IP address allows you to set a global security configuration that can be applied to an arbitrary number of peers.
Examples This example shows the application of a specific option set to 10.6.3.21 and a global option set to all other IP addresses. The CSM encrypts datagrams received from 10.6.3.21 and transmitted to 10.6.3.21 with encryption code mySecret. All other datagrams, received or transmitted, are assigned to the default encryption secret anotherSecret.
Cat6k-2(config-slb-capp-udp)# options 10.6.3.21 encryption MD5 mySecret
Cat6k-2(config-slb-capp-udp)# options 0.0.0.0 encryption MD5 anotherSecret
ip_address IP address that you want associate with this group of options.
encryption MD5 Specifies MD5 authentication.
secret The string used in encryption and decryption of the MD5 hashing method. Enter an unquoted text string with a maximum of 31 characters.
Release Modification
Chapter 2 Content Switching Module with SSL Commands port (CAPP UDP submode)
port (CAPP UDP submode)
To set the port number for CAPP UDP connections, use the port command in the CAPP UDP submode. To remove the port from the configuration, use the no form of this command.
port port_num
no port
Syntax Description
Defaults The no form of this command sets the port to 5002.
Command Modes CSM CAPP UDP submode
Command History
Examples This example shows how to set the port for CAPP connections:
Cat6k-2(config-slb-capp-udp)# 50
Related Commands capp udp
port_num Specifies the UDP port number. Enter a value of 1 to 65535.
Release Modification
Chapter 2 Content Switching Module with SSL Commands
secure (CAPP UDP submode)
secure (CAPP UDP submode)
To enable or disable the encryption requirement for inbound CAPP datagrams, use the secure command in the CAPP UDP submode. This command prevents unauthorized messages from entering the CSM. To remove the encryption requirement from the configuration, use the no form of this command.
secure
no secure
Syntax Description This command has no arguments or keywords.
Defaults This command has no default settings.
Command Modes CSM CAPP UDP submode
Command History
Usage Guidelines Use the capp udp secure command with the capp udp options command to specify which secure messages are accepted. If you use this command without the capp udp options command, the CSM drops all incoming data.
Examples This example shows how to allow only incoming traffic from 10.6.3.21 encrypted with the encryption
code mySecret:
Cat6k-2(config-slb-capp-udp)# secure
Cat6k-2(config-slb-capp-udp)# options 10.6.3.21 encryption md5 mySecret
Related Commands capp udp
Release Modification
Chapter 2 Content Switching Module with SSL Commands clear module csm
clear module csm
To force the active CSM to become the standby module, use the clear module csm command.
clear module csm [slot | all] arp-cache ip-address connections [real | vserver] counters ft active linecard-configuration sticky [1-255 | all]
Syntax Description
Defaults This command has no default settings.
Command Modes Privileged
Command History
Usage Guidelines When a connection is closed, a reset (RST) is sent to both the client and the server. Counters reset all the CSM statistics information, except for the show mod csm X tech-support counters, which are reset any time that you run the show command. The linecard-configuration command forces a soft-reset of the CSM, which erases all existing connections and run-time information. The CSM then reloads its configuration from Cisco IOS. This process takes about 3 seconds.
The ft active command is used to force the active CSM to the failover state. Fault tolerance preempt must not be enabled.
slot (Optional) Specifies the CSM location in the switch. Range is from 1 to 9.
all (Optional) Applies to all online CSM modules.
arp-cache ip-address Clears the SLB ARP cache.
connections Specifies connections.
real (Optional) Clears SLB connections for the real servers.
vserver (Optional) Clears SLB connections for a virtual server.
counters Clears SLB statistics.
ft active Clears the CSM fault tolerance state to force a failover.
linecard-configuration Clears the configuration database stored in the SLB linecard
sticky Specifies sticky.
1-255 (Optional) Clears the designated sticky group; range is from 1 to 255.
all (Optional) Clears all sticky entries from the sticky database.
Release Modification
Chapter 2 Content Switching Module with SSL Commands
dfp
dfp
To enter the Dynamic Feedback Protocol (DFP) submode, and then configure DFP, use the dfp
command. To remove the DFP configuration, use the no form of this command.
dfp [password password[timeout]]
no dfp [password password]
Syntax Description
Defaults Timeout value is 180 seconds.
Command Modes Module CSM configuration submode
Command History
Usage Guidelines The timeout option allows you to change the password without stopping messages between the DFP agent and its manager.
During a timeout, the agent sends packets with the old password (or null, if there is no old password), and receives packets with either the old or new password. After a timeout expires, the agent sends and receives packets with only the new password; received packets that use the old password are discarded.
If you are changing the password for an entire load-balanced environment, set a longer timeout. The extended timeout allows enough time for you to update the password on all agents and servers before the timeout expires. The embedded timeout also prevents mismatches between agents and servers that have the new password and agents and servers that have the old password.
password (Optional) Specifies a password for MD5 authentication.
password (Optional) Password value for MD5 authentication. This password must be the same on all DFP manager devices. The password can contain 1–64 characters. Valid characters are: a–z, A–Z, 0–9, @, #, $.
timeout (Optional) Delay period, in seconds, during which both the old password and the new password are accepted; the range is from 0 to 65535.
Release Modification
Chapter 2 Content Switching Module with SSL Commands dfp
Chapter 2 Content Switching Module with SSL Commands
agent (DFP submode)
agent (DFP submode)
To configure the DFP agent to which the CSM is going to communicate, use the agent command in the SLB DFP submode. To remove the agent configuration, use the no form of this command.
agent ip-address port [keepalive-timeout[retry-count[retry-interval]]]
no agent ip-address port
Syntax Description
Defaults Keepalive timeout is 0 (no keepalive message).
Retry count is 0 seconds (0 seconds allows infinite retries).
Retry intervalis 180 seconds.
Command Modes SLB DFP configuration submode
Command History
Examples This example shows how to initiate the DFP agent, configure a 350-second timeout, and configure the
number of retries to 270:
Cat6k-2(config-slb-dfp)# agent 111.101.90.10 2 350 270
Related Commands dfp
manager (DFP submode)
ip-address IP address of the DFP agent.
port Port number of the DFP agent.
keepalive-timeout (Optional) Time period in seconds between keepalive messages; the range is from 1 to 65535.
retry-count (Optional) Number of consecutive connection attempts or invalid DFP reports received before tearing down the connections and marking the agent as failed; the range is from 0 to 65535.
retry-interval (Optional) Interval between retries; the range is from 1 to 65535.
Release Modification
Chapter 2 Content Switching Module with SSL Commands manager (DFP submode)
manager (DFP submode)
To set the port where an external DFP can connect to the CSM, use the manager command in SLB DFP submode. To remove the manager configuration, use the no form of this command.
manager port
no manager
Syntax Description
Defaults This command has no default settings.
Command Modes SLB DFP configuration submode
Command History
Usage Guidelines This command enables the CSM to listen to DFP connections from an external DFP manager.
Examples This example shows how to set the DFP manager port:
Cat6k-2(config-slb-dfp)# manager 4
Related Commands agent (DFP submode)
dfp
show module csm dfp
port Port number.
Release Modification
Chapter 2 Content Switching Module with SSL Commands
exit
exit
To log out of the system or to leave a subcommand mode, use the exit command.
exit
Syntax Description This command has no arguments or keywords.
Defaults This command has no default settings.
Command Modes Command mode
Usage Guidelines To leave a subcommand mode, use the exit command. The exit command saves any changes before leaving the submode.
Examples This example shows how to log out of the CSM:
Cat6k-2(config-module-csm)# exit
Chapter 2 Content Switching Module with SSL Commands ft group
ft group
To enter the fault tolerant submode, and then configure fault tolerance on the CSM, use the ft group
command. To remove the fault-tolerant configuration, use the no form of this command.
ft group group-id vlan vlan number
no ft group
Syntax Description
Defaults This command has no default settings.
Command Modes Module CSM configuration submode
Command History
Usage Guidelines A fault-tolerant group is comprised of two Catalyst 6500 series switches each containing a CSM configured for fault-tolerant operation. Each fault-tolerant group appears to network devices as a single device. A network may have more than one fault-tolerant group.
When you enter the fault tolerance group submode, the following commands are available:
• default—Sets a command to its default.
• exit—Saves changes and exits from the subcommand mode; see the “agent (DFP submode)” command section.
• failover—Saves changes and exits from the subcommand mode; see the “failover (fault tolerant submode)” command section.
• heartbeat-time—Saves changes and exits from the subcommand mode; see the “heartbeat-time (fault tolerant submode)” command section.
• no—Negates a command or sets the specified command to its defaults.
• preempt—Sets optional parameters for a specified IP address. See the “preempt (fault tolerant submode)” command section.
• priority—Configures the CAPP port. Range is from 1 to 65535; default is 5002. See the “priority (fault tolerant submode)” command section.
group-id ID of the fault-tolerant group. Both CSMs must have the same group ID. Range is from 1 to 254.
vlan vlan number Specifies the VLAN over which heartbeat messages are sent by VLAN number. Both CSMs must have the same VLAN ID. The range is from 2 to 4095.
Release Modification
Chapter 2 Content Switching Module with SSL Commands
ft group
Examples This example shows how to configure a fault-tolerant group named 123 on VLAN 5 and set the failover
time to 3 seconds:
Cat6k-2(config-module-csm)# ft group 123 vlan 5
Cat6k-2(config-slb-ft)# failover 3
Related Commands failover (fault tolerant submode)
Chapter 2 Content Switching Module with SSL Commands failover (fault tolerant submode)
failover (fault tolerant submode)
To set the time for a standby CSM to wait before becoming an active CSM, use the failover command in the SLB fault-tolerant configuration submode. To remove the failover configuration, use the no form of this command.
failover failover-time
no failover
Syntax Description
Defaults Failover time is 3 seconds.
Command Modes SLB fault-tolerant configuration submode
Command History
Examples This example shows how to set a failover period of 6 seconds:
Cat6k-2(config-slb-ft)# failover 6
Related Commands ft group
show module csm ft
failover-time Amount of time the CSM must wait after the last heartbeat message is received before assuming the other CSM is not operating; the range is from 1 to 65535.
Release Modification
Chapter 2 Content Switching Module with SSL Commands
heartbeat-time (fault tolerant submode)
heartbeat-time (fault tolerant submode)
To set the time interval between heartbeat messages that are transmitted by the CSM, use the
heartbeat-time command in the SLB fault-tolerant configuration submode. To restore the default heartbeat interval, use the no form of this command.
heartbeat-time heartbeat-time
no heartbeat-time
Syntax Description
Defaults Heartbeat time is 1 second.
Command Modes SLB fault-tolerant configuration submode
Command History
Examples This example shows how to set the heartbeat time to 2 seconds:
Cat6k-2(config-slb-ft)# heartbeat-time 2
Related Commands ft group
show module csm ft
heartbeat-time Time interval between heartbeat transmissions in seconds; the range is from 1 to 65535.
Release Modification
Chapter 2 Content Switching Module with SSL Commands preempt (fault tolerant submode)
preempt (fault tolerant submode)
To allow a higher priority CSM to take control of a fault-tolerant group when it comes online, use the
preempt command in the SLB fault-tolerant configuration submode. To restore the preempt default value, use the no form of this command.
preempt
no preempt
Syntax Description This command has no arguments or keywords.
Defaults The default value is that preempt is disabled.
Command Modes Privileged
Command History
Usage Guidelines When you enable preempt, the higher priority CSM preempts the other CSM in the fault-tolerant group when the higher priority CSM comes online. When you enable no preempt, the current primary CSM remains the primary CSM when the next CSM comes online.
Note You must set both members of the fault-tolerant CSM pair to preempt for this feature to work.
Examples This example shows how to set the fault-tolerance mode to preempt:
Cat6k-2(config-slb-ft)# preempt
Related Commands ft group
show module csm ft
Release Modification
Chapter 2 Content Switching Module with SSL Commands
priority (fault tolerant submode)
priority (fault tolerant submode)
To set the priority of the CSM, use the priority command in the SLB fault-tolerant configuration submode. To restore the priority default value, use the no form of this command.
priority value [alt value]
no priority
Syntax Description
Defaults Value is 10.
Command Modes SLB fault-tolerant configuration submode
Command History
Usage Guidelines The CSM with the largest priority value is the primary CSM in the fault-tolerant pair when the modules are both operating.
Examples This example shows how to set the priority value to 12:
Cat6k-2(config-slb-ft)# priority 12
Related Commands ft group
preempt (fault tolerant submode) show module csm ft
alt (Optional) Configures the alternate priority value for the standby CSM.
value (Optional) Priority of a CSM; the range is from 1 to 254.
Release Modification
CSM release 1.1(1) This command was introduced.
Chapter 2 Content Switching Module with SSL Commands track (fault tolerant submode)
track (fault tolerant submode)
To set the fault-tolerant tracking for the gateway, HSRP group, or interface of the CSM, use the track
command in the SLB fault-tolerant configuration submode.
track {gateway ip_addr | group group_number | interface {async | ctunnel | dialer | fastethernet|
gigabitethernet} | mode {all | any}}
Syntax Description
Defaults The default setting for mode is any.
Command Modes SLB fault-tolerant configuration submode
Command History
Usage Guidelines The CSM with the largest priority value is the primary CSM in the fault-tolerant pair when the modules are both operating.
Examples This example shows how to set tracking mode for all devices:
Cat6k-2(config-slb-ft)# track mode all
Related Commands ft group
preempt (fault tolerant submode) show module csm ft
gateway ip_addr Configures a gateway or host for tracking.
group group_number Configures an HSRP group for tracking.
interface async | ctunnel |
dialer | fastethernet|
gigabitethernet
Configures an interface for tracking. The interfaces can be asynchronous, tunnel, dialer, fast Ethernet, or Gigabit Ethernet.
modeall | any Configures tracking mode for all devices or any device.
Release Modification
Chapter 2 Content Switching Module with SSL Commands
hw-module csm standby config-sync
hw-module csm standby config-sync
To synchronize the configuration between the active CSM and standby CSM, enter the hw-module csm standby config-sync command on the active CSM:
hw-module csm slot standby config-sync
Syntax Description
Defaults Route processor mode.
Command Modes Global configuration
Command History
Usage Guidelines You can synchronize the configurations between the active and standby CSMs in a single chassis or in separate chassis.
Enter this command after you have configured both the active and standby CSMs for synchronization. Enter this command every time you want to synchronize the configuration.
Synchronization happens over the fault-tolerant VLAN. Since traffic over the fault-tolerant VLAN uses broadcast packets, we recommend that you remove all devices from the fault-tolerant VLAN except those that are necessary for communication between the active and standby CSMs.
If you do not enter the altstandby_ip_address command on the active CSM before you synchronize the configuration, the VLAN IP addresses on the backup CSM will be removed.
Examples This example shows how to synchronize the configuration between the active and standby CSMs:
Router# hw-module csm 5 standby config-sync
%CSM_SLB-6-REDUNDANCY_INFO:Module 5 FT info:Active:Bulk sync started
%CSM_SLB-6-REDUNDANCY_INFO:Module 5 FT info:Active:Manual bulk sync completed
Related Commands ft group
ip address (VLAN submode) priority (fault tolerant submode)
slot Specifies the slot of the active CSM.
Release Modification
Chapter 2 Content Switching Module with SSL Commands ip slb mode
ip slb mode
To operate as a CSM load-balancing device instead of a Cisco IOS server load balancing (SLB) device, use the ip slb mode command to configure the switch. To remove the mode configuration, use the no
form of this command.
ip slb mode {csm | rp}
no ip slb mode
Syntax Description
Defaults Route processor mode
Command Modes Global configuration
Command History
Usage Guidelines We recommend that you use the rp mode for all configurations. The rp mode allows you to configure both the switch and the CSM or other modules without changing modes.
Note You need to reboot the switch to change the mode.
This command allows you to change from the Cisco IOS SLB mode to the CSM load-balancing mode.
Note Specifying the no ip slb mode command is the same as specifying the rp mode.
Note In csm mode, all ip slb commands apply to a CSM module; Cisco IOS SLB is not available. In rp mode (the default), ip slb commands apply to Cisco IOS SLB. The modulecsm commands are available to configure multiple CSMs.
csm Keyword to select the CSM load-balancing mode that allows you to configure a single CSM only and prohibits the use of Cisco IOS SLB on the Catalyst 6500 series switch.
rp Keyword to select the route processor Cisco IOS SLB mode and
enable module CSM commands for configuring multiple CSMs.
Release Modification
CSM release 1.1(1) This command was introduced.
Chapter 2 Content Switching Module with SSL Commands
ip slb mode
Examples This example shows how to configure the CSM load-balancing mode:
Cat6k-2(config)# ip slb mode csm
Related Commands module csm
Chapter 2 Content Switching Module with SSL Commands map cookie
map cookie
To create a cookie map, and then enter the cookie map configuration submode for specifying cookie match rules, use the map cookie command. To remove the cookie maps from the configuration, use the
no form of this command.
map cookie-map-name cookie
no map cookie-map-name
Syntax Description
Defaults This command has no default settings.
Command Modes Module CSM configuration submode
Command History
Examples This example shows how to create a cookie map:
Cat6k-2(config-module-csm)# map upnready cookie
Related Commands cookie-map (policy submode)
match protocol http cookie (cookie map submode) show module csm map
cookie-map-name Cookie map instance; the character string is limited to 15 characters.
cookie Enters the cookie map submode.
Release Modification
Chapter 2 Content Switching Module with SSL Commands
match protocol http cookie (cookie map submode)
2 2
match protocol http cookie (cookie map submode)
To add cookies to a cookie map, use the match protocol http cookie command in SLB cookie map configuration submode. Multiple match rules can be added to a cookie map. To remove the cookie map name from the cookie map, use the no form of this command.
match protocol http cookie cookie-name cookie-value cookie-value-expression
no match protocol http cookie cookie-name cookie-value cookie-value-expression
Syntax Description
Defaults This command has no default settings.
Command Modes SLB cookie map configuration submode
Command History
Usage Guidelines Cookie regular expressions (see “Regular Expressions” section on page 2-3) are based on the UNIX filename specification. URL expressions are stored in a cookie map in the form cookie-name =
cookie-value-expression. Cookie expressions allow spaces if they are escaped or quoted. You must match all cookies in the cookie map.
Examples This example shows how to add cookies to a cookie map:
Cat6k-2(config-slb-map-cookie)# match protocol http cookie albert cookie-value 4*
Related Commands cookie-map (policy submode)
map cookie
show module csm map
cookie-name Cookie name; the range is from 1 to 63 characters.
cookie-value
cookie-value-expression
Specifies a cookie value expression; the range is from 1 to 255 characters.
Release Modification
Chapter 2 Content Switching Module with SSL Commands map dns
map dns
To enter the SLB DNS map mode and configure a DNS map, use the map dns command. To remove the DNS map from the configuration, use the no form of this command.
map dns-map-name dns
no map dns-map-name dns
Syntax Description
Defaults This command has no default settings.
Command Modes SLB DNS map configuration submode
Command History
Usage Guidelines Any match of a DNS regular expression in the DNS map results in a successful match. A maximum of 1023 DNS domains can be configured to a map.
Examples This example shows how to group DNS domains:
Cat6k-2(config-module-csm)# map m1 dns
Cat6k-2(config-slb-map-dns)# exit
Cat6k-2(config)
Related Commands match protocol dns domain (DNS map submode)
show module csm map
dns-map-name Name of an SLB DNS map; the character string range is from 1 to 15 characters.
Release Modification
Chapter 2 Content Switching Module with SSL Commands
match protocol dns domain (DNS map submode)
match protocol dns domain (DNS map submode)
To add a DNS domain to a DNS map, use the match protocol dns domain command in the SLB DNS map configuration submode. To remove the DNS domain from the URL map, use the no form of this command.
match protocol dns domain name
no match protocol dns domain name
Syntax Description
Defaults This command has no default settings.
Command Modes SLB DNS map configuration submode
Command History
Examples This example shows how to add domains to a DNS map:
Cat6k-2(config-slb-map-dns)# match protocol dns domain cisco.com
Related Commands map dns
show module csm map
name Names the DNS domain being mapped.
Release Modification
CSM release 1.1(1) This command was introduced.
Chapter 2 Content Switching Module with SSL Commands map header
map header
To create a map group for specifying HTTP headers, and then enter the header map configuration submode, use the map header command. To remove the HTTP header group from the configuration, use the no form of this command.
map name header
no map name
Syntax Description
Defaults This command has no default settings.
Command Modes Module CSM configuration submode
Command History
Examples This example shows how to group HTTP headers and associate them with a content switching policy:
Cat6k-2(config-module-csm)# map upnready header
Cat6k-2(config-slb-map-header)# match protocol http header Accept header-value *jpeg*
Cat6k-2(config-slb-map-header)# match protocol http header User-Agent header-value *NT*
Cat6k-2(config-slb-map-header)# match protocol http header Host header-value
www.myhome.com
Cat6k-2(config-slb-map-header)# exit
Related Commands header-map (policy submode)
insert protocol http header (header map submode) match protocol http header (header map submode) show module csm map
name Map instance; the character string is from 1 to 15 characters.
Release Modification
Chapter 2 Content Switching Module with SSL Commands
insert protocol http header (header map submode)
insert protocol http header (header map submode)
To insert header fields and values into an HTTP request, use the insert protocol http header command in SLB header map configuration submode. To remove the header insert item from the header map, use the no form of this command.
insert protocol http header name header-value value
no insert protocol http header name
Syntax Description
Defaults This command has no default settings.
Command Modes SLB header map configuration submode
Command History
Usage Guidelines You can also use the %is and %id special parameters for header values. The %is value inserts the source IP into the HTTP header, and the %id value inserts the destination IP into the header. You can only specify each special parameter once per header map.
Examples This example shows how to specify header fields and values to search upon a request:
Cat6k-2(config-slb-map-header)# insert protocol http header client header-value %is
Related Commands header-map (policy submode)
map header
show module csm map
name Literal name of the generic field in the HTTP header. The name is a string with a range from 1 to 63 characters.
header-value value Specifies the literal header value string to insert in the request.
Release Modification
Chapter 2 Content Switching Module with SSL Commands match protocol http header (header map submode)
match protocol http header (header map submode)
To specify header fields and values for the CSM to search for when receiving a request, use the match protocol http header command in SLB header map configuration submode. Multiple match rules can be added to a header map. To remove the header match rule from the header map, use the no form of this command.
match protocol http header field header-value expression
no match protocol http header field
Syntax Description
Defaults This command has no default settings.
Command Modes SLB header map configuration submode
Command History
Usage Guidelines There are predefined fields, for example, Accept-Language, User-Agent, or Host.
Header regular expressions (see “Regular Expressions” section on page 2-3) are based on the UNIX filename specification. URL expressions are stored in a header map in the form header-name =
expression. Header expressions allow spaces if they are escaped or quoted. All headers in the header map must be matched.
Examples This example shows how to specify header fields and values to search upon a request:
Cat6k-2(config-slb-map-header)# match protocol http header Host header-value XYZ
Related Commands header-map (policy submode)
insert protocol http header (header map submode) map header
show module csm map
field Literal name of the generic field in the HTTP header. The range is from 1 to 63 characters.
header-value expression Specifies the header value expression string to compare against the value in the specified field; the range is from 1 to 127 characters.
Release Modification
Chapter 2 Content Switching Module with SSL Commands
map retcode
map retcode
To enable return code checking, and then enter the return code map submode, use the map retcode
command. To remove the return code checking from the configuration, use the no form of this command.
map name retcode
no map name
Syntax Description
Defaults This command has no default settings.
Command Modes CSM module submode
Command History
Examples This example shows how to enable return error code checking:
Cat6k-2(config-module-csm)# map upnready retcode
Related Commands cookie-map (policy submode)
match protocol http cookie (cookie map submode) show module csm map
name Return error code map instance; the character string is limited to 15 characters.
retcode Keyword to enter the return error code map submode.
Release Modification
Chapter 2 Content Switching Module with SSL Commands match protocol http retcode (return code map submode)
match protocol http retcode (return code map submode)
To specify return code