Corporate Headquarters
Cisco Systems, Inc. 170 West Tasman Drive San Jose, CA 95134-1706 USA
http://www.cisco.com Tel: 408 526-4000
800 553-NETS (6387) Fax: 408 526-4100
Catalyst 6500 Series Switch
SSL Services Module Command Reference
THE SPECIFICATIONS AND INFORMATION REGARDING THE PRODUCTS IN THIS MANUAL ARE SUBJECT TO CHANGE WITHOUT NOTICE. ALL STATEMENTS, INFORMATION, AND RECOMMENDATIONS IN THIS MANUAL ARE BELIEVED TO BE ACCURATE BUT ARE PRESENTED WITHOUT WARRANTY OF ANY KIND, EXPRESS OR IMPLIED. USERS MUST TAKE FULL RESPONSIBILITY FOR THEIR APPLICATION OF ANY PRODUCTS.
THE SOFTWARE LICENSE AND LIMITED WARRANTY FOR THE ACCOMPANYING PRODUCT ARE SET FORTH IN THE INFORMATION PACKET THAT SHIPPED WITH THE PRODUCT AND ARE INCORPORATED HEREIN BY THIS REFERENCE. IF YOU ARE UNABLE TO LOCATE THE SOFTWARE LICENSE OR LIMITED WARRANTY, CONTACT YOUR CISCO REPRESENTATIVE FOR A COPY.
The Cisco implementation of TCP header compression is an adaptation of a program developed by the University of California, Berkeley (UCB) as part of UCB’s public domain version of the UNIX operating system. All rights reserved. Copyright © 1981, Regents of the University of California.
NOTWITHSTANDING ANY OTHER WARRANTY HEREIN, ALL DOCUMENT FILES AND SOFTWARE OF THESE SUPPLIERS ARE PROVIDED “AS IS” WITH ALL FAULTS. CISCO AND THE ABOVE-NAMED SUPPLIERS DISCLAIM ALL WARRANTIES, EXPRESSED OR IMPLIED, INCLUDING, WITHOUT
LIMITATION, THOSE OF MERCHANTABILITY, FITNESS FOR A PARTICULAR PURPOSE AND NONINFRINGEMENT OR ARISING FROM A COURSE OF DEALING, USAGE, OR TRADE PRACTICE.
IN NO EVENT SHALL CISCO OR ITS SUPPLIERS BE LIABLE FOR ANY INDIRECT, SPECIAL, CONSEQUENTIAL, OR INCIDENTAL DAMAGES, INCLUDING, WITHOUT LIMITATION, LOST PROFITS OR LOSS OR DAMAGE TO DATA ARISING OUT OF THE USE OR INABILITY TO USE THIS MANUAL, EVEN IF CISCO OR ITS SUPPLIERS HAVE BEEN ADVISED OF THE POSSIBILITY OF SUCH DAMAGES.
CCSP, CCVP, the Cisco Square Bridge logo, Follow Me Browsing, and StackWise are trademarks of Cisco Systems, Inc.; Changing the Way We Work, Live, Play, and Learn, and iQuick Study are service marks of Cisco Systems, Inc.; and Access Registrar, Aironet, BPX, Catalyst, CCDA, CCDP, CCIE, CCIP, CCNA, CCNP, Cisco, the Cisco Certified Internetwork Expert logo, Cisco IOS, Cisco Press, Cisco Systems, Cisco Systems Capital, the Cisco Systems logo, Cisco Unity, Enterprise/Solver, EtherChannel, EtherFast, EtherSwitch, Fast Step, FormShare, GigaDrive, GigaStack, HomeLink, Internet Quotient, IOS, IP/TV, iQ Expertise, the iQ logo, iQ Net Readiness Scorecard, LightStream, Linksys, MeetingPlace, MGX, the Networkers logo, Networking Academy, Network Registrar, Packet, PIX, Post-Routing, Pre-Routing, ProConnect, RateMUX, ScriptShare, SlideCast, SMARTnet, The Fastest Way to Increase Your Internet Quotient, and TransPath are registered trademarks of Cisco Systems, Inc. and/or its affiliates in the United States and certain other countries.
All other trademarks mentioned in this document or Website are the property of their respective owners. The use of the word partner does not imply a partnership relationship between Cisco and any other company. (0601R)
C O N T E N T S
Preface
viiAudience
viiOrganization
viiRelated Documentation
viiConventions
viiiObtaining Documentation
ixCisco.com
ixProduct Documentation DVD
ixOrdering Documentation
xDocumentation Feedback
xCisco Product Security Overview
xReporting Security Problems in Cisco Products
xiObtaining Technical Assistance
xiCisco Technical Support & Documentation Website
xiSubmitting a Service Request
xiiDefinitions of Service Request Severity
xiiObtaining Additional Publications and Information
xiiiC H A P T E R 1
Command-Line Interface
1-1Getting Help
1-1How to Find Command Options
1-2Understanding Command Modes
1-5Cisco IOS User Interface
1-5Using the No and Default Forms of Commands
1-6Using the CLI String Search
1-7Regular Expressions
1-7Alternation
1-10Anchoring
1-10Contents
C H A P T E R 2
Commands for the Catalyst 6500 Series Switch SSL Services Module
2-1clear ssl-proxy conn
2-2clear ssl-proxy content
2-3clear ssl-proxy session
2-4clear ssl-proxy stats
2-5crypto pki export pem
2-7crypto pki import pem
2-9crypto pki export pkcs12
2-11crypto pki import pkcs12
2-13crypto key decrypt rsa
2-15crypto key encrypt rsa
2-16crypto key export rsa pem
2-17crypto key import rsa pem
2-19crypto key lock rsa
2-21crypto key unlock rsa
2-22debug ssl-proxy
2-23do
2-26interface ssl-proxy
2-27natpool
2-30policy health-probe tcp
2-31policy http-header
2-34policy ssl
2-39policy tcp
2-45policy url-rewrite
2-49pool ca
2-51service
2-52service client
2-56show interfaces ssl-proxy
2-59show ssl-proxy buffers
2-60show ssl-proxy certificate-history
2-61show ssl-proxy conn
2-64show ssl-proxy context
2-67show ssl-proxy crash-info
2-68show ssl-proxy mac address
2-70Contents
show ssl-proxy policy
2-72show ssl-proxy service
2-75show ssl-proxy stats
2-77show ssl-proxy status
2-82show ssl-proxy version
2-84show ssl-proxy vlan
2-85snmp-server enable
2-86ssl-proxy context
2-87ssl-proxy crypto selftest
2-89ssl-proxy mac address
2-90ssl-proxy pki
2-91ssl-proxy crypto key unlock rsa
2-93ssl-proxy ip-frag-ttl
2-94ssl-proxy ssl ratelimit
2-95standby authentication
2-96standby delay minimum reload
2-97standby ip
2-99standby mac-address
2-101standby mac-refresh
2-103standby name
2-104standby preempt
2-105standby priority
2-107standby redirects
2-109standby timers
2-111standby track
2-113standby use-bia
2-115standby version
2-116A P P E N D I X A
Acronyms
A-1Preface
This preface describes the audience, organization, and conventions of this publication, and provides information on how to obtain related documentation.
Audience
This publication is for experienced network administrators who are responsible for configuring and maintaining Catalyst 6500 series switches.
Organization
This publication is organized as follows:
Related Documentation
The Catalyst 6500 series switch Cisco IOS documentation set includes these documents:
• Release Notes for Catalyst 6500 Series Switch SSL Services Module Release 3.x
• Catalyst 6500 Series Switch SSL Services Module Configuration Note
• Catalyst 6500 Series Switch SSL Services Module System Message Guide
• Catalyst 6500 Series Switch SSL Services Module Installation and Verification Note
• Catalyst 6500 Series Switch Cisco IOS Software Configuration Guide
Chapter Title Description
Chapter 1 Command-Line Interface Describes the Catalyst 6500 series switch CLI.
Chapter 2 Commands for the Catalyst 6500 Series Switch SSL Services Module
Lists alphabetically and provides detailed information for commands specific to the Catalyst 6500 series switch SSL Services Module.
Preface Conventions
The Cisco IOS documentation set includes these documents:
• Configuration Fundamentals Configuration Guide
• Command Reference
For information about MIBs, refer to this URL:
http://www.cisco.com/public/sw-center/netmgmt/cmtk/mibs.shtml
Conventions
This document uses the following conventions:
Convention Description
boldface font Commands, command options, and keywords are in boldface.
italic font Arguments for which you supply values are in italics. [ ] Elements in square brackets are optional.
{ x | y | z } Alternative keywords are grouped in braces and separated by vertical bars. Braces can also be used to group keywords and/or aguments; for example, {interfaceinterfacetype}.
[ x | y | z ] Optional alternative keywords are grouped in brackets and separated by vertical bars.
string A nonquoted set of characters. Do not use quotation marks around the string or the string will include the quotation marks.
screen font Terminal sessions and information the system displays are in screen font.
boldface screen
font
Information you must enter is in boldface screen font.
italic screen font Arguments for which you supply values are in italic screen font. ^ The symbol ^ represents the key labeled Control—for example, the key
combination ^D in a screen display means hold down the Control key while you press the D key.
< > Nonprinting characters, such as passwords are in angle brackets. [ ] Default responses to system prompts are in square brackets.
Preface
Obtaining Documentation
Notes use the following conventions:
Note Means reader take note. Notes contain helpful suggestions or references to material not covered in the publication.
Cautions use the following conventions:
Caution Means reader be careful. In this situation, you might do something that could result in equipment damage or loss of data.
Obtaining Documentation
Cisco documentation and additional literature are available on Cisco.com. Cisco also provides several ways to obtain technical assistance and other technical resources. These sections explain how to obtain technical information from Cisco Systems.
Cisco.com
You can access the most current Cisco documentation at this URL:
http://www.cisco.com/techsupport
You can access the Cisco website at this URL:
http://www.cisco.com
You can access international Cisco websites at this URL:
http://www.cisco.com/public/countries_languages.shtml
Product Documentation DVD
Cisco documentation and additional literature are available in the Product Documentation DVD package, which may have shipped with your product. The Product Documentation DVD is updated regularly and may be more current than printed documentation.
The Product Documentation DVD is a comprehensive library of technical product documentation on portable media. The DVD enables you to access multiple versions of hardware and software installation, configuration, and command guides for Cisco products and to view technical documentation in HTML. With the DVD, you have access to the same documentation that is found on the Cisco website without being connected to the Internet. Certain products also have .pdf versions of the documentation available. The Product Documentation DVD is available as a single unit or as a subscription. Registered Cisco.com users (Cisco direct customers) can order a Product Documentation DVD (product number
DOC-DOCDVD=) from Cisco Marketplace at this URL:
Preface Documentation Feedback
Ordering Documentation
Beginning June 30, 2005, registered Cisco.com users may order Cisco documentation at the Product Documentation Store in the Cisco Marketplace at this URL:
http://www.cisco.com/go/marketplace/
Nonregistered Cisco.com users can order technical documentation from 8:00 a.m. to 5:00 p.m. (0800 to 1700) PDT by calling 1 866 463-3487 in the United States and Canada, or elsewhere by calling 011 408 519-5055. You can also order documentation by e-mail at
[email protected] or by fax at 1 408 519-5001 in the United States and Canada, or elsewhere at 011 408 519-5001.
Documentation Feedback
You can rate and provide feedback about Cisco technical documents by completing the online feedback form that appears with the technical documents on Cisco.com.
You can send comments about Cisco documentation to [email protected].
You can submit comments by using the response card (if present) behind the front cover of your document or by writing to the following address:
Cisco Systems
Attn: Customer Document Ordering 170 West Tasman Drive
San Jose, CA 95134-9883 We appreciate your comments.
Cisco Product Security Overview
Cisco provides a free online Security Vulnerability Policy portal at this URL:
http://www.cisco.com/en/US/products/products_security_vulnerability_policy.html
From this site, you can perform these tasks:
• Report security vulnerabilities in Cisco products.
• Obtain assistance with security incidents that involve Cisco products.
• Register to receive security information from Cisco.
A current list of security advisories and notices for Cisco products is available at this URL:
http://www.cisco.com/go/psirt
If you prefer to see advisories and notices as they are updated in real time, you can access a Product Security Incident Response Team Really Simple Syndication (PSIRT RSS) feed from this URL:
Preface
Obtaining Technical Assistance
Reporting Security Problems in Cisco Products
Cisco is committed to delivering secure products. We test our products internally before we release them, and we strive to correct all vulnerabilities quickly. If you think that you might have identified a vulnerability in a Cisco product, contact PSIRT:
• Emergencies —[email protected]
An emergency is either a condition in which a system is under active attack or a condition for which a severe and urgent security vulnerability should be reported. All other conditions are considered nonemergencies.
• Nonemergencies —[email protected]
In an emergency, you can also reach PSIRT by telephone:
• 1 877 228-7302
• 1 408 525-6532
Tip We encourage you to use Pretty Good Privacy (PGP) or a compatible product to encrypt any sensitive information that you send to Cisco. PSIRT can work from encrypted information that is compatible with PGP versions 2.x through 8.x.
Never use a revoked or an expired encryption key. The correct public key to use in your correspondence with PSIRT is the one linked in the Contact Summary section of the Security Vulnerability Policy page at this URL:
http://www.cisco.com/en/US/products/products_security_vulnerability_policy.html
The link on this page has the current PGP key ID in use.
Obtaining Technical Assistance
Cisco Technical Support provides 24-hour-a-day award-winning technical assistance. The Cisco Technical Support & Documentation website on Cisco.com features extensive online support resources. In addition, if you have a valid Cisco service contract, Cisco Technical Assistance Center (TAC) engineers provide telephone support. If you do not have a valid Cisco service contract, contact your reseller.
Cisco Technical Support & Documentation Website
The Cisco Technical Support & Documentation website provides online documents and tools for troubleshooting and resolving technical issues with Cisco products and technologies. The website is available 24 hours a day, at this URL:
http://www.cisco.com/techsupport
Access to all tools on the Cisco Technical Support & Documentation website requires a Cisco.com user ID and password. If you have a valid service contract but do not have a user ID or password, you can register at this URL:
Preface Obtaining Technical Assistance
Note Use the Cisco Product Identification (CPI) tool to locate your product serial number before submitting a web or phone request for service. You can access the CPI tool from the Cisco Technical Support & Documentation website by clicking the Tools & Resources link under Documentation & Tools.Choose Cisco Product Identification Tool from the Alphabetical Index drop-down list, or click the Cisco Product Identification Tool link under Alerts & RMAs. The CPI tool offers three search options: by product ID or model name; by tree view; or for certain products, by copying and pasting show command output. Search results show an illustration of your product with the serial number label location highlighted. Locate the serial number label on your product and record the information before placing a service call.
Submitting a Service Request
Using the online TAC Service Request Tool is the fastest way to open S3 and S4 service requests. (S3 and S4 service requests are those in which your network is minimally impaired or for which you require product information.) After you describe your situation, the TAC Service Request Tool provides recommended solutions. If your issue is not resolved using the recommended resources, your service request is assigned to a Cisco engineer. The TAC Service Request Tool is located at this URL:
http://www.cisco.com/techsupport/servicerequest
For S1 or S2 service requests or if you do not have Internet access, contact the Cisco TAC by telephone. (S1 or S2 service requests are those in which your production network is down or severely degraded.) Cisco engineers are assigned immediately to S1 and S2 service requests to help keep your business operations running smoothly.
To open a service request by telephone, use one of the following numbers: Asia-Pacific: +61 2 8446 7411 (Australia: 1 800 805 227)
EMEA: +32 2 704 55 55 USA: 1 800 553-2447
For a complete list of Cisco TAC contacts, go to this URL:
http://www.cisco.com/techsupport/contacts
Definitions of Service Request Severity
To ensure that all service requests are reported in a standard format, Cisco has established severity definitions.
Severity 1 (S1)—Your network is “down,” or there is a critical impact to your business operations. You and Cisco will commit all necessary resources around the clock to resolve the situation.
Severity 2 (S2)—Operation of an existing network is severely degraded, or significant aspects of your business operation are negatively affected by inadequate performance of Cisco products. You and Cisco will commit full-time resources during normal business hours to resolve the situation.
Severity 3 (S3)—Operational performance of your network is impaired, but most business operations remain functional. You and Cisco will commit resources during normal business hours to restore service to satisfactory levels.
Preface
Obtaining Additional Publications and Information
Obtaining Additional Publications and Information
Information about Cisco products, technologies, and network solutions is available from various online and printed sources.
• Cisco Marketplace provides a variety of Cisco books, reference guides, documentation, and logo merchandise. Visit Cisco Marketplace, the company store, at this URL:
http://www.cisco.com/go/marketplace/
• Cisco Press publishes a wide range of general networking, training and certification titles. Both new and experienced users will benefit from these publications. For current Cisco Press titles and other information, go to Cisco Press at this URL:
http://www.ciscopress.com
• Packet magazine is the Cisco Systems technical user magazine for maximizing Internet and networking investments. Each quarter, Packet delivers coverage of the latest industry trends, technology breakthroughs, and Cisco products and solutions, as well as network deployment and troubleshooting tips, configuration examples, customer case studies, certification and training information, and links to scores of in-depth online resources. You can access Packet magazine at this URL:
http://www.cisco.com/packet
• iQ Magazine is the quarterly publication from Cisco Systems designed to help growing companies learn how they can use technology to increase revenue, streamline their business, and expand services. The publication identifies the challenges facing these companies and the technologies to help solve them, using real-world case studies and business strategies to help readers make sound technology investment decisions. You can access iQ Magazine at this URL:
http://www.cisco.com/go/iqmagazine
or view the digital edition at this URL:
http://ciscoiq.texterity.com/ciscoiq/sample/
• Internet Protocol Journal is a quarterly journal published by Cisco Systems for engineering professionals involved in designing, developing, and operating public and private internets and intranets. You can access the Internet Protocol Journal at this URL:
http://www.cisco.com/ipj
• Networking products offered by Cisco Systems, as well as customer support services, can be obtained at this URL:
http://www.cisco.com/en/US/products/index.html
• Networking Professionals Connection is an interactive website for networking professionals to share questions, suggestions, and information about networking products and technologies with Cisco experts and other networking professionals. Join a discussion at this URL:
http://www.cisco.com/discuss/networking
• World-class networking training is available from Cisco. You can view current offerings at this URL:
C H A P T E R
1
Command-Line Interface
This chapter provides information for understanding and using the Catalyst 6500 series switch SSL Services Module software using the command-line interface (CLI). The CLI for the Catalyst 6500 series switch SSL Services Module is based on the Cisco IOS CLI. For information about Cisco IOS
commands that are not contained in this publication, refer to the current Cisco IOS documentation including:
• Cisco IOS Release 12.2 Configuration Fundamentals Configuration Guide
• Cisco IOS Release 12.2 Command Reference
This chapter includes the following sections:
• Getting Help, page 1-1
• How to Find Command Options, page 1-2
• Understanding Command Modes, page 1-5
• Using the No and Default Forms of Commands, page 1-6
• Using the CLI String Search, page 1-7
Getting Help
To obtain a list of commands that are available for each command mode, enter a question mark (?) at the system prompt. You also can obtain a list of any command’s associated keywords and arguments with the context-sensitive help feature.
Table 1-1 lists commands that you can enter to get help that is specific to a command mode, a command, a keyword, or an argument.
Table 1-1 Getting Help
Command Purpose
abbreviated-command-entry? Obtain a list of commands that begin with a particular character string. (Do not leave a space between the command and question mark.)
abbreviated-command-entry<Tab> Complete a partial command name.
Chapter 1 Command-Line Interface How to Find Command Options
This example shows how to obtain a list of commands that begin with a particular character string or complete a partial command name:
ssl-proxy# tu?
tunnel
simpson1-2# tu
This example shows how to list all commands available for a particular command mode:
ssl-proxy(config)# ?
Configure commands:
aaa Authentication, Authorization and Accountin
access-list Add an access list entry alias Create command alias arp Set a static ARP entry
async-bootp Modify system bootp parameters banner Define a login banner
boot Modify system boot parameters bridge Bridge Group.
buffers Adjust system buffer pool parameters cdp Global CDP configuration subcommands class-map Configure QoS Class Map
. . .
Output is truncated.
This example shows how to list a keyword’s associated arguments:
ssl-proxy(config-if)# channel-group 1 mode ?
auto Enable PAgP only if a PAgP device is detected desirable Enable PAgP unconditionally
on Enable Etherchannel only
ssl-proxy(config-if)#
How to Find Command Options
This section provides an example of how to display syntax for a command. The syntax can consist of optional or required keywords. To display keywords for a command, enter a question mark (?) at the configuration prompt or after entering part of a command followed by a space. The Catalyst 6500 series SSL Services Module software displays a list of available keywords along with a brief description of the keywords. For example, if you are in global configuration mode and want to see all the keywords for the ssl-proxy command, you enter ssl-proxy ?.
command? List a command’s associated keywords. Leave a space between the command and question mark.
commandkeyword ? List a keyword’s associated arguments. Leave a space between the keyword and question mark.
Table 1-1 Getting Help (continued)
Chapter 1 Command-Line Interface
How to Find Command Options
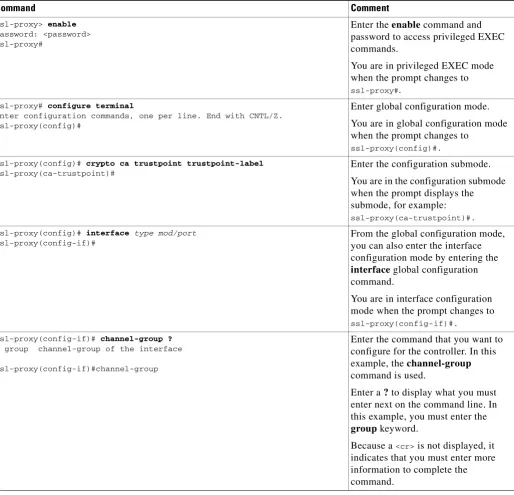
Table 1-2 shows examples of how you can use thequestion mark (?)to assist you in entering commands.
Table 1-2 How to Find Command Options
Command Comment
ssl-proxy> enable
Password: <password> ssl-proxy#
Enter the enable command and password to access privileged EXEC commands.
You are in privileged EXEC mode when the prompt changes to
ssl-proxy#. ssl-proxy# configure terminal
Enter configuration commands, one per line. End with CNTL/Z. ssl-proxy(config)#
Enter global configuration mode. You are in global configuration mode when the prompt changes to
ssl-proxy(config)#. ssl-proxy(config)# crypto ca trustpoint trustpoint-label
ssl-proxy(ca-trustpoint)#
Enter the configuration submode. You are in the configuration submode when the prompt displays the submode, for example:
ssl-proxy(ca-trustpoint)#. ssl-proxy(config)# interface type mod/port
ssl-proxy(config-if)#
From the global configuration mode, you can also enter the interface configuration mode by entering the interface global configuration command.
You are in interface configuration mode when the prompt changes to
ssl-proxy(config-if)#. ssl-proxy(config-if)# channel-group ?
group channel-group of the interface
ssl-proxy(config-if)#channel-group
Enter the command that you want to configure for the controller. In this example, the channel-group command is used.
Enter a ? to display what you must enter next on the command line. In this example, you must enter the group keyword.
Because a <cr> is not displayed, it
Chapter 1 Command-Line Interface How to Find Command Options
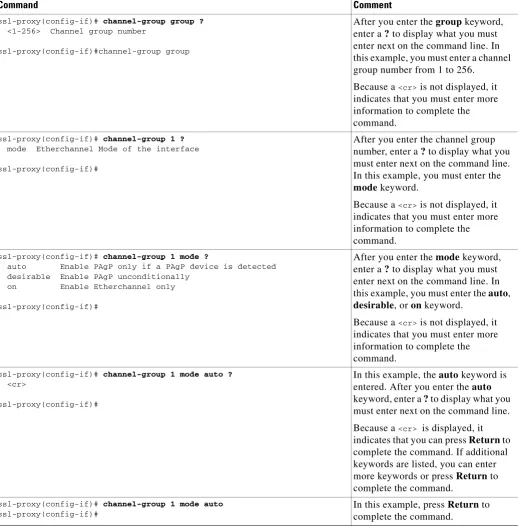
ssl-proxy(config-if)# channel-group group ?
<1-256> Channel group number
ssl-proxy(config-if)#channel-group group
After you enter the group keyword, enter a ? to display what you must enter next on the command line. In this example, you must enter a channel group number from 1 to 256.
Because a <cr> is not displayed, it
indicates that you must enter more information to complete the command.
ssl-proxy(config-if)# channel-group 1 ?
mode Etherchannel Mode of the interface
ssl-proxy(config-if)#
After you enter the channel group number, enter a ? to display what you must enter next on the command line. In this example, you must enter the mode keyword.
Because a <cr> is not displayed, it
indicates that you must enter more information to complete the command.
ssl-proxy(config-if)# channel-group 1 mode ?
auto Enable PAgP only if a PAgP device is detected desirable Enable PAgP unconditionally
on Enable Etherchannel only
ssl-proxy(config-if)#
After you enter the mode keyword, enter a ? to display what you must enter next on the command line. In this example, you must enter the auto, desirable, or on keyword.
Because a <cr> is not displayed, it
indicates that you must enter more information to complete the command.
ssl-proxy(config-if)# channel-group 1 mode auto ?
<cr>
ssl-proxy(config-if)#
In this example, the auto keyword is entered. After you enter the auto keyword, enter a ? to display what you must enter next on the command line. Because a <cr> is displayed, it
indicates that you can press Return to complete the command. If additional keywords are listed, you can enter more keywords or press Return to complete the command.
ssl-proxy(config-if)# channel-group 1 mode auto
ssl-proxy(config-if)#
In this example, press Return to complete the command.
Table 1-2 How to Find Command Options (continued)
Chapter 1 Command-Line Interface
Understanding Command Modes
Understanding Command Modes
This section contains descriptions of the command modes for the Cisco IOS user interface.
Cisco IOS User Interface
The Cisco IOS user interface is divided into many different modes. The commands that are available to you depend on which mode you are currently in. You can obtain a list of commands that are available for each command mode by entering a question mark(?) at the system prompt.
When you start a session on the Catalyst 6500 series switch, you begin in user mode, often called EXEC mode. Only a limited subset of the commands are available in EXEC mode. In order to have access to all commands, you must enter privileged EXEC mode. Normally, you must enter a password to enter privileged EXEC mode. From privileged EXEC mode, you can enter any EXEC command or enter global configuration mode. Most EXEC commands are one-time commands, such as show commands, which show the current status of a given item, and clear commands, which clear counters or interfaces. The EXEC commands are not saved across reboots of the Catalyst 6500 series switch.
The configuration modes allow you to make changes to the running configuration. If you later save the configuration, these commands are stored across Catalyst 6500 series switch reboots. In order to get to the various configuration modes, you must start at global configuration mode where you can enter interface configuration mode, subinterface configuration mode, and a variety of protocol-specific modes. ROM-monitor mode is a separate mode that is used when the Catalyst 6500 series switch cannot boot properly. If your Catalyst 6500 series switch or access server does not find a valid system image when it is booting, or if its configuration file is corrupted at startup, the system might enter ROM-monitor mode.
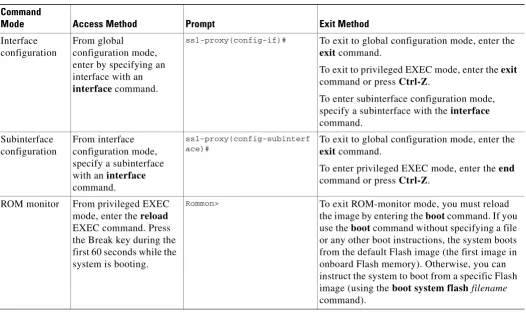
Table 1-3 provides a summary of the main command modes.
Table 1-3 Summary of Main Command Modes
Command
Mode Access Method Prompt Exit Method
User EXEC Log in. ssl-proxy> Use the logout command.
Privileged EXEC
From user EXEC mode, enter the enable EXEC command.
ssl-proxy# To exit to user EXEC mode, enter the disable
command.
To enter global configuration mode, enter the configure terminal privileged EXEC command.
Global configuration
From privileged EXEC mode, enter the
configure terminal privileged EXEC command.
ssl-proxy(config)# To exit to privileged EXEC mode, enter the exit
or end command or press Ctrl-Z.
To enter interface configuration mode, enter an interface configuration command.
Global configuration submode
From global configuration mode, enter a submode command.
ssl-proxy(config-submode)# To exit to global configuration submode, enter
Chapter 1 Command-Line Interface Using the No and Default Forms of Commands
For more information on command modes, refer to the “Using the Command Line Interface” chapter of the Configuration Fundamentals Configuration Guide.
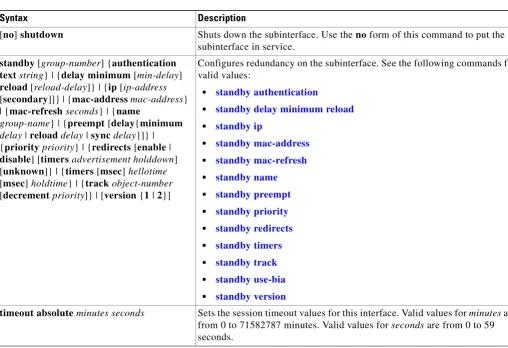
Note You can issue EXEC-level Cisco IOS commands (such as show, clear, and debug commands) from within global configuration mode or other modes by issuing the docommand followed by the EXEC command. See the do command for information on how to use this command.
Using the No and Default Forms of Commands
Almost every configuration command has a no form. In general, enter the no form to disable a function. Use the command without the keyword no to reenable a disabled function or to enable a function that is disabled by default. For example, IP routing is enabled by default. To disable IP routing, specify the no ip routing command and specify the ip routing command to reenable it. This publication provides the complete syntax for the configuration commands and describes what the no form of a command does. Configuration commands can have a default form. The default form of a command returns the command setting to its default. Most commands are disabled by default, so the default form is the same as the no form. However, some commands are enabled by default and have variables set to certain default values. In these cases, the default form of the command enables the command and sets variables to their default values. This publicationdescribes what the default form of a command does if the command is not the same as the no form.
Interface configuration
From global configuration mode, enter by specifying an interface with an interface command.
ssl-proxy(config-if)# To exit to global configuration mode, enter the
exit command.
To exit to privileged EXEC mode, enter the exit command or press Ctrl-Z.
To enter subinterface configuration mode, specify a subinterface with the interface command.
Subinterface configuration
From interface configuration mode, specify a subinterface with an interface command.
ssl-proxy(config-subinterf ace)#
To exit to global configuration mode, enter the exit command.
To enter privileged EXEC mode, enter the end command or press Ctrl-Z.
ROM monitor Fromprivileged EXEC mode, enter the reload EXEC command. Press the Break key during the first 60 seconds while the system is booting.
Rommon> To exit ROM-monitor mode, you must reload
the image by entering the boot command. If you use the boot command without specifying a file or any other boot instructions, the system boots from the default Flash image (the first image in onboard Flash memory). Otherwise, you can instruct the system to boot from a specific Flash image (using the boot system flashfilename
command).
Table 1-3 Summary of Main Command Modes (continued)
Command
Chapter 1 Command-Line Interface
Using the CLI String Search
Using the CLI String Search
The pattern in the command output is referred to as a string. The CLI string search feature allows you to search or filter any show or more command output and allows you to search and filter at --More-- prompts. This feature is useful when you need to sort though large amounts of output, or if you want to exclude output that you do not need to see.
With the search function, you can begin unfiltered output at the first line that contains a regular expression that you specify. You can then specify a maximum of one filter per command or start a new search from the --More-- prompt.
A regular expression is a pattern (a phrase, number, or more complex pattern) that software uses to match against show or more command output. Regular expressions are case sensitive and allow for complex matching requirements. Examples of simple regular expressions are Serial, misses, and 138. Examples of complex regular expressions are 00210..., ( is ), and [Oo]utput.
You can perform three types of filtering:
• Use the begin keyword to begin output with the line that contains a specified regular expression.
• Use the include keyword to include output lines that contain a specified regular expression.
• Use the exclude keyword to exclude output lines that contain a specified regular expression. You can then search this filtered output at the --More-- prompts.
Note The CLI string search function does not allow you to search or filter backward through previous output; filtering cannot be specified using HTTP access to the CLI.
Regular Expressions
A regular expression can be a single character that matches the same single character in the command output or multiple characters that match the same multiple characters in the command output. This section describes how to create both single-character patterns and multiple-character patterns and how to create more complex regular expressions using multipliers, alternation, anchoring, and parentheses.
Single-Character Patterns
The simplest regular expression is a single character that matches the same single character in the command output. You can use any letter (A-Z, a-z) or digit (0-9) as a single-character pattern. You can also use other keyboard characters (such as ! or ~) as single-character patterns, but certain keyboard characters have special meaning when used in regular expressions. Table 1-4 lists the keyboard characters with special meaning.
Table 1-4 Characters with Special Meaning
Character Special Meaning
. Matches any single character, including white space. * Matches 0 or more sequences of the pattern.
Chapter 1 Command-Line Interface Using the CLI String Search
To enter these special characters as single-character patterns, remove the special meaning by preceding each character with a backslash (\). These examples are single-character patterns matching a dollar sign, an underscore, and a plus sign, respectively.
\$ \_ \+
You can specify a range of single-character patterns to match against command output. For example, you can create a regular expression that matches a string containing one of the following letters: a, e, i, o, or u. One and only one of these characters must exist in the string for pattern matching to succeed. To specify a range of single-character patterns, enclose the single-character patterns in square brackets ([ ]). For example,
[aeiou]
matches any one of the five vowels of the lowercase alphabet, while [abcdABCD]
matches any one of the first four letters of the lower- or uppercase alphabet.
You can simplify ranges by entering only the end points of the range separated by a dash (-). Simplify the previous range as follows:
[a-dA-D]
To add a dash as a single-character pattern in your range, include another dash and precede it with a backslash:
[a-dA-D\-]
You can also include a right square bracket (]) as a single-character pattern in your range. To do so, enter the following:
[a-dA-D\-\]]
The previous example matches any one of the first four letters of the lower- or uppercase alphabet, a dash, or a right square bracket.
You can reverse the matching of the range by including a caret (^) at the start of the range. This example matches any letter except the ones listed:
[^a-dqsv]
This example matches anything except a right square bracket (]) or the letter d: [^\]d]
^ Matches the beginning of the string. $ Matches the end of the string.
_ (underscore) Matches a comma (,), left brace ({), right brace (}), left parenthesis ( ( ), right parenthesis ( ) ), the beginning of the string, the end of the string, or a space.
Table 1-4 Characters with Special Meaning (continued)
Chapter 1 Command-Line Interface
Using the CLI String Search
Multiple-Character Patterns
When creating regular expressions, you can also specify a pattern containing multiple characters. You create multiple-character regular expressions by joining letters, digits, or keyboard characters that do not have special meaning. For example, a4% is a multiple-character regular expression. Put a backslash in front of the keyboard characters that have special meaning when you want to remove their special meaning.
With multiple-character patterns, order is important. The regular expression a4% matches the character a followed by a 4 followed by a % sign. If the string does not have a4%, in that order, pattern matching fails. This multiple-character regular expression
a.
uses the special meaning of the period character to match the letter a followed by any single character. With this example, the strings ab, a!, or a2 are all valid matches for the regular expression.
You can remove the special meaning of the period character by putting a backslash in front of it. In the following expression
a\.
only the string a. matches this regular expression.
You can create a multiple-character regular expression containing all letters, all digits, all keyboard characters, or a combination of letters, digits, and other keyboard characters. These examples are all valid regular expressions:
telebit 3107 v32bis
Multipliers
You can create more complex regular expressions to match multiple occurrences of a specified regular expression by using some special characters with your single- and multiple-character patterns. Table 1-5
lists the special characters that specify “multiples” of a regular expression.
This example matches any number of occurrences of the letter a, including none: a*
This pattern requires that at least one letter a in the string is matched: a+
This pattern matches the string bb or bab: ba?b
This string matches any number of asterisks (*): \**
Table 1-5 Special Characters Used as Multipliers
Character Description
* Matches 0 or more single- or multiple-character patterns. + Matches 1 or more single- or multiple-character patterns.
Chapter 1 Command-Line Interface Using the CLI String Search
To use multipliers with multiple-character patterns, you enclose the pattern in parentheses. In the following example, the pattern matches any number of the multiple-character string ab:
(ab)*
As a more complex example, this pattern matches one or more instances of alphanumeric pairs (but not none; that is, an empty string is not a match):
([A-Za-z][0-9])+
The order for matches using multipliers (*, +, or ?) is to put the longest construct first. Nested constructs are matched from outside to inside. Concatenated constructs are matched beginning at the left side of the construct. The regular expression matches A9b3, but not 9Ab3 because the letters are specified before the numbers.
Alternation
Alternation allows you to specify alternative patterns to match against a string. You separate the alternative patterns with a vertical bar (|). Exactly one of the alternatives can match the string. For example, the regular expression
codex | telebit
matches the string codex or the string telebit, but not both codex and telebit.
Anchoring
You can match a regular expression pattern against the beginning or the end of the string. That is, you can specify that the beginning or end of a string contains a specific pattern. You “anchor” these regular expressions to a portion of the string using the special characters shown in Table 1-6.
This regular expression matches a string only if the string starts with abcd: ^abcd
In contrast, this expression is in a range that matches any single letter, as long as it is not the letters a, b, c, or d:
[^abcd]
With this example, the regular expression matches a string that ends with .12: $\.12
Contrast these anchoring characters with the special character underscore (_). The underscore matches the beginning of a string (^), the end of a string ($), parentheses ( ), space ( ), braces { }, comma (,), or underscore (_). With the underscore character, you can specify that a pattern exist anywhere in the string.
Table 1-6 Special Characters Used for Anchoring
Character Description
Chapter 1 Command-Line Interface
Using the CLI String Search
For example, _1300_
matches any string that has 1300 somewhere in the string. The string’s 1300 can be preceded by or end with a space, brace, comma, or underscore. For example,
{1300_
matches the regular expression, but 21300 and 13000 do not.
Using the underscore character, you can replace long regular expression lists, such as the following: ^1300$ ^1300(space) (space)1300 {1300, ,1300, {1300} ,1300, (1300
with _1300_
Parentheses for Recall
As shown in the “Multipliers” section on page 1-9, you use parentheses with multiple-character regular expressions to multiply the occurrence of a pattern. You can also use parentheses around a single- or multiple-character pattern to remember a pattern for use elsewhere in the regular expression.
To create a regular expression that recalls a previous pattern, you use parentheses to indicate a
remembered specific pattern and a backslash (\) followed by an integer to reuse the remembered pattern. The integer specifies the occurrence of the parentheses in the regular expression pattern. If you have more than one remembered pattern in your regular expression, then \1 indicates the first remembered pattern, \2 indicates the second remembered pattern, and so on.
This regular expression uses parentheses for recall: a(.)bc(.)\1\2
C H A P T E R
2
Commands for the Catalyst 6500 Series Switch
SSL Services Module
This chapter contains an alphabetical listing of commands for the Catalyst 6500 series switch SSL Services Module.
For additional SSL Services Module information, refer to the following documentation:
• Catalyst 6500 Series Switch SSL Services Module Configuration Note
• Catalyst 6500 Series Switch SSL Services Module System Message Guide
Chapter 2 Commands for the Catalyst 6500 Series SSL Services Module clear ssl-proxy conn
clear ssl-proxy conn
To clear all TCP connections on the entire system, use the clear ssl-proxy conn command.
clear ssl-proxy conn [context name[module [module]]][service name [context name[module [module]]]]
Syntax Description
Defaults This command has no default settings.
Command Modes EXEC
Command History
Examples This example shows how to clear the connections for the specified service:
ssl-proxy# clear ssl-proxy conn service S6
This example shows how to clear all TCP connections on the entire system:
ssl-proxy# clear ssl-proxy conn
ssl-proxy#
contextname (Optional) Clears the connections for a specific context. modulemodule (Optional) Clears the connections for the specified module type.
The available options for the module variable are as follows:
• all—All CPUs
• fdu—FDU CPU
• ssl1—SSL1 CPU
• tcp1—TCP1 CPU
• tcp2—TCP2 CPU
service name (Optional) Clears the connections for the specified service.
Release Modification
Cisco IOS Release 12.1(13)E and SSL Services Module Release 1.1(1)
Support for this command was introduced on the Catalyst 6500 series switches.
SSL Services Module Release 3.1(1)
This command was changed to add the following keywords:
• context name
Chapter 2 Commands for the Catalyst 6500 Series SSL Services Module
clear ssl-proxy content
clear ssl-proxy content
To clear all TCP connections on the entire system, use the clear ssl-proxy conn command.
clear ssl-proxy content {all | rewrite | scanning} [module [module]]
Syntax Description
Defaults This command has no default settings.
Command Modes EXEC
Command History
Usage Guidelines To reset all the content statistics that the SSL Services Module maintains, use the clear ssl-proxy content all command.
Examples This example shows how to clear all of the content statistics:
ssl-proxy# clear ssl-proxy content all
all Clears all content statistics. scanning Clears scanning statistics. rewrite Clears rewriting statistics.
modulemodule (Optional) Clears statistics for the specified module type. The available options for the module variable are as follows:
• all—All CPUs
• fdu—FDU CPU
• ssl1—SSL1 CPU
• tcp1—TCP1 CPU
• tcp2—TCP2 CPU
Release Modification
SSL Services Module Release 3.1(1)
Chapter 2 Commands for the Catalyst 6500 Series SSL Services Module clear ssl-proxy session
clear ssl-proxy session
To clear all entries from the session cache, use the clear ssl-proxy session command.
clear ssl-proxy session [service[name] [context name[module [module]]]]
Syntax Description
Defaults This command has no default settings.
Command Modes EXEC
Command History
Usage Guidelines To clear all entries from the session cache for all services, use the clear ssl-proxy session command without options.
Examples This example shows how to clear the entries from the session cache for the specified service on the SSL Services Module:
ssl-proxy# clear ssl-proxy session service S6
This example shows how to clear all entries in the session cache that are maintained on the SSL Services Module:
ssl-proxy# clear ssl-proxy session
ssl-proxy#
contextname (Optional) Clears the session cache for a specific context. modulemodule (Optional) Clears session cache for the specified module type.
The available options for the module variable are as follows:
• all—All CPUs
• fdu—FDU CPU
• ssl1—SSL1 CPU
• tcp1—TCP1 CPU
• tcp2—TCP2 CPU
service name (Optional) Clears the session cache for the specified service.
Release Modification
SSL Services Module Release 1.2(1)
Support for this command was introduced on the Catalyst 6500 series switches.
SSL Services Module Release 3.1(1)
This command was changed to add the following keywords:
• context name
Chapter 2 Commands for the Catalyst 6500 Series SSL Services Module
clear ssl-proxy stats
clear ssl-proxy stats
To reset the statistics counters that are maintained in the different system components on the SSL Services Module, use the clear ssl-proxy stats command.
clear ssl-proxy stats [context [name] | crypto | fdu | hdr | ipc | module [module]| pki | service | ssl | tcp | url]
Syntax Description
Defaults This command has no default settings.
Command Modes EXEC
context (Optional) Clears statistics information about the context.
name (Optional) Specifies the name of the context.
crypto (Optional) Clears statistics information about the crypto. fdu (Optional) Clears statistics information about the FDU.
hdr (Optional) Clears statistics information about HTTP header insertion.
ipc (Optional) Clears statistics information about the inter-process communications (IPC).
modulemodule (Optional) Clears statistics information about the specified module type. The available options for the module variable are as follows:
• all—All CPUs
• fdu—FDU CPU
• ssl1—SSL1 CPU
• tcp1—TCP1 CPU
• tcp2—TCP2 CPU
pki (Optional) Clears information about the public key infrastruture (PKI). service name (Optional) Clears statistics information for a specific service.
Chapter 2 Commands for the Catalyst 6500 Series SSL Services Module clear ssl-proxy stats
Command History
Usage Guidelines To reset all the statistics counters that the SSL Services Module maintains, use the clear ssl-proxy stats command without options.
Examples This example shows how to reset the statistics counters that are maintained in the different system components on the SSL Services Module:
ssl-proxy# clear ssl-proxy stats crypto
ssl-proxy# clear ssl-proxy stats ipc
ssl-proxy# clear ssl-proxy stats pki
ssl-proxy# clear ssl-proxy stats service S6
This example shows how to clear all the statistic counters that the SSL Services Module maintains:
ssl-proxy# clear ssl-proxy stats
ssl-proxy#
Release Modification
Cisco IOS Release 12.1(13)E and SSL Services Module Release 1.1(1)
Support for this command was introduced on the Catalyst 6500 series switches.
SSL Services Module Release 3.1(1)
This command was changed to add the following keywords:
• contextname
• hdr
• module module
Chapter 2 Commands for the Catalyst 6500 Series SSL Services Module
crypto pki export pem
crypto pki export pem
To export privacy-enhanced mail (PEM) files from the SSL Services Module, use the crypto pkiexport pem command.
crypto pkiexporttrustpoint_labelpem {terminal {des | 3des} {urlurl}} pass_phrase
Syntax Description
Defaults This command has no default settings.
Command Modes Global configuration
Command History
Usage Guidelines The pass_phrase can be any phrase including spaces and punctuation except for the question mark (?), which has a special meaning to the Cisco IOS parser.
Pass-phrase protection associates a pass phrase with the key. The pass phrase is used to encrypt the key when it is exported. When this key is imported, you must enter the same pass phrase to decrypt it. A key that is marked as unexportable cannot be exported.
trustpoint-label Name of the trustpoint.
terminal Displays the request on the terminal.
des Specifies the 56-bit DES-CBC encryption algorithm. 3des Specifies the 168-bit DES (3DES) encryption algorithm. urlurl Specifies the URL location. Valid values are as follows:
• ftp:—Exports to the FTP: file system
• null:—Exports to the NULL: file system
• nvram:—Exports to the NVRAM: file system
• rcp:—Exports to the RCP: file system
• scp:—Exports to the SCP: file system
• system:—Exports to the system: file system
• tftp:—Exports to the TFTP: file system
pass-phrase Pass phrase that is used to protect the private key.
Release Modification
SSL Services Module Release 1.2(1)
Support for this command was introduced on the Catalyst 6500 series switches.
SSL Services Module Release 3.1(1)
Chapter 2 Commands for the Catalyst 6500 Series SSL Services Module crypto pki export pem
You can change the default file extensions when prompted. The default file extensions are as follows:
• public key (.pub)
• private key (.prv)
• certificate (.crt)
• CA certificate (.ca)
• signature key (-sign)
• encryption key (-encr)
Note In SSL software release 1.2, only the private key (.prv), the server certificate (.crt), and the issuer CA certificate (.ca) of the server certificate are exported. To export the whole certificate chain, including all the CA certificates, use a PKCS12 file instead of PEM files.
Examples This example shows how to export a PEM-formatted file on the SSL Services Module:
ssl-proxy(config)# crypto ca export TP5 pem url tftp://10.1.1.1/tp99 3des password
% Exporting CA certificate...
Address or name of remote host [10.1.1.1]? Destination filename [tp99.ca]?
% File 'tp99.ca' already exists.
% Do you really want to overwrite it? [yes/no]: yes
!Writing file to tftp://10.1.1.1/tp99.ca! % Key name: key1
Usage: General Purpose Key % Exporting private key...
Address or name of remote host [10.1.1.1]? Destination filename [tp99.prv]?
% File 'tp99.prv' already exists.
% Do you really want to overwrite it? [yes/no]: yes
!Writing file to tftp://10.1.1.1/tp99.prv! % Exporting router certificate...
Address or name of remote host [10.1.1.1]? Destination filename [tp99.crt]?
% File 'tp99.crt' already exists.
% Do you really want to overwrite it? [yes/no]: yes
!Writing file to tftp://10.1.1.1/tp99.crt!
ssl-proxy(config)#
Chapter 2 Commands for the Catalyst 6500 Series SSL Services Module
crypto pki import pem
crypto pki import pem
To import a PEM-formatted file to the SSL Services Module, use the crypto pkiimportpem command.
crypto pki importtrustpoint_label pem [exportable] {terminal | urlurl | usage-keys}
pass_phrase
Syntax Description
Defaults This command has no default settings.
Command History Global configuration
Command History
Usage Guidelines You will receive an error if you enter the pass phrase incorrectly. The pass_phrase can be any phrase including spaces and punctuation except for the question mark (?), which has a special meaning to the Cisco IOS parser.
Pass-phrase protection associates a pass phrase with the key. The pass phrase is used to encrypt the key when it is exported. When this key is imported, you must enter the same pass phrase to decrypt it. When importing RSA keys, you can use a public key or its corresponding certificate.
trustpoint-label Name of the trustpoint.
exportable (Optional) Specifies the key that can be exported. terminal Displays the request on the terminal.
urlurl Specifies the URL location. Valid values are as follows:
• ftp:—Exports to the FTP: file system
• null:—Exports to the null: file system
• nvram:—Exports to the NVRAM: file system
• rcp:—Exports to the RCP: file system
• scp:—Exports to the SCP: file system
• system:—Exports to the system: file system
• tftp:—Exports to the TFTP: file system
pass_phrase Pass phrase.
usage-keys Specifies that two special-usage key pairs should be generated, instead of one general-purpose key pair.
Release Modification
SSL Services Module Release 1.2(1)
Support for this command was introduced on the Catalyst 6500 series switches.
SSL Services Module Release 3.1(1)
Chapter 2 Commands for the Catalyst 6500 Series SSL Services Module crypto pki import pem
The crypto pkiimportpem command imports only the private key (.prv), the server certificate (.crt), and the issuer CA certificate (.ca). If you have more than one level of CA in the certificate chain, you need to import the root and subordinate CA certificates before this command is issued for authentication. Use cut-and-paste or TFTP to import the root and subordinate CA certificates.
Examples This example shows how to import a PEM-formatted file from the SSL Services Module:
ssl-proxy(config)# crypto pki import TP5 pem url tftp://10.1.1.1/TP5 password
% Importing CA certificate...
Address or name of remote host [10.1.1.1]? Destination filename [TP5.ca]?
Reading file from tftp://10.1.1.1/TP5.ca
Loading TP5.ca from 10.1.1.1 (via Ethernet0/0.168): ! [OK - 1976 bytes]
% Importing private key PEM file...
Address or name of remote host [10.1.1.1]? Destination filename [TP5.prv]?
Reading file from tftp://10.1.1.1/TP5.prv
Loading TP5.prv from 10.1.1.1 (via Ethernet0/0.168): ! [OK - 963 bytes]
% Importing certificate PEM file...
Address or name of remote host [10.1.1.1]? Destination filename [TP5.crt]?
Reading file from tftp://10.1.1.1/TP5.crt
Loading TP5.crt from 10.1.1.1 (via Ethernet0/0.168): ! [OK - 1692 bytes]
% PEM files import succeeded. ssl-proxy(config)# end
ssl-proxy#
*Apr 11 15:11:29.901: %SYS-5-CONFIG_I: Configured from console by console
Chapter 2 Commands for the Catalyst 6500 Series SSL Services Module
crypto pki export pkcs12
crypto pki export pkcs12
To export a PKCS12 file from the SSL Services Module, use the crypto pki export pkcs12 command.
crypto pki export trustpoint_label pkcs12 file_system [pkcs12_filename]pass_phrase
Syntax Description
Defaults This command has no default settings.
Command Modes Global configuration
Command History
Usage Guidelines Imported key pairs cannot be exported.
If you are using SSH, we recommend using SCP(secure file transfer) when exporting a PKCS12 file. SCP authenticates the host and encrypts the transfer session.
If you do not specify pkcs12_filename, you will be prompted to accept the default filename (the default filename is the trustpoint_label) or enter the filename. For the ftp: or tftp: value, include the full path in the pkcs12_filename.
You will receive an error if you enter the pass phrase incorrectly.
If there is more than one level of CA, the root CA and all the subordinate CA certificates are exported in the PKCS12 file.
trustpoint_label Specifies the trustpoint label.
file_system Specifies the file system. Valid values are scp:, ftp:, nvram:, rcp:,and tftp:
pkcs12_filename (Optional) Specifies the name of the PKCS12 file to import.
pass_phrase Specifies the pass phrase of the PKCS12 file.
Release Modification
Cisco IOS Release 12.1(13)E and SSL Services Module Release 1.1(1)
Support for this command was introduced on the Catalyst 6500 series switches.
SSL Services Module Release 3.1(1)
Chapter 2 Commands for the Catalyst 6500 Series SSL Services Module crypto pki export pkcs12
Examples This example shows how to export a PKCS12 file using SCP:
ssl-proxy(config)# crypto pki export TP1 pkcs12 scp: sky is blue
Address or name of remote host []? 10.1.1.1
Destination username [ssl-proxy]? admin-1
Destination filename [TP1]? TP1.p12
Password:
Writing TP1.p12 Writing pkcs12 file to scp://[email protected]/TP1.p12
Password: !
Chapter 2 Commands for the Catalyst 6500 Series SSL Services Module
crypto pki import pkcs12
crypto pki import pkcs12
To import a PKCS12 file to the SSL Services Module, use the crypto pki import pkcs12 command.
crypto pki import trustpoint_label pkcs12 file_system [pkcs12_filename]pass_phrase
Syntax Description
Defaults This command has no default settings.
Command Modes Global configuration
Command History
Usage Guidelines If you are using SSH, we recommend using SCP(secure file transfer) when importing a PKCS12 file. SCP authenticates the host and encrypts the transfer session.
If you do not specify pkcs12_filename, you will be prompted to accept the default filename (the default filename is the trustpoint_label) or to enter the filename. For the ftp: or tftp: value, include the full path in the pkcs12_filename.
You will receive an error if you enter the pass phrase incorrectly.
If there is more than one level of CA, the root CA and all the subordinate CA certificates are exported in the PKCS12 file.
trustpoint_label Specifies the trustpoint label.
file_system Specifies the file system. Valid values are as follows:
• ftp:—Imports from the FTP: file system
• nvram:—Imports from the NVRAM: file system
• rcp:—Imports from the RCP: file system
• scp:—Imports from the SCP: file system
• tftp:—Imports from the TFTP: file system
pkcs12_filename (Optional) Specifies the name of the PKCS12 file to import.
pass_phrase Specifies the pass phrase of the PKCS12 file.
Release Modification
Cisco IOS Release 12.1(13)E and SSL Services Module Release 1.1(1)
Support for this command was introduced on the Catalyst 6500 series switches.
SSL Services Module Release 3.1(1)
Chapter 2 Commands for the Catalyst 6500 Series SSL Services Module crypto pki import pkcs12
Examples This example shows how to import a PKCS12 file using SCP:
ssl-proxy(config)# crypto pki import TP2 pkcs12 scp: sky is blue
Address or name of remote host []? 10.1.1.1
Source username [ssl-proxy]? admin-1
Source filename [TP2]? /users/admin-1/pkcs12/TP2.p12
Password:password
Sending file modes:C0644 4379 TP2.p12 !
ssl-proxy(config)#
Chapter 2 Commands for the Catalyst 6500 Series SSL Services Module
crypto key decrypt rsa
crypto key decrypt rsa
To delete the encrypted key and leave only the unencrypted key, use the crypto key decrypt rsa command.
crypto key decrypt [write] rsa [name key-name] passphrase passphrase
Syntax Description
Defaults This command has no default settings.
Command Modes Global configuration mode
Command History
Usage Guidelines Entering the write keyword immediately saves the unencrypted key to NVRAM. If you do not enter the write keyword, you must manually write the configuration to NVRAM; otherwise, the key remains encrypted the next time that the router is reloaded.
Examples This example shows how to display the administration VLAN and related IP and gateway addresses:
ssl-proxy(config)# crypto key decrypt rsa name pki1-72a.cisco.com passphrase cisco1234
WARNING: Configuration with decrypted key not saved. Please save it manually as soon as possible to save decrypted key
ssl-proxy(config)# end
ssl-proxy# show crypto key mypubkey rsa
Key name: pki1-72a.cisco.com Usage: General Purpose Key Key is not exportable. Key Data:
30819F30 0D06092A 864886F7 0D010101 05000381 ...
% Key pair was generated at: 15:42:15 PST Jun
ssl-proxy#
Related Commands crypto key encrypt rsa crypto key lock rsa crypto key unlock rsa
write (Optional) Writes the configuration to the startup configuration. name key-name (Optional) Name of the key.
passphrasepassphrase Pass phrase.
Release Modification
SSL Services Module Release 3.1(1)
Chapter 2 Commands for the Catalyst 6500 Series SSL Services Module crypto key encrypt rsa
crypto key encrypt rsa
To encrypt the RSA keys, use the crypto key encrypt rsa command.
crypto key encrypt [write] rsa [name key-name] passphrase passphrase
Syntax Description
Defaults This command has no default settings.
Command Modes Global configuration
Command History
Usage Guidelines After you enter this command, the router can continue to use the key; the key remains unlocked. If you do not enter the write keyword, you must manually write the configuration to NVRAM; otherwise, the encrypted key will be lost the next time that the router is reloaded.
Examples This example shows how to encrypt the RSA key “pki1-72a.cisco.com.” Enter the show crypto key mypubkey rsa command to verify that the RSA key is encrypted (protected) and unlocked.
ssl-proxy(config)# crypto key encrypt rsa name pki1-72a.cisco.com passphrase cisco1234
ssl-proxy(config)# exit
ssl-proxy# show crypto key mypubkey rsa
Key name:pki1-72a.cisco.com Usage:General Purpose Key
*** The key is protected and UNLOCKED. *** Key is not exportable.
Key Data:
305C300D 06092A86 4886F70D 01010105 00034B00 30480241 00E0CC9A 1D23B52C ...
% Key pair was generated at:00:15:32 GMT Jun 25 2003
ssl-proxy#
Related Commands crypto key decrypt rsa crypto key lock rsa crypto key unlock rsa
write (Optional)