Gary B. Shelly
Misty E. Vermaat
Australia • Brazil • Japan • Korea • Mexico • Singapore • Spain • United Kingdom • United States
INTRODUCTORY
Microsoft
WORD
®
2010
1439078459_Intro FM.indd i
1439078459_Intro FM.indd i 7/8/10 8:58:26 PM7/8/10 8:58:26 PM
52609_00_fm_pi-pxxvi.indd ii
52609_00_fm_pi-pxxvi.indd ii 2/1/10 11:37:43 PM2/1/10 11:37:43 PM
review has deemed that any suppres ed content does not materially affect the over all learning experience. The publisher reserves the
right to remove the contents from this title at any time if subsequent rights restrictions require it. For valuable information on pricing, previous editions, changes to current editions, and alternate format, please visit
www.cengage.com/highered to search by ISBN#, author, title, or keyword
for materials in your areas of interest. s
ALL RIGHTS RESERVED. No part of this work covered by the copyright herein may be reproduced, transmitted, stored or used in any form or by any means graphic, electronic, or mechanical, including but not limited to photocopying, recording, scanning, digitizing, taping, Web distribution, information networks, or information storage and retrieval systems, except as permitted under Section 107 or 108 of the 1976 United States Copyright Act, without the prior written permission of the publisher.
Library of Congress Control Number: 2010929406 ISBN-13: 9781439078457
ISBN-10: 1-4390-7845-9
Course Technology
20 Channel Center Street Boston, MA 02210 USA
Microsoft and the Offi ce logo are either registered trademarks or trademarks of Microsoft Corporation in the United States and/or other countries. Course Technology, a part of Cengage Learning, is an independent entity from the Microsoft Corporation, and not affi liated with Microsoft in any manner.
Cengage Learning is a leading provider of customized learning solutions with offi ce locations around the globe, including Singapore, the United Kingdom, Australia, Mexico, Brazil, and Japan. Locate your local offi ce at:
international.cengage.com/region
Cengage Learning products are represented in Canada by Nelson Education, Ltd.
Visit our website www.cengage.com/ct/shellycashman to share and gain ideas on our textbooks!
To learn more about Course Technology, visit www.cengage.com/coursetechnology
Purchase any of our products at your local college store or at our preferred online store www.cengagebrain.com
Vice President, Publisher: Nicole Pinard Executive Editor: Kathleen McMahon Senior Product Manager: Mali Jones Associate Product Manager: Aimee Poirier Editorial Assistant: Lauren Brody
Director of Marketing: Cheryl Costantini Marketing Manager: Tristen Kendall Marketing Coordinator: Stacey Leasca Print Buyer: Julio Esperas
Director of Production: Patty Stephan Senior Content Project Manager: Jill Braiewa Development Editor: Lyn Markowicz Copyeditor: Foxxe Editorial Services Proofreader: Chris Clark
Indexer: Rich Carlson
QA Manuscript Reviewers: Chris Scriver, John Freitas, Serge Palladino, Susan Pedicini, Danielle Shaw
Art Director: Marissa Falco
Cover Designer: Lisa Kuhn, Curio Press, LLC Cover Photo: Tom Kates Photography Text Design: Joel Sadagursky Compositor: PreMediaGlobal
For product information and technology assistance, contact us at
Cengage Learning Customer & Sales Support, 1-800-354-9706
For permission to use material from this text or product, submit all requests online at cengage.com/permissions
Further permissions questions can be emailed to
Printed in the United States of America 1 2 3 4 5 6 7 16 15 14 13 12 11 10
We dedicate this book to the memory of James S. Quasney (1940 – 2009), who for 18 years co-authored numerous books with Tom Cashman and Gary Shelly and provided extraordinary leadership to the Shelly Cashman Series editorial team. As series editor, Jim skillfully coordinated, organized, and managed the many aspects of our editorial development processes and provided unending direction, guidance, inspiration, support, and advice to the Shelly Cashman Series authors and support team members. He was a trusted, dependable, loyal, and well-respected leader, mentor, and friend. We are forever grateful to Jim for his faithful devotion to our team and eternal contributions to our series.
The Shelly Cashman Series Team
1439078459_Intro FM.indd ii
1439078459_Intro FM.indd ii 7/8/10 8:58:41 PM7/8/10 8:58:41 PM
Contents
Microsoft
Offi ce 2010 and Windows 7
Offi ce 2010 and Windows 7: Essential Concepts and Skills
Objectives OFF 1
Offi ce 2010 and Windows 7 OFF 2
Overview OFF 2
Introduction to the Windows 7 Operating System OFF 2
Using a Mouse OFF 2
Scrolling OFF 4
Shortcut Keys OFF 4
Starting Windows 7 OFF 5
To Log On to the Computer OFF 6
The Windows 7 Desktop OFF 7
Introduction to Microsoft Offi ce 2010 OFF 7
Microsoft Offi ce 2010 Programs OFF 8
Microsoft Offi ce 2010 Suites OFF 8
Starting and Using a Program OFF 9
Word OFF 9
To Start a Program Using the Start Menu OFF 10
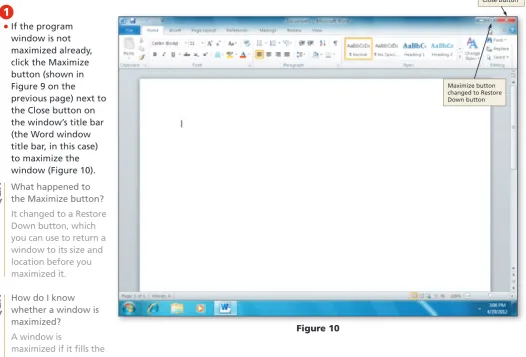
To Maximize a Window OFF 12
The Word Document Window, Ribbon, and
Elements Common to Offi ce Programs OFF 12 To Display a Different Tab on the Ribbon OFF 16 To Minimize, Display, and Restore the Ribbon OFF 17 To Display and Use a Shortcut Menu OFF 18 To Customize the Quick Access Toolbar OFF 19
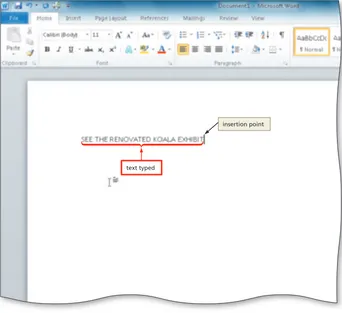
To Enter Text in a Document OFF 20
Saving and Organizing Files OFF 21
Organizing Files and Folders OFF 21
To Create a Folder OFF 22
Folder Windows OFF 24
To Create a Folder within a Folder OFF 24 To Expand a Folder, Scroll through Folder
Contents, and Collapse a Folder OFF 26 To Switch from One Program to Another OFF 27
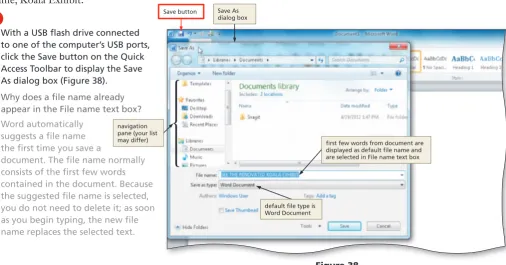
To Save a File in a Folder OFF 27
Navigating in Dialog Boxes OFF 30
To Minimize and Restore a Window OFF 30
Screen Resolution OFF 31
To Change the Screen Resolution OFF 33
To Quit an Offi ce Program with
One Document Open OFF 35
Additional Microsoft Offi ce Programs OFF 36
PowerPoint OFF 36
To Start a Program Using the Search Box OFF 37
The PowerPoint Window and Ribbon OFF 39
To Enter Content in a Title Slide OFF 40 To Create a New Offi ce Document from the
Backstage View OFF 41
To Close an Offi ce File Using the Backstage View OFF 44 To Open a Recent Offi ce File Using the
Backstage View OFF 45
Excel OFF 46
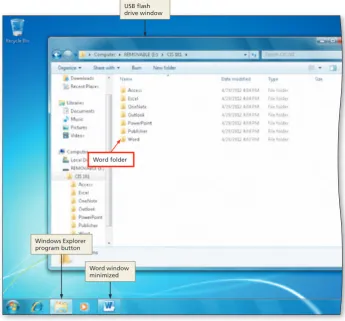
To Create a New Blank Offi ce Document from
Windows Explorer OFF 47
To Start a Program from Windows Explorer and
Open a File OFF 48
Unique Features of Excel OFF 49
To Enter a Worksheet Title OFF 50
To Save an Existing Offi ce Document with
the Same File Name OFF 51
Access OFF 53
Unique Elements in Access OFF 54
To Create an Access Database OFF 55
To Open an Existing Offi ce File OFF 57
Other Offi ce Programs OFF 58
Outlook OFF 58
Publisher OFF 59
OneNote OFF 61
Moving, Renaming, and Deleting Files OFF 62
To Rename a File OFF 63
To Move a File OFF 64
To Delete a File OFF 64
Microsoft Offi ce and Windows Help OFF 66
To Open the Help Window in an Offi ce Program OFF 66
Moving and Resizing Windows OFF 66
To Move a Window by Dragging OFF 66
To Resize a Window by Dragging OFF 67
Using Offi ce Help OFF 68
To Obtain Help Using the ‘Type words to search
for’ Text Box OFF 68
To Obtain Help Using the Help Links OFF 70 To Obtain Help Using the Help Table of Contents OFF 71 Obtaining Help while Working in an Offi ce
Program OFF 72
Using Windows Help and Support OFF 73
To Start Windows Help and Support OFF 73
Microsoft
WORD
®
2010
INTRODUCTORY
Preface vii
1439078459_Intro FM.indd iii
1439078459_Intro FM.indd iii 7/8/10 8:58:41 PM7/8/10 8:58:41 PM
Deleting Text from a Document WD 47
To Delete Text WD 47
To Move Text WD 47
Changing Document Properties WD 49
To Change Document Properties WD 49
Printing a Document WD 51
To Print a Document WD 51
Chapter Summary WD 53
Learn It Online WD 54
Apply Your Knowledge WD 54
Extend Your Knowledge WD 56
Make It Right WD 57
In the Lab WD 58
Cases and Places WD 63
CHAPTER TWO
Creating a Research Paper with Citations and References
Objectives WD 65
Introduction WD 66
Project — Research Paper WD 66
Overview WD 68
MLA Documentation Style WD 69
Changing Document Settings WD 69
Styles WD 70
To Modify a Style WD 70
Adjusting Line and Paragraph Spacing WD 72
To Change Line Spacing WD 73
To Remove Space after a Paragraph WD 74
To Update a Style to Match a Selection WD 74
Headers and Footers WD 75
To Switch to the Header WD 75
To Right-Align a Paragraph WD 76
To Insert a Page Number WD 77
To Close the Header WD 78
Typing the Research Paper Text WD 78
To Click and Type WD 80
Shortcut Keys WD 81
To Display the Rulers WD 82
To First-Line Indent Paragraphs WD 83
To AutoCorrect as You Type WD 85
To Use the AutoCorrect Options Button WD 85
To Create an AutoCorrect Entry WD 86
The AutoCorrect Dialog Box WD 87
Citations WD 88
To Change the Bibliography Style WD 89
To Insert a Citation and Create Its Source WD 90
To Edit a Citation WD 91
Footnotes WD 93
To Insert a Footnote Reference Mark WD 93
To Insert a Citation Placeholder WD 94
Footnote Text Style WD 95
To Modify a Style Using a Shortcut Menu WD 95
To Edit a Source WD 97
Working with Footnotes and Endnotes WD 100
To Count Words WD 101
Automatic Page Breaks WD 101
Creating an Alphabetical Works Cited Page WD 105
To Page Break Manually WD 106
To Apply a Style WD 106
To Create the Bibliographical List WD 108
Chapter Summary OFF 74
Learn It Online OFF 75
Apply Your Knowledge OFF 76
Extend Your Knowledge OFF 76
Make It Right OFF 77
In the Lab OFF 78
Cases and Places OFF 80
Microsoft
Word 2010
CHAPTER ONECreating, Formatting, and Editing a Word Document with Pictures
Objectives WD 1
Introduction WD 2
Project — Flyer with Pictures WD 2
Overview WD 4
Entering Text WD 5
To Type Text WD 6
To Display Formatting Marks WD 7
To Insert a Blank Line WD 7
Wordwrap WD 8
To Wordwrap Text as You Type WD 8
Spelling and Grammar Check WD 9
To Check Spelling and Grammar as You Type WD 9
Navigating a Document WD 11
Formatting Paragraphs and Characters WD 12
To Center a Paragraph WD 14
Formatting Single versus Multiple Paragraphs
and Characters WD 15
To Select a Line WD 15
To Change the Font Size of Selected Text WD 16 To Change the Font of Selected Text WD 17 To Change the Case of Selected Text WD 18 To Apply a Text Effect to Selected Text WD 19
To Shade a Paragraph WD 20
To Select Multiple Lines WD 21
To Bullet a List of Paragraphs WD 22
To Undo and Redo an Action WD 23
To Italicize Text WD 24
To Color Text WD 25
To Use the Mini Toolbar to Format Text WD 26
To Select a Group of Words WD 27
To Underline Text WD 27
To Bold Text WD 28
To Change Theme Colors WD 28
Selecting Text WD 30
Inserting and Formatting Pictures in a Word Document WD 30
To Insert a Picture WD 31
To Zoom the Document WD 33
To Resize a Graphic WD 34
To Resize a Graphic by Entering Exact Measurements WD 36
To Apply a Picture Style WD 37
To Apply Picture Effects WD 38
Enhancing the Page WD 40
To View One Page WD 40
To Add a Page Border WD 41
To Change Spacing before and after a Paragraph WD 43
Correcting Errors and Revising a Document WD 44
Types of Changes Made to Documents WD 44 To Insert Text in an Existing Document WD 46
1439078459_Intro FM.indd iv
1439078459_Intro FM.indd iv 7/8/10 8:58:42 PM7/8/10 8:58:42 PM
Creating a Business Letter WD 164
To Create a New File from an Existing File WD 165
To Apply a Quick Style WD 166
Using Tab Stops to Align Text WD 168
To Set Custom Tab Stops WD 169
To Insert the Current Date in a Document WD 170
To Create a Building Block WD 171
To Modify a Building Block WD 173
To Insert a Building Block WD 174
Building Blocks vs. AutoCorrect WD 174
To Insert a Nonbreaking Space WD 175
Tables WD 176
To Insert an Empty Table WD 176
To Enter Data in a Table WD 177
To Apply a Table Style WD 179
To Resize Table Columns to Fit Table Contents WD 180
Selecting Table Contents WD 181
To Align Data in Cells WD 182
To Center a Table WD 183
To Insert a Row in a Table WD 184
Deleting Table Data WD 185
To Merge Cells WD 185
To Bullet a List as You Type WD 186
Addressing and Printing Envelopes and Mailing Labels WD 189
To Address and Print an Envelope WD 189
Envelopes and Labels WD 189
Chapter Summary WD 190
Learn It Online WD 191
Apply Your Knowledge WD 191
Extend Your Knowledge WD 192
Make It Right WD 194
In the Lab WD 195
Cases and Places WD 199
Appendices
APPENDIX A
Project Planning Guidelines
Using Project Planning Guidelines APP 1
Determine the Project’s Purpose APP 1
Analyze Your Audience APP 1
Gather Possible Content APP 2
Determine What Content to Present to Your Audience APP 2
Summary APP 2
APPENDIX B
Publishing Offi ce 2010 Web Pages Online
Using an Offi ce Program to Publish Offi ce 2010
Web Pages APP 3
APPENDIX C
Saving to the Web Using Windows Live SkyDrive
Introduction APP 5
To Save a File to Windows Live SkyDrive APP 6
Web Apps APP 8
To Download a File from Windows Live SkyDrive APP 9
Collaboration APP 12
To Modify a Source and Update the
Bibliographical List WD 109
To Convert a Field to Regular Text WD 110
Proofi ng and Revising the Research Paper WD 112
To Scroll Page by Page through a Document WD 112
Copying, Cutting, and Pasting WD 113
To Copy and Paste WD 113
To Display the Paste Options Menu WD 114
To Find Text WD 115
To Replace Text WD 116
Find and Replace Dialog Box WD 117
To Go to a Page WD 117
To Find and Insert a Synonym WD 118
To Check Spelling and Grammar at Once WD 118
The Main and Custom Dictionaries WD 120
To Use the Research Task Pane to
Look Up Information WD 120
Research Task Pane Options WD 122
To Print Document Properties WD 123
To Preview the Document and Then Print It WD 124
Chapter Summary WD 125
Learn It Online WD 126
Apply Your Knowledge WD 126
Extend Your Knowledge WD 128
Make It Right WD 129
In the Lab WD 130
Cases and Places WD 136
CHAPTER THREE
Creating a Business Letter with a Letterhead and Table
Objectives WD 137
Introduction WD 138
Project — Business Letter with a Letterhead
and Table WD 138
Overview WD 138
To Change Margin Settings WD 141
Creating a Letterhead WD 142
To Insert a Shape WD 142
To Apply a Shape Style WD 144
To Add Text to a Shape WD 145
To Use the Grow Font Button to Increase
Font Size WD 146
Floating versus Inline Objects WD 147
To Change an Object’s Text Wrapping WD 148
To Insert Clip Art WD 148
To Resize a Graphic to a Percent of the Original WD 150
To Change the Color of a Graphic WD 151
To Set a Transparent Color in a Graphic WD 152 To Adjust the Brightness and Contrast
of a Graphic WD 153
To Change the Border Color on a Graphic WD 154
To Move a Graphic WD 155
To Use Paste Options WD 156
To Flip a Graphic WD 157
To Insert a Symbol from the Symbol Dialog Box WD 158 To Insert a Symbol from the Symbol Gallery WD 159
To Bottom Border a Paragraph WD 160
To Clear Formatting WD 161
AutoFormat as You Type WD 162
To Convert a Hyperlink to Regular Text WD 163
1439078459_Intro FM.indd v
1439078459_Intro FM.indd v 7/8/10 8:58:42 PM7/8/10 8:58:42 PM
Project — Research Paper Based on
APA Documentation Style APP 13
APA Documentation Style APP 13
To Modify the Normal Style for the Current
Document APP 16
To Change Line Spacing to Double APP 17
To Remove Space after a Paragraph APP 18 To Update a Style to Match a Selection APP 18 To Insert a Formatted Header and Switch to
the Header APP 19
To Enter Text in a Header Content Control APP 20
To Count Characters APP 20
To Insert a Page Number in a Header
Content Control APP 21
To Close the Header APP 22
To Page Break Manually APP 23
To Count Words APP 24
To Insert a Citation and Create Its Source APP 29
To Edit a Citation APP 31
To Apply the Normal Style APP 35
To Create the Bibliographical List APP 36 To Convert a Field to Regular Text APP 37
Appendix Summary APP 39
Learn It Online APP 39
Apply Your Knowledge APP 40
Extend Your Knowledge APP 41
Make It Right APP 43
In the Lab APP 44
Cases and Places APP 52
Index IND 1
Quick Reference Summary QR 1
1439078459_Intro FM.indd vi
1439078459_Intro FM.indd vi 7/8/10 8:58:42 PM7/8/10 8:58:42 PM
Preface
The Shelly Cashman Series® offers the fi nest textbooks in computer education. We are proud that since Mircosoft Offi ce 4.3, our series of Microsoft Offi ce textbooks have been the most widely used books in education. With each new edition of our Offi ce books, we make signifi cant improvements based on the software and comments made by instructors and students. For this Microsoft Word 2010 text, the Shelly Cashman Series development team carefully reviewed our pedagogy and analyzed its effectiveness in teaching today’s Offi ce student. Students today read less, but need to retain more. They need not only to be able to perform skills, but to retain those skills and know how to apply them to dif-ferent settings. Today’s students need to be continually engaged and challenged to retain what they’re learning.
With this Microsoft Word 2010 text, we continue our commitment to focusing on the user and how they learn best.
Microsoft Word 2010: Introductory is intended for a fi rst course on Word 2010. No experience with a computer is assumed, and no mathematics beyond the high school freshman level is required. The objectives of this book are:
To offer an introduction to Microsoft Word 2010
•
To expose students to practical examples of the computer as a useful tool
•
To acquaint students with the proper procedures to create documents suitable for coursework,
•
professional purposes, and personal use
To help students discover the underlying functionality of Word 2010 so they can become more
•
productive
To develop an exercise-oriented approach that allows learning by doing
•
Objectives of
This Textbook
1439078459_Intro FM.indd vii
1439078459_Intro FM.indd vii 7/8/10 8:58:44 PM7/8/10 8:58:44 PM
The Shelly Cashman Approach
A Proven Pedagogy with an Emphasis on Project Planning
Each chapter presents a practical problem to be solved, within a project planning framework. The project orientation is strengthened by the use of Plan Ahead boxes, which encourage critical thinking about how to proceed at various points in the project. Step-by-step instructions with supporting screens guide students through the steps. Instructional steps are supported by the Q&A, Experimental Step, and BTW features.
A Visually Engaging Book that Maintains Student Interest
The step-by-step tasks, with supporting fi gures, provide a rich visual experience for the student. Call-outs on the screens that present both explanatory and navigational information provide students with information they need when they need to know it.
Supporting Reference Materials (Appendices, Quick Reference)
The appendices provide additional information about the Application at hand and include such topics and project planning guidelines and certifi cation. With the Quick Reference, students can quickly look up information about a single task, such as keyboard shortcuts, and fi nd page references of where in the book the task is illustrated.
Microsoft Word 2010: Introductory offers a number of new features and approaches, which improve student understanding, retention, transference, and skill in using Word 2010. The following enhancements will enrich the learning experience:
Offi ce 2010 and Windows 7: Essential Concepts and Skills chapter presents basic Offi ce 2010
•
and Windows 7 skills.
Streamlined fi rst chapter allow the ability to cover more advanced skills earlier.
•
Chapter topic redistribution offers concise chapters that ensure complete skill coverage.
•
New pedagogical elements enrich material creating an accessible and user-friendly approach.
•
Break Points, a new boxed element, identify logical stopping points and give students instructions
•
regarding what they should do before taking a break.
Within step instructions, Tab | Group Identifi ers, such as (Home tab | Bold button), help students
•
more easily locate elements in the groups and on the tabs on the Ribbon.
Modifi ed step-by-step instructions tell the student what to do and provide the generic reason
•
why they are completing a specifi c task, which helps students easily transfer given skills to different settings.
New to
This Edition
1439078459_Intro FM.indd viii
1439078459_Intro FM.indd viii 7/8/10 8:58:47 PM7/8/10 8:58:47 PM
Integration of the World Wide Web
The World Wide Web is integrated into the Word 2010 learning experience by (1) BTW annotations; (2) BTW, Q&A, and Quick Reference Summary Web pages; and (3) the Learn It Online section for each chapter.
End-of-Chapter Student Activities
Extensive end-of-chapter activities provide a variety of reinforcement opportunities for students where they can apply and expand their skills.
Instructor Resources
The Instructor Resources include both teaching and testing aids and can be accessed via CD-ROM or at www.cengage.com/login.
Instructor’s Manual Includes lecture notes summarizing the chapter sections, fi gures and
boxed elements found in every chapter, teacher tips, classroom activities, lab activities, and quick quizzes in Microsoft Word fi les.
Syllabus Easily customizable sample syllabi that cover policies, assignments, exams,
and other course information.
Figure Files Illustrations for every fi gure in the textbook in electronic form.
PowerPoint Presentations A multimedia lecture presentation system that provides slides for
each chapter. Presentations are based on chapter objectives.
Solutions To Exercises Includes solutions for all end-of-chapter and chapter reinforcement
exercises.
Test Bank & Test Engine Test Banks include 112 questions for every chapter, featuring
objective-based and critical thinking question types, and including page number references and fi gure references, when appropriate. Also included is the test engine, ExamView, the ultimate tool for your objective-based testing needs.
Data Files for Students Includes all the fi les that are required by students to complete the
exercises.
Additional Activities for Students Consists of Chapter Reinforcement Exercises, which are
true/false, multiple-choice, and short answer questions that help students gain confi dence in the material learned.
SAM: Skills Assessment Manager
SAM 2010 is designed to help bring students from the classroom to the real world. It allows students to train on and test important computer skills in an active, hands-on environment.
SAM’s easy-to-use system includes powerful interactive exams, training, and projects on the most commonly used Microsoft Offi ce applications. SAM simulates the Microsoft Offi ce 2010 application environment, allowing students to demonstrate their knowledge and think through the skills by performing real-world tasks such as bolding word text or setting up slide transitions. Add in live-in-the-application projects, and stu dents are on their way to truly learning and applying skills to business-centric documents.
Designed to be used with the Shelly Cashman Series, SAM includes handy page references so that students can print helpful study guides that match the Shelly Cashman textbooks used in class. For instructors, SAM also includes robust scheduling and
reporting features.
1439078459_Intro FM.indd ix
1439078459_Intro FM.indd ix 7/8/10 8:58:48 PM7/8/10 8:58:48 PM
Content for Online Learning
Course Technology has partnered with the leading distance learning solution providers and class-management platforms today. To access this material, instructors will visit our password-protected instructor resources available at www.cengage.com/coursetechnology. Instructor resources include the following: additional case projects, sample syllabi, PowerPoint presentations per chapter, and more. For additional information or for an instructor user name and password, please contact your sales representative. For students to access this material, they must have purchased a WebTutor PIN-code specifi c to this title and your campus platform. The resources for students may include (based on instruc tor preferences), but are not limited to: topic review, review questions, and practice tests.
CourseNotes
Course Technology’s CourseNotes are six-panel quick reference cards that reinforce the most important and widely used features of a software application in a visual and user-friendly format. CourseNotes serve as a great reference tool during and after the student completes the
course. CourseNotes are available for software applications such as Microsoft Offi ce 2010, Word 2010, Excel 2010, Access 2010, PowerPoint 2010, and Windows 7. Topic-based CourseNotes are available for Best Practices in Social Networking, Hot Topics in Technology, and Web 2.0. Visit www.cengage.com/ct/ coursenotes to learn more!
A Guided Tour
Add excitement and interactivity to your classroom with “A Guided Tour” product line. Play one of the brief mini-movies to spice up your lecture and spark classroom discussion. Or, assign a movie for homework and ask students to complete the correlated assignment that accompanies each topic. “A Guided Tour” product line takes the prep work out of pro-viding your students with information about new technologies and applications and helps keep students engaged with content relevant to their lives; all in under an hour!
1439078459_Intro FM.indd x
1439078459_Intro FM.indd x 7/8/10 8:58:49 PM7/8/10 8:58:49 PM
About Our Covers
The Shelly Cashman Series is continually updating our approach and content to refl ect the way
today’s students learn and experience new technology. This focus on student success is refl ected
on our covers, which feature real students from Westfi eld State College using the Shelly Cashman
Series in their courses, and refl ect the varied ages and backgrounds of the students learning with
our books. When you use the Shelly Cashman Series, you can be assured that you are learning
computer skills using the most effective courseware available.
1439078459_Intro FM.indd xi
1439078459_Intro FM.indd xi 7/8/10 8:58:56 PM7/8/10 8:58:56 PM
WD 26 Word Chapter 1 Creating, Formatting, and Editing a Word Document with Pictures
To Use the Mini Toolbar to Format Text
Recall from the Offi ce 2010 and Windows 7 chapter at the beginning of this book that the Mini toolbar, which automatically appears based on certain tasks you perform, contains commands related to changing the appearance of text in a document. All commands on the Mini toolbar also exist on the Ribbon.
When the Mini toolbar appears, it initially is transparent. If you do not use the transparent Mini toolbar, it disappears from the screen. The following steps use the Mini toolbar to change the color and font size of text in the signature line of the fl yer.
1
2
3
4
5
Move the mouse pointer to the left
•
of the line to be selected (in this case, the signature line) until the mouse pointer changes to a right-pointing block arrow and then click the mouse to select the line (Figure 1–35).
Move the mouse pointer into the
•
transparent Mini toolbar, so that it changes to a bright toolbar. Click the Font Size box arrow on
•
the Mini toolbar to display the Font Size gallery and then point to 28 in the Font Size gallery to display a live preview of the selected font size (Figure 1– 36).
Click 28 in the Font Size gallery to
•
increase the font size of the selected text.
With the text still selected and the
•
Mini toolbar still displayed, click the Font Color button arrow on the Mini toolbar to display the Font Color gallery and then point to Purple, Accent 4, Darker 50% (eighth color in the sixth row) to display a live preview of the selected font color (Figure 1– 37).
Click Purple, Accent 4, Darker 50% to change the color of the text.
•
Click anywhere in the document window to remove the selection from the text.
•
Figure 1– 35
Figure 1– 36
Figure 1– 37
selected text shows live preview of font size to which you are pointing in gallery
bright Mini toolbar
bright Mini toolbar
selected text shows live preview of font color to which you are pointing in gallery
selected
font size Font Size
box arrow
selected color
Font Color button arrow
Fi 1 35
line selected mouse pointer is right-pointing block arrow transparent Mini toolbar
1439078459_CH01.indd 26 7/8/10 5:01:30 PM
ct ng an bb no han g n b o n u
WD 4 Word Chapter 1 Creating, Formatting, and Editing a Word Document with Pictures
General Project Guidelines
When creating a Word document, the actions you perform and decisions you make will affect the appearance and characteristics of the fi nished document. As you create a fl yer, such as the project shown in Figure 1–1, you should follow these general guidelines:
1. Choose the words for the text. Follow the less is more principle. The less text, the more likely the fl yer will be read. Use as few words as possible to make a point. 2. Identify how to format various elements of the text. The overall appearance of a
document signifi cantly affects its ability to communicate clearly. Examples of how you can modify the appearance, or format, of text include changing its shape, size, color, and position on the page.
3. Find the appropriate graphical image(s). An eye-catching graphical image should convey the fl yer’s overall message. It could show a product, service, result, or benefi t, or visually convey a message that is not expressed easily with words.
4. Establish where to position and how to format the graphical image(s). The position and format of the graphical image(s) should grab the attention of passersby and draw them into reading the fl yer.
5. Determine whether the page needs enhancements such as a border or spacing adjustments. A graphical, color-coordinated page border can further draw attention to a fl yer and nicely frame its contents. Increasing or decreasing spacing between elements on a fl yer can improve its readability and overall appearance.
6. Correct errors and revise the document as necessary. Post the fl yer on a wall and make sure all text and images are legible from a distance. Ask someone else to read the fl yer and give you suggestions for improvements.
7. Determine the best method for distributing the document. Documents can be distributed on paper or electronically. A fl yer should be printed on paper so that it can be posted. When necessary, more specifi c details concerning the above guidelines are presented at appropriate points in the chapter. The chapter also will identify the actions performed and decisions made regarding these guidelines during the creation of the fl yer shown in Figure 1–1.
Plan Ahead
Overview
As you read this chapter, you will learn how to create the fl yer shown in Figure 1–1 on the previous page by performing these general tasks:
Enter text in the document. •
Format the text in the document. •
Insert the pictures in the document. •
Format the pictures in the document. •
Enhance the page with a border and additional spacing. •
Correct errors and revise the document. •
Print the document. •
To Start Word
If you are using a computer to step through the project in this chapter and you want your screens to match the fi gures in this book, you should change your screen’s resolution to 1024 × 768. For information about how to change a computer’s resolution, refer to the Offi ce 2010 and Windows 7 chapter at the beginning of this book.
For an introduction to Windows 7 and instruction about how to perform basic Windows 7 tasks, read the Offi ce 2010 and Windows 7 chapter at the beginning of this book, where you can learn how to resize windows, change screen resolution, create folders, move and rename fi les, use Windows Help, and much more.
1439078459_CH01.indd 4 7/8/10 5:00:26 PM
Plan Ahead boxes prepare students to create successful projects by encouraging them to think strategically about what they are trying to accomplish before they begin working.
Step-by-step instructions now provide a context beyond the point-and-click. Each step provides information on why students are performing each task, or what will occur as a result.
Explanatory callouts summarize what is happening on screen.
Navigational callouts in red show students where to click.
The Shelly Cashman Series Pedagogy: Project-Based — Step-by-Step — Variety of Assessments
1439078459_Intro FM.indd xii
1439078459_Intro FM.indd xii 7/8/10 8:59:12 PM7/8/10 8:59:12 PM
[image:14.607.47.550.103.757.2]W
or
d Chapter 3
To Add Text to a Shape
The next step is to add the organization name to the shape. The following steps add text to a shape.
With the shape still selected,
•
click the More button (shown in Figure 3– 6) in the Shape Styles gallery (Drawing Tools Format tab | Shape Styles group) to expand the gallery.
What if my shape is no longer selected?
Click the shape to select it.
Point to Intense Effect - Brown,
•
Accent 4 in the Shape Styles gallery to display a live preview of that style applied to the shape in the document (Figure 3– 7).
IExperiment
Point to various styles in the Shape
•
Styles gallery and watch the style of the shape change in the document. Click Intense Effect - Brown, Accent
•
4 in the Shape Styles gallery to apply the selected style to the shape.
1
2
Figure 3 – 7
expanded gallery
style format changes to Intense Effect - Brown, Accent 4, showing live preview of style to which you are pointing in expanded gallery
mouse pointer on Intense Effect - Brown, Accent 4 style
Q&A
1. Click Format Shape Dialog Box Launcher (Drawing Tools Format tab | Shape Styles group), click Picture Color in left pane
(Format Shape dialog box), select desired colors, click Close button 2. Right-click shape, click Format Shape on
shortcut menu, click Picture Color in left pane (Format Shape dialog box), select desired colors, click Close button Other Ways
Right-click the shape to display a
•
shortcut menu and the Mini toolbar (Figure 3– 8).
1
Figure 3 – 8
Mini toolbar shortcut menu Add Text command mouse pointer
1439078459_CH03_REV2.indd 145 6/12/10 2:02:59 PM
T T To To To To
To AddAddAddAddAddAddAdd TeTeTeTeTeTTxtxtxtxtxt tttoto tototott a Sa Sa Sa Sa SSShaphaphaphhaphaph peeeee
The next step is to add the organization
Right-click the shape to display a •
shortcut menu and the Mini toolbar (Figure 3– 8).
1
WD 30 Word Chapter 1 Creating, Formatting, and Editing a Word Document with Pictures Selecting Text
In many of the previous steps, you have selected text. Table 1–3 summarizes the techniques used to select various items.
Table 1– 3 Techniques for Selecting Text
Item to Select Mouse Keyboard (where applicable) Block of text Click at beginning of selection, scroll to end of selection,
position mouse pointer at end of selection, hold down SHIFT key and then click; or drag through the text.
Character(s) Drag through character(s). SHIFT+RIGHT ARROW or SHIFT+LEFT ARROW Document Move mouse to left of text until mouse pointer changes to
a right-pointing block arrow and then triple-click.
CTRL+A
Graphic Click the graphic.
Line Move mouse to left of line until mouse pointer changes to a right-pointing block arrow and then click.
HOME, then SHIFT+END or END, then SHIFT+HOME
Lines Move mouse to left of fi rst line until mouse pointer changes to a right-pointing block arrow and then drag up or down.
HOME, then SHIFT+DOWN ARROW or END, then SHIFT+UP AROW
Paragraph Triple-click paragraph; or move mouse to left of paragraph until mouse pointer changes to a right-pointing block arrow and then double-click.
CTRL+SHIFT+DOWN ARROW or CTRL+SHIFT+UP ARROW
Paragraphs Move mouse to left of paragraph until mouse pointer changes to a right-pointing block arrow, double-click, and then drag up or down.
CTRL+SHIFT+DOWN ARROW or CTRL+SHIFT+UP ARROW repeatedly
Sentence Press and hold down CTRL key and then click sentence.
Word Double-click the word. CTRL+SHIFT+RIGHT ARROW or CTRL+SHIFT+LEFT ARROW Words Drag through words. CTRL+SHIFT+RIGHT ARROW or CTRL+SHIFT+LEFT ARROW repeatedly
To Save an Existing Document with the Same File Name
You have made several modifi cations to the document since you last saved it. Thus, you should save it again. The following step saves the document again. For an example of the step listed below, refer to the Offi ce 2010 and Windows 7 chapter at the beginning of this book.
1 Click the Save button on the Quick Access Toolbar to overwrite the previously saved fi le.
Inserting and Formatting Pictures in a Word Document
With the text formatted in the fl yer, the next step is to insert digital pictures in the fl yer and format the pictures. Flyers usually contain graphical images, such as a picture, to attract the attention of passersby. In the following pages, you will perform these tasks:
1. Insert the fi rst digital picture into the fl yer and then reduce its size. 2. Insert the second digital picture into the fl yer and then reduce its size. 3. Change the look of the fi rst picture and then the second picture.
Break Point: If you wish to take a break, this is a good place to do so. You can quit Word now (refer to page WD 44 for instructions). To resume at a later time, start Word (refer to pages WD 4 and WD 5 for instructions), open the fi le called Found Dog Flyer (refer to page WD 45 for instructions), and continue following the steps from this location forward.
1439078459_CH01.indd 30 7/8/10 5:01:46 PM
provide additional information about what they are doing right where they need it.
Experiment Steps within our step-by-step instructions, encourage students to explore, experiment, and take advantage of the features of the Word 2010 user interface. These steps are not necessary to complete the projects, but are designed to increase the confi dence with the software and build problem-solving skills.
Break Points identify logical breaks in the chapter if students need to stop before completing the project.
1439078459_Intro FM.indd xiii
1439078459_Intro FM.indd xiii 7/8/10 8:59:18 PM7/8/10 8:59:18 PM
[image:15.607.34.569.68.733.2]Learn It Online Every chapter features a Learn It Online section that is comprised of six exercises. These exercises include True/False, Multiple Choice, Short Answer, Flash Cards, Practice Test, and Learning Games.
Apply Your Knowledge This exercise usually requires students to open and manipulate a fi le from the Data Files that parallels the activities learned in the chapter. To obtain a copy of the Data Files for Students, follow the instructions on the inside back cover of this text.
Creating, Formatting, and Editing a Word Document with Pictures Word Chapter 1 WD 53
W
or
d Chapter 1
To Quit Word
The project now is complete. Thus, the following steps quit Word. For an example of the step listed below, refer to the Offi ce 2010 and Windows 7 chapter at the beginning of this book.
If you have one Word document open, click the Close button on the right side of the title bar to close the document and quit Word; or if you have multiple Word documents open, click File on the Ribbon to open the Backstage view and then click Exit in the Backstage view to close all open documents and quit Word.
If a Microsoft Word dialog box appears, click the Save button to save any changes made to the document since the last save.
1
2
Chapter Summary
In this chapter, you have learned how to enter text in a document, format text, insert a picture, format a picture, add a page border, and print a document. The items listed below include all the new Word skills you have learned in this chapter.
1. Start Word (WD 4) 2. Type Text (WD 6)
3. Display Formatting Marks (WD 7) 4. Insert a Blank Line (WD 7) 5. Wordwrap Text as You Type (WD 8)
6. Check Spelling and Grammar as You Type (WD 9) 7. Save a Document (WD 12)
8. Center a Paragraph (WD 14) 9. Select a Line (WD 15)
10. Change the Font Size of Selected Text (WD 16) 11. Change the Font of Selected Text (WD 17) 12. Change the Case of Selected Text (WD 18) 13. Apply a Text Effect to Selected Text (WD 19) 14. Shade a Paragraph (WD 20)
15. Select Multiple Lines (WD 21) 16. Bullet a List of Paragraphs (WD 22) 17. Undo and Redo an Action (WD 23) 18. Italicize Text (WD 24) 19. Color Text (WD 25)
20. Use the Mini Toolbar to Format Text (WD 26) 21. Select a Group of Words (WD 27) 22. Underline Text (WD 27)
23. Bold Text (WD 28) 24. Change Theme Colors (WD 28)
25. Save an Existing Document with the Same File Name (WD 30)
26. Insert a Picture (WD 31) 27. Zoom the Document (WD 33) 28. Resize a Graphic (WD 34)
29. Resize a Graphic by Entering Exact Measurements (WD 36)
30. Apply a Picture Style (WD 37) 31. Apply Picture Effects (WD 38) 32. View One Page (WD 40) 33. Add a Page Border (WD 41)
34. Change Spacing before and after a Paragraph (WD 44)
35. Quit Word (WD 44)
36. Open a Document from Word (WD 45) 37. Insert Text in an Existing Document (WD 46) 38. Delete Text (WD 47)
39. Move Text (WD 47)
40. Change Document Properties (WD 49) 41. Print a Document (WD 51)
If you have a SAM 2010 user profi le, your instructor may have assigned an autogradable version of this assignment. If so, log into the SAM 2010 Web site at www.cengage.com/sam2010 to download the instruction and start fi les.
Printed Borders
If one or more of your borders do not print, click the Page Borders button (Page Layout tab | Page Background group), click the Options button (Borders and Shading dialog box), click the Measure from box arrow and click Text, change the four text boxes to 15 pt, and then click the OK button in each dialog box. Try printing the document again. If the borders still do not print, adjust the text boxes in the dialog box to a number smaller than 15 point.
BTW
Quick Reference
For a table that lists how to complete the tasks covered in this book using the mouse, Ribbon, shortcut menu, and keyboard, see the Quick Reference Summary at the back of this book, or visit the Word 2010 Quick Reference Web page (scsite.com/wd2010/qr).
BTW
1439078459_CH01.indd 53 7/8/10 5:02:39 PM
11. Change the Font of Selected Text (WD 17) 12. Change the Case of Selected Text (WD 18) 13. Apply a Text Effect to Selected Text (WD 1 14. Shade a Paragraph (WD 20)
15. Select Multiple Lines (WD 21) 16. Bullet a List of Paragraphs (WD 22) 17. Undo and Redo an Action (WD 23) 18. Italicize Text (WD 24) 19. Color Text (WD 25)
20. Use the Mini Toolbar to Format Text (WD 21. Select a Group of Words (WD 27) 22. Underline Text (WD 27)
If you have a SAM 2010 user pro version of this assignment. If so to download the instruction and WD 54 Word Chapter 1 Creating, Formatting, and Editing a Word Document with Pictures
STUDENT ASSIGNMENTS
Learn It Online
Test your knowledge of chapter content and key terms.
Instructions: To complete the Learn It Online exercises, start your browser, click the Address bar, and
then enter the Web address scsite.com/wd2010/learn. When the Word 2010 Learn It Online page is displayed, click the link for the exercise you want to complete and then read the instructions.
Chapter Reinforcement TF, MC, and SA
A series of true/false, multiple choice, and short answer questions that test your knowledge of the chapter content.
Flash Cards
An interactive learning environment where you identify chapter key terms associated with displayed defi nitions.
Practice Test
A series of multiple choice questions that test your knowledge of chapter content and key terms.
Who Wants To Be a Computer Genius?
An interactive game that challenges your knowledge of chapter content in the style of a television quiz show.
Wheel of Terms
An interactive game that challenges your knowledge of chapter key terms in the style of the television show Wheel of Fortune.
Crossword Puzzle Challenge
A crossword puzzle that challenges your knowledge of key terms presented in the chapter.
Apply Your Knowledge
Reinforce the skills and apply the concepts you learned in this chapter.
Modifying Text and Formatting a Document
Note: To complete this assignment, you will be required to use the Data Files for Students. See the
inside back cover of this book for instructions on downloading the Data Files for Students, or contact your instructor for information about accessing the required fi les.
Instructions: Start Word. Open the document, Apply 1-1 Buffalo Photo Shoot Flyer Unformatted, from
the Data Files for Students. The document you open is an unformatted fl yer. You are to modify text, format paragraphs and characters, and insert a picture in the fl yer.
Perform the following tasks:
1. Delete the word, single, in the sentence of body copy below the headline.
2. Insert the word, Creeks, between the words, Twin Buffalo, in the sentence of body copy below the headline.
3. At the end of the signature line, change the period to an exclamation point. 4. Center the headline and the signature line.
5. Change the theme colors to the Aspect color scheme.
6. Change the font and font size of the headline to 48-point Impact, or a similar font. Change the case of the headline text to all capital letters. Apply the text effect called Gradient Fill – Orange, Accent 1, Outline – White to the headline.
7. Change the font size of body copy between the headline and the signature line to 20 point. 8. Use the Mini toolbar to change the font size of the signature line to 26 point.
9. Select the words, hundreds of buffalo, in the paragraph below the headline and underline them.
1439078459_CH01.indd 54 7/8/10 5:02:40 PM
Chapter Summary A concluding paragraph, followed by a listing of the tasks completed within a chapter together with the pages on which the step-by-step, screen-by-screen explanations appear.
1439078459_Intro FM.indd xiv
1439078459_Intro FM.indd xiv 7/8/10 8:59:22 PM7/8/10 8:59:22 PM
STUDENT ASSIGNMENTS
Extend Your Knowledge
Extend the skills you learned in this chapter and experiment with new skills. You may need to use Help to complete the assignment.
Modifying Text and Picture Formats and Adding Page Borders
Note: To complete this assignment, you will be required to use the Data Files for Students. See the
inside back cover of this book for instructions on downloading the Data Files for Students, or contact your instructor for information about accessing the required fi les.
Instructions: Start Word. Open the document, Extend 1-1 TVC Cruises Flyer, from the Data Files for
Students. You will enhance the look of the fl yer shown in Figure 1–76. Hint: Remember, if you make a mistake while formatting the picture, you can reset it by clicking the Reset Picture button or Reset Picture button arrow (Picture Tools Format tab | Adjust group).
Perform the following tasks:
1. Use Help to learn about the following formats: remove bullets, grow font, shrink font, art page borders, decorative underline(s), picture bullets, picture border shading, shadow picture effects, and color saturation and tone.
2. Remove the bullet from the paragraph below the picture.
3. Select the text, 10 percent, and use the Grow Font button to increase its font size.
4. Add an art page border to the fl yer. If the border is not in color, add color to it.
5. Change the solid underline below the word, cruises, to a decorative underline. Change the color of the underline. 6. Change the style of the
bullets to picture bullet(s). 7. Change the color of the
picture border. Add a shadow picture effect to the picture.
8. Change the color saturation and color tone of the picture. 9. Change the document
properties, including keywords, as specifi ed by your instructor. Save the revised document with a new fi le name and then submit it in the format specifi ed by your instructor.
Figure 1– 76
change border color and add shadow effect; change color saturation and color tone
use Grow Font button to increase font size
remove bullet
change to picture bullets
change underline style and color add art page border
1439078459_CH01.indd 56 7/8/10 5:02:48 PM
Extend Your Knowledge
projects at the end of each chapter allow students to extend and expand on the skills learned within the chapter. Students use critical thinking to experiment with new skills to complete each project.
decorative underline Change decorative underline. Change
Creating, Formatting, and Editing a Word Document with Pictures Word Chapter 1 WD 57
STUDENT ASSIGNMENTS
W
or
d Chapter 1
Make It Right
Analyze a document and correct all errors and/or improve the design.
Correcting Spelling and Grammar Errors
Note: To complete this assignment, you will be required to use the Data Files for Students. See the
inside back cover of this book for instructions on downloading the Data Files for Students, or contact your instructor for information about accessing the required fi les.
Instructions: Start Word. Open the document, Make It Right 1-1 Karate Academy Flyer Unchecked,
from the Data Files for Students. The document is a fl yer that contains spelling and grammar errors, as shown in Figure 1–77. You are to correct each spelling (red wavy underline) and grammar error (green and blue wavy underlines) by right-clicking the fl agged text and then clicking the appropriate correc-tion on the shortcut menu.
If your screen does not display the wavy underlines, click File on the Ribbon and then click Options in the Backstage view. When the Word Options dialog box is displayed, click Proofi ng in the left pane, be sure the ‘Hide spelling errors in this document only’ and ‘Hide grammar errors in this document only’ check boxes do not contain check marks, and then click the OK button. If your screen still does not display the wavy underlines, redisplay the Word Options dialog box, click Proofi ng, and then click the Recheck Document button.
Change the document properties, including keywords, as specifi ed by your instructor. Save the revised document with the name, Make It Right 1-1 Karate Academy Flyer, and then submit it in the format specifi ed by your instructor.
Figure 1– 77
spelling and grammar errors fl agged in document with wavy underlines
shortcut menu appears when you right-click fl agged text
1439078459_CH01.indd 57 7/8/10 5:02:51 PM
Make It Right projects call on students to analyze a fi le, discover errors in it, and fi x them using the skills they learned in the chapter.
1439078459_Intro FM.indd xv
1439078459_Intro FM.indd xv 7/8/10 8:59:25 PM7/8/10 8:59:25 PM
WD 58 Word Chapter 1 Creating, Formatting, and Editing a Word Document with Pictures
STUDENT ASSIGNMENTS
In the Lab
Design and/or create a document using the guidelines, concepts, and skills presented in this chapter. Labs are listed in order of increasing diffi culty.
Lab 1: Creating a Flyer with a Picture
Problem: As a part-time employee in the Student Services Center at school, you have been asked to
prepare a fl yer that advertises study habits classes. First, you prepare the unformatted fl yer shown in Figure 1–78a, and then you format it so that it looks like Figure 1–78b. Hint: Remember, if you make a mistake while formatting the fl yer, you can click the Undo button on the Quick Access Toolbar to undo your last action.
Note: To complete this assignment, you will be required to use the Data Files for Students. See the
inside back cover of this book for instructions on downloading the Data Files for Students, or contact your instructor for information about accessing the required fi les.
Instructions: Perform the following tasks:
1. Start Word. Display formatting marks on the screen.
2. Type the fl yer text, unformatted, as shown in Figure 1–78a, inserting a blank line between the headline and the body copy. If Word fl ags any misspelled words as you type, check their spelling and correct them.
3. Save the document using the fi le name, Lab 1-1 Study Habits Flyer. 4. Center the headline and the signature line.
5. Change the theme colors to Concourse.
6. Change the font size of the headline to 36 point and the font to Ravie, or a similar font. Apply the text effect called Gradient Fill – Dark Red, Accent 6, Inner Shadow.
7. Change the font size of body copy between the headline and the signature line to 20 point. 8. Change the font size of the signature line to 22 point. Bold the text in the signature line.
Figure 1– 78 (a) Unformatted Flyer
Figure 1 78 (a) Unformatted Flyer
blank line
1439078459_CH01.indd 58 7/8/10 5:02:54 PM
ma maaa
Creating a Business Letter with a Letterhead and Table Word Chapter 3 WD 199
W
or
d Chapter 3
STUDENT ASSIGNMENTS
create a building block for Fair Grove Elementary School and insert the building block whenever you have to enter the school name. Resize table columns to fi t contents. Check the spelling of the letter. Change the document properties, as specifi ed by your instructor. Save the letter with Lab 3-3 Education Board Letter as the fi le name.
Cases and Places
Apply your creative thinking and problem solving skills to design and implement a solution.
Note: To complete these assignments, you may be required to use the Data Files for Students. See the
inside back cover of this book for instructions on downloading the Data Files for Students, or contact your instructor for information about accessing the required fi les.
1: Create a Letter to a Potential Employer
Academic
As a student about to graduate, you are actively seeking employment in your fi eld and have located an advertisement for a job in which you are interested. You decide to write a letter to the potential employer: Ms. Janice Tremont at Home Health Associates, 554 Mountain View Lane, Blue Dust, MO 64319.
The draft wording for the letter is as follows: I am responding to your advertisement for the nursing position in the Blue Dust Press. I have tailored my activities and education for a career in geriatric medicine. This month, I will graduate with concentrations in Geriatric Medicine (24 hours), Osteopathic Medicine (12 hours), and Holistic Nursing (9 hours). In addition to receiving my bachelor degree in nursing, I have enhanced my education by participating in the following activities: volunteered at Blue Dust’s free health care clinic; attended several continuing education and career-specifi c seminars, including An Aging Populace, Care of the Homebound, and Special Needs of the Elderly; completed one-semester internship at Blue Dust Community Hospital in spring semester of 2012; completed Certifi ed Nursing Assistant (CNA) program at Blue Dust Community College; and worked as nurse’s aide for two years during college. I look forward to an interview so that we can discuss the position you offer and my qualifi cations. With my background and education, I am confi dent that I will make a positive contribution to Home Health Associates.
The letter should contain a letterhead that uses a shape and clip art, a table (use a table to present the areas of concentration), and a bulleted list (use a bulleted list to present the activities). Insert nonbreaking spaces in the newspaper name. Use the concepts and techniques presented in this chapter to create and format a letter according to the modifi ed block style, creating appropriate paragraph breaks and rewording the draft as necessary. Use your personal information for contact information in the letter. Be sure to check the spelling and grammar of the fi nished letter. Submit your assignment in the format specifi ed by your instructor.
2: Create a Letter Requesting Donations
Personal
As an alumnus of your historic high school, you are concerned that the building is being considered for demolition. You decide to write a letter to another graduate: Mr. Jim Lemon, 87 Travis Parkway, Vigil, CT 06802.
The draft wording for the letter is as follows: As a member of the class of 1988, you, like many others, probably have many fond memories of our alma mater, Vigil East High School. I recently learned that the building is being considered for demolition because of its age and structural integrity.
Continued >
1439078459_CH03_REV2.indd 199 6/12/10 2:04:10 PM
Cases & Places exercises call on students to create open-ended projects that refl ect academic, personal, and business settings.
In the Lab Three all new in-depth assignments per chapter require students to utilize the chapter concepts and techniques to solve problems on a computer.
1439078459_Intro FM.indd xvi
1439078459_Intro FM.indd xvi 7/8/10 8:59:28 PM7/8/10 8:59:28 PM
Offi ce 2010 and
Windows 7: Essential
Concepts and Skills
Objectives
You will have mastered the material in this chapter when you can:
Perform basic mouse operations
•
Start Windows and log on to the
•
computer
Identify the objects on the
•
Windows 7 desktop
Identify the programs in and
•
versions of Microsoft Offi ce
Start a program
•
Identify the components of the
•
Microsoft Offi ce Ribbon
Create folders
•
Save fi les
•
Change screen resolution
•
Perform basic tasks in Microsoft
•
Offi ce programs
Manage fi les
•
Use Microsoft Offi ce Help and
•
Windows Help
1439078386_CH01.indd 1
1439078386_CH01.indd 1 7/1/10 7:35:29 PM7/1/10 7:35:29 PM
OFF 2
Offi ce 2010 and Windows 7:
Essential Concepts and Skills
Offi ce 2010 and Windows 7
This introductory chapter covers features and functions common to Offi ce 2010 programs, as well as the basics of Windows 7.
Overview
As you read this chapter, you will learn how to perform basic tasks in Windows and Offi ce programs by performing these general activities:
Start programs using Windows. •
Use features common across Offi ce programs. •
Organize fi les and folders. •
Change screen resolution. •
Quit Offi ce programs. •
Introduction to the Windows 7 Operating System
Windows 7 is the newest version of Microsoft Windows, which is the most popular
and widely used operating system. An operating system is a computer program (set of computer instructions) that coordinates all the activities of computer hardware such as memory, storage devices, and printers, and provides the capability for you to communicate with the computer.
The Windows 7 operating system simplifi es the process of working with documents and programs by organizing the manner in which you interact with the computer.
Windows 7 is used to run application software, which consists of programs designed to make users more productive and/or assist them with personal tasks, such as word processing.
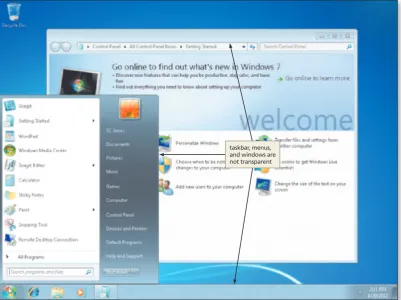
Windows 7 has two interface variations, Windows 7 Basic and Windows 7 Aero. Computers with up to 1 GB of RAM display the Windows 7 Basic interface (Figure 1a). Computers with more than 1 GB of RAM also can display the Windows Aero interface (Figure 1b), which provides an enhanced visual appearance. The Windows 7 Professional, Windows 7 Enterprise, Windows 7 Home Premium, and Windows 7 Ultimate editions have the capability to use Windows Aero.
Using a Mouse
Windows users work with a mouse that has at least two buttons. For a right-handed user, the left button usually is the primary mouse button, and the right mouse button is the secondary mouse button. Left-handed people, however, can reverse the function of these buttons.
1439078386_CH01.indd 2
1439078386_CH01.indd 2 7/1/10 7:35:33 PM7/1/10 7:35:33 PM
OFF 3
Figure 1 (a) Windows 7 Basic interface
Figure 1 (b) Windows 7 Aero interface
taskbar, menus, and windows are not transparent
taskbar and title bars are transparent
live preview
1439078386_CH01.indd 3
1439078386_CH01.indd 3 7/1/10 7:35:34 PM7/1/10 7:35:34 PM
[image:21.607.47.449.63.363.2]Scrolling
A scroll bar is a horizontal or vertical bar that appears when the contents of an area may not be visible completely on the screen (Figure 2). A scroll bar contains scroll arrows and a scroll box that enable you to view areas that currently cannot be seen. Clicking the up and down scroll arrows moves the screen content up or down one line. You also can click above or below the scroll box to move up or down a section, or drag the scroll box up or down to move up or down to move to a specifi c location.
Shortcut Keys
In many cases, you can use the keyboard instead of the mouse to accomplish a task. To perform tasks using the keyboard, you press one or more keyboard keys, sometimes identifi ed as
Table 1 Mouse Operations
Operation Mouse Action Example*
Point Move the mouse until the pointer on the desktop is positioned on the item of choice.
Position the pointer on the screen.
Click Press and release the primary mouse button, which usually is the left mouse button.
Select or deselect items on the screen or start a program or program feature.
Right-click Press and release the secondary mouse button, which usually is the right mouse button.
Display a shortcut menu.
Double-click Quickly press and release the left mouse button twice without moving the mouse.
Start a program or program feature.
Triple-click Quickly press and release the left mouse button three times without moving the mouse.
Select a paragraph.
Drag Point to an item, hold down the left mouse button, move the item to the desired location on the screen, and then release the left mouse button.
Move an object from one location to another or draw pictures.
Right-drag Point to an item, hold down the right mouse button, move the item to the desired location on the screen, and then release the right mouse button.
Display a shortcut menu after moving an object from one location to another.
Rotate wheel Roll the wheel forward or backward. Scroll vertically (up and down).
Free-spin wheel Whirl the wheel forward or backward so that it spins freely on its own. Scroll through many pages in seconds.
Press wheel Press the wheel button while moving the mouse. Scroll continuously.
Tilt wheel Press the wheel toward the right or left. Scroll horizontally (left and right).
Press thumb button
Press the button on the side of the mouse with your thumb. Move forward or backward through Web pages and/or control media, games, etc.
*Note: the examples presented in this column are discussed as they are demonstrated in this chapter.
Table 1 explains how to perform a variety of mouse operations. Some programs also use keys in combination with the mouse to perform certain actions. For example, when
you hold down the
ctrl
key while rolling the mouse wheel, text on the screen becomeslarger or smaller based on the direction you roll the wheel. The function of the mouse buttons and the wheel varies depending on the program.
Figure 2
mouse pointer
scroll box scroll
arrows
scroll bar
Minimize Wrist Injury Computer users frequently switch between the keyboard and the mouse during a word processing session; such switching strains the wrist. To help prevent wrist injury, minimize switching. For instance, if your fi ngers already are on the keyboard, use keyboard keys to scroll. If your hand already is on the mouse, use the mouse to scroll.
BTW
1439078386_CH01.indd 4
1439078386_CH01.indd 4 7/1/10 7:35:38 PM7/1/10 7:35:38 PM
Of
fice 2010 and Windows 7 Chapter
a shortcut key or keyboard shortcut. Some shortcut keys consist of a single key, such as
the
f
1 key. For example, to obtain help about Windows 7, you can press thef
1 key. Othershortcut keys consist of multiple keys, in which case a plus sign separates the key names,
such as
ctrl+esc
. This notation means to press and hold down the fi rst key listed, pressone or more additional keys, and then release all keys. For example, to display the Start
menu, press
ctrl+esc
, that is, hold down thectrl
key, press theesc
key, and thenrelease both keys.
Starting Windows 7
It is not unusual for multiple people to use the same computer in a work, educational, recreational, or home setting. Windows 7 enables each user to establish a
user account, which identifi es to Windows 7 the resources, such as programs and storage
locations, a user can access when working with a computer.
Each user account has a user name and may have a password and an icon, as well. A user name is a unique combination of letters or numbers that identifi es a specifi c user to Windows 7. A password is a private combination of letters, numbers, and special characters associated with the user name that allows access to a user’s account resources. A user icon is a picture associated with a user name.
When you turn on a computer, an introductory screen consisting of the Windows logo and copyright messages is displayed. The Windows logo is animated and glows as the Windows 7 operating system is loaded. After the Windows logo appears, depending on your computer’s settings, you may or may not be required to log on to the computer.
Logging on to a computer opens your user account and makes the computer available
for use. If you are required to log on to the computer, the Welcome screen is displayed, which shows the user names of users on the computer (Figure 3). Clicking the user name or picture begins the process of logging on to the computer.
Figure 3
Ease of access button
Microsoft Windows 7 logo
Shut down button
Shut down options button Welcome screen
SC Series icon
Note:To help you locate screen elements that are referenced in the step instructions, such as buttons and commands, this book uses red boxes to point to these screen elements.
1439078386_CH01.indd 5
1439078386_CH01.indd 5 7/1/10 7:35:40 PM7/1/10 7:35:40 PM
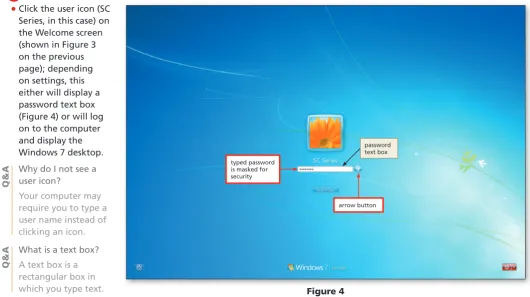
Click the user icon (SC
•
Series, in this case) on the Welcome screen (shown in Figure 3 on the previous page); depending on settings, this either will display a password text box (Figure 4) or will log on to the computer and display the Windows 7 desktop.
Why do I not see a user icon?
Your computer may require you to type a user name instead of clicking an icon.
What is a text box?
A text box is a rectangular box in which you type text.
Why does my screen not show a password text box?
Your account does not require a password.
1
At the bottom of the Welcome screen is the ‘Ease of access’ button, Windows 7 logo, a Shut down button, and a ‘Shut down options’ button. The following list identifi es the functions of the buttons and commands that typically appear on the Welcome screen:
Clicking the ‘Ease of access’ button displays the Ease of Access Center, which •
provides tools to optimize your computer to accommodate the needs of the mobility, hearing, and vision impaired users.
Clicking the Shut down button shuts down Windows 7 and the computer. •
Clicking the ‘Shut down options’ button, located to the right of the Shut down •
button, provides access to a menu containing commands that perform actions such as restarting the computer, putting the computer in a low-powered state, and shutting down the computer. The commands available on