555-230-700
Comcode 108383837
Issue 4
June 1999
Release 7
Every effort was made to ensure that the information in this book was complete and accurate at the time of printing. However, information is subject to change.
Your Responsibility for Your System’s Security
Toll fraud is the unauthorized use of your telecommunications system by an unauthorized party, for example, persons other than your com-pany’s employees, agents, subcontractors, or persons working on your company’s behalf. Note that there may be a risk of toll fraud associated with your telecommunications system and, if toll fraud occurs, it can result in substantial additional charges for your telecommunications services.
You and your system manager are responsible for the security of your system, such as programming and configuring your equipment to pre-vent unauthorized use. The system manager is also responsible for reading all installation, instruction, and system administration docu-ments provided with this product in order to fully understand the fea-tures that can introduce risk of toll fraud and the steps that can be taken to reduce that risk. Lucent Technologies does not warrant that this product is immune from or will prevent unauthorized use of com-mon-carrier telecommunication services or facilities accessed through or connected to it. Lucent Technologies will not be responsible for any charges that result from such unauthorized use.
Lucent Technologies Fraud Intervention
If you suspect that you are being victimized by toll fraud and you need technical support or assistance, call Technical Service Center Toll Fraud Intervention Hotline at 1 800 643-2353.
Federal Communications Commission Statement
Part 15: Class A Statement. This equipment has been tested and
found to comply with the limits for a Class A digital device, pursuant to Part 15 of the FCC Rules. These limits are designed to provide rea-sonable protection against harmful interference when the equipment is operated in a commercial environment. This equipment generates, uses, and can radiate radio-frequency energy and, if not installed and used in accordance with the instructions, may cause harmful interfer-ence to radio communications. Operation of this equipment in a resi-dential area is likely to cause harmful interference, in which case the user will be required to correct the interference at his own expense.
Part 68: Network Registration Number. This equipment is registered
with the FCC in accordance with Part 68 of the FCC Rules. It is identi-fied by FCC registration number AS593M-13283-MF-E. Refer to “Federal Communications Commission Statement” in “About This Book” for more information regarding Part 68.
Canadian Department of Communications (DOC) Interference Information
This digital apparatus does not exceed the Class A limits for radio noise emissions set out in the radio interference regulations of the Canadian Department of Communications.
Le Présent Appareil Nomérique n’émet pas de bruits radioélectriques dépassant les limites applicables aux appareils numériques de la class A préscrites dans le reglement sur le brouillage radioélectrique édicté par le ministére des Communications du Canada.
Trademarks
DEFINITY is a registered trademark of Lucent Technologies.
Fax 1 800 457-1764 International Fax 317 322-6699
Write: Lucent Technologies BCS Publications Center 2855 N. Franklin Road
Indianapolis, IN 46219
Order: Document No. 555-230-700 Comcode 108383837 Issue 4, June 1999
For additional documents, refer to the “Introduction.”
You can be placed on a standing order list for this and other documents you may need. Standing order will enable you to automatically receive updated versions of individual documents or document sets, billed to account information that you provide. For more information on stand-ing orders, or to be put on a list to receive future issues of this docu-ment, contact the Lucent Technologies Publications Center.
European Union Declaration of Conformity
The “CE” mark affixed to the DEFINITY® equipment described in this book indicates that the equipment conforms to the following Euro-pean Union (EU) Directives:
• Electromagnetic Compatibility (89/336/EEC) • Low Voltage (73/23/EEC)
• Telecommunications Terminal Equipment (TTE) i-CTR3 BRI and i-CTR4 PRI
For more information on standards compliance, contact your local dis-tributor.
Comments
To comment on this document, return the comment card at the front of the document.
Acknowledgment
Contents
Contents iii
1
Introduction 1■ Conventions Used in This Document 2
■ Security Measures 2
2
Understanding the Console Layout 5■ Physical Layout of Your Console 5
Outside-Lines Buttons Area 7
Call Appearance Buttons 8
Dialing Keypad 9
Features 11
The Display 12
Displaying in Normal Mode 14
Ringer-Volume Control Area 18
Selector Console 19
Tones Heard Through Handset or Headset 21
3
Operating the Console 23■ Activating the Console 24
■ Deactivating the Console 24
■ Transferring Calls to Internal Extensions 24
■ Transferring Calls to Outside Numbers 25
■ Placing Callers on Hold 26
■ Connecting Two or More Callers 26
■ Answering Emergency Calls 27
4
Using the Features 29■ Speeding Up the Console 29
Using Auto Start 29
Speed Dialing 30
Holding Calls Automatically 31
■ Handling Multiple-Party Calls 31
Connecting Multiple Callers 31
Locking Out the Console Operator 32
Recalling the Console Operator 32
■ Answering Calls for Another Party 34
Backing Up the Console Operator 35
Routing Calls Through the Console Operator 35
Covering Calls from the Console 35
Forwarding All Calls 36
Parking Calls 37
■ Paging for Called Parties 38
Parking Calls 38
Chime Paging 39
Paging with Voice Paging 41
Paging with Deluxe Voice Paging 42
■ Assisting Callers with Special Tools 43
Using Call Waiting 43
Split-Swap 44
Interrupting a Call 45
Overriding Diversion Features 46
Emergency Notification to Digital Telephones 46 Providing Emergency Notification to the Operator 48 Providing Emergency Access to the Operator 48
Placing a Series of Calls 49
■ Managing Outside Lines 50
Controlling Access to Outside Lines 50
Displaying Outside Line Information 51
Choosing Outside Lines 52
■ Using Features for Internal Use 52
Restricting Calls 52
Activating Don’t Split 54
Testing Phone System Components 55
Accessing Individual Console Operators 55
Using the Internal Directory 56
Assigning Main Console Operators 57
Leaving Messages 57
Retrieving Messages 58
Using Night Service 59
Using Visually Impaired Attendant Service 63
5
Centralized Attendant Service 65■ Identifying Differences
in a CAS Environment 65
Using CAS-Associated Tones 66
Using a CAS Display 66
Using CAS Operating Procedures 67
Transferring CAS Calls 67
Placing Calls on Remote Hold 68
Using CAS Backup Service 68
Using CAS Night Service Operations 68
6
Routine Maintenance 71■ Testing the Console 71
■ Cleaning Your Console 72
■ Commercial Power Failure 72
GL
Glossary and Abbreviations 731
Introduction
If you are a console operator, this book is for you! It is designed to show you the physical layout of your computer, how to perform standard and specialty
functions, and how to maintain and clean your console. It also provides
information specific to operating your console in a Centralized Attendant Service (CAS) environment.
NOTE:
This guide does not cover operations associated with Hospitality Services and Automatic Call Distribution (ACD). Information on these groups of features can be found in the following documents:
■ DEFINITY Enterprise Communications Server and GuestWorks
Release 7 — Hospitality Operations, Issue 5, 555-230-723
■ DEFINITY Enterprise Communications Server Generic 1, Generic
3, and System 75 — Automatic Call Distribution (ACD) Agent Instructions, Issue 5, 555-230-722
■ DEFINITY Enterprise Communications Server Generic 1, Generic
3, and System 75 — Automatic Call Distribution (ACD) Supervisor Instructions, Issue 4, 555-230-724
■ DEFINITY Enterprise Communications Server Release 7 —
Console Operations Quick Reference, Issue 3, 555-230-890
The rest of this book includes:
■ Chapter 2, ‘‘Understanding the Console Layout’’ describes and illustrates
the basic and enhanced versions of the two console models. It also
■ Chapter 3, ‘‘Operating the Console’’ contains step-by-step instructions for
placing calls, transferring calls, placing callers on hold, placing conference calls, and handling emergency calls.
■ Chapter 4, ‘‘Using the Features’’ describes of features associated with the
console and provides step-by-step instructions where applicable.
■ Chapter 5, ‘‘Centralized Attendant Service’’ describes CAS operations for
handling CAS calls, CAS night service, and CAS backup procedures.
■ Chapter 6, ‘‘Routine Maintenance’’ describes routine procedure for testing
the console, cleaning the console; also contains information for handling the console after a commercial power failure.
■ Glossary and Abbreviations provides an alphabetical listing and brief
definitions of words and terms used with the attendant console and communications systems.
■ Index provides an alphabetical listing of the information within this guide.
For ease of use, all key words within a title or term are listed.
Conventions Used in This Document
■ Console buttons are shown as: CANCEL
■ Console lamps are shown as: Attd
■ Alphanumeric displays appear as:
Security Measures
For detailed information on securing your systems from unauthorized use please refer to BCS Products Security Handbook. This document addresses security issues related to consoles including:
■ Procedures for console operators when they receive hangup or silence calls
■ Physical security
■ Class of service
■ Facility restriction levels and alternate facility restriction levels
■ Console operator-controlled phones
■ Rerouting calls to console operators
■ Changing barrier codes
■ Sending calls to console operators
■ Console operator-controlled remote access
2
Understanding the Console Layout
Your console is a powerful communications tool. With it, you function as a communications hub by managing calls and performing a variety of special functions. The goal of this chapter is to familiarize you with the console layout.
At the end of this chapter, you will be able to describe the layout of your console.
Physical Layout of Your Console
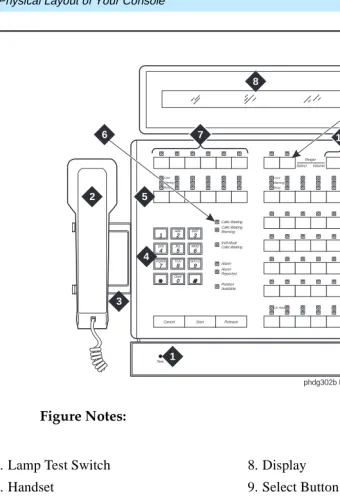
At first glance, your console may look like an oversized phone with a few too many buttons and lamps (lights). While your console can function like a phone, it also manages several additional functions. In fact, your console, with its many buttons and lamps, has functional groups designed to manage outside lines, incoming calls, and special features.
Figure Notes:
Figure 1. 302A/B Console
1. Lamp Test Switch 8. Display
2. Handset 9. Select Button
3. Handset Cradle 10. Volume Control Buttons
4. Call Processing Area 11. Outside-line Buttons
5. Outside-line Buttons 12. Feature Buttons
6. Warning Lamps and Call Waiting Lamps
13. Call Appearance Buttons
7. Display Buttons
Test 1
phdg302b KLC 031899
Figure Notes:
Figure 2. 302C Console
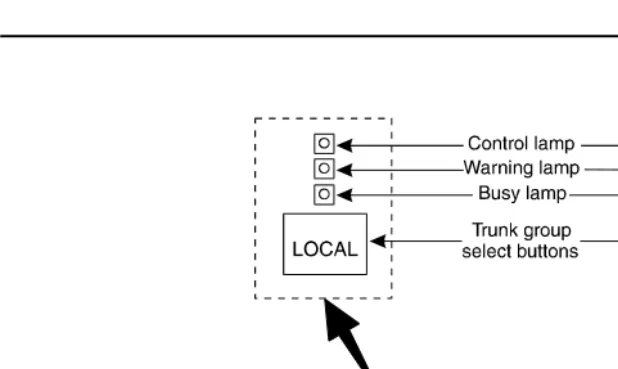
Outside-Lines Buttons Area
The outside-lines buttons area allows you to choose an outside line or can be dedicated for paging system users. The outside-lines buttons area includes:
■ Labeled buttons representing outside lines
■ A Busy lamp that lights when all outside lines are busy
1. Handset 7. Display
2. Handset Cradle 8. Select Button
3. Call Processing Area 9. Volume Control Buttons
4. Warning Lamps and Call Waiting Lamps
10. Outside-line Buttons
5. Outside-line Buttons 11. Feature Buttons
6. Display Buttons 12. Call Appearance Buttons
a b c d e f
Position Available
Forced
Release Night BusyPos
Calls Waiting Calls Waiting Warning Individual Calls Waiting Alarm Alarm Reported Control Warning Busy Control Warning Busy Split Hold Date Time Ringer Select Volume
Cancel Start Release
3 DEF 1 4 GHI 7 PRQS 6 MNO 9 WXYZ 2 ABC 5 JKL 8 TUV 0
phdg302c KLC 031199
■ A Warning lamp that lights when a predetermined number of outside lines
are busy
■ A Control lamp indicating that an outside line is in use
Figure 3. Sample Outside-Lines Buttons Area
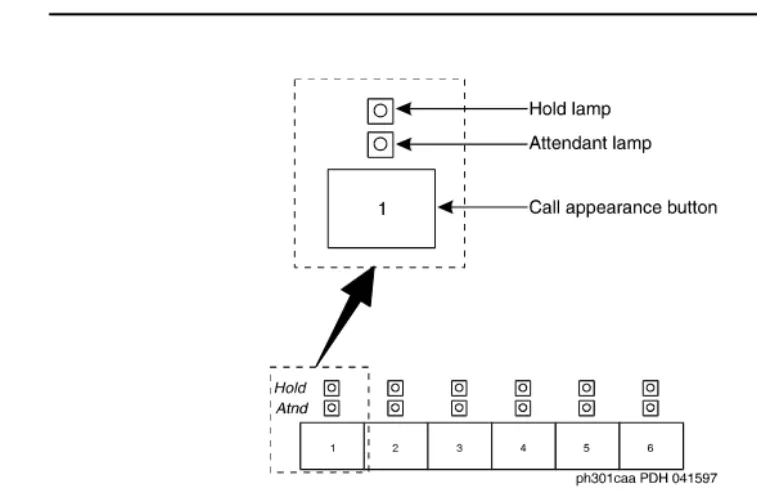
Call Appearance Buttons
The call appearance buttons allow you to answer calls, place calls, or place calls on hold. It includes:
■ A call appearance button for answering or placing calls
■ An Atnd lamp that lights when you answer or place a call. This lamp
flashes when an incoming call comes to the console, or when a transferred call returns to the console.
■ A Hold lamp that lights when you place a call on hold. This lamp flashes
Figure 4. Call Appearance Buttons and Lamps
Dialing Keypad
The dialing keypad has several buttons and lamps used for processing calls or notifying you of calls that are waiting to be answered, system-detected alarms, and lines that are available for placing calls.
The call-appearance buttons allow you to:
■ Cancel a call
The CANCEL button allows you to abort a call procedure without
disconnecting parties who are on the line.
■ Start a call
The START button allows you to initiate a call or to transfer a call.
NOTE:
If you have Autostart, you can begin a call without pressing any button.
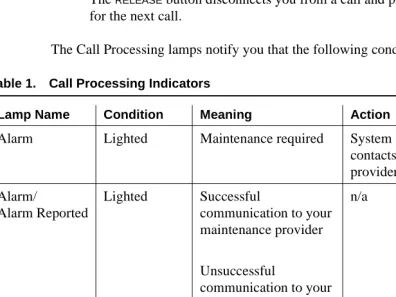
■ End a call
The RELEASE button disconnects you from a call and prepares the console
for the next call.
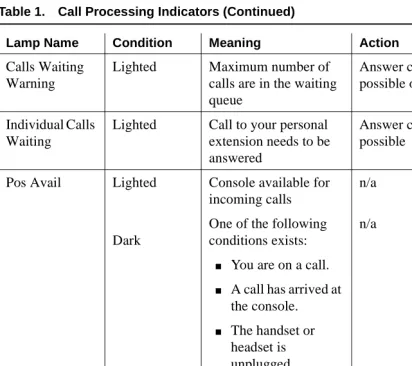
The Call Processing lamps notify you that the following conditions exist:
Table 1. Call Processing Indicators
Lamp Name Condition Meaning Action
Alarm Lighted Maintenance required System automatically contacts your maintenance provider
Alarm/
Alarm Reported
Lighted
Flashing
Dark
Successful
communication to your maintenance provider
Unsuccessful
communication to your maintenance provider
Maintenance problem resolved
n/a
Contact your system manager
n/a
Calls Waiting Lighted Call is waiting to be answered
Answer call at your earliest convenience
Features
The features area of your console allows you to perform standard and specialty operations. Your console is configured with features purchased by your company. Your system manager can provide a list of features available to you. For specific feature information, refer to Chapter 4, ‘‘Using the Features’’.
Calls Waiting Warning
Lighted Maximum number of calls are in the waiting queue
Answer calls as soon as possible or get assistance
Individual Calls Waiting
Lighted Call to your personal extension needs to be answered
Answer call as soon as possible
Pos Avail Lighted
Dark
Console available for incoming calls
One of the following conditions exists:
■ You are on a call.
■ A call has arrived at
the console.
■ The handset or
headset is unplugged.
■ You pressed the
POS BUSY button.
■ You placed the
system in
night-service mode. n/a
n/a
Table 1. Call Processing Indicators (Continued)
Lamp Name Condition Meaning Action
Figure 6. Feature Button Area
The Display
Figure 7. Display
These display mode buttons are as follows:
NOTE:
Your system manager may change the function of each button.
■ NORMAL MODE (comes with every console)
This button displays call-related information for active, incoming calls and console-originated calls. For more information on information that displays in normal mode, refer to Displaying in Normal Mode later in this chapter.
■ INSPECT MODE
This button displays call-related information for held calls when you are on another call.
■ DATE TIME
This button displays the current time of day and date for five seconds.
■ TIMER (Elapsed Time)
This button displays elapsed time in hours, minutes, and seconds. Timing begins when you press the TIMER button and stops when you press the button again. The elapsed time information disappears when you press the button a third time.
■ COVER MSG RT (Coverage Message Retrieval)
■ NEXT MSG
This button displays the next stored LWC message. If you are in Cover Msg Rt mode, the display shows END OF MESSAGES or NEXT TO REPEAT. If you are in Integrated Directory mode, it displays the next caller’s name.
■ DELETE MSG (Message)
This button deletes the displayed message.
■ INTGRTD DIRECTORY (Integrated Directory)
This button displays users’ names and extensions from the system directory.
■ MAKE CALL
This button automatically returns calls from messages left in LWC. It also automatically calls currently-displayed Integrated Directory listings.
■ STORED NUMBER
This button displays the code required for accessing an outside line (usually a 9), or the extension number of the facility that the BUSY button
monitors. To access this information:
1. Press the STORED NUMBER button
2. Press the BUSY button.
Displaying in Normal Mode
Call-related information includes:
■ Incoming-call button associated with the call
One of six buttons, labeled a through f, lights when a call comes to your console. In the following sample, the lamp that lights is a.
■ Caller identification
For internal calls, the display shows the caller’s name or the identification assigned to the phone in use, and the caller’s extension. In the following sample, the caller is Tom Brown who is at extension 3062.
For outside calls, the display shows the kind of outside line used and the outside line’s assigned access code. In the following sample, the access code for the local outside line is 8.
■ Called-party identification
a= TOM BROWN 3062
a= TOM BROWN 3062
For incoming calls, the display shows the called party’s name and extension. In the following sample, the called party is Liz Via who is at extension 4328.
For outside calls, the display shows the kind of outside line used and the outside line’s access code. In the following sample, the access code the line used is a WATS line, with access code 101.
■ Calling party identification for outbound calls
For an outgoing call, the display shows the called party’s name and extension. In the following sample, the called party is Jeff Morrow who is at extension 4032.
If only name information is available, the following displays.
If only number information is available, the following displays.
If neither the name or the number is available, the following displays.
or
If the call gets redirected, the following displays.
System user’s calling privileges e= OUTSIDE CALL to LIZ VIA at EXT 4328
b= WATS 101
a= JEFF MORROW 4032
a= JEFF MORROW 4032
a= 3304 3304
a= 3304
a = OUTSIDE LINE NAME TRUNK ID
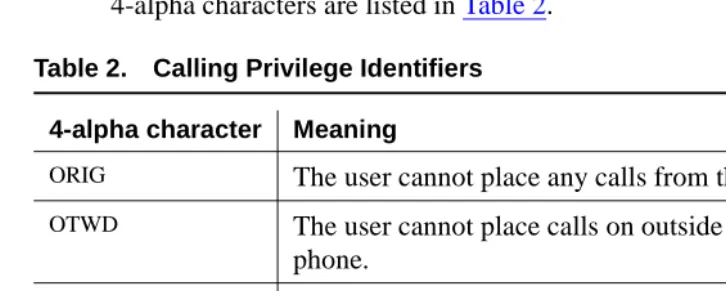
Your system manager assigns calling privileges for all system users. A 2-digit number assigned by your system manager, followed by a hyphen and 4-alpha characters that identify the user’s calling privileges. The 4-alpha characters are listed in Table 2.
■ Call purpose
Call-purpose information identifies features that are in use. Table 3 defines call-purpose identifiers.
Table 2. Calling Privilege Identifiers
4-alpha character Meaning
ORIG The user cannot place any calls from their phone.
OTWD The user cannot place calls on outside lines from their
phone.
TOLL The user cannot place long distance calls from their
phone.
NONE The user has no calling restrictions.
Table 3. Call Purpose Identifiers
Identifier Description
B or b Displays when called parties do one of the following:
■ Do not answer
■ Send their calls to coverage
■ Are active on a call that uses temporary bridged appearance
co An internal user who doesn’t have calling privileges for outside lines attempts to make an outgoing call.
cs An internal user who doesn’t have internal calling privileges attempts to make a call to another internal phone.
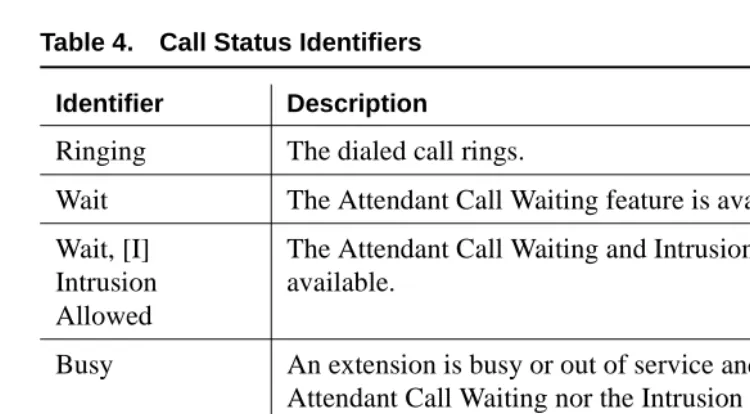
■ Call status
Call-status displays the phone call’s current status. Table 4 identifies call status indicators and describes when they occur.
d Displays when called parties do one of the following:
■ Do not answer
■ Send their calls to coverage
■ Are unavailable and have a temporary bridged appearance.
f System users forward their calls to you.
ic The system redirects calls to you due to a problem with the system or because your system manager has programmed calls made to specified extensions to come to you.
ld Incoming calls that are listed in the phone book and are placed directly to a system user’s extension.
n Night service is on and the call goes to the night service station.
na Consoles are in night service mode.
rc A held call returns to the console.
rt An unanswered, transferred call returns to the console.
sc A caller places repeated calls on the same line without disconnecting.
s Displays when a called system user temporarily sends all their calls to coverage.
tc A caller attempts to make an outgoing call on an outside line that you control. The call redirects to you.
Table 3. Call Purpose Identifiers (Continued)
NOTE:
If your system has Integrated Services Digital Network (ISDN) — Primary Rate Interface (PRI), refer to Chapter 4, ‘‘Using the Features’’, for display information associated with ISDN-PRI.
Ringer-Volume Control Area
The ringer-volume control area provides volume control for:
■ Incoming calls
■ Timed reminder tones (notification that a call needs additional attention)
■ Call waiting tones (notification that a call is waiting to be answered)
■ Emergency access to attendant calls (not Crisis Alert calls)
Table 4. Call Status Identifiers
Identifier Description
Ringing The dialed call rings.
Wait The Attendant Call Waiting feature is available.
Wait, [I] Intrusion Allowed
The Attendant Call Waiting and Intrusion features are available.
Busy An extension is busy or out of service and neither the Attendant Call Waiting nor the Intrusion features are allowed.
Busy, [I] Intrusion Allowed
Figure 8. Ringer Volume Control Area (enhanced console)
The ringer volume control area has an (up) button, a (down) button, and a
SELECT button. To adjust the volume on your console:
1. Press and release the (up) button) or (down) button to activate the display.
The display exhibits a bar graph and identifies the tone to be adjusted.
2. Press the SELECT button to choose the type of tone that you wish to adjust.
3. Press and release the (up) button to increase the volume or the
(down) button to decrease the volume.
4. Press any other button on the console to complete or cancel this task.
Selector Console
The Selector Console allows you to transfer calls and determine the status of an extension. It has two groups of buttons and lamps: the Hundreds Group Select (HGS) and the Direct Extension Selection (DXS) with Busy Lamp Field (BLF).
The basic console has 8 HGS buttons; the enhanced console has 20. You use them in conjunction with the DXS buttons to dial an extension. For example, if you wish to transfer a call to extension 3452, press the HGS button labeled 34, then press the DXS button labeled 52.
Figure 9. Selector Console Area
Determining Extension Number Status
You can determine the status of an extension by pressing the two buttons necessary to complete the extension and looking at the lamp to the left of the appropriate DXS button.
■ If the lamp is dark, the extension is idle.
■ If the lamp is lighted, the extension is in use. You can still transfer a call if
system users have more than one line available. Ask your system manager about the phones in your company.
■ If a station has the SAC feature active and is busy, the DXS/BLF lamps
remain steady until the station is no longer busy. At that time, the lamp goes to a flashing mode. The PC Console alerts by changing colors on the icon for the associated extension.
Tones Heard Through Handset or Headset
When you operate the console, you hear tones through the handset or headset that can indicate progress or status of a call, or identify types of incoming calls. Table 5 describes the tones available on your console.
Table 5. Ringing and Tones Descriptions
Tone Name Pitch Frequency Meaning
Ringback Low 15 times a minute
A transferred call comes back to the console.
Special Ringback
Low Single Calls are waiting to be answered.
Busy Low 60 times a
minute
The called extension is busy.
Fast Busy Low 120 times a minute
A caller dialed an incorrect number or called a phone that cannot be called.
Confirmation n/a Three short bursts
The operation requested (activated or deactivated) is accepted.
Coverage n/a One short
burst
A call to one extension rings at a different extension.
Dial Low Continuous
steady tone
A phone is ready to use.
Intercept On-Off, high and low
Siren-type
“Dee-Do”
A caller dialed a number incorrectly or called a phone that cannot be called.
Reorder Low 120 times a minute
All trunks within a particular trunk group are busy or that a requested feature is not available.
Call Waiting Ringback
Low 15 times a minute with decreasing volume during the last 0.2 second
A call is waiting at the console and the called party has been notified that the call is waiting.
Incoming Call Ringing
On-off, low
0.5 second An incoming call is waiting to be answered. Calls Waiting (Queued Calls) On-off, low
0.25 second One or more incoming calls are waiting to be answered.
Timed Reminder (Attendant Recall)
high On for 0.5 second; off for 1 second
A single-party call is on hold for longer than the time allowed by your company. This tone also occurs when someone on a conference call calls you or an unanswered transferred call returns to you.
Emergency Access Ringing On-Off, high and low
Siren-like A tone that indicates an emergency. This ringing tone is heard on the latest models of the basic console and all models of the enhanced console.
Table 5. Ringing and Tones Descriptions (Continued)
Tone Name Pitch Frequency Meaning
3
Operating the Console
As a console operator, you spend the majority of your day placing calls,
transferring calls, and putting callers on hold. You might also place a conference call or handle communications for an unexpected emergency. This section describes and provides step-by-step procedures for these operations. Before you read the rest of this section, check with your system manager to see if you work in a Centralized Attendant Service (CAS) environment. If you work in a CAS environment, be sure to read Chapter 5, ‘‘Centralized Attendant Service’’.
This chapter refers to “principal” consoles. A principal console is the main console used at your company. If your company has only one console, it is considered to be the principal console. If your work environment utilizes more than one console, your system manager assigns one console as “principal.” Principal consoles can control features, such as night service, for all consoles in the system.
At the end of this chapter, you will be able to:
■ Identify standard features available on your console
■ Perform standard functions available on your console
For additional information on console operations, refer to DEFINITY ECS
Activating the Console
Activating the console refers to preparing the console for human control.
To activate the console:
1. Plug in the handset or the headset.
2. Select one of the following two options:
■ If you are at the principal console, press the NIGHT button if the
Night lamp is lit.
■ If you are not at the principal console, press the POS BUSY button.
Deactivating the Console
Deactivating the console refers to preparing the console to operate automatically after hours.
To deactivate the console:
1. Select one of the following two options:
■ If you are at the principal console, press the NIGHT button.
■ If you are not at the principal console, press the POS BUSY button.
2. Unplug the handset or the headset.
Transferring Calls to Internal
Extensions
You may receive outside calls that you need to transfer to internal extensions or internal callers may need for you to transfer them to an extension. The process for both types of calls is the same.
To transfer calls to internal extensions:
1. Press the lighted call appearance button.
2. Greet the caller.
3. Press the START button.
NOTE:
If the Auto Start feature is administered at your console, you do not need to press the START button.
5. Select one of the following options:
■ Press the RELEASE button as soon as the call starts to ring.
or
■ Announce the call to the called party.
— If the called party accepts the call, press the RELEASE button.
— If the called party declines to talk to the caller, press the SPLIT
button to reconnect to the caller.
Follow your company’s procedures for taking messages.
— Press the RELEASE button.
or
■ If the called party is busy or does not answer, press the CANCEL
button to reconnect with the caller.
■ Follow your company’s procedures for taking messages.
■ Press the RELEASE button.
Transferring Calls to Outside
Numbers
You may receive calls that you need to transfer to outside calls from internal callers or you may need to transfer one outside call to another outside number. The process for both types of calls is the same.
To transfer a call to an outside number:
1. Press the lighted call appearance button.
2. Greet the caller.
3. Access an outgoing line by pressing an outside line button or by dialing an outside line access code (many companies use 9 to access an outside line).
4. Select one of the following options:
■ Press the RELEASE button if the caller plans to complete the call.
or
■ Dial the desired party using the dialing keypad, then press the
RELEASE button as soon the call starts to ring.
or
■ Announce the call to the called party.
— If the called party declines to talk to the caller, press the SPLIT
button to reconnect to the caller.
Follow your company’s procedures for taking messages.
Press the RELEASE button.
or
■ If the called party is busy or does not answer, press the CANCEL
button to reconnect with the caller.
■ Follow your company’s procedures for taking messages.
■ Press the RELEASE button.
Exceptions:
Two conditions impact your ability to transfer callers to outside parties. You cannot transfer calls to outside parties if:
■ All outside lines are busy.
■ The caller does not have calling privileges for the outside line requested.
Placing Callers on Hold
You can place up to 6 calls on hold. You should place callers on hold if you cannot service them immediately, or if you need to get back to the caller with
information.
To place a call on hold:
1. Press the lighted call appearance button.
2. Greet the caller.
3. Press the HOLD button.
To reenter a call that is on hold:
1. Press the call appearance button that is on hold.
2. Talk to the party.
A single-party call that is on hold returns to the console automatically when it has been on hold for too long.
Connecting Two or More Callers
To use connect two or more parties:
1. Call internal or external party number 1.
2. Press the START button.
3. Call the internal or external party number 2.
4. Press the SPLIT button. Both parties are connected.
5. Repeat steps 2 through 4 for additional parties.
6. Press the HOLD button.
Answering Emergency Calls
You may need to manage communication for an emergency. You can process emergency calls in the same way as regular calls. However, the console alerts you of an emergency call with the following information:
■ The Emergency lamp flashes.
■ The siren-like emergency tone sounds.
■ The display identifies the calling party and shows EMERG.
4
Using the Features
You might find yourself working at an organization that requires you to know more than the standard operating procedures outlined in the previous chapter. For example, you may be the guardian of your company’s long distance calls.
This chapter covers features available at your console. You may not have every feature described in this chapter. To obtain a list of your company’s features and their associated access codes, check with your system manager.
Information for each feature discussed in this chapter includes a brief feature description, an example that illustrates the feature, the feature’s official name, and step-by-step procedures for using the feature.
The examples in this chapter are based on a fictitious company, Widgets, Inc., that produces self-cleaning bathtubs. The console operator for Widgets, Inc., Pat, manages calls for this 500-employee company.
Speeding Up the Console
Your system manager can program features described in this section to save time in a fast-paced environment. Features in this section reduce the number of buttons you must press to complete an operation.
Using Auto Start
Example
Phone calls to Widgets, Inc. exceed 300 per day. Pat scrambles constantly to meet the demands of incoming calls. The system manager, Kelly Ratliffe, programs Auto Start to save Pat precious seconds.
Feature Name Auto Start
Procedures
Your system manager programs this feature into your console to occur automatically.
Speed Dialing
With speed dialing, you can dial a frequently-used number by entering a code or pressing a button. You can use it to:
■ Place local, long-distance, or international calls
■ Activate features
■ Access computer equipment at another location
Example
Pat orders office supplies for the executive offices. She purchases all Widget, Inc. supplies from the same vendor. So, Pat asks the system manager Kelly Ratliffe to add the vendor’s number to the abbreviated dialing list. Kelly programs the new number and gives Pat the code assigned to the vendor’s number. Now, Pat dials *12 every time she wants to call the office supply vendor.
Feature Name
Abbreviated Dialing
Procedures
To use speed dialing:
1. Obtain an abbreviated dialing list from your system manager.
Holding Calls Automatically
Your console automatically places a call on hold when you answer another call.
Example
Widgets, Inc. is conducting an infomercial on their self-cleaning bathtubs. Pat’s console is unusually busy. So, the system manager, Kelly Ratliffe, programs Pat’s console to place calls on hold automatically when Pat answers another call. Pat answers the first incoming call and asks the party to hold. Then she presses the
CALL APPEARANCE button for the next incoming call, placing the first caller on
hold.
Feature Name
Hold-Automatic
Procedures
Your system manager programs hold-automatic to work on all consoles in your system.
Handling Multiple-Party Calls
This section covers features associated with connecting 2 to 5 callers on one call. It includes connecting callers, parking callers, locking the console operator out of multi-party calls, accessing operators from a conference call, and paging system users to add them to an existing conference call.
Connecting Multiple Callers
You can connect up to five callers on a single call.
Example
Two bathtub distributors want identical contract upgrades with Widgets, Inc. Company president Randy Foxworthy commissions Pat to set up a conference call with him, two sales representatives, and the two distributors. Pat uses the
procedures listed below to connect all five callers.
Feature Name
Procedures
To place a conference call:
1. Call internal or external party number 1.
2. Press the START button.
3. Call the internal or external party number 2.
4. Press the SPLIT button. Both parties are connected.
5. Repeat steps 2 through 4 for additional parties.
6. Press the HOLD button.
Locking Out the Console Operator
Your system manager programs the console to prevent you from reentering a multi-party call that you initiated. Parties on these calls, however, can contact you.
Example
Widgets Inc. is undergoing a merger. Company president Randy Foxworthy requests numerous conference calls to discuss highly confidential information. To protect the confidentiality of the conversations, the system manager, Kelly Ratliffe, programs the console with Attendant Lockout. Because no one can enter the conference call, Randy can conduct his calls with guaranteed privacy.
Feature Name
Attendant Lockout
Procedures
Your system manager programs this feature into your console to work automatically. If you try to reenter the call, the Hold lamp for this call:
1. Flutters for 2 seconds
2. Returns to a solid, lighted state
Recalling the Console Operator
Example
Robert Planter, vice president of public relations, is on a conference call with musician, Larry Browning, and stand-up comedian, Cindy Wittner, to plan for a community fund-raising event. Robert wants Larry and Cindy to present their ideas to coworker Jay Winstead so Robert calls Pat to add Jay to the call.
Feature Name
Attendant Recall
Procedures
To recall the operator from multi-party calls from a phone with one line:
■ Press the RECALL button.
or
■ Flash the switch hook.
To recall the operator from multi-party calls from a phone with more than one line:
■ Press the CONFERENCE button.
or
■ Press the TRANSFER button.
Paging with Deluxe Voice Paging
This feature combines Call Park and Loudspeaker Paging features. With deluxe loudspeaker paging, you can page a system user to call the extension where their call is parked or have them call you. If the system user calls you, you can add them to an existing conference call.
You can page called parties in up to nine locations or use a single, designated access code or button to page the called party in all 9 locations at once. Your system manager designates codes for each paging zone by assigning:
■ Outside line buttons (see Table 1 on page 6 or Table 2 on page 7 for more
information) to function as paging buttons
or
■ A sequence of numbers on your dial keypad that serves as the paging
Example
Robert Planter, vice president of public relations, is on a conference call with musician, Larry Browning, and stand-up comedian, Cindy Wittner, to plan for an upcoming community fund-raising event. Robert wants Larry and Cindy to present their ideas to executive vice president Cathi Henrique. Pat pages Cathi. When Cathi answers her page, Pat adds her to the existing conference call.
Feature Name
Loudspeaker Paging Access — Deluxe
Procedures
To page individuals:
1. Tell the caller that you are going to page the called party.
2. Press one of the following:
■ PAGE 1 through PAGE 9
■ PAGE ALL, if provided
■ Keypad buttons to dial an access code
3. Page the called party, telling them which extension to call to get their call.
If you plan to connect the paged party to an existing conference call:
1. Tell them to call your extension.
2. Press the line where the conference call resides.
3. Press the SPLIT button.
4. Press the HOLD button.
Unanswered pages return to you for further assistance. If the allotted time for paging announcements expires during the page, the call disconnects and you hear an intercept tone (alternating high-low, siren-like tone or fast busy tone).
Answering Calls for Another Party
Backing Up the Console Operator
Your system manager can program your overflow calls to ring to one or more designated phone.
Example
The marketing department just launched an infomercial about Widget, Inc.’s self-cleaning bathtubs. Consequently, the phones are “ringing off the hook”. Chris answers Pat’s overflow calls at his own phone.
Feature Name
Attendant Backup
Procedures
Your system manager programs this information into your console to occur automatically.
Routing Calls Through the Console Operator
Your system manager can designate up to 50 listed directory numbers to come directly to you.
Example
Widgets, Inc. president Randy Foxworthy wants Pat to screen all calls for him. Kelly Ratliffe, system manager, programs all of Randy’s calls to come directly to Pat. When a salesman calls, Pat takes a message. When Randy’s wife calls, Pat sends the call through to Randy.
Feature Name
Multiple Listed Directory Numbers
Procedures
Your system manager programs this information into your console to occur automatically.
Covering Calls from the Console
Example
Widgets, Inc. takes great pride in providing human contact for all persons calling customer service representatives. The system manager, Kelly Ratliffe, has programmed all customer service representative phones to go to coverage. When Suzanne Jones, customer service representative, is busy on a call, an incoming call routes to Pat.
Feature Name
Call Coverage
Procedures
Table 6 describes the information that displays on your display when call coverage calls come to your console.
Forwarding All Calls
You can forward all calls or remove forwarding for all calls for any extension in the system except the console.
Exception:
Ask your system manager if you work in a Distributed Communications System (DCS) environment. If you do, the forwarded-to telephone number must not:
■ Be longer than 10 digits. The 10 digits can include a 3-digit access code
followed by a typical 7-digit telephone number.
■ Include authorization codes. Authorization codes cannot be in the
forwarded-to telephone number.
Table 6. Call Coverage Display Information
Display Meaning
B or b The called party is already on a call. Your console displays the caller’s number and the unanswered phone’s number.
d Nobody answered this phone or the calling party sent the call to coverage. Your console displays the caller’s number and the unanswered phone’s number.
Example
Bob Sisterkey, quality assurance specialist at Widgets, Inc., had to leave the office in a hurry for a personal emergency. He is expecting an important phone call, so he calls Pat and asks her to forward his calls to another member of his team. Pat uses the call forwarding all calls procedures to forward his calls to his team member.
Feature Name
Call Forwarding All Calls
Procedures
To forward all calls for an extension:
1. Press the START button.
2. Dial the forwarding all calls access code.
3. Dial the extension of the phone to be forwarded.
4. Dial the forwarded-to number.
5. Select one of the following options:
■ If you hear a confirmation tone (3 short bursts of tone) indicating
that the procedure is successful, press the RELEASE button.
■ If you hear an intercept tone (alternating high-low, siren-like tone or
fast busy tone) indicating that the procedure is unsuccessful, press
the CANCEL button to try again.
To deactivate call forwarding all calls for a particular extension:
1. Press the START button.
2. Dial the forwarding all calls access code.
3. Dial the extension you want to deactivate.
4. Press the RELEASE button.
Parking Calls
Example
Rick Foylund, company arbitrator, is away from his desk when a call comes in for him. Pat pages Rick to tell him that he can call extension 5432 to answer his call. Rick dials his company’s call park feature access code then 5432 to answer his call.
Feature Name Call Park
Procedures
To park a call:
1. Press the START button.
2. Select one of the following options:
■ Dial the Call Park access code.
or
■ Press the button your system administrator assigned to call park.
3. Use the dial keypad or the selector console to dial the extension where you want to park the call.
4. Select one of the following options:
■ If you hear a confirmation tone (3 short bursts of tone), the call is
parked. Press the RELEASE button.
■ If you hear a busy tone, a call is already parked at the dialed
extension. Press the CANCEL button to try again.
Paging for Called Parties
This section covers 3 methods for paging system users and includes Call Park information necessary for 2 of these methods.
Parking Calls
Example
Rick Foylund, company arbitrator, is away from his desk when a call comes in for him. Pat places the call on hold at one of her 10 call park extensions. Pat pages Rick to tell him the number to dial to answer his call.
Feature Name Call Park
Procedures
To park a call:
1. Press the START button.
2. Select one of the following options:
■ Dial the Call Park access code.
or
■ Press the button your system administrator assigned to call park.
3. Use the dial keypad or the selector console to dial the extension where you want to park the call.
4. Select one of the following options:
■ If you hear a confirmation tone (3 short bursts of tone), the call is
parked. Press the RELEASE button.
■ If you hear a busy tone, a call is already parked at the dialed
extension. Press the CANCEL button to try again.
Chime Paging
When called parties are not at their phones, you can page them with coded chime signals. The chimes coincide with the paged party’s extension. For example, paging someone from extension 113 generates chimes that:
1. Chime once followed by a pause
2. Chime once again followed by a pause
3. Chime three successive times followed by a pause
The chime sequence repeats up to 3 times. If the paged party does not answer, the call returns to you for further assistance.
■ The outside line buttons to function as paging buttons
or
■ A sequence of numbers on your dial keypad that serves as the paging
access code
Example
Rick Foylund, company arbitrator, is away from his desk when a call comes in for him. Pat pages Rick with code calling access. Rick hears his extension, 113, chimed and calls Pat to answer the page.
Feature Name
Code Calling Access
Procedures
To page using chimes:
1. Tell the caller that you are going to page the called party.
2. Press the START button.
3. Dial the code calling access code.
4. Dial the paged party’s extension.
5. Select one of the following options:
■ If you hear a confirmation tone (3 short bursts of tone), the call
parks on paged party’s extension, and the system pages the called party.
— To drop out of the call before the paged and calling parties are connected, press the RELEASE button.
— To establish a 3-way call, wait for the called party to answer; then press Split.
— To hold the call on the console, press the HOLD button.
or
■ If you hear a busy tone, press the CANCEL button.
— Report that the line is busy to the caller.
— Take a message.
Paging with Voice Paging
When called parties are away from their phones, you can page them with
loudspeaker paging by parking their call then voice paging them to the extension where you parked their call. If called parties do not answer their pages, their calls automatically return to you for further assistance.
You can page called parties in up to 9 locations or use a single, designated access code or button to page the called party in all 9 locations. Your system manager designates codes for each paging zone by assigning:
■ Outside line buttons to function as paging buttons
or
■ A sequence of numbers on your dial keypad that serves as the paging
access code
Example
Rick Foylund, company arbitrator, is away from his desk when a call comes in for him. Pat parks the call for Rick and pages him to let him know which extension he needs to call to answer the page.
Feature Name
Loudspeaker Paging Access
Procedures
To page individuals:
1. Tell the caller that you are going to page the called party.
2. Press one of the following:
■ PAGE buttons
■ PAGE ALL button, if provided
■ Keypad buttons to dial an access code
3. Page the called party, to tell them which extension to call to answer their call.
Paging with Deluxe Voice Paging
This feature combines call park and loudspeaker paging. You can page a caller to call an extension or call you. You also can add a paged party to an existing conference call.
You can page called parties in up to 9 locations or use a single, designated access code or button to page the called party in all 9 locations. Your system manager designates codes for each paging zone by assigning:
■ Outside line buttons to function as paging buttons
or
■ A sequence of numbers on your dial keypad
Example
Robert Planter, vice president of public relations, is on a conference call with musician, Larry Browning, and stand-up comedian, Cindy Wittner, to plan for an upcoming community fund-raising event. Robert wants Larry and Cindy to present their ideas to executive vice president Cathi Henrique. Pat pages Cathi. When Cathi answers her page, Pat adds her to the existing conference call.
Feature Name
Loudspeaker Paging Access — Deluxe
Procedures
To page individuals:
1. Tell the caller that you are going to page the called party.
2. Press one of the following:
■ PAGE
■ PAGE ALL, if provided
■ Keypad buttons to dial an access code
3. Page the called party and tell them which extension to call to answer their call.
If you plan to connect the paged party to an existing conference call:
1. Tell them to call your extension.
3. Press the SPLIT button.
4. Press the HOLD button.
Unanswered pages return to you for further assistance. If the allotted time for paging announcements expires during the page, the call disconnects and you hear an intercept tone (alternating high-low, siren-like tone or fast busy tone).
Assisting Callers with Special Tools
This section covers features that allow you to provide special assistance to callers. It includes ways to hold callers on the line, interrupt an existing call, override existing features designed to block incoming calls, assist callers who need to reach a series of system users, or manage emergency calls.
Using Call Waiting
When you transfer a call to a busy line, the call returns to the console until the busy line becomes available. When the busy line becomes available, the call automatically rings through. If the line does not become available, the call rings back to you for further attention.
Example
A customer, John Steele, places a call to customer service representative Leah Hoffguard. Leah is serving another client, but hears a beep in her ear indicating that she just received an incoming call. Pat notifies the caller that Leah’s line is busy. Leah brings her current call to closure and John’s call automatically rings through to her extension.
Feature Name
Attendant Call Waiting
Procedures
To notify callers that the party they called is busy:
1. Press the SPLITbutton. The called party hears a call-waiting ringback tone.
2. Inform the caller that the called extension is busy, and that their call is waiting to be answered.
4. One of the following options occurs:
■ The call automatically rings through when the busy line becomes
available.
■ If the line does not become available within the time preset by your
system manager, the call rings back to you. To try to transfer again, repeat steps 1 through 3.
Split-Swap
You can alternate between active and split calls by pressing the SPLIT-SWAP
button. This operation happens only if you have a split call and an active call, and both calls are in the talking state. If you press the SPLIT-SWAP button during
non-talking states (for example, dialing, ringing states, and so forth), then the split-swap operation is denied. For outgoing trunk calls, the state of the trunk is considered to be in talking state once the trunk is cut-through or the trunk answer supervision timer times out.
The SPLIT button lamp remains lit during the split-swap operation and the SPLIT
button lamp flutters if the split-swap operation is denied. The Split-Swap lamp stays off during the split-swap operation.
During the split-swap operation, if you:
■ press the SPLIT button, then all parties are joined in conference and further presses of the SPLIT button or the SPLIT-SWAP button are denied.
■ press the RELEASE button, then the active call and the split call are connected.
■ press the HOLD button, then the active call and the split call are connected, and the connected call is put on hold.
■ press the CANCEL button, then the active will drops and the split away party joins with you as the active call.
Example
George calls you and you press the START button and dial Harry, who answers. At
this point, George is split away, and Harry and you are in conversation. If you wish to consult with George, but do not want Harry on the same call with George, then you can press the SPLIT-SWAP button which will split Harry away and George is in conversation with you. If you press the SPLIT-SWAP button again, then Harry
will be active with you and George is split away.
Procedures
To activate split-swap:
1. Press the SPLIT-SWAP button.
To deactivate split-swap, do one of the following:
1. Press the SPLIT button and all parties are joined in conference.
2. Press the RELEASE button and the active call and the split call are connected.
3. Press the HOLD button and the active call and the split call are connected and the connected call is put on hold.
4. Press the CANCEL button and the active call drops and the split away party joins with you as the active call.
Interrupting a Call
You can interrupt someone who is on a call.
Example
Telemarketer Sara Adams has a son, Rob, who just broke his leg. Rob’s high school coach calls Sara to let her know that they are taking Rob to the hospital. Pat assists Rob’s coach by interrupting Sara’s existing call. Now Rob’s coach can talk to Sara.
Feature Name
Attendant Intrusion
Procedures
To interrupt a call:
1. Dial the desired busy party.
2. Press the INTRUSION button.
3. Give message to called party.
4. Press the RELEASE button.
Exception:
If you interrupt a call with a caller on your line:
■ Dial the desired busy party.
■ Press the SPLIT button.
■ Press the RELEASE button.
Overriding Diversion Features
Sometimes system users divert their incoming calls to another phone. For example, a user might forward calls to another extension for a lunch break. With this feature, you can bypass a diversion feature to access a desired party.
Diversion features include Send All Calls, Call Coverage, Call Forward, and Busy Don’t Answer.
Example
The vice president of design and development, Renee Gebner, is working on a tight deadline. She needs uninterrupted time to complete her project, so she forwards all incoming calls to her voice mail. Pat receives an urgent call for Renee and overrides the call forwarding that Renee implemented to reach her at her extension.
Feature Name
Attendant Override of Diversion Features
Procedures
To override diversion features:
1. Press the OVERRIDE button.
2. Dial the desired number.
3. Proceed with your current operation.
Emergency Notification to Digital Telephones
Example
Edward Murrow, Widgets, Inc. salesman, just fell down a flight of stairs breaking his leg. Tom Bronaw, who was nearby, calls the emergency extension. As soon as the call is made, all digital telephones with an assigned CRSS-ALERT button are
notified with a continuous ring. The following information appears on Pat’s display:
Feature Name
Crisis Alert — Every User Responds
Procedures
If you work for a company that has more than one digital telephone and you receive an emergency call, the following occurs at all digital telephones and the attendant console:
1. The CRSS-ALERT button flashes and a continuous ring alerts the designated
digital station. The display shows the current crisis alert, overwriting any current display.
2. Because each digital station must acknowledge each alert, each user pushes
the CRSS-ALERT button, turning off the ringing and changing the lamp to a
steady state.
3. The user records the crisis alert information.
4. The user pushes the NORMAL DISPLAY MODE button and the lamp turns off and the display clears.
Feature Name
Crisis Alert — Single User Responds
Procedures
If you work for a company that has more than one digital telephone and you receive an emergency call, the following occurs at all digital telephones and the attendant console:
1. The CRSS-ALERT button flashes and a continuous ring alerts the designated digital station. The display shows the current crisis alert, overwriting any current display.
2. Because each digital station receives the alert, one user pushes the
CRSS-ALERT button, turning off the ringing and clearing the alert from all
3. The user records the crisis alert information.
4. The user pushes the NORMAL DISPLAY MODE button and the lamp turns off and the display clears.
Providing Emergency Notification to the Operator
Your system manager dedicates an attendant consoles to service emergency calls. When system users dial an emergency number (for example, 911), the console is notified that an emergency call was made.
Example
Jeff Springer, Widgets, Inc. salesman, has just suffered from a heart attack. Bill O’Connor, who works nearby, dials 911. As soon as the call is made, the following information appears on Pat’s display:
She also hears a siren-like tone.
Feature Name
Crisis Alert to Attendant Console
Procedures
If the attendant receives an emergency call, the following occurs:
1. The CRSS-ALERT button flashes and a continuous ring alerts the attendant
console. The display shows the current crisis alert, overwriting any current display.
2. The attendant pushes the CRSS-ALERT button, turning off the ringing.
3. The attendant records the crisis alert information.
4. The attendant pushes the CRSS-ALERT button, changing the lamp to a steady state.
5. The attendant pushes the CRSS-ALERT button and the lamp turns off and the display clears.
Providing Emergency Access to the Operator
Your system manager can administer the switch to allow emergency access calls to the attendant console operator.
Example
Linda Mahoney, Widgets, Inc. spokesperson, has just suffered from a heart attack. Tom Roberts, who works nearby, calls the company’s emergency access to attendant feature access code (FAC). As soon as the call is made, the following information appears on Pat’s display:
She also hears a siren-like tone.
Feature Name
Emergency Access to Attendant
Procedures
If you work for a company that has more than one console and you receive an emergency call, the following occurs at all consoles:
1. A user takes the handset off-hook or dials the feature access code.
■ If the user took the handset off-hook, the call automatically rings at
the attendant console after a predetermined amount of time (usually 10 seconds after dial tone stops). The call rings at the console with a louder-than-normal volume. If the guest dialed the feature access code, the call rings immediately at the attendant console.
■ The following displays:
2. Follow your local procedures for handling emergencies.
NOTE:
Even if the attendant console is in night service, the call still rings at the attendant console, but it can be answered at the backup telephone with Trunk Answer Any Station, or from a designated emergency redirection telephone.
Placing a Series of Calls
You can manage serial calls for parties who call you from outside lines, needing to speak to a series of system users without hanging up. With this feature, the caller returns to you when the first called party hangs up. You then can transfer the caller to the next party and continue the process until all calls are complete.
a=<Name> Ext<ext> 00 in EMRG Q
Examples
Widgets, Inc. researcher Susan Bealan is in a remote part of the world locating natural resources for manufacturing environmentally-safe bathtub cleanser. She needs to talk to several people at Widgets, Inc. and wants to ensure that she does not lose contact with the company’s phone system. Pat uses serial calling to connect Susan on multiple calls.
Feature Name
Attendant Serial Calling
Procedures
To manage a serial call:
1. Answer the call.
2. Press the SERIAL button.
3. Press the START button.
4. Dial the desired extension.
5. Press the RELEASE button.
When the call is complete, it returns to the console.
6. Repeat steps 1 through 5 until all calls are made.
7. Press the SERIAL button to terminate a serial call.
Managing Outside Lines
This section provides feature information for managing outside lines. It describes two types of networks and includes ways to control outside line access, ways to view outside line calling information, and ways to record outside-call information.
Controlling Access to Outside Lines
Example
In an effort to increase their profit margins, Widgets, Inc. institutes a controlled long-distance calling plan. Only three customer service representatives may use long distance service and they may only call Widget, Inc. distributors. Pat screens all outgoing customer service calls and when appropriate dials the long-distance numbers for the representatives.
Feature Name
Attendant Control of Trunk Group Access
Procedures
Your system manager programs this information into your console to occur automatically. When a controlled trunk group access call occurs, the display provides you with the following information:
■ The name of the calling line (a=)
■ The calling party’s name (Linda Wagner)
■ The type of outside line that the calling party tried to access (Local)
■ The type of call purpose in use (tc = you have control of outside lines for
this call)
Displaying Outside Line Information
This feature provides call information about outside calls. This information appears on your display. When parties on the other end of the call do not have this feature, or faulty transmission causes information to be lost, information may not appear as you expect.
With this feature, the following information appears on your display:
■ Calling party’s number
The full number, including the area code, of the calling party
■ Calling party’s name
The name associated with the calling party’s phone
■ Called party’s number
The full number, including the area code, of the called party
■ Called party’s name
■ Special call status information (designated by MISCID in this chapter)
Information about the changing status of a call
NOTE:
Sometimes a billing number displays for a calling or called number. For example, the billing number for a pay phone might display rather than the pay phone number.
Choosing Outside Lines
You can select a specific group of outside lines for an outgoing call.
Example
Widgets, Inc. frequently communicates with its parent company, Widgets
International, located in Chicago. The system manager, Kelly Ratliffe, assigns one of the buttons in the outside lines select area to Widgets International. To call someone in Widgets International, Pat presses the outside line button labeled Chicago and dials the 7-digit phone number, without having to dial 1 and the area code.
Feature Name
Attendant Direct Trunk Group Selection
Procedures
To select an outside line:
1. Press the desired outside line button.
2. Dial the desired number.
Using Features for Internal Use
This section covers features that you might use internally for a variety of reasons. These reasons may range from restricting calls, to providing system user
telephone lists, to testing your equipment. It also includes information specific to accessing console operators and working with non-phone equipment.
Restricting Calls
These restrictions override user privileges established by your system manager. Toll restriction can be substituted for outbound or station-to-station restrictions by your system manager.
Example
Lynn Johnston, telemarketing manager, is starting a special marketing push for out-of-state business. He schedules 3 of his finest telemarketers to place long-distance calls for 4 days. Rather than change the system setup for phone calls, he asks Pat to deactivate outbound call restrictions for these three telemarketers.
Feature Name
Controlled Restrictions
Procedures
To manually activate a restriction:
1. Press the START button.
2. Dial the feature access code for controlled restrictions.
3. Dial one of the following restriction code numbers:
■ 1 = Outbound calls/toll calls
■ 2 = All calls
■ 3 = Termination
■ 4 = Phone-to-phone/toll calls
4. Dial the extension you wish to restrict.
Table 7. Calling Restrictions
Call Type Users Cannot Do the Following:
Outbound calls Place outside calls from these phones.
All Calls Place or receive any calls from these phones.
Station-to-Station Receive or place internal calls from these phones.
Termination Receive calls on these phones.
5. Select one of the following options:
■ If you hear a confirmation tone (3 short bursts of tone), press the
RELEASE button.
■ If you hear an intercept tone (alternating high-low, siren-like tone or
fast busy tone), the extension is