User's Guide
Borland® C++
for
OS/2®
Redistributable files
You can redistribute the following files in accordance with the No Nonsense License Statement:
• BIDS402.DLL • TCLASS2.DLL • C215.DLL
• BIDS402D2.DLL • C215MT.DLL • BPMCC.DLL
• LOCALE.BLL
Borland may have patents andbr pending patent applications covering subject matter in this document. The furnishing of this document does not give you any license to these patents.
COPYRIGHT © 1987, 1994 by Borland International. All rights reserved. All Borland products are trademarks or registered trademarks of Borland International, Inc. Other brand and product names are trademarks or registered trademarks of their respective holders.
Borland International, Inc.
100 Borland Way, Scotts Valley, CA 95066-3249
PRINTED IN THE UNITED STATES OF AMERICA
1 EOR0294
Contents
Introduction 1
What's in Borland C++ 0 0 0 0 0 0 0 0 0 0 0 0 0 0 0 0 0 0 0 ; 0 0 0 1 Hardware and software requirements 0 0 0 0 0 0 0 0 0 0 2 The Borland C++ implementation 0 0 0 0 0 0 0 0 0 0 0 0 0 3 The Borland C++ package 0 0 0 0 0 0 0 0 0 0 0 0 0 0 0 0 0 0 0 0 3
The User's Guide 0 0 0 0 0 0 0 0 0 0 0 0 0 0 0 0 0 0 0 0 0 0 0 0 0 0 3 The Tools and Utilities Guide 0 0 0 0 0 0 0 0 0 0 0 0 0 0 0 4 The Programmer's Guide 0 0 0 0 0 0 0 0 0 0 0 0 0 0 0 0 0 0 0 5 The Library Reference 0 0 0 0 0 0 0 0 0 0 0 0 0 0 0 0 0 0 0 0 0 0 6 Typefaces and icons used in these books 0 0 0 0 0 0 0 0 6 Tools in your package 0 0 0 0 0 0 0 0 0 0 0 0 0 0 0 0 0 0 0 0 0 0 0 0 7 Contacting Borland 0 0 0 0 0 0 0 0 0 0 0 0 0 0 0 0 0 0 0 0 0 0 0 0 0 0 8
Borland Assist plans 0 0 0 0 0 0 0 0 0 0 0 0 0 0 0 0 0 0 0 0 0 0 0 8
Chapter 1 Installing Borland C++ 11 Using INSTALL 0 0 0 0 0 0 0 0 0 0 0 0 0 0 0 0 0 0 0 0 0 0 0 0 0 0 0 0 11 Running the IDE 0 0 0 0 0 0 0 0 0 0 0 0 0 0 0 0 0 0 0 0 0 0 0 0 0 1 3 Opening the README file 0 0 0 0 0 0 0 0 0 0 0 0 0 0 0 0 0 0 0 1 3 The HELPME!.DOC file 0 0 0 0 0 0 0 0 0 0 0 0 0 0 0 0 0 0 0 0 0 1 3 Customizing the IDE 0 0 0 0 0 0 0 0 0 0 0 0 0 0 0 0 0 0 0 0 0 0 0 0 1 4 Sample programs 0 0 0 0 0 0 0 0 0 0 0 0 0 0 0 0 0 0 0 0 0 0 0 0 0 0 0 1 4
Chapter 2 IDE basics 1 5
Starting the IDE 0 0 0 0 0 0 0 0 0 0 0 0 0 0 0 0 0 0 0 0 0 0 0 0 0 0 0 0 1 5 Startup options 0 0 0 0 0 0 0 0 0 0 0 0 0 0 0 0 0 0 0 0 0 0 0 0 0 0 0 1 7 The Ib option 0 0 0 0 0 0 0 0 0 0 0 0 0 0 0 0 0 0 0 0 0 0 0 0 0 0 1 7 The 1m option 0 0 0 0 0 0 0 0 0 0 0 0 0 0 0 0 0 0 0 0 0 0 0 0 0 1 7 Exiting the IDE 0 0 0 0 0 0 0 0 0 0 0 0 0 0 0 0 0 0 0 0 0 0 0 0 0 0 0 0 0 1 7 IDE components 0 0 0 0 0 0 0 0 0 0 0 0 0 0 0 0 0 0 0 0 0 0 0 0 0 0 0 0 1 8 The menu bar and menus 0 0 0 0 0 0 0 0 0 0 0 0 0 0 0 0 0 0 1 8 Mouse shortcuts 0 0 0 0 0 0 0 0 0 0 0 0 0 0 0 0 0 0 0 0 0 0 0 0 1 9 Using the SpeedBar 0 0 0 0 0 0 0 0 0 0 0 0 0 0 0 0 0 0 0 0 0 1 9 Keyboard shortcuts 0 0 0 0 0 0 0 0 0 0 0 0 0 0 0 0 0 0 0 0 0 2 1 Borland C++ windows 0 0 0 0 0 0 0 0 0 0 0 0 0 0 0 0 0 0 0 0 2 3 Window management 0 0 0 0 0 0 0 0 0 0 0 0 0 0 0 0 0 0 0 2 5 The status line 0 0 0 0 0 0 0 0 0 0 0 0 0 0 0 0 0 0 0 0 0 0 0 0 0 0 0 2 6 Dialog boxes 0 0 0 0 0 0 0 0 0 0 0 0 0 0 0 0 0 0 0 0 0 0 0 0 0 0 0 0 0 2 6 Action buttons 0 0 0 0 0 0 0 0 0 0 0 0 0 0 0 0 0 0 0 0 0 0 0 0 0 2 6 Radio buttons and check boxes 0 0 0 0 0 0 0 0 0 0 0 2 7 Input and list boxes 0 0 0 0 0 0 0 0 0 0 0 0 0 0 0 0 0 0 0 0 0 2 7 Configuration and project files 0 0 0 0 0 0 0 0 0 0 0 0 0 0 0 2 8 The configuration file 0 0 0 0 0 0 0 0 0 0 0 0 0 0 0 0 0 0 0 0 0 2 8 Project files 0 0 0 0 0 0 0 0 0 0 0 0 0 0 0 0 0 0 0 0 0 0 0 0 0 0 0 0 0 0 2 8 The project directory 0 0 0 0 0 0 0 0 0 0 0 0 0 0 0 0 0 0 0 0 2 9 Desktop files 0 0 0 0 0 0 0 0 0 0 0 0 0 0 0 0 0 0 0 0 0 0 0 0 0 0 0 2 9
Default files 0 0 0 0 0 0 0 0 0 0 0 0 0 0 0 0 0 0 0 0 0 0 0 0 0 0 0 2 9 Changing project files 0 0 0 0 0 • 0 0 0 0 0 0 0 0 0 0 0 0 0 3 0 Syntax highlighting 0 0 0 0 0 0 0 0 0 0 0 0 0 0 0 0 0 0 0 0 0 0 0 3 0 Configuring element colors 0 0 0 0 0 0 0 0 0 0 0 0 0 0 3 0 Some basic tasks 0 0 0 0 0 0 0 0 0 0 0 0 0 0 0 0 0 0 0 0 0 0 0 0 0 0 0 3 1 Compiling and linking programs 0 0 0 0 0 0 0 0 0 0 0 3 1 Making an application 0 0 0 0 . 0 0 0 0 0 0 0 0 0 0 0 0 0 3 1 Building an application 0 0 0 0 0 0 0 0 0 0 0 0 0 0 0 0 0 3 1 Compiling a file 0 0 0 0 0 0 0 0 0 0 0 0 0 0 0 0 0 0 0 0 0 0 0 0 3 1 Linking a file 0 0 0 0 0 0 0 0 0 0 0 0 0 0 0 0 0 0 0 0 0 0 0 0 0 0 3 2 Debugging an application 0 0 0 0 0 0 0 0 0 0 0 0 0 0 0 0 0 3 2 Preparing your application . 0 0 0 0 0 0 0 0 0 0 0 0 0 3 2 Debugging environment 0 0 0 0 0 0 0 0 0 0 0 0 0 0 0 0 3 3 Viewing data objects 0 0 0 0 0 0 • 0 0 0 0 0 0 0 0 0 0 0 0 0 3 4 Controlling program execution 0 0 0 0 0 0 0 0 0 0 0 3 4
Trace Into ... 45
Run To Cursor ... 45
Reset ... 45
Run Arguments ... 45
Compile menu ... 46
Compile ... 46
Make ... 46
Link ... 46
Build All ... 46
Break ... 47
Debug menu ... 47
Breakpoints ... 48
Messagepoints ... 48
Datapoints ... 48
Exceptionpoints ... 48
Source ... 48
Disassembly ... 48
Variable ... 48
Call Stack ... 48
Watch ... 49
Evaluator ... 49
Inspector ... 49
Thread ... 49
Memory ... 49
Registers ... 49
Numeric Processor ... 49
Heap ... 49
Hide Windows ... 49
Show Windows ... 49
Tools menu ... 50
View Transcript ... 50
Previous Error ... 50
Next Error ... 50
Remove Messages ... 50
Transfer items ... 50
Project menu ... 51
Open Project ... 51
Close Project ... 51
View Project ... 51
View Settings ... 51
Add Item ... 51
Delete Item ... 52
Local Options ... 52
Include Files ... 52
Generate Makefile ... 52
Save ... 53
Window menu ... 53
Tile ... 53
Cascade ... 53
Arrange Icons ... 53
Close All ... 53
Open Windows Listing ... 53
Help menu ... 54
Contents ... 55
Index ... 55
Topic Search ... 56
Essentials ... 56
Language Reference ... 56
Error Messages ... 56
Tasks ... 56
Menus ... 56
Keyboard ... 56
Using Help ... 56
About Borland C++ ... 57
Chapter 4 Settings notebook 59 Using the Settings notebook ... 59
Getting around ... 59
Organization ... 60
Changing and saving settings ... 62
Compiler section ... 62
Code Generation Options ... 63
C++ Options ... 65
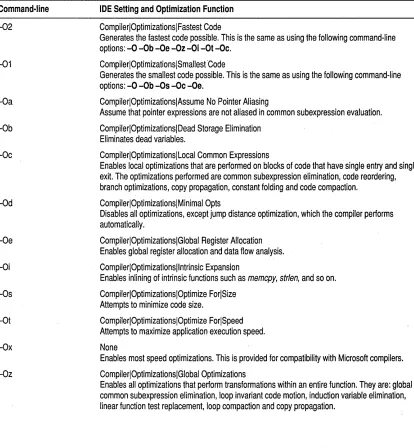
Optimizations ... 67
Source Options ... 68
Messages ... 69
Names ... 70
Make section ... 70
Target section ... 71
Linker section . . . 72
Link Settings . . . 72
Link Libraries . . . 74
Link Warnings ... 74
Librarian section ... 74
Debugger Options section ... 75
Debugger Options ... 75
Disassembly View Local Options ... : ... 77
Variables View Local Options ... 78
Call Stack View Local Options ... 79
Watch View Local Options ... 79
Evaluator View Local Options ... 80
Inspector View Local Options ... 80
Memory View Local Options ... 80
Register View Local Options ... 81
File And Numeric View Local Options ... 82
Directories section . . . 82
Environment section ... 83
Desktop ... 85 Appendix A The optimizer 129
Editor ... 85 What is optimization? ... 129
Fonts ... 87 When should you use the optimizer? .... 129
Syntax Hilite ... 88 Optimization options ... 129
Transfer section ... 89 A closer look at the Borland C++ optimizer. 131 Chapter 5 Managing multi-file projects 93 Sampling the Project Manager ... 94
Error tracking ... 96
Stopping a make ... 97
Syntax errors in multiple source files ... 97
Saving or deleting messages ... 98
Autodependency checking ... 98
Using different file translators ... 99
Overriding libraries ... 101
More Project Manager features ... 101
Looking at files in a project ... 103
Global register allocation ... 131
Globaloptimizations ... 131
Common sub expression elimination ... 131
Loop invariant code motion ... 132
Copy propagation ... 132
Induction variable analysis and strength reduction ... 133
Linear function test replacement ... 133
Loop compaction ... 134
Dead storage elimination ... 135
Pointer aliasing ... 135
Code size versus speed optimizations .... 136
Chapter 6 Command-line compiler 105 Intrinsic function inlining ... 136
Running BCC ... 105
Using the options ... 105
Option precedence rules ... 106
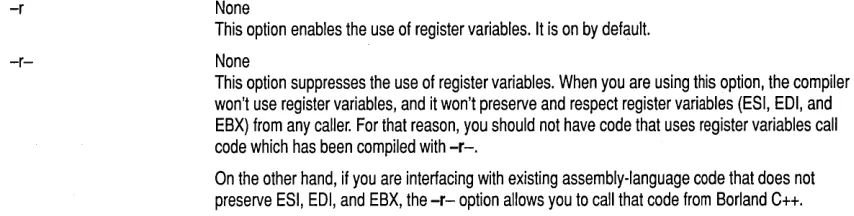
Register parameter passing . . . 138
Parameter rules ... 138
Floating-point registers ... 138
Syntax and file names ... 109 Function naming ... 139
Response files ... 110
Configuration files ... 110
Option precedence rules ... 111
Compiler options ... 111
Appendix B Editor reference 141 Block commands ... 144
Other editing commands ... 145
Macro definitions ... 112 Appendix C Precompiled headers 147 Code-generation options ... 113 How they work ... 147
The -v and -vi options ... 115 Drawbacks ... 148
Optimization options ... 116 Using precompiled headers ... 148
Source code options ... 116 Setting file names ... 148
Error-reporting options ... 117 Establishing identity ... 148
Segment-naming control ... 119 Optimizing precompiled headers . . . 149
Compilation control options ... 120
C++ virtual tables ... 121 Appendix 0 Using the Browser 151 C++ member pointers ... 122
Template generation options ... 123
Exception handling/RTTI ... 124
Linker options ... 124
Environment options ... 125
Include file and library directories ... 125
Browsing through your code ... 151
Browsing through objects ... 153
Filters ... 154
Viewing declarations of listed symbols . . . 155
Browsing through global symbols ... 155
Browsing symbols in your code ... 155
File-search algorithms ... 126 Index 157 An annotated example ... 127
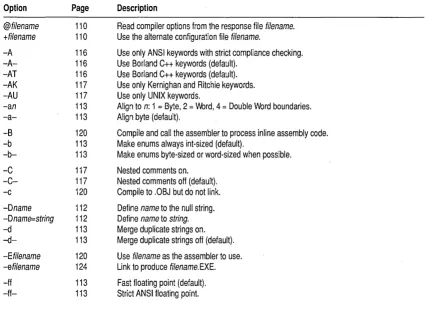
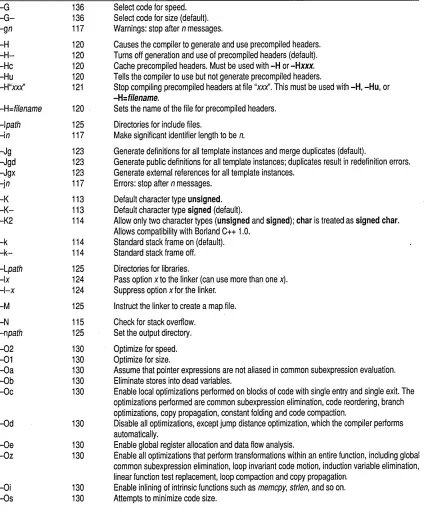
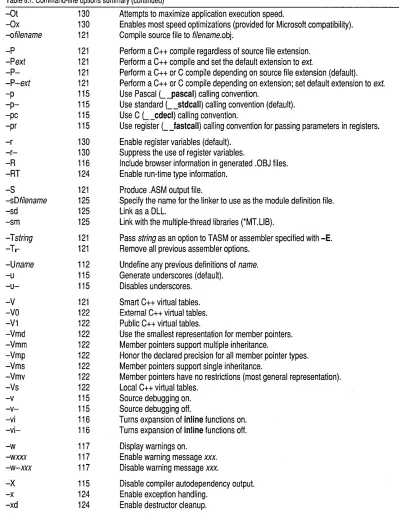
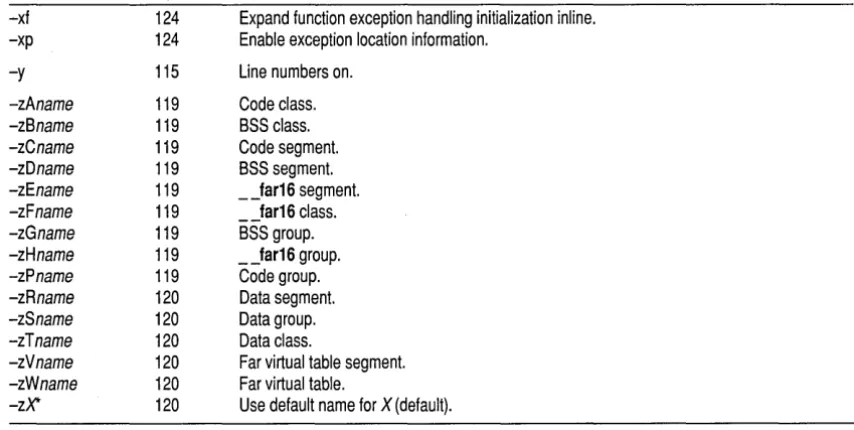
Tables
2.1 General hot keys ... 22 A.1 Optimization options summary ... 130
2.2 Menu hot keys ... 22 A.2 Parameter types and possible 2.3 Editing hot keys ... 23 registers used ... 138
2.4 Online Help hot keys ... 23 B.1 Editing commands ... 141
2.5 Debugging/Running hot keys ... 23 B.2 Block commands in depth ... 144
2.6 Manipulating windows ... 25 B.3 Borland-style block commands .... . . 145
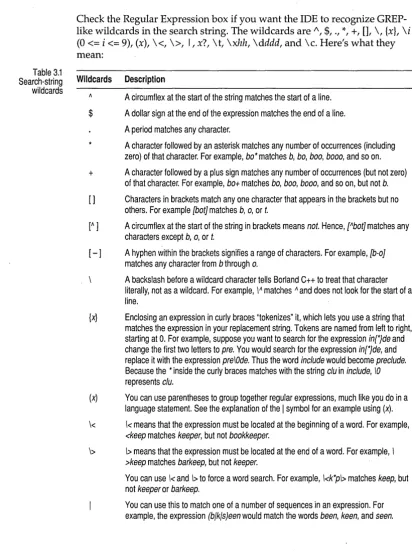
3.1 Search-string wildcards ... 42 B.4 Other editor commands in depth ... 145
Figures
D.l Buttons on the Browser SpeedBar ... 152 D.3 Viewing the details of an object ... 154 D.2 Viewing the object hierarchy of an
application ... 153
Introduction
Borland C++ is a professional optimizing compiler for C++ and C develop-ers. It's powerful, fast, and efficient. With Borland C++, you can create practically any OS/2 or Presentation Manager application.
Because C++ is an object-oriented programming (OOP) language, it gives you the advantages of advanced design methodology and labor-saving features. It's the next step in the natural evolution of C. And because it's portable, you can easily transfer application programs written in C++ from one system to another. You can use C++ for almost any programming task on any platform.
What's in Borland C++
Chapter 1 tells you how to install Borland C++. This Introduction tells you where you can find out more about each feature.
Introduction
Borland C++ includes the latest features programmers have asked for:
.. C and C++: Borland C++ offers you the full power of C and C++ pro-gramming, with a complete implementation of the AT&T v. 3.0 , specification as well as a 100% ANSI C compiler. Borland C++ for OS/2 also provides a number of useful C++ class libraries, plus the a complete implementation of templates and exception handling, which allow efficient collection classes to be built using parameterized types.
• Global optimization: a full suite of state-of-the-art optimizations gives you complete control over code generation, so you can program in the style you find most convenient, yet still produce small, fast, highly efficient code.
• Faster compilation speed: Precompiled headers significantly shorten recompilation time. Optimizations are also performed at high speed, so you don't have to wait for high quality code.
• Programmer's Platform: Borland C++ for OS/2 comes with an improved version of the Programmer's Platform, Borland's open-architecture integrated development environment (IDE) that gives you access to a full range of programming tools and utilities, including
• A multi-file editor featuring an industry-standard Common User Access (CUA) interface .
• Multiple overlapping windows with full mouse support. • Integrated resource compiling and linking.
• Fully integrated debugger with support for multi-thread debugging. • Support for inline assembly code.
• Complete undo and redo capability with a large buffer.
• Built-in Browser that lets you visually explore your class hierarchies, functions and variables, locate inherited function and data members, and instantly browse the source code of any element you select. • Visual SpeedBar for instant point-and-click access to frequently used
menu selections.
• Help: Online context-sensitive hypertext help, with copy-and-paste pro-gram examples for almost every function. You can reach the help func-tions from anywhere in the IDE by simply pressing Ft.
• Streams: Full support for C++ iostreams, plus special Borland extensions to the streams library that let you position text, set screen attributes, and perform other manipulations to streams within the OS/2 environment.
• Container classes: Advanced container class libraries giving you sets, bags, lists, arrays, B-trees, and other reusable data structures. The containers are implemented as templates.
• OS/2 API: The complete OS/2 API documentation in online Help.
Other features:
• Over 200 extended library functions for maximum flexibility and compa-tibility.
• Complex and binary-coded decimal (BCD) math. • Response files for the command-line compiler.
• NMAKE compatibility for easy transition from Microsoft C or C++.
Hardware and software requirements
Borland C++ runs on the IBM PS/2- and PC-compatible family of
computers running the OS/2 operating system. Borland C++ requires OS/2 2.1 or higher, 28M of hard disk space, a floppy drive, and at least 6M of memory; it runs on any OS/2-compatible monitor.
significantly enhance the performance of your programs that use floating-point math operations.
The Borland C++ implementation
Borland C++ is a full implementation of the AT&T C++ version 3.0 with exception handling. It also supports the American National Standards Institute (ANSI) C standard. In addition, Borland C++ includes certain extensions for mixed-language programming that let you exploit your PC's capabilities. See Chapters 1-5 in the Programmer's Guide for a complete formal description of Borland C++.
The Borland C++ package
The Users Guide tells you how to use this product; the
Programmers Guide
and the Library
. Reference focus on
programming in C and C++. The Tools
and Utilities Guide
explains the specialized Borland programming tools.
The User's Guide
Introduction
Your Borland C++ package consists of a set of disks and eight manuals.
The disks contain all the programs, files, and libraries you need to create, compile, link, and run your Borland C++ programs; they also contain sample programs, many standalone utilities, a contextual help file, an inte-grated debugger, and C and C++ documentation in online text files.
These are the eight manuals:
• Borland c++ User's Guide
• Borland C++ Tools and Utilities Guide • Borland C++ Library Reference
II Borland C++ Programmer's Guide
• Resource Workshop User's Guide
.. Turbo Debugger User's Guide .. Turbo Assembler User's Guide .. Turbo Assembler Quick Reference
The User's Guide introduces you to Borland C++ and shows you how to create and run both C and C++ programs. It consists of information you'll need to get up and running quickly, and provides reference chapters on the features of Borland C++: the Programmer's Platform-including the editor and Project Manager-and the command-line compiler. These are the chapters in this manual:
Introduction introduces you to Borland C++ and tells you where to look for more information about each feature and option.
The Tools and Utilities Guide
Chapter 1: Installing Borland C++ tells you how to install Borland C++ on your system; it also tells you how to configure your installation, defaults, and many other aspects of Borland C++.
Chapter 2: IDE basics introduces the features of the Programmer's Platform, giving information and examples of how to use the IDE to full advantage. It includes information on how to start up and exit from the IDE, descriptions of the IDE's local menus (which provide a large part of the IDE's functionality), and describes basic programming and debugging techniques within the IDE.
Chapter 3: Menus and options reference provides a complete reference to the menus and options in the Programmer's Platform.
Chapter 4: Settings notebook explains the use of the Settings notebook for setting the various compilation, linking, and environment settings available in the IDE.
Chapter 5: Managing multi-file projects introduces you to Borland C++S built-in project manager and shows you how to build and update large projects from within the IDE.
Chapter 6: Command-line compiler explains the use of the command-line compiler. It also explains how to use compiler configuration files.
Appendix A: The optimizer introduces the concepts of compiler optimiza-tion, and describes the specific optimization strategies and techniques available in Borland C++.
Appendix B: Editor reference provides a convenient command reference to using the editor with the CVA command interface.
Appendix C: Precompiled headers tells you how to use Borland C++'s precompiled headers feature to save substantial time when recompiling large projects.
Appendix D: Using the Browser tells you how to use the IDE Browser to explore objects hierarchies, functions, and variables in your program.
The Tools and Utilities Guide introduces you to the many programming tools and utility programs provided with Borland C++. It contains information you'll need to make full use of the Borland C++ programming
environment, including the Make utility, the Turbo Librarian and Linker, and special utilities for PM programming.
The Programmers Guide
Introduction
Chapter 2: Make: The program manager introduces the Borland C++ MAKE utility, describes its features and syntax, and presents some examples of usage.
Chapter 3: TUB: The Turbo librarian tells you how to use the Borland C++ Turbo Librarian to combine object files into integrated library (.LIB) files.
Chapter 4: Import library tools tells you how to use the IMPDEF and IMPLIB utilities to define and specify import libraries.
Chapter 5: Resource tools tells you how to use the Resource Compiler to compile .RC scripts into .RES resource files for your PM programs.
Appendix A: Error messages lists and explains run-time, compile-time, linker, and librarian errors and warnings, with suggested solutions.
The Programmer's Guide provides useful material for the experienced C user: a complete language reference for C and C++, writing PM applications, C++ streams, Borland C++ class libraries, OS/2 memory management, and floating-point issues.
Chapters 1-5: Lexical elements, Language structure, C++ specifics, Exception handling, and The preprocessor describe the Borland C++ language.
Chapter 6: Using C++ streams tells you how to use the C++ iostreams library, as well as special Borland C++ extensions for PM.
Chapter 7: Using Borland class libraries tells you how to use the Borland C++ container class library in your programs. .
Chapter 8: Dynamic-link libraries discusses how to build and use dynamic-link libraries under OS/2.
Chapter 9: Building OS/2 applications introduces you to the concepts and
te~hniques of writing applications for PM using Borland C++.
Chapter 10: Mathematical operations covers floating-point, BCD, and complex math.
Chapter 11: OS/2 memory management describes the OS/2 memory-management scheme and system calls.
Chapter 12: Inline assembly tells how to write inline assembly language functions within your Borland C++ program.
Appendix A: ANSI implementation-specific standards describes those aspects of the ANSI C standard that have been left loosely defined or undefined by ANSI, and how Borland has chosen to implement them.
The Library Reference
The Library Reference contains a detailed list and explanation of Borland C++'s extensive library functions and global variables.
Chapter 1: The main function describes the main function.
Chapter 2: Run-time functions is an alphabetically arranged reference to all Borland C++ library functions.
Chapter 3: Global variables defines and discusses Borland C++'s global variables.
Chapter 4: The C++ iostreams provides a reference to the C++ iostreams library, including the Borland extensions to the library.
Chapter 5: Persistent stream classes and macros describes the persistent streams classes and macros.
Chapter 6: The C++ container classes provides a reference to the Borland implementation of the container class library.
Chapter 7: The C++ mathematical classes describes the Borland implementation of the C++ math class libraries.
Chapter 8: Class diagnostic macros describes the classes and macros that support object diagnostics.
Chapter 9: Run-time support describes functions and classes that let you control the way your program executes at run time in case the program runs out of memory or encounters some exception.
Chapter 10: C++ utility classes describes the C++ date, string, and time
classes.
Appendix A: Run-time library cross-reference provides a complete indexed locator reference to all Borland C++ library functions.
Typefaces and icons used in these books
All typefaces and icons used in this manual were produced by Borland's Sprint: The Professional Word Processor, on a PostScript laser printer.
Monospaced type This typeface represents text as it appears onscreen or in a program. It is also used for anything you must type literally (such as Be to start up the Borland C++ IDE).
[ ]
<>
Boldface
Italics
Keycaps
Initial Caps
Square brackets [] in text or OS/2 command lines enclose optional items that depend on your system. Text of this sort should not be typed verbatim.
Angle brackets in the function reference section enclose the names of include files.
This typeface is used in text for Borland C++ reserved words (such as char, switch, void, and __ cdecl), for format specifiers and escape sequences (%d,
\t), and for command-line options (lb).
Borland C++ function names (such as printj), class, and structure names are shown in italics when they appear in text (but not in program examples).
Italics also indicate variable names (identifiers) that appear in text. They can represent terms that you can use as is, or that you can think up new names for (your choice, usually). Italic type is also used to emphasize certain words, such as new terms.
This typeface indicates a key on your keyboard. For example, "Press Esc to exit a menu."
Menu choices and items in dialog boxes are indicated by capitalizing the first letter of each word.
This icon indicates keyboard actions.
This icon indicates mouse actions.
This icon indicates language items that are specific to C++. It is used primarily in the Programmer's Guide.
Tools in your package
Introduction
This product contains many tools to help you:
• The manuals provide information on every aspect of the program. Use them as your main information source.
• While using the IDE, you can press F1 for general help, Ctrl+F1 for help about the currently selected item, or Shift+F1 for an index of topics in the Help system.
• If you are using the command-line compiler, use the OS/2 utility VIEW for online help. For information on VIEW, see your OS/2 documentation. • Many common questions are answered in the DOC files listed in the
README file located in the installation directory of your Borland compiler.
Contacting Borland
Borland Assist plans
Service
Installation hotline
Automated support
TechFax
Online services
Borland Download BBS
CompuServe
BIX
The Borland Assist program offers a range of services to fit the different needs of individuals, consultants, large corporations, and developers. To receive help with your questions about our products, send in the
registration card. North American customers can register by phone 24 hours a day by calling 1-800-845-0147.
Borland Assist is made up of three levels of support:
• Standard Assist gives all registered users assistance with installation and configuration, and offers automated and online services to answer other product questions (see the following table).
• Enhanced Assist plans are designed for individuals who need unlimited support on a toll-free number or priority hotline access.
• Premium Assist plans are designed to support large corporations and software developers.
Available at no charge, Standard Assist offers all registered users the following services:
How to contact Cost Available Description
408-461-9133 The cost of 6:00am - 5:00pm PST Provides assistance on product the phone call Monday - Friday installation and configuration.
Voice: Free 24 hours daily Provides answers to common questions
1-800-524-8420 Requires a Touch-Tone phone or modem.
Modem: The cost of
408-431-5250 the phone call
1-800-822-4269 Free 24 hours daily Sends technical information to your fax
(voice) machine (up to 3 documents per call).
Requires a Touch-Tone phone. Document #1 is the catalog of available catalogs.
408-431-5096 The cost of 24 hours daily Sends sample files, applications, and the phone call technical information via your modem.
Requires a modem (up to 9600 baud).
Type GO BORLAND. Your online 24 hours daily; Sends answers to technical questions via Address messages to charges 1-working-day your modem. Messages are public.
Sysop or All. response time
Type JOIN BORLAND. Your online 24 hours daily; Sends answers to technical questions via Address messages to charges 1-working-day your modem. Messages are public.
GEnie
Introduction
Type BORLAND. Your online Address messages to charges All.
24 hours daily; 1-working-day response time
Sends answers to technical questions via your modem. Messages are public.
For additional details on these and other Borland services, see the Borland Assist Support and Services Guide included with your product.
Your Borland C++ package includes two different versions of Borland C++: the IDE (Programmer's Platform) and the OS/2 command-line version. If you don't already know how to use OS/2 commands, refer to your OS/2 reference manual before setting up Borland C++ on your system.
Using INSTALL
c
H A p T E R1
Installing Borland C++
Borland C++ comes with an automatic installation program called
INSTALL. Because we used file-compression techniques, you must use this program; you can't just copy the Borland C++ files onto your hard disk. INSTALL automatically copies and decompresses the Borland C++ files. FILELIST.DOC on the installation disk includes a list of the distribution files, with a brief description of what each one contains.
We assume you're already familiar with OS/2 commands. For example, you'll need the DISKCOPY command to make backup copies of your distribution disks. Make a complete working copy of your distribution disks when you receive them, then store the original disks away in a safe place.
This chapter contains the following information:
• How to use INSTALL.
II How to access the README file . • How to access the HELPME! file.
II Pointers to more information on Borland's sample programs. iii Information about customizing Borland C++ (setting or changing
defaults, colors, and so on).
INSTALL detects what hardware you are using and configures Borland C++ appropriately. It also creates directories as needed and transfers files from your distribution disks (the disks you bought) to your hard disk.
To install Borland C++, follow these steps:
1. Insert the installation disk (disk 1) into drive A:. 2. Click the icon for drive A:.
3. Click the Install icon.
By default, INSTALL modifies your CONFIG.SYS file for you, unless you turned this option off.
4. The Borland C++ For OS/2 Installation dialog box opens up. It has eight controls:
• Installation Options lets you specify which parts of the Borland C++ package you want to install, whether the installation program should create a PM program group for the compiler, and whether the instal-lation program should modify your CONFIG.5YS file to support the Borland C++ compiler.
• Directory Options lets you specify the directories where you want each part of the compiler installed. By default, these are
subdirectories below the directory specified in the Base Directory input box.
• Base Directory lets you specify the name of the directory in which you want the compiler installed.
• Install From lets you specify where the Borland C++ installation files are located.
• Install starts the installation procedure based on the options you define through the· other controls in this dialog box.
• Exit exits the installation procedure without installing the compiler. • Reset resets all options to their default state (the state they were in
when you first ran the installation program).
• Help gives you help in installing the Borland C++ package.
Use these controls to configure your Borland C++ installation to your satisfaction, then click Install to begin installing the compiler.
5. If you did not tell INSTALL to modify your CONFIG.SYS file in the Installation Options dialog box, you must make the following changes to your CONFIG.5YS file for the compiler to function correctly:
• Modify the PATH line in your CONFIG.SYS file to contain the directory where your compiler is installed:
PATH=C:\OS2iC:\OS2\SYSTEMi ... iC:\BORLANDC\BIN
where BORLANDC is the name of the directory where you installed Borland C++.
• Modify the LIBP ATH line in your CONFIG.SYS file to contain the directory where your compiler is installed:
LIBPATH=C:\OS2iC:\OS2\SYSTEMi ... iC:\BORLANDC\BIN
where BORLANDC is the name of the directory where you installed Borland C++.
6. Reboot your machine so the changes in the PATH and LIBP ATH variables take effect.
Important! When the installation process is complete, INSTALL opens the README file for you to read. The README file contains important, last-minute information about Borland C++.
Note
Running the IDE
After you exit the README file, INSTALL creates a Borland C++ program group and installs it on your desktop if you chose the Create Borland C++ Program Group option in the Borland C++ For OS/2 Installation dialog box. The program group contains icons for the following Borland C++ programs and utilities:
• Borland C++ • Turbo Debugger • Resource Workshop • Import Librarian
If you reinstall your compiler in the future, OS/2 replaces the existing icons with new ones.
If you're anxious to get up and running once you've installed Borland C++, start by opening the Borland C++ folder and clicking on the Borland C++ icon. This starts up the Borland C++ Programmer's Platform, or IDE. For help in the IDE, press Ft.
Opening the README file
Borland C++ automatically places you in the README file when you run the INSTALL program. To access the README file at a later time, open the README file using any regular OS/2 text editor. The file is located in the root directory of your compiler installation.
The HELPME!.DOC file
Your installation disk contains a file called HELPME!.DOC, which contains answers to problems that users commonly run into. Consult it if you find yourself having difficulties. To access the HELPME!.DOC file, open the file using any regular OS/2 text editor. The file is located in the DOC directory of your compiler installation.
Customizing the IDE
Borland C++ lets you completely customize your tools from within the IDE itself, using the various settings that appear in the Settings notebook. These settings let you specify editing modes, default directories, compiler
settings, linker options, and much more.
For information on accessing menus and options in the Borland C++ IDE, see Chapter 2, "IDE basics." For specific information about each menu item, see Chapter 3, "Menus and options reference." For information about the Settings notebook, see Chapter 4, "Settings notebook."
Sample programs
Your Borland C++ package includes the source code for a large number of C and C++ sample programs for OS/2. These programs are located in the EXAMPLES directory (and subdirectories) created by INSTALL. Before you compile any of these sample programs, you should read the printed or online documentation for them.
c
H A p T E R2
IDE basics
Borland's Programmer's Platform, also known as the integrated develop-ment environdevelop-ment, or IDE, has everything you need to write, edit, compile, link, and debug OS/2 or Presentation Manager programs. It provides
iii Multiple, movable, resizable windows.
II Language syntax highlighting with customizable colors .
• Cut, paste, and copy commands that use the Clipboard.
II Full editor undo and redo.
Ell Online Help.
II Examples to copy and paste from the online Help system.
III Inline assembler .
.. Quick spawning of other programs.
II Editor macro language.
II Background compilation that lets you perform other tasks during pro-gram builds.
II Full built-in debugging capability, including multi-thread support.
This chapter explains how to start up and exit the Borland C++ IDE, discusses its components, describes the options available for both the IDE and the command-line compiler, and explains how configuration and project files work.
Starting the IDE
Chapter 2, IDE basics
To start the IDE, you can either double-click the Borland C++ icon or type BC on the OS/2 command line. You can also specify an optional parameter by either typing the parameter on the command line or by configuring the Borland C++ icon with the OS/2 Settings notebook. To open the OS/2 Set-tings notebook, right-click the BC icon. Click the arrow next to the Open menu choice. When the submenu opens, click Settings. When the Settings notebook opens, click in the Parameters box and type the desired
parameter.
Valid parameters for the Borland C++ for OS/2 IDE are Ib and 1m, along with one or more file or project names. You can also specify one or more file or project names without a Ib or 1m parameter.
If you specify a name without an extension, Borland C++ assumes it is a source file with the default extension .CPP and opens the file, even if it does not exist. If you specify the name of a project file, Borland C++ opens that project.
If you do not specify a project name, and if there is a single project file with a .PRJ extension in the current directory, Borland C++ automatically opens the project. If there is more than one file with a .PRJ extension in the current directory, Borland C++ doesn't open any of the projects.
You can set up multiple project icons so that you can load, build, or make various projects by simply clicking on an icon.
To create a new icon for a project, follow these steps:
1. Open the OS/2 Templates folder by double-clicking on it.
2. Right-click the Program icon. Hold the button down.
3. Drag the icon onto the desktop or into a folder and let go of the mouse button.
4. The Settings notebook for the icon automatically opens. Click in the box labeled Path and file name. Type in the path and name of BC.EXE, including the extension.
5. Click in the box labeled Parameters. Type Ib or 1m if you want to do a build or a make, respectively. Type in the path to the file or files you want to use. If a file is a project file, you must specify the .PRJ extension. If you do not specify Ib or 1m, BC loads the files or projects you specify. 6. Click the tab labeled General. In the box labeled Title, type in a name for
your project. This name helps you distinguish between separate
projects, but has no other significance. .
7. Double-click the system menu button in the upper left corner to close the Settings notebook. The new icon appears on the desktop with the name you gave it.
Startup options
The Ib option
The 1m option
Exiting the IDE
Chapter 2, IDE basics
.. Click in another window on the OS/2 desktop.
II Click the Minimize icon in the upper right-hand corner of the IDE desk-top window.
II Press AIt+F9.
The valid startup options for Borland C++'s IDE are Ib and 1m, which use this syntax:
BC [option] [sourcename I projectname [sourcellame]]
where option can be either Ib or 1m, sourcellame is any ASCII file (default extension assumed), and projectname is your project file (it must have the .PRJ extension).
The Ib (build) option causes Borland C++ to open the IDE, recompile and link all the files in your project, print out all compiler messages, and then close the IDE.
To specify a project file, enter the Be command followed by Ib and the project file name. For example,
BC Ib myprog
If there is no MYPROG.PRJ file, the following command loads the file MYPROG.CPP in the editor and then compiles and links it:
BC Ib myprog
The 1m option lets you do a make rather than a build. That is, only outdated source files in your project are recompiled and linked. Follow the
instructions for the Ib option, but use 1m instead.
There are three ways to leave the IDE completely:
II Choose File I Exit.
II Double-click the system menu button, located in the upper-left corner of the IDE window.
EI Press A It+F4.
You'll be prompted to save your files before exiting, if you haven't already done so.
IDE components
The menu bar and menus
To cancel an action, press Esc.
There are three visible components to the IDE desktop: the menu bar at the top, the window area in the middle, and the status line at the bottom. Many menu items also offer dialog boxes.
The menu bar is your primary access to all the menu commands. The menu bar is always visible.
You can choose commands with a mouse in one of two ways:
• Click the desired menu title to display the menu and click the desired command .
• Drag straight from the menu title down to the menu command. Release the mouse button on the command you want (if you change your mind, just drag off the menu; no command is chosen).
If a menu command is followed by an ellipsis ( ... ), choosing the command displays a dialog box. If the command is not followed by an ellipsis, an action occurs as soon as you choose the command.
You can also use the mouse to access local menus throughout the IDE. Click the right mouse button anywhere on the IDE desktop and select a
command from the menu that appears. See page 19 for more information on local menus.
Here is how you choose menu commands using the keyboard:
1. Press Aft or F10. This makes the menu bar active; the next thing you type relates to the items on the menu bar.
2. Use the arrow keys to select the menu you want to display, then press
Enter.
As a shortcut for this step, you can just press the underlined letter of the menu title. For example, when the menu bar is active, press E to move to and display the Edit menu. At any time, press Aft and the underlined letter (such as Att+E) to display the menu you want.
3. Use the arrow keys to select a command from the menu you've opened, or press the underlined letter in the command name. Then press Enter.
Mouse shortcuts
Using the SpeedBar
Chapter 2, IDE basics
The IDE makes some menu commands unavailable when it would make no sense to choose them. However, you can always get online Help about currently unavailable commands.
You can also access local menus using the keyboard. Press Shift+F10, use the arrow keys to select a command from the menu that appears, and press
Enter. See the following section for more information on local menus. Borland C++ offers a number of quick ways to choose menu commands. The click-drag method of selecting a menu item is an example. You can also use the right mouse button as a shortcut for performing a number of tasks. Just right-click anywhere on the IDE desktop or press Shift+F10. A local menu appears. Choose a command from the menu by clicking it with the mouse or by using the arrow keys to select a command and pressing Enter.
The command then executes.
The particular· local menu that appears depends on which window is active. There are different local menus for each of four different window types: Edit, Transcript, Project, and desktop. To familiarize yourself with the local menus and the capabilities they provide, try opening a local menu in each new kind of window you encounter.
Menu choices from local menus are referenced by the same notation that is used for menu choices, except with the window type specified before Local. For example, Edit Local I Toggle Breakpoint means you should open a local menu in an edit window and choose the Toggle Breakpoint command.
Borland C++ has a SpeedBar you can use as a quick way to choose menu commands and other actions with the mouse. The first time you start the IDE, the SpeedBar is a horizontal grouping of buttons just under the menu bar. You can use it as it is, change it to be a vertical bar that appears on the left side of the Borland C++ desktop window, or change it to be a floating palette you can move anywhere on the IDE desktop. You can also turn it off. To configure the SpeedBar, turn to the Environment I Desktop subsec-tion of the Settings notebook and select the setting you want.
The buttons on the SpeedBar represent menu commands. They are shortcuts for your mouse, just as certain key combinations are shortcuts when you use your keyboard. To choose a command, click a button with your mouse. If you click the File I Open button, for example, Borland C++ responds just as if you chose the Open command on the File menu.
The SpeedBar is context sensitive. The buttons that appear on it vary, depending on which window is active.
These are the buttons that appear on the SpeedBar, accompanied by their descriptions that appear on the desktop status bar:
Remove the selected text and put it in the Clipboard
Place a copy of the selected text in the Clipboard
Insert text from the Clipboard at the cursor position
Undo the previous editor action
Locate and open a file
Save the file in the active Edit window
View the include files for project item
Repeat last Find or Replace operation
~ ~
Compile the selected file
Bring target up-to-date
Make and run the current program
M
L1!J
Trace into statement
Step over statement
Trace into instruction
Step over instruction
Access online help
Open the Project Manager window
Keyboard shortcuts
Input boxes are described on page 27.
Chapter 2, IDE basics
Open the Transcript window Edit selected file
Add an item to the project View selected file
Delete an item from the project
Some of the buttons on the SpeedBar are occasionally dimmed, just as some menu commands occasionally are. This means that, in the current context, the command the button represents is not available to you. For example, the Compile The Selected File button is dimmed if the selected file is not compilable (for example, if the selected file is a .DEF file).
From the keyboard, you can use a number of keyboard shortcuts (also known as hot keys) to access the menu bar, choose commands, or work within dialog boxes. You need to hold down Aft while pressing the high-lighted letter when moving from an input box to a group of buttons or boxes. Here's a list of the keyboard shortcuts available:
To accomplish this:
Display the menu, carry out the command, or select the button or menu choice
Open the System menu
Open the menu of the active window
Carry out the command
Do this:
Press Aft plus the underlined letter of the command (in a dialog box, just press the underlined letter). For the File menu,you can press A/tby itself or F10.
Press Alt+Spacebar.
Press A/t+- (the Aft key and the - key).
Type the keystrokes next to a menu command.
For example, to cut selected text, press Alt+E T (for Edit I Cut) or you can just press Shift+Del, the shortcut.
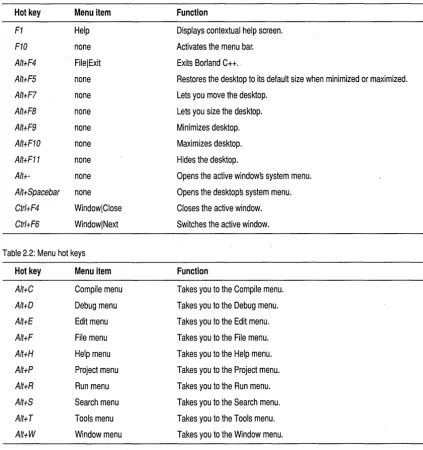
There are also hot keys that perform functions without accessing any menus by means of a single keystroke. The following tables list the most-used Borland C++ hot keys.
Table 2.1: General hot keys
Hot key Menu item
F1 Help
F10 none
Alt+F4 FilelExit
Alt+FS none
AIt+F7 none
AIt+FB none
AIt+F9 none
AIt+F10 none
Alt+F11 none
Alt+- none
AIt+Spacebar none
Ctrl+F4 WindowlClose
[image:31.507.52.475.74.524.2]Ctrl+F6 WindowlNext
Table 2.2: Menu hot keys
Hot key Menu item
Alt+C Compile menu
Alt+D Debug menu
AIt+E Edit menu
Alt+F File menu
AIt+H Help menu
AIt+P Project menu
Alt+R Run menu
Alt+S Search menu
Alt+T Tools menu
Alt+W Window menu
Function
Displays contextual help screen.
Activates the menu bar.
Exits Borland C++ ..
Restores the desktop to its default size when minimized or maximized.
Lets you move the desktop.
Lets you size the desktop.
Minimizes desktop.
Maximizes desktop.
Hides the desktop.
Opens the active windows system menu.
Opens the desktops system menu.
Closes the active window.
Switches the active window.
Function
Takes you to the Compile menu.
Takes you to the Debug menu.
Takes you to the Edit menu.
Takes you to the File menu.
Takes you to the Help menu.
Takes you to the Project menu.
Takes you to the Run menu.
Takes you to the Search menu.
Takes you to the Tools menu.
Table 2.3: Editing hot keys
Hot key Menu item
Ctrl+lns EditlCopy
Shift+Del EditlCut
Shift+lns EditlPaste
Ctrl+Del EditlClear
Alt+Bksp EditlUndo
AIt+Shift+Bksp EditlRedo
F3 SearchlSearch Again
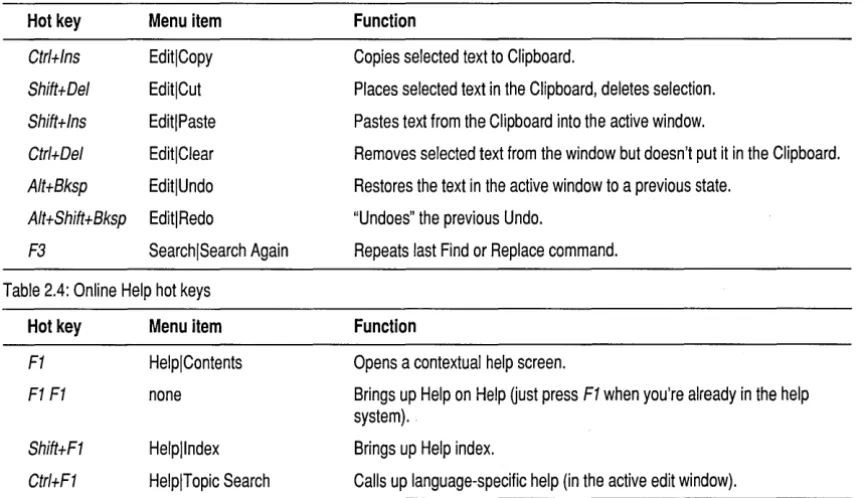
Table 2.4: Online Help hot keys
Hot key
F1
F1 F1
Shift+F1
Ctrl+F1
Menu item
HelplContents
none
Helpllndex
[image:32.507.28.460.78.327.2]HelplTopic Search
Table 2.5: Debugging/Running hot keys
Hot key Menu item
F2 Edit LocallToggle Breakpoint
Ctrl+F9 RunlRun
F4 RunlGo To Cursor
F7 RunlTrace Into
FB RunlStep Over
F9 CompilelMake
Function
Copies selected text to Clipboard.
Places selected text in the Clipboard, deletes selection.
Pastes text from the Clipboard into the active window.
Removes selected text from the window but doesn't put it in the Clipboard.
Restores the text in the active window to a previous state.
"Undoes" the previous Undo.
Repeats last Find or Replace command.
Function
Opens a contextual help screen.
Brings up Help on Help Uust press F1 when you're already in the help system).
Brings up Help index.
Calls up language-specific help (in the active edit window).
Function
Sets or clears conditional breakpoint.
Runs program.
Runs program to cursor position.
Executes one line, tracing into functions.
Executes one line, skipping function calls.
Makes (compiles'links) program.
Borland C++ windows
Most of what you see and do in the IDE happens in a window. A window is a screen area that you can open, close, move, resize, minimize, maximize, tile, and overlap.
[image:32.507.31.456.351.483.2]If you exit Borland C++ with a file open in a window, you are returned to your desktop, open file and all, when you next use Borland C++.
You can have many windows open in the IDE, but only one window can be
active at any time. Any command you choose or text you type generally applies only to the active window. (If you have the same file open in several windows, the action applies to the file everywhere that it's open).
You can spot the active window easily: It's the one with the colored bar at the top of it. If your windows are overlapping, the active window is usually the one on top of all the others (the foremost one). The only time the active window is not on top of all other open windows is when you have a window open that is not contained on the IDE desktop, such as the Settings notebook. The Settings notebook is always on top, even when it is not the active window.
There are several types of windows, but most of them have these things in common:
• A title bar
• A system menu button • Scroll bars
• Window sizing buttons
The status line at the bottom of the desktop window also displays the current line and column numbers of the active edit window. If you've modified the file in the active window, the word "Modified" appears on the status line.
The system menu button of a window is the small box in the upper left comer. Double-click the system menu button to quickly close the window. You can also press Ctrl+F4, which closes the active window. The Inspector and Help windows are considered temporary; you can close them by pressing Esc.
The title bar, the topmost horizontal bar of a window, contains the name of the window. If the window contains a text file, the window name is the same as that of the open file. Otherwise, the window name indicates the function of the window. Click the title bar and move the mouse to drag the window to a new location. You can also double-click anywhere on the title bar to maximize the window, or, if it's already maximized, you can double-click anywhere on the title bar to restore the window to its normal size.
The Maximize and Restore buttons are never present at the same time.
Scroll bars also show you where you are in your file.
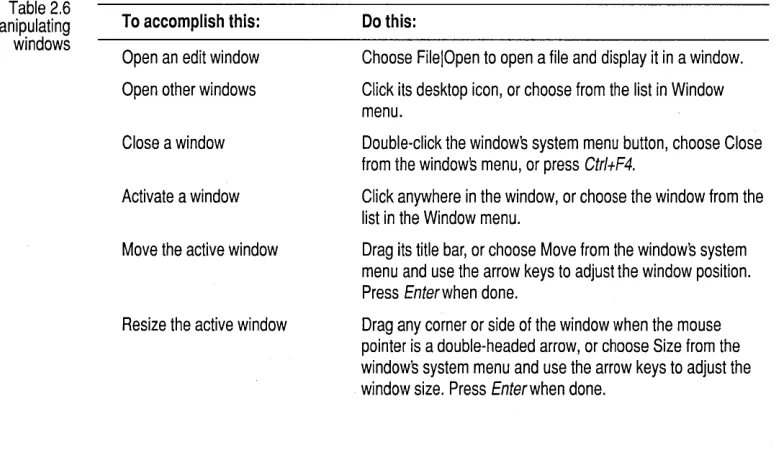
[image:34.504.67.455.378.606.2]Window management
Table 2.6 Manipulating windows
Chapter 2, IDE basics
Pressing the Minimize button closes the window, and places an icon for it on the IDE desktop. You can then double-click the icon to restore it to its previous size.
Pressing the Maximize button opens the window to the full size of the Borland C++ desktop window. The Maximize button is then replaced by the Restore button. Pressing the Restore button returns the window to the same size as when you pressed the Maximize button. The Restore button is then replaced by the Maximize button.
Scroll bars are horizontal or vertical bars located on the bottom or right side of a window, respectively. You use these bars to scroll the contents of the window. Click the arrow at either end to scroll one line at a time. Keep the mouse button pressed to scroll continuously. You can click the shaded area to either side of the scroll box to scroll a page at a time. Finally, you can drag the scroll box to any spot on the bar to quickly move to a spot in the window relative to the position of the scroll box.
You can drag any corner nr side of a window to make the window larger or smaller. Dragging a side lets you size the window in only one direction. For example, if you drag the bottom of the window, you can only make the window taller or shorter. But if you drag from the corner of a window, you can make it taller or shorter and wider or thinner.
Table 2.6 gives you a quick rundown of how to handle windows in Borland C++. Note that you don't need to use the mouse to perform these actions-a keyboactions-ard works just fine.
To accomplish this:
Open an edit window
Open other windows
Close a window
Activate a window
Move the active window
Resize the active window
Do this:
Choose FilelOpen to open a file and display it in a window.
Click its desktop icon, or choose from the list in Window menu.
Double-click the window's system menu button, choose Close from the window's menu, or press CtrltF4.
Click anywhere in the window, or choose the window from the list in the Window menu.
Drag its title bar, or choose Move from the window's system menu and use the arrow keys to adjust the window position. Press Enterwhen done.
Drag any corner or side of the window when the mouse pointer is a double-headed arrow, or choose Size from the windows system menu and use the arrow keys to adjust the window size. Press Enterwhen done.
The status line
Dialog boxes
Action buttons
Table 2.6: Manipulating windows (continued)
Maximize the active window Click the Maximize box in the upper right corner of the window, or double-click the window's title bar.
The status line appears at the bottom of the IDE desktop. It
• Tells you what the program is doing (for example, when an edit file is being saved, the status line displays Savingfilename ... ).
• Offers one-line hints on any selected menu command and dialog box items.
• Indicates whether the file has been modified since the last time you saved it.
• Displays the current line and column position of the cursor when an edit window is active.
The status line changes as you switch windows or activities. When you've selected a menu title or command, the status line changes to display a one-line summary of the function of the selected item.
A menu command with an ellipsis ( ... ) after it leads to a dialog box. Dialog boxes offer a convenient way to view and change multiple settings. When you're making settings in dialog boxes, you work with five basic types of onscreen controls:
• Action buttons • Radio buttons • Check boxes • Input boxes • List boxes
Many dialog boxes have three standard buttons: OK, Cancel, and Help. If you choose OK, the choices in the dialog box are accepted; if you choose Cancel, nothing changes, no action takes place, and the dialog box is closed. Choosing Help opens a Help window containing information about your dialog box. Esc is always a keyboard shortcut for Cancel (even if no Cancel button appears).
To choose an item, click the dialog box button you want. If you want to use the keyboard, press Aft and the underlined letter of an item to activate it. For example, if the K in OK is underlined, Alt+K selects the OK button. Press
You can select another button with
Tab; press Enterto
choose that button.
Radio buttons and check boxes
Input and list boxes
You can control whether history lists are saved to the desktop; see the Environmentl Desktop subsection of the
Set-tings notebook.
Chapter 2, IDE basics
Most dialog boxes also have a default button that you can choose by simply pressing Enter. You can always tell which button is the default button because it's highlighted when the dialog box is first opened.
Radio buttons are like car radio buttons. They come in groups, and only one radio button in the group can be on at anyone time. To choose a radio button, click it or its text. From the keyboard, select Aft and the highlighted letter, or press Tab until the group is highlighted and then use the arrow keys to choose a particular radio button. Press Tab or Shift+Tab again to leave the group with the new radio button chosen.
Check boxes differ from radio buttons in that you can have any number of check boxes checked at the same time. When you select a check box, a check mark appears in it to show you it's on. An empty box indicates it's off. To change the status of a check box, either click it or its text, press Tab until the check box is highlighted and then press Spacebar, or select Alt and the highlighted letter.
If several check boxes apply to a particular topic, they appear as a group. In that case, tabbing moves to the group. Once the group is selected, use the arrow keys to select the item you want, and then press Spacebar to check or uncheck it.
Input boxes let you type in text. Most basic text-editing keys work in the text box (for example, arrow keys, Home, End, and Ins). If you continue to type once you reach the end of the box, the contents automatically scroll right or left as necessary.
If an input box has a down-arrow icon ( t ) to its right, you can display that box's history list or choice list. A history list is a list of the text you previously typed into this box. The Find box, for example, keeps track of and lists the text you searched for previously. Click the t to display the list. To choose an item from the list, select it, then press Enter. You can also edit an entry in the history list, once it's in the input box. Press Esc to exit from the list without making a selection.
Many dialog boxes also contain a list box, which lets you scroll through and select from variable-length lists (often file names) without leaving a dialog box. If a blinking cursor appears in the list box and you know what you're looking for, you can type the word (or the first few letters of the word) and Borland C++ searches the list for it.
To make a list box active, click it or choose the highlighted letter of the list title (or press Tab until it's highlighted). Once a list box is displayed, you
can use the scroll box to move through the list or press
t
or J, from the keyboard.Configuration and project files
The configuration file
Project files
IDE configuration files contain information about how you have the IDE environment configured. Project files contain all the information necessary to build a project, but don't affect how you use the IDE.
The IDE configuration file, TCCONFIG.TC, contains only environmental (or global) information, including
• Editor mode setting (such as autoindent, use tabs, and so on). • Auto-save flags.
The configuration file is not required to build programs defined by a project. The project (.PRJ) file handles those details.
When you start a programming session, Borland C++ looks for
TCCONFIG.TC first in the current directory and then in the directory that contains BC.EXE. If you delete TCCONFIG.TC, you can replace it with a default configuration file. The next time you start the IDE, choose the Project I Save menu command. Make sure the Environment box is checked and press OK.
The IDE places all information needed to build a program into a binary project file, a file with a .PRJ extension. Project files contain the settings for
• Compiler, linker, make, and librarian settings. • Directory paths.
• The list of all files that make up the project. • Special translators (such as Turbo Assembler).
In addition, the project file contains other general information on the project, such as compilation statistics (shown in the project window), and cached autodependency information .
. PRJ project files correspond to the .CFG configuration files that you supply to the command-line compiler (the default command-line compiler
configuration file is TURBOC.CFG).
You can load project files in any of the following ways:
The project
directory
Desktop files
You can set some of these settings on or off using controls in the Environmentl Desktop subsection of the Settings note-book.
Default files
Chapter 2, IDE basics
Be myproj [. PRJ]
• Specify a project file for a BC icon through the OS/2 Settings notebook. See page 16 for a description of how to set up project icons.
• If there is only one .PRJ file in the working directory when you start up the IDE, the IDE assumes that this directory is dedicated to this project and automatically loads the project file.
• To load a project from within the IDE, select Project I Open Project.
When a project file is loaded from a directory other than the current directory, the current directory is set to where the project is loaded from. This allows project items to be located relative to the current directory instead of by absolute paths, which allows projects to move from one drive to another or from one directory branch to another.
Each project file can have an associated desktop file (prjname.DSK) that contains state information about the associated project. While none of its information is needed to build the project, all of the information is directly related to the project. The desktop file includes
• The context information for each window of the desktop (for example, .. your positions in the files or bookmarks).
• The history lists for various input boxes (for example, search strings or file masks).
• The layout of the windows on the desktop. • The contents of the Clipboard.
• Watch expressions. • Breakpoints.
You don't need to have the desktop file to use a project file. If you delete a desktop file, you can replace it by choosing the Project I Save menu command. Make sure the Desktop box is checked and press OK.
When no project file is loaded, two default files serve as global placeholders for project- and state-related information: TCDEF.DPR and TCDEF.DSK files, collectively referred to as the default project.
These files are usually stored in the same directory as BC.EXE, and are created if they are not found. When you run the IDE from a directory without loading a project file, you get the desktop and settings from these files. These files are updated when you change any project-related settings (for example, compiler settings) or when your desktop changes (for example, the window layout).
Changing project files
Syntax highlighting
Configuring element colors
When you start a new project, the settings from your previous project are in effect.
Because each project file has its own desktop file, changing to an existing project file causes the newly loaded project's desktop to be used, which can change your entire window layout. When you create a new project (by using Project I Open Project and typing in a new .PRJ file name), the new project's desktop inherits the previous desktop. When you select Project I Close Project, the default project is loaded and you get the default desktop and project settings.
Syntax highlighting helps you easily distinguish various parts of your code. Different syntax elements are highlighted in different colors for easy identification. For example, C and C++ keywords are highlighted a different color from identifiers. So when you look at your file in the editor, you can quickly pick out keywords from your variables and function names. Syntax items that are distinguished by syntax highlighting include the following:
• Breakpoint • Character • Comment
• CPU position
• Float • Hex
• Identifier • Illegal char
• Integer .Odal
• Preprocessor • Reserved word
• String • Symbol
• Whitespace
Click the Syntax Highlighting check box in the Environment I Editor sub-section of the Settings notebook to turn syntax highlighting on and off. To choose the colors, select the Environment I Syntax Hilite subsection of the Settings notebook.
To change the color of an element, follow these steps:
1. Select the element you want to change in the Element list box, or click a sample of that element in the code sample.
2. Select the colors you want in the Color dialog box .
II To select a background color with your mouse, click the color in the BG box. To select the color with your keyboard, press Tab until the BG box is active. Use the arrow keys to move around the box.
As you select colors, you'll see the results reflected in the sample code. 3. Close the Settings notebook.
Some basic tasks
Compiling and linking programs
Making an
application
Building an application
Chapter 2, IDE basics
This section contains descriptions of some basic tasks you can perform in the IDE, including compiling, linking, and debugging a program.
You can use the Borland C++ IDE to compile and link both single-file programs or multiple-file projects. There are a number of ways· you can compile and/or link your application.
Making an application consists of the following steps:
1. Compile any source files that have been modified since they were last compiled, that include header files that have been modified, or that' have not previously been compiled. This includes C and C++ files, assembly files (.ASM), resource script files (.RC), and any other text files that are processed into object or binary files.
2. Link the application if any of the link files (that is, object files, libraries, resource files, module-definition files (.DEF files), and so on) are newer than the existing executable file, or if there is no existing executable.
If you have a project file open, the project is built, regardless of what the current active window is. If you are compiling a single-file application without a project file, the source-file edit window must be the active window.
To make an application, do one of the following:
III Press F9.
II Choose the Compile I Make menu command.
iii Press the Bring Target Up-to-date SpeedBar button.
Building an application is similar to making an application, except that all
source files are compiled, regardless of whether they've been modified, and the application is linked. To build an application, choose the Compile I Build All menu choice.
Compiling a file
Linking a file
Debugging an application
Preparing your application
You can choose to compile a single file as opposed to an entire application. This compiles the file in the active edit window or, if the Project window is the active window, compiles the file currently selected in the Project window. The Project Manager automatically uses the appropriate tool to compile a file. For example, the IDE uses the C++ compiler to compile a C++ file and the Resource Compiler to compile a resource script file (.RC file).
You cannot choose to compile if there are no windows open or if the Transcript window is the active window.
To compile a file, do one of the following:
• Choose the Compile I Compile menu command . • Press the Compile The Selected File SpeedBar button.
You can link your object files into an execu~able without processing any source files, even if the source files have been modified since they were last compiled. To link an application, choose the Compile I Link menu
command.
Once you have written and compiled your program, you might notice that it doesn't produce the results you expected. This means you have a bug in your program. Borland C++ provides integrated debugging to let you track down program bugs, modify erroneous code, and rebuild your application, all without leaving the IDE. You can also use the standalone Turbo
Debugger in much the same way as the IDE debugger. The IDE debugger is actually a functional subset of the standalone debugger. For more
information on debugging, consult the Turbo Debugger User's Guide and the Turbo Debugger online help.
Before you can debug your application, it needs to contain debugging information. There are a number of settings that affect what debugging information is included in your application.
B There a