AT&T
PARTNER MAIL VS™
Voice Messaging System
Release 1
Copyright © 1994 AT&T All Rights Reserved Printed in U.S.A.
AT&T 518-322-102 Issue 1
January 1994
Notice
Every effort was made to ensure that the information in this book was complete and accurate at the time of printing. However, information is subject to change.
Federal Communications Commission (FCC) Interference Notice
This equipment has been tested and found to comply with the limits of a Class A digital device, pursuant to Part 15 of FCC rules. For additional FCC information, see Appendix B of this book.
Canadian Emissions Requirements
This digital apparatus does not exceed the Class A limits for radio noise emissions from digital apparatus set out in the Radio Interference Regulations of the Canadian Department of Communications. For additional DOC information, see Appendix B of this book.
Le present appareil numerique n’emet pas de bruits radioelectriques depassant Ies Iimites
applicable aux appareils numeriques de la classe A prescrites dans Ie Reglement sur Ie brouillage radioelectrique edicte par Ie ministere des Communications du Canada. Vous trouverez des renseignements complémitaires à la annexe B de ce manuel.
Security
As a customer of new telecommunications equipment, you should be aware of the significant and growing problem of theft of long distance services by third parties, known commonly as “toll fraud.” It is particularly important that you understand and take appropriate steps to deal with this crime because under applicable tariffs, you will be responsible for payment of associated toll charges. AT&T cannot be responsible for such charges and will not make any allowance or give any credit resulting from toll fraud.
Toll fraud can occur despite the preventive efforts of network providers and equipment
manufacturers. Toll fraud is a potential risk for every customer with telecommunications equipment having one or more of the following features: (1) remote access, (2) automated attendant, (3) voice mail, (4) remote administration and maintenance, and (5) call forwarding (remote). This is not a product or design defect, but a risk associated with equipment having one or more of the features described above. If your new telecommunications equipment possesses any of these features, please consult the relevant portion of your documentation for further details and specific procedures to reduce the risk of toll fraud or contact your AT&T dealer for further details.
Trademarks
PARTNER MAIL VS and PARTNER MAIL are trademarks of AT&T. MLS-34D, MLS-18D, MLS-12D, MLS-12, MLS-6, and PARTNER are registered trademarks of AT&T.
Ordering Information
The order number for this book is 518-322-102. To order additional books, call 1 800 432-6600 in the U.S. and 1 800 255-1242 in Canada.
Support Telephone Number
In the continental U.S., AT&T provides a toll-free customer helpline 24 hours a day. Call the AT&T Helpline at 1 800 628-2888 if you need assistance when programming or using your system.
Call Voice Mail Service (Press Intercom 7 7 7 )
Enter Login (Press 9 9 # )
Enter Password
(Press 1 2 3 4 for factory default and # )
Select Programming
Main Menu (Press 9 )
Automated Attendant
(Press [ 3 ])
Line Ownership
(Press [ 6 ])
System Reset– Save All
(Press [ 9 ][ 8 ][ 9 ][ 7 ][ 3 ][ 7 ][ 3 ][ 8 ])
Day Menu
(Press [ 1 ]) +[ # ])
Play Menu Definition (Press [ 2 ][ 2 ])
Mailbox Number Exists? No Play Day Prompt (Press [ 2 ][ 1 ])
Re-initialize Password (Press [ 3 ])
Create Mailbox (Press [ 4 ])
Modify Menu Definition and/or
Day Prompt
(Press [ 6 ]) (Press [ ★ ][ D ])
Night Menu (Press [ 2 ])
Mailboxes (Press [ 4 ])
Yes
Mailbox Number (Enter Number
Re-initialize Mailbox (Press [ 4 ])
Delete Mailbox (Press [ ★ ][ D ])
Scan Line Ownership
(Press [ 2 ])
Assign Line Ownership
(Press [ 4 ])
Modify Line Ownership
(Press [ 6 ])
Contents
About This Guide
iii1
Overview
1-i■ Important Safety Instructions 1-ii
■ Tutor Service 1-2
■ Voice Messaging Services 1-3
Summary of Fixed Settings 1-10
■
2
Installation
2-i■ Important Safety Instructions 2-ii
■ Before You Start 2-1
Installing the Voice Messaging System Module 2-2
■
3
Understanding Programming
3-i■ Communications System Programming 3-1
Voice Messaging System Programming 3-4
■
4
Initial Programming
4-i■ Overview 4-1
■ Initial System Setup 4-2
■ Voice Messaging System Programming 4-3 ■ Communications System Programming 4-7
■ Verifying System Operation 4-12
■ Initial Programming Flowchart 4-14
Programming Quick Reference 4-17
Contents
5
System Management
5-i■ General Information 5-2
Automated Attendant Service 5-5
■
■ Modifying Mailboxes 5-13
■ CO Line Coverage 5-21
■ Telephone Button Programming 5-26
6
Troubleshooting
6-iA
Specifications
A-1B
FCC Information
B-1C
Maintenance
C-1D
Planning Forms
D-1About This Guide
Purpose
This guide provides instructions for installing, programming, and managing the PARTNER MAIL VS™ Voice Messaging System on the PARTNER® Plus or PARTNER II Release 3.1 or later Communications System. It is intended for the technician who installs the hardware and programs the initial system settings and for the System Manager, the person at the customer site who is responsible for managing the system on an on-going basis.
Terminology
Throughout this guide, the PARTNER MAIL VS Voice Messaging System is referred to simply as the voice messaging system and users who have a mailbox on the voice messaging system are called subscribers. Additionally, the PARTNER Plus or PARTNER II Communications System is referred to as the
communications system and the AT&T telephones specifically designed to work
with the communications system are called system phones. System phones include the MLS-34D®, MLS-18D®, MLS-12D®, MLS-12®, MLS-6®, and MLC-6 model telephones.
Finally, the procedures in this guide instruct you to press dialpad key
sequences using a letter that relates to the specific task. For example, to delete a message from your mailbox, you are instructed to press [ ✳ ] [ D ], which is equivalent to [ ✳ ] [ 3 ] on the dialpad. These key sequences and their associated numerical sequences are listed below for your reference:
How to Use This Guide
If you are the technician, refer to the appropriate chapters to help you:
■
■
■
■
Install the voice messaging system hardware. Chapter 2 provides
instructions for installing the voice messaging system module in the communication system’s control unit. It also provides instructions for installing the Mailbox Expansion Card–20.
Refresh your memory about programming. Chapter 3 offers general
programming information for both the communications system and the voice messaging system.
Perform initial programming. Chapter 4 provides step-by-step
programming instructions for integrating the voice messaging system with the communications system. It also provides test procedures that you should use after installation to ensure that the system is working properly.
Solve problems. Chapter 6 provides information to help you identify and
correct problems you may have with the voice messaging system. If you are the System Manager, refer to the appropriate chapters to help you:
Learn about the voice messaging system. Chapter 1 describes the
voice messaging system’s features and services.
Learn about programming. Chapter 3 offers general programming
information for both the communications system and the voice messaging system.
Manage the voice messaging system. Chapter 5 provides instructions
for changing system settings to accommodate the changing needs of your business. It also offers guidelines for setting up and using the receptionist’s extension.
Solve problems. Chapter 6 provides information to help you identify
■
■
■
■
and correct problems you may have with the voice messaging system.
Once you are experienced with the system, use the Table of Contents or Index to locate the information you need.
Product Safety Statements
How to Comment on This Guide
A feedback form is located at the end of this guide, after the appendixes. If the form is missing, send your comments and recommendations for changes to Documentation Manager, AT&T, 200 Laurel Avenue (Room 4E-409),
Middletown, NJ 07748 (FAX 908 957-4009).
Reference Materials
In addition to this guide, the following materials are available (the order numbers are in parentheses):
PARTNER MAIL VS Voice Messaging System
■ Planning Guide and Forms (518-322-503) ■ User’s Quick Reference (518-322-103) ■ Tutor Labels (585-322-104)
PARTNER Plus Release 3.1 Communications
System
■ System Planner (518-455-219) ■ Installation (518-455-218)
■ Programming and Use (518-455-217)
■ Quick Reference for Use with MLS-Series Telephones (518-455-216)
PARTNER II Release 3.1 Communications System
■ System Planner (518-455-319) ■ Installation (518-455-318)
■ Programming and Use (518-455-317)
■ Quick Reference for Use with MLS-Series Telephones (518-455-316)
To order these materials, call the AT&T Customer Information Center:
In the U.S.: 1 800 432-6600
In Canada: 1 800 255-1242
Overview
1
Contents
Important Safety Instructions
Tutor Service
Voice Messaging Services
■ Automated Attendant Service Automated Attendant Options Music On Hold
■ Call Answer Service Extension Coverage CO Line Coverage Voice Mailbox Transfer
■ Voice Mail Service
Voice Mailboxes Guest Mailboxes
Summary of Fixed Settings
Important Safety Instructions
WARNING:
The following list provides basic safety precautions that should always be followed when using your system:
1.
2.
3.
4.
5.
6.
7.
8.
9.
Read and understand all instructions.
Follow all warnings and instructions marked on the product.
Unplug all telephone connections before cleaning. DO NOT use liquid cleaners or aerosol cleaners. Use a damp cloth for cleaning.
This product should be serviced by (or taken to) a qualified repair center when service or repair work is required.
DO NOT use this product near water, for example, in a wet basement location
DO NOT place this product on an unstable cart, stand, or table.
Never push objects of any kind into slots or openings as they may touch dangerous voltage points or short out parts that could result in a risk of fire or electric shock. Never spill liquid of any kind on the product.
Avoid using this telephone during an electrical storm. There may be a remote risk of electric shock from lightning.
DO NOT use the telephone to report a gas leak in the vicinity of the leak.
10. The product is provided with a three-wire grounding type plug. This is a safety feature. DO NOT defeat the safety purpose of the grounding type plug. DO NOT staple or otherwise attach the AC power supply cord to building surfaces.
CAUTION:
DO NOT block or cover the ventilation slots and openings. They prevent the product from overheating. DO NOT place the product in a separate enclosure unless proper ventilation is provided.
Overview
1
The PARTNER MAIL VS Voice Messaging System is designed to work with your communications system to automate the call handling needs of your business. The voice messaging system:
■
■
■
■
■
Handles up to two calls simultaneously and provides service for up to 10 subscribers. If an optional Mailbox Expansion Card–20 is installed, the voice messaging system provides service for up to 20 subscribers. Answers outside calls, plays a customized message prompting the caller to press digits for the party with whom the caller wants to speak, and efficiently routes the call to the appropriate party—all without the aid of a receptionist.
Allows callers to leave a private message if the called party does not answer or is busy on another call, or to transfer to another system extension or the receptionist’s extension for assistance.
Allows subscribers to retrieve messages from any touch-tone phone on your premises or from a remote location.
Provides after-hours service in addition to daytime service.
Tutor Service
The Tutor Service is an “on-line help” feature that allows users to easily access and listen to information on commonly-used communications system features. Any user with a system phone can access this service—users do not have to be voice messaging system subscribers.
The Tutor Service provides information about the following subjects:
■
■
Learning about system phone features such as ringing patterns, volume control, speakerphone, display, buttons, and lights.
Making various types of internal calls including group paging calls, voice interrupt on busy calls, and hands-free answer on intercom calls.
Using system features such as Conference, Transfer, Auto Dialing,
■
Personal Speed Dialing, Last Number Redial, and Save Number Redial.
To access the Tutor Service menu, users simply make a call to the voice messaging system. The system plays:
Welcome to PARTNER MAIL VS. Please enter extension and pound sign. Otherwise, to access PARTNER Tutor, press star 4.
When users dial [ ✳ ] [ 4 ], they hear instructions for using the Tutor Service, followed by a list of topics and subtopics. The user can then enter the topic and subtopic numbers of their choice. Refer to “Using the Tutor Service” in Chapter 5 for a list of topic and subtopic numbers.
Voice Messaging Services
The voice messaging system provides three types of service:
■ Automated Attendant Service. Answers your company’s outside calls
and transfers them to the destination selected by the caller.
■ Call Answer Service. If the called party is busy or does not answer, this
service allows the caller to leave a message or to transfer to another extension.
■ Voice Mail Service. Allows subscribers to listen to messages and
manage their own mailbox.
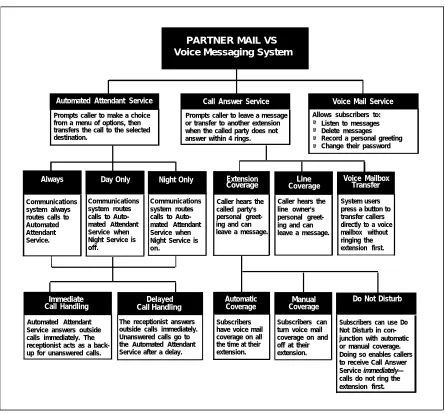
Figure 1-1 provides an overview of the features associated with each service.
PARTNER MAIL VS Voice Messaging System
Automated Attendant Service Call Answer Service Voice Mail Service
Prompts caller to make a choice from a menu of options, then transfers the call to the selected destination.
Prompts caller to leave a message or transfer to another extension when the called party does not answer within 4 rings.
Allows subscribers to:
■
■ Listen to messagesDelete messages
Record a personal greeting Change their password
■ ■
Always Day Only Night Only Extension
Coverage CoverageLine
Voice Mailbox Transfer
Communications system always routes calls to Automated Attendant Service.
Communications system routes calls to Auto-mated Attendant Service when Night Service is off.
Communications system routes calls to Auto-mated Attendant Service when Night Service is on.
Caller hears the called party's personal greet-ing and can leave a message.
Caller hears the line owner's personal greet-ing and can leave a message.
System users press a button to transfer callers directly to a voice mailbox without ringing the extension first.
Immediate
Call Handling Call HandlingDelayed
Automatic
Coverage CoverageManual
Do Not Disturb
Automated Attendant Service
The Automated Attendant Service can answer and route your company’s outside calls without assistance from a receptionist. After an outside call is answered, the Automated Attendant Service plays a customized message (or
menu prompt). The message typically welcomes calIers—to let them know they
have reached your company—and then offers callers a menu of options for transferring to the desired party. It is recommended that you offer callers not more than five transfer options to avoid confusion when callers listen to the message.
You can customize the menu prompt for use during normal business hours (called the day menu prompt) and for use after normal business hours (called the night menu prompt). For example, you can set up Automated Attendant Service so that callers hear the following prompt during the day:
Thank you for calling the ANY Travel Agency. If you know the extension you want, dial it now or press 0 to speak with the receptionist. For information on
Corporate Travel, press 3. For information on Personal Travel, press 4. Press star 4 to replay this message.
For after-hours callers, you can set up Automated Attendant Service to play this prompt:
You have reached the ANY Travel Agency. Our hours are 8 to 5, Monday through Friday. Please press 9 to leave a message and we will promptly return your call.
NOTE:
When the system is first installed, Automated Attendant Service has this factory set day menu prompt:
Hello, welcome to PARTNER MAIL VS. Please enter the extension number of the person you wish to reach or press 0 to reach the receptionist.
In addition, Automated Attendant Service has this factory set night menu prompt:
Good Evening. Welcome to PARTNER MAIL VS. Please enter the extension number of the person you wish to reach or press 9 to leave a message with the
Automated Attendant Service is useful for many businesses, such as car dealerships, insurance agencies, and stores. For example, a car dealership can use Automated Attendant Service to allow its customers to directly reach the customer service department. This frees sales employees to handle customer transactions while the Automated Attendant Service transfers service calls to the appropriate department. In this case, you can program the
Automated Attendant Service to allow callers to enter a group number to reach an available customer service representative. Callers hear Music On Hold (if it is available) while they are being transferred.
Automated Attendant Options
When planning Automated Attendant Service, you must choose settings for the following communications system features:
■ Group Call Distribution. Specifies the outside lines (if any) that are to
be answered by Automated Attendant Service.
■ VMS Hunt Schedule. Specifies when you want the communications
system to route calls to the voice messaging system.
■ VMS Hunt Delay. Specifies whether you want to use Automated
Attendant Service for immediate or delayed call handling. Each of these features is explained further below.
Group Call Distribution
This feature lets you specify the outside lines on which you want Automated Attendant Service coverage. You can specify some or all of your company’s outside lines.
VMS Hunt Schedule
This feature determines when the communications system is to route calls to the Automated Attendant Service. VMS Hunt Schedule works in conjunction with the communication system’s Night Service feature so that the voice messaging system can play the appropriate menu prompt. In other words, the menu prompt the caller hears depends on the VMS Hunt Schedule setting you select and the status of the Night Service button at the receptionist’s extension. You can choose one of the following VMS Hunt Schedule settings:
■ Always (factory setting). Instructs the communications system to route
VMS Hunt Delay
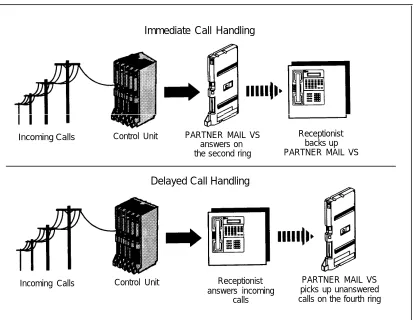
This option specifies either Immediate Call Handling or Delayed Call Handling (see Figure 1-2 below):
■ Immediate Call Handling (factory setting). The Automated Attendant
Service answers outside calls on the second ring and plays the day or night menu prompt. The receptionist can act as back-up. Callers using rotary phones or callers requesting assistance can be transferred to the receptionist’s extension (extension 10).
Delayed Call Handling. The Automated Attendant Service answers
■
outside calls on the fourth ring. This delay gives the receptionist time to answer the call.
The VMS Hunt Delay setting you select is used for both day and night operation.
NOTE:
If you set VMS Hunt Delay to Immediate, you may want to set the
communications system’s Automatic Extension Privacy feature to Assigned for the extensions associated with the voice messaging system. This prevents users from accidentally picking up calls sent to the voice messaging system.
Immediate Call Handling
Incoming Calls Control Unit PARTNER MAIL VS Receptionist
answers on backs up
the second ring PARTNER MAIL VS
Delayed Call Handling
Incoming Calls Control Unit Receptionist PARTNER MAIL VS
answers incoming picks up unanswered calls calls on the fourth ring
Music On Hold
If you use Automated Attendant Service, it is strongly recommended that you also use the communications system’s Music On Hold feature. This feature plays music or recorded material to callers who are on hold or waiting to be transferred, and it is particularly useful for callers transferred by the voice messaging system. If you do not use Music On Hold, callers hear silence (rather than ringing) while they are being transferred.
For more information about using Music On Hold, see the PARTNER Plus or PARTNER II system Programming and Use guide.
Call Answer Service
This service offers callers the following options when they reach an extension which is unable to answer their call:
■
■
■
Leave a detailed, confidential message in the called party’s mailbox. Press [ 0 ] to transfer to the receptionist’s extension for assistance. Press [ ✳ ] [ T ] to transfer to another system extension.
Callers can press [ 0 ] or [ ✳ ] [ T ] before, during, or after leaving a message. NOTE:
Until subscribers record a personal greeting for their extension, outside callers hear this factory set message:
Extension XX is not available. To leave a message, wait for the tone. After recording hang up or press 1 for more options.
Call Answer Service provides three main features, which are discussed below:
■ Extension Coverage
■ CO Line Coverage
■ Voice Mailbox Transfer
Extension Coverage
Automatic Coverage
Do Not Disturb
Subscribers who have extension coverage—either automatic or manual—can use the communications system’s Do Not Disturb feature when they want calls to have immediate coverage. If Do Not Disturb is used in conjunction with extension coverage, callers are sent to the subscriber’s mailbox immediately (calls do not ring the extension first) so the caller can leave a message. This is useful, for example, when subscribers are already on a call or are too busy to answer calls or when they leave their desk for extended periods of time, such as at lunch time or at the end of the day. To use Do Not Disturb, subscribers must program this feature on a button with lights on their system phone.
CO Line Coverage
CO Line Coverage lets callers who call in on a covered line leave messages in the mailbox of a specific subscriber (known as the owner of the covered line). When a call comes in on a covered line, the system routes the caller directly to the line owner’s mailbox if the call is not answered. The caller has the option of leaving a message or transferring to another extension. (Do Not Disturb has no effect on CO Line Coverage.)
Line ownership typically is assigned to personal lines or to lines to be used for outside access to the voice messaging system when Automated Attendant Service is not used. (Lines in your system can be assigned either ownership or Automated Attendant Service coverage—a single line cannot be assigned both types of coverage.)
Voice Mailbox Transfer
Users can program a Voice Mailbox Transfer button on their system phone to transfer callers directly to a subscriber’s voice mailbox without ringing the extension first. This feature is useful when handling a call for a person who is not at his or her desk.
Voice Mail Service
This service allows subscribers to manage their own mailbox. With it, subscribers can:
■
■
Listen to messages, then save or delete them. Record their own personal greeting.
Change the default password for their voice mailbox to ensure that messages are kept confidential.
Transfer to another extension or to the receptionist’s extension.
■
■
Subscribers can retrieve messages at their convenience from any touch-tone phone either while on-site or from an off-site location. Subscribers can refer to the Quick Reference booklet for instructions on recording a personal greeting, changing a password, and performing other Voice Mail Service procedures. Voice Mail Service also allows the System Manager to program the voice messaging system. See “Voice Messaging System Programming” in Chapter 3 for more information.
NOTE:
When subscribers call in to the Voice Mail Service, they hear this factory set prompt:
Welcome to PARTNER MAIL VS. Please enter extension and pound sign. Otherwise, to access PARTNER Tutor, press star 4.
Voice Mailboxes
By default, the voice messaging system provides mailboxes for extensions 10 through 19. If a Mailbox Expansion Card–20 is installed, default mailboxes are provided for extensions 10 through 29.
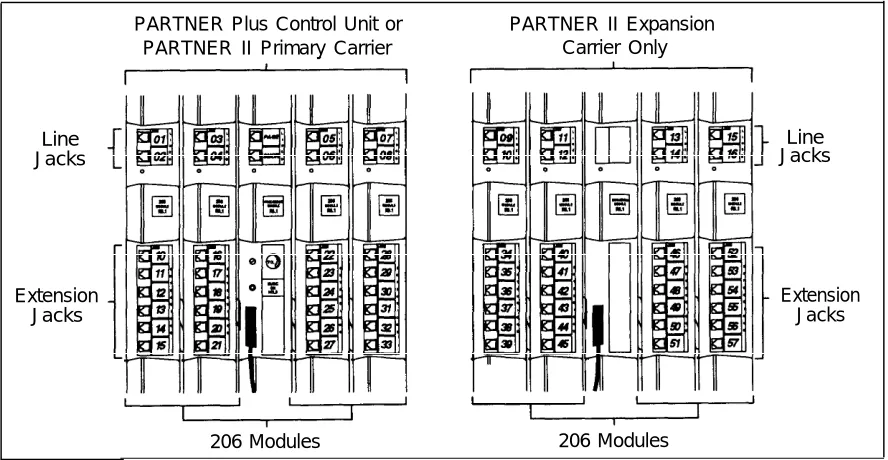
You can change default mailbox assignments. First, delete mailboxes from any extensions that do not require voice mail coverage. Then, create mailboxes for extensions that need them. Mailboxes can be created for extensions 11 through 33 for the PARTNER Plus system and 11 through 57 for the PARTNER II system.
NOTE:
You should delete mailboxes from extensions that connect auxiliary equipment (such as fax machines or doorphones) to keep the maximum number of mailboxes available for users.
Guest Mailboxes
Summary of Fixed Settings
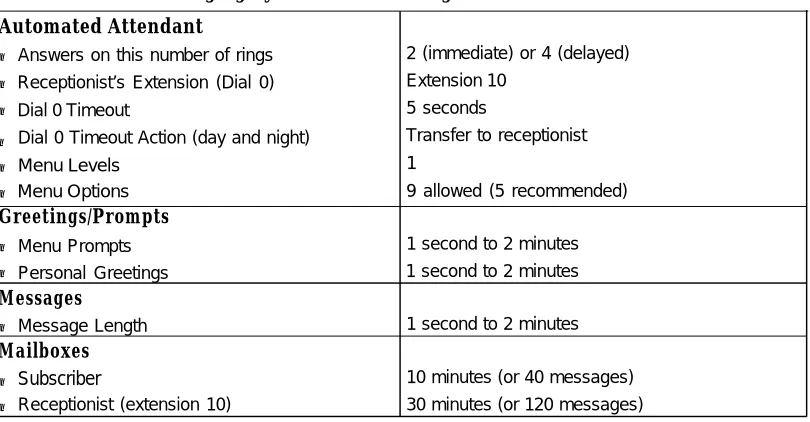
Table 1-1 shows the fixed factory settings for the voice messaging system.
Table 1-1. Voice Messaging System Fixed Settings
Automated Attendant
■ Answers on this number of rings ■ Receptionist’s Extension (Dial 0) ■ Dial 0 Timeout
Dial 0 Timeout Action (day and night)
■
■ Menu Levels ■ Menu Options Greetings/Prompts
■ Menu Prompts ■ Personal Greetings Messages
■ Message Length Mailboxes
Subscriber ■
■ Receptionist (extension 10)
2 (immediate) or 4 (delayed) Extension 10
5 seconds
Transfer to receptionist 1
9 allowed (5 recommended)
1 second to 2 minutes 1 second to 2 minutes
1 second to 2 minutes
Installation
2
Contents
Important Safety Instructions
Before You Start
Installing the Voice Messaging System Module
Important Safety Instructions
The following list provides basic safety precautions that should always be followed when using your telephone equipment:
1.
2.
3.
4.
5.
6.
7.
8.
9.
10.
Read and understand all instructions.
Follow all warnings and instructions marked on the product.
Unplug all telephone connections before cleaning. DO NOT use liquid cleaners or aerosol cleaners. Use a damp cloth for cleaning.
This product should be serviced by (or taken to) a qualified repair center when service or repair work is required.
DO NOT use this product near water, for example, in a wet basement location
DO NOT place this product on an unstable cart, stand, or table.
Never push objects of any kind into slots or openings as they may touch dangerous voltage points or short out parts that could result in a risk of fire or electric shock. Never spill liquid of any kind on the product.
Avoid using this telephone during an electrical storm. There may be a remote risk of electric shock from lightning.
DO NOT use the telephone to report a gas leak in the vicinity of the leak.
The product is provided with a three-wire grounding type plug. This is a safety feature. DO NOT defeat the safety purpose of the grounding type plug. DO NOT staple or otherwise attach the AC power supply cord to building surfaces.
CAUTION:
DO NOT block or cover the ventilation slots and openings. They prevent the product from overheating. DO NOT place the product in a separate enclosure unless proper ventilation is provided.
Additional Safety Instructions for Installers
1. DO NOT install telephone wiring during a lightning storm.
2. DO NOT install telephone jacks in a wet location unless the jack is specifically designed for wet locations.
3. Never touch uninsulated telephone wires or terminals, unless the telephone line has been disconnected at the network interface.
4 . Use caution when installing or modifying telephone lines.
5. The control unit must be securely wall mounted.
CAUTION:
If any wiring from the extension jacks leaves the building premises, you must install AT&T IROB protectors (see “Requirements for Out-of-Building
Extensions” in Appendix A of the PARTNER Plus or PARTNER II
Communications System Programming and Use Guide).
CAUTION:
Use only AT&T-manufactured PARTNER modules in the PARTNER Plus or PARTNER II Communications System.
CAUTION:
Installation
2
This chapter provides instructions for installing the voice messaging system’s hardware in the communications system’s control unit.
Before You Start
Verify that you have the required voice messaging system and communications system hardware:
■ The PARTNER MAIL VS Voice Messaging System Module, and optional
Mailbox Expansion Card–20.
■ A PARTNER Plus or PARTNER II Communications System control unit
equipped with a Release 3.1 (R3.1) or later processor module.
■ For message waiting capability, system phones or supported standard phones with message lights. Supported standard phones must be connected to extension jacks on R3.1 or later 206 modules. Before you proceed:
■ Make sure the communications system control unit, processor module(s), and 206/400 modules have been installed.
Installing the Voice Messaging System
Module
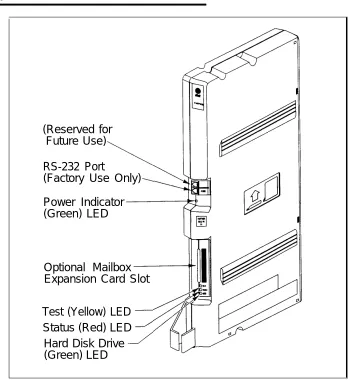
(Reserved for
Future Use)
RS-232 Port
(Factory Use Only)
Power Indicator
(Green) LED
Optional Mailbox
Expansion Card Slot
Test (Yellow) LED
Status (Red) LED
Hard Disk Drive
(Green) LED
Figure 2-1. Voice Messaging System Module
To install the voice messaging system module in the communications system’s control unit:
1. Turn power off to the communications system’s control unit by pulling out the main circuit breaker on the right rear side of the control unit.
CAUTION:
2. Install the voice messaging system module in the first available slot to the right of the last installed 206 or 400 module. Do not install the voice messaging system module in the first slot of the PARTNER Plus system control unit or the PARTNER II system primary carrier.
NOTE:
The voice messaging system module should always be installed after the 206 and 400 modules to ensure consecutive extension numbering. If the control unit is upgraded with more 206 or 400 modules, the voice
messaging system module should be removed, the new modules should be installed, and the voice messaging system module should be replaced in the first available slot after the 206 and 400 modules. Reprogram the VMS Hunt Group Extensions and Transfer Return Extensions (page 4-2).
a. Press the locking tab on the bottom of the slot as you push in the module. Align the dovetail guides on the sides of the module with the guides on any previously inserted modules.
b. Push slowly but firmly until the module locks into place with two snaps, and is attached to the rear of the backplane and held in place by the locking tab. Do not force the module. If it does not insert easily, remove the module, clear any obstruction, and reinsert it.
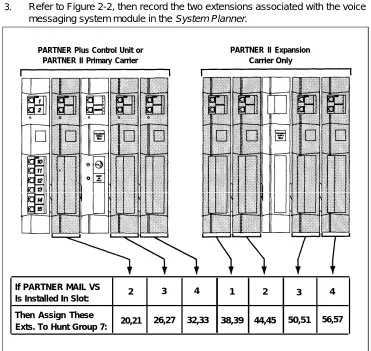
3. Refer to Figure 2-2, then record the two extensions associated with the voice messaging system module in the System Planner.
PARTNER Plus Control Unit or PARTNER II Primary Carrier
(Reserved for
Future Use)
RS-232 Port
(Factory Use Only)
Power Indicator
(Green) LED
Mailbox Expansion
Card
Test (Yellow) LED
Status (Red) LED
Hard Disk Drive
(Green) LED
Figure 2-3. Installing the Mailbox Expansion Card
4.
5.
6.
To install the Mailbox Expansion Card, insert the card in the vertical slot on the lower front of the voice messaging system module (see Figure 2-3). Make sure the arrows on the Mailbox Expansion Card label face up and in, as indicated on the card’s label. Also make sure the card is pushed in all the way.
Turn the control unit’s power on. The green Power LED should light—if it does, skip to Step 6. If the green Power LED does not light, power down the control unit, reseat the voice messaging system module, then power up the control unit again. If the green Power LED still does not light, call the Helpline.
Next, the voice messaging system module performs self-diagnostic tests. The LEDs work as follows:
LED State
Green Power ON
Yellow Test ON
7. After approximately 10 seconds when the tests are completed, the yellow Test LED goes off. When this occurs, check the red Status LED:
■ If the red Status LED is not lit, the module passed the tests. Continue
with Step 8.
■ If the red Status LED is lit, power down the control unit, re-install the Mailbox Expansion Card if it was installed in Step 4, then power up the control unit again. If the red Status LED comes on again, call the Helpline.
Understanding Programming
3
Contents
Communications System Programming
■ Planning Forms
■ Using System Programming The Programming Overlays Programming Mode
Voice Messaging System Programming
■ Planning Forms
■ Using System Programming
The Programming Main Menu
Accessing the Programming Main Menu Programming Guidelines
Understanding Programming
3
This chapter provides general programming information for the communications system and the voice messaging system. Both systems must be programmed so they can work together as an integrated unit.
Communications System Programming
When the communications system is installed, it uses factory settings that reflect the most common usage of the equipment. You can change these settings as required to customize them for your business.
You can program the communications system from extension 10 or 11. Since an extension cannot be in programming mode and handle calls at the same time, and since extension 10 is programmed as the receptionist’s extension, you may find it more convenient to program from extension 11 while the receptionist continues to handle calls from extension 10.
System Programming changes settings for the system as a whole, or for individual lines or extensions. (Refer to the communication system’s
Programming and Use guide for more information on System Programming
Planning Forms
Refer to the communications system’s System Planner when you are changing system settings, and be sure to record any changes you make. The following forms from the System Planner contain information about the voice messaging system:
■
■
Form A: System Configuration. Records basic information about your
business. It also identifies the line number and type of voice messaging service required for each line, and other settings required to program the systems.
Form B1: System Extensions. Records basic information for each
system extension. This includes the type of phone or auxiliary equipment at the extension, and the name of the system user or a description of how a specific extension is used.
Form B2: Customized Extension Settings. Records feature settings,
such as Automatic VMS Cover and Automatic Extension Privacy, and group assignments for each system extension.
Form C: Button Programming. Specifies which features are
■
■
programmed on buttons for each system extension. This includes VMS Cover, Voice Mailbox Transfer, and Voice Mail Messages buttons.
Using System Programming
System Programming requires a system display phone (MLS-34D, MLS-18D, or MLS-12D) at extension 10 or 11, with a programming overlay placed over the phone’s dialpad. System Programming procedures are identified by # and a 3-digit code (for example, the procedure used to program the System Date is #101).
You can program the system in one of two ways:
■ Direct Method. This method enables you to access a programming
procedure directly by dialing the code for that procedure. This method works best when you are using only a few procedures during the programming session, and you know the codes. For example, press [ # ] [ 1 ] [ 0 ] [ 1 ] to change the system date.
■ Cycle Method. This method enables you to cycle through a sequence of
procedures in numerical order by pressing [ Next Procedure ] or [ Prev Procedure ]. You should use this method when programming the communications system for the first time, or when you are changing a series of related settings. However, procedures #399, #609, and #728 are skipped when you cycle through procedures
NOTE:
The Programming Overlays
During System Programming, the normal functions of several buttons on the display phone at extension 10 or 11 change. For example, left [ Intercom ] becomes [ System Program ], which is the button used to enter programming mode. To identify these buttons while programming, place the appropriate
programming overlay provided with the system on the dialpad of the phone at extension 10 or 11.
Use the following special buttons while programming:
■
■
■
[ Next Procedure ] and [ Prev Procedure ] cycle forward and backward through the programming procedures.
[ Next Item ] and [ Prev Item ] cycle forward and backward through a procedure’s parameters. A parameter is typically an outside line, an extension, or a telephone list entry.
[ Next Data ] and [ Prev Data ] cycle forward and backward through the valid list entries. These buttons work only for fixed data, such as a line or extension number. They do not work for variable data such as date, time, password, telephone numbers, or doorphone assignments.
[ Remove ] returns the current setting to the factory setting.
[ Enter ] ends an entry of variable length, such as a telephone number in an Allowed Phone Number List.
[ System Program ] starts the System Programming process.
■
■
■
■ [ Central Tel Program ] starts the Centralized Telephone Programming process
(that is, customizing individual telephones centrally from extension 10 or 11).
[ Feature ] when followed by [ 0 ] [ 0 ], enters or exits programming mode.
■
Programming Mode
To enter programming mode:
1. At extension 10 or 11, make sure the overlay is in place over the system phone’s dialpad.
2. Press [ Feature ] [ 0 ] [ 0 ].
3. Press [ System Program ] [ System Program ].
Voice Messaging System Programming
Before you program the voice messaging system, obtain completed copies of planning forms for the communications system and the voice messaging system. These forms provide the names, extensions, mailboxes and other information required to program the voice messaging system.
Planning Forms
You need the following forms from the Planning Guide for the voice messaging system:
■
■
Form 1: Mailbox Assignments. Shows factory set mailbox assignments
for the voice messaging system with and without the Mailbox Expansion Card–20. Allows you to record your company’s mailbox assignments.
Form 2: Menu Definition. Shows factory set transfer options for
Automated Attendant Service. Allows you to record the extension or group number for a selector code transfer and a description of that extension or group.
Form 3: Day Menu Prompt. Shows the script used to record the day
menu prompt.
Form 4: Night Menu Prompt Shows the script used to record the night
menu prompt.
Form 5: Line Ownership. Records the personal lines used for CO Line
■
■
■
Coverage, the line’s associated telephone number, the owner (subscriber name) of the line, and the owner’s mailbox number.
Using System Programming
A special Iogin number is required to program the voice messaging system. The following information applies to this Iogin:
■
■
The Iogin number is 99. 99 is not an extension number.
This Iogin does not have an associated mailbox.
This Iogin’s factory-set password is 1234. If you are the System Manager,
■
■
refer to “Changing Your Password” in Chapter 5 to change the password before you begin to program the system.
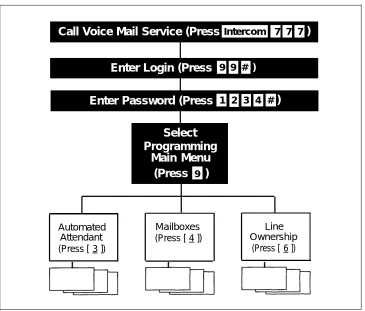
The Programming Main Menu
The Programming Main Menu (shown in Figure 3-1) allows you to change the Automated Attendant Service Menu, mailbox assignments, and line ownership assignments.
Call Voice Mail Service (Press
Intercom 7 7 7)
Enter Login (Press
9 9 # )Enter Password (Press
1 2 3 4 #)
Select
Programming
Main Menu
(Press
9)
Automated Mailboxes Line
Attendant (Press [ 4 ]) Ownership
(Press [ 3 ]) (Press [ 6 ])
Accessing the Programming Main Menu
To access the Programming Main Menu:1.
2.
3.
4.
Press [ Intercom ] [ 7 ] [ 7 ] [ 7 ] or a programmed button. The system plays:
Welcome to PARTNER MAIL VS. Please enter extension and pound sign. Otherwise, to access PARTNER Tutor, press star 4.
Press [ 9 ] [ 9 ] [ # ]. The system plays:
Enter password and pound sign.
Enter your password and press [ # ]. (The factory-set password is 1234.) The system plays:
System Manager. PARTNER MAIL VS Release 1.
The system plays the available programming options. It does not play option 9 (the Programming Main Menu), which only you should access.
Press [ 9 ] to access the Programming Main Menu. The system plays:
To program the Automated Attendant press 3, for mailboxes press 4, for line ownership press 6. If finished, press star pound.
Programming Guidelines
Once you are familiar with the voice messaging system, use these shortcuts to save time while programming:
■
■
■
■
You do not have to wait for a prompt to play before entering digits for the next step.
Press [ ✳ ] [ # ] to return to the previous menu. Press [ ✳ ] [ H ] to repeat the current menu options.
Press [ ✳ ] [ R ] at any point during programming to restart at the Programming Main Menu.
Use the handset to record prompts and greetings to avoid background noise in your recordings.
To ensure that you hear voice prompts, turn off your microphone when programming the system using the speakerphone.
Hang up to exit programming.
■
■
Initial Programming
4
Contents
Overview
Initial System Setup
■ VMS Hunt Group Extensions
■ Transfer Return Extensions
Voice Messaging System Programming
■ Automated Attendant Service
Programming the Menu Definition and Recording the Day Menu Prompt
Recording the Night Menu Prompt
■ Voice Mail Service Deleting a Mailbox Creating a Mailbox
■ Line Ownership
Assigning Line Ownership
Communications System Programming
■ Automated Attendant Service Group Call Distribution VMS Hunt Delay VMS Hunt Schedule Night Service
■ Call Answer Service
CO Line Coverage
4-1 4-2 4-2 4-2 4-3 4-3
Contents
Verifying System Operation
■ Voice Mail Service
■ Automated Attendant Service
Day Menu (Night Service button is off) Night Menu (Night Service button is on)
■ Call Answer Service
Extension Coverage CO Line Coverage
Initial Programming Flowchart
Programming Quick Reference
4-12 4-12 4-12 4-12 4-13 4-13 4-13 4-13
Initial Programming
4
Overview
This chapter tells you how to program the voice messaging system and communications system for initial installations. It begins with two procedures that allow you to access and program the voice messaging system—you must perform these procedures first for every installation. The next section deals with voice messaging system programming and the last section covers
communications system programming.
The procedures in this chapter are in this order to enable you to program the menu definition and record the day and/or night prompts before the voice messaging system begins to handle calls—this order is recommended for voice messaging systems that are being added to existing communications systems. If this is a new installation, however, you can program the communications system first, and then the voice messaging system if you prefer.
Initial System Setup
For the following two procedures, you need to know the two extension numbers associated with the voice messaging system module (VMS extensions). Locate Form B1 of the System Planner for the communications system.
VMS Hunt Group Extensions
You must use this procedure to assign the two extensions associated with the voice messaging system module to Hunt Group 7. This Hunt Group, which is called the VMS Hunt Group, is used exclusively for the voice messaging system. To assign the two VMS extensions specified on Form B1 to Hunt Group 7: 1.
2. 3.
4.
5.
6. 7.
At extension 10 or 11, press [ Feature ] [ 0 ] [ 0 ] [ System Program ] [ System Program ] [ # ] [ 5 ] [ 0 ] [ 5 ].
At the Group: prompt, press [ 7 ].
At the Extension: prompt, enter the first VMS–PMVS extension number specified on Form B1.
Press [ Next Data ] until the display reads 1 Assigned.
Press [ Next Item ] or [ Prev Item ] until the second VMS–PMVS extension number specified on Form B1 displays.
Press [ Next Data ] until the display reads 1 Assigned.
Continue with “Transfer Return Extensions” below.
Transfer Return Extensions
For extensions that do not have voice mail coverage, this procedure ensures that unanswered calls transferred by the voice messaging system to an extension will return to the receptionist’s extension. (Note that transfer return calls do not receive voice mail coverage.)
To assign extension 10 as the transfer return extension for both VMS extensions specified on Form B1:
1. 2.
3. 4.
5.
6. 7.
Press [ # ] [ 3 ] [ 0 ] [ 6 ].
Enter the first VMS–PMVS extension number specified on Form B1.
Press [ 1 ] [ 0 ].
Press [ Next Item ] or [ Prev Item ] until the second VMS–PMVS extension number specified on Form B1 displays.
Press [ 1 ] [ 0 ].
Press [ Feature ] [ 0 ] [ 0 ] to exit programming.
Voice Messaging System Programming
Automated Attendant Service
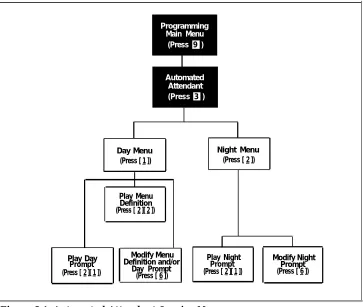
Before you begin, locate Form 2, Form 3, and Form 4 of the Planning Guide for the voice messaging system. If Automated Attendant Service is not to be used, skip to “Voice Mail Service.” Otherwise, use the procedures in this section to program Automated Attendant Service menus.
Programming the Menu Definition and Recording
the Day Menu Prompt
Use this procedure to program the Automated Attendant Service Menu Definition and to record the Day Menu Prompt.
To define the menu as specified on Form 2 and/or record the Day Menu Prompt specified on Form 3:
1.
2. 3. 4. 5.
6. 7. 8.
9.
10.
Access the Programming Main Menu:
a. Press [ Intercom ] [ 7 ] [ 7 ] [ 7 ] or a programmed button. b. Press [ 9 ] [ 9 ] [ # ].
c. Enter your password and press [ # ]. d. Press [ 9 ].
Press [ 3 ] for Automated Attendant. Press [ 1 ] for the day menu.
Press [ 6 ] to modify the day menu.
As indicated on Form 2, enter a Selector Code from 1 through 9 specified for Selector Code Transfer.
Press [ 9 ] to confirm that you are modifying this Selector Code action.
Press [ 1 ] for Selector Code Transfer.
Enter the extension, hunt group, or calling group (PARTNER II system only) number where the Automated Attendant Service transfers callers as
specified on Form 2, Part C, followed by [ # ].
Repeat Steps 5 through 8 for each Selector Code specified for Selector Code Transfer.
13. Choose an option or skip this step:
■ Press [ 2 ] [ 1 ] to immediately re-record the Day Menu Prompt.
■ Press [ 2 ] [ 3 ] to play back the Day Menu Prompt.
■ Press [ ✳ ] [ D ] to delete the Day Menu Prompt and return to Step 11 to be prompted for re-recording.
14. Press [ ✳ ] [ # ] to approve the Day Menu Prompt. 15. Press [ ✳ ] [ R ] to return to the Programming Main Menu.
16. Continue with “Recording the Night Menu Prompt” or go to the next section “Voice Mail Service.”
Recording the Night Menu Prompt
Use this procedure to record the Night Menu Prompt for Automated Attendant Service.
To record the Night Menu Prompt specified on Form 4: 1.
2. 3. 4. 5.
6. 7.
8.
9. 10.
Access the Programming Main Menu:
a. Press [ Intercom ] [ 7 ] [ 7 ] [ 7 ] or a programmed button. b . Press [ 9 ] [ 9 ] [ # ].
c . Enter your password and press [ # ]. d . Press [ 9 ].
Press [ 3 ] for Automated Attendant. Press [ 2 ] for the Night Menu Prompt. Press [ 6 ] to modify the Night Menu Prompt.
Lift the handset, press [ 1 ], and record the Night Menu Prompt specified on Form 4.
Press [ 1 ] after recording.
Choose an option or skip this step:
■ Press [ 2 ] [ 1 ] to immediately re-record the Night Menu Prompt.
■ Press [ 2 ] [ 3 ] to play back the Night Menu Prompt.
■ Press [ ✳ ] [ D ] to delete the Night Menu Prompt and return to Step 5 to be prompted for re-recording.
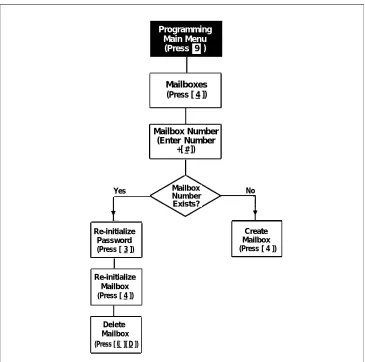
Voice Mail Service
Before you begin, locate Form 1 of the Planning Guide for the voice messaging system. Check the form to determine if mailboxes are numbered differently than the factory defaults. If they are not, skip to “Line Ownership” on the next page. If they are, first delete all mailboxes from extensions that do not require
coverage, then create mailboxes for all extensions that do.
NOTE:
The receptionist’s mailbox (at extension 10) cannot be deleted.
Deleting a Mailbox
To delete mailboxes as specified on Form 1: 1.
2. 3.
4. 5. 6. 7. 8.
Access the Programming Main Menu:
a. Press [ Intercom ] [ 7 ] [ 7 ] [ 7 ] or a programmed button. b. Press [ 9 ] [ 9 ] [ # ].
c. Enter your password and press [ # ]. d. Press [ 9 ].
Press [ 4 ] for mailboxes.
Enter the first mailbox number to be deleted as indicated on Form 1, followed by [ # ].
Press [ ✳ ] [ D ] to delete the mailbox Press [ 9 ] to confirm mailbox deletion.
Repeat Steps 3 through 5 for each mailbox to be deleted. Press [ ✳ ] [ R ] to return to the Programming Main Menu.
Creating a Mailbox
To create mailboxes as specified on Form 1: 1.
2. 3.
4. 5. 6. 7.
Access the Programming Main Menu:
a. Press [ Intercom ] [ 7 ] [ 7 ] [ 7 ] or a programmed button. b. Press [ 9 ] [ 9 ] [ # ].
c. Enter your password and press [ # ]. d. Press [ 9 ].
Press [ 4 ] for mailboxes.
Enter the number of the first mailbox you want to create as indicated on Form 1, followed by [ # ].
Press [ 4 ] to create this mailbox.
Repeat Steps 3 and 4 for each mailbox to be created. Press [ ✳ ] [ R ] to return to the Programming Main Menu. Continue with the next section, “Line Ownership.”
Line Ownership
Before you begin, locate Form 5 of the Planning Guide for the voice messaging system. If line owners are not assigned to any lines, skip to “Communications System Programming.” If they are, use this section to assign ownership.
Assigning Line Ownership
To assign an owner to an outside line as specified on Form 5: 1.
2.
3. 4. 5.
6.
7. 8.
Access the Programming Main Menu:
a. Press [ Intercom ] [ 7 ] [ 7 ] [ 7 ] or a programmed button. b. Press [ 9 ] [ 9 ] [ # ].
c. Enter your password and press [ # ]. d. Press [ 9 ].
Press [ 6 ] for line ownership. Press [ 4 ] to assign line ownership.
Enter a line number as specified on Form 5, item A, followed by [ # ]. Enter the line owner’s mailbox number as specified on Form 5, item D, followed by [ # ].
Repeat Steps 4 and 5 for each covered line.
Hang up to exit voice messaging system programming.
Communications System Programming
Automated Attendant Service
Before you begin, locate Form A, Form B1, and Form C of the System Planner for the communications system.
Refer to Form A, item 7, Line Coverage, to see if any lines are designated “VMS–AA.” If so, use this section to program Automated Attendant Service; otherwise, skip to “Call Answer Service.”
Group Call Distribution
Use this procedure to specify the outside lines on which Automated Attendant Service is required.
To assign “VMS-AA” lines specified on Form A, item 7, Line Coverage, to Hunt Group 7:
1. 2. 3.
4. 5.
6.
Press [ Feature ] [ 0 ] [ 0 ] [ System Program ] [ System Program ] [ # ] [ 2 ] [ 0 ] [ 6 ]. At the Group: prompt, press [ 7 ].
At the Line: prompt, enter the first “VMS-AA” line specified in the Line Coverage column of Form A, item 7.
Press [ Next Data ] until the display reads 1 Assigned.
To program another line, press [ Next Item ] or [ Prev Item ] until the appropriate line number displays. Then press [ Next Data ] until 1 Assigned is displayed. Continue with “VMS Hunt Delay” below.
VMS Hunt Delay
Use this procedure to specify when Automated Attendant Service is to handle calls.
To change the VMS Hunt Delay setting from Immediate to Delayed as specified on Form A, item 9:
1. Press [ # ] [ 5 ] [ 0 ] [ 6 ].
2. Press [ Next Data ] until the appropriate value displays. 3. Continue with “VMS Hunt Schedule” on the next page.
VMS Hunt Schedule
Use this procedure to specify when the communications system is to route calls to the voice messaging system.
To change the VMS Hunt Schedule setting from Always to Day Only or Night
1. 2. 3.
Night Service
Only as specified on Form A, item 9: Press [ # ] [ 5 ] [ 0 ] [ 7 ].
Press [ Next Data ] until the appropriate value displays. Continue with “Night Service Button” below.
Use this procedure to program a Night Service button.
To program Night Service on a button with lights at extension 10 as specified on Form C:
1. Press [ # ] [ 5 ] [ 0 ] [ 3 ]. 2. At this point:
If you want to assign Night Service to the first available button on the system phone, press [ Next Data ] until the display reads:
Night Service 1 Assigned—Ext10
If you want to assign Night Service to a specific button, press [ 3 ]. The display reads:
Night Service 3 Select Button
Press the desired programmable button with lights to assign Night Service to that button.
Call Answer Service
Before you begin, locate Form A and Form B2 of the System Planner for the Communications System. Refer to Form A, item 7, Line Coverage, to see if any lines are designated “VMS–MAlL.” If so, use this section to program Call Answer Service. If not, skip to “Telephone Button Programming.”
CO Line Coverage
To assign “VMS-MAIL” lines specified on Form A, item 7, Line Coverage, to Hunt Group 7:
1. Press [ # ] [ 2 ] [ 0 ] [ 6 ].
2. At the Group: prompt, press [ 7 ].
3. At the Line: prompt, enter the first “VMS-MAIL” line specified in the Line Coverage column of Form A, item 7.
4. Press [ Next Data ] until the display reads 3 VMS Line Cover.
5. To program another line, press [ Next Item ] or [ Prev Item ] until the appropriate line number displays. Then press [ Next Data ] until 3 VMS Line Cover
displays.
6. Continue with “Automatic VMS Cover” below.
Automatic VMS Cover
Use this procedure to assign automatic voice mail coverage to the appropriate extensions.
To change the Automatic VMS Cover setting for an extension to Assigned as indicated on Form B2:
1. Press [ # ] [ 3 ] [ 1 ] [ 0 ].
2. Enter the number of the first extension to which Automatic VMS Cover is to be Assigned.
3. Press [ Next Data ] until 1 Assigned shows on the display.
4. To program another extension, press [ Next Item ] or [ Prev Item ] until the extension number shows on the display. Then repeat Step 3.
5. Press [ Feature ] [ 0 ] [ 0 ] to exit programming mode.
Telephone Button Programming
Before you begin, locate Form C of the System Planner for the communications system.
Use this section to program buttons on subscribers’ phones, including the receptionist’s phone. This section uses Centralized Telephone Programming. When you are finished programming, be sure to label all buttons on subscribers’ phones.
VMS Cover
This button gives subscribers the ability to turn voice mail coverage on and off. To program a VMS Cover button as specified on Form C:
1. Press [ Feature ] [ 0 ] [ 0 ] [ System Program ] [ System Program ] [ Central Tel Program ].
2. Enter the number of an extension to be programmed as specified on Form C. 3. Press a programmable button with lights.
4. Press [ Feature ] [ 1 ] [ 5 ].
5. At this point, do one of the following:
■ Go to Step 3 of the next procedure to program another button for this
extension.
■ Press [ Central Tel Program ] and go to Step 2 of a button programming procedure in this section to program a button for a different extension.
■ Press [ Feature ] [ 0 ] [ 0 ] to exit.
Do Not Disturb
Used in conjunction with either automatic or manual extension coverage, this button lets subscribers send callers immediately to their voice mailbox (instead of ringing the extension four times first).
To program a Do Not Disturb (DND) button as specified on Form C:
1. Press [ Feature ] [ 0 ] [ 0 ] [ System Program ] [ System Program ] [ Central Tel Program ]. 2. Enter the number of an extension to be programmed as specified on Form C. 3. Press a programmable button with lights.
4. Press [ Feature ] [ 0 ] [ 1 ].
5. At this point, do one of the following:
■ Go to Step 3 of the next procedure to program another button for this
extension.
■ Press [ Central Tel Program ] and go to Step 2 of a button programming procedure in this section to program a button for a different extension.
Voice Mailbox Transfer
This button lets any system user transfer calls directly to a subscriber’s mailbox, without ringing the extension first.
To program a Voice Mailbox Transfer (VMBox) button as specified on Form C: 1. Press [ Feature ] [ 0 ] [ 0 ] [ System Program ] [ System Program ] [ Central Tel Program ].
2. Enter the number of an extension to be programmed as specified on Form C. 3. Press a programmable button.
4. Press [ Feature ] [ 1 ] [ 4 ].
5. At this point, do one of the following:
■ Go to Step 3 of the next procedure to program another button for this extension.
■ Press [ Central Tel Program ] and go to Step 2 of a button programming procedure in this section to program a button for a different extension.
■ Press [ Feature ] [ 0 ] [ 0 ] to exit.
Voice Mail Messages
This intercom Auto Dial button allows subscribers to access the voice messaging system with the touch of one button.
To program a Voice Mail Messages (VMMsgs) button as specified on Form C: 1.
2. 3. 4.
5.
Press [ Feature ] [ 0 ] [ 0 ] [ System Program ] [ System Program ] [ Central Tel Program ]. Dial the number of an extension to be programmed as specified on Form C. Press a programmable button.
Press left [ Intercom ] [ 7 ] [ 7 ] [ 7 ]. At this point, do one of the following:
■ Press [ Central Tel Program ] and go to Step 2 of a button programming procedure in this section to program a button for a different extension.
Verifying System Operation
Once you have completed programming for the voice messaging system and the communications system, you should perform the acceptance tests discussed below to verify system operation.
You should perform these tests from extension 11 to keep extension 10 free for the receptionist to handle calls.
Voice Mail Service
Make a call to the VMS Hunt Group by pressing [ Intercom ] [ 7 ] [ 7 ] [ 7 ] or a programmed button. You should hear the Voice Mail Service greeting:
Welcome to PARTNER MAIL VS. Please enter extension and pound sign. Otherwise, to access PARTNER Tutor, press star 4.
Automated Attendant Service
If the VMS Hunt Schedule is set for Day Only or Always, ensure that the Night Service button at extension 10 is off to test the day menu. If the VMS Hunt Schedule is set for Night Only or Always, ensure that the Night Service button is on to test the night menu.
Day Menu (Night Service button is off)
1.2.
3. 4.
5. 6. 7.
Call in on a line answered by the Automated Attendant Service. If the system is set for:
■ Immediate, Automated Attendant Service should answer the call on the
second ring.
■ Delayed, Automated Attendant Service should answer the call on the
fourth ring.
Listen for the Day Menu Prompt.
After the prompt, choose an option from the day menu.
Make sure your call is transferred to the appropriate extension or group. Repeat Steps 1 through 5 for each option on the day menu.
Night Menu (Night Service button is on)
1. Turn Night Service on at extension 10.2. Call in on a line answered by the Automated Attendant Service.
3. If the system is set for:
■ Immediate, Automated Attendant Service should answer the call on the
second ring.
■ Delayed, Automated Attendant Service should answer the call on the
fourth ring.
4. Listen for the Night Menu Prompt.
5. After the prompt, choose an option from the night menu.
6. Make sure your call is transferred to the appropriate extension or group. 7. Repeat Steps 2 through 6 for each option on the night menu.
8. Repeat Steps 2 through 4 for each line that has Automated Attendant Service coverage only if you did not test these lines in the previous procedure.
Call Answer Service
Extension Coverage
1. Press the Do Not Disturb button at the appropriate destination extensions to quickly route your test calls to Call Answer Service.
2. For extensions that do not have Automatic VMS Cover, turn on coverage by pressing the VMS Cover button at those extensions.
3. Call the first extension that has voice mail coverage (either automatic or manual).
If Do Not Disturb is on at the extension, Call Answer Service should answer the call immediately and you should hear the default personal greeting for that mailbox. (If Do Not Disturb is not on, the call rings three times at the extension before Call Answer Service answers it.)
4. Repeat this procedure for every extension that has voice mail coverage.
CO Line Coverage
1. Call in on the first line that is programmed for VMS Line Cover.
Initial Programming Flowchart
START
A
Refer to SP Form B1 to identify the VMS extensions for the PARTNER MAIL VS system.
Use Hunt Group Extensions (#505) to assign both VMS extensions to
Hunt Group 7. C1
Go To C
Use Transfer Return Extension (#306) to specify extension 10 as the transfer return extension for each of the VMS extensions. C2
Yes
Go To A Go To B
No
Go To B
Go To B
C7
Key: Go To B
● SP – Refers to the System Planner forms for the Communications System.
● PG – Refers to the Planning Guide forms for the Voice
Messaging System. ● C# – Refers to a quick reference
programming procedure for the Communications System (p. 4-18).
● V# – Refers to a quick reference programming procedure for the Voice Messaging System (p. 4-17).
Refer to SP Form A, Item 7, Line Use Group Call Distribution (#206) Coverage to see if VMS-AA is Yes to assign VMS-AA lines to Hunt
specified for any lines. Group 7. C3
No
Refer to SP Form A, Item 9 to check VMS Hunt Delay and VMS Hunt Schedule settings for the PARTNER MAIL VS system.
If Immediate and Always are checked, this site uses immediate call handling all the time (day and night).
● Leave VMS Hunt Delay (#506) at factory setting (Immediate) ● Leave VMS Hunt Schedule (#507)
at factory setting (Always) ● Program a Night Service Button
(#503) at extension 10 C7
If Delayed and Always are checked, Yes ● Set VMS Hunt Delay (#506) this site uses delayed call handling to Delayed C4
all the time (day and night). ● Leave VMS Hunt Schedule (#507) at factory setting (Always) ●