installed and used, that is, in strict accordance with the instructions in this manual, may cause interference to radio and television reception. It has been type-tested and found to be within the RF emission limits for a Class B computing device which is intended to provide reasonable protection against such interference in a residential environment. However, there is no guarantee that interference will not occur in any particular environment or location. If this equipment does cause interference to radio and television reception, which can be determined by turning this equipment on and off, try to correct the interference by one of more of the following measures.
• Move the computing device away from the equipment receiving the interference. • Relocate the computing device with respect to the receiver.
• Reorient (turn) the antenna of the receiving equipment.
• Plug the computing device into a different AC outlet so that the computing device and receiver are on separate circuits from the fuse or circuit breaker box.
• Disconnect and remove any input/output cables that are not being used since unter-minated input/output cables are a potential source of high RF emission levels.
• Unplug and remove any serial input/output circuit board cards that are not being used since unterminated cards can be a potential source of interference.
• Make sure that the computing devices are plugged into grounded outlet receptacles. Avoid using AC two- to three-wire cheater plugs. Lifting or removing the power cord ground may increase RF emission levels. Removing the ground circuit also may cause a lethal shock hazard to the user.
If you need additional help, consult your dealer or ask for assistance from the manufacturer. You may also find the following booklet helpful: How to Identify and Resolve Radio-TV Interference Problems. This booklet is available from the U.S. Government Printing Office, Washington, DC 20402, stock number 004-000-00345-4.
Registration
To receive the full benefits of your warranty, complete and mail the accompanying registration card. Also, record the series and serial numbers of your equipment below. Refer to these numbers in any correspondence you have with Zenith Data Systems regarding this equipment.
Model Serial Number ___________________________
Series Date purchased _________________________
Place purchased ____________________________________________________________
Z-100 Series
Computers
LIMITED RIGHTS LEGEND
Contractor is Zenith Data Systems Corporation of St. Joseph, Michigan 49085. The entire document is subject to Limited Rights data provisions.
RESTRICTED RIGHTS LEGEND
This computer software and documentation are provided with RESTRICTED RIGHTS. Use, duplication or disclosure by the Government is subject to restrictions is set forth in the Governing Rights in Technical Data and Computer Software clause – subdivision (b)(3)(B) of DAR 7-104.9(a) (May 1981) or subdivision (b)(3)(ii) of DOD FAR Supp 252.227-7013 (May 1981). Contractor/Manufacturer is Zenith Data Systems Corporation, or Hilltop Road, St. Joseph, MI 49085.
Copyright 1982, 1985 by Zenith Data Systems Corporation. Printed in the United States of America.
Congratulations on your purchase of the Zenith Data Systems Z-100 Series Computer. The Z-100 microcomputer represents a truly state-ofthe-art design, capable of satisfying both your business and personal needs.
With the Z-1 00 Computer - the All-in-One model or the Low-Profile model - the future is here today. The Z-100 Computer can act as a simple tool or function as the heart of a powerful and expandable business automation package. Combined with Zenith Data Systems software, your new Z-100 Computer can easily provide the practical and affordable solutions to your business problems. It can easily satisfy a variety of business applications, such at data processing, telecommunications, networking, and financial analysis to aid you in making those all-important business decisions.
This User's Manual has been prepared for you, the new computer owner and user. Welcome to computing at its best and accept Zenith's assurance and commitment that the quality goes in before the name goes on.
This User's Manual is divided into four sections for easy use:
• Operation - The beginning section tells you how to set up your new Z-100 Computer. Then you will turn it on and be introduced to the keyboard and controls. You will learn about disks and how to use a special demonstration disk. And finally, there is a section on what to do if you have a problem with your computer.
• Disk Operating System - This chapter will help you understand and use your computer. In addition, it will show you how to make extra copies (called "backups") of the information stored by your computer.
• Computer Programming and BASIC - Here you will be briefly introduced to the world of programming and learn how to give instructions to your computer in BASIC, one of the most popular computer "languages."
• Appendices - This last section contains reference material that you may find informative. It also contains step-by-step disassembly and assembly information that replaces the equivalent instructions in the installation manual included with any accessories you may purchase for your computer.
You will want to become familiar with your computer's many features. This manual will help you get the most out of your new Zenith Data Systems Z-1 00 Computer.
Contents
Welcome iii
Preface V
Chapter 1 Operation
Your Computer System 1-1
Setting Up 1-3
Back Panel 1-3
Power Connection 1-7
Keyboard 1-8
Alphabetic Keys 1-8
Nonalphabetic Keys 1-9
Other Keys 1-10
Disk Drives 1-13
Disks 1-15
Disk Care 1-18
Power Up 1-19
Z-100 Demonstration Disk 1-20
Introduction 1-20
Master Menu 1-22
Artwork 1-22
Interactive Business Graphics 1-23
In Case of Difficulty 1-26
Service Information 1-29
When You Call for Help 1-29
Chapter 2 Disk Operating System
Introduction 2-1
The Monitor Program 2-2
Autoboot 2-2
The Commands 2-3
B – Boot 2-4
C – Color Bar 2-5
H – Help 2-6
S – System 2-7
V – Version 2-7
Loading MS-DOS 2-8
The MS-DOS Prompt 2-11
Making A Backup 2-11
Backups 2-11
Backing Up Your Disks the First Time 2-12
Labeling Disks 2-14
MS-DOS Control Key Functions ... 2-16 MS-DOS Commands ... 2-19 Changing MS-DOS Prompts ... 2-19 Error Messages ... 2-20 Files, Programs, and File Names ... 2-21 Internal Commands ... 2-22 COPY ... 2-23 DATE ... 2-24 DIR ... 2-24 Wild Cards ... 2-26 Multiple Directories ... 2-27 ERASE (DEL) ... 2-32 RENAME (REN) ... 2-33 TIME ... 2-33 TYPE ... 2-34 VER ... 2-34 VERIFY ... 2-35 VOL ... 2-35 Other Internal Commands ... 2-36 External Commands ... 2-36 CH KDSK ... 2-38 FORMAT ... 2-39 SYS ... 2-43 DISKCOPY ... 2-43 DISKCOMP ... 2-45 Other External MS-DOS Commands ... 2-47
Chapter 3 Computer Programming and BASIC
Programs ... 3-1 Program Types ... 3-1 Programmers ... 3-2 Programming Languages ... 3-2 Syntax ... 3-2 Language Types ... 3-3 Understanding BASIC ... 3-6 Getting Started with BASIC ... 3-6 Loading BASIC ... 3-7 BASIC Modes of Operation ... 3-8 Statements ... 3-9 Direct Mode Operation ... 3-9 Variables ... 3-11 Variable Types ... 3-11
Programming in BASIC ... 3-12 Using the Indirect Mode of BASIC ... 3-12 Saving and Loading Programs ... 3-14 Designing a Program ... 3-15 Program Purpose ... 3-16 Breakdown ... 3-17 Detailed Steps ... 3-17 Conversion ... 3-19 Summary ... 3-26
Appendix A A Glossary of Commonly-Used Computer Terms
Appendix B Symbols and Codes
Appendix C Monitor Program Command Summary
The Monitor Program Commands ... C-2 Boot ... C-2 Color Bar ... C-4 Dump ... C-4 Examine ... C-5 Fill ...C-5 Help ... C-6 Input ... C-6 Output ... C-6 System ... C-7 Test ... C-7 Version ...C-8 Execute ...C-8
Appendix D MS-DOS Command Summary
Command Summary ...D-1 Commands ... D-2 MS-DOS With Single Drive Computers ...D-8
Appendix E BASIC Command Summary
BASIC Commands, Functions, and Statements ...E-5
Appendix F System Configuration
The CONFIGUR Utility ... F-2 Display 1 ... F-3 Display 2 ...F-4 Display 3 ... F-5 Display 4 ... F-6 Display 5 ...F-7 Display 6 ... F-8 Display 7 ...F-9 Display 8 ... F-10 Display 9 ... F-11 Display 10 ... F-12 Display 11 ... F-13 Display 12 ... F-14 Display 13 ...F-14 Display 14 ...F-15 Display 15 ... F-15 Display 16 ... F-16 Display 17 ...F-16 Display 18 ...F-16 Display 19 ... F-17 Display 20 ...F-17 Printer Configuration ...F-17
Appendix G Changing Hardware Configuration
Disassembly ... G-1 All-in-One Model ... G-2 Low-Profile Model ... G-6 Final Disassembly ... G-10 Reassembly ... G-12 All-in-One Reassembly ... G-14 Low-Profile Model ... G-18 Switch S101 ... G-22 Floppy Disk Controller DS1 Switch Settings ... G-24 Video Board Jumpers ... G-26
Appendix H System Specifications
Appendix I CP/M-85 Disk Operating System
Appendix J Using Z-89 Software on the Z-100
Transfer Procedure One ... J-2 Equipment Needed ... J-2 Transfer Procedure ...J-3 5.25-inch Source Disks ... J-4 8-inch Source Disks ... J-5 Transfer Procedure Two ... J-6 Equipment Needed ... J-6 Transfer Procedure ... J-6 Transfer Procedure Three ... J-8 Equipment Needed ... J-8 Transfer Procedure ... J-9 Convertible Software ... J-11 Magic Wand Function Key Guide ... J-14
Appendix K Interactive Business Graphics
Introduction ...K-1 The Interactive Business Graphics Program ...K-1 The Data Management Routines ...K-3 Create New Data File ...K-3 Modify Existing Data File ...K-6 Print Existing Data File ...K-8
Graphic Design Routine ...K-8 Displaying the Graph ...K-12
Appendix L Backups
Using the DISKCOPY Utility to Make Backups ... L-1 Using the FORMAT and COPY Procedure to Make Backups ... L-4 FORMAT ... L-4 COPY ... L-7 Creating Bootable MS-DOS Disks for Your Applications ... L-8
Index
Figures
1-1: Typical System Components ...1-1 1-2 All-in-One Model ...1-4 1-3: Low-Profile Model ...1-4 1-4: Peripheral Connectors ...1-5 1-5 . Power Connectors and Controls ...1-6 1-6: Power Connections ...1-7 1-7: Alphabetic Keys ...1-8 1-8: Nonalphabetic Keys ...1-9 1-9: Other Keys ...1-10 1-10: Special Purpose Keys ...1-11 1-11: Control Keys and Numeric Keypad ...1-12 1-12: All-in-One Model ...1-13 1-13: Low-Profile Model ...1-13 1-14: Disk Drive Controls ...1-14 1-15: Disks ...1-15 1-16: Disk Surface ...1-17 1-17: Business Graphics Menu ...1-24
3-1: A Comparison of Language Types ...3-5
G-1: All-in-One Cabinet Removal ... G-2 G-2: Unfastening the Drive/Video Subassembly ... G-3 G-3: Disconnecting the Floppy Disk Drives ... G-4 G-4: Disconnecting the Winchester Disk System ... G-5 G-5: Removing the Top Case ... G-6 G-6: Unfastening the Drive Subassembly ... G-7 G-7: Disconnecting the Floppy Disk Drives ... G-8 C-3: Disconnecting the Winchester Disk Drive ... G-9 G-9: Removing the Keyboard/Base Cover ... G-10 G-10: Removing the Video Board ... G-11 G-11: Installing the Video Board ... G-12 G-12: Installing the Keyboard/Base Cover ... G-13 G-13: Connecting the Signal/Power and Floppy Disk Drive Cables ... G-14 G-14: Connecting the Winchester Disk Drive ... G-15 G-15: Fastening the Drive/Video Subassembly to the Base ... G-16 G-16: Replacing the Cabinet Top ... G-17 G-17: Connecting the Floppy Disk Drive Cables ... G-18 G-18: Connecting the Winchester Disk Drive ... G-19 G-19: Fastening the Drive Subassembly and Base ... G-20 G-20: Switch S101 (Main Board) ... G-21 G-21: RGB Connector (J9)... G-22 G-22: Switch DS1 (Floppy Disk Card) ... G.24 G-23: RGB Connector J9 ... G-26 G-24: Video Board Jumpers... G-27
Tables
2-1: Monitor Command Summary ... 2-3 2-2: Internal MS-DOS Commands ... 2-22 2-3: External MS-DOS Commands (Utilities) ... 2-37 2-4: FORMAT Switches ... 2-40
3-1: Sources of Some High-Level Language Names ... 3-4 3-2: Sample Output from BASIC ... 3-24
B-1: The ASCII Character Set ...B-2 B-2: Hexadecimal Key Codes ...B-5 B-3: ASCII Keypad Codes - Key Expansion Mode Enabled ...B-9 B-4: ASCII Function Key Codes - Key Expansion Mode Enabled... B-10 B-5: Escape Codes - Cursor Functions ...B-10 B-6: Escape Codes - Erasing and Editing ...B-11 B-7: Escape Codes - Modes of Operation ... B-11 B-8: Escape Codes - Configuration ...B-12 B-9: Escape Codes - Additional Functions ...B-14
C-1: Monitor Program Command Summary ...C-1 C-2: Monitor Program Syntax Notation ... C-2
D-1: Control Key Functions ...D-1 D-2: File Name Conventions ...D-1
E-1: Control Characters ...E-1 E-2: Variable Specifications ...E-2 E-3: Arithmetic Operators ...E-3 E-4: Relational Operators ...E-3 E-5: Logical Operators ...E-3 E-6: Truth Table for Logical Operators ...E-4 E-7: BASIC Color Attributes ...E-4 E-8: String Operators ...E-4 E-9: Arrays ...E-4 E-10: Directions Recognized by the DRAW Statement ...E-9 E-11: USING Field Specifiers ...E-17 E-12: Image Transfer Action Verbs ... E-18 F-1: Devices Directly Supported by CONFIGUR ... F-1
G-1: S101 Switch Settings ... G-23 G-2: DS1 Floppy Disk Controller Switch Settings ... G-25 G-3: RGB Connector (J9) Pinouts ... G-26 G-4: Video Board Jumpers ... G-27
1-1: MS-DOS and CP/M-85 Control Functions ... 1-1 1-2: MS-DOS and CP/M-85 Commands ... 1-2
J-1: Convertible CP/M-80 Software ... J-11 J-2: Magic Wand Z-89 to Z-100 Function Key Guide ... J-14
K-1: Graph Display Types ...K-9 K-2: Chart Specifications ... K-10
Your Computer System
Your new Z-100 Computer is a tool, much like a typewriter or calculator. You can use it in a wide number of applications, such as general accounting, inventory management, payroll, communications, maintaining mailing lists, filing and retrieval of information, and word processing. It is also an excellent educational aide that can make the learning process fun and challenging for the student while providing management support for the teacher and school.
Your computer is an extremely reliable machine. When it is properly installed and receives proper care, it will last for years with little need for service.
A typical computer system will consist of at least two units: the computer and a peripheral (any piece of equipment that is attached to and controlled by the computer). It may be a video display, printer, telephone communications device (called a modem), or additional disk drives.
The video display (sometimes called the CRT, monitor, or screen) is like a television set. This is where you will see and work with the programs you use in your computer system. The Low-Profile model does not have a built-in video display; it uses a separate video monitor that is connected to the computer with a cable.
You will use the keyboard to enter information into your computer. It has all the keys contained on a standard typewriter keyboard plus additional special function keys. There is also a calculator-style "keypad" to the right of the main keyboard that will allow you to make faster numeric entries. (information can also be placed in the computer from disks, signals over telephones lines, and other special devices.)
The floppy disk capability that is built into your computer allows you to store large amounts of information on 5.25-inch plastic disks (see Disks later in this chapter). Each disk that your computer uses is capable of holding up to 180 pages of typewritten text. You can get even more storage by adding 8-inch floppy disk drives or a high-capacity W8-inchester disk drive.
You can greatly enhance the operation of your computer by adding a printer to your system. This makes it possible to produce copies of letters, accounting records, or any other material.
Finally, you may add computer-to-computer communications via telephone. This capability makes it possible for your computer to exchange information with other computers over the telephone, which makes available electronic mail service, news, shopping services, electronic banking and bill paying, stock market services, and so on.
You should select an area to set up your computer that:
• accommodates the computer and all of its peripherals.
• has a level work surface that is near a power source and a telephone.
Setting Up
The following paragraphs will describe setting up each connector and control on your computer. While examining the back panel and the connectors, be sure that the computer is turned off and unplugged. Rotate the computer so you are looking at its back.
Back Panel
Refer to Figure 1-2 for the All-in-One model and to Figure 1-3 for the Low-Profile model.
• Fan – Used to provide ventilation to the power supply. Never block the fan openings or restrict air movement while you have your computer turned on.
The following control and connector(s) are located next to the fan openings on the upper back panel.
• J15 -- The brightness control. Used to adjust the brightness of the video display. Adjust the brightness to obtain the most suitable display. (All-in-One model only.)
• J15 – The composite video output connector. Provides the proper video signal for a separate black and white (monochrome) video monitor. The Low-Profile model requires a separate video monitor; you cannot use a standard television receiver for this purpose as it is not designed to display all of the information needed for word processing or accounting applications.
• J9 – The RGB video output connector. Provides the necessary signals for a high-resolution color monitor that uses RGB (Red, Green, Blue) color signals. Appendix G contains the necessary information that you need to configure this connector.
Refer to Figure 1-4. These connectors are on the lower-left portions of the back of your computer.
• J1 – A serial connector. Provides the necessary EIA-standard RS-232 DCE signals for connection to a serial printer.
• J2 – A serial connector. Provides the necessary EIA-standard RS-232 DTE signals for use with a telephone modem.
• J3 – The parallel printer connector. Provides the necessary Centronics-type parallel signals for connection to a parallel printer.
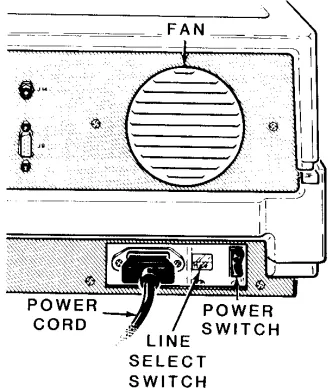
Refer to Figure 1-5. These features are located on the lower-right portion of the back panel.
• Power cord connector – Used with the AC power cord to supply power to the computer.
• Line select switch – Used to select between 115 volts AC and 230 volts AC. Normally, you will never use this switch unless (during initial setup) you are in an area serviced by a 230 volts AC power source. (Changing the setting on this switch should be done only be qualified individuals. When changing line voltage, i.e., 115 to 230, the line cord plug must be changed to the proper type and voltage rating. Check local electrical codes.)
Power Connection
Locate the power connector, power switch, and openings for the fan in Figure 1-6 and on your computer. Never block the fan openings or restrict air flow.
Make sure the power switch is in the OFF position.
Plug the power cord into your computer.
Be sure that the line select switch shows the proper voltage level for your power source. You may read the voltage setting through the plastic window located between the power cord receptacle and the power switch. If it is set incorrectly for your needs, contact your local Zenith Data Systems dealer for instructions.
Rotate the computer so the keyboard faces you.
Keyboard
The keyboard of your computer consists of 95 keys, which are discussed on the following pages in groups.
Whenever you hold any key except the SHIFT or CTRL keys down for more than a moment, it will automatically start repeating. The rate of repeated entry is equal to pressing the same key about eleven times a second.
Alphabetic Keys
Refer to Figure 1-7 for the following discussion.
• The computer has the standard 26 letters of the alphabet arranged as they are on a typewriter. These keys allow you to enter either loweror uppercase letters. You can hold either SHIFT key down or push the CAPS LOCK key to obtain uppercase letters.
Nonalphabetic Keys
Other Keys
The following discussions describe the normal function for each key. How-ever, software (a program) may direct any key to cause some other action to take place. Any key that performs a special function is usually described in the documentation that accompanies the program.
Refer to Figure 1-9 for the following discussion.
• SPACE BAR - Enters a blank character (space), just as it does on a typewriter.
• BACK SPACE - Moves the cursor' one space to the left, just as it does on a typewriter.
• TAB - Moves the cursor to the next tab column (set to every eighth column).
RETURN - Returns the cursor to the left side of the display (software will usually add a line feed as well). It also tells the computer that data or instructions have been entered and may be processed or executed.
1
See Figure 1-10 for the next discussion.
The following keys are used for special purposes. Instructions that tell you how to use them will appear with the programs.
• Special function keys (FO through F12) - Used for special purposes by some programs.
• HOME, LINE FEED, and arrow keys - Used to control cursor movement and screen presentation by some programs.
• D CHR/I CHR and DEL LINE/INS LINE keys - Used in applications that require special insertion and deletion operations.
• DELETE - Often duplicates the BACK SPACE key, but is sometimes used for other purposes.
• BREAK - Used to interrupt program execution (not always active).
• RESET - Used with the CTRL key (described later) to reset the computer to a power-on state. This key also has a power-on indicator in it which will be illuminated whenever the computer is turned on.
The following keys are used in combination with other keys to perform a function. See Figure 1-11.
• ESC - The escape key. Performs special functions when you press Et and another key in sequence. For instance, if you want to enter ESC E, you would press the ESC key, release it, and then press the E key. If you want to enter ESC <, you would press the ESC key, release it, press and hold the SHIFT key, and then press the < key.
• CTRL - The control key. You can use it to perform special functions by pressing it and an alphabetic key at the same time. For instance, if you want to enter the CTRL-C combination, you would press and hold the
CTRL key and then press the C key, or you may press both keys at the same time. If you want to enter the CTRL-S combination, you would press and hold the CTRL key and then press the S key, or you may press both keys at the same time.
The following keys are used to speed up the entry of data.
• Calculator-style keypad - This group of keys, located to the right of the main keyboard, is organized somewhat like a calculator and include: the numbers 0 through 9; a period for entry of decimal points; a dash for entry of negative numbers; and an ENTER key for signaling the computer that the entry has been completed.
Disk Drives
The disk drives are storage devices designed to transfer information into and out of your computer's memory. Refer to Figure 1-12 for the All-in-One model and Figure 1-13 for the Low-Profile model.
NOTE: The disk drives shown in this manual are typical of the type sup-plied in Zenith Data Systems computers. The drives in your unit may appear to be different; however, they function the same.
• Disk drive positions - One or two disk drives are included with your computer. For dual-drive systems on the All-in-One model, the top disk drive is referred to as drive A and the bottom as drive B. One the Low-Profile model, the left disk drive is drive A and the right one is drive B.
If your computer has only one disk drive, it will be known as drive A, regardless of its position in either the Low-Profile or All-in-One model.
Refer to Figure 1-14 for the following discussion.
• Disk load slot - Insert 5.25-inch disks in this slot with the label up and toward you. If the disk is not oriented as shown in the figure, the computer will not operate properly and you may damage the disk and/or disk drive. If the disk meets resistance while you are inserting it into the drive, check to make sure that there is not a disk already in the drive. It should slide smoothly into the drive.
• Disk drive latch - Your floppy disk drive may have a latch, door, or handle as illustrated in the insets. It is used to secure the floppy disk in the proper position in the disk drive. Closing the latch engages the drive hub into the disk and brings the read/write heads into contact with the disk surface. If the latch closes with difficulty, remove the disk, inspect the edge of the center hole for damage, check for proper floppy disk orientation (see the previous discussion), and try again.
NOTE: Several different disk drive types are equipped with a locking mechanism that prevents the latch from being closed if there is no disk inserted in the drive. This prevents possible damage to the read/write heads. Be sure there is a disk inserted in the disk drive before attempting to close the latch.
NOTE: Winchester disk drives do not have removable disks. Instead, all you will see is the LED disk access indicator.
Disks
The floppy disk, or disk, sometimes called a diskette, is a precision storage medium which requires care and attention to insure a long, trouble-free life.
A disk is made up of three parts (see Figure 1-15): the plastic disk, the disk liner, and the disk jacket. A disk envelope is provided for additional protection when the disk is not being used in your computer.
The disk is well protected against accidental damage. The protective liner, a sleeve of cloth-like material that cleans the disk and traps dust particles, is placed around the disk. The outer jacket (with a label on the upper left-hand corner) adds additional protection and makes the disk somewhat rigid. The protective envelope covers the exposed areas of the disk when it is not in use or is being stored.
The outer jacket has three openings and a notch along one side. The disk drive grips the disk through the large center opening. The small circu-lar hole to one side is used for timing purposes. The read/write head accesses the disk through the long slot.
The notch, on 5.25-inch disks, is called a "write-protect notch" and is located near the label. Whenever you have important information on a disk that you do not want to "write over," place an opaque tab over this notch. The computer will sense its presence and will not record on this disk. I .B-1 8-inch disks (used in 8-inch disk drives), the notch is located near the read/write head access slot and is a "write-enable" notch that must covered in order to record information on the disk.
The read/write head functions like the recording and playback head in a tape recorder. The disk comes in contact with the read/write head, which will either record (write to) or read magnetic impulses from the disk. If the disk is in any way deformed, this process is interrupted and valuable data can be lost. For instance, the oily residue left from a fingerprint will cause the disk to loose good contact with the head, interrupting the read/ write process.
Refer to Figure 1-16. A disk's surface is divided into tracks and sectors. A track is that portion of the disk that passes under the read/write head. It is divided into sectors by either timing holes placed in the disk itself, or by software. When timing holes determine the sectoring of a track, the disk is said to be a "hard-sector" disk. When software determines the sectoring, the disk is a "soft-sector" disk.
The number of tracks that a disk can hold is measured in tracks per inch (tpi). Two common specifications are 48 tpi and 96 tpi, although you may find these disks labeled 40 tracks and 80 tracks, respectively. Occasionally, you will find disks labeled for 35-track systems. Your computer uses 48 tpi, 40 track disks in its built-in drives. If 48 tpi disks are not available, you may safely use 96 tpi disks.
The other difference between disks is the number of sides. All disks are coated on both sides; however, double-sided disks have been tested for use with double-sided disk drives. Single-sided disks are for disk drives that only write on one side of the disk. Your computer has double-sided disk drives to provide full business applications usage.
When you purchase disks for use in the built-in drives of your computer, ask for 5.25-inch disks that are soft-sectored, double-sided, and doubledensity. You may use either 40 track, 48 tpi, or 80 track, 96 tpi disks.
For 8-inch disks, ask for double-sided, double-density 77 track, 48 tpi disks. You may also use single-sided, single-density disks, but will have to make special provisions when you format them.
Disk Care
Because the disks can be damaged when you handle them, keep the following precautions in mind.
When you prepare a label for a disk, write on it before you place it on the disk; or, if you must write on a label that is already on the disk, use a felt-tip pen. Ball point pens and pencils may exert enough force on the disk to crease the Mylar (thus destroying its usefulness) and should not be used to mark labels once they are on a disk.
Magnets and magnetized objects can erase some of the information stored on your disks. Also, X-rays may destroy the data on a disk. By keeping your disks away from these sources of trouble, you can help reduce problems with your computer.
Power Up
You are now ready to see your new computer in operation. The following directions will help you power up your computer and prepare it for the demonstration disk.
Turn on the power switch. You should see the power-on indicator (in the RESET key) light and disk drive A's disk access indicator glow.
NOTE: The disk access indicator may not glow if certain features are not enabled on your computer. However, if you do not see the power-on indicator light up, turn the power off and refer to In Case of Difficulty in this chapter.
After about 30 seconds, the following message should appear on the screen.
Device Error
A small hand (called the "hand prompt"), pointing to a cursor, will appear in the upper left-hand corner of the screen. If the prompt does not appear, press both the CTRL and RESET keys at the same time. If the message, small hand, and cursor still do not appear after another 30 seconds, refer to In Case of Difficulty at the end of this chapter.
NOTE: If the disk access light does not glow when you turn on your com-puter, the hand prompt should appear very shortly. If it does not, press both the CTRL and RESET keys at the same time. If the hand prompt does not immediately appear, refer to the In Case of Difficulty section.
Also, you may override the 30-second wait by pressing the DELETE key while the disk access light is glowing. The screen will then display the following message and the hand prompt.
Z-100 Demonstration Disk
Introduction
The Z-100 Demonstration Disk will show you some of the power and ver-satility of your new computer. The demonstration disk contains three sections; the first two are automatic and will provide you with a good demon-stration of the graphic capabilities of your computer. The third section is a useful program that will allow you to specify, design, and display your information using the graphic capabilities of either Z-BASIC or (3W-BASIC. The instructions for using the interactive portion of the disk are found in Appendix K.
If this is the first time that you are going to use your demonstration disk, be sure you have read the section on disks, found earlier in this chapter, before you start. You may also want to make a backup copy of it for safe keeping. You will need MS-DOS to do this. Refer to Appendix L of this manual for information about making backups.
To; use your demonstration disk, follow these procedures:
If you have not done so, turn on your computer. Otherwise, if the hand prompt is showing, press the B key. The word Boot will appear on the screen. Press the F1 key. The letters f1 will appear on the screen in reverse video (dark letters on a light background). Press the RETURN
key.
NOTE: Look at your demonstration disk. If a tab is covering the write-protechnotch, remove it.
After a moment, a message similar to the following will appear on the screen. These are the sign-on messages of Z-DOS, an operating system used on your computer.
Z-DOS/MS-DOS BIOS release 1.00, version 1.00
Z-DOS/MS-DOS release 1.00, version 1.25 (C)Copyright 1982 Zenith Data Systems
Z-DOS/MS-DOS Command release 1.00, version 1.19
The demonstration program will then automatically start and you will see the following:
A: zbasic choice
There will be a brief pause while the next part of the program loads into your computer's memory. The screen will clear and then display the BASIC copyright notice (similar to the following):
Z-BASIC Rev. 1.0
[Z-DOS/MSDOS Version] Copyright 1982 (C) by Microsoft Created: 15-Jul-82
Master Menu
The master menu will now load into memory, the screen will clear, and the following choices will be displayed:
Z-100 / Z-BASIC Demonstration System Version 1.0
<:F1> Artwork.
<F2> Interactive Business Graphics.
Enter your choice :
If you press the F1 function key, you will select an automatic display of several interesting graphic designs. If you press the F2 function key, you will select a program which will allow you to design and display different charts on your computer.
If you do not want either program, you may safely end the program. To do so, open the disk drive door and remove your disk. Then either press both the CTRL and RESET keys at the same time or turn off your computer.
Artwork
Press the F1 function key to select the artwork display. The screen will clear and the following will be displayed.
A:autoexe1
After a moment, the screen will clear and the BASIC copyright notice will appear. Then the screen will again clear and the first display will be drawn. After it is completed, the screen will once again clear and a new display will be drawn. This process will continue through the entire series of displays.
If you want to "freeze" any picture, press both the CTRL and S keys at the same time and then release them. This action will stop the display and allow you more time to study the drawing.
To continue the display, press any other key.
After all the displays have been completed, the computer will return to the master menu where you may either reselect the artwork series or go on to the business graphics section.
Interactive Business Graphics
The interactive business graphics portion of your demonstration disk is actually a set of very powerful programs which you may use by themselves or incorporate into your own software. The interactive portion of the program is described in Appendix K at the back of this manual.
Press the F2 function key at the master menu. The screen will clear and the following will appear on your screen:
A:autoexe1
In addition, the business graphics menu runs a continuing display of various types of charts in three "windows." The following types of charts are illustrated:
• Line charts
• Side bar charts (horizontal bars)
• Bar charts (vertical bars)
• 3-D charts (three-dimensional bars)
• Trend-line charts (data with least square fit analysis)
• Pie charts (single, full-screen pie)
For now, select the continuous demonstrations to look at full-screen representations of the different types of charts. Later on, after you have become familiar with your new computer, you may turn to Appendix J and use the other three functions of this program to create your own charts with your own information.
Press the F4 function key to select a demonstration of screen-sized charts. Like the artwork demonstration, this program does not require any keyboard entries on your part.
The display is a series of designs created by Zenith Data Systems as examples of each of the seven types of charts. In some cases, you will see different examples that illustrate the versatility offered in the design phase of these routines. Two types of charts will not be illustrated on machines that do not contain the color option: multiple pie charts and three-dimensional bar graphs. A test is performed and an appropriate message will be displayed for the monochrome display machines.
Each chart will be displayed for about a minute (or 40 seconds on 8 MHz machines) before going on to the next.
If you wish to exit the continuous demonstration portion, press the HOME key when the following appears at the bottom-left of your screen:
PRESS <HOME>
Otherwise, when the entire series has been displayed, the program will return to the business graphics menu.
ZDS computer hardware and software products are designed to work together as a complete system. Proper operation can be assumed only when your computer is used with ZDS-designed or approved accessories. ZDS does not assume the responsibility for improper operation resulting from custom interfacing, custom software, or the use of accessories not approved by Zenith Data Systems.
All the computer components have been wired and tested by ZDS. If you encounter any malfunction during the warranty period, call your Zenith Data Systems dealer or authorized Zenith Data Systems repair facility to arrange for service. Do not attempt to service this computer yourself during the warranty period; to do so may void the warranty.
You may have out-of-warranty products repaired by your Zenith Data Systems dealer of authorized Zenith Data Systems repair facility. You may wish to obtain a maintenance contract for your computer system, or you can purchase individual replacement parts to do your own service.
If you cannot locate a Zenith Data Systems dealer or repair facility, call 1-800-447-4700 (in Illinois, 1-800-322-4400) for the name and location of one nearest you.
The following information will provide you with information concerning possiblesolutions to common problems.
Condition: Nothing happens at power on, and the red light in the RESET key is not lit.
Possible causes: 1. The AC power cord may not be plugged in (check both ends). If you are using a multiple outlet box, check its plug.
2. The power may not be on at the AC power source (wall outlet). Check the power source with a different electric device.
3. The computer's (or the multiple outlet box's) power switch may not be on.
Condition: No video (blank screen).
Possible causes: 1. The brightness control may be turned down (either in the All-in-One model or external monitor).
2. The external monitor (Low-Profile model) may not be plugged in and/or turned on.
3. The external monitor (Low-Profile model) may not be property connected to the computer.
4. The computer may not be transmitting a signal (screen may have been blanked or cleared by a program). Note that this will not be the case when you first turn your computer system on or if the computer is waiting for you to do something.
5. The computer may have failed during the initial self-tests.
Condition: Insufficient brightness on the screen.
Possible cause: 1. The brightness control is probably turned down (either in the All-in-One model or external monitor).
Condition: With the autoboot feature off, the disk won't boot from the hand prompt.
Possible causes: 1. You may not have pressed the B, F1, and RETURN keys. Press the CTRL and the RESET keys at the same time and try again. Don't forget to press the
RETURN key after pressing the B and F1 keys.
2. You may have the wrong disk in the disk drive (you may be trying to boot from an unformatted disk or a data disk).
3. The disk may be inserted in the drive wrong or may be in the wrong disk drive. 4. The disk drive latch may not be closed. 5. You may have pressed the wrong key. 6. The disk may be damaged. Try another
2. The disk may be inserted in the drive incorrectly or may be in the wrong disk drive. 3. The disk drive latch may not be closed.
4. The disk may be damaged. Try another bootable disk.
Condition: The system resets to the power-up point or the disk keeps rebooting.
Possible causes: 1. You may have a bad or loose power cord. 2. You may have a bad disk (part of the
Service Information
In the extreme case where you are unable to resolve a problem with your computer system, you may want to contact your local Zenith Data Systems dealer or authorized Zenith Data Systems service center.
If you can isolate the problem to a particular symptom or hardware unit, such as the printer, you will save time and possible service expenses.
When You Call for Help
When you call for service, list the following information about your computer and its peripherals. It will help your ZDS representative diagnose and repair your unit.
1. The problem you are having. Supply any error messages that may have been displayed on the screen at the time your equipment failed.
2. The name, model number, and series or serial number of your computer and affected peripherals.
3. The way your system is configured; that is, the name and model numbers of the peripherals that are connected to your computer and how (or where) they are connected.
Introduction
A disk operating system, or DOS, is a program that lets you do certain tasks, such as organize the disk (with the FORMAT command), copy information from one disk to another (with the COPY command), enter the date and time (DATE and TIME commands), and load other programs.
NOTE: Two disk operating systems that work with your computer are MS-DOS and CP/M. There is also at least one version of BASIC for each operating system: BASIC-80 for use with CP/M-85 and existing 8-bit software, and Z-BASIC for use with MS-DOS and 16-bit software. GW-BASIC is also available for use with MS-DOS.
MS-DOS was prepared for Zenith Data Systems Z-100 Computers by Microsoft. It is compatible with the same MS-DOS that runs on the IBM Personal Computer. MS-DOS stands for Microsoft Disk Operating System. It is supplied on disk and must be loaded into your computer.
To load MS-DOS, you will use a program called a "monitor," which is built into your computer. The monitor program is always there, ready to help you get started, to check out certain features, and to serve as a system supervisor. You will learn how to load MS-DOS into your computer and how to use some of the features of MS-DOS to organize disks and duplicate them.
CP/M-85 is briefly compared to MS-DOS in Appendix I. Complete information concerning this operating system is contained in the CP/M-85 documentation.
If you are using your Z-100 computer for the first time, be sure you have read the "Operation" chapter of this manual; it contains important information for new users. Even if you have used other computers, you should read the discussion on controls before you attempt to use your computer.
The Monitor Program
Your computer contains a special program, called a monitor, that is designed to help you get started. One of its functions is to load (or "boot") the disk operating system from disk into memory. The Z-100 computer is set at the factory to automatically boot the DOS when it is turned on. By setting a switch (see Appendix G) you can disable this feature (called "autoboot").
Autoboot
If autoboot is disabled, after power up you will see a small hand pointing to a flashing underline in the upper left-hand corner of the screen. This "prompt" is the computer's way of telling you that it is ready and waiting for your command. To execute any monitor program command, the hand prompt must be present. It occurs automatically after the system is turned on and may be restored at any time. To do so, simultaneously press both the CTRL and
RESET keys if you ever find that you need to start over. However, do not reset your computer unless you are sure that no important programs are being executed.
If autoboot is enabled (set as the computer comes from the factory), then there will be no display until a certain amount of time passes, or you press the DELETE key, or you insert a disk with the DOS on it into drive A:
If you press the DELETE key, the autoboot process will be interrupted and the screen will show:
Boot Abort
and the hand prompt. The system is now in a manual mode and you canuse the commands described later in this chapter.
If you wait for the system and do not put a disk into drive A, the screen wiIl show:
and the hand prompt. This message will also appear if you put the disk into the disk drive incorrectly.
The system is now in a manual mode and you can use the commands described later in this chapter.
If you want to restart the computer at any time, press both the CTRL
and RESET keys at the same time. The computer will attempt to boot in a DOS, as it did when you first turned it on. If you have a disk properly inserted in drive A, the DOS will be booted.
The Commands
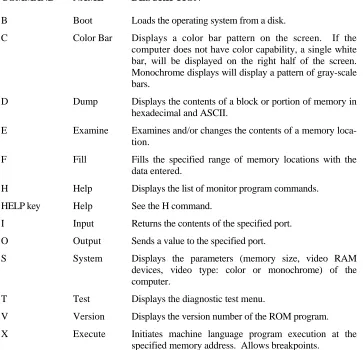
The monitor program will execute twelve different commands, a summary of which is shown in Table 2-1. Only a few are explained here. The remainder are briefly described in Appendix C.
Table 2-1: Monitor Command Summary
COMMAND NAME DESCRIPTION
B Boot Loads the operating system from a disk.
C Color Bar Displays a color bar pattern on the screen. If the computer does not have color capability, a single white bar, will be displayed on the right half of the screen. Monochrome displays will display a pattern of gray-scale bars.
D Dump Displays the contents of a block or portion of memory in hexadecimal and ASCII.
E Examine Examines and/or changes the contents of a memory loca-tion.
F Fill Fills the specified range of memory locations with the data entered.
H Help Displays the list of monitor program commands.
HELP key Help See the H command.
I Input Returns the contents of the specified port.
O Output Sends a value to the specified port.
S System Displays the parameters (memory size, video RAM devices, video type: color or monochrome) of the computer.
T Test Displays the diagnostic test menu.
V Version Displays the version number of the ROM program.
B – Boot
This is the monitor command you will use if your system is not set up to boot automatically, if a disk is not autobooted after power up, or if you want to manually boot the system. The boot process reads the operating system from the disk and loads it into the computer. To use this command
Make sure the computer is on and the hand prompt is showing.
Insert the MS-DOS disk (or any disk that contains a Z-100 disk operating system) into drive A (see the discussion on disk drives in Chapter 1).
Close the disk drive door or latch.
Press the B key and then the F1 function key. The computer will display:
Boot f1
Press the RETURN key.
The computer will now execute the boot routine and load the operating system from the disk in drive A into the computer's memory.
There are several variations of the boot command available to you. Three of the function keys, F1, F2, and F3, tell the computer what kind of disk drive to use: F1 is for the built-in floppy disk drives, F2 is for the optional 8-inch floppy disk drives, and F3 is for the optional Winchester disk system.
Therefore, if you want to boot from the second 8-inch floppy disk drive, you would (1) turn on your computer and the 8-inch disk system, (2) insert an 8-inch floppy disk into the bottom 8-inch disk drive (it must contain a Z-100 operating system), (3) close the drive, and (4) press the B key, the F2 key, the 1 key, and the RETURN
key, in that order. The computer will display:
Boot f21
and load the operating system from the second 8-inch disk drive.
NOTE: For a complete discussion on the optional 8-inch disk drives or Winchester disk system, refer to the documentation that accompanies these products and also your operating system documentation.
C - Color Bar
If your computer is equipped with color video memory, it has the capability to display a color bar pattern on the screen so you may adjust your color monitor for the most pleasing display. To use this command:
Make sure your computer is properly attached to your color monitor.
Make sure the monitor is on.
Make sure the computer is on and the hand prompt is showing.
Press the C key. You will see one of two possible patterns, depending upon the capabilities of your system.
Use this pattern to adjust the controls for your monitor to provide the most pleasing display.
H -- Help
This command will display the commands available for the monitor program. The HELP key, located on the left side of the keyboard will also provide the same display when it is pressed. To use this command:
Make sure the computer is on and the hand prompt is showing.
Press either the H key or the HELP key. The computer will display:
Boot Color Bar Dump Examine Fill Help
<HELP Key> Input Output System Test Version Xecute
S - System
This command will provide you will a brief summary of the features of your computer. If provides you with the amount of system memory installed in your computer, the amount of video memory installed in your computer, and the type of video (color or monochrome) supported by your system. To use this command:
Make sure the computer is on and the hand prompt is showing.
Press the S key. The computer will show you a display similar to:
256Kb of contiguous RAM 64Kb Video memory Color
This particular display tells you that your system has 256 kilobytes of random access memory (RAM) and 64 kilobytes of color video memory. Other variations that will commonly be seen are 128 or 192 kilobytes of random access memory and 32 or 64 kilobytes of color or monochrome video memory.
V - Version
NOTE: Professional software is released in versions. Updates and enhancements to these programs are made as they are developed. Each time a revision of this type occurs, it is called a new "version" and given a number (Version 1.0, Version 1.1, Version 2.0, etc.).
You can use the Version command whenever you want to find out what version of the monitor program you have in your computer. To use this command:
and return to the hand prompt.
The display tells you that the monitor version (in this example) is 2.5. There is no relationship between the monitor version number and the operating system version number shown later in this chapter.
Loading MS-DOS
With the MS-DOS manual, you will receive two MS-DOS disks: disk #1 and disk #2. The following steps will show you how to "load" the disk operating system the first time and then create "backups," or "working copies," of the distribution disks.
To load MS-DOS:
Turn on the computer or press the CTRL and RESET
keys at the same time if the computer is already on.
Insert the MS-DOS distribution disk #1 into drive A.
Close the disk drive door or latch.
If you are booting the computer manually, press the B key and then the F1 key. The computer will display the following.
Boot f1
The floppy disk drive's disk access indicator will come on, indicating that the disk is being "read" by the computer. You may hear a faint whirring noise, which is the normal sound of the disk drive motors.
As MS-DOS is read into the computer, your display will show a message similar to:
MS-DOS Version 2.20
Copyright(C) 1984, Zenith Data Systems Corporation
A>date
Current date is Mon 11-12-1984 Enter new date:
The date actually shown on your computer will probably differ from this sample. The format for entering the date is M/D/Y or M-D-Y where M is the month (1 to 12), D is the day (1 to 31), and Y is the year (80 to 99). Four digits may be used for year if you are entering a year from 2000 from 2099. Any other response will cause the computer to display:
Invalid date Enter new date:
Some examples of how valid dates are entered and stored are:
Your entry: Will be stored as: 6-9-82 Wed 6-09-1982 12-31-2084 Sun 12-31-2084 8/12/91 Mon 8-12-1991 2-5-85 Tue 2-05-1985
Enter the current date and press the RETURN key. The computer will display:
A>time
tenths of a second are optional and may be omitted. The separators, colon and period, must be used exactly as shown or else the following error message will be displayed.
Invalid time
Enter new time:
Some examples of valid entries and how they are stored in your computer follow:
Your entry: Will be stored as:
9:15 9:15:00.00 9:15:30 9: 15: 30.00
9:15:30.5 9:15:30.50 14:2:3 14:02:03.00
Enter the current time and press the RETURN key. The display will now show:
'Path- \bin
The MS-DOS Prompt
Normally, after you load MS-DOS, you will see:
A>
You can see by this example that the small hand has been replaced by the A>, which is MS-DOS's prompt. The A> also tells you which drive is currently being used by the system. This is called the "default drive." Later on, you'll find out how to change the drive being used. But first, you need to create a copy, or backup, of MS-DOS and store the original in a safe place.
Making A Backup
Backups
A backup might easily be considered to be an "insurance copy." It is a duplicate of important data. During the course of normal operation, accidents do happen and a disk can be accidentally ruined. By having a backup, you have "insured" yourself against the loss of information that may be vital to the successful operation of your business or computer.
By making backups at regular intervals, you can minimize the amount of work that would be necessary to bring your computer records up to date if information is lost through mishandling of a disk or by some other cause.
Backups also provide a convenient method of rotating your disks so that one is not in constant use. The backup procedure gives you a way of verifying that the disk you are using is a good one, and not one which may cause a problem.
duplicate the two 5.25-inch MS-DOS distribution disks.
The working master disks are those that you will create during this backup procedure. Because there is more than one disk, you will be asked to repeat the process twice. The disk that is now in drive A should be labeled disk #1. You will be given an opportunity to make sure that it is the correct disk in a moment.
You will be copying the information from the distribution, or "source," disks onto "destination" disks.
To start the backup procedure, make sure that the A> MS-DOS prompt is showing on the screen. If it is not, reboot your system (see the procedure earlier in this chapter).
Enter the following into your keyboard. The characters you type will be shown on the screen.
BACKUP/V
Press the RETURN key. The light in drive A will come on and your screen will show a display similar to the following.
DISKCOPY version 2.20
Copyright(C) 1984 Zenith Data Systems Corporation
Source drive name? (A-H) _:
Press the A key. The computer will now show:
Destination drive name (A-H) _:
NOTE: This backup procedure does not check to see if your destination disk has data on it. Any information previously recorded on the disk will be erased and blank (empty) tracks will be placed on the disk, making it ready to receive new data. Be sure you are using a blank disk (or one that you wish to erase).
Insert a blank disk in drive B and close the door or latch.
Press the B key. The computer will display:
Place the source disk in A and the destination disk in B. Press RETURN when ready.
You now have one last chance to check that you have the correct disks in the proper drives. The source disk, MS-DOS distribution disk #1, should be in drive A. The destination disk, a blank disk, should be in drive B. If you are not sure that they are correct, check them now.
You also may stop the duplication process now if you wish. To stop (or abort) the backup procedure, you would press both the CTRL and C keys at the same time. The computer would end the program and display ↑C on the screen, followed by the MS-DOS prompt. However, you need to make working copies of your distribution disks, so continue with the following procedure.
With MS-DOS distribution disk #1 in drive A and a blank disk in drive B, press the RETURN key. The light in drive A will come on momentarily and then the light in drive B will come on. You will see the following on the screen.
Formatting destination...
Co p ying .. .
Now you will see the disk access indicators in drive A and drive B alternately come on. While the indicator in drive A is on, the computer is reading information from the disk into memory. Then while the indicator in drive B is on, the computer is writing that same information onto the tracks and sectors in drive B. When this process has been completed, the computer will show:
Verifying...
Again, the disk access indicators in drive A and drive B will alternately come on. This time, the computer reads the information from each respective disk and then compares the data to make sure it matches. This process verifies that the destination disk is an exact copy of the source disk. When this process has been completed, the computer will show:
Do you wish to copy another disk (Y/N)? <N>
Remove MS-DOS distribution disk #1 from drive A and place it in its protective envelope.
Remove the disk in drive B and prepare a label for it. Whenever a new disk has been used for a backup, you will want to prepare a label for it.
Labeling Disks
There are many different methods of labeling and keeping track of disks. One method is to keep a log containing the date the disk was first formatted and the material that you expect to place on the disk (a summary or title only). An example would be:
Most people assign each disk a unique number or code. This allows them to track the location of the disk easily and use a permanent storage area or container for the disk.
For your new copy of the MS-DOS distribution disk #1, assign it number 1, label it with the format date (the current date), and call it "MS-DOS disk 1 - working copy 1." It is called a working copy because it is one you will use on a continuing basis. Place the label in the upper right-hand corner of the disk, making sure you do not cover the write-protect notch.
The message on the computer is asking you if you want to duplicate, or back up, another disk. You need to make a backup of the second distribution disk, so press the Y key and then the RETURN key. The computer will show:
Source drive name? (A-H) _:
Press the A key. The computer will show:
Destination drive name? (A-H) _:
Press the B key. The computer will show:
Place the source disk in A and the destination disk in B.
Press RETURN when ready.
Insert the second distribution disk, disk #2, into drive A and close the door or latch.
Insert a blank disk into drive B and close the door or latch.
Press the RETURN key. The computer will repeat the backup process as described earlier in this chapter. When the destination disk has been formatted and the information copied from the disk in drive A and verified, the computer will display:
Since you have no more disks to copy at this time, press the
RETURN key. The computer will display the MS-DOS prompt.
Remove the distribution disk from drive A and place it in its protective envelope.
Remove the disk from drive B and place it in its protective envelope.
Prepare a label for the destination disk which includes the number (number 2), the format (current) date, and "MS-DOS disk #2 - working copy 1." Place the label in the upper right-hand corner of the disk, making sure you do not cover the write-protect notch with the label.
You have now completed the first backup of the distribution disks. When convenient, you will want to make at least one more working copy of these disks. The easiest way to do it is to follow these same instructions. However, label your disks as copy 2 (or 3) instead of copy 1.
It is possible that, after reading the remainder of this chapter, you will want to make a custom working copy of MS-DOS. The procedure in Appendix L explains how to do this.
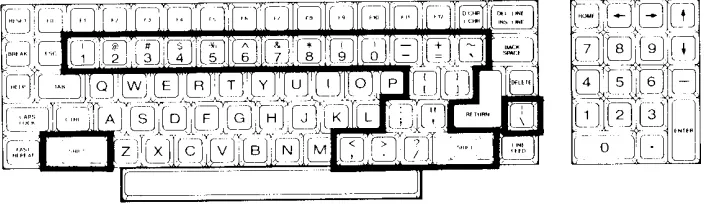
MS-DOS Control Key Functions
The following keys and key combinations are those that function while you are operating under MS-DOS. (If you have trouble locating any of these keys, you will find them highlighted in the Keyboard section of Chapter 1.)
Three single keystrokes are recognized by MS-DOS:
• RETURN - When you press this key, the computer will accept what you have entered through the keyboard. If you typed the information correctly, the computer will follow your instructions.
• BACK SPACE - If you accidentally press the wrong key or keys, you can use the BACK SPACE key to back over and erase those characters. Then you can enter the correct information.
• LINE FEED - You will not need to use this key unless you have a large amount of information to enter on one line. MS-DOS won't automatically go to the next line when you come to the end of the physical line on the screen and have more information to enter. To go to the next line, press the LINE FEED key. It will put the cursor (underline) at the beginning of the next physical line and then, when the command is executed, the computer will use information from both lines.
NOTE: There is a danger in using the BACK SPACE key after using the LINE FEED key. The BACK SPACE key will function normally, "backing out" each character and erasing it from the screen until it reaches the beginning of the line. Then, if you continue to press the BACK SPACE key, it will continue to back out each character typed in the previous line, but it will not affect the display. Without seeing the action of the BACK SPACE key, it is difficult to know what has been backed out unless you are very careful. The CTRL-X combination, described later, provides the easiest solution: it cancels the current command and gives you the opportunity to start over.
MS-DOS will also recognize the following five combinations of keys. One key is always the control key (labeled CTRL). In this manual, whenever you see the word "control" or "CTRL" followed by a dash and some letter, you are to press and hold the CTRL key and then press the other key.
CTRL-S combination, which will tell the computer to stop what it is doing. Then, when you press any key, the com-puter will continue. By alternately pressing the CTRL-S and another key, you can control the way information is displayed on the screen.
• CTRL-C - There will be times when you wish to interrupt an operation and you don't want it to finish. You can cancel most operations by pressing the CTRL-C combination. This tells the computer to stop what it is doing, return to the MS-DOS prompt, and wait for your next instruction. Remember, you have canceled the operation, so you cannot start where you have left off - the CTRL-S allows for that. A ^ C will be displayed on the screen where you entered the command.
• CTRL-P - There will be times when you want to send information normally shown on the display to a printer (if you have one connected to your computer). By pressing the CTRL-P combination, you tell the computer to send information to both the computer screen and the printer. Whenever the computer does this, most operations are slowed, because a printer is slower than the screen.
NOTE: If you do not have a printer connected, or if it is not turned on, or if it is off line, out of paper, or something is not right, then the computer can "hang up" until the problem is corrected. If there is no printer, or if there is some other problem that cannot be easily corrected (for instance, MS-DOS may not be configured for your printer), the computer will have to be reset.
• CTRL-N - This combination will cancel the CTRL-P operation and return the computer to normal operation.
NOTE: If the printer should hang up your computer for some reason, CTRL-N will not operate. The computer must be reset or the fault corrected.
Try the functions described in this section. The more you use them, the easier they will be to remember.
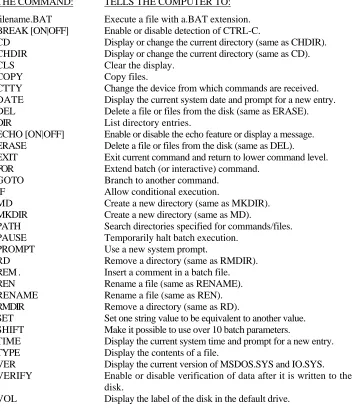
MS-DOS Commands
An MS-DOS command is an instruction to your computer that you type on the keyboard. Some of the commands, called "internal commands," are an integral part of the operating system. Other commands, referred to as "external commands," are actually separate programs on the disk, and must be loaded into the computer before the functions are performed.
The DISKCOPY command, for example, is external; that is, it is a separate program. The COPY command is internal and, as such, is always a part of MS-DOS. In order to use an external command, the command "file" must exist on the disk. If it is not present, the command will not work.
Changing MS-DOS Prompts
The prompt is a signal to you that your computer is ready to accept a command. While using MS-DOS, you will see the prompt displayed as the letter representing the drive being used by MS-DOS (the default drive). It is followed by some symbol, usually the greater-than sign (>), and the cursor.
If you selected drive A (and this is the normal default drive on power up), the MS-DOS prompt would look like this:
The greater-than sign may be replaced by another symbol, if desired. For more information on changing the prompt symbol, consult your MS-DOS documentation.
You can change the prompt (and the default drive) by typing the new drive name, a colon, and pressing the RETURN key. (You will be instructed to use the RETURN key only in the next two examples. However, you should always use it whenever you finish entering an MS-DOS command.)
If drive A is currently the default drive and you want to change the default drive to drive B, type:
B:
and press the RETURN key.
If drive B is the current default drive and you want to change the default drive to drive A, type:
A:
and press the RETURN key.
You will notice that the current default drive (in the form of the prompt) is displayed each time you finish an MS-DOS command.
Error Messages
Your computer will display an error message when something is wrong. The message itself often will tell you what is wrong so you will be able to correct the problem. An example of this would be:
Invalid drive specification
For a complete list of MS-DOS error messages and their meanings, refer to the MS-DOS documentation.
Files, Programs, and File Names
A file may contain either data or a program. Some "programs" may actually consist of several different files. MS-DOS is a good example; there are three programs (files) critical to the operation of MS-DOS: IO.SYS, MSDOS.SYS, and COMMAND.COM (the first two are "hidden" files - files that are physically present on the disk, but do not display as part of the disk directory). On the disk, these are separate files.
Each file is identified by a file "specification." It has three parts: an optional drive name, a file name, and an extension.
• Drive name - The drive name is a letter from A to H and must be followed by a colon. The use of these letters is limited to the configuration of your computer system. For instance, if your computer system does not have more than two drives and you try to use any drive name beyond B, an error message may be displayed.
• File name - The file name is from one to eight